start stop button TOYOTA RAV4 PRIME 2021 Owners Manual
[x] Cancel search | Manufacturer: TOYOTA, Model Year: 2021, Model line: RAV4 PRIME, Model: TOYOTA RAV4 PRIME 2021Pages: 618, PDF Size: 24.18 MB
Page 125 of 618
1252-2. Charging
2
Plug-in hybrid system
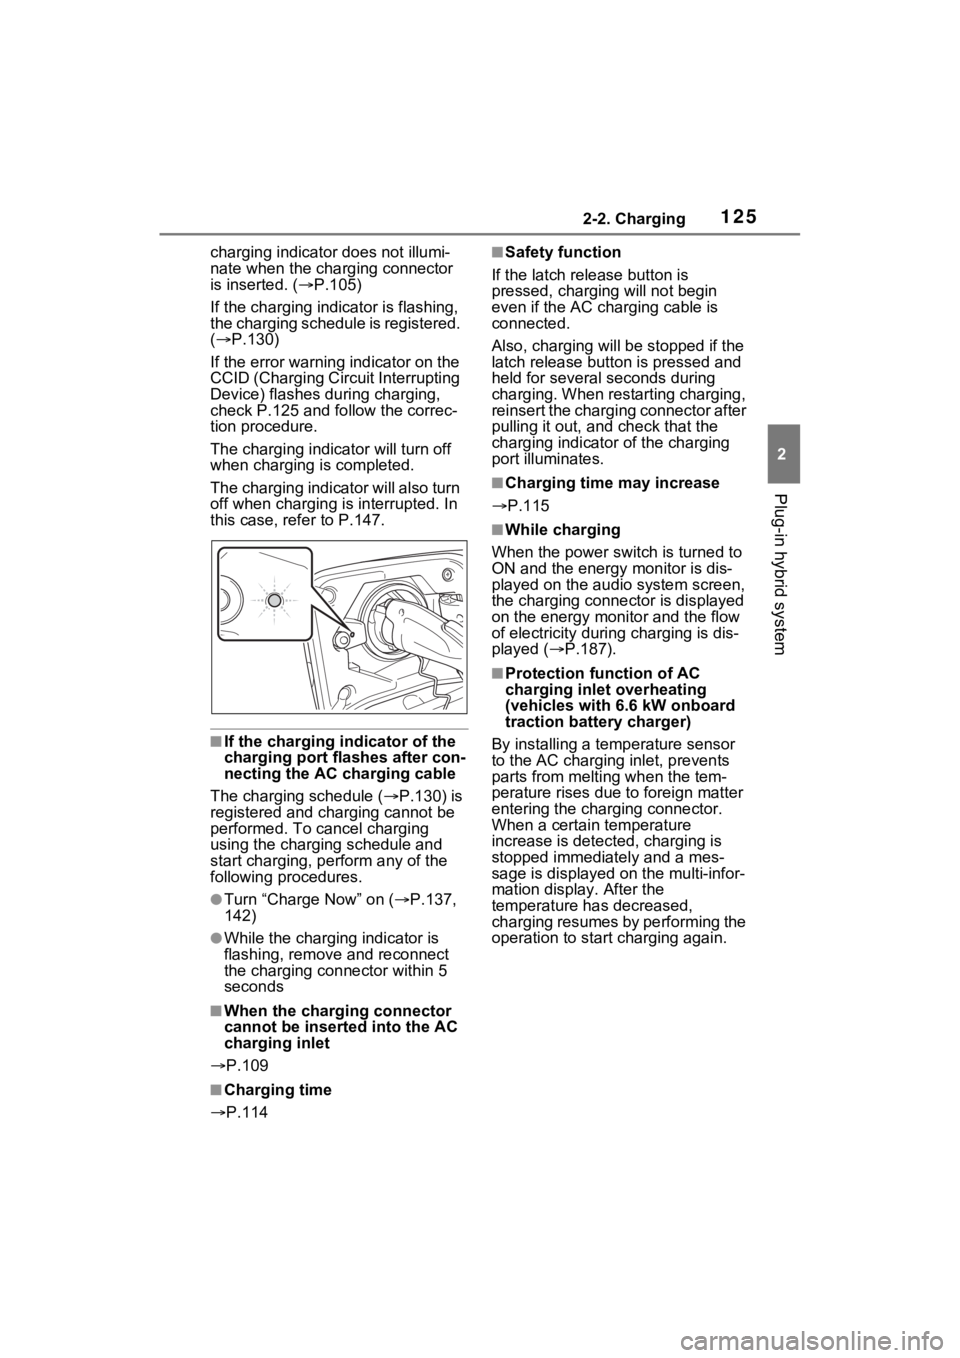
charging indicator does not illumi-
nate when the charging connector
is inserted. ( P.105)
If the charging indicator is flashing,
the charging schedule is registered.
( P.130)
If the error warning indicator on the
CCID (Charging Circuit Interrupting
Device) flashes during charging,
check P.125 and follow the correc-
tion procedure.
The charging indicator will turn off
when charging is completed.
The charging indicator will also turn
off when charging is interrupted. In
this case, refer to P.147.
■If the charging indicator of the
charging port flashes after con-
necting the AC charging cable
The charging schedule ( P.130) is
registered and charging cannot be
performed. To cancel charging
using the charging schedule and
start charging, per form any of the
following procedures.
●Turn “Charge Now” on ( P.137,
142)
●While the charging indicator is
flashing, remove and reconnect
the charging connector within 5
seconds
■When the charging connector
cannot be inserted into the AC
charging inlet
P.109
■Charging time
P.114
■Safety function
If the latch release button is
pressed, charging will not begin
even if the AC cha rging cable is
connected.
Also, charging will be stopped if the
latch release button is pressed and
held for several seconds during
charging. When restarting charging,
reinsert the charging connector after
pulling it out, and check that the
charging indicator of the charging
port illuminates.
■Charging time may increase
P.115
■While charging
When the power switch is turned to
ON and the energy monitor is dis-
played on the audio system screen,
the charging connector is displayed
on the energy monitor and the flow
of electricity during charging is dis-
played ( P.187).
■Protection function of AC
charging inlet overheating
(vehicles with 6.6 kW onboard
traction battery charger)
By installing a temp erature sensor
to the AC charging inlet, prevents
parts from melti ng when the tem-
perature rises due to foreign matter
entering the charging connector.
When a certain temperature
increase is detected, charging is
stopped immediat ely and a mes-
sage is displayed on the multi-infor-
mation display. After the
temperature has decreased,
charging resumes by performing the
operation to start charging again.
Page 148 of 618
1482-2. Charging
■The error warning indicator on the CCID (Charging Circuit
Interrupting Device) flashes.
■Charging indicator of the charging port does not illuminate,
even though charging connector is connected.
Likely causeCorrection procedure
Electrical leakage detection function
or self-diagnostic function operates
and power is cut off
When the voltage is insufficient, the
error warning indi cator may flash
when there is noise interference.
Perform a reset and connect to a
proper power source. ( P.105)
If charging does not start, immedi-
ately stop charging and contact your
Toyota dealer.
Likely causeCorrection procedure
The plug is not properly connected to
the outletCheck whether the plug is properly
connected to the outlet.
Charging connector is not securely
connected to AC charging inlet
Check the connection status of the
charging connector.
When connecting the charging
connector, make su re not to touch
the latch release button. Insert the
charging connector securely until
you hear a click. The charging con-
nector may not be connected cor-
rectly if the latch release button is
pressed while inserting.
After connecting the charging con-
nector, check that the latch release
button is not pressed and the
charging indicator of the charging
port is turned on.
If the charging indicator of the
charging port does not illuminate,
even though the charging connector
is securely connec ted, there may be
a malfunction in the system. Immedi-
ately stop charging and contact your
Toyota dealer.
Page 286 of 618
2865-2. Driving procedures
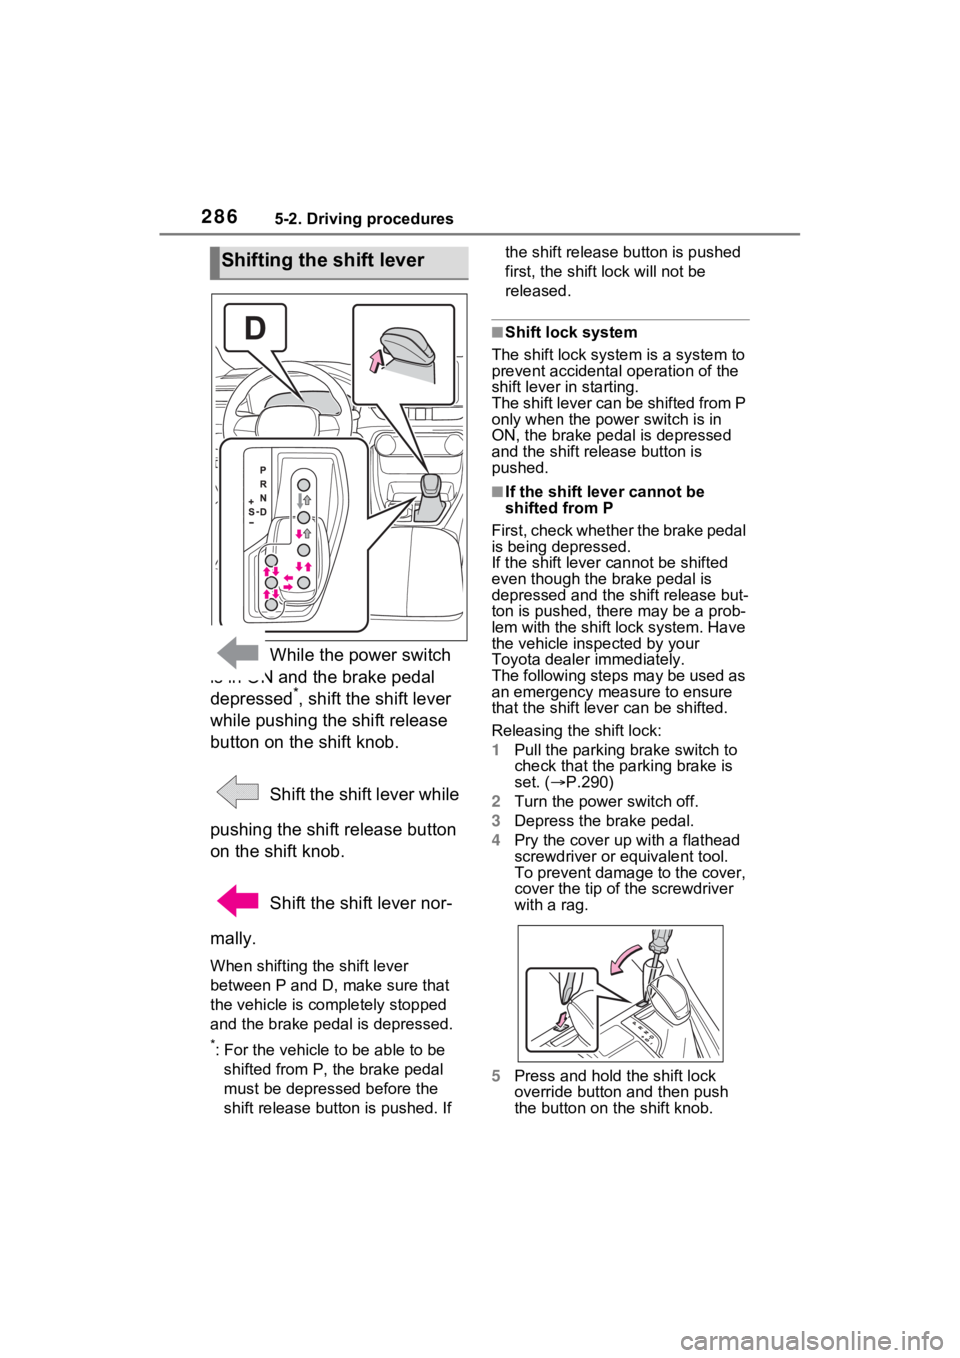
While the power switch
is in ON and the brake pedal
depressed
*, shift the shift lever
while pushing the shift release
button on the shift knob.
Shift the shift lever while
pushing the shift release button
on the shift knob.
Shift the shift lever nor-
mally.
When shifting the shift lever
between P and D, make sure that
the vehicle is completely stopped
and the brake pedal is depressed.
*: For the vehicle to be able to be
shifted from P, the brake pedal
must be depresse d before the
shift release button is pushed. If the shift release button is pushed
first, the shift lock will not be
released.
■Shift lock system
The shift lock syste m is a system to
prevent accidental operation of the
shift lever in starting.
The shift lever can be shifted from P
only when the power switch is in
ON, the brake pedal is depressed
and the shift release button is
pushed.
■If the shift lever cannot be
shifted from P
First, check whether the brake pedal
is being depressed.
If the shift lever cannot be shifted
even though the brake pedal is
depressed and the shift release but-
ton is pushed, the re may be a prob-
lem with the shift lock system. Have
the vehicle inspected by your
Toyota dealer immediately.
The following steps may be used as
an emergency measure to ensure
that the shift lev er can be shifted.
Releasing the shift lock:
1 Pull the parking brake switch to
check that the parking brake is
set. ( P.290)
2 Turn the power switch off.
3 Depress the brake pedal.
4 Pry the cover up with a flathead
screwdriver or equivalent tool.
To prevent damage to the cover,
cover the tip of the screwdriver
with a rag.
5 Press and hold the shift lock
override button and then push
the button on the shift knob.
Shifting the shift lever
Page 287 of 618
2875-2. Driving procedures
5
Driving
The shift lever can be shifted
while both buttons are pressed.
P.377
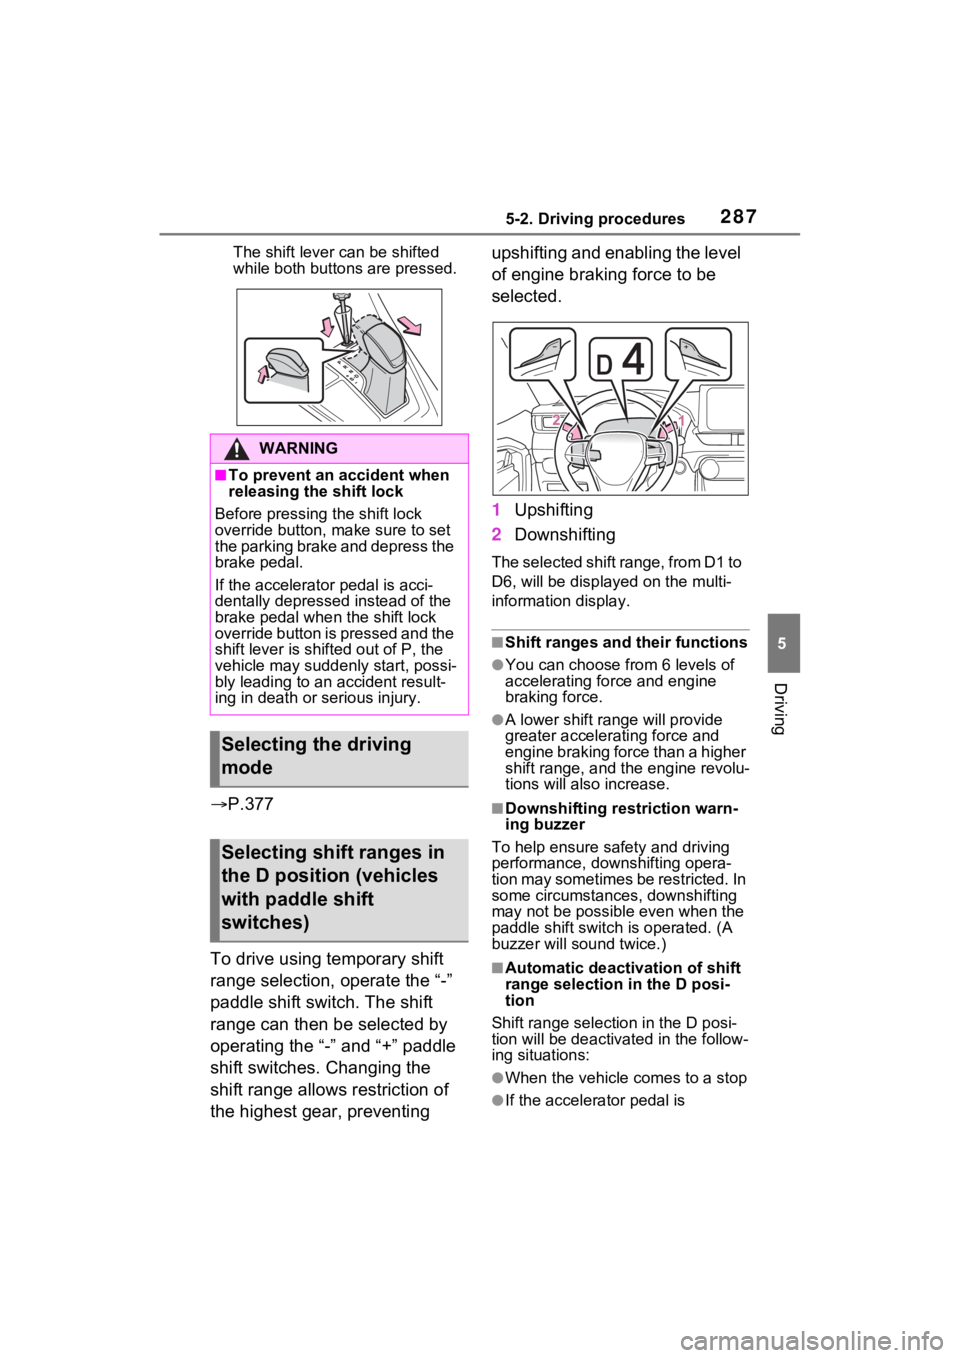
To drive using temporary shift
range selection, operate the “-”
paddle shift switch. The shift
range can then be selected by
operating the “-” and “+” paddle
shift switches. Changing the
shift range allows restriction of
the highest gear, preventing upshifting and enabling the level
of engine braking force to be
selected.
1
Upshifting
2 Downshifting
The selected shift range, from D1 to
D6, will be display ed on the multi-
information display.
■Shift ranges and their functions
●You can choose from 6 levels of
accelerating force and engine
braking force.
●A lower shift range will provide
greater accelerating force and
engine braking force than a higher
shift range, and t he engine revolu-
tions will also increase.
■Downshifting restriction warn-
ing buzzer
To help ensure safety and driving
performance, dow nshifting opera-
tion may sometimes be restricted. In
some circumstances, downshifting
may not be possible even when the
paddle shift switch is operated. (A
buzzer will sound twice.)
■Automatic deactivation of shift
range selection in the D posi-
tion
Shift range selection in the D posi-
tion will be deactivated in the follow-
ing situations:
●When the vehicle comes to a stop
●If the accelerator pedal is
WARNING
■To prevent an accident when
releasing the shift lock
Before pressing the shift lock
override button, make sure to set
the parking brake and depress the
brake pedal.
If the accelerator pedal is acci-
dentally depressed instead of the
brake pedal when the shift lock
override button is pressed and the
shift lever is shifted out of P, the
vehicle may suddenly start, possi-
bly leading to an accident result-
ing in death or serious injury.
Selecting the driving
mode
Selecting shift ranges in
the D position (vehicles
with paddle shift
switches)
Page 293 of 618
2935-2. Driving procedures
5
Driving
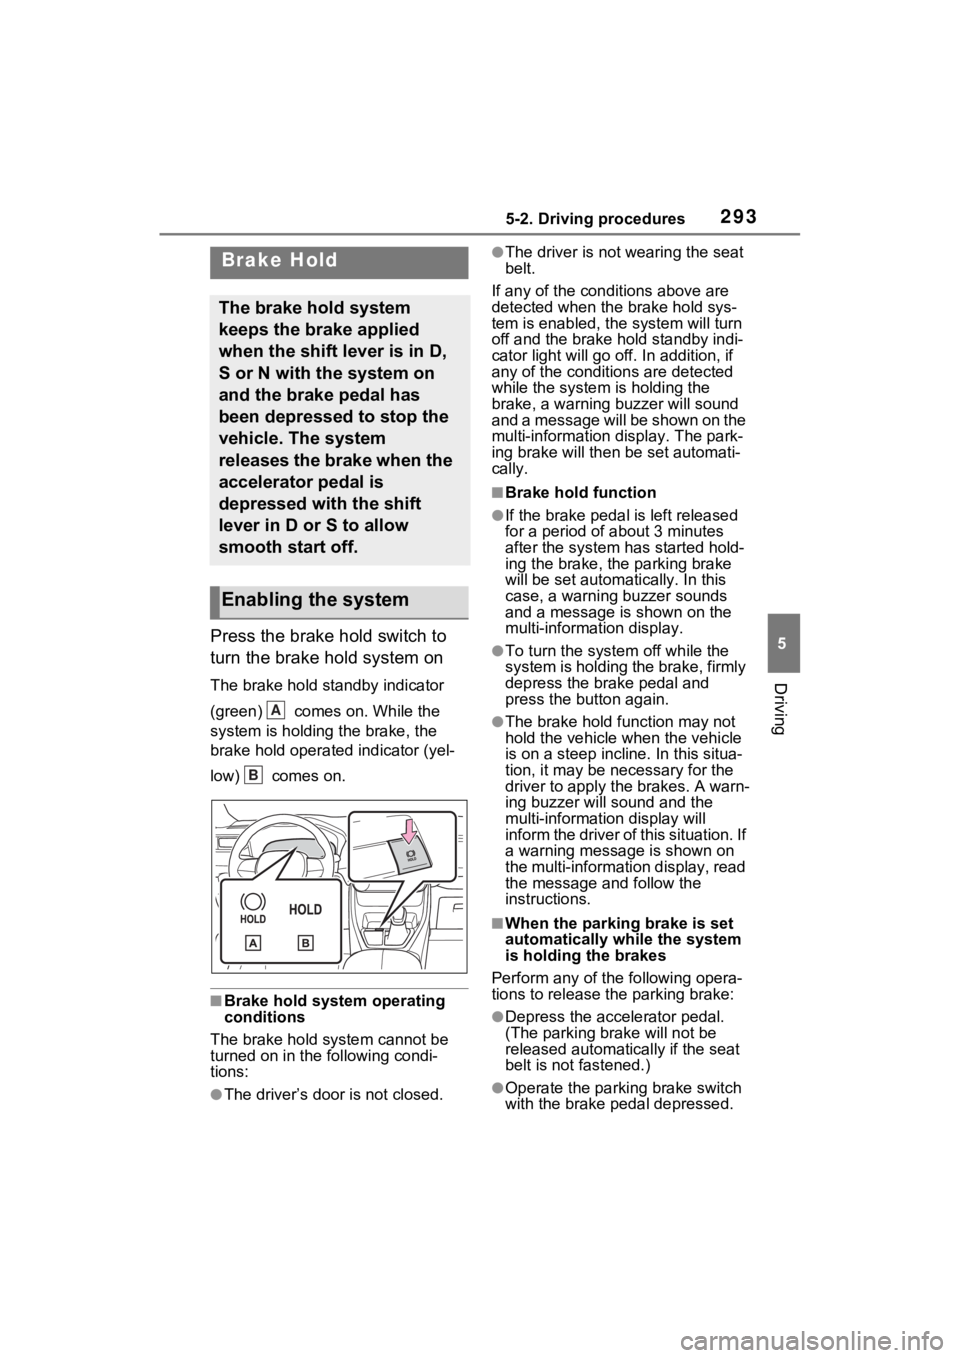
Press the brake hold switch to
turn the brake hold system on
The brake hold standby indicator
(green) comes on. While the
system is holding the brake, the
brake hold operated indicator (yel-
low) comes on.
■Brake hold system operating
conditions
The brake hold system cannot be
turned on in the following condi-
tions:
●The driver’s doo r is not closed.
●The driver is not wearing the seat
belt.
If any of the cond itions above are
detected when the brake hold sys-
tem is enabled, the system will turn
off and the brake hold standby indi-
cator light will go off. In addition, if
any of the conditions are detected
while the system is holding the
brake, a warning buzzer will sound
and a message will be shown on the
multi-information display. The park-
ing brake will then be set automati-
cally.
■Brake hold function
●If the brake pedal is left released
for a period of about 3 minutes
after the system has started hold-
ing the brake, the parking brake
will be set automatically. In this
case, a warning buzzer sounds
and a message is shown on the
multi-information display.
●To turn the syste m off while the
system is holding the brake, firmly
depress the brake pedal and
press the button again.
●The brake hold function may not
hold the vehicle when the vehicle
is on a steep incline. In this situa-
tion, it may be ne cessary for the
driver to apply the brakes. A warn-
ing buzzer will sound and the
multi-information display will
inform the driver of this situation. If
a warning message is shown on
the multi-information display, read
the message and follow the
instructions.
■When the parking brake is set
automatically while the system
is holding the brakes
Perform any of the following opera-
tions to release the parking brake:
●Depress the accelerator pedal.
(The parking brake will not be
released automatically if the seat
belt is not fastened.)
●Operate the parkin g brake switch
with the brake pedal depressed.
Brake Hold
The brake hold system
keeps the brake applied
when the shift lever is in D,
S or N with the system on
and the brake pedal has
been depressed to stop the
vehicle. The system
releases the brake when the
accelerator pedal is
depressed with the shift
lever in D or S to allow
smooth start off.
Enabling the system
A
B