sensor TOYOTA RAV4 PRIME 2022 Owners Manual
[x] Cancel search | Manufacturer: TOYOTA, Model Year: 2022, Model line: RAV4 PRIME, Model: TOYOTA RAV4 PRIME 2022Pages: 624, PDF Size: 24.01 MB
Page 32 of 624
321-1. For safe use
Move the height adjuster up and
down as needed until you hear a
click.
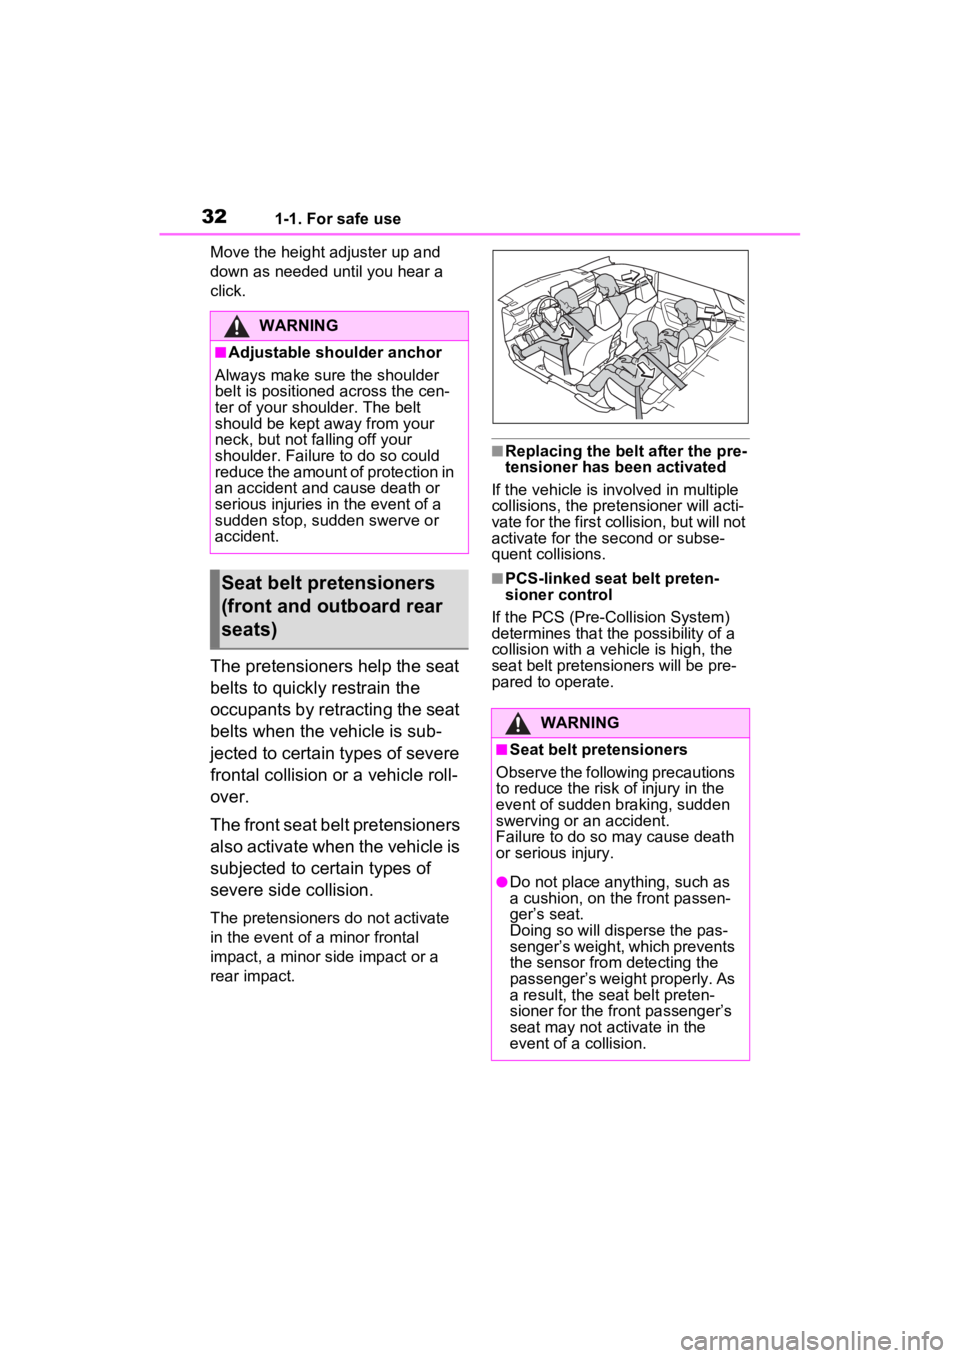
The pretensioners help the seat
belts to quickly restrain the
occupants by retracting the seat
belts when the vehicle is sub-
jected to certain types of severe
frontal collision or a vehicle roll-
over.
The front seat belt pretensioners
also activate when the vehicle is
subjected to certain types of
severe side collision.
The pretensioners do not activate
in the event of a minor frontal
impact, a minor side impact or a
rear impact.
■Replacing the belt after the pre-
tensioner has been activated
If the vehicle is involved in multiple
collisions, the pretensioner will acti-
vate for the first collision, but will not
activate for the second or subse-
quent collisions.
■PCS-linked seat belt preten-
sioner control
If the PCS (Pre-Collision System)
determines that the possibility of a
collision with a vehi cle is high, the
seat belt pretensioners will be pre-
pared to operate.
WARNING
■Adjustable shoulder anchor
Always make sure the shoulder
belt is positioned across the cen-
ter of your shoulder. The belt
should be kept away from your
neck, but not falling off your
shoulder. Failure to do so could
reduce the amount of protection in
an accident and cause death or
serious injuries in the event of a
sudden stop, sudden swerve or
accident.
Seat belt pretensioners
(front and outboard rear
seats)
WARNING
■Seat belt pretensioners
Observe the following precautions
to reduce the risk of injury in the
event of sudden braking, sudden
swerving or an accident.
Failure to do so may cause death
or serious injury.
●Do not place anything, such as
a cushion, on the front passen-
ger’s seat.
Doing so will disperse the pas-
senger’s weight, which prevents
the sensor from detecting the
passenger’s weight properly. As
a result, the seat belt preten-
sioner for the fr ont passenger’s
seat may not activate in the
event of a collision.
Page 35 of 624
351-1. For safe use
1
For safety and security
SRS curtain shield airbags
• Can help protect primarily the head of occupants in the outboard seats
• Can help prevent the occupants from being thrown from the vehi cle in the
event of vehicle rollover
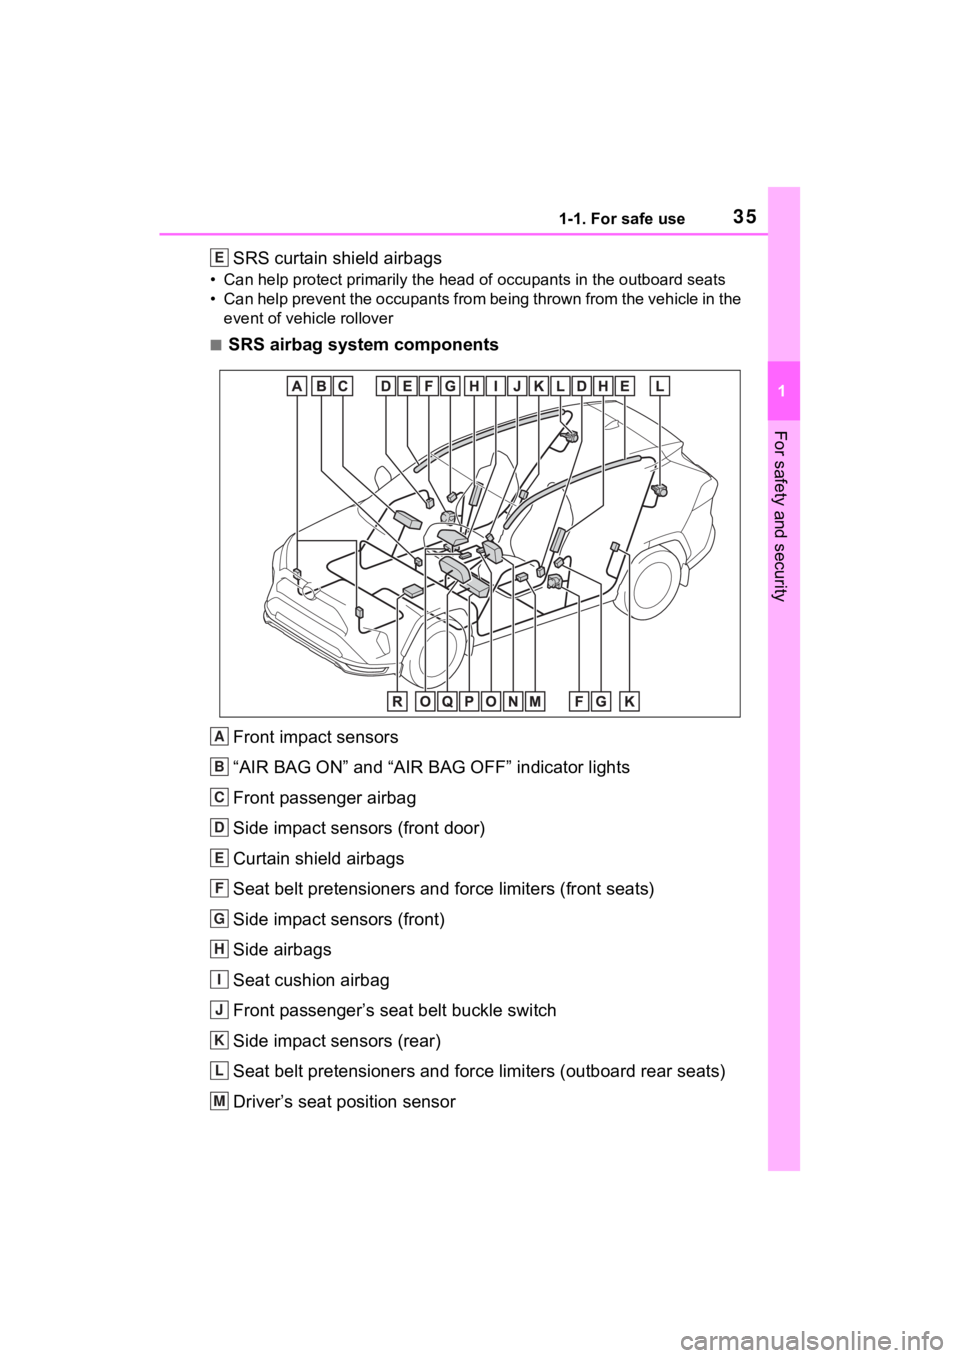
■SRS airbag system components
Front impact sensors
“AIR BAG ON” and “AIR BAG OFF” indicator lights
Front passenger airbag
Side impact sensors (front door)
Curtain shield airbags
Seat belt pretensioners and force limiters (front seats)
Side impact sensors (front)
Side airbags
Seat cushion airbag
Front passenger’s seat belt buckle switch
Side impact sensors (rear)
Seat belt pretensioners and force limiters (outboard rear seats)
Driver’s seat position sensor
E
A
B
C
D
E
F
G
H
I
J
K
L
M
Page 36 of 624

361-1. For safe use
Driver airbag
Front passenger occupant classification sensors
Knee airbag
SRS warning light
Airbag sensor assembly
Your vehicle is equipped with ADVANCED AIRBAGS designed
based on the US motor vehicle safety standards (FMVSS208). The
airbag sensor assembly (ECU) cont rols airbag deployment based on
information obtained from the sensors etc. shown in the system
components diagram above. This in formation includes crash sever-
ity and occupant information. As the airbags deploy, a chemical
reaction in the inflators quickly fills the airbags with non-toxic gas to
help restrain the motion of the occupants.
■If the SRS airbags deploy
(inflate)
●Slight abrasions, burns, bruising
etc., may be sustained from SRS
airbags, due to the extremely high
speed deployment (inflation) by
hot gases.
●A loud noise and white powder will
be emitted.
●Parts of the airbag module (steer-
ing wheel hub, airbag cover and
inflator) as well as the front seats,
parts of the front and rear pillars,
and roof side rails, may be hot for
several minutes. T he airbag itself
may also be hot.
●The windshield may crack.
●The hybrid system will be stopped
and fuel supply to the engine will
be stopped. ( P.91)
●All of the doors will be unlocked.
( P.199)
●The brakes and st op lights will be
controlled automatically.
( P.376)
●The interior lights will turn on auto-
matically. ( P.405)
●The emergency flashers will turn
on automatically. ( P.498)
●For Safety Connect subscribers, if
any of the following situations
occur, the system is designed to
send an emergency call to the
response center, notifying them of
the vehicle’s location (without
needing to push the “SOS” button)
and an agent will attempt to speak
with the occupants to ascertain
the level of emergency and assis-
tance required. If the occupants
are unable to communicate, the
agent automatically treats the call
as an emergency and helps to dis-
patch the necessary emergency
services. ( P.65)
• An SRS airbag is deployed.
• A seat belt pretensioner is acti-
vated.
• The vehicle is involved in a severe
rear-end collision.
■SRS airbag deployment condi-
tions (SRS front airbags)
●The SRS front airbags will deploy
in the event of an impact that
exceeds the set threshold level
(the level of forc e corresponding
to an approximately 12 - 18 mph
[20 - 30 km/h] frontal collision with
a fixed wall that does not move or
deform).
However, this threshold velocity will
N
O
P
Q
R
Page 92 of 624
922-1. Plug-in hybrid system
detected by the impact sensor,
the emergency shut off system
blocks off the high voltage cur-
rent and stops the fuel pump to
minimize the risk of electrocu-
tion and fuel leakage.
If the emergency shut off system
activates, your vehicle will not
restart. To restart the hybrid sys-
tem, contact your Toyota dealer.
A message is automatically dis-
played when a malfunction
occurs in the hybrid system or
an improper operation is
attempted.
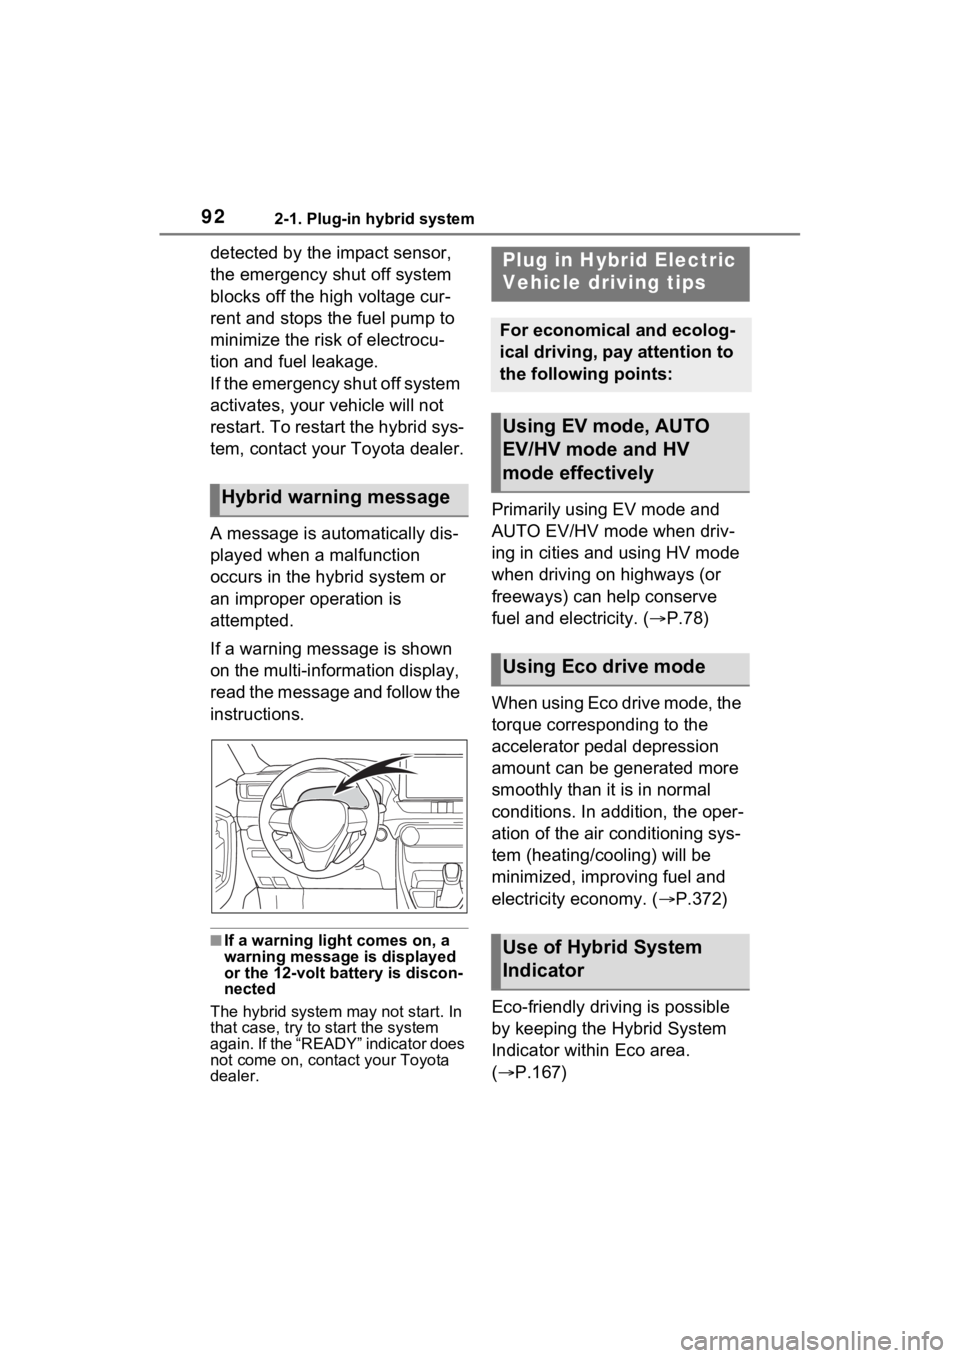
If a warning message is shown
on the multi-information display,
read the message and follow the
instructions.
■If a warning light comes on, a
warning message is displayed
or the 12-volt battery is discon-
nected
The hybrid system may not start. In
that case, try to start the system
again. If the “READY” indicator does
not come on, contact your Toyota
dealer.
Primarily using EV mode and
AUTO EV/HV mode when driv-
ing in cities and using HV mode
when driving on highways (or
freeways) can help conserve
fuel and electricity. ( P.78)
When using Eco drive mode, the
torque corresponding to the
accelerator pedal depression
amount can be generated more
smoothly than it is in normal
conditions. In addition, the oper-
ation of the air conditioning sys-
tem (heating/cooling) will be
minimized, improving fuel and
electricity economy. ( P.372)
Eco-friendly driving is possible
by keeping the Hybrid System
Indicator within Eco area.
( P.167)Hybrid warning message
Plug in Hybrid Electric
Vehicle driving tips
For economical and ecolog-
ical driving, pay attention to
the following points:
Using EV mode, AUTO
EV/HV mode and HV
mode effectively
Using Eco drive mode
Use of Hybrid System
Indicator
Page 125 of 624
1252-2. Charging
2
Plug-in hybrid system
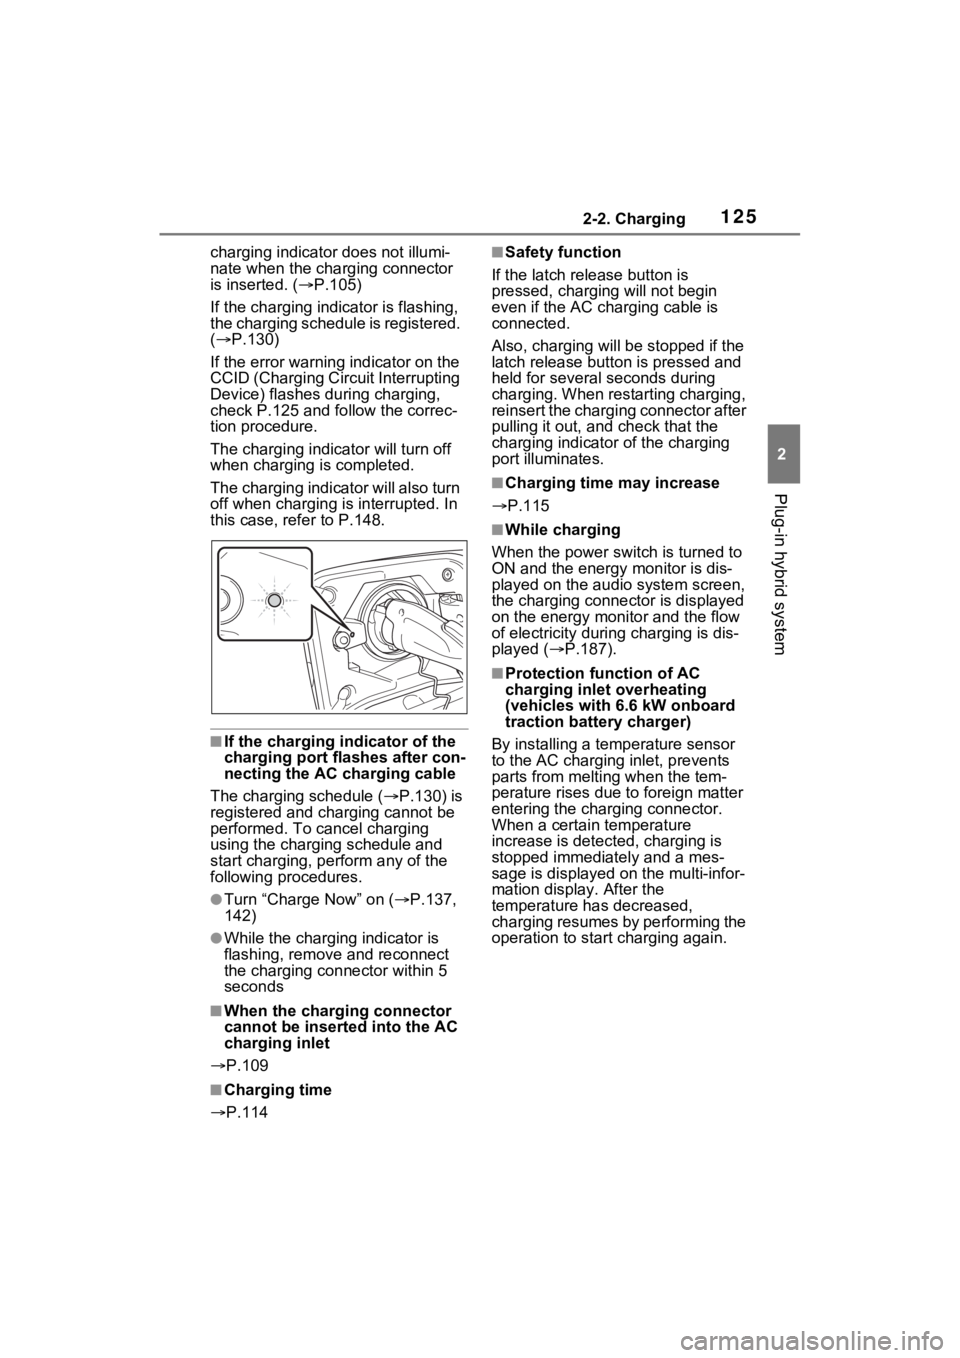
charging indicator does not illumi-
nate when the charging connector
is inserted. ( P.105)
If the charging indicator is flashing,
the charging schedule is registered.
( P.130)
If the error warning indicator on the
CCID (Charging Circuit Interrupting
Device) flashes during charging,
check P.125 and follow the correc-
tion procedure.
The charging indicator will turn off
when charging is completed.
The charging indicator will also turn
off when charging is interrupted. In
this case, refer to P.148.
■If the charging indicator of the
charging port flashes after con-
necting the AC charging cable
The charging schedule ( P.130) is
registered and charging cannot be
performed. To cancel charging
using the charging schedule and
start charging, per form any of the
following procedures.
●Turn “Charge Now” on ( P.137,
142)
●While the charging indicator is
flashing, remove and reconnect
the charging connector within 5
seconds
■When the charging connector
cannot be inserted into the AC
charging inlet
P.109
■Charging time
P.114
■Safety function
If the latch release button is
pressed, charging will not begin
even if the AC cha rging cable is
connected.
Also, charging will be stopped if the
latch release button is pressed and
held for several seconds during
charging. When restarting charging,
reinsert the charging connector after
pulling it out, and check that the
charging indicator of the charging
port illuminates.
■Charging time may increase
P.115
■While charging
When the power switch is turned to
ON and the energy monitor is dis-
played on the audio system screen,
the charging connector is displayed
on the energy monitor and the flow
of electricity during charging is dis-
played ( P.187).
■Protection function of AC
charging inlet overheating
(vehicles with 6.6 kW onboard
traction battery charger)
By installing a temp erature sensor
to the AC charging inlet, prevents
parts from melti ng when the tem-
perature rises due to foreign matter
entering the charging connector.
When a certain temperature
increase is detected, charging is
stopped immediat ely and a mes-
sage is displayed on the multi-infor-
mation display. After the
temperature has decreased,
charging resumes by performing the
operation to start charging again.
Page 198 of 624
1984-2. Opening, closing and locking the doors
4-2.Opening, closing and locking the doors
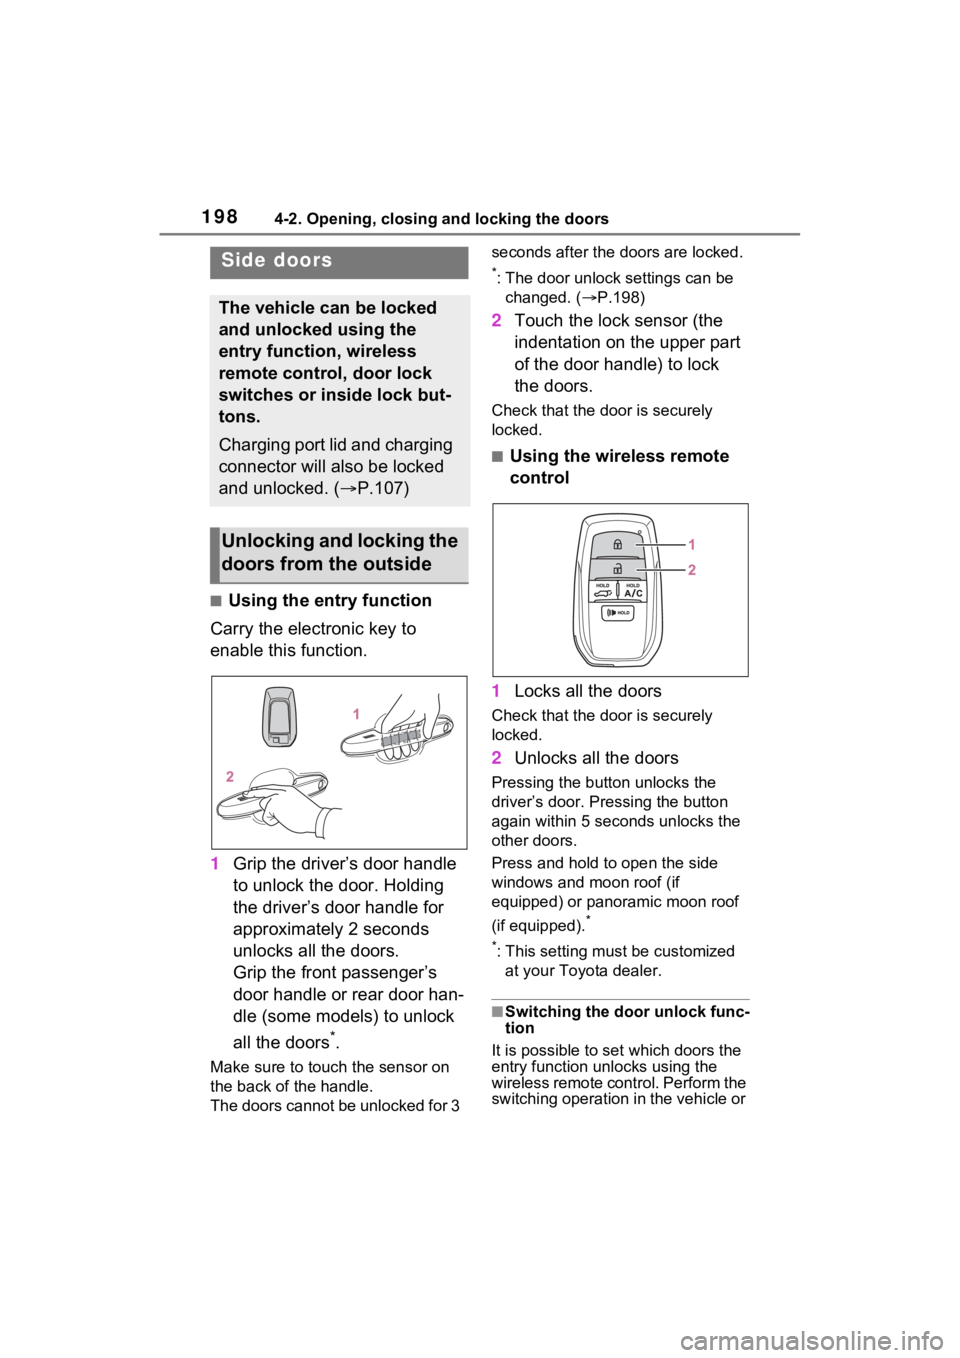
■Using the entry function
Carry the electronic key to
enable this function.
1 Grip the driver’s door handle
to unlock the door. Holding
the driver’s door handle for
approximately 2 seconds
unlocks all the doors.
Grip the front passenger’s
door handle or rear door han-
dle (some models) to unlock
all the doors
*.
Make sure to touch the sensor on
the back of the handle.
The doors cannot be unlocked for 3 seconds after the doors are locked.
*: The door unlock settings can be
changed. ( P.198)
2 Touch the lock sensor (the
indentation on the upper part
of the door handle) to lock
the doors.
Check that the d oor is securely
locked.
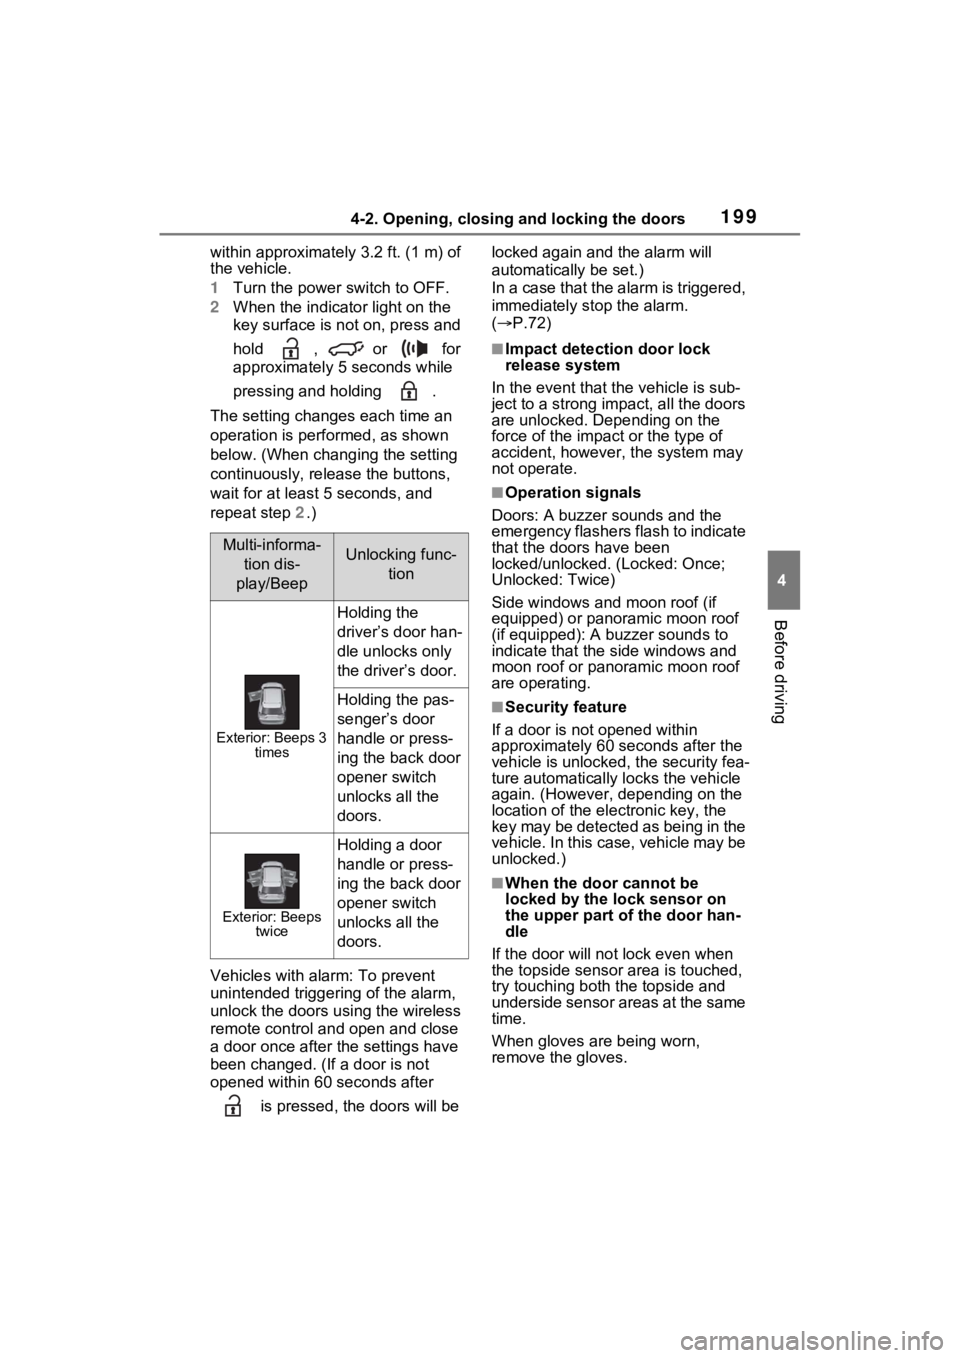
■Using the wireless remote
control
1 Locks all the doors
Check that the d oor is securely
locked.
2 Unlocks all the doors
Pressing the button unlocks the
driver’s door. Pressing the button
again within 5 seconds unlocks the
other doors.
Press and hold to open the side
windows and moon roof (if
equipped) or panoramic moon roof
(if equipped).
*
*
: This setting must be customized at your Toyota dealer.
■Switching the door unlock func-
tion
It is possible to set which doors the
entry function unlocks using the
wireless remote control. Perform the
switching operation in the vehicle or
Side doors
The vehicle can be locked
and unlocked using the
entry function, wireless
remote control, door lock
switches or inside lock but-
tons.
Charging port lid and charging
connector will also be locked
and unlocked. ( P.107)
Unlocking and locking the
doors from the outside
Page 199 of 624
1994-2. Opening, closing and locking the doors
4
Before driving
within approximately 3.2 ft. (1 m) of
the vehicle.
1Turn the power switch to OFF.
2 When the indicator light on the
key surface is not on, press and
hold , or for
approximately 5 seconds while
pressing and holding .
The setting changes each time an
operation is performed, as shown
below. (When changing the setting
continuously, release the buttons,
wait for at least 5 seconds, and
repeat step 2.)
Vehicles with alarm: To prevent
unintended triggering of the alarm,
unlock the doors us ing the wireless
remote control and open and close
a door once after t he settings have
been changed. (If a door is not
opened within 60 seconds after
is pressed, the doors will be locked again and the alarm will
automatically be set.)
In a case that the alarm is triggered,
immediately stop the alarm.
(
P.72)
■Impact detection door lock
release system
In the event that t he vehicle is sub-
ject to a strong impact, all the doors
are unlocked. Depending on the
force of the impact or the type of
accident, however, the system may
not operate.
■Operation signals
Doors: A buzzer sounds and the
emergency flashers flash to indicate
that the doors have been
locked/unlocked. (Locked: Once;
Unlocked: Twice)
Side windows and moon roof (if
equipped) or panoramic moon roof
(if equipped): A buzzer sounds to
indicate that the side windows and
moon roof or panoramic moon roof
are operating.
■Security feature
If a door is not opened within
approximately 60 s econds after the
vehicle is unlocked, the security fea-
ture automatically locks the vehicle
again. (However, depending on the
location of the el ectronic key, the
key may be detected as being in the
vehicle. In this case, vehicle may be
unlocked.)
■When the door cannot be
locked by the lock sensor on
the upper part of the door han-
dle
If the door will not lock even when
the topside sensor area is touched,
try touching both the topside and
underside sensor areas at the same
time.
When gloves are being worn,
remove the gloves.
Multi-informa-
tion dis-
play/BeepUnlocking func- tion
Exterior: Beeps 3 times
Holding the
driver’s door han-
dle unlocks only
the driver’s door.
Holding the pas-
senger’s door
handle or press-
ing the back door
opener switch
unlocks all the
doors.
Exterior: Beeps twice
Holding a door
handle or press-
ing the back door
opener switch
unlocks all the
doors.
Page 208 of 624
2084-2. Opening, closing and locking the doors
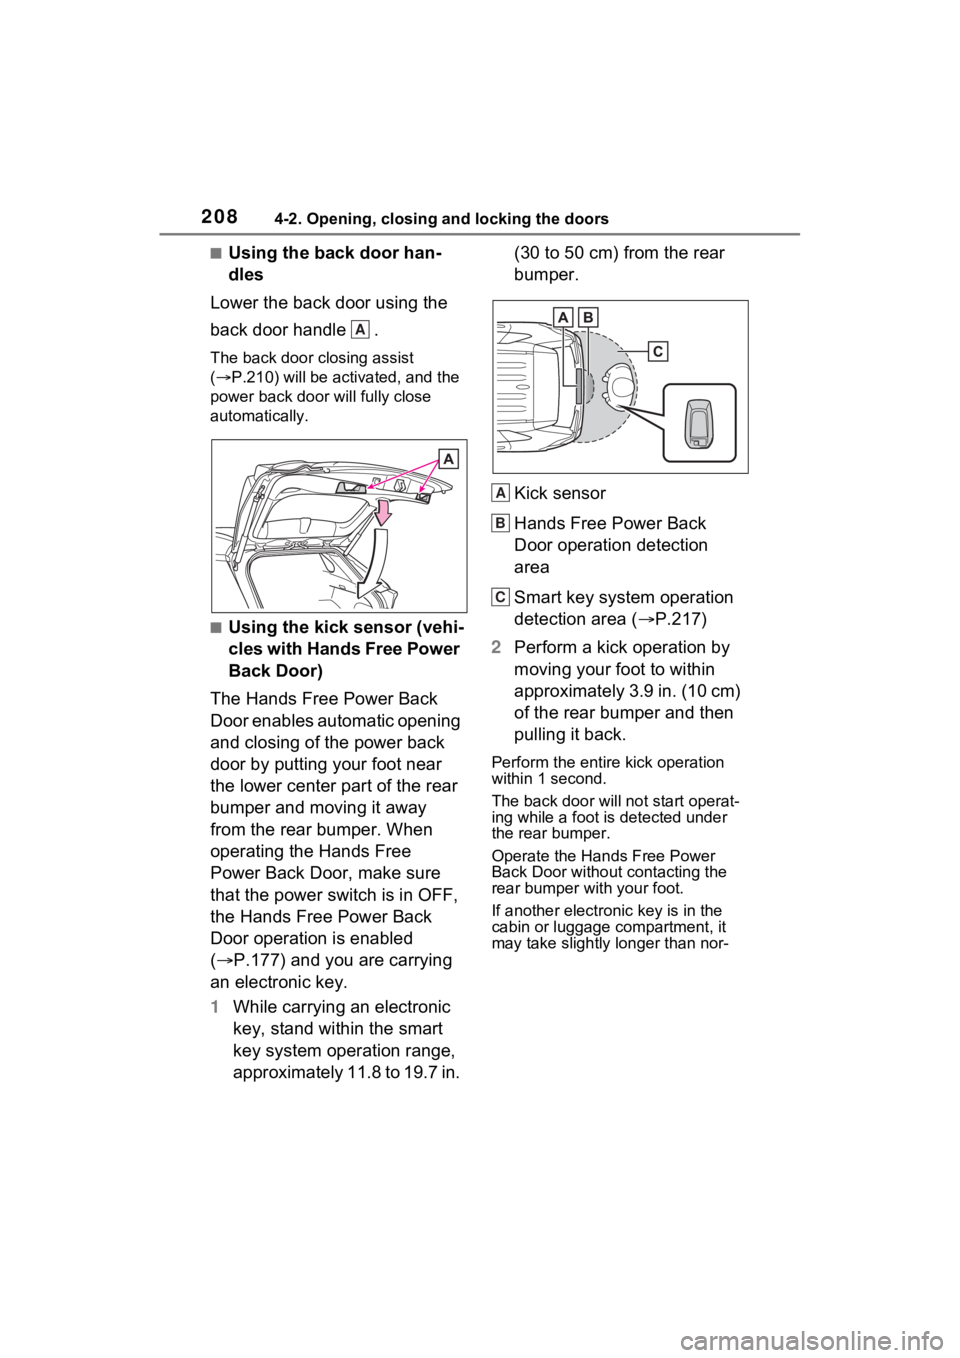
■Using the back door han-
dles
Lower the back door using the
back door handle .
The back door closing assist
( P.210) will be activated, and the
power back door will fully close
automatically.
■Using the kick sensor (vehi-
cles with Hands Free Power
Back Door)
The Hands Free Power Back
Door enables automatic opening
and closing of the power back
door by putting your foot near
the lower center part of the rear
bumper and moving it away
from the rear bumper. When
operating the Hands Free
Power Back Door, make sure
that the power switch is in OFF,
the Hands Free Power Back
Door operation is enabled
( P.177) and you are carrying
an electronic key.
1 While carrying an electronic
key, stand within the smart
key system operation range,
approximately 11.8 to 19.7 in. (30 to 50 cm) from the rear
bumper.
Kick sensor
Hands Free Power Back
Door operation detection
area
Smart key system operation
detection area (
P.217)
2 Perform a kick operation by
moving your foot to within
approximately 3.9 in. (10 cm)
of the rear bumper and then
pulling it back.
Perform the entire kick operation
within 1 second.
The back door will not start operat-
ing while a foot is detected under
the rear bumper.
Operate the Hand s Free Power
Back Door without contacting the
rear bumper with your foot.
If another electronic key is in the
cabin or luggage compartment, it
may take slightly l onger than nor-
A
A
B
C
Page 209 of 624
2094-2. Opening, closing and locking the doors
4
Before driving
mal for the operation to occur.
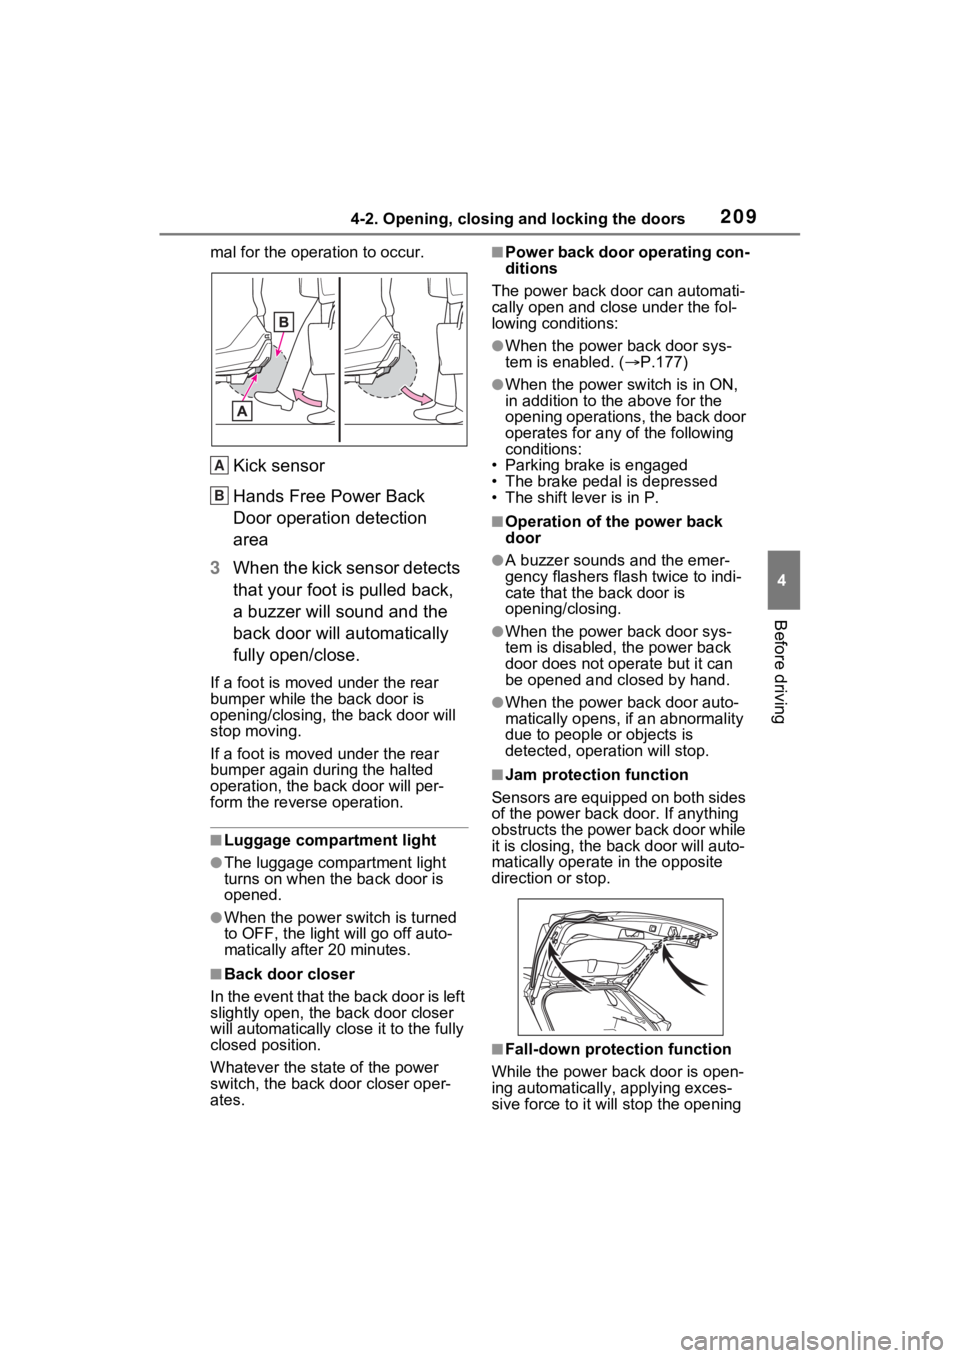
Kick sensor
Hands Free Power Back
Door operation detection
area
3 When the kick sensor detects
that your foot is pulled back,
a buzzer will sound and the
back door will automatically
fully open/close.
If a foot is moved under the rear
bumper while the back door is
opening/closing, the back door will
stop moving.
If a foot is moved under the rear
bumper again during the halted
operation, the back door will per-
form the reverse operation.
■Luggage compartment light
●The luggage compartment light
turns on when the back door is
opened.
●When the power switch is turned
to OFF, the light will go off auto-
matically after 20 minutes.
■Back door closer
In the event that the back door is left
slightly open, the back door closer
will automatically close it to the fully
closed position.
Whatever the state of the power
switch, the back door closer oper-
ates.
■Power back door operating con-
ditions
The power back doo r can automati-
cally open and close under the fol-
lowing conditions:
●When the power back door sys-
tem is enabled. ( P.177)
●When the power switch is in ON,
in addition to the above for the
opening operations, the back door
operates for any of the following
conditions:
• Parking brake is engaged
• The brake pedal is depressed
• The shift lever is in P.
■Operation of the power back
door
●A buzzer sounds and the emer-
gency flashers flash twice to indi-
cate that the back door is
opening/closing.
●When the power back door sys-
tem is disabled, t he power back
door does not operate but it can
be opened and closed by hand.
●When the power back door auto-
matically opens, if an abnormality
due to people or objects is
detected, operation will stop.
■Jam protection function
Sensors are equipped on both sides
of the power back door. If anything
obstructs the power back door while
it is closing, the back door will auto-
matically operate in the opposite
direction or stop.
■Fall-down protection function
While the power back door is open-
ing automatically, applying exces-
sive force to it will stop the opening
A
B
Page 214 of 624
2144-2. Opening, closing and locking the doors
WARNING
●When putting your foot near the
lower center part of the rear
bumper and moving it from the
rear bumper, be careful not to
touch the exhaust pipes until
they have cooled down suffi-
ciently, as touching hot exhaust
pipes can cause burns.
●Do not leave the electronic key
within the eff ective range
(detection area) of the luggage
compartment.
NOTICE
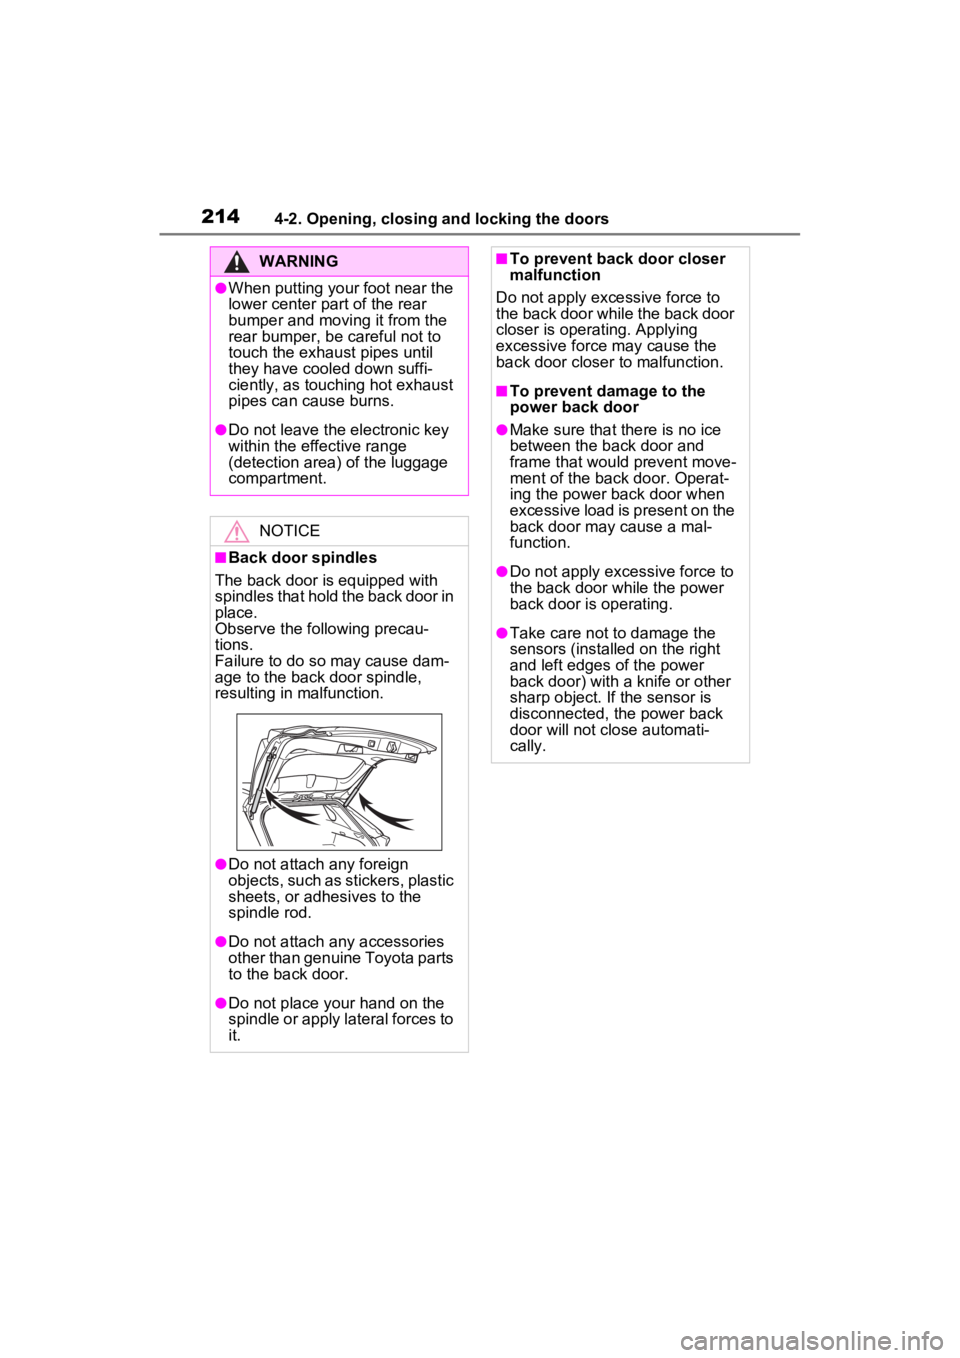
■Back door spindles
The back door is equipped with
spindles that hold the back door in
place.
Observe the following precau-
tions.
Failure to do so may cause dam-
age to the back door spindle,
resulting in malfunction.
●Do not attach any foreign
objects, such as stickers, plastic
sheets, or adhesives to the
spindle rod.
●Do not attach any accessories
other than genuine Toyota parts
to the back door.
●Do not place your hand on the
spindle or apply lateral forces to
it.
■To prevent back door closer
malfunction
Do not apply excessive force to
the back door while the back door
closer is operating. Applying
excessive force may cause the
back door closer t o malfunction.
■To prevent damage to the
power back door
●Make sure that there is no ice
between the back door and
frame that would prevent move-
ment of the back door. Operat-
ing the power back door when
excessive load is present on the
back door may cause a mal-
function.
●Do not apply excessive force to
the back door while the power
back door is operating.
●Take care not to damage the
sensors (installed on the right
and left edges of the power
back door) with a knife or other
sharp object. If the sensor is
disconnected, the power back
door will not cl ose automati-
cally.