TOYOTA SEQUOIA 2008 2.G Owners Manual
SEQUOIA 2008 2.G
TOYOTA
TOYOTA
https://www.carmanualsonline.info/img/14/6752/w960_6752-0.png
TOYOTA SEQUOIA 2008 2.G Owners Manual
Page 487 of 596
487
4-3. Do-it-yourself maintenance
4
Maintenance and care
■
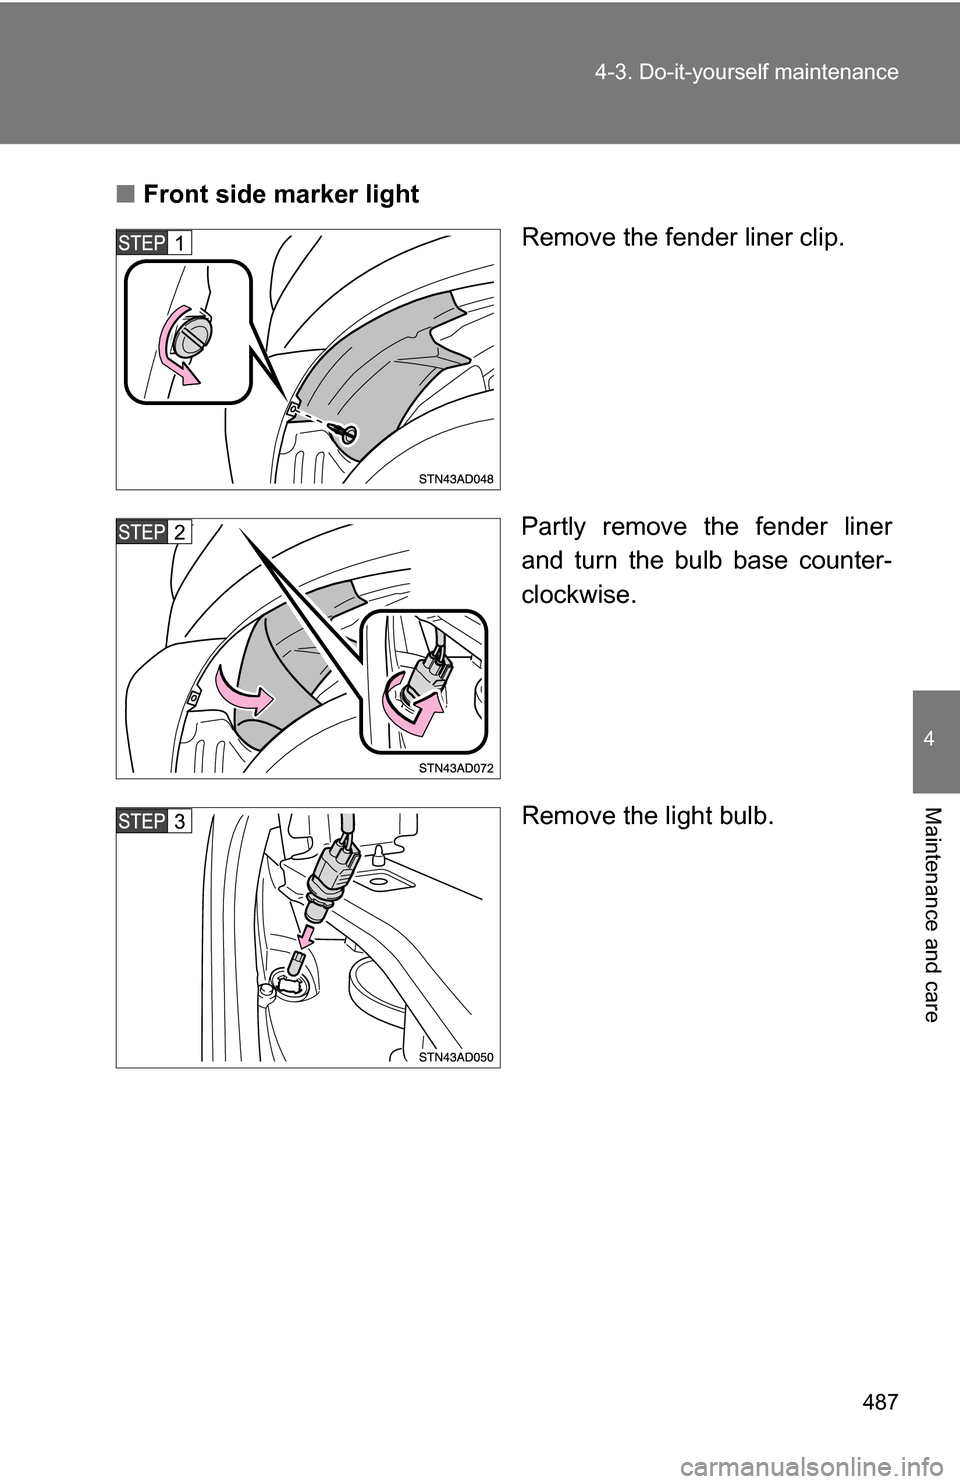
Front side marker light
Remove the fender liner clip.
Partly remove the fender liner
and turn the bulb base counter-
clockwise.
Remove the light bulb.
Page 488 of 596
488 4-3. Do-it-yourself maintenance
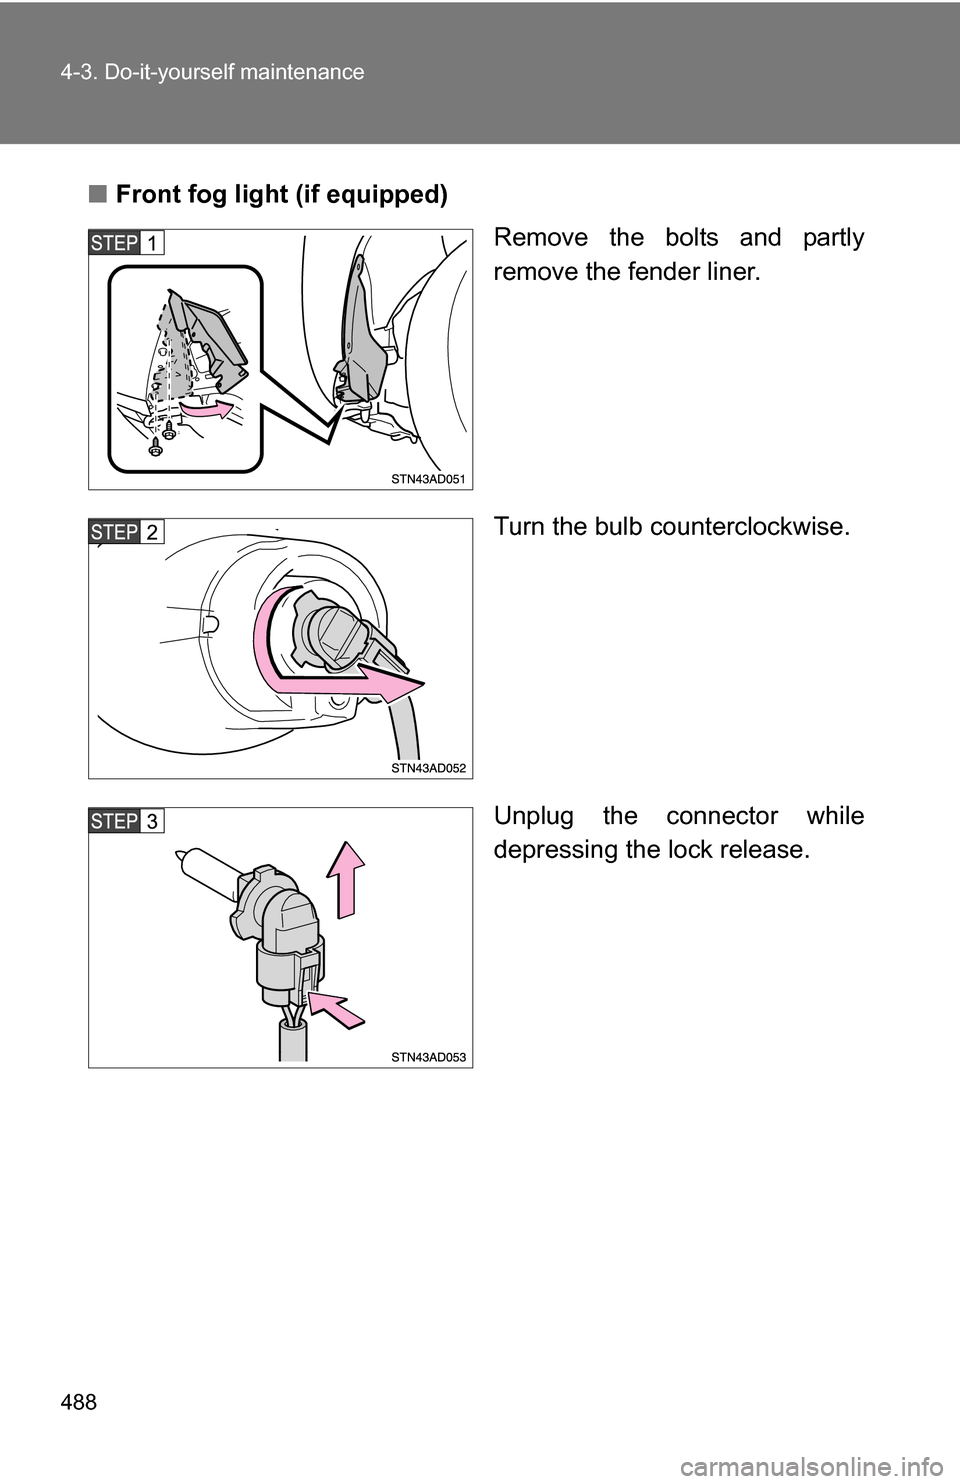
■Front fog light (if equipped)
Remove the bolts and partly
remove the fender liner.
Turn the bulb counterclockwise.
Unplug the connector while
depressing the lock release.
Page 489 of 596
489
4-3. Do-it-yourself maintenance
4
Maintenance and care
■
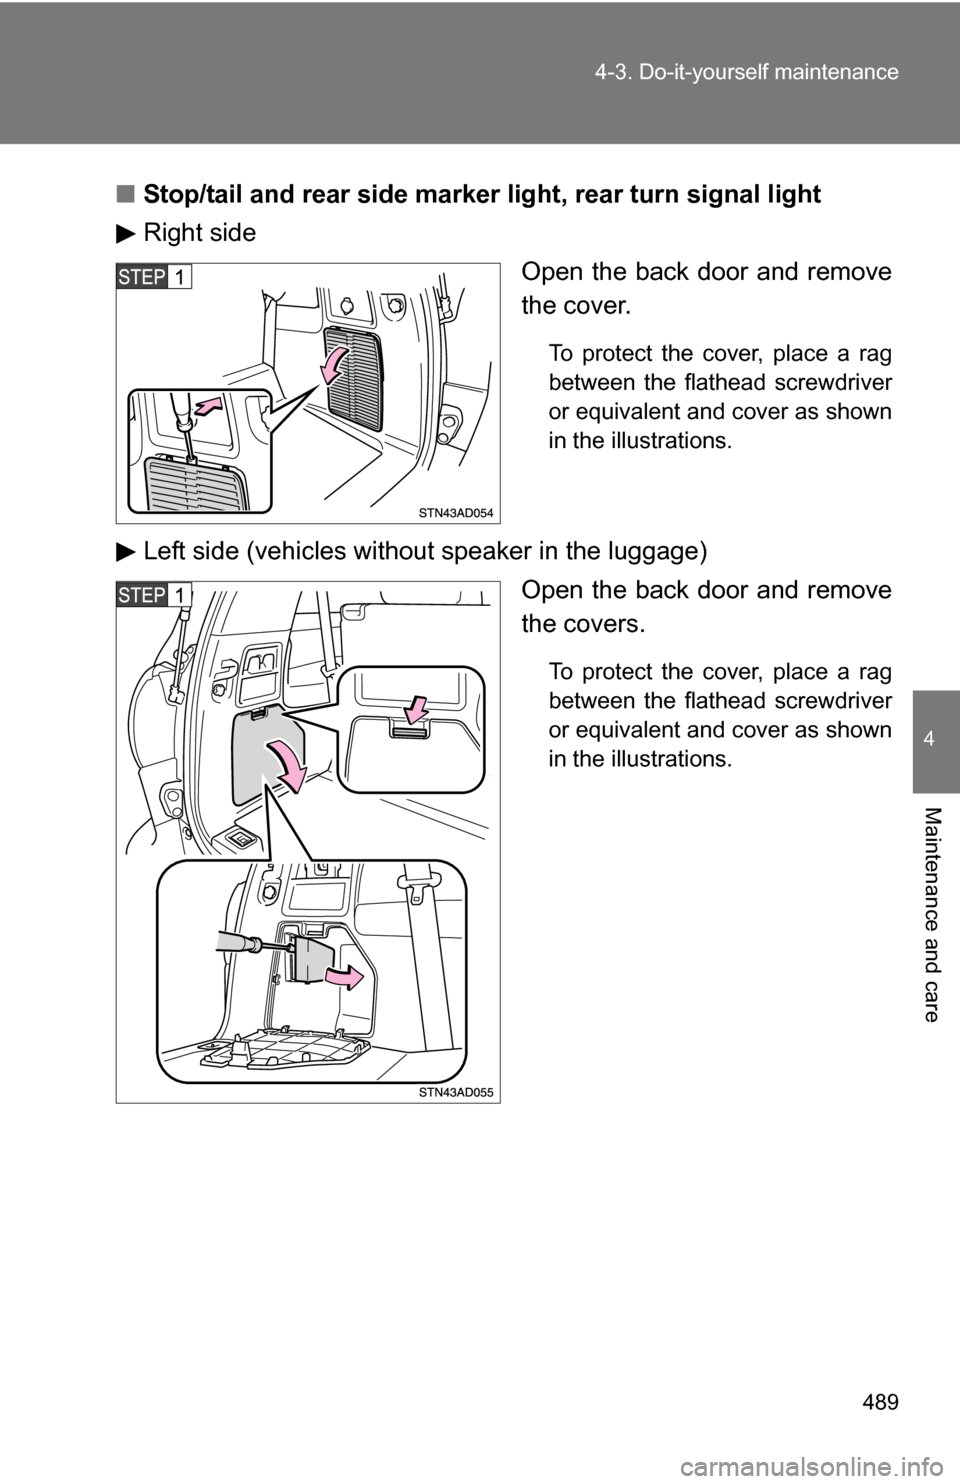
Stop/tail and rear side marker light, rear turn signal light
Right side
Open the back door and remove
the cover.
To protect the cover, place a rag
between the flathead screwdriver
or equivalent and cover as shown
in the illustrations.
Left side (vehicles without speaker in the luggage)Open the back door and remove
the covers.
To protect the cover, place a rag
between the flathead screwdriver
or equivalent and cover as shown
in the illustrations.
Page 490 of 596
490 4-3. Do-it-yourself maintenance
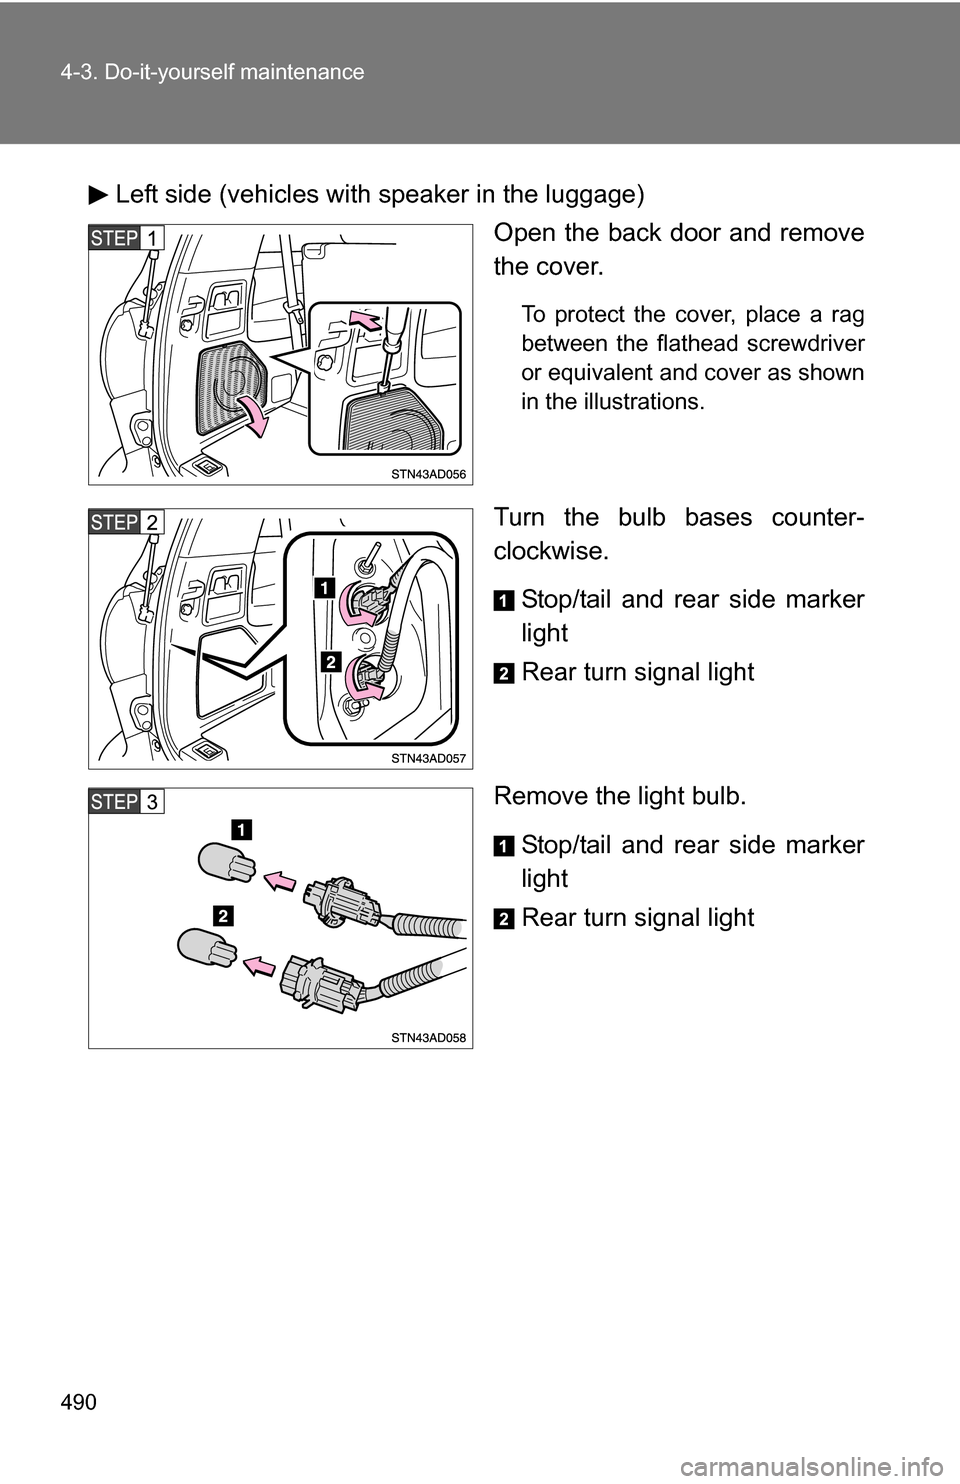
Left side (vehicles with speaker in the luggage)Open the back door and remove
the cover.
To protect the cover, place a rag
between the flathead screwdriver
or equivalent and cover as shown
in the illustrations.
Turn the bulb bases counter-
clockwise.
Stop/tail and rear side marker
light
Rear turn signal light
Remove the light bulb. Stop/tail and rear side marker
light
Rear turn signal light
Page 491 of 596
491
4-3. Do-it-yourself maintenance
4
Maintenance and care
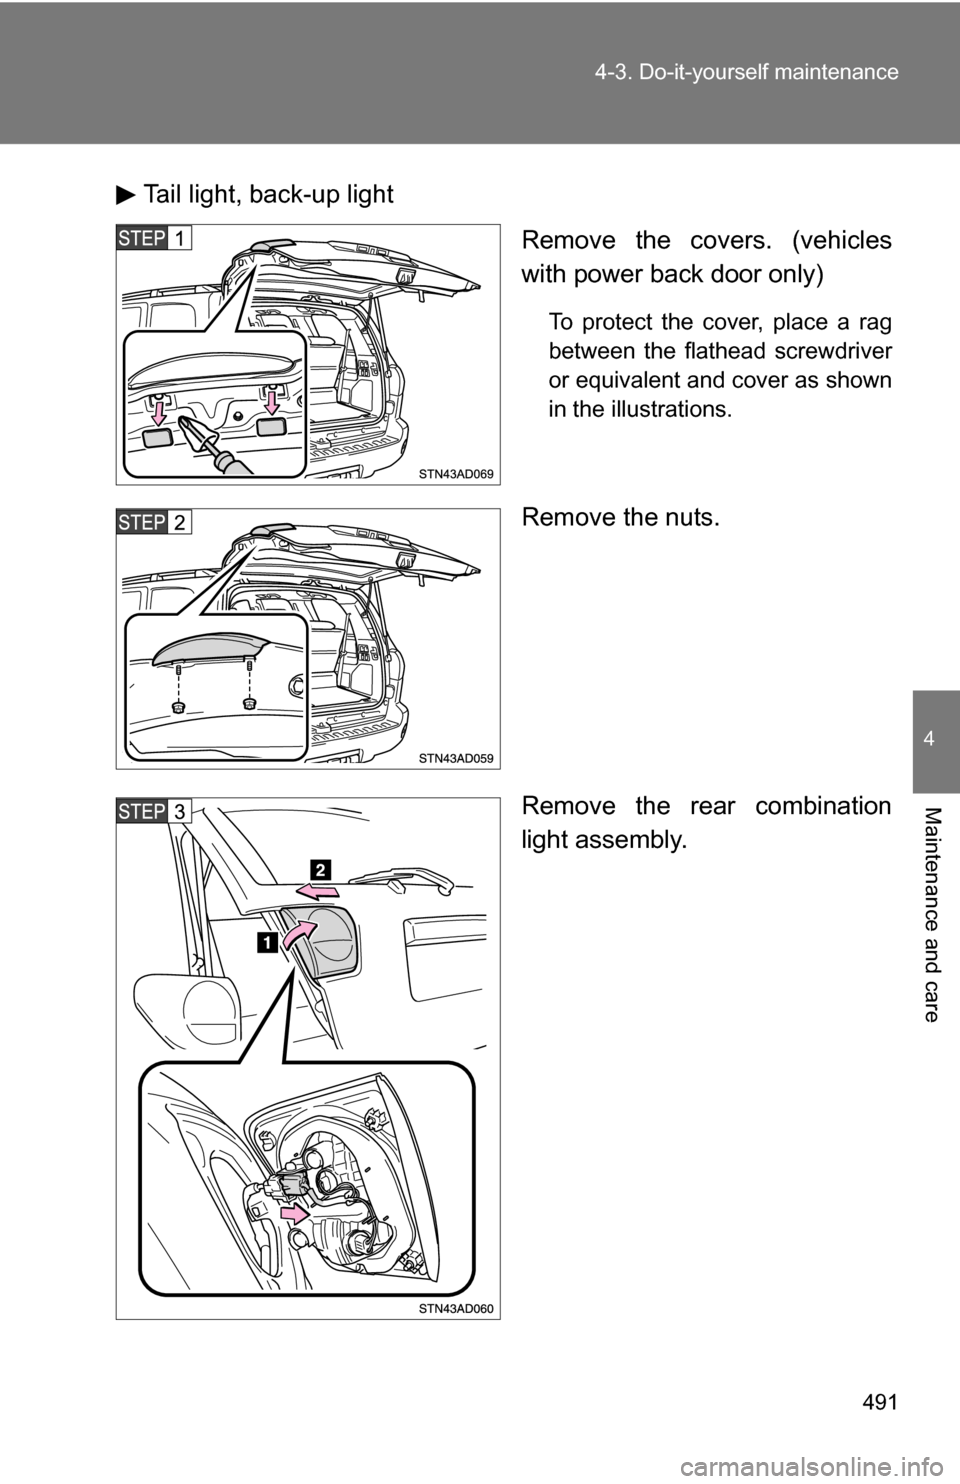
Tail light, back-up light
Remove the covers. (vehicles
with power back door only)
To protect the cover, place a rag
between the flathead screwdriver
or equivalent and cover as shown
in the illustrations.
Remove the nuts.
Remove the rear combination
light assembly.
Page 492 of 596
492 4-3. Do-it-yourself maintenance
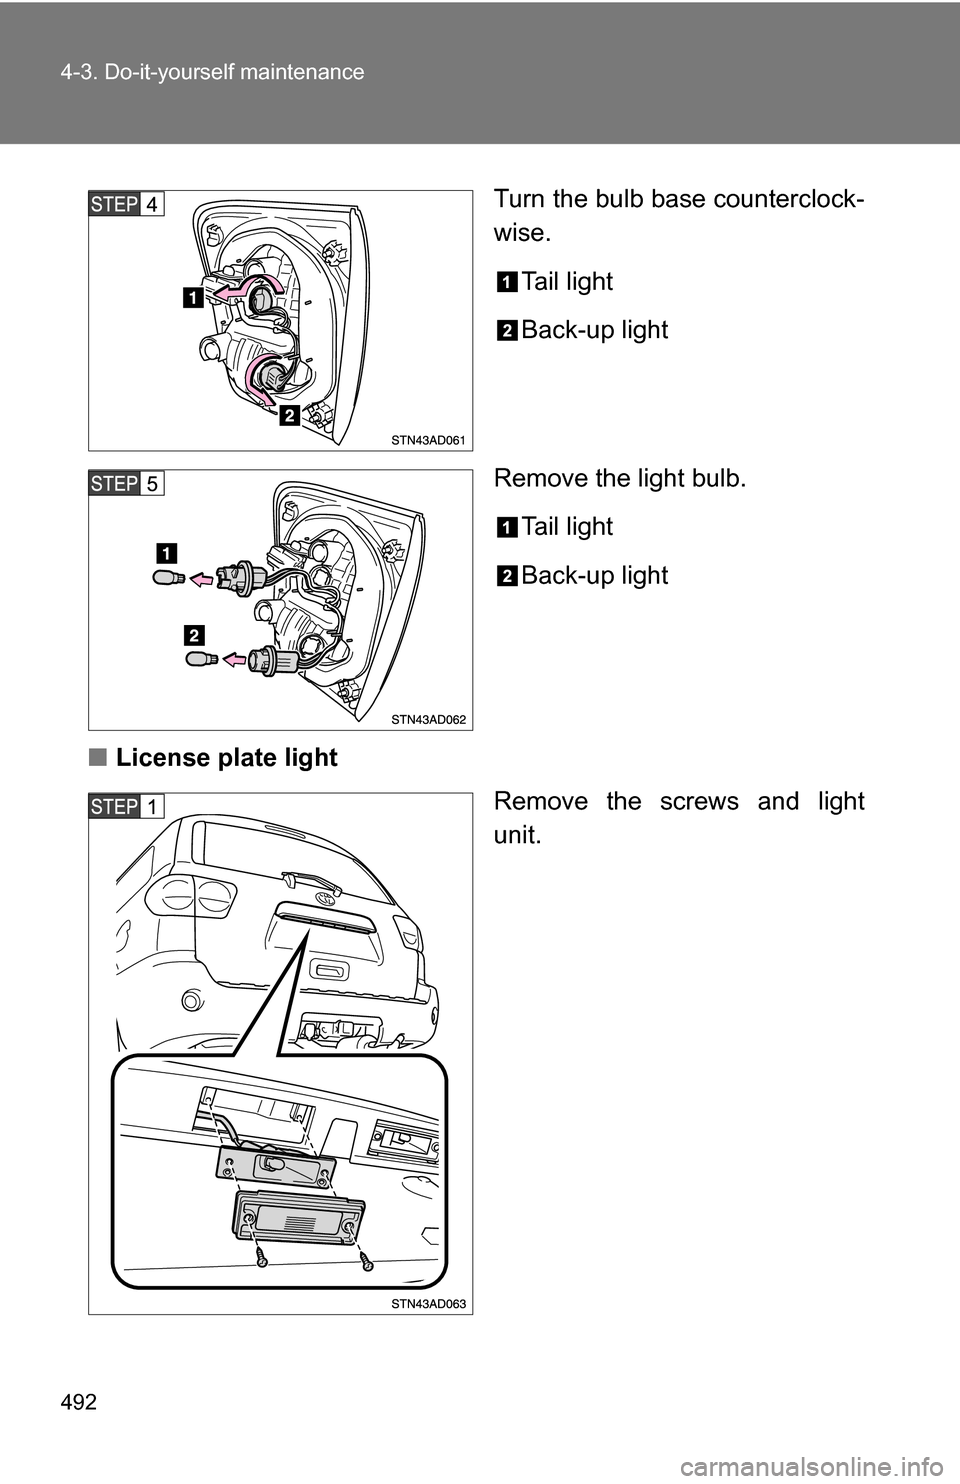
Turn the bulb base counterclock-
wise.Tail light
Back-up light
Remove the light bulb. Tail light
Back-up light
■ License plate light
Remove the screws and light
unit.
Page 493 of 596
493
4-3. Do-it-yourself maintenance
4
Maintenance and care
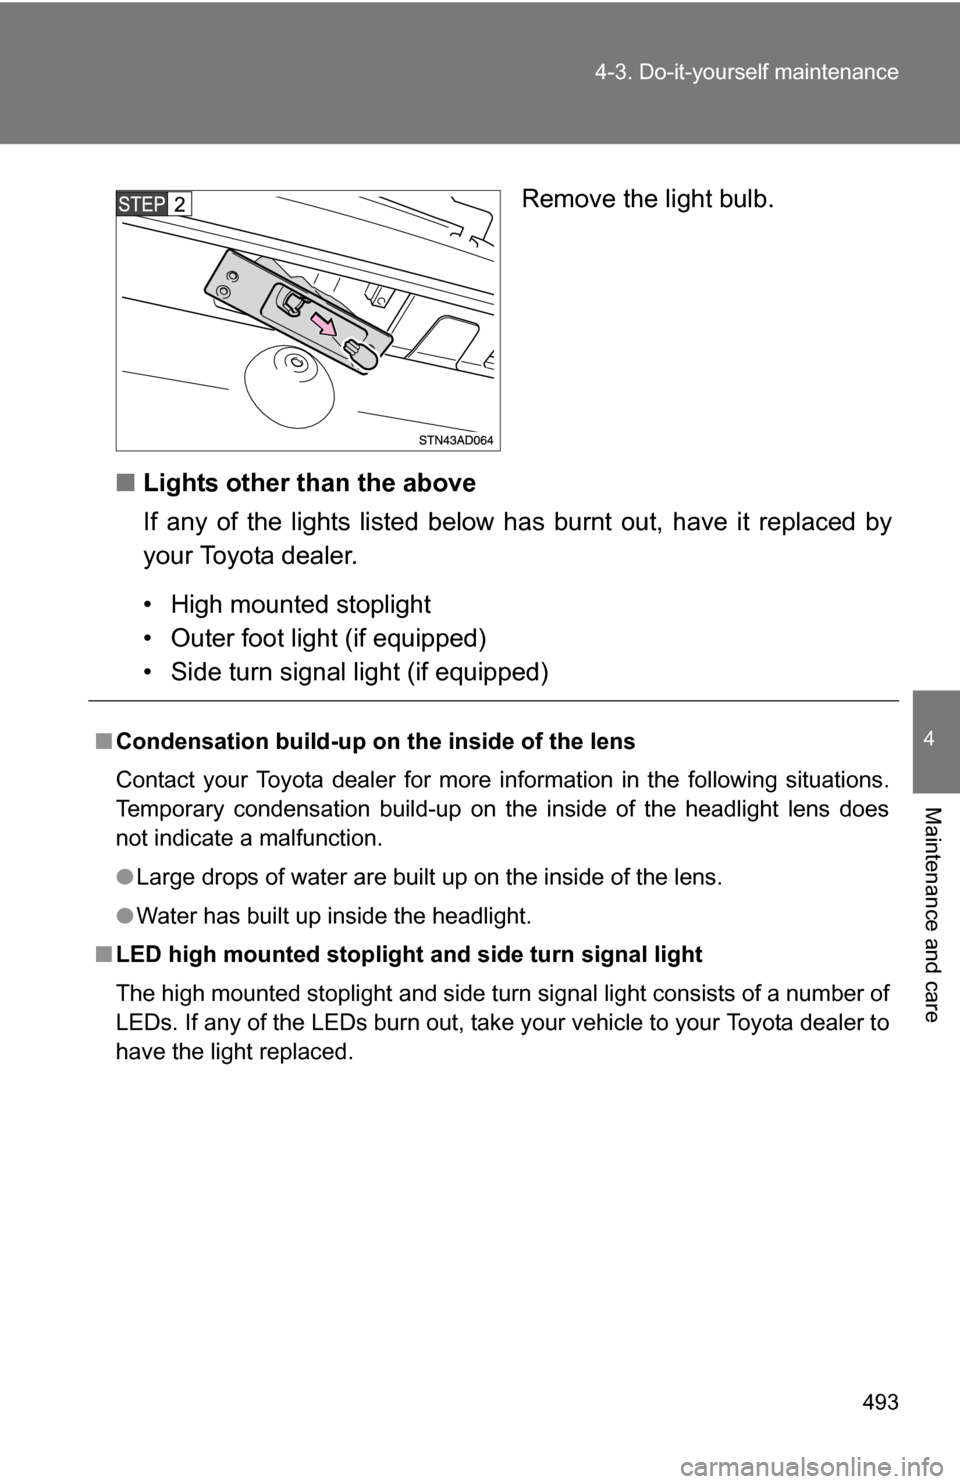
Remove the light bulb.
■ Lights other than the above
If any of the lights listed below has burnt out, have it replaced by
your Toyota dealer.
• High mounted stoplight
• Outer foot light (if equipped)
• Side turn signal light (if equipped)
■ Condensation build-up on th e inside of the lens
Contact your Toyota dealer for more information in the following situations.
Temporary condensation build-up on the inside of the headlight lens does
not indicate a malfunction.
● Large drops of water are built up on the inside of the lens.
● Water has built up inside the headlight.
■ LED high mounted stoplight and side turn signal light
The high mounted stoplight and side turn signal light consists of a number of
LEDs. If any of the LEDs burn out, take your vehicle to your Toyota dealer to
have the light replaced.
Page 494 of 596
494 4-3. Do-it-yourself maintenance
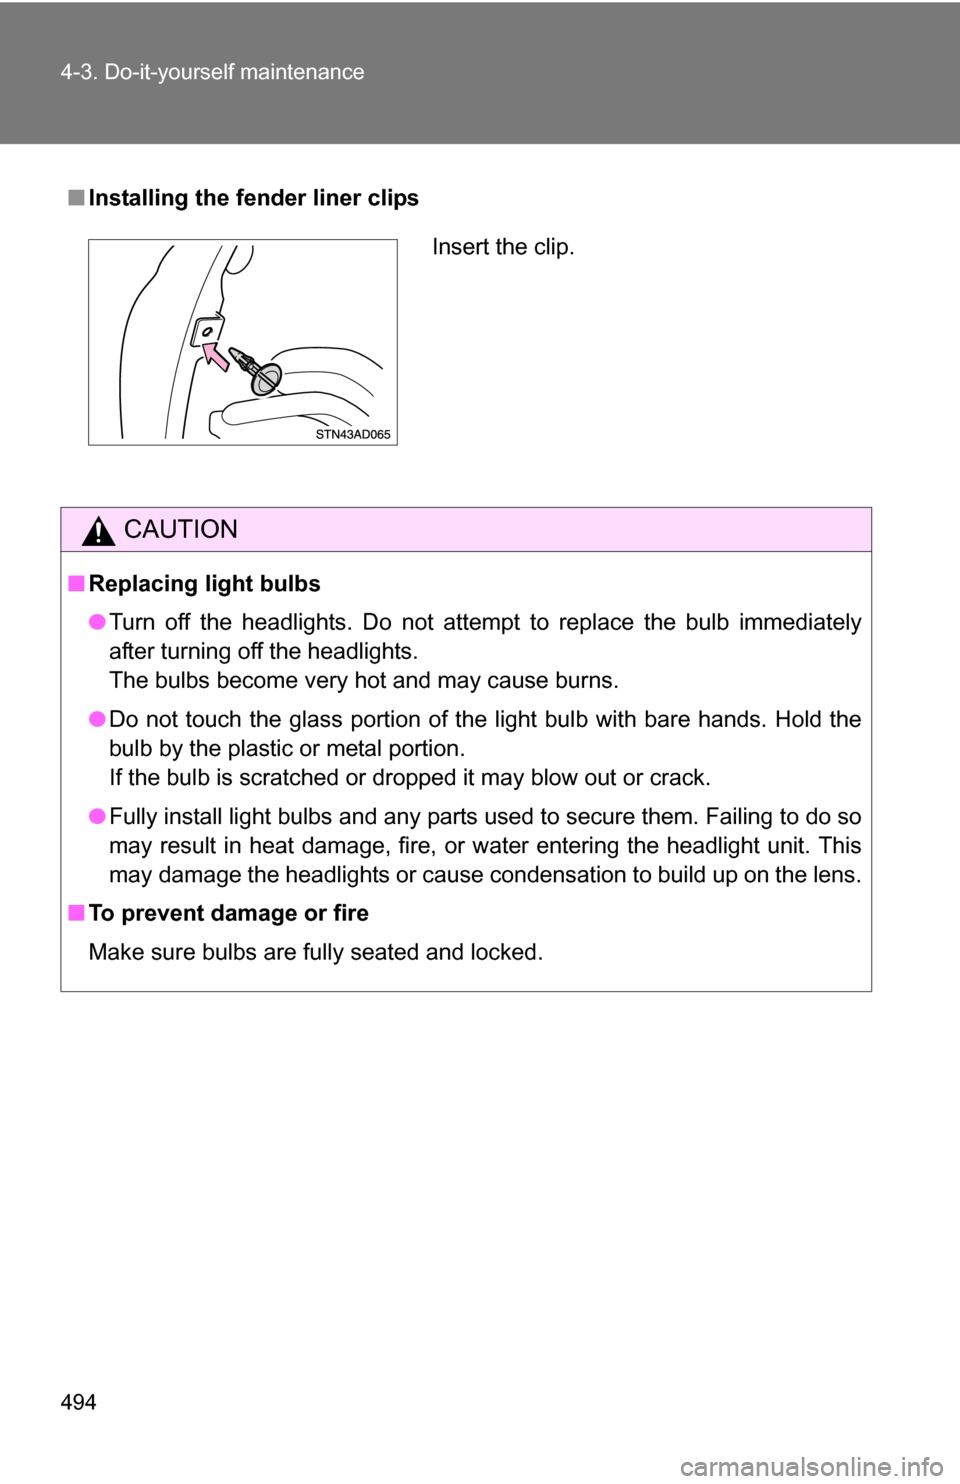
■Installing the fender liner clips
CAUTION
■Replacing light bulbs
●Turn off the headlights. Do not attempt to replace the bulb immediately
after turning off the headlights.
The bulbs become very hot and may cause burns.
● Do not touch the glass portion of the light bulb with bare hands. Hold the
bulb by the plastic or metal portion.
If the bulb is scratched or dropped it may blow out or crack.
● Fully install light bulbs and any parts used to secure them. Failing to do so
may result in heat damage, fire, or water entering the headlight unit. This
may damage the headlights or cause condensation to build up on the lens.
■ To prevent damage or fire
Make sure bulbs are fully seated and locked.
Insert the clip.
Page 495 of 596
When trouble arises5
495
5-1. Essential information .... 496If your vehicle needs to be towed ........................ 496
If you think something is wrong ............................. 501
Fuel pump shut off system ........................... 502
Event data recorder ......... 503 5-2. Steps to take in an
emergency .................... 505
If a warning light turns on or a warning buzzer
sounds... ........................ 505
If a warning message is displayed (vehicles with
multi-information
display) .......................... 514
If you have a flat tire......... 519
If the engine will not start ................................ 529
If the shift lever cannot be shifted from P................. 530
If you lose your keys ........ 531
If the vehicle battery is discharged ..................... 532
If your vehicle overheats ....................... 536
If the vehicle becomes stuck .............................. 539
Page 505 of 596
5
When trouble arises
505
5-2. Steps to take in an emergency
If a war ning light turns on or a war ning buzzer sounds...
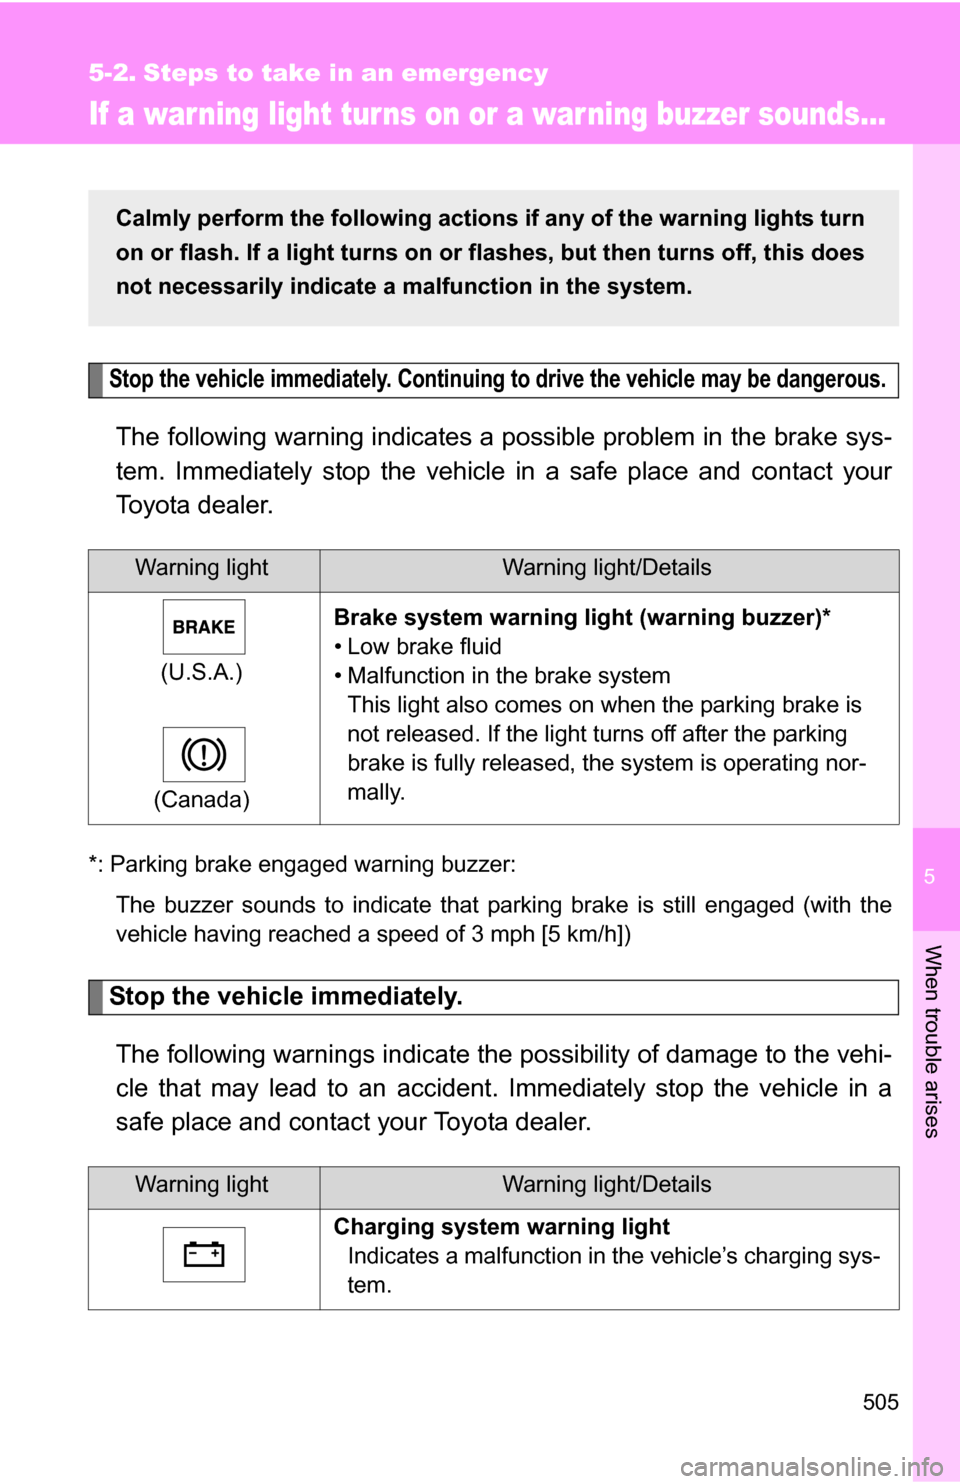
Stop the vehicle immediately. Continuing to drive the vehicle may be dangerous.
The following warning indicates a possible problem in the brake sys-
tem. Immediately stop the vehicle in a safe place and contact your
Toyota dealer.
*: Parking brake engaged warning buzzer:
The buzzer sounds to indicate that parking brake is still engaged (with the
vehicle having reached a speed of 3 mph [5 km/h])
Stop the vehicle immediately.
The following warnings indicate the possibility of damage to the vehi-
cle that may lead to an accident. Immediately stop the vehicle in a
safe place and contact your Toyota dealer.
Warning lightWarning light/Details
(U.S.A.)
(Canada) Brake system warning li
ght (warning buzzer)*
• Low brake fluid
• Malfunction in the brake system This light also comes on when the parking brake is
not released. If the light turns off after the parking
brake is fully released, the system is operating nor-
mally.
Warning lightWarning light/Details
Charging system warning light Indicates a malfunction in the vehicle’s charging sys-
tem.
Calmly perform the following actions if any of the warning lights turn
on or flash. If a light turns on or flashes, but then turns off, this does
not necessarily indicate a malfunction in the system.
