display TOYOTA SEQUOIA 2010 2.G Owner's Guide
[x] Cancel search | Manufacturer: TOYOTA, Model Year: 2010, Model line: SEQUOIA, Model: TOYOTA SEQUOIA 2010 2.GPages: 660, PDF Size: 12.29 MB
Page 211 of 660
211
2-4. Using other
driving systems
2
When driving
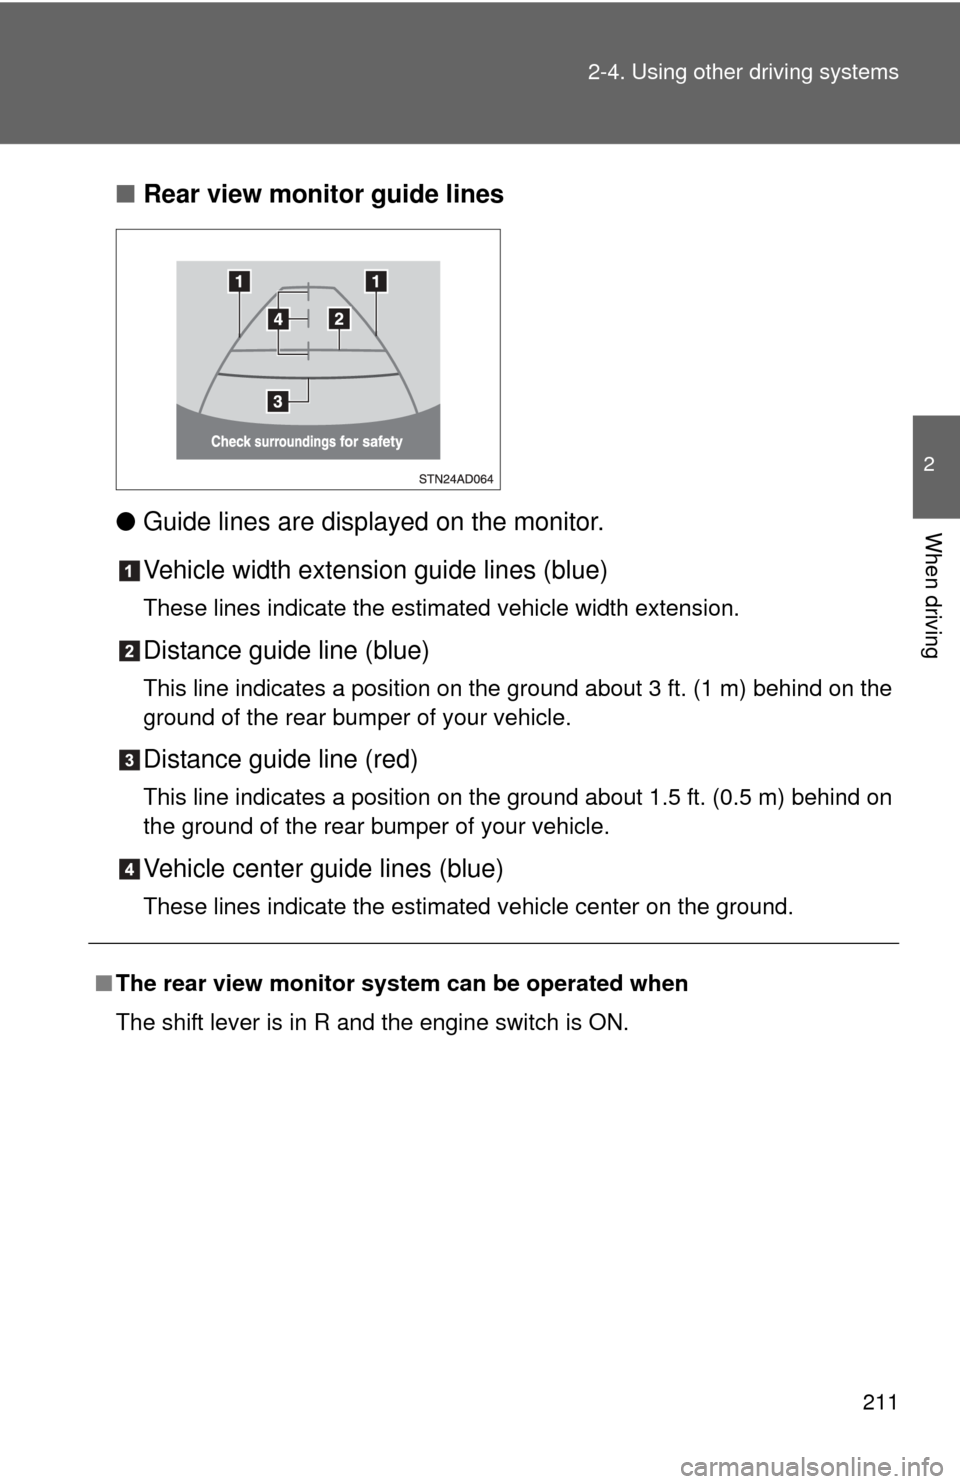
■Rear view monitor guide lines
● Guide lines are displayed on the monitor.
Vehicle width extension guide lines (blue)
These lines indicate the estimated vehicle width extension.
Distance guide line (blue)
This line indicates a position on the ground about 3 ft. (1 m) behind on the
ground of the rear bumper of your vehicle.
Distance guide line (red)
This line indicates a position on the ground about 1.5 ft. (0.5 m) behind on
the ground of the rear bumper of your vehicle.
Vehicle center guide lines (blue)
These lines indicate the estimated vehicle center on the ground.
■The rear view monitor system can be operated when
The shift lever is in R and the engine switch is ON.
Page 212 of 660
212 2-4. Using other driving systems
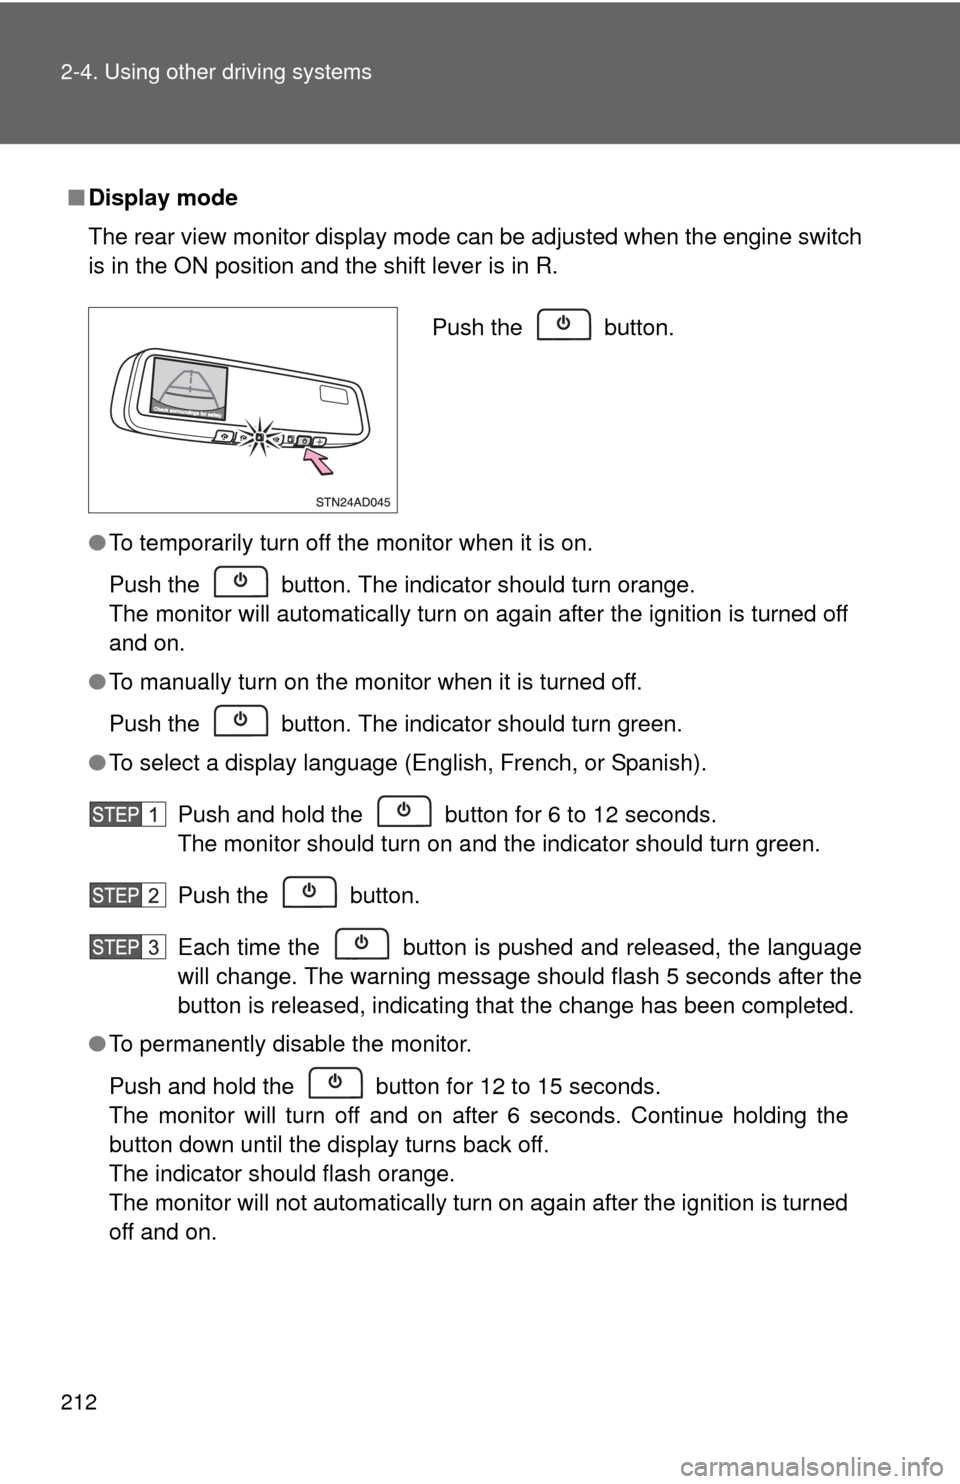
■Display mode
The rear view monitor display mode can be adjusted when the engine switc\
h
is in the ON position and the shift lever is in R.
●To temporarily turn off the monitor when it is on.
Push the button. The indicator should turn orange.
The monitor will automatically turn on again after the ignition is turned off
and on.
● To manually turn on the monitor when it is turned off.
Push the button. The indicator should turn green.
● To select a display language (English, French, or Spanish).
Push and hold the button for 6 to 12 seconds.
The monitor should turn on and the indicator should turn green.
Push the button.
Each time the button is pushed and released, the language
will change. The warning message should flash 5 seconds after the
button is released, indicating that the change has been completed.
● To permanently disable the monitor.
Push and hold the button for 12 to 15 seconds.
The monitor will turn off and on after 6 seconds. Continue holding the
button down until the display turns back off.
The indicator should flash orange.
The monitor will not automatically turn on again after the ignition is turned
off and on.
Push the button.
Page 213 of 660
213
2-4. Using other
driving systems
2
When driving
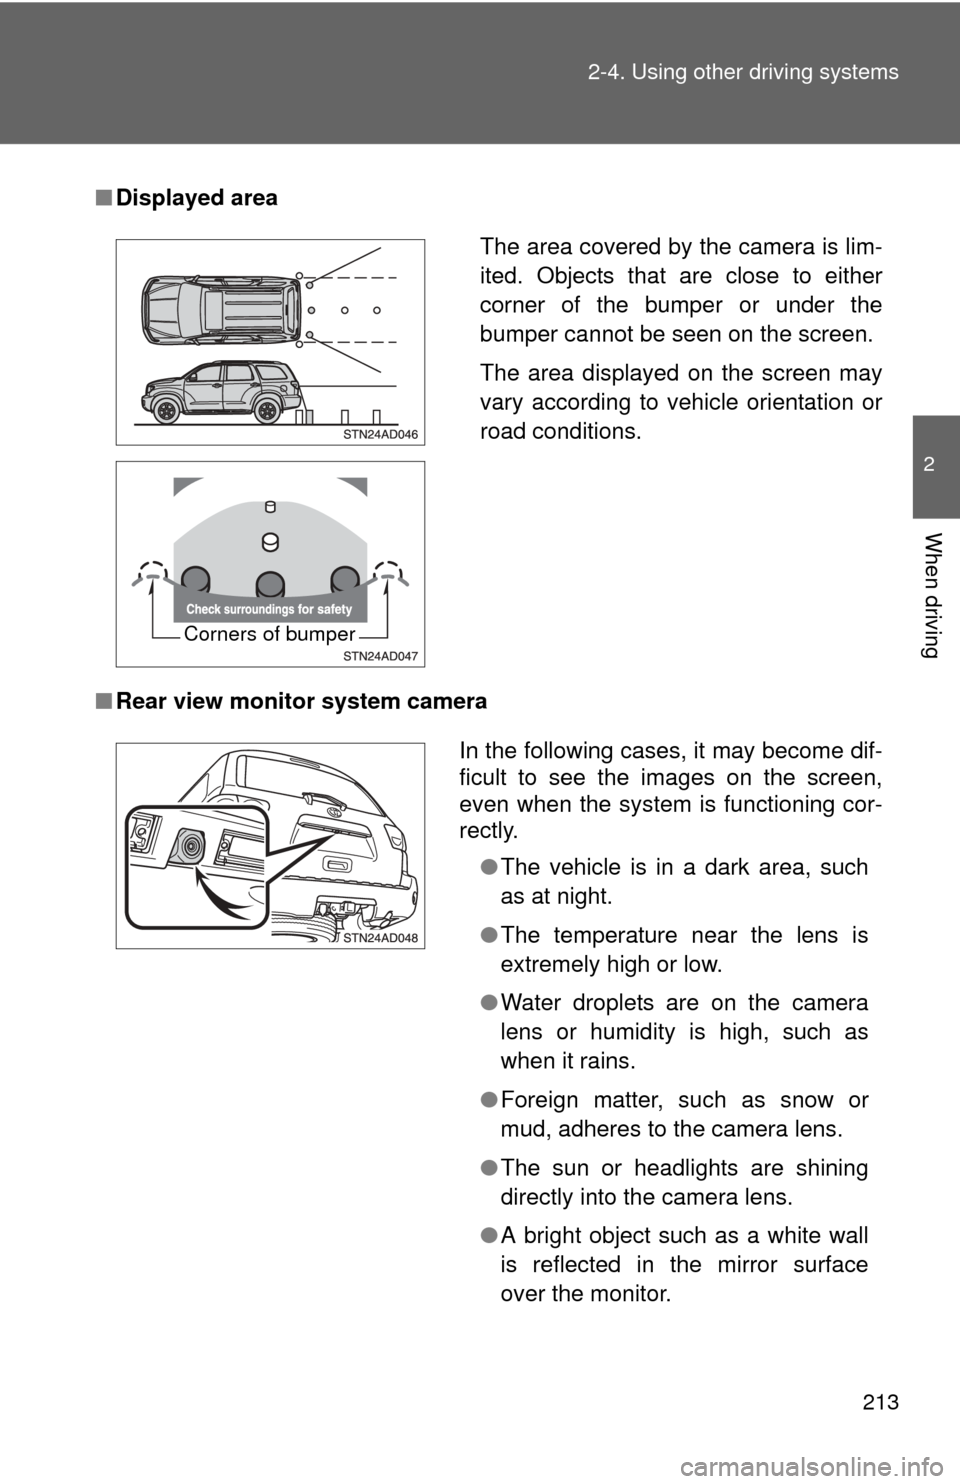
■Displayed area
■ Rear view monitor system camera
The area covered by the camera is lim-
ited. Objects that are close to either
corner of the bumper or under the
bumper cannot be seen on the screen.
The area displayed on the screen may
vary according to vehicle orientation or
road conditions.
Corners of bumper
In the following cases, it may become dif-
ficult to see the images on the screen,
even when the system is functioning cor-
rectly.
●The vehicle is in a dark area, such
as at night.
● The temperature near the lens is
extremely high or low.
● Water droplets are on the camera
lens or humidity is high, such as
when it rains.
● Foreign matter, such as snow or
mud, adheres to the camera lens.
● The sun or headlights are shining
directly into the camera lens.
● A bright object such as a white wall
is reflected in the mirror surface
over the monitor.
Page 215 of 660
215
2-4. Using other
driving systems
2
When driving
CAUTION
■Conditions which may affect the rear view monitor system
● If the back of the vehicle has been hit, the camera’s position and mounting
angle may have changed. Have the vehicle inspected by your Toyota
dealer.
● Rapid temperature changes, such as when hot water is poured on the
vehicle in cold weather, may cause the system to function abnormally.
● If the camera lens is dirty, it cannot transmit a clear image. Rinse with
water and wipe with a soft cloth. If extremely dirty, wash with a mild
cleanser and rinse.
● The displayed image may be darker and moving images may be slightly
distorted when the system is cold.
■ Caution while dr iving in reverse
● Do not change modes while the vehicle is moving.
NOTICE
●As the camera has a water proof construction, do not detach, disassemble
or modify it. This may cause incorrect operation.
● If the camera lens becomes dirty, it cannot transmit a clear image. If water
droplets, snow, or mud adhere to the lens, rinse with water and wipe with a
soft cloth. If the lens is extremely dirty, wash it with a mild cleanser and
rinse.
Page 222 of 660
222
2-4. Using other driving systems
Four-wheel drive system
: If equipped
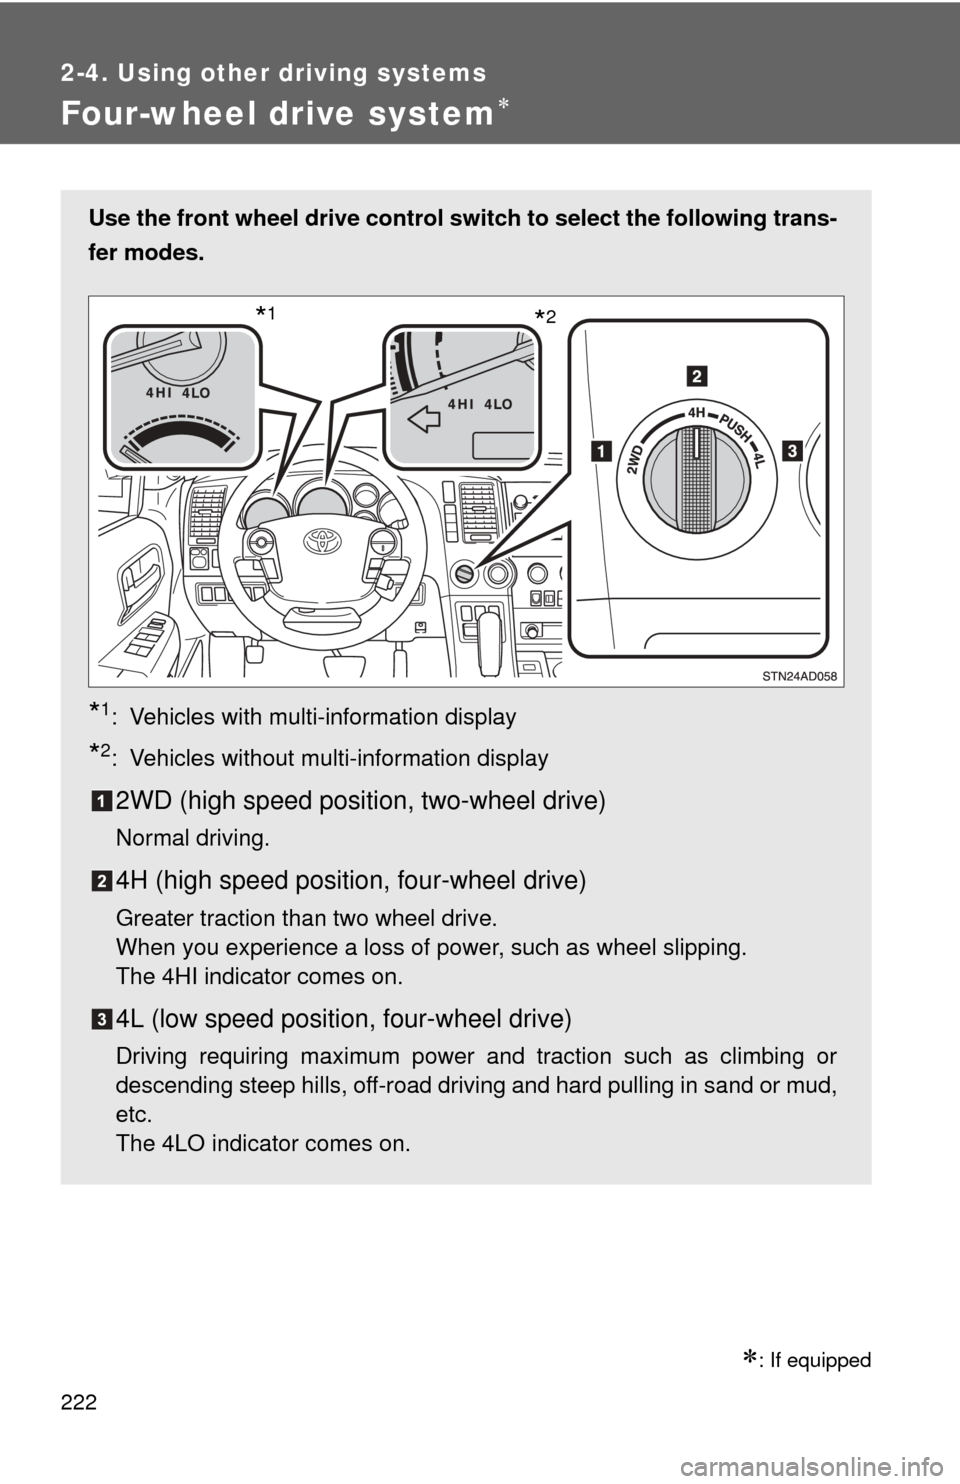
Use the front wheel drive control switch to select the following trans-
fer modes.
*1: Vehicles with multi-information display
*2: Vehicles without multi-information display
2WD (high speed position, two-wheel drive)
Normal driving.
4H (high speed position, four-wheel drive)
Greater traction than two wheel drive.
When you experience a loss of power, such as wheel slipping.
The 4HI indicator comes on.
4L (low speed position, four-wheel drive)
Driving requiring maximum power and traction such as climbing or
descending steep hills, off-road driving and hard pulling in sand or mud,
etc.
The 4LO indicator comes on.
*2*1
Page 267 of 660
Interior features3
267
3-5. Using the hands-free phone system (for cellular phone)
Hands-free phone system features .......................... 387
Using the hands-free phone system ................ 391
Making a phone call ......... 400
Setting a cellular phone ... 404
Security and system setup .............................. 408
Using the phone book ...... 411
3-6. Using the interior lights Interior lights list ............... 417
• Personal/interior light main switch .................... 418
• Personal/interior lights ... 419
• Interior light .................... 420
3-7. Using the storage features List of storage features .... 421
• Glove boxes ................... 422
• Coin holder .................... 423
• Front console box .......... 424
• Card holder .................... 426
• Map holder ..................... 427
• Pen holder ..................... 429
• Tissue pocket................. 430
• Rear console box ........... 431
• Overhead console.......... 434
• Cup holders ................... 436
• Bottle holders ................. 440 • Auxiliary boxes ............... 441
3-8. Other interior features Sun visors ........................ 443
Vanity mirrors ................... 444
Clock ................................ 445
Outside temperature display............................ 446
Portable ashtray ............... 448
Cigarette lighter................ 449
Conversation mirror ......... 450
Power outlets ................... 451
Seat heaters..................... 457
Seat heaters and ventilators ...................... 460
Armrests........................... 462
Rear side sunshades ....... 463
Seatback table ................. 465
Floor mat .......................... 466
Luggage compartment features .......................... 467
Garage door opener......... 472
Compass .......................... 477
Page 269 of 660
269
3-1. Using the air conditioning system
and defogger
3
Interior features
Using the automatic mode
Press .
The air conditioning system will begin to operate. Air outlets and fan
speed are automatically adjusted according to the temperature set-
ting.
Turn the temperature control dial clockwise (warm) or coun-
terclockwise (cool).
The temperature for the driver and passenger seat can be set sepa-
rately.
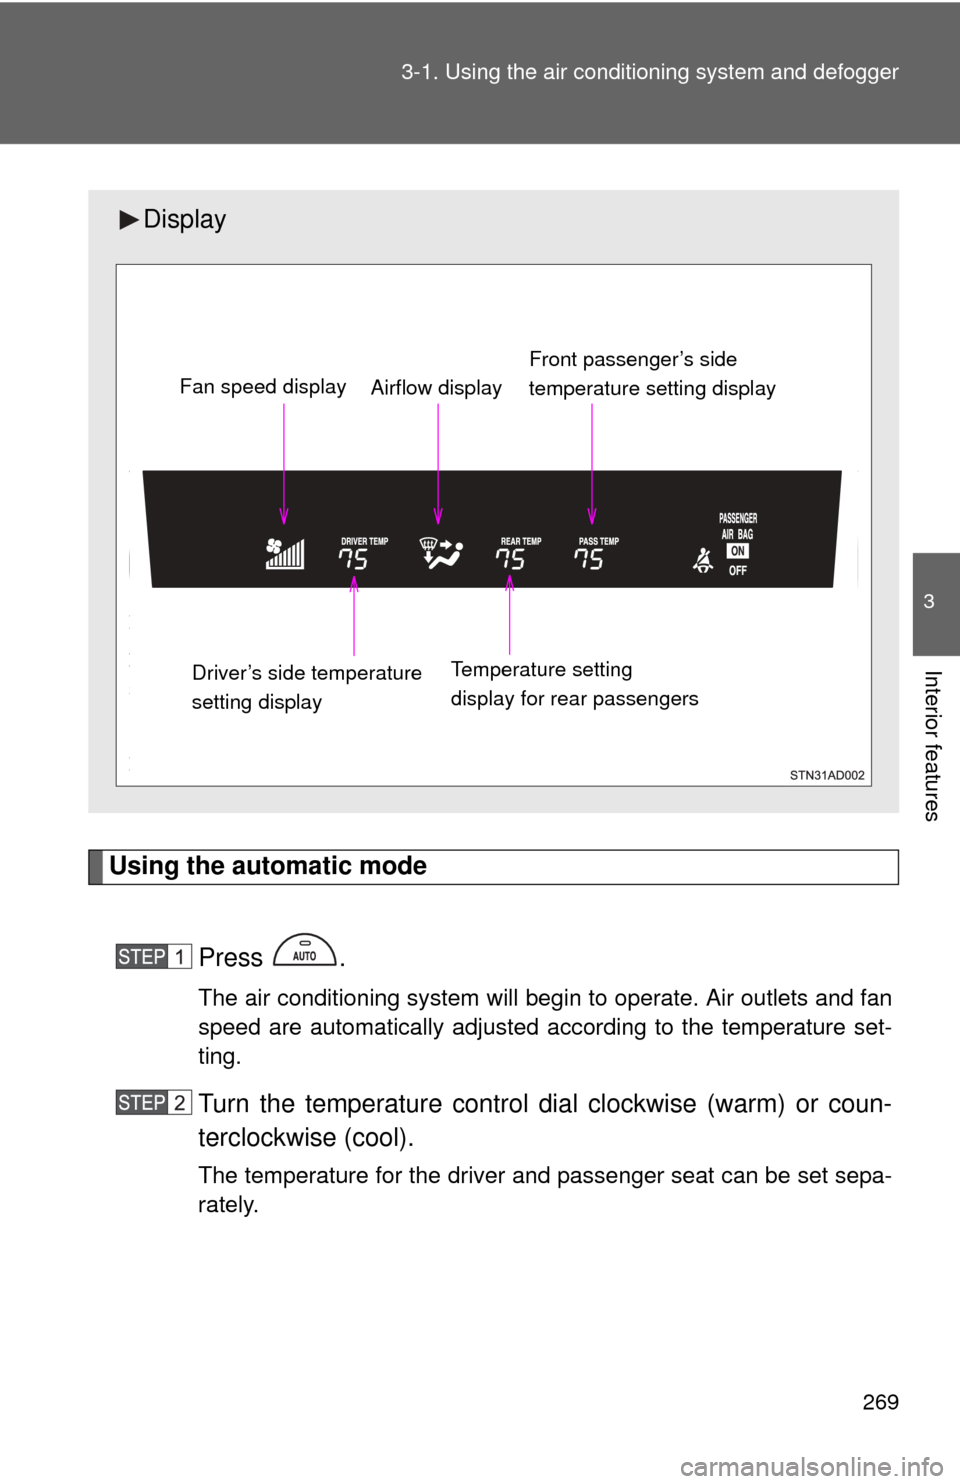
Display
Front passenger’s side
temperature setting display
Fan speed display
Airflow display
Driver’s side temperature
setting display Temperature setting
display for rear passengers
Page 270 of 660
270 3-1. Using the air conditioning system and defogger
Adjusting the settings
■ Adjusting the temperature setting
Turn the temperature control dial clockwise (warm) or counter-
clockwise (cool).
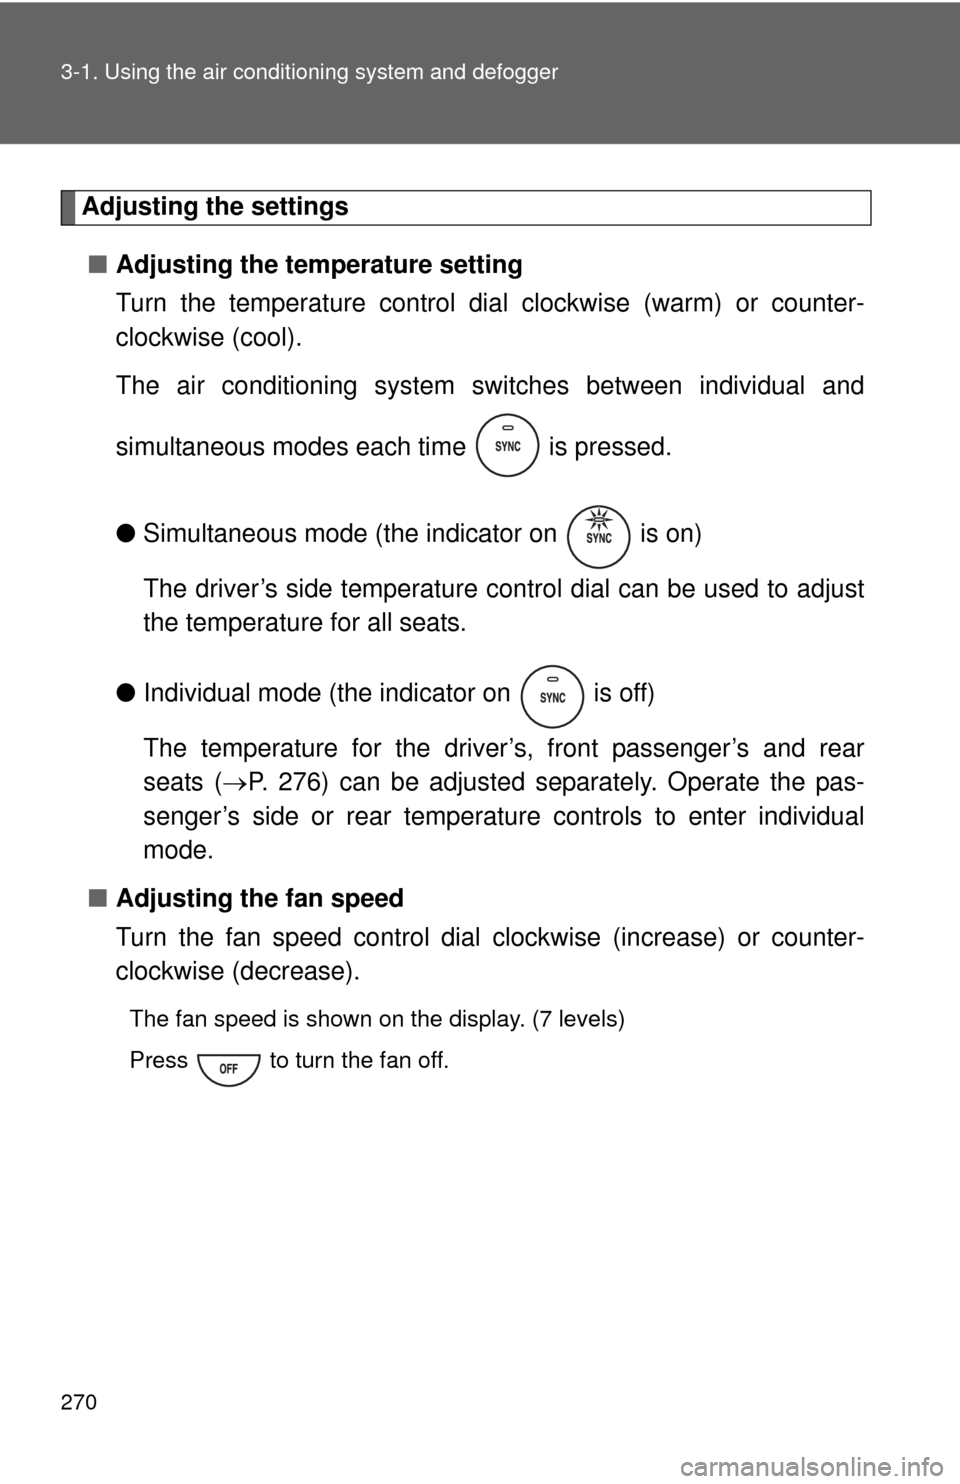
The air conditioning system sw itches between individual and
simultaneous modes each time is pressed.
● Simultaneous mode (the indicator on is on)
The driver’s side temperature control dial can be used to adjust
the temperature for all seats.
● Individual mode (the indicator on is off)
The temperature for the driver’s, front passenger’s and rear
seats ( P. 276) can be adjusted separately. Operate the pas-
senger’s side or rear temperature controls to enter individual
mode.
■ Adjusting the fan speed
Turn the fan speed control dial clockwise (increase) or counter-
clockwise (decrease).
The fan speed is shown on the display. (7 levels)
Press to turn the fan off.
Page 276 of 660
276
3-1. Using the air conditioning system and defogger
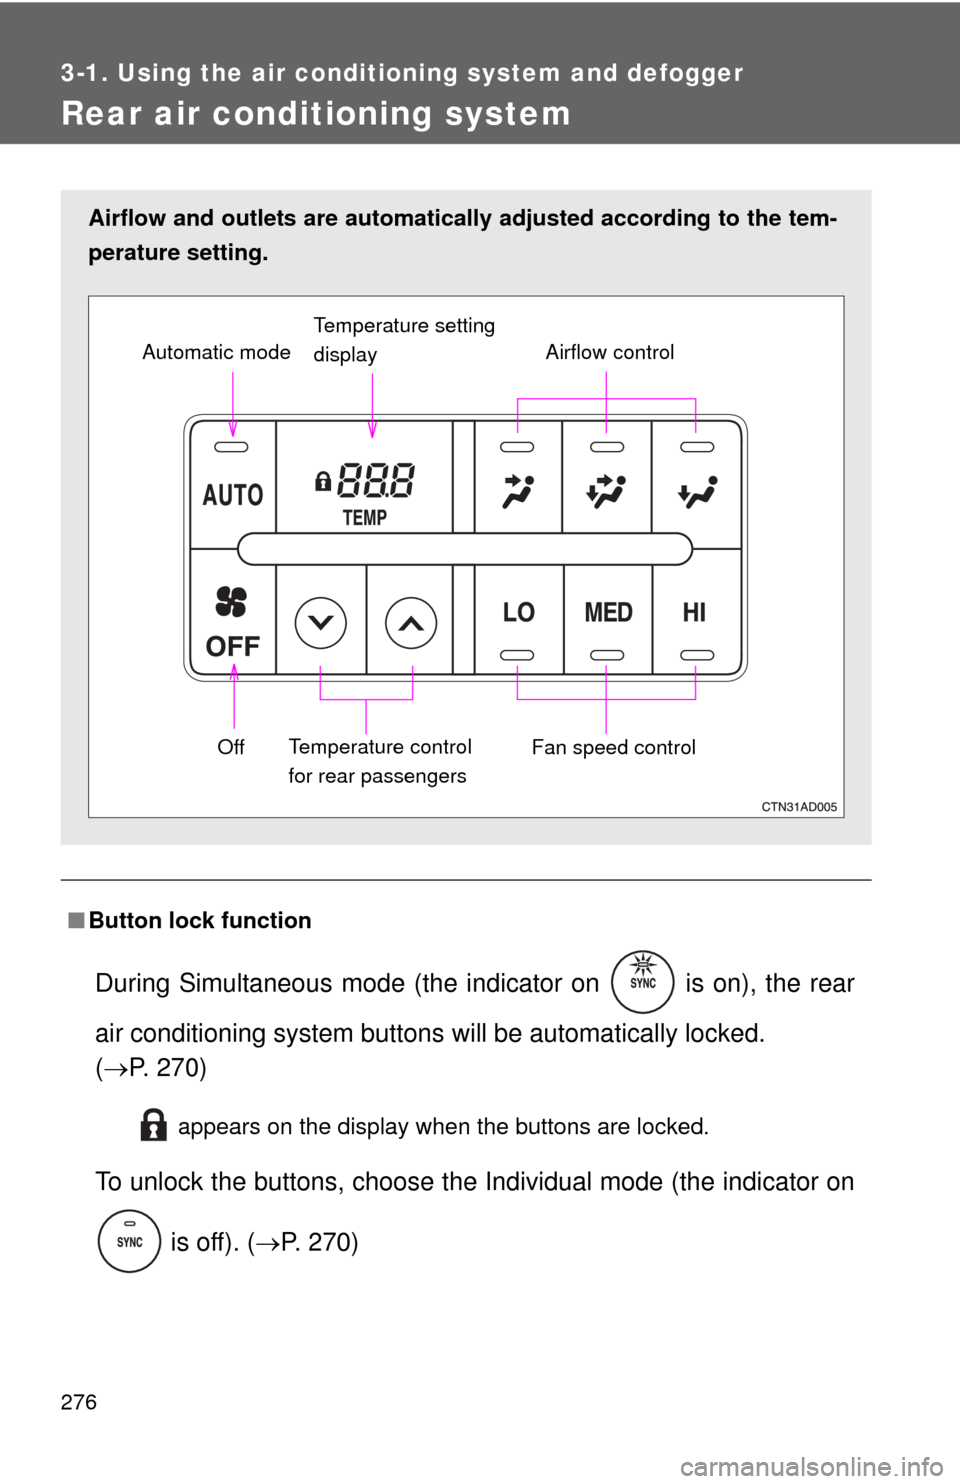
Rear air conditioning system
■Button lock function
During Simultaneous mode (the indicator on is on), the rear
air conditioning system button s will be automatically locked.
( P. 270)
appears on the display when the buttons are locked.
To unlock the buttons, c hoose the Individual mode (the indicator on
is off). ( P. 270)
Airflow and outlets are automatica lly adjusted according to the tem-
perature setting.
Airflow control
Temperature setting
display
Fan speed control
Off
Automatic mode
Temperature control
for rear passengers
Page 289 of 660
289
3-2. Using the audio system
3
Interior features
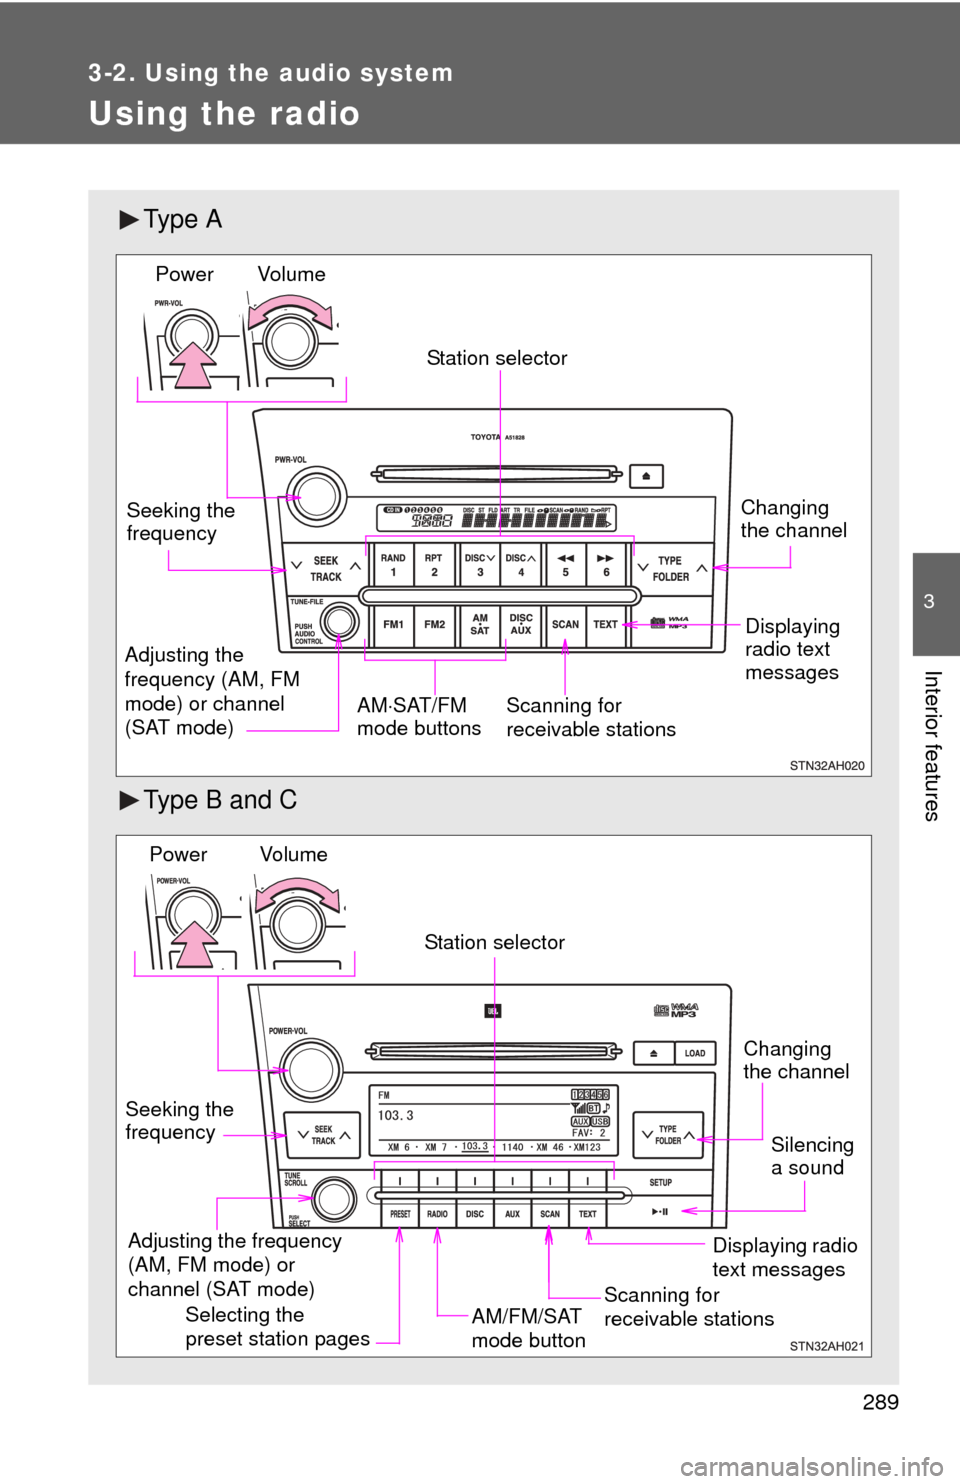
Using the radio
Ty p e A
Type B and C
Vol u m eScanning for
receivable stations
Station selector
Seeking the
frequency
Adjusting the
frequency (AM, FM
mode) or channel
(SAT mode) AM
SAT/FM
mode buttonsPower
Displaying
radio text
messages
Changing
the channel
AM/FM/SAT
mode button
Station selector
Seeking the
frequency Adjusting the frequency
(AM, FM mode) or
channel (SAT mode)
Displaying radio
text messages
Changing
the channel
Scanning for
receivable stations
Vo l u m e
Power
Silencing
a sound
Selecting the
preset station pages