light TOYOTA SEQUOIA 2011 2.G Owners Manual
[x] Cancel search | Manufacturer: TOYOTA, Model Year: 2011, Model line: SEQUOIA, Model: TOYOTA SEQUOIA 2011 2.GPages: 688, PDF Size: 14.76 MB
Page 595 of 688
5
When trouble arises
595
5-2. Steps to take in an emergency
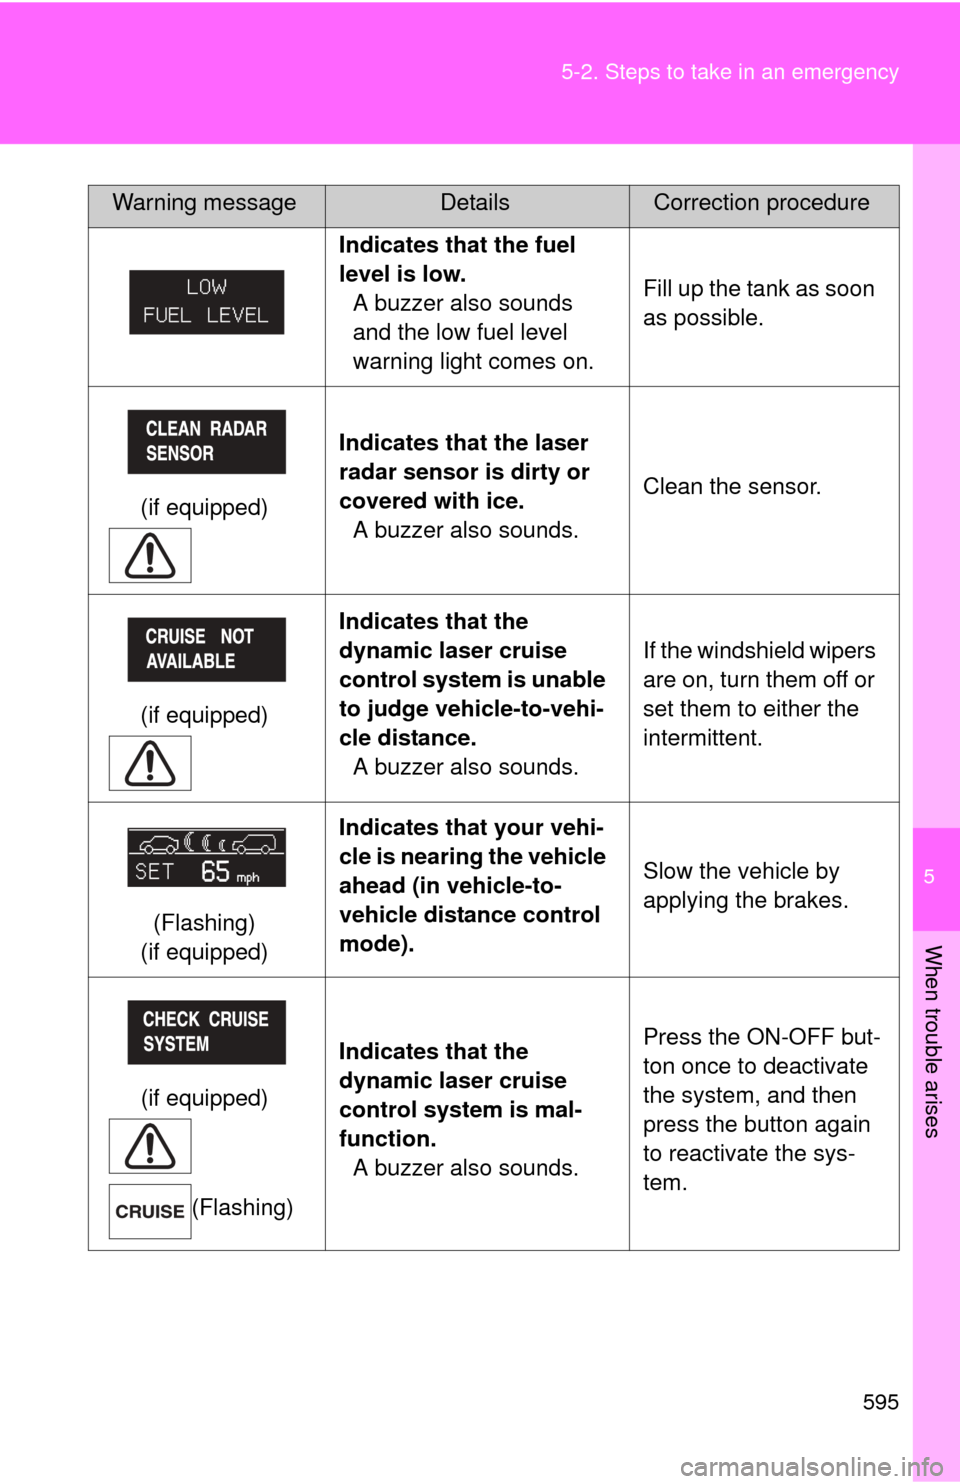
Indicates that the fuel
level is low.
A buzzer also sounds
and the low fuel level
warning light comes on. Fill up the tank as soon
as possible.
(if equipped) Indicates that the laser
radar sensor is dirty or
covered with ice.
A buzzer also sounds. Clean the sensor.
(if equipped) Indicates that the
dynamic laser cruise
control system is unable
to judge vehicle-to-vehi-
cle distance.
A buzzer also sounds. If the windshield wipers
are on, turn them off or
set them to either the
intermittent.
(Flashing)
(if equipped) Indicates that your vehi-
cle is nearing the vehicle
ahead (in vehicle-to-
vehicle distance control
mode).
Slow the vehicle by
applying the brakes.
(if equipped) (Flashing) Indicates that the
dynamic laser cruise
control system is mal-
function.
A buzzer also sounds. Press the ON-OFF but-
ton once to deactivate
the system, and then
press the button again
to reactivate the sys-
tem.
Warning messageDetailsCorrection procedure
Page 596 of 688
596 5-2. Steps to take in an emergency
■After changing the engine oil (U.S.A. only)
Make sure to reset the oil maintenance data. ( P. 517)
■ Warning light display in vehicle -to-vehicle distance control mode
In the following cases, the warning light may not be displayed even if vehi-
cle-to-vehicle distance closes.
● When your vehicle and the vehicle ahead are traveling at the same
speed or the vehicle ahead is traveling more quickly than your vehicle
● When the vehicle ahead is traveling at a very low speed
● Immediately after cruise control speed is set
● At the instant the accelerator pedal is depressed
Page 600 of 688
600 5-2. Steps to take in an emergency
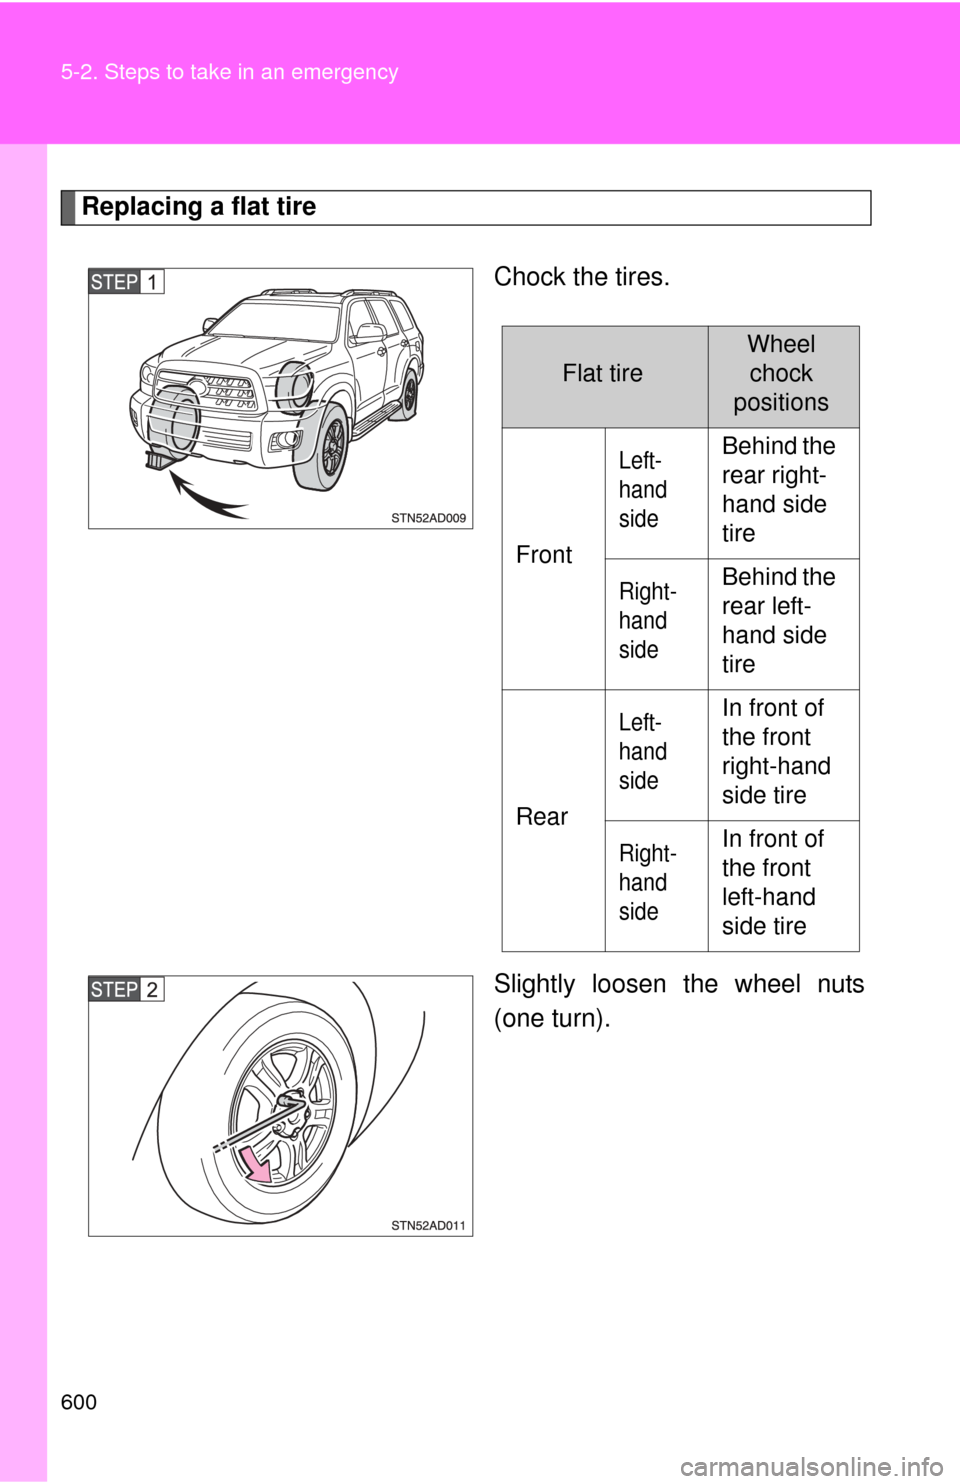
Replacing a flat tireChock the tires.
Slightly loosen the wheel nuts
(one turn).
Flat tire
Wheelchock
positions
Front
Left-
hand
sideBehind the
rear right-
hand side
tire
Right-
hand
sideBehind the
rear left-
hand side
tire
Rear
Left-
hand
sideIn front of
the front
right-hand
side tire
Right-
hand
sideIn front of
the front
left-hand
side tire
Page 601 of 688
5
When trouble arises
601
5-2. Steps to take in an emergency
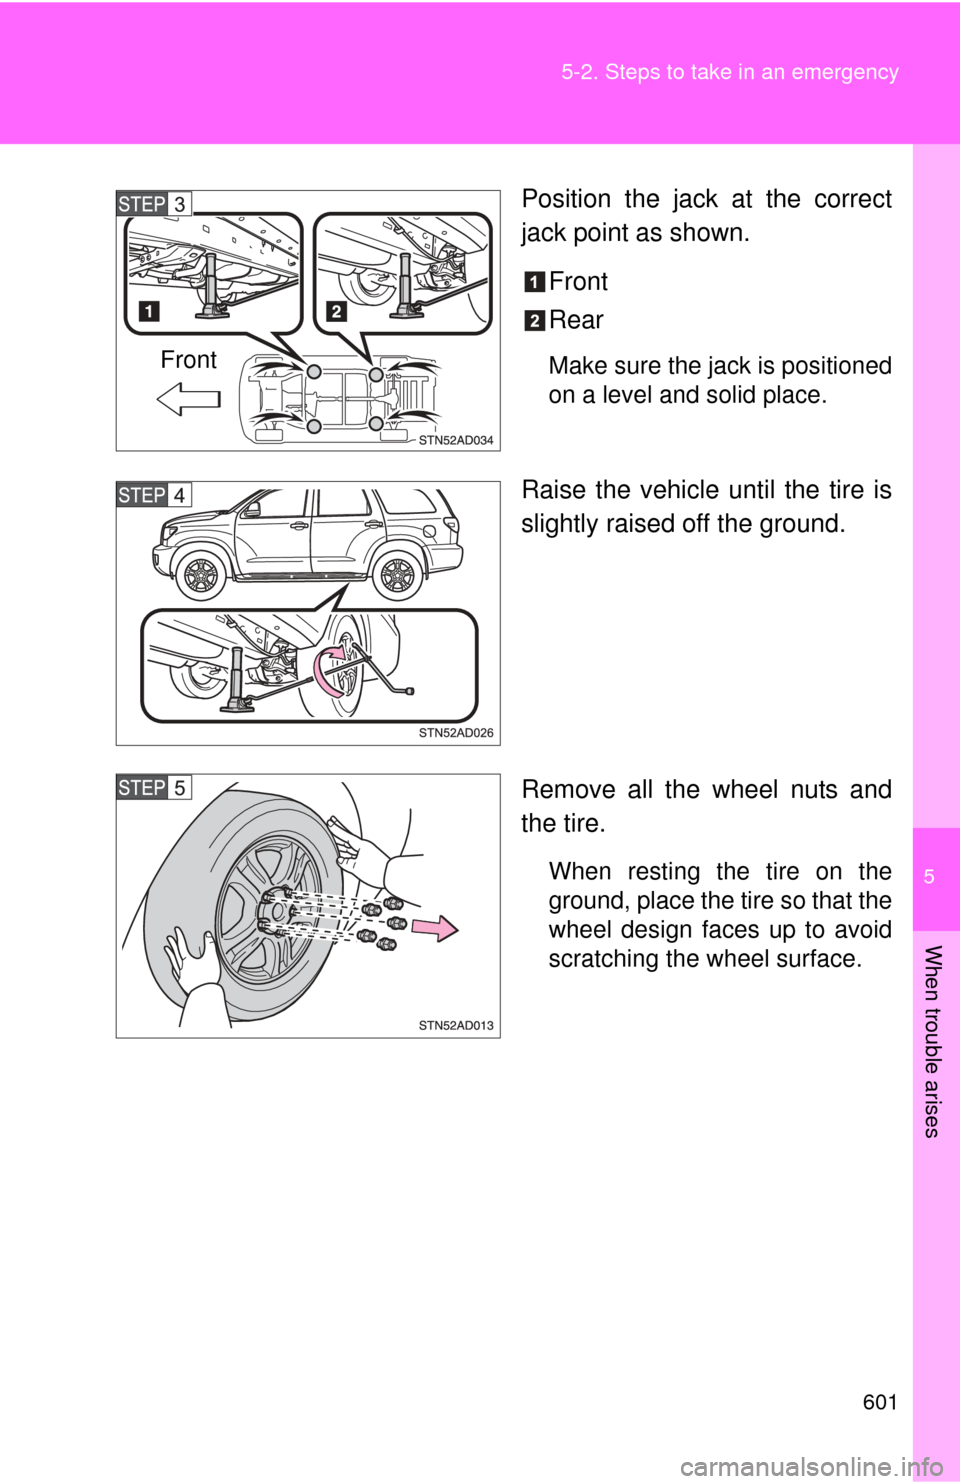
Position the jack at the correct
jack point as shown.
Front
Rear
Make sure the jack is positioned
on a level and solid place.
Raise the vehicle until the tire is
slightly raised off the ground.
Remove all the wheel nuts and
the tire.
When resting the tire on the
ground, place the tire so that the
wheel design faces up to avoid
scratching the wheel surface.
Front
Page 603 of 688
5
When trouble arises
603
5-2. Steps to take in an emergency
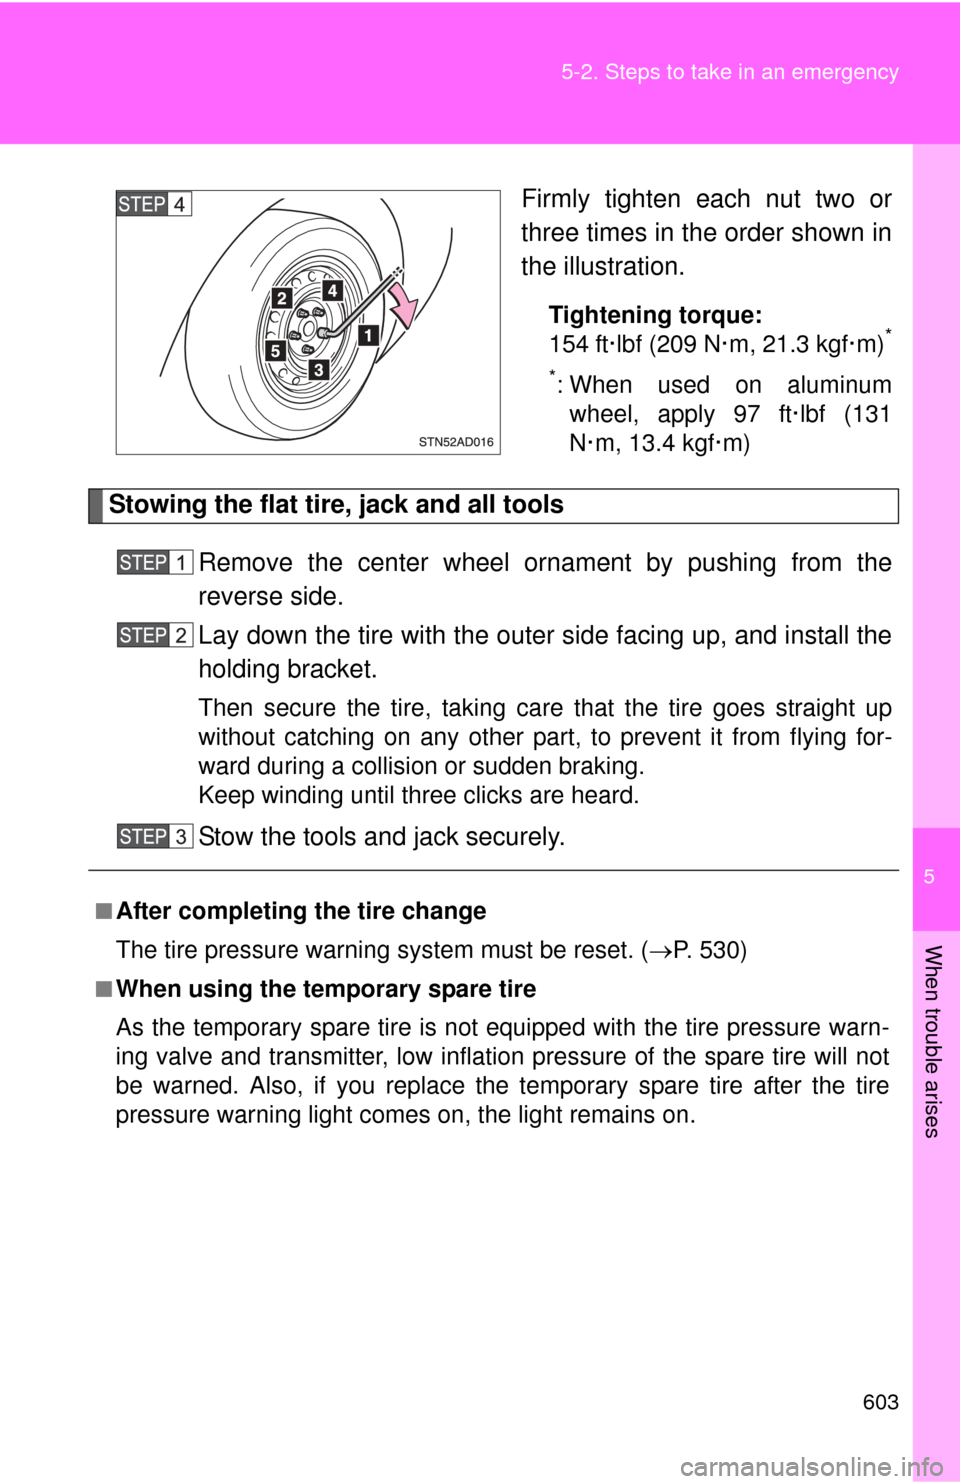
Firmly tighten each nut two or
three times in the order shown in
the illustration.
Tightening torque:
154 ft·lbf (209 N·m, 21.3 kgf·m)*
*
: When used on aluminum wheel, apply 97 ft·lbf (131
N·m, 13.4 kgf·m)
Stowing the flat tire, jack and all tools
Remove the center wheel ornament by pushing from the
reverse side.
Lay down the tire with the outer side facing up, and install the
holding bracket.
Then secure the tire, taking care that the tire goes straight up
without catching on any other part, to prevent it from flying for-
ward during a collision or sudden braking.
Keep winding until three clicks are heard.
Stow the tools and jack securely.
■After completing the tire change
The tire pressure warning system must be reset. (P. 530)
■When using the temporary spare tire
As the temporary spare tire is not equipped with the tire pressure warn-
ing valve and transmitter, low inflation pressure of the spare tire will not
be warned. Also, if you replace the temporary spare tire after the tire
pressure warning light comes on, the light remains on.
Page 608 of 688

608
5-2. Steps to take in an emergency
If the engine will not star t
If the engine still does not start after following the correct starting
procedure ( P. 157) or releasing the steering lock (P. 158), confirm
the following points.
■ The engine will not start even when the starter motor oper-
ates normally.
One of the following may be the cause of the problem.
●There may not be sufficient fuel in the vehicle’s tank.
Refuel the vehicle. ( P. 9 9 )
Flex-fuel vehicles: The type of fuel may be different. When
refueling, add the same type of fuel, if available.
After adding a different type of fuel, the engine may run
roughly and driving performance may be reduced for a while
when the engine is first started. In this case, wait until the
engine runs normally.
● The engine may be flooded.
Try to restart the engine once more following correct starting
procedures.
● There may be a malfunction in the engine immobilizer system.
( P. 104)
■ The starter motor turns over slowly, the interior lights and
headlights are dim, or the horn does not sound or sounds at
a low volume.
One of the following may be the cause of the problem.
●The battery may be discharged. ( P. 612)
● The battery terminal connec tions may be loose or corroded.
Page 609 of 688
5
When trouble arises
609
5-2. Steps to take in an emergency
■
The starter motor does not turn over, the interior lights and
headlights do not turn on, or the horn does not sound.
One of the following may be the cause of the problem.
● One or both of the battery terminals may be disconnected.
● The battery may be discharged. ( P. 612)
Contact your Toyota dealer if the problem cannot be repaired, or if
repair procedures are unknown.
Page 612 of 688
612
5-2. Steps to take in an emergency
If the vehicle batter y is discharged
The following procedures may be used to start the engine if the
vehicle’s battery is discharged.
You can call your Toyota dealer or qualified repair shop.
If you have a set of jumper (or boo ster) cables and a second vehi-
cle with a 12-volt battery, you can jump start your Toyota following
the steps below.
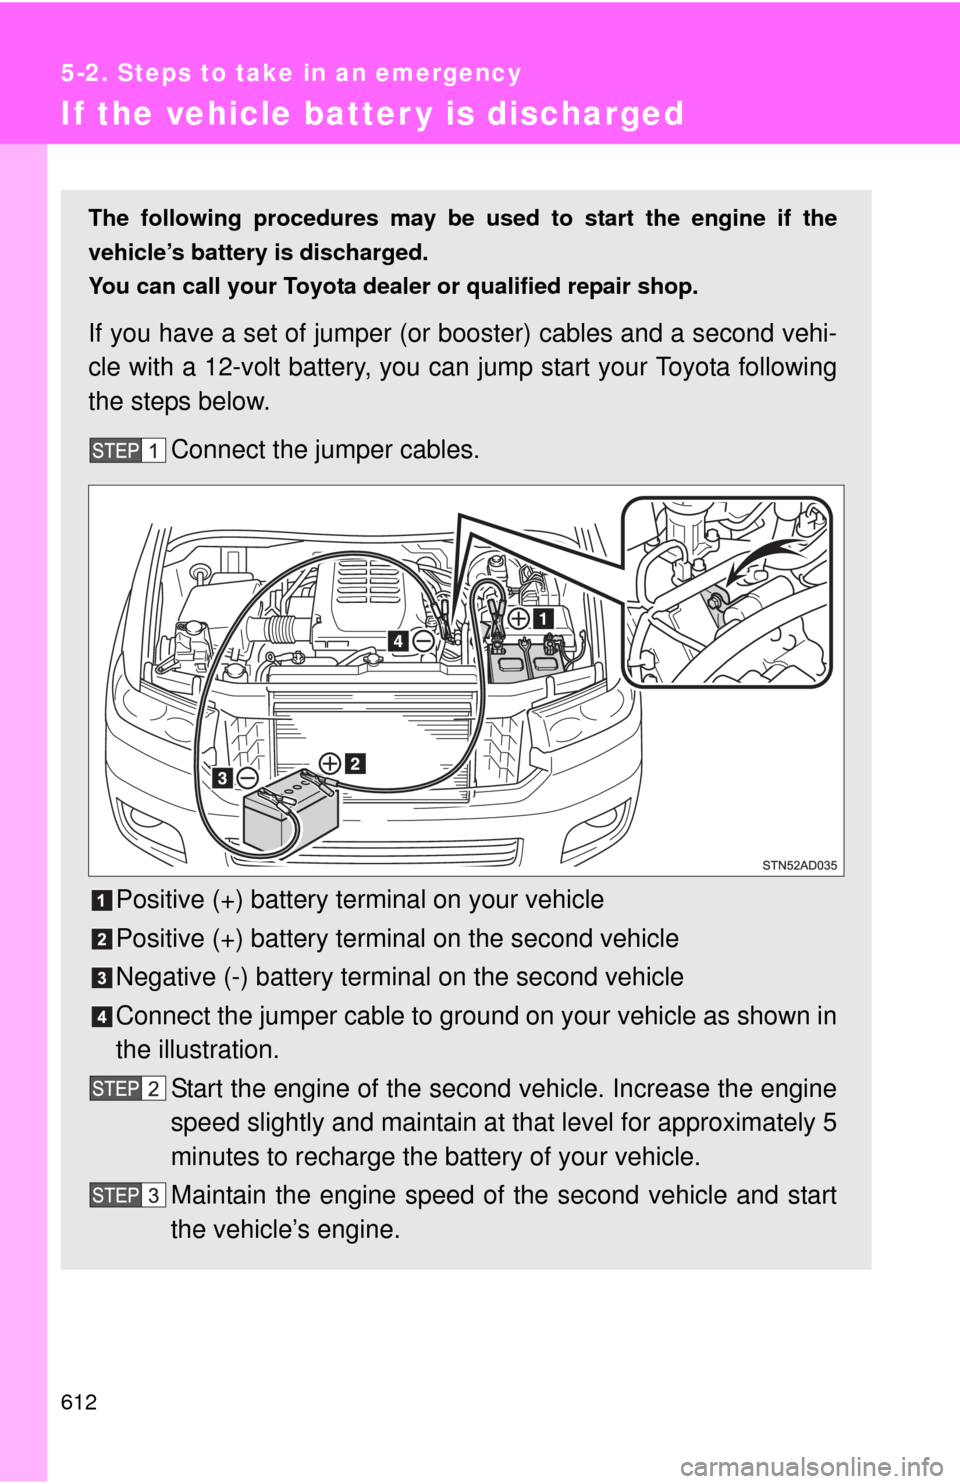
Connect the jumper cables.
Positive (+) battery terminal on your vehicle
Positive (+) battery terminal on the second vehicle
Negative (-) battery terminal on the second vehicle
Connect the jumper cable to ground on your vehicle as shown in
the illustration. Start the engine of the second vehicle. Increase the engine
speed slightly and maintain at that level for approximately 5
minutes to recharge the battery of your vehicle.
Maintain the engine speed of the second vehicle and start
the vehicle’s engine.
Page 613 of 688
5
When trouble arises
613
5-2. Steps to take in an emergency
■
Starting the engine when the battery is discharged
The engine cannot be started by push-starting.
■ Avoiding a discharged battery
●Turn off the headlights and the audio system while the engine is turned
off.
● Turn off any unnecessary electrical components when the vehicle is run-
ning at a low speed for an extended period, such as in heavy traffic, etc.
■ When the battery is removed or discharged
Flex-fuel vehicles: The information recorded in the computer will be cleared,
which may cause the engine to run roughly and reduce driving performance
for a while when the engine is first started. In this case, wait until the engine
runs normally.
If the vehicle is running on E85, the engine may stall. In this case, restart the
engine, repeatedly if necessary.
Once the vehicle’s engine has started, remove the jumper
cables in the exact reverse order in which they were con-
nected.
Once the engine starts, have the vehicle checked at your Toyota
dealer as soon as possible.
Page 614 of 688
614 5-2. Steps to take in an emergency
CAUTION
■Avoiding battery fires or explosions
Observe the following precautions to prevent accidentally igniting the flam-
mable gas that may be emitted from the battery.
●Make sure the jumper cable is connected to the correct terminal and that it
is not unintentionally in contact with any part other than the intended termi-
nal.
● Do not allow the jumper cables to come into contact with the “+” and “-” ter-
minals.
● Do not smoke, use matches, cigarette lighters or allow open flame near
the battery.
■ Battery precautions
The battery contains poisonous and corrosive acidic electrolyte, while
related parts contain lead and lead compounds. Observe the following pre-
cautions when handling the battery.
When working with the battery, always wear safety glasses and take care
not to allow any battery fluids (acid) to come into contact with skin, clothing
or the vehicle body.
●
Do not lean over the battery.
●In the event that battery fluid comes into contact with the skin or eyes,
immediately wash the affected area with water and seek medical attention.
Place a wet sponge or cloth over the affected area until medical attention
can be received.
● Always wash your hands after handling the battery support, terminals, and
other battery-related parts.
● Do not allow children near the battery.
NOTICE
■When handling jumper cables
Be careful that the jumper cables do not become tangled in the cooling fan
or any of the belts when connecting or disconnecting them.