check engine TOYOTA SEQUOIA 2012 2.G User Guide
[x] Cancel search | Manufacturer: TOYOTA, Model Year: 2012, Model line: SEQUOIA, Model: TOYOTA SEQUOIA 2012 2.GPages: 708, PDF Size: 15.12 MB
Page 159 of 708
159
2-1. Driving procedures
2
When driving
Engine (ignition) switch
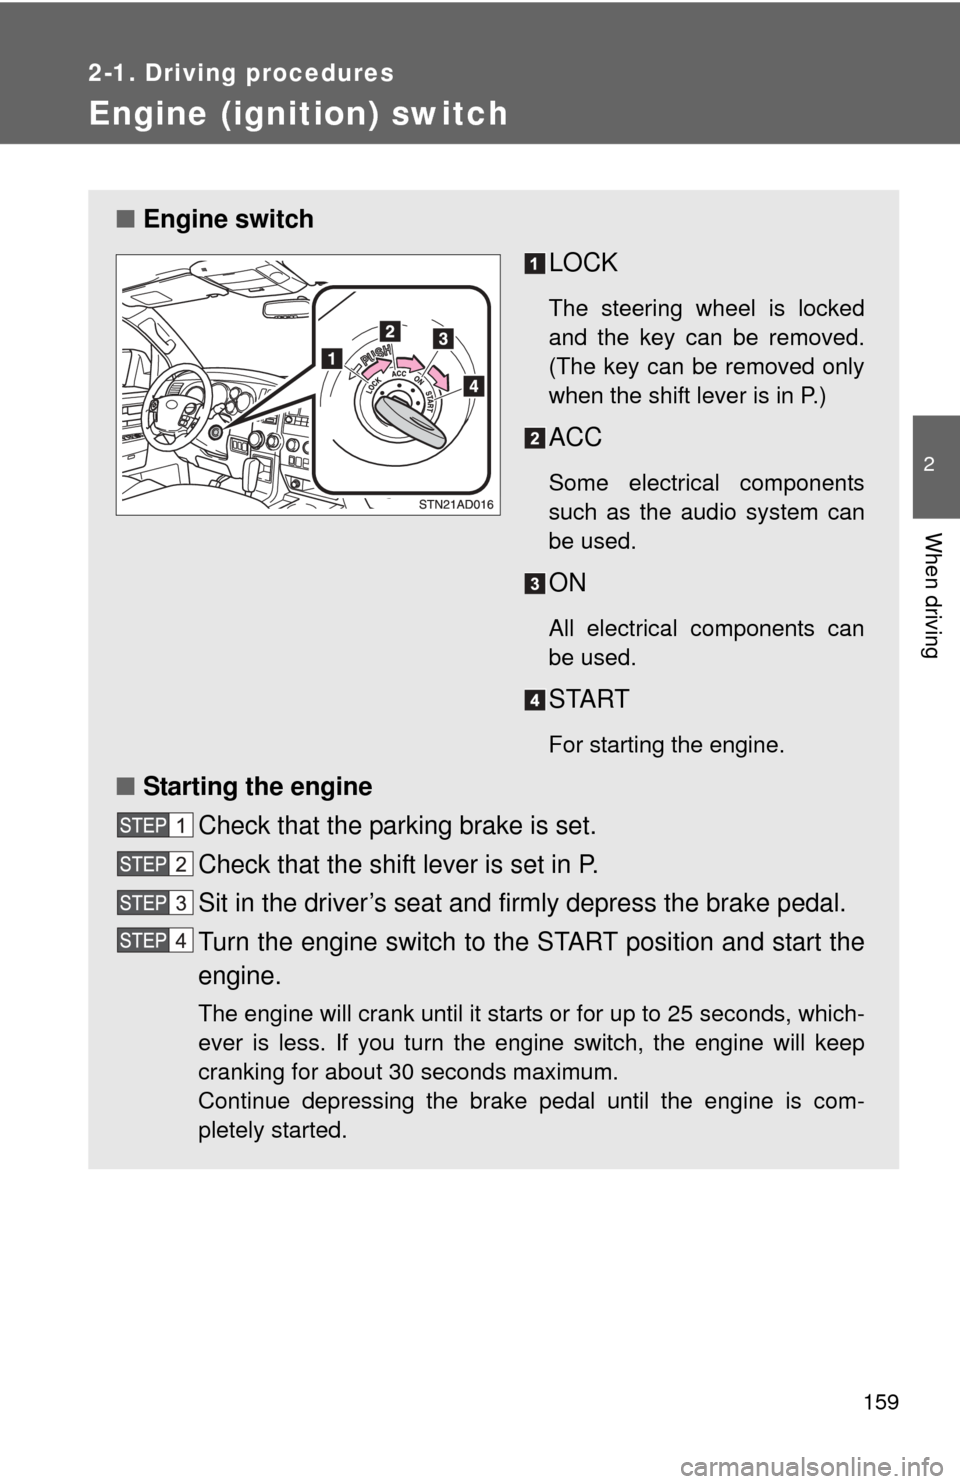
■Engine switch
LOCK
The steering wheel is locked
and the key can be removed.
(The key can be removed only
when the shift lever is in P.)
ACC
Some electrical components
such as the audio system can
be used.
ON
All electrical components can
be used.
START
For starting the engine.
■Starting the engine
Check that the parking brake is set.
Check that the shift lever is set in P.
Sit in the driver’s seat and firmly depress the brake pedal.
Turn the engine switch to the START position and start the
engine.
The engine will crank until it starts or for up to 25 seconds, which-
ever is less. If you turn the engine switch, the engine will keep
cranking for about 30 seconds maximum.
Continue depressing the brake pedal until the engine is com-
pletely started.
Page 161 of 708

161
2-1. Driving procedures
2
When driving
NOTICE
■
To prevent battery discharge
Do not leave the engine switch in the ACC or ON position for long periods if
the engine is not running.
■ When starting the engine
●Do not crank for more than 30 seconds at a time. This may overheat the
starter and wiring systems.
● Do not race a cold engine.
● If the engine becomes difficult to start or stalls frequently, have the engine
checked immediately.
Page 166 of 708
166
2-1. Driving procedures
Turn signal lever
■Turn signals can be operated when
The engine switch is in the ON position.
■ If the indicators flash faster than usual
Check that a light bulb in the front or rear turn signal lights has not burned
out.
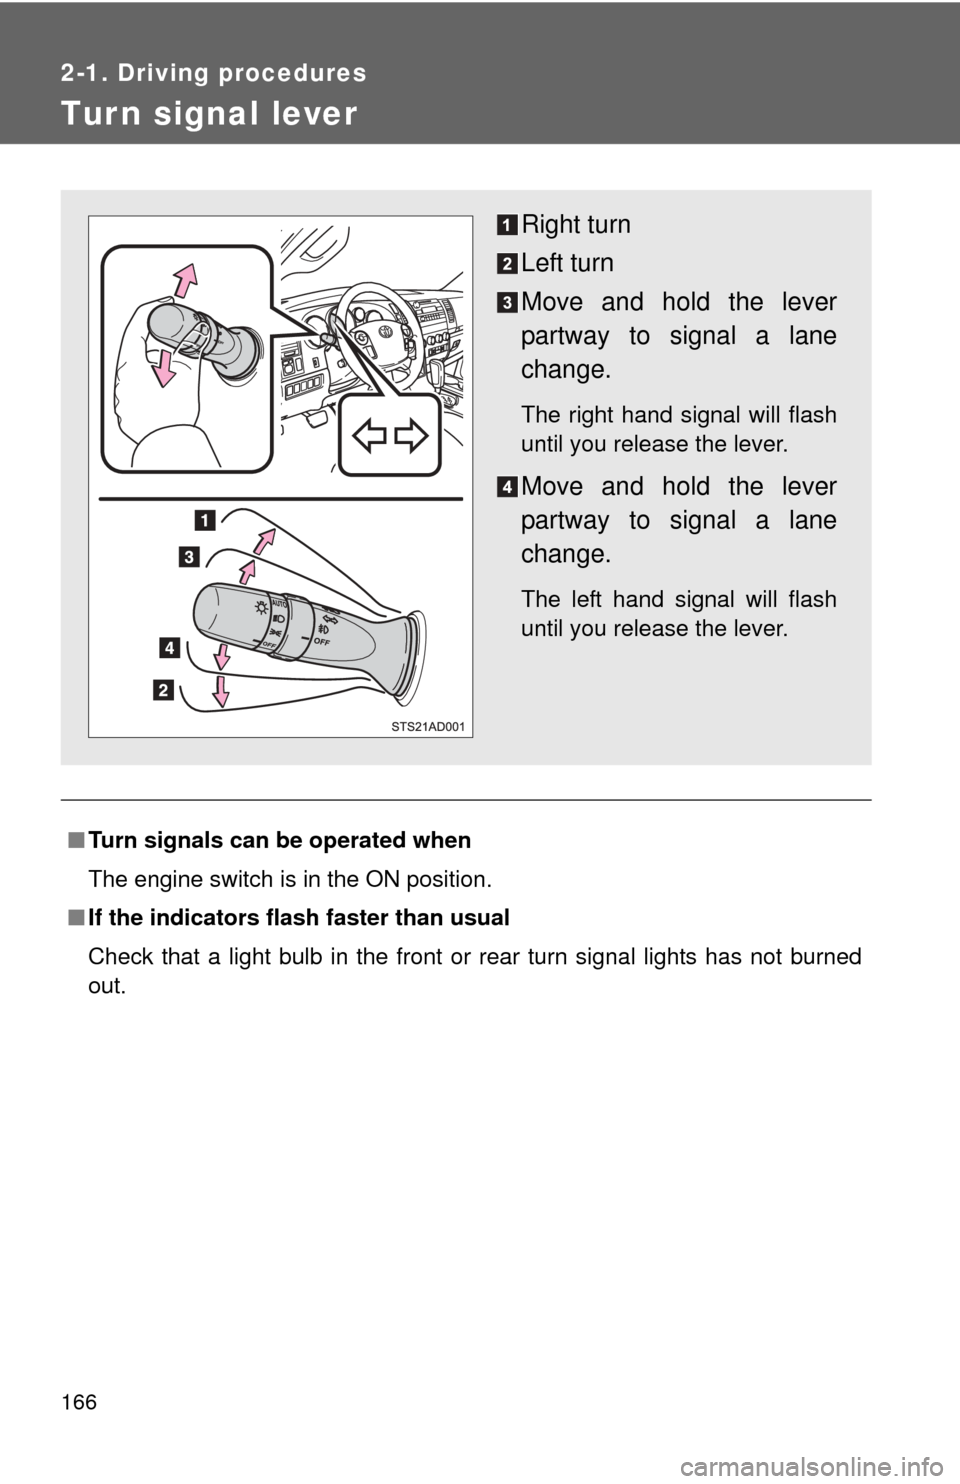
Right turn
Left turn
Move and hold the lever
partway to signal a lane
change.
The right hand signal will flash
until you release the lever.
Move and hold the lever
partway to signal a lane
change.
The left hand signal will flash
until you release the lever.
Page 173 of 708
173
2-2. Instrument cluster
2
When driving
Instrument panel light control
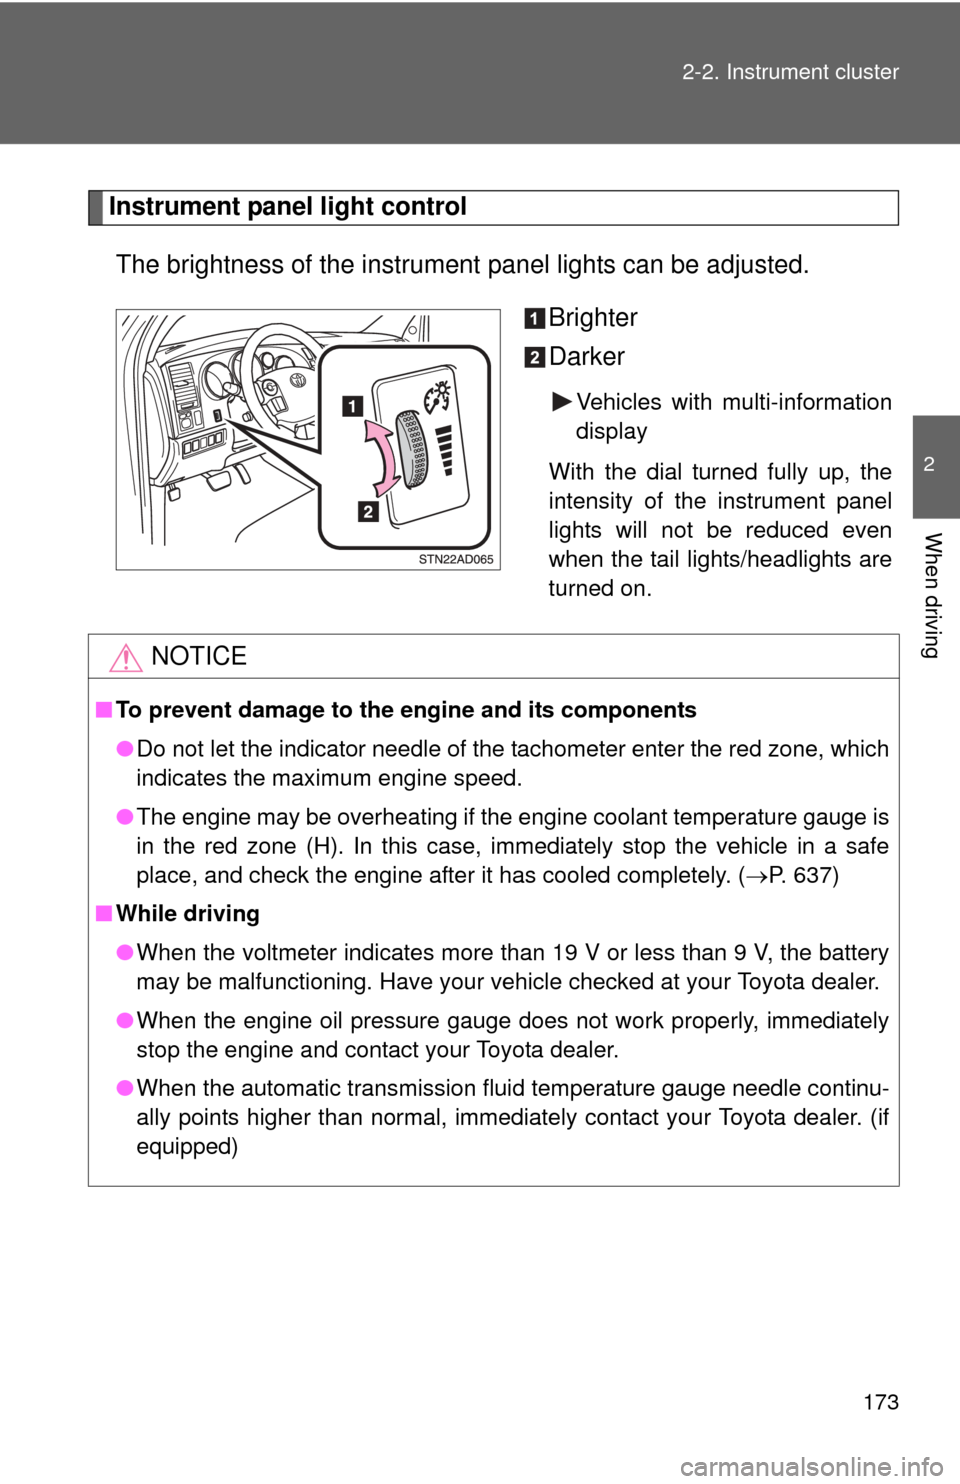
The brightness of the instrument panel lights can be adjusted.
Brighter
Darker
Vehicles with multi-information
display
With the dial turned fully up, the
intensity of the instrument panel
lights will not be reduced even
when the tail lights/headlights are
turned on.
NOTICE
■ To prevent damage to the engine and its components
●Do not let the indicator needle of the tachometer enter the red zone, which
indicates the maximum engine speed.
● The engine may be overheating if the engine coolant temperature gauge is
in the red zone (H). In this case, immediately stop the vehicle in a safe
place, and check the engine after it has cooled completely. ( P. 637)
■ While driving
●When the voltmeter indicates more than 19 V or less than 9 V, the battery
may be malfunctioning. Have your vehicle checked at your Toyota dealer.
● When the engine oil pressure gauge does not work properly, immediately
stop the engine and contact your Toyota dealer.
● When the automatic transmission fluid temperature gauge needle continu-
ally points higher than normal, immediately contact your Toyota dealer. (if
equipped)
Page 177 of 708
177
2-2. Instrument cluster
2
When driving
■
Warning lights
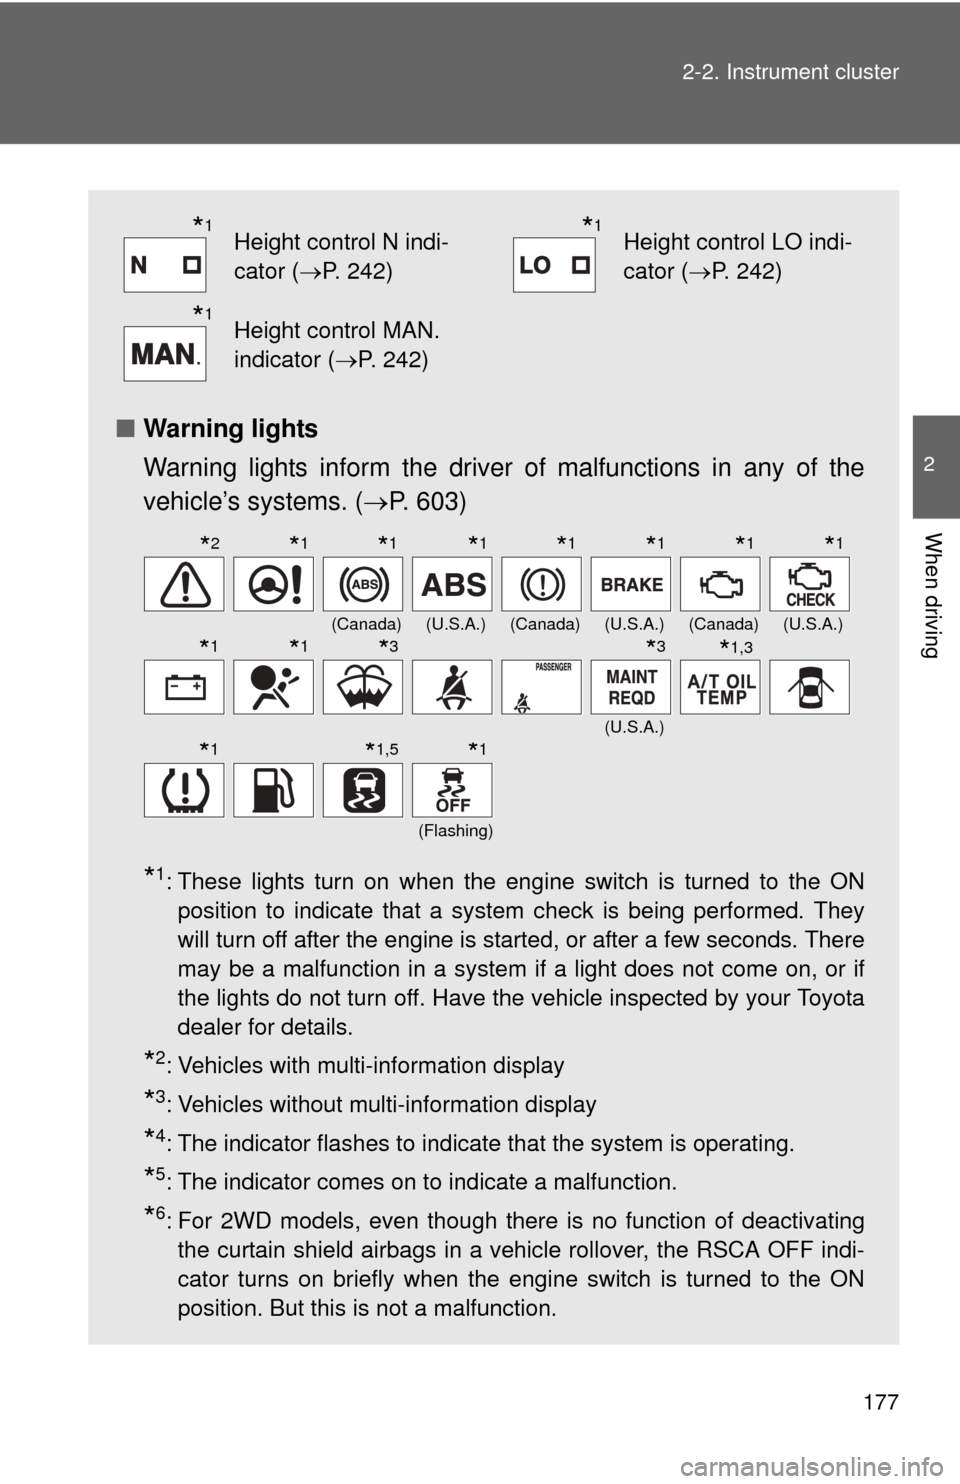
Warning lights inform the driver of malfunctions in any of the
vehicle’s systems. ( P. 603)
*1: These lights turn on when the engine switch is turned to the ON
position to indicate that a system check is being performed. They
will turn off after the engine is started, or after a few seconds. There
may be a malfunction in a system if a light does not come on, or if
the lights do not turn off. Have the vehicle inspected by your Toyota
dealer for details.
*2: Vehicles with multi-information display
*3: Vehicles without multi-information display
*4: The indicator flashes to indicate that the system is operating.
*5: The indicator comes on to indicate a malfunction.
*6: For 2WD models, even though there is no function of deactivatingthe curtain shield airbags in a vehicle rollover, the RSCA OFF indi-
cator turns on briefly when the engine switch is turned to the ON
position. But this is not a malfunction.
*1Height control N indi-
cator (P. 242)*1Height control LO indi-
cator (P. 242)
*1Height control MAN.
indicator ( P. 242)
(Canada)(U.S.A.)(Canada)(U.S.A.)(Canada)(U.S.A.)
(U.S.A.)
(Flashing)
*2*1*1*1*1*1*1*1
*1*1*3*3*1,3
*1*1,5*1
Page 198 of 708
198 2-3. Operating the lights and wipers
■The windshield wiper and washer can be operated when
The engine switch must be in the ON position.
■ If no windshield washer fluid sprays
Check that the washer nozzles are not blocked and if there is washer fluid in
the windshield washer fluid reservoir.
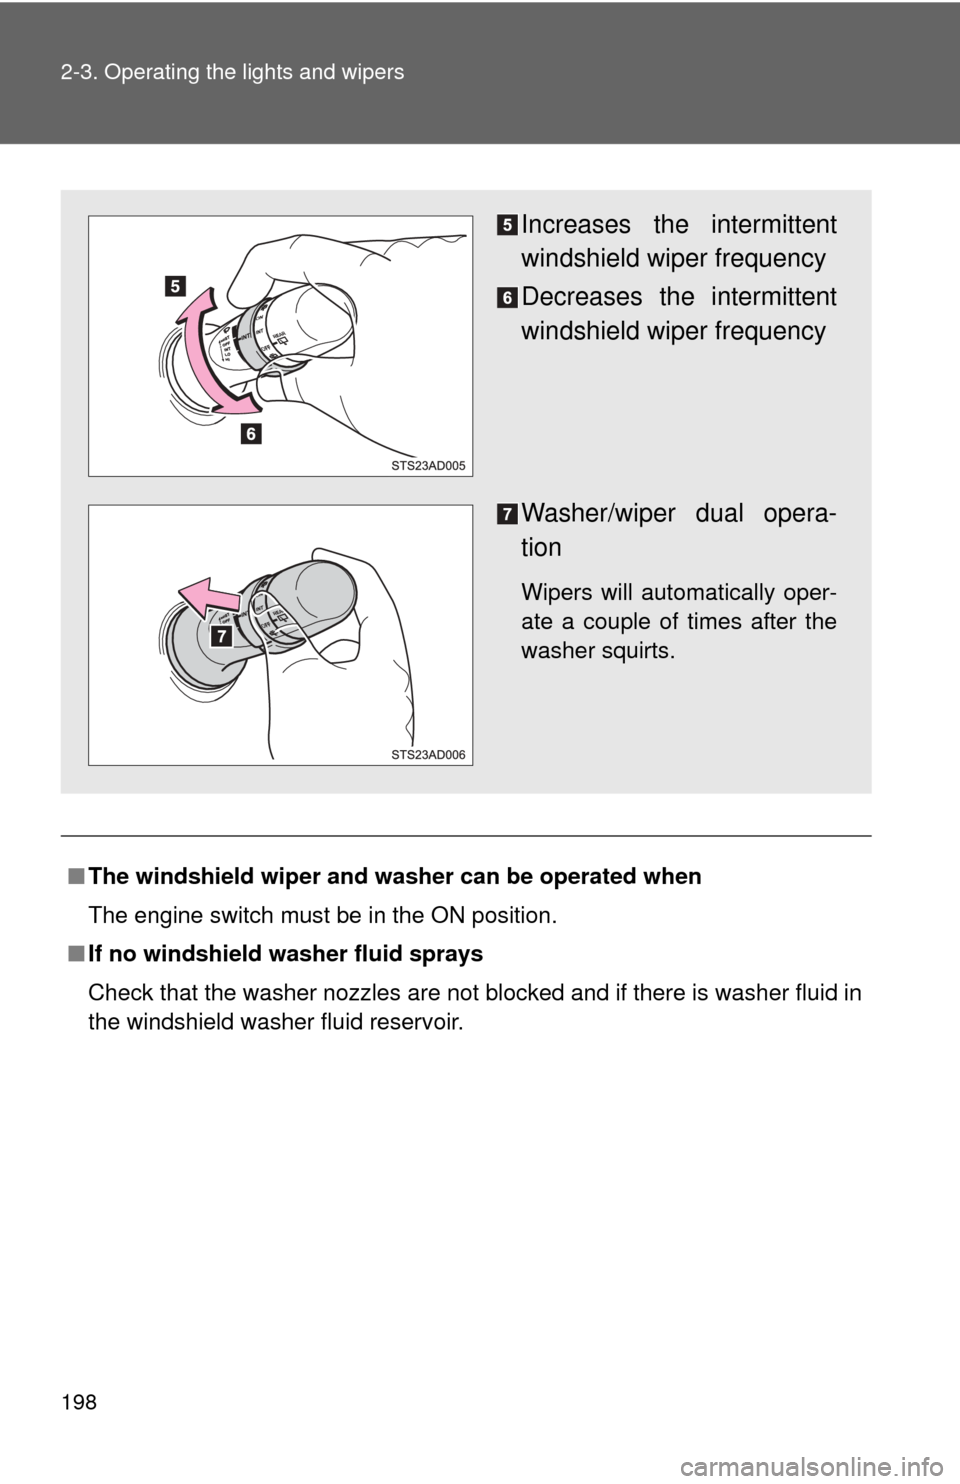
Increases the intermittent
windshield wiper frequency
Decreases the intermittent
windshield wiper frequency
Washer/wiper dual opera-
tion
Wipers will automatically oper-
ate a couple of times after the
washer squirts.
Page 244 of 708
244 2-4. Using other driving systems
CAUTION
■The electronically modulated air susp ension must be turned off in the
following circumstances:
Otherwise, the automatic leveling function may cause the vehicle’s height to
change, and you may catch part of your body in the vehicle, resulting in an
unexpected accident:
● When driving through water such as shallow streams (Put the vehicle
height in HI mode and turn off the electronically modulated air suspension.
Drive at 18 mph [30 km/h] or slower.)
● When jacking up the vehicle, installing tire chains or tying the vehicle with
chains/wires for transportation via flat bed truck (Turn the system to the
manual mode and stop the engine.)
● When the vehicle must be towed (Put the vehicle height in N mode and
turn the system to the manual mode.)
● When the vehicle gets stuck (Turn the system to the manual mode.)
● When disconnecting a trailer (Put the vehicle height in LO mode and turn
the system to the manual mode.)
■ Selecting the correct height mode
Observe the following precautions to prevent accidents.
Failure to do so may cause damage to parts of the vehicle, as well as dan-
gerous handling characteristics, which may lead to fatal or injury accidents.
●Before you lower the vehicle’s height, check under the vehicle to make
sure that no one is there.
● HI mode should only be used when driving on rough roads, for example
when driving off-road.
Because the vehicle’s center of gravity will become higher when in the
mode, the vehicle may become unstable when turning abruptly, resulting
in an accident.
● Do not select HI mode when you load cargo on the roof luggage carrier.
Because the vehicle’s center of gravity will become higher when in the
mode, the vehicle may become unstable when turning abruptly, resulting
in an accident.
Page 265 of 708
265
2-5. Driving information
2
When driving
NOTICE
■
To prevent the water damage
●Take all necessary safety measures to ensure that water damage to the
engine or other components does not occur.
● Water entering the engine air intake will cause severe engine damage.
● Water entering the automatic transmission will cause deterioration in shift
quality, locking up of your transmission accompanied by vibration, and ulti-
mately damage.
● Water can wash the grease from wheel bearings, causing rusting and pre-
mature failure, and may also enter the differentials, transmission and
transfer case, reducing the gear oil’s lubricating qualities.
■ When you drive through water
If driving through water, such as when crossing shallow streams, first check
the depth of the water and the bottom of the river bed for firmness. Drive
slowly and avoid deep water.
■ Inspection after off-road driving
●Sand and mud that has accumulat ed in brake drums and around brake
discs may affect braking efficiency and may damage brake system compo-
nents.
● Always perform a maintenance inspection after each day of off-road driv-
ing that has taken you through rough terrain, sand, mud, or water. For
scheduled maintenance information, refer to the “Scheduled Maintenance
Guide” or “Owner’s Manual Supplement”.
Page 272 of 708
272
2-5. Driving information
Winter driving tips
Carry out the necessary preparations and inspections before driving
the vehicle in winter. Always drive the vehicle in a manner appropri-
ate to the prevailing weather conditions.
■ Pre-winter preparations
●Use fluids that are appropriate to the prevailing outside tem-
peratures.
• Engine oil
• Engine coolant
• Washer fluid
● Have a service technician inspect the level and specific grav-
ity of battery electrolyte.
● Have the vehicle fitted with four snow tires or purchase a set
of tire chains for the rear tires.
Ensure that all tires are the same size and brand, and that chains
match the size of the tires.
■Before driving the vehicle
Perform the following according to the driving conditions.
●Do not try to forcibly open a window, scrape an outside rear
view mirror surface or move a wiper or outside rear view mir-
ror that is frozen. Pour warm water over the frozen area to
melt the ice. Wipe away the water immediately to prevent it
from freezing.
● To ensure proper operation of th e climate control system fan,
remove any snow that has accumulated on the air inlet vents
in front of the windshield.
● Remove any ice that has accumu lated on the vehicle chassis.
● Periodically check for and remove any excess ice or snow
that may have accumulated in the wheel well or on the
brakes.
Page 286 of 708
286 2-5. Driving information
Connecting and disconnecting a trailer (vehicles with
electronically modulated air suspension)
If a height control system is installed in your vehicle, you have to con-
nect and disconnect your trailer more carefully.
● Connecting
Set the height control of elec tronically modulated air suspen-
sion system to N mode.
Turn off the engine, or set the electronically modulated air
suspension system to MAN. (manual).
Connect the trailer.
Turn the engine switch to the START position and start the
engine.
Press the height control mode select switch to cancel the
MAN. (manual) condition that was set on .
Check that the MAN. indicator turns off.
Set the height control of elec tronically modulated air suspen-
sion system to N mode.
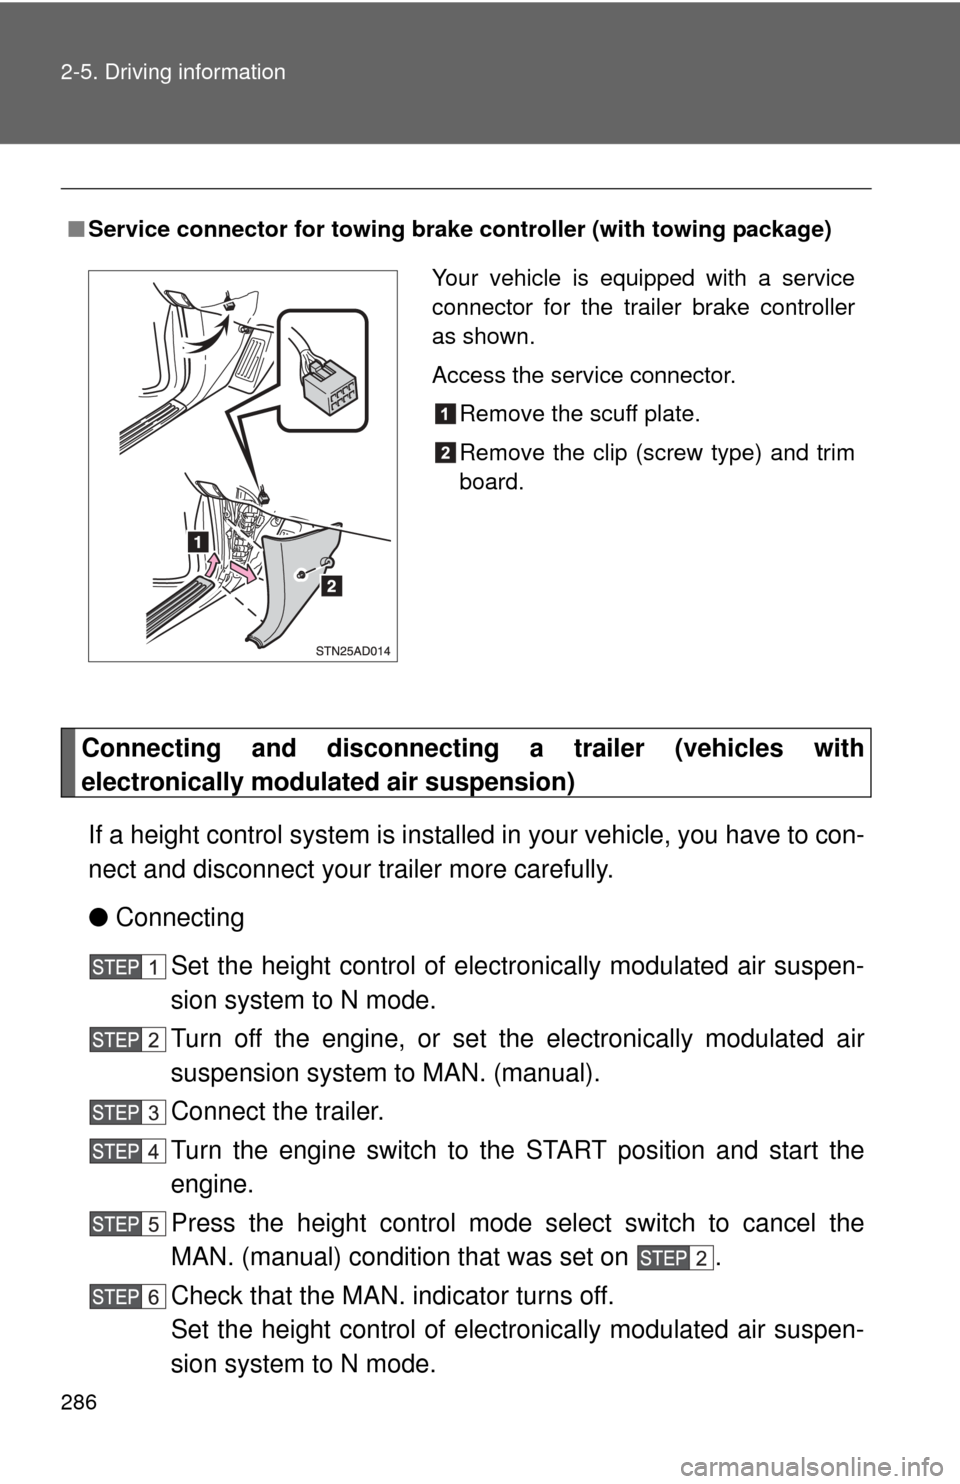
■ Service connector for towing br ake controller (with towing package)
Your vehicle is equipped with a service
connector for the trailer brake controller
as shown.
Access the service connector.
Remove the scuff plate.
Remove the clip (screw type) and trim
board.