display TOYOTA SEQUOIA 2013 2.G Navigation Manual
[x] Cancel search | Manufacturer: TOYOTA, Model Year: 2013, Model line: SEQUOIA, Model: TOYOTA SEQUOIA 2013 2.GPages: 328, PDF Size: 8.3 MB
Page 277 of 328
277
2. ENTUNE OPERATION
8
APPS
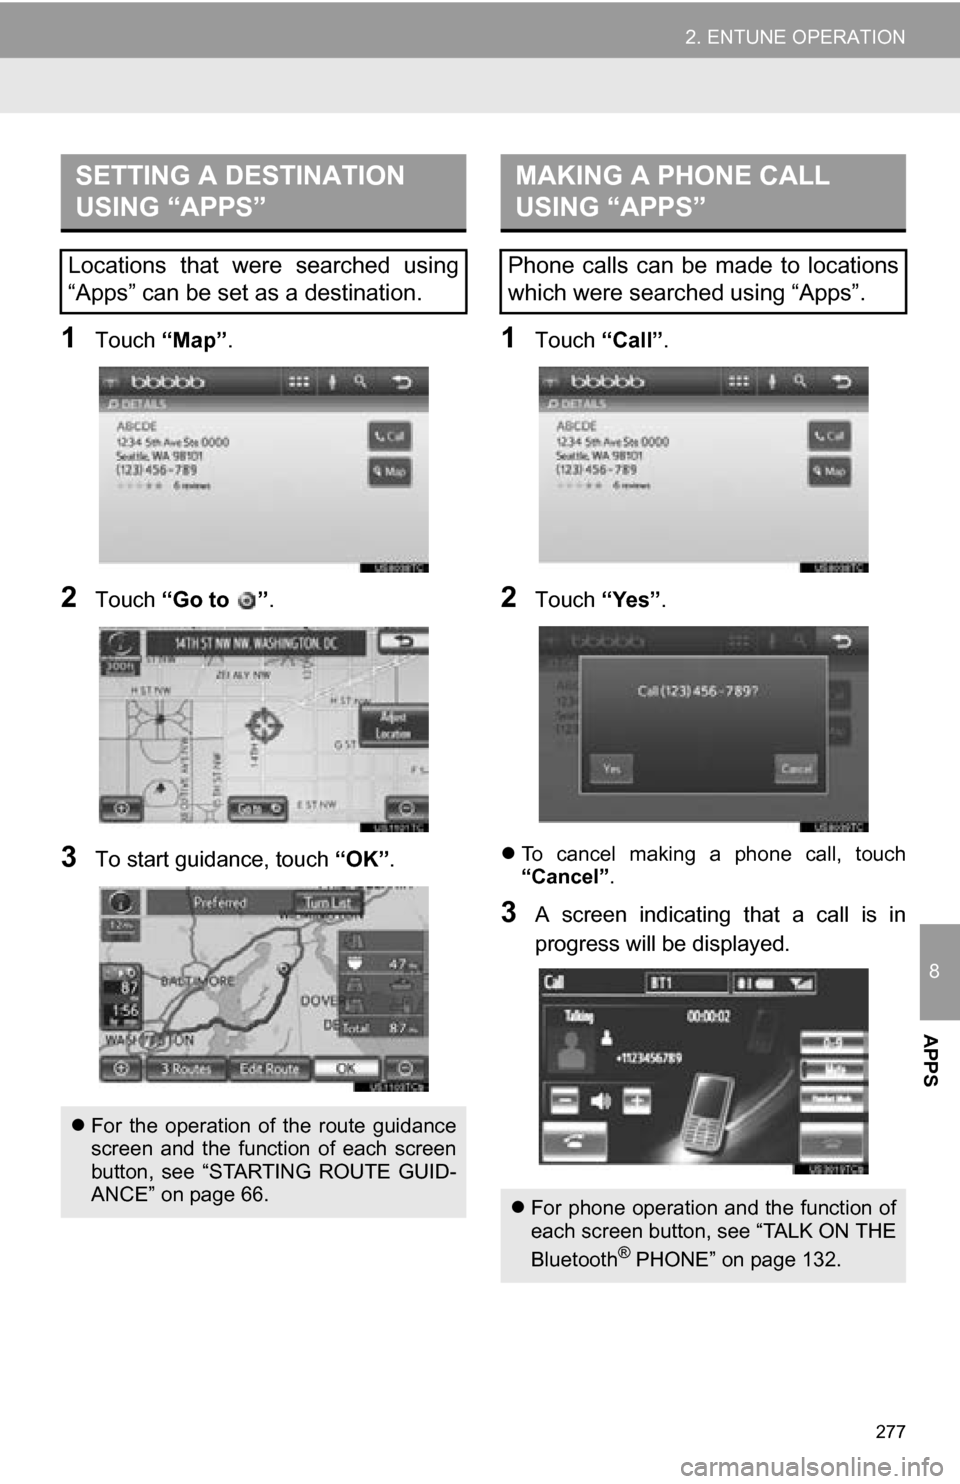
1Touch “Map”.
2Touch “Go to ” .
3To start guidance, touch “OK”.
1Touch “Call”.
2Touch “Yes”.
To cancel making a phone call, touch
“Cancel” .
3A screen indicating that a call is in
progress will be displayed.
SETTING A DESTINATION
USING “APPS”
Locations that were searched using
“Apps” can be set as a destination.
For the operation of the route guidance
screen and the function of each screen
button, see “STARTING ROUTE GUID-
ANCE” on page 66.
MAKING A PHONE CALL
USING “APPS”
Phone calls can be made to locations
which were searched using “Apps”.
For phone operation and the function of
each screen button, see “TALK ON THE
Bluetooth
® PHONE” on page 132.
Page 278 of 328
278
2. ENTUNE OPERATION
3. INPUTTING KEYWORD OPERATION
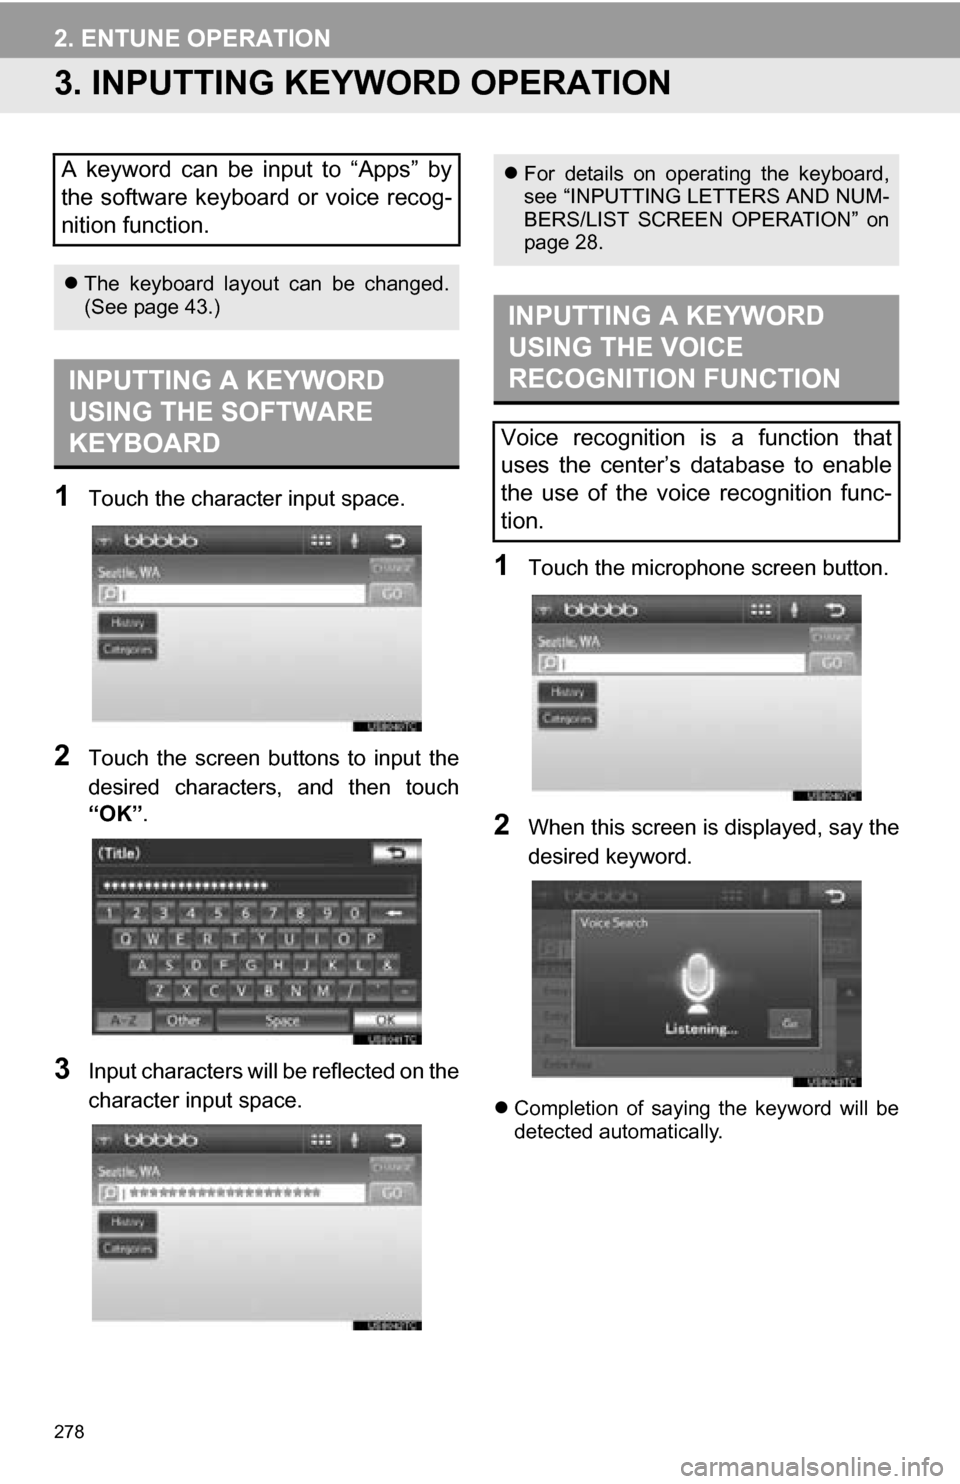
1Touch the character input space.
2Touch the screen buttons to input the
desired characters, and then touch
“OK”.
3Input characters will be reflected on the
character input space.
1Touch the microphone screen button.
2When this screen is displayed, say the
desired keyword.
Completion of saying the keyword will be
detected automatically.
A keyword can be input to “Apps” by
the software keyboard or voice recog-
nition function.
The keyboard layout can be changed.
(See page 43.)
INPUTTING A KEYWORD
USING THE SOFTWARE
KEYBOARD
For details on operating the keyboard,
see “INPUTTING LETTERS AND NUM-
BERS/LIST SCREEN OPERATION” on
page 28.
INPUTTING A KEYWORD
USING THE VOICE
RECOGNITION FUNCTION
Voice recognition is a function that
uses the center’s database to enable
the use of the voice recognition func-
tion.
Page 279 of 328
279
2. ENTUNE OPERATION
8
APPS
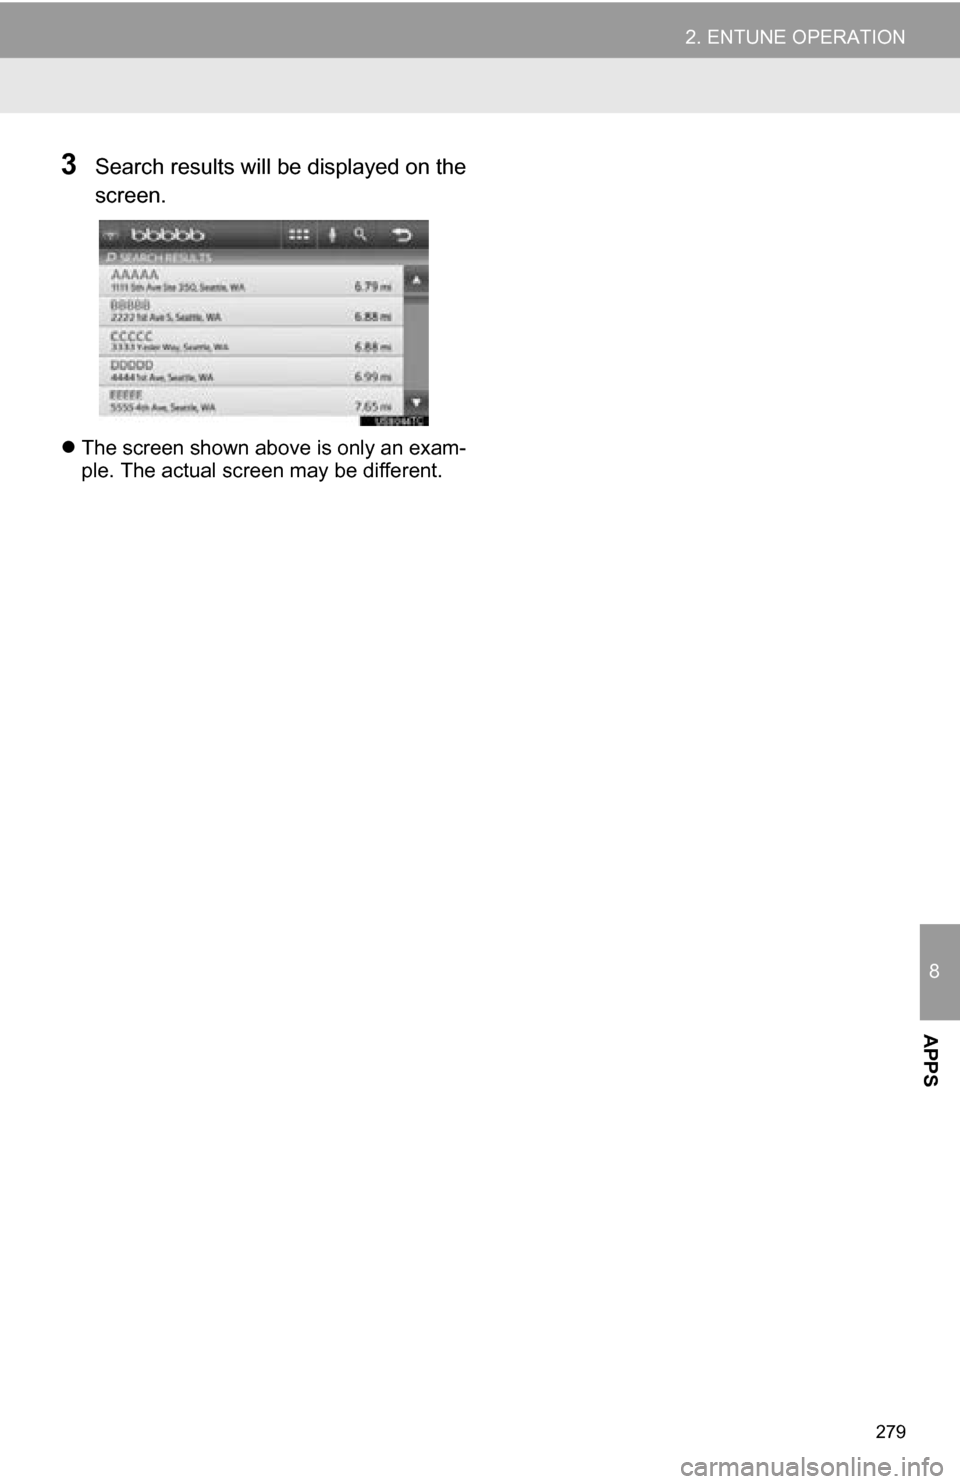
3Search results will be displayed on the
screen.
The screen shown above is only an exam-
ple. The actual screen may be different.
Page 281 of 328
9
281
1
2
3
4
5
6
7
8
9
1. REAR VIEW MONITOR SYSTEM .......... ....................... ... 282
REAR VIEW MONITOR SYSTEM ....... 282
DRIVING PRECAUTIONS ................... 282
SCREEN DESCRIPTION .................... 284
2. REAR VIEW MONITOR SYSTEM
PRECAUTIONS......................... 286
AREA DISPLAYED ON SCREEN........ 286
THE CAMERA ..................................... 286
DIFFERENCES BETWEEN
THE SCREEN AND THE ACTUAL
ROAD ................................................ 287
WHEN APPROACHING THREE- DIMENSIONAL OBJECTS ................ 289
3. THINGS YOU SHOULD KNOW ....................................... 291
IF YOU THINK SOMETHING
IS WRONG ........................................ 291
1REAR VIEW MONITOR
SYSTEM
PERIPHERAL MONITORING SYSTEM
Page 282 of 328
282
1. REAR VIEW MONITOR SYSTEM
1. REAR VIEW MONITOR SYSTEM
REAR VIEW MONITOR
SYSTEM
The rear view monitor system assists
the driver by displaying an image of the
view behind the vehicle with fixed
guide lines on the screen while backing
up, for example while parking.
INFORMATION
●The screen illustrations used in this text
are intended as examples, and may dif-
fer from the image that is actually dis-
played on the screen.
DRIVING PRECAUTIONS
When backing up, be sure to visually
check all around the vehicle both di-
rectly and using the mirrors before pro-
ceeding. If you do not, you may hit
another vehicle, and could possibly
cause an accident.
Pay attention to the following precau-
tions when using the rear view monitor
system.
CAUTION
●The rear view monitor system is a sup-
plemental device intended to assist the
driver when backing up. Never depend
on the rear view monitor system entirely
when backing up. Always make sure
your intended path is clear.
Use caution, just as you would when
backing up any vehicle.
● Never back up while looking only at the
screen.
The image shown on the screen may dif-
fer from the actual state, and you could
collide with another vehicle or obstacles
if backing up looking only at the screen,
possibly causing an accident. When
backing up, be sure to check in front of
and behind the vehicle, both directly and
with mirrors.
● Be sure to back up slowly, depressing
the brake pedal to control vehicle speed.
● The instructions given are only guide-
lines. When and how much to turn the
steering wheel will vary according to
traffic conditions, road surface condi-
tions, vehicle condition, etc. when park-
ing. It is necessary to be fully aware of
this before using the rear view monitor
system.
● When parking, be sure to check that the
parking space will accommodate your
vehicle before maneuvering into it.
Page 283 of 328
283
1. REAR VIEW MONITOR SYSTEM
9
PERIPHERAL MONITORING SYSTEM
CAUTION
●Do not use system in the following
cases:
• On icy or slick road surfaces, or in
snow
• When using tire chains or emergency tires
• When the back door is not closed com- pletely
• On roads that are not flat or straight, such as curves or slopes.
● In low temperatures, the screen may
darken or the image may become faint.
The image could distort when the vehi-
cle is moving, or you may become
unable to see the image on the screen.
Be sure to visually check all around the
vehicle both directly and using the mir-
rors before proceeding.
● If the tire sizes are changed, the position
of the fixed guide lines displayed on the
screen may change.
● The camera uses a special lens. The
distances between objects and pedestri-
ans that appear in the image displayed
on the screen will differ from the actual
distances. (See page 287.)
Page 284 of 328
284
1. REAR VIEW MONITOR SYSTEM
SCREEN DESCRIPTION
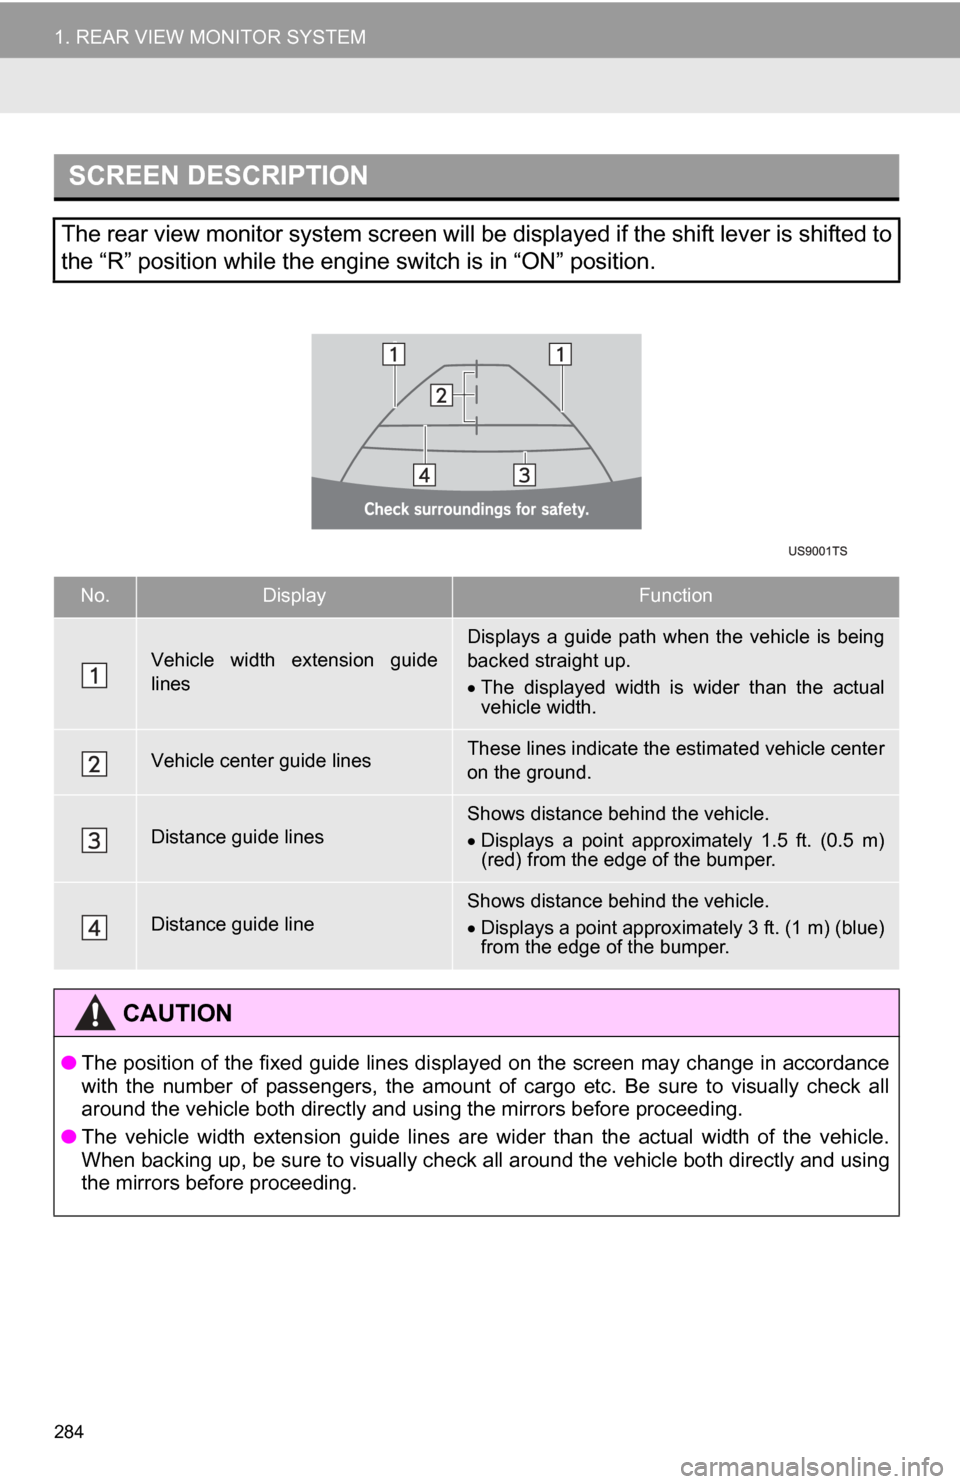
The rear view monitor system screen will be displayed if the shift lever is shifted to
the “R” position while the engine switch is in “ON” position.
No.DisplayFunction
Vehicle width extension guide
linesDisplays a guide path when the vehicle is being
backed straight up.
The displayed width is wider than the actual
vehicle width.
Vehicle center guide linesThese lines indicate the estimated vehicle center
on the ground.
Distance guide linesShows distance behind the vehicle.
Displays a point approximately 1.5 ft. (0.5 m)
(red) from the edge of the bumper.
Distance guide lineShows distance behind the vehicle.
Displays a point approximately 3 ft. (1 m) (blue)
from the edge of the bumper.
CAUTION
● The position of the fixed guide lines displayed on the screen may change in accordance
with the number of passengers, the amount of cargo etc. Be sure to visually check all
around the vehicle both directly and using the mirrors before proceeding.
● The vehicle width extension guide lines are wider than the actual width of the vehicle.
When backing up, be sure to visually check all around the vehicle both directly and using
the mirrors before proceeding.
Page 286 of 328
286
1. REAR VIEW MONITOR SYSTEM
2. REAR VIEW MONITOR SYSTEM PRECAUTIONS
The image adjustment procedure for the
rear view monitor system screen is the
same as the procedure for adjusting the
navigation screen. (See page 30.)
AREA DISPLAYED ON
SCREEN
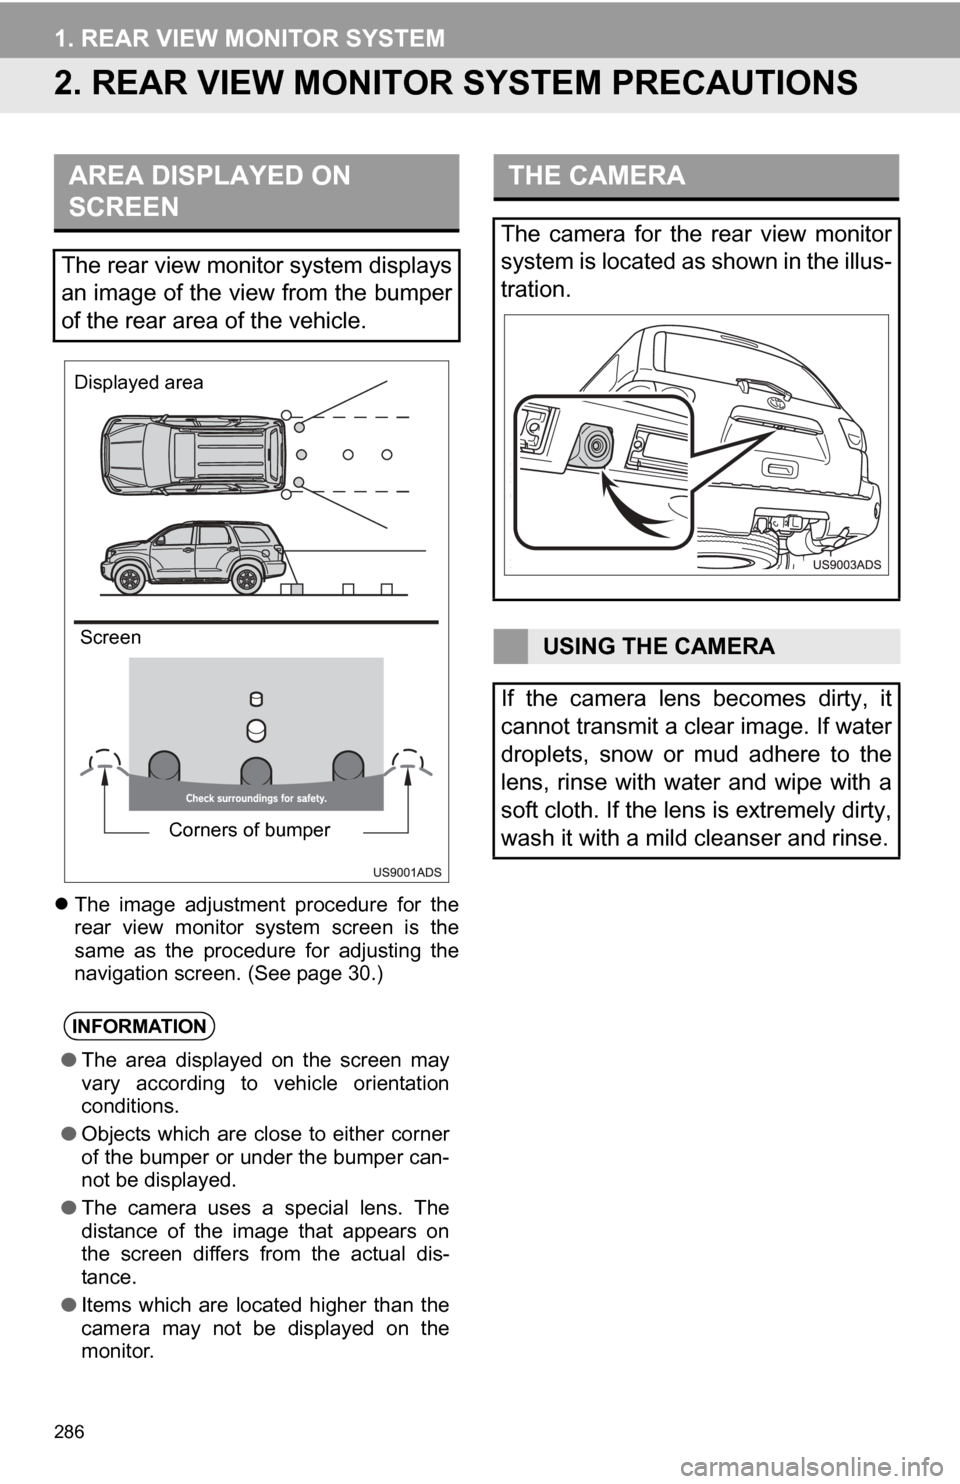
The rear view monitor system displays
an image of the view from the bumper
of the rear area of the vehicle.
INFORMATION
● The area displayed on the screen may
vary according to vehicle orientation
conditions.
● Objects which are close to either corner
of the bumper or under the bumper can-
not be displayed.
● The camera uses a special lens. The
distance of the image that appears on
the screen differs from the actual dis-
tance.
● Items which are located higher than the
camera may not be displayed on the
monitor.
Corners of bumper
Displayed area
Screen
THE CAMERA
The camera for the rear view monitor
system is located as shown in the illus-
tration.
USING THE CAMERA
If the camera lens becomes dirty, it
cannot transmit a clear image. If water
droplets, snow or mud adhere to the
lens, rinse with water and wipe with a
soft cloth. If the lens is extremely dirty,
wash it with a mild cleanser and rinse.
Page 289 of 328
289
1. REAR VIEW MONITOR SYSTEM
9
PERIPHERAL MONITORING SYSTEM
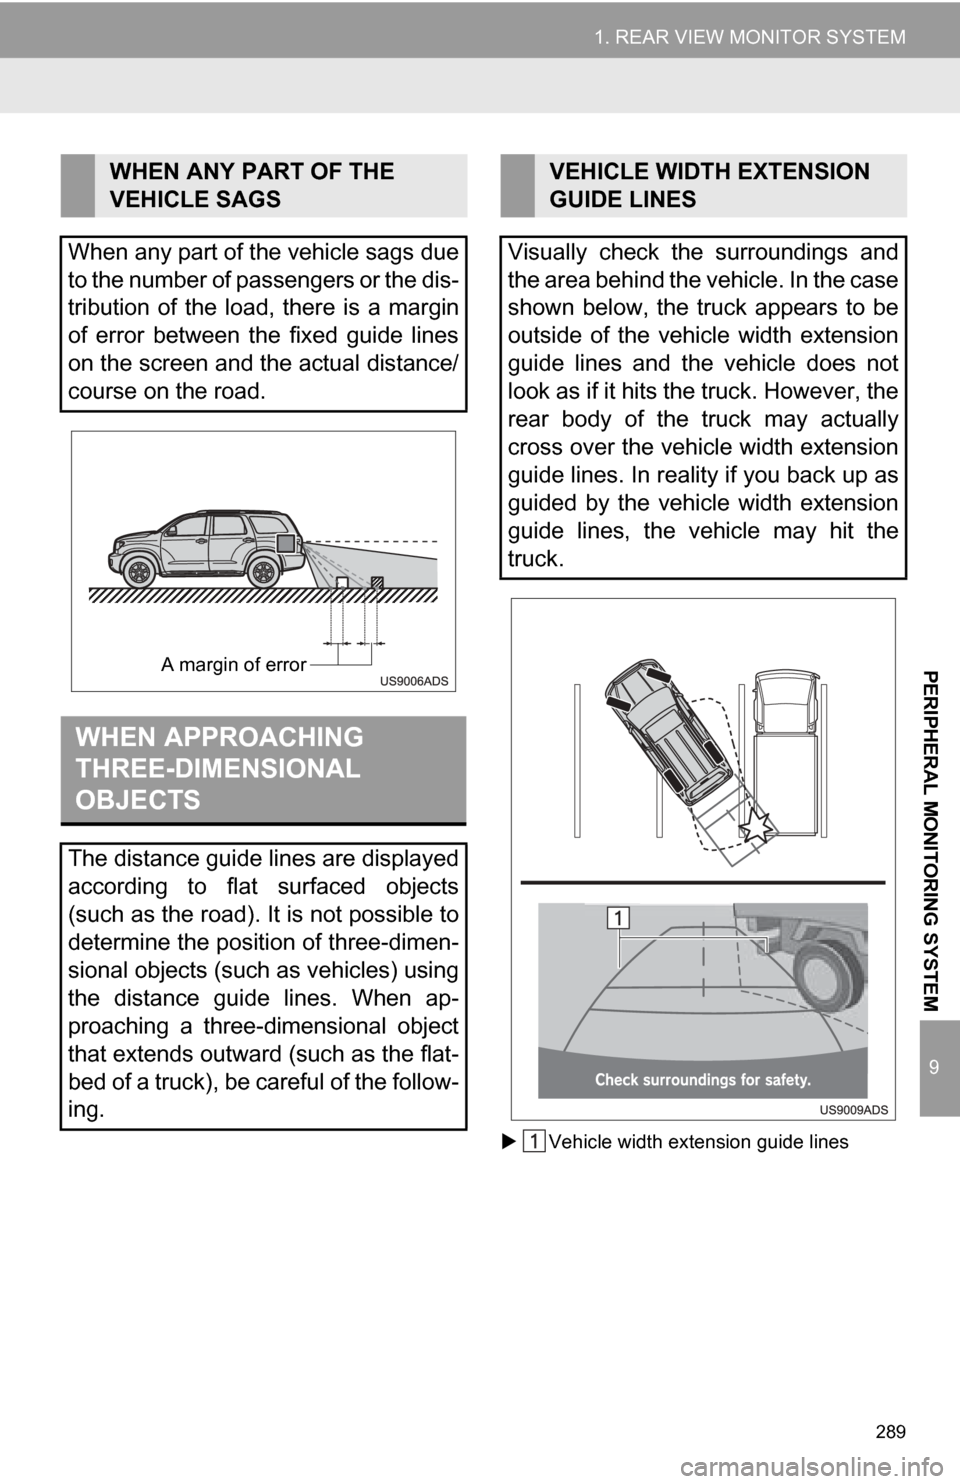
Vehicle width extension guide lines
WHEN ANY PART OF THE
VEHICLE SAGS
When any part of the vehicle sags due
to the number of passengers or the dis-
tribution of the load, there is a margin
of error between the fixed guide lines
on the screen and the actual distance/
course on the road.
WHEN APPROACHING
THREE-DIMENSIONAL
OBJECTS
The distance guide lines are displayed
according to flat surfaced objects
(such as the road). It is not possible to
determine the position of three-dimen-
sional objects (such as vehicles) using
the distance guide lines. When ap-
proaching a three-dimensional object
that extends outward (such as the flat-
bed of a truck), be careful of the follow-
ing.
A margin of error
VEHICLE WIDTH EXTENSION
GUIDE LINES
Visually check the surroundings and
the area behind the vehicle. In the case
shown below, the truck appears to be
outside of the vehicle width extension
guide lines and the vehicle does not
look as if it hits the truck. However, the
rear body of the truck may actually
cross over the vehicle width extension
guide lines. In reality if you back up as
guided by the vehicle width extension
guide lines, the vehicle may hit the
truck.
Page 294 of 328
294
ALPHABETICAL INDEX
A
Adding destinations.................................. 76
Address book ............................................ 91
Address book entries ................................ 91
AM........................................................... 175
Apps ........................................................ 270
Audio ....................................................... 168
Audio language code .............................. 200
Audio settings ........................................ 234HD Radio system settings .. ............. 234
iPod settings ........................................ 235
Audio/video remote controls (steering switches) ............................. 223
Audio/video system ......... ..................... ... 168
Audio/video system operating hints ....... 225 Caring for your DVD player and disc .......................................... 226
CD-R and CD-RW discs ..................... 230
iPod .................................................... 226
MP3/WMA files ................................... 229
Radio reception .................................. 225
Terms ................................................. 231
USB memory ...................................... 226
Automatic Sound Levelizer (ASL) ........... 172
AUX port ................................................ 174
B
Basic function ............................................26
Bluetooth®...............................................114
Bluetooth® audio .....................................213
Connecting a Bluetooth®
audio player .................................... 216
Playing Bluetooth
® audio.................... 218
Bluetooth® phone ....................................121
Bluetooth® phone message function...... 134
Checking messages ........................... 134
New message notification................... 136
Replying (quick reply) ......................... 135
Bluetooth
® settings ................................ 156
Detailed Bluetooth® settings............... 162
Registered devices ............................. 156
Selecting a Bluetooth
® phone ............ 159
Selecting portable player .................... 161
Brightness .........................................31, 198
C
Call on the Bluetooth® phone................. 125
By call history ..................................... 127
By dial ................................................. 125
By phonebook..................................... 125
By POI call .......................................... 130
By speed dial ...................................... 127
By voice recognition ........................... 128
Calling using an SMS/MMS message ......................................... 130
CD ...........................................................188
CLOSE button .........................................168
Color..................................................43, 198
Command list ......................................... 246
Contrast.............................................31, 198
Current position calibration .....................104
Current position display............................ 32