display TOYOTA SEQUOIA 2013 2.G Navigation Manual
[x] Cancel search | Manufacturer: TOYOTA, Model Year: 2013, Model line: SEQUOIA, Model: TOYOTA SEQUOIA 2013 2.GPages: 328, PDF Size: 8.3 MB
Page 210 of 328
210
1. AUDIO/VIDEO SYSTEM OPERATION
9. iPod OPERATION
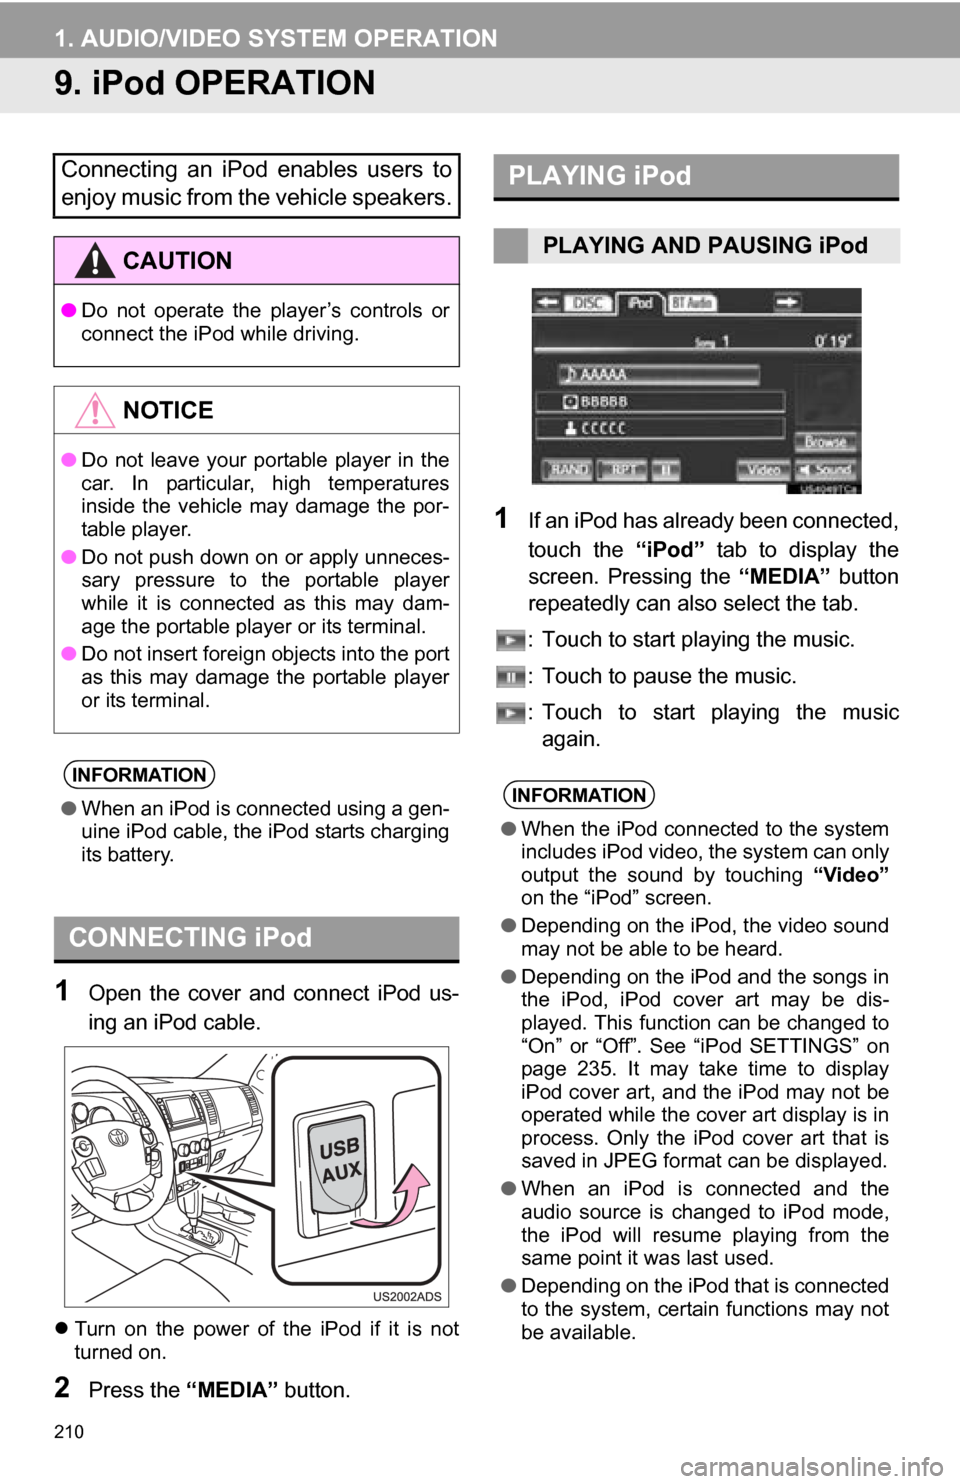
1Open the cover and connect iPod us-
ing an iPod cable.
Turn on the power of the iPod if it is not
turned on.
2Press the “MEDIA” button.
1If an iPod has already been connected,
touch the “iPod” tab to display the
screen. Pressing the “MEDIA” button
repeatedly can also select the tab.
: Touch to start playing the music.
: Touch to pause the music.
: Touch to start playing the music again.
Connecting an iPod enables users to
enjoy music from the vehicle speakers.
CAUTION
● Do not operate the player’s controls or
connect the iPod while driving.
NOTICE
●Do not leave your portable player in the
car. In particular, high temperatures
inside the vehicle may damage the por-
table player.
● Do not push down on or apply unneces-
sary pressure to the portable player
while it is connected as this may dam-
age the portable player or its terminal.
● Do not insert foreign objects into the port
as this may damage the portable player
or its terminal.
INFORMATION
●When an iPod is connected using a gen-
uine iPod cable, the iPod starts charging
its battery.
CONNECTING iPod
PLAYING iPod
PLAYING AND PAUSING iPod
INFORMATION
●When the iPod connected to the system
includes iPod video, the system can only
output the sound by touching “Video”
on the “iPod” screen.
● Depending on the iPod, the video sound
may not be able to be heard.
● Depending on the iPod and the songs in
the iPod, iPod cover art may be dis-
played. This function can be changed to
“On” or “Off”. Se e “iPod SETTINGS” on
page 235. It may take time to display
iPod cover art, and the iPod may not be
operated while the cover art display is in
process. Only the iPod cover art that is
saved in JPEG format can be displayed.
● When an iPod is connected and the
audio source is changed to iPod mode,
the iPod will resume playing from the
same point it was last used.
● Depending on the iPod that is connected
to the system, certain functions may not
be available.
Page 211 of 328
211
1. AUDIO/VIDEO SYSTEM OPERATION
5
AUDIO/VIDEO SYSTEM
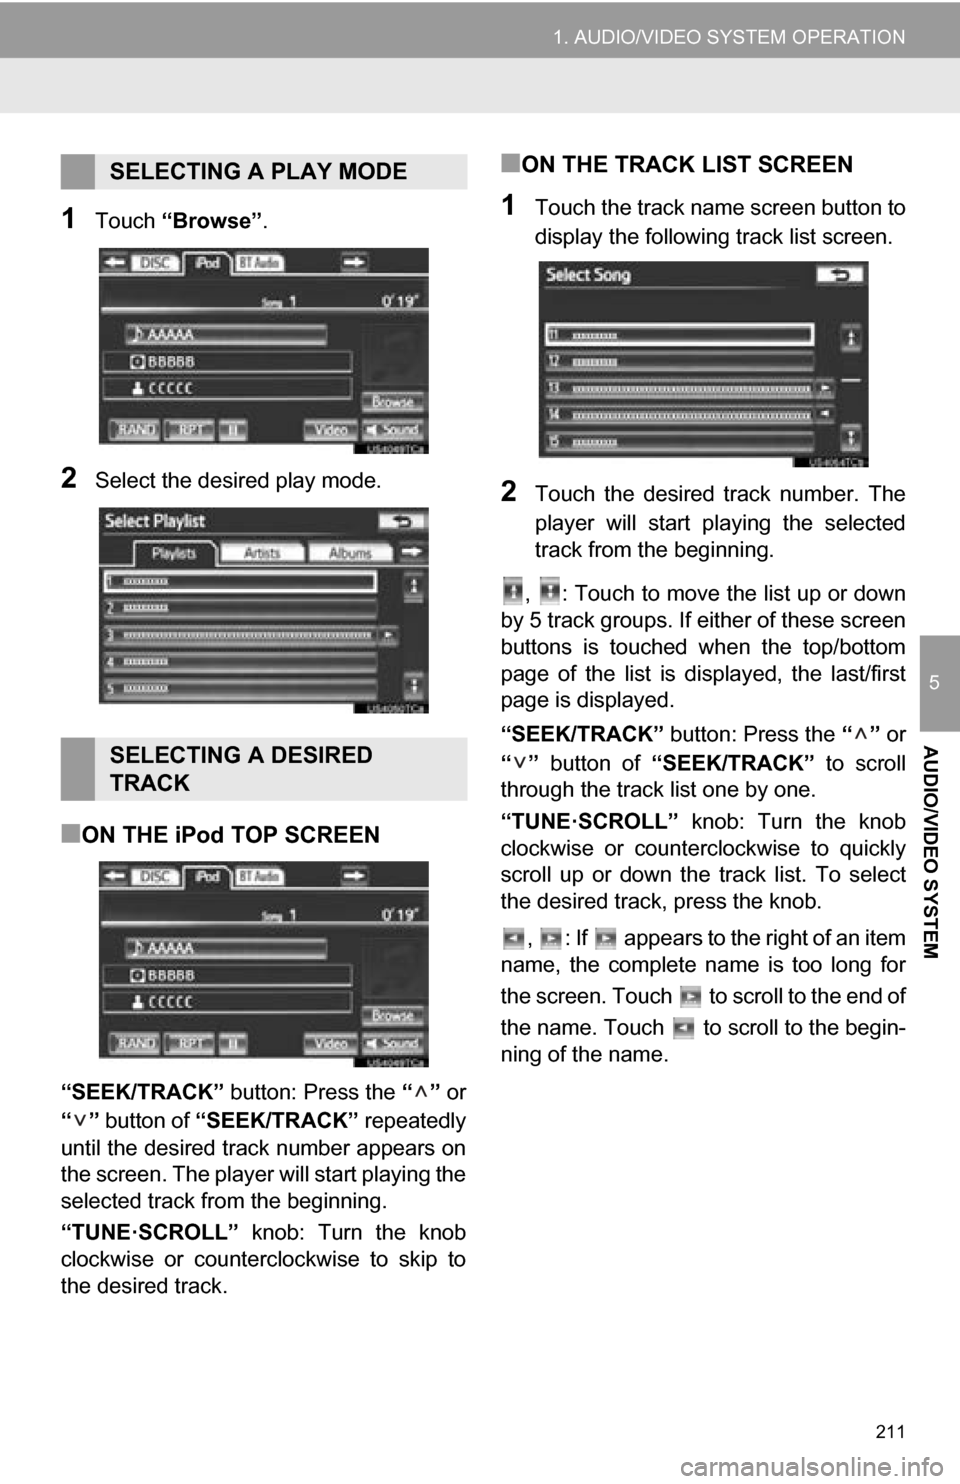
1Touch “Browse” .
2Select the desired play mode.
■ON THE iPod TOP SCREEN
“SEEK/TRACK” button: Press the “” or
“” button of “SEEK/TRACK” repeatedly
until the desired track number appears on
the screen. The player will start playing the
selected track from the beginning.
“TUNE·SCROLL” knob: Turn the knob
clockwise or counterclockwise to skip to
the desired track.
■ON THE TRACK LIST SCREEN
1Touch the track name screen button to
display the following track list screen.
2Touch the desired track number. The
player will start playing the selected
track from the beginning.
, : Touch to move the list up or down
by 5 track groups. If either of these screen
buttons is touched when the top/bottom
page of the list is displayed, the last/first
page is displayed.
“SEEK/TRACK” button: Press the “” or
“” button of “SEEK/TRACK” to scroll
through the track list one by one.
“TUNE·SCROLL” knob: Turn the knob
clockwise or counterclockwise to quickly
scroll up or down the track list. To select
the desired track, press the knob.
, : If appears to the right of an item
name, the complete name is too long for
the screen. Touch to scroll to the end of
the name. Touch to scroll to the begin-
ning of the name.
SELECTING A PLAY MODE
SELECTING A DESIRED
TRACK
Page 214 of 328
214
1. AUDIO/VIDEO SYSTEM OPERATION
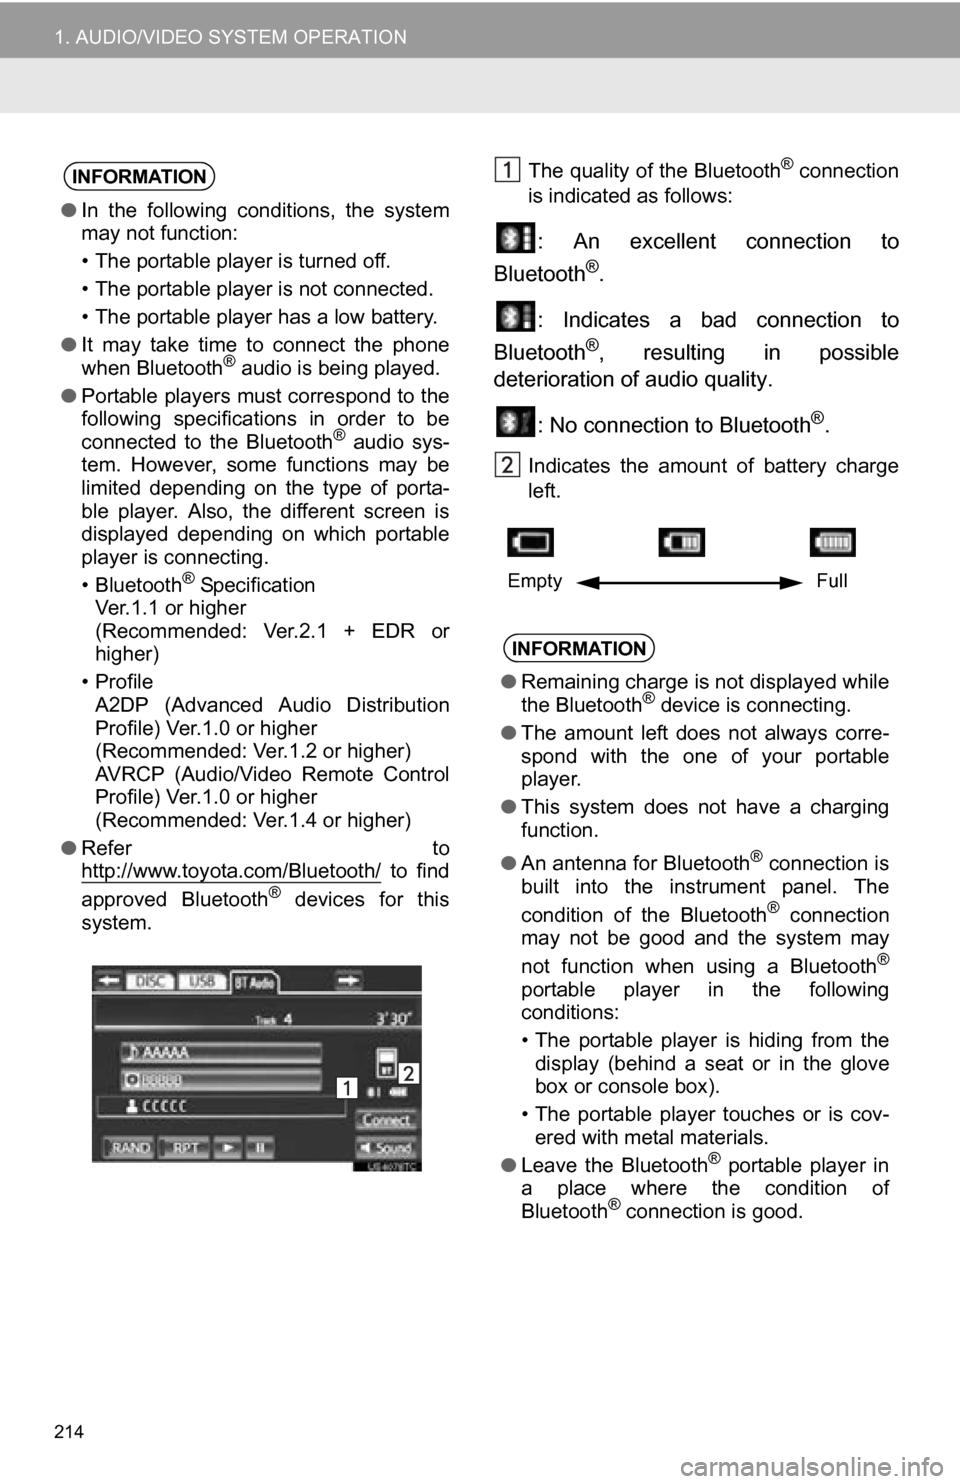
The quality of the Bluetooth® connection
is indicated as follows:
: An excellent connection to
Bluetooth®.
: Indicates a bad connection to
Bluetooth
®, resulting in possible
deterioration of audio quality.
: No connection to Bluetooth
®.
Indicates the amount of battery charge
left.
INFORMATION
●In the following conditions, the system
may not function:
• The portable player is turned off.
• The portable player is not connected.
• The portable player has a low battery.
● It may take time to connect the phone
when Bluetooth
® audio is being played.
● Portable players must correspond to the
following specifications in order to be
connected to the Bluetooth
® audio sys-
tem. However, some functions may be
limited depending on the type of porta-
ble player. Also, the different screen is
displayed depending on which portable
player is connecting.
• Bluetooth
® Specification
Ver.1.1 or higher
(Recommended: Ver.2.1 + EDR or
higher)
•Profile A2DP (Advanced Audio Distribution
Profile) Ver.1.0 or higher
(Recommended: Ver.1.2 or higher)
AVRCP (Audio/Video Remote Control
Profile) Ver.1.0 or higher
(Recommended: Ver.1.4 or higher)
● Refer to
http://www.toyota.com/Bluetooth/
to find
approved Bluetooth® devices for this
system.
INFORMATION
● Remaining charge is not displayed while
the Bluetooth® device is connecting.
● The amount left does not always corre-
spond with the one of your portable
player.
● This system does not have a charging
function.
● An antenna for Bluetooth
® connection is
built into the instrument panel. The
condition of the Bluetooth
® connection
may not be good and the system may
not function when using a Bluetooth
®
portable player in the following
conditions:
• The portable player is hiding from the display (behind a seat or in the glove
box or console box).
• The portable player touches or is cov- ered with metal materials.
● Leave the Bluetooth
® portable player in
a place where the condition of
Bluetooth
® connection is good.
Empty Full
Page 217 of 328
217
1. AUDIO/VIDEO SYSTEM OPERATION
5
AUDIO/VIDEO SYSTEM
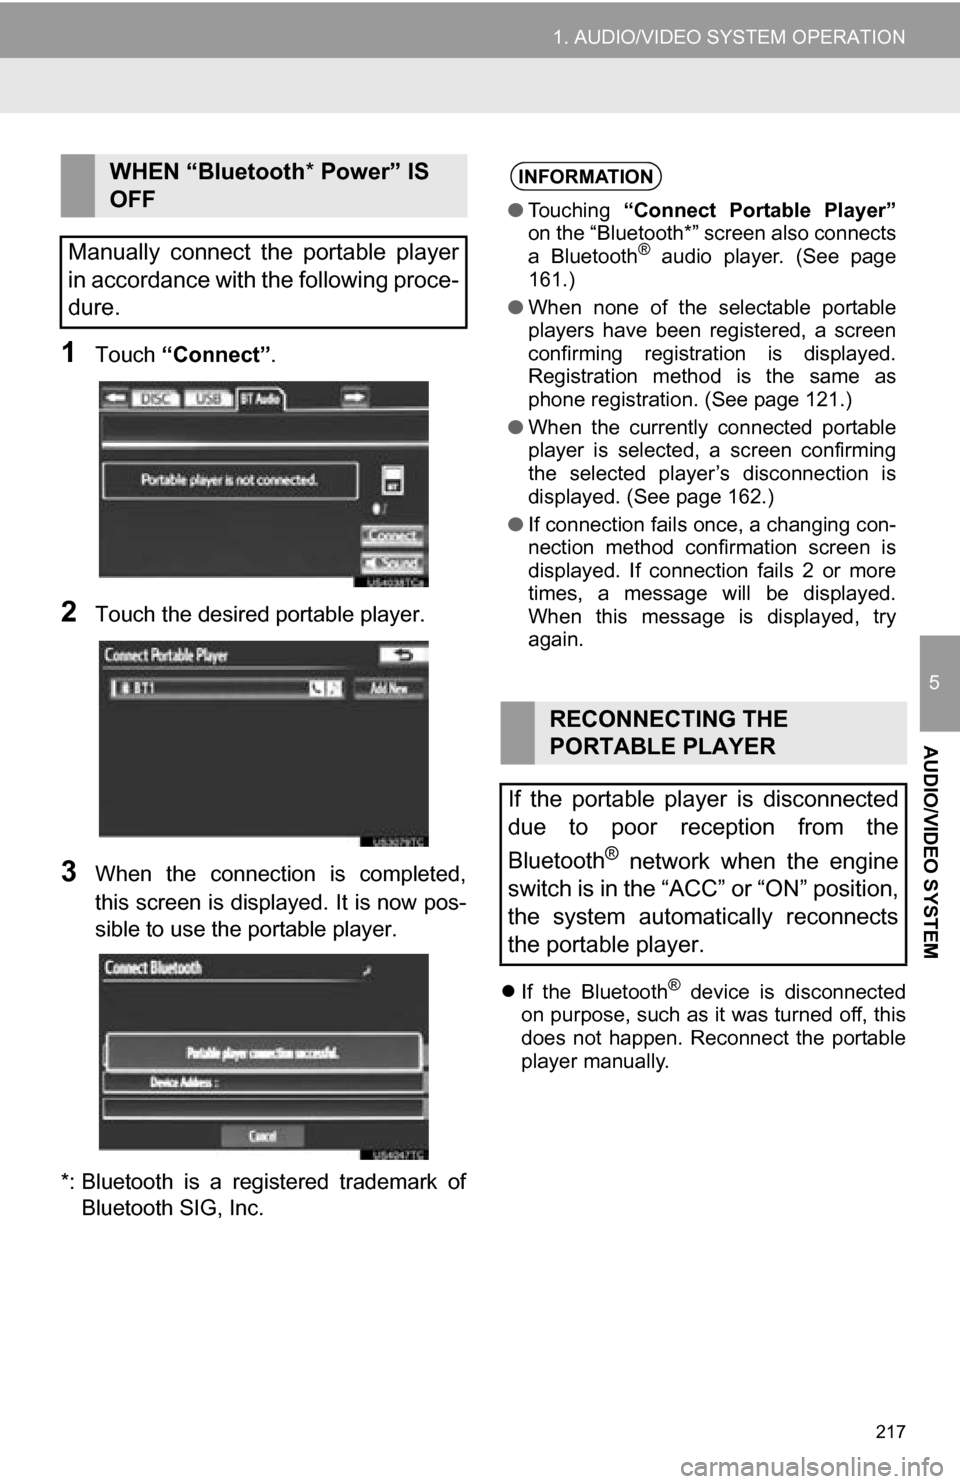
1Touch “Connect” .
2Touch the desired portable player.
3When the connection is completed,
this screen is displayed. It is now pos-
sible to use the portable player.
*: Bluetooth is a registered trademark of Bluetooth SIG, Inc.
If the Bluetooth® device is disconnected
on purpose, such as it was turned off, this
does not happen. Reconnect the portable
player manually.
WHEN “Bluetooth * Power” IS
OFF
Manually connect the portable player
in accordance with the following proce-
dure.INFORMATION
● Touching “Connect Portable Player”
on the “Bluetooth*” screen also connects
a Bluetooth
® audio player. (See page
161.)
● When none of the selectable portable
players have been registered, a screen
confirming registration is displayed.
Registration method is the same as
phone registration. (See page 121.)
● When the currently connected portable
player is selected, a screen confirming
the selected player’s disconnection is
displayed. (See page 162.)
● If connection fails once, a changing con-
nection method confirmation screen is
displayed. If connection fails 2 or more
times, a message will be displayed.
When this message is displayed, try
again.
RECONNECTING THE
PORTABLE PLAYER
If the portable player is disconnected
due to poor reception from the
Bluetooth
® network when the engine
switch is in the “ACC” or “ON” position,
the system automatically reconnects
the portable player.
Page 218 of 328
218
1. AUDIO/VIDEO SYSTEM OPERATION
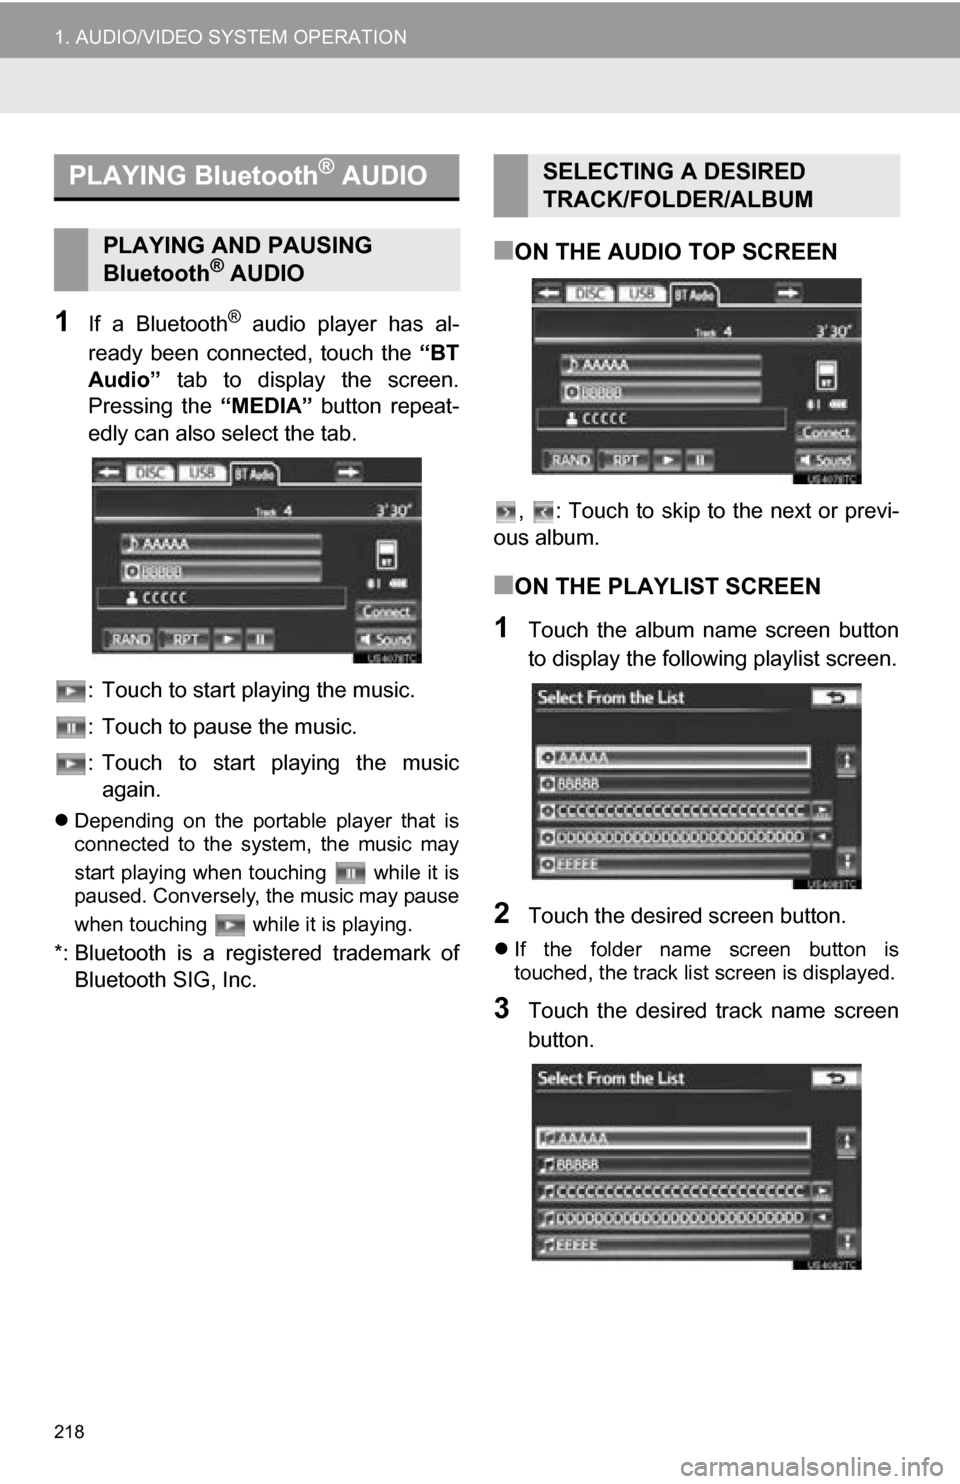
1If a Bluetooth® audio player has al-
ready been connected, touch the “BT
Audio” tab to display the screen.
Pressing the “MEDIA” button repeat-
edly can also select the tab.
: Touch to start playing the music.
: Touch to pause the music.
: Touch to start playing the music again.
Depending on the portable player that is
connected to the system, the music may
start playing when touching while it is
paused. Conversely, the music may pause
when touching while it is playing.
*: Bluetooth is a regi stered trademark of
Bluetooth SIG, Inc.
■ON THE AUDIO TOP SCREEN
, : Touch to skip to the next or previ-
ous album.
■ON THE PLAYLIST SCREEN
1Touch the album name screen button
to display the following playlist screen.
2Touch the desired screen button.
If the folder name screen button is
touched, the track list screen is displayed.
3Touch the desired track name screen
button.
PLAYING Bluetooth® AUDIO
PLAYING AND PAUSING
Bluetooth® AUDIO
SELECTING A DESIRED
TRACK/FOLDER/ALBUM
Page 219 of 328
219
1. AUDIO/VIDEO SYSTEM OPERATION
5
AUDIO/VIDEO SYSTEM
, : Touch to move the list up or down
by 5 track/folder groups. If either of these
screen buttons is touched when the
top/bottom page of the list is displayed, the
last/first page is displayed.
“SEEK/TRACK” button: Press the “” or
“” button of “SEEK/TRACK” to scroll
through the track list one by one.
“TUNE·SCROLL” knob: Turn the knob
clockwise or counte rclockwise to quickly
scroll up or down the track/folder list. To
select the desired tr ack/folder, press the
knob.
, : If appears to the right of an item
name, the complete name is too long for
the screen. Touch to scroll to the end of
the name. Touch to scroll to the begin-
ning of the name.
■FAST FORWARDING OR REWIND-
ING
1Press and hold the “” or “” button
of “SEEK/TRACK” to fast forward or
rewind the song.
When the button is released, the player
resumes playing from that position.
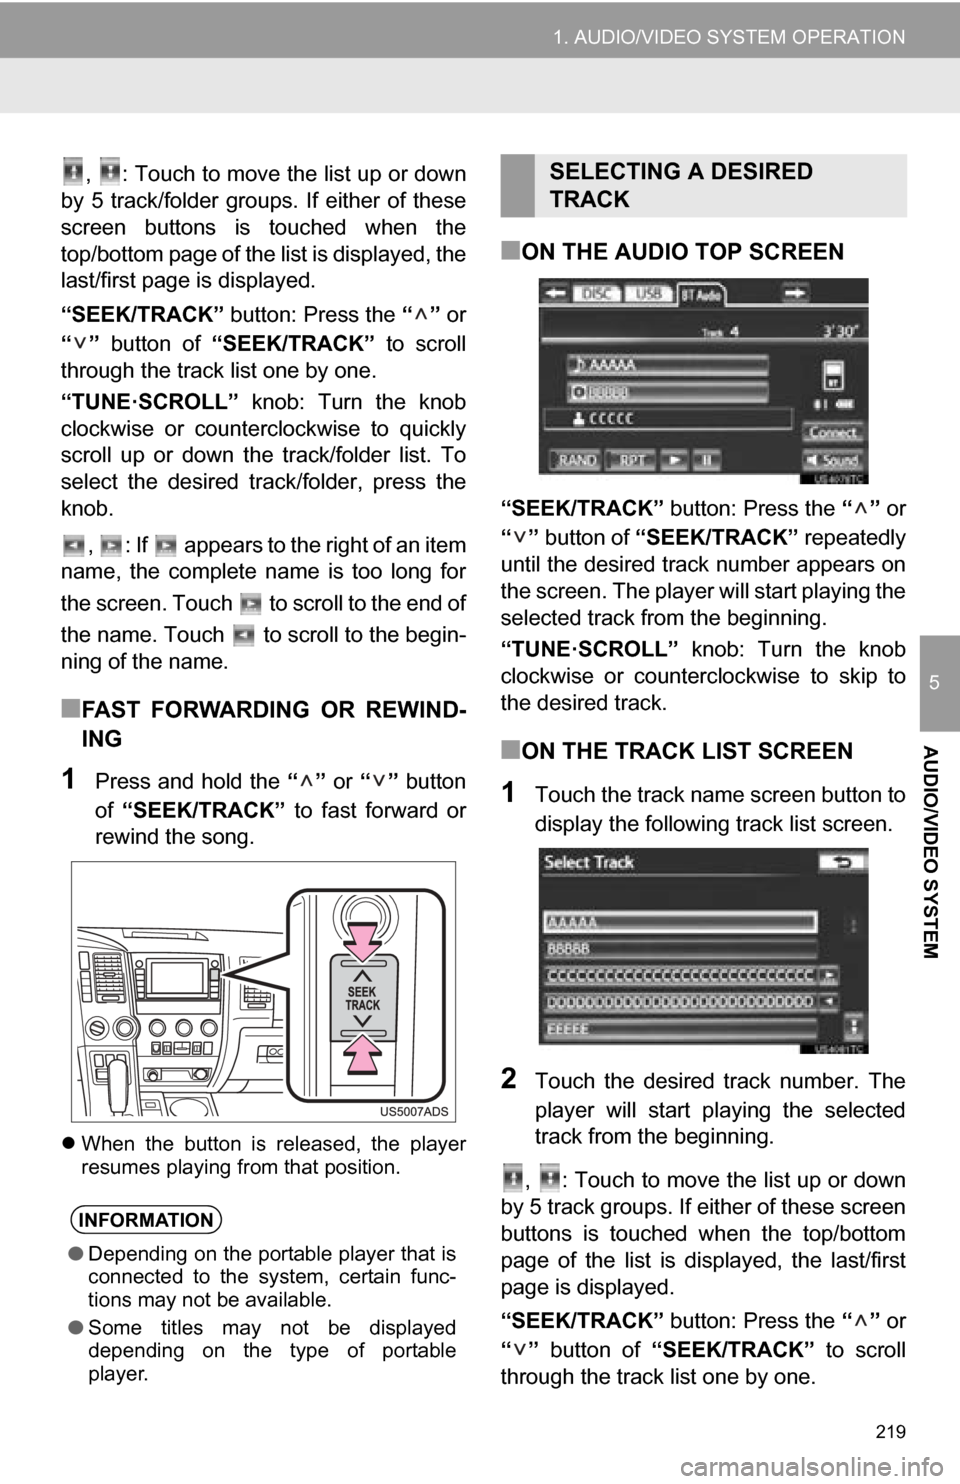
■ON THE AUDIO TOP SCREEN
“SEEK/TRACK” button: Press the “” or
“” button of “SEEK/TRACK” repeatedly
until the desired track number appears on
the screen. The player will start playing the
selected track from the beginning.
“TUNE·SCROLL” knob: Turn the knob
clockwise or counterclockwise to skip to
the desired track.
■ON THE TRACK LIST SCREEN
1Touch the track name screen button to
display the following track list screen.
2Touch the desired track number. The
player will start playing the selected
track from the beginning.
, : Touch to move the list up or down
by 5 track groups. If either of these screen
buttons is touched when the top/bottom
page of the list is displayed, the last/first
page is displayed.
“SEEK/TRACK” button: Press the “” or
“” button of “SEEK/TRACK” to scroll
through the track list one by one.
INFORMATION
● Depending on the portable player that is
connected to the system, certain func-
tions may not be available.
● Some titles may not be displayed
depending on the type of portable
player.
SELECTING A DESIRED
TRACK
Page 229 of 328
229
1. AUDIO/VIDEO SYSTEM OPERATION
5
AUDIO/VIDEO SYSTEM
MP3 (MPEG Audio Layer 3) and WMA
(Windows Media Audio) are audio com-
pression standards.
The MP3/WMA player can play MP3 and
WMA files on CD-ROM, CD-R and CD-
RW discs.
The unit can play disc recordings compati-
ble with ISO 9660 level 1 and level 2 and
with the Romeo and Joliet file system.
When naming an MP3 or WMA file, add
the appropriate file extension (.mp3 or
.wma).
The MP3/WMA player plays back files
with .mp3 or .wma file extensions as MP3
or WMA files. To prevent noise and play-
back errors, use the appropriate file exten-
sions.
The MP3/WMA player can play only the
first session when using multi-session
compatible CDs.
MP3 player: MP3 files are compatible with
the ID3 Tag Ver. 1.0, Ver. 1.1, Ver. 2.2 and
Ver. 2.3 formats. The unit cannot display
disc title, track title and artist name in
other formats.
USB memory: MP3 files are compatible
with the ID3 Tag Ver. 1.0, Ver. 1.1, Ver.
2.2, Ver. 2.3 and Ver. 2.4 formats. The unit
cannot display track title and artist name
in other formats.
WMA files can contain a WMA tag that is
used in the same way as an ID3 tag. WMA
tags carry information such as track title
and artist name.
The emphasis function is available only
when playing MP3/WMA files recorded at
32, 44.1 and 48 kHz.
MP3 files for MP3 player:
MPEG 1 LAYER 3 — 32, 44.1, 48 kHz
MPEG 2 LSF LAYER 3 — 16, 22.05, 24
kHz
MP3 files for USB memory:
MPEG 1 AUDIO LAYER 2, 3 — 32, 44.1,
48 kHz
MPEG 2 AUDIO LAYER 2, 3 — 16, 22.05,
24 kHz
WMA files for WMA player:
Ver. 7, 8, 9 CBR — 32, 44.1, 48 kHz
WMA files for USB memory:
Ver. 9 — HIGH PROFILE 32, 44.1, 48 kHz
The sound quality of MP3/WMA files gen-
erally improves with higher bit rates. In
order to achieve a reasonable level of
sound quality, discs recorded with a bit
rate of at least 128 kbps are recom-
mended.
MP3 files for MP3 player:
MPEG1 LAYER3 — 32 to 320 kbps
MPEG2 LSF LAYER3 — 8 to 160 kbps
MP3 files for USB memory:
MPEG 1 AUDIO LAYER 2, 3 — 32 to 320
kbps
MPEG 2 AUDIO LAYER 2, 3 — 8 to 160
kbps
WMA files for WMA player:
Ver. 7, 8 CBR — 48 to 192 kbps
Ver. 9 CBR — 48 to 320 kbps
WMA files for USB memory:
Ver. 9 HIGH PROFILE 32 to 320 kbps,
VBR (Variable Bit Rate)
The MP3/WMA player does not play back
MP3/WMA files from discs recorded using
packet write data transfer (UDF format).
Discs should be recorded using “pre-mas-
tering” software rather than packet-write
software.
M3u playlists are not compatible with the
audio player.
MP3i (MP3 interactive) and MP3PRO for-
mats are not compatible with the audio
player.
The player is compatible with VBR (Vari-
able Bit Rate).
MP3/WMA FILESSAMPLING FREQUENCY
PLAYABLE BIT RATES
Page 230 of 328
230
1. AUDIO/VIDEO SYSTEM OPERATION
When playing back files recorded as VBR
(Variable Bit Rate) files, the play time will
not be correctly displayed if the fast for-
ward or reverse operations are used.
It is not possible to check folders that do
not include MP3/WMA files.
MP3/WMA files in folders up to 8 levels
deep can be played. However, the start of
playback may be delayed when using
discs containing numerous levels of fold-
ers. For this reason, we recommend creat-
ing discs with no more than two levels of
folders.
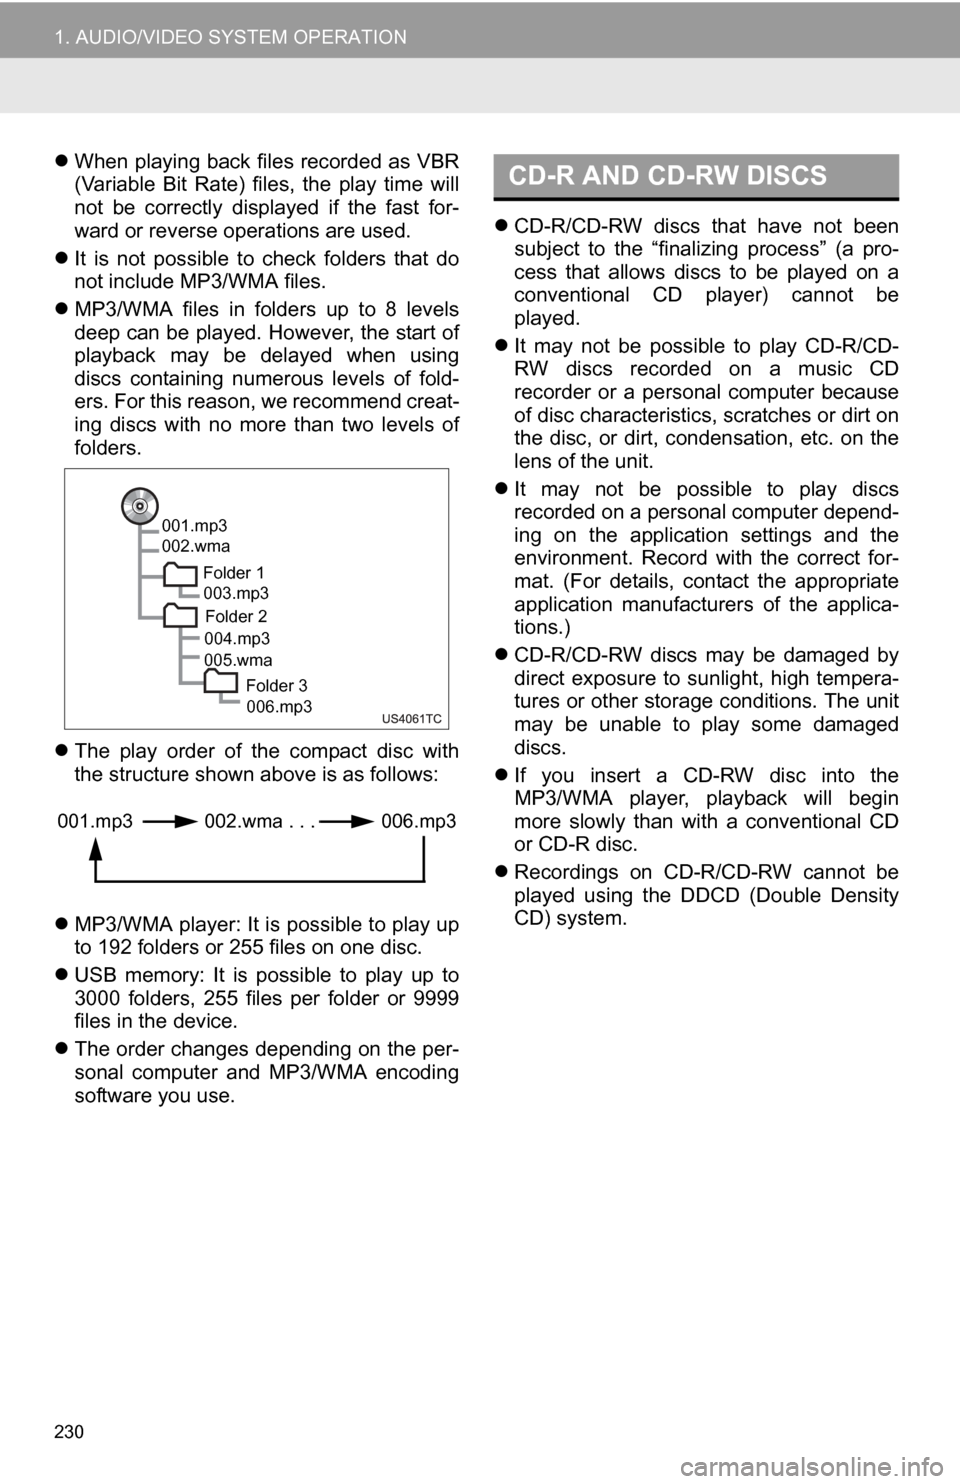
The play order of the compact disc with
the structure shown above is as follows:
MP3/WMA player: It is possible to play up
to 192 folders or 255 files on one disc.
USB memory: It is possible to play up to
3000 folders, 255 files per folder or 9999
files in the device.
The order changes depending on the per-
sonal computer and MP3/WMA encoding
software you use.
CD-R/CD-RW discs that have not been
subject to the “finalizing process” (a pro-
cess that allows discs to be played on a
conventional CD player) cannot be
played.
It may not be possible to play CD-R/CD-
RW discs recorded on a music CD
recorder or a personal computer because
of disc characteristics, scratches or dirt on
the disc, or dirt, condensation, etc. on the
lens of the unit.
It may not be possible to play discs
recorded on a personal computer depend-
ing on the application settings and the
environment. Record with the correct for-
mat. (For details, contact the appropriate
application manufacturers of the applica-
tions.)
CD-R/CD-RW discs may be damaged by
direct exposure to sunlight, high tempera-
tures or other storage conditions. The unit
may be unable to play some damaged
discs.
If you insert a CD-RW disc into the
MP3/WMA player, playback will begin
more slowly than with a conventional CD
or CD-R disc.
Recordings on CD-R/CD-RW cannot be
played using the D DCD (Double Density
CD) system.
001.mp3
002.wma
Folder 1003.mp3
Folder 2
004.mp3
005.wma
Folder 3006.mp3
001.mp3 002.wma . . . 006.mp3
CD-R AND CD-RW DISCS
Page 235 of 328
235
2. SETUP
5
AUDIO/VIDEO SYSTEM
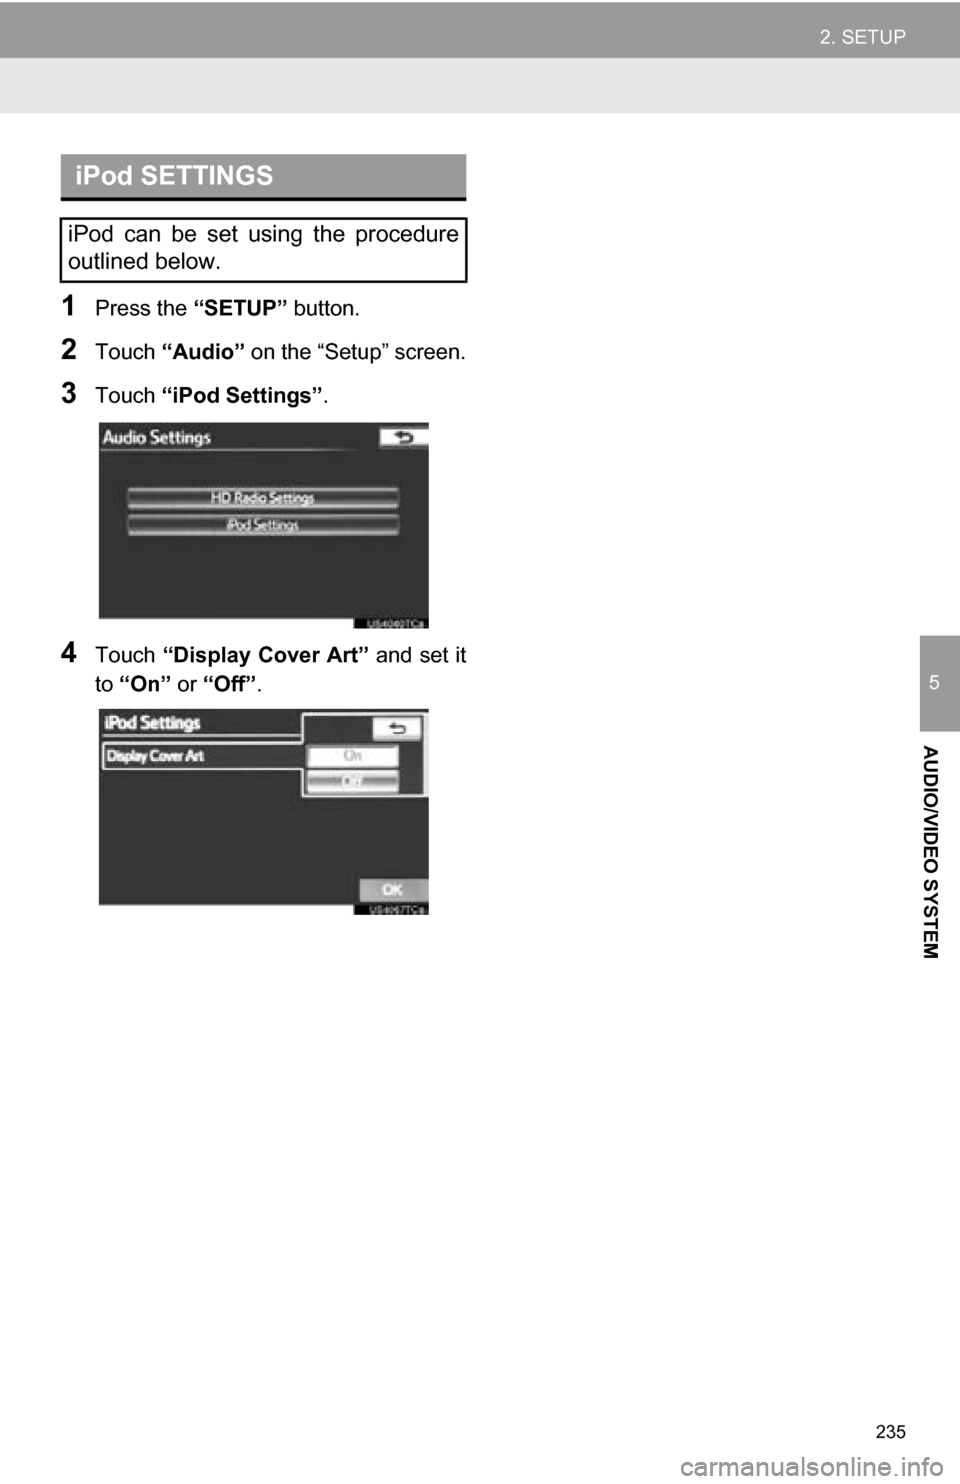
1Press the “SETUP” button.
2Touch “Audio” on the “Setup” screen.
3Touch “iPod Settings” .
4Touch “Display Cover Art” and set it
to “On” or “Off” .
iPod SETTINGS
iPod can be set using the procedure
outlined below.
Page 238 of 328
238
1. VOICE COMMAND SYSTEM OPERATION
1. VOICE COMMAND SYSTEM
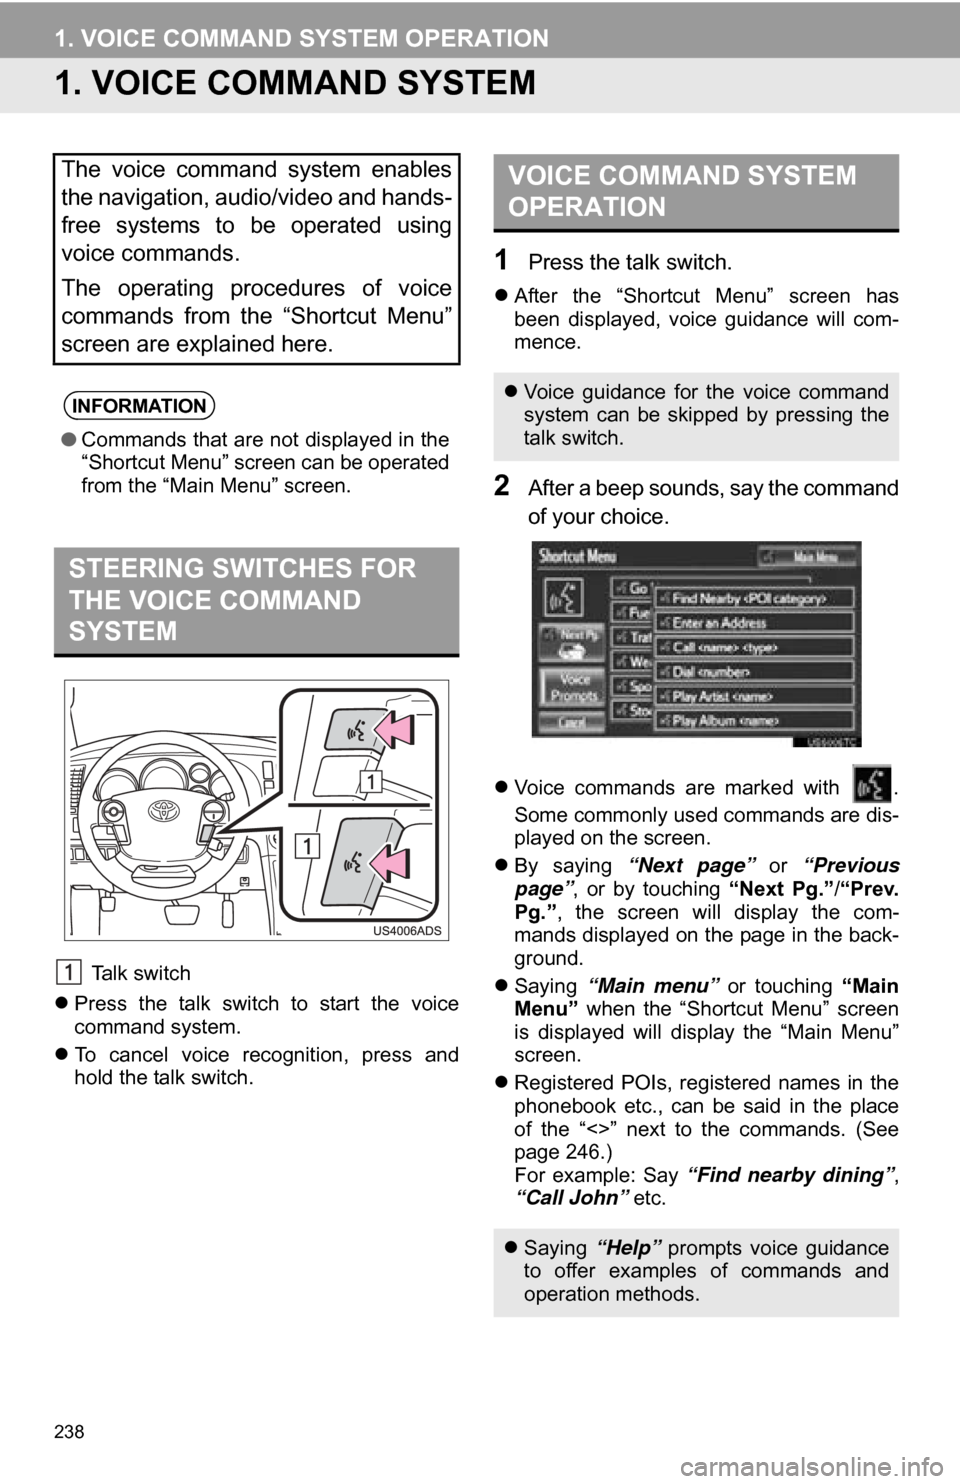
Talk switch
Press the talk switch to start the voice
command system.
To cancel voice recognition, press and
hold the talk switch.
1Press the talk switch.
After the “Shortcut Menu” screen has
been displayed, voice guidance will com-
mence.
2After a beep sounds, say the command
of your choice.
Voice commands are marked with .
Some commonly used commands are dis-
played on the screen.
By saying “Next page” or “Previous
page” , or by touching “Next Pg.”/“Prev.
Pg.” , the screen will display the com-
mands displayed on the page in the back-
ground.
Saying “Main menu” or touching “Main
Menu” when the “Shortcut Menu” screen
is displayed will display the “Main Menu”
screen.
Registered POIs, registered names in the
phonebook etc., can be said in the place
of the “<>” next to the commands. (See
page 246.)
For example: Say “Find nearby dining” ,
“Call John” etc.
The voice command system enables
the navigation, audio/video and hands-
free systems to be operated using
voice commands.
The operating procedures of voice
commands from the “Shortcut Menu”
screen are explained here.
INFORMATION
●Commands that are not displayed in the
“Shortcut Menu” screen can be operated
from the “Main Menu” screen.
STEERING SWITCHES FOR
THE VOICE COMMAND
SYSTEM
VOICE COMMAND SYSTEM
OPERATION
Voice guidance for the voice command
system can be skipped by pressing the
talk switch.
Saying “Help” prompts voice guidance
to offer examples of commands and
operation methods.