navigation TOYOTA SEQUOIA 2013 2.G Navigation Manual
[x] Cancel search | Manufacturer: TOYOTA, Model Year: 2013, Model line: SEQUOIA, Model: TOYOTA SEQUOIA 2013 2.GPages: 328, PDF Size: 8.3 MB
Page 133 of 328
133
1. PHONE OPERATION
4
PHONE
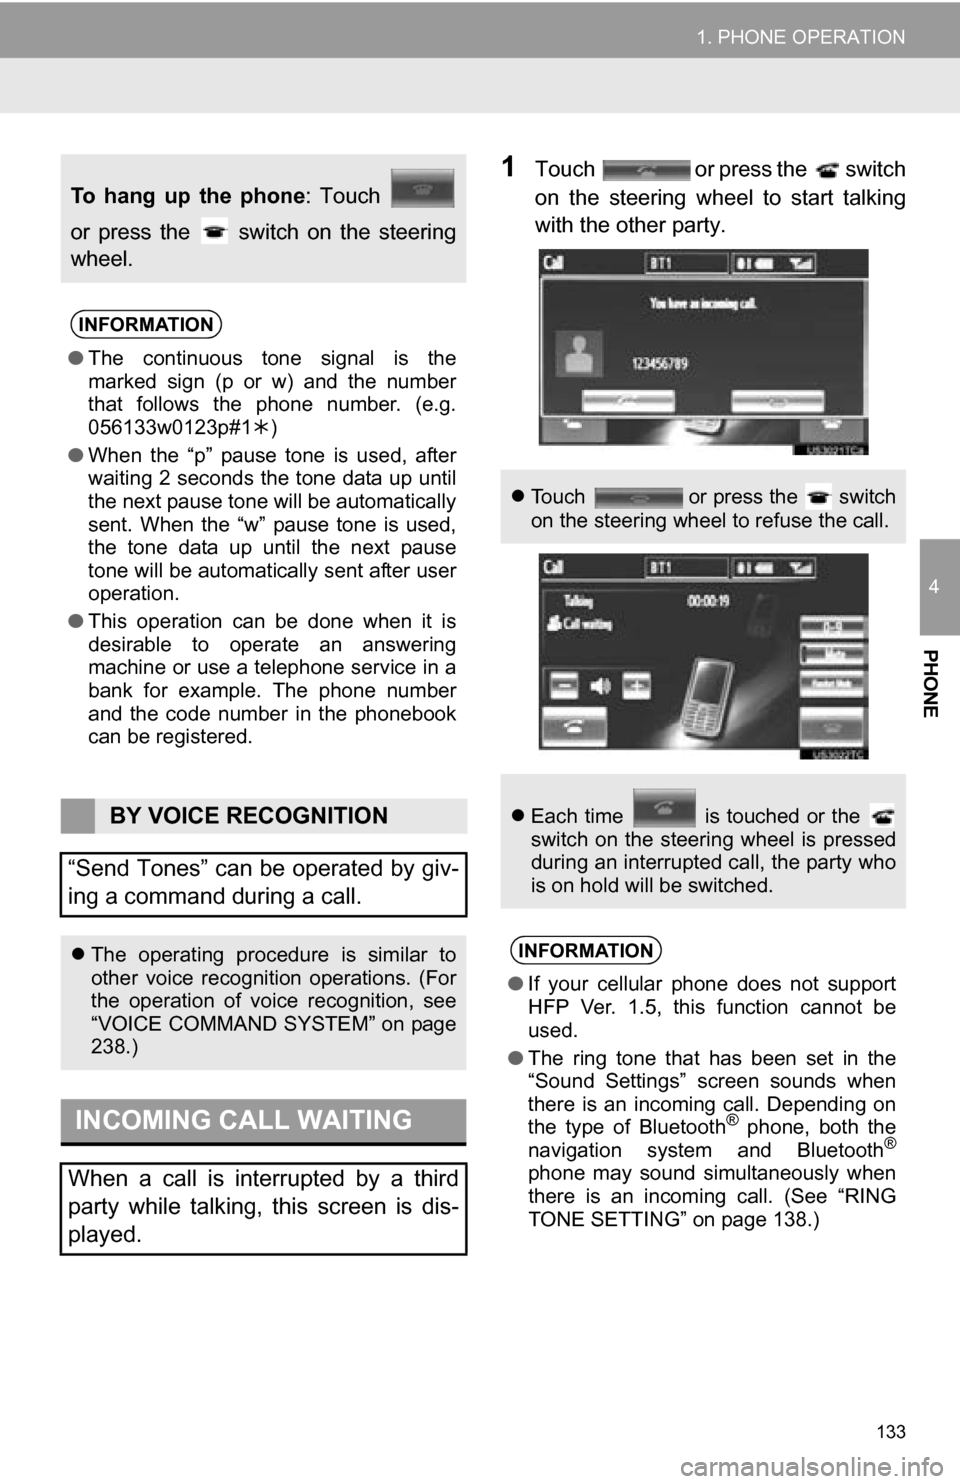
1Touch or press the switch
on the steering wheel to start talking
with the other party.
To hang up the phone: Touch
or press the switch on the steering
wheel.
INFORMATION
● The continuous tone signal is the
marked sign (p or w) and the number
that follows the phone number. (e.g.
056133w0123p#1 )
● When the “p” pause tone is used, after
waiting 2 seconds the tone data up until
the next pause tone will be automatically
sent. When the “w” pause tone is used,
the tone data up until the next pause
tone will be automatically sent after user
operation.
● This operation can be done when it is
desirable to operate an answering
machine or use a telephone service in a
bank for example. The phone number
and the code number in the phonebook
can be registered.
BY VOICE RECOGNITION
“Send Tones” can be operated by giv-
ing a command during a call.
The operating procedure is similar to
other voice recognition operations. (For
the operation of voice recognition, see
“VOICE COMMAND SYSTEM” on page
238.)
INCOMING CALL WAITING
When a call is interrupted by a third
party while talking, this screen is dis-
played.
Touch or press the switch
on the steering wheel to refuse the call.
Each time is touched or the
switch on the steering wheel is pressed
during an interrupted call, the party who
is on hold will be switched.
INFORMATION
●If your cellular phone does not support
HFP Ver. 1.5, this function cannot be
used.
● The ring tone that has been set in the
“Sound Settings” screen sounds when
there is an incoming call. Depending on
the type of Bluetooth
® phone, both the
navigation system and Bluetooth®
phone may sound simultaneously when
there is an incoming call. (See “RING
TONE SETTING” on page 138.)
Page 134 of 328
134
1. PHONE OPERATION
7. Bluetooth® PHONE MESSAGE FUNCTION
1Press the button or the switch
on the steering wheel.
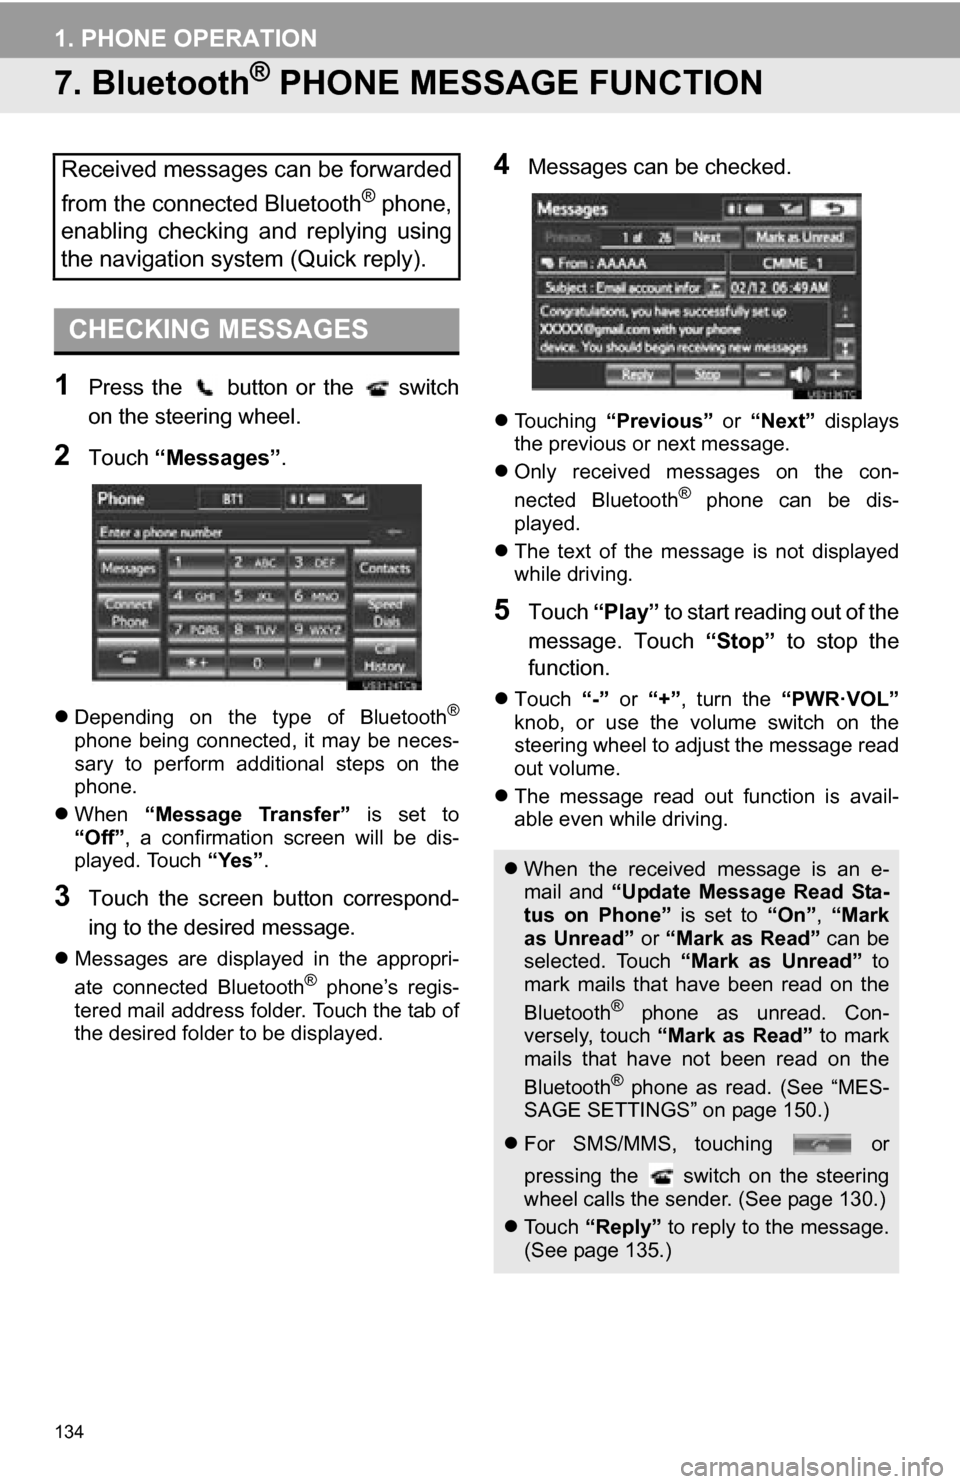
2Touch “Messages” .
Depending on the type of Bluetooth®
phone being connected, it may be neces-
sary to perform additional steps on the
phone.
When “Message Transfer” is set to
“Off”, a confirmation screen will be dis-
played. Touch “Yes”.
3Touch the screen button correspond-
ing to the desired message.
Messages are displayed in the appropri-
ate connected Bluetooth® phone’s regis-
tered mail address folder. Touch the tab of
the desired folder to be displayed.
4Messages can be checked.
Touching “Previous” or “Next” displays
the previous or next message.
Only received messages on the con-
nected Bluetooth
® phone can be dis-
played.
The text of the message is not displayed
while driving.
5Touch “Play” to start reading out of the
message. Touch “Stop” to stop the
function.
Touch “-” or “+”, turn the “PWR·VOL”
knob, or use the volume switch on the
steering wheel to adjust the message read
out volume.
The message read out function is avail-
able even while driving.
Received messages can be forwarded
from the connected Bluetooth
® phone,
enabling checking and replying using
the navigation system (Quick reply).
CHECKING MESSAGES
When the received message is an e-
mail and “Update Message Read Sta-
tus on Phone” is set to “On”, “Mark
as Unread” or “Mark as Read” can be
selected. Touch “Mark as Unread” to
mark mails that have been read on the
Bluetooth
® phone as unread. Con-
versely, touch “Mark as Read” to mark
mails that have not been read on the
Bluetooth
® phone as read. (See “MES-
SAGE SETTINGS” on page 150.)
For SMS/MMS, touching or
pressing the switch on the steering
wheel calls the sender. (See page 130.)
Touch “Reply” to reply to the message.
(See page 135.)
Page 143 of 328
143
2. SETUP
4
PHONE
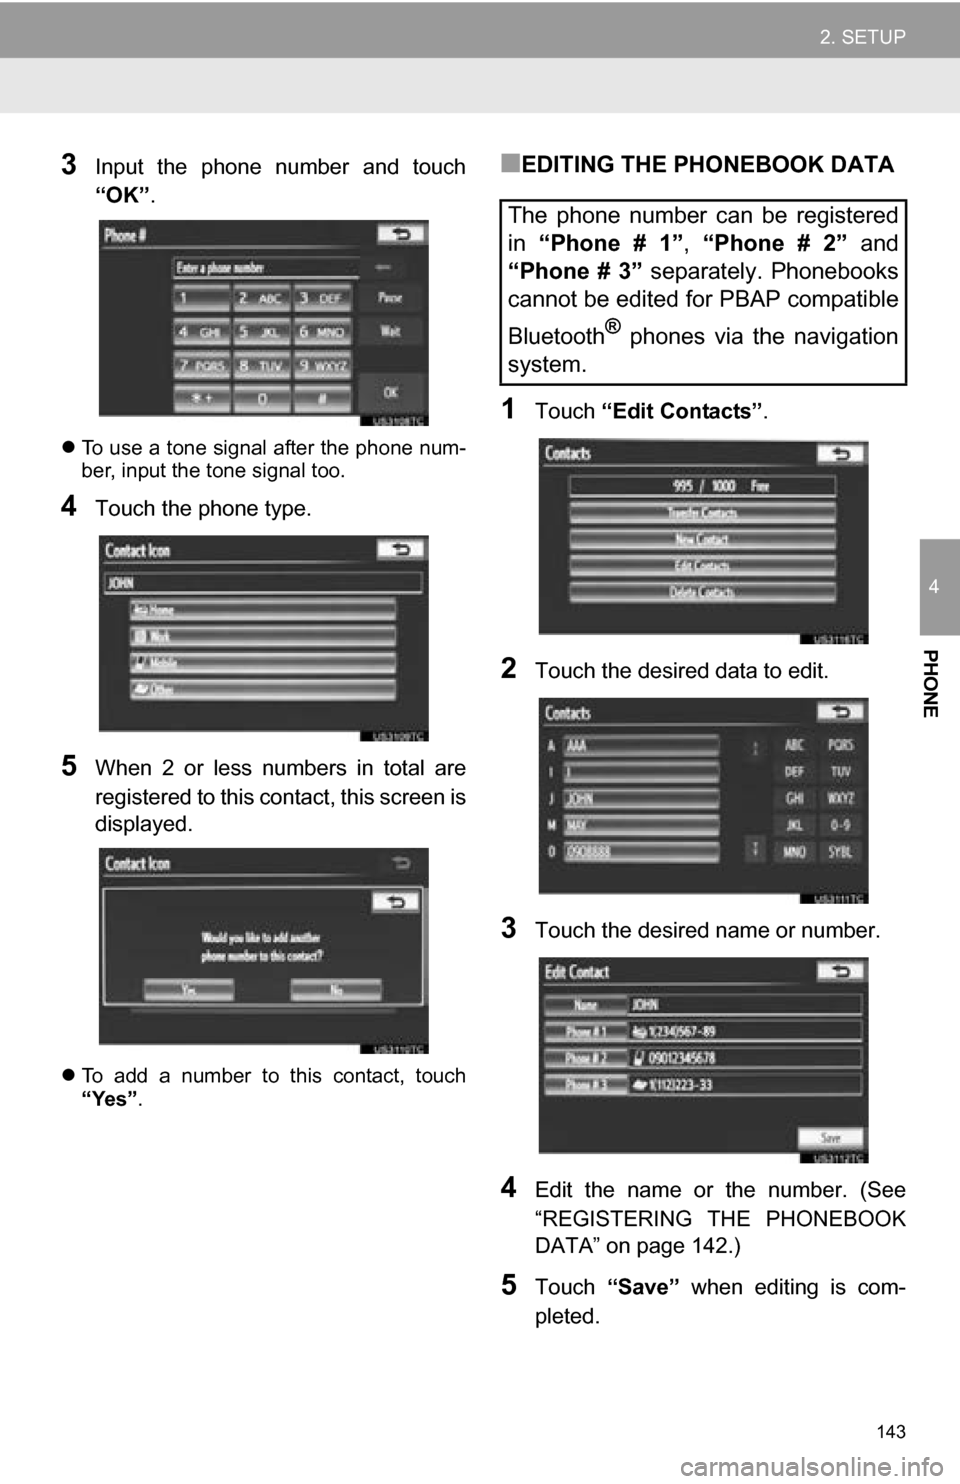
3Input the phone number and touch
“OK”.
To use a tone signal after the phone num-
ber, input the tone signal too.
4Touch the phone type.
5When 2 or less numbers in total are
registered to this contact, this screen is
displayed.
To add a number to this contact, touch
“Yes”.
■EDITING THE PHONEBOOK DATA
1Touch “Edit Contacts” .
2Touch the desired data to edit.
3Touch the desired name or number.
4Edit the name or the number. (See
“REGISTERING THE PHONEBOOK
DATA” on page 142.)
5Touch “Save” when editing is com-
pleted.
The phone number can be registered
in “Phone # 1” , “Phone # 2” and
“Phone # 3” separately. Phonebooks
cannot be edited for PBAP compatible
Bluetooth
® phones via the navigation
system.
Page 187 of 328
187
1. AUDIO/VIDEO SYSTEM OPERATION
5
AUDIO/VIDEO SYSTEM
6. RADIO OPERATION (INTERNET RADIO BROADCAST)
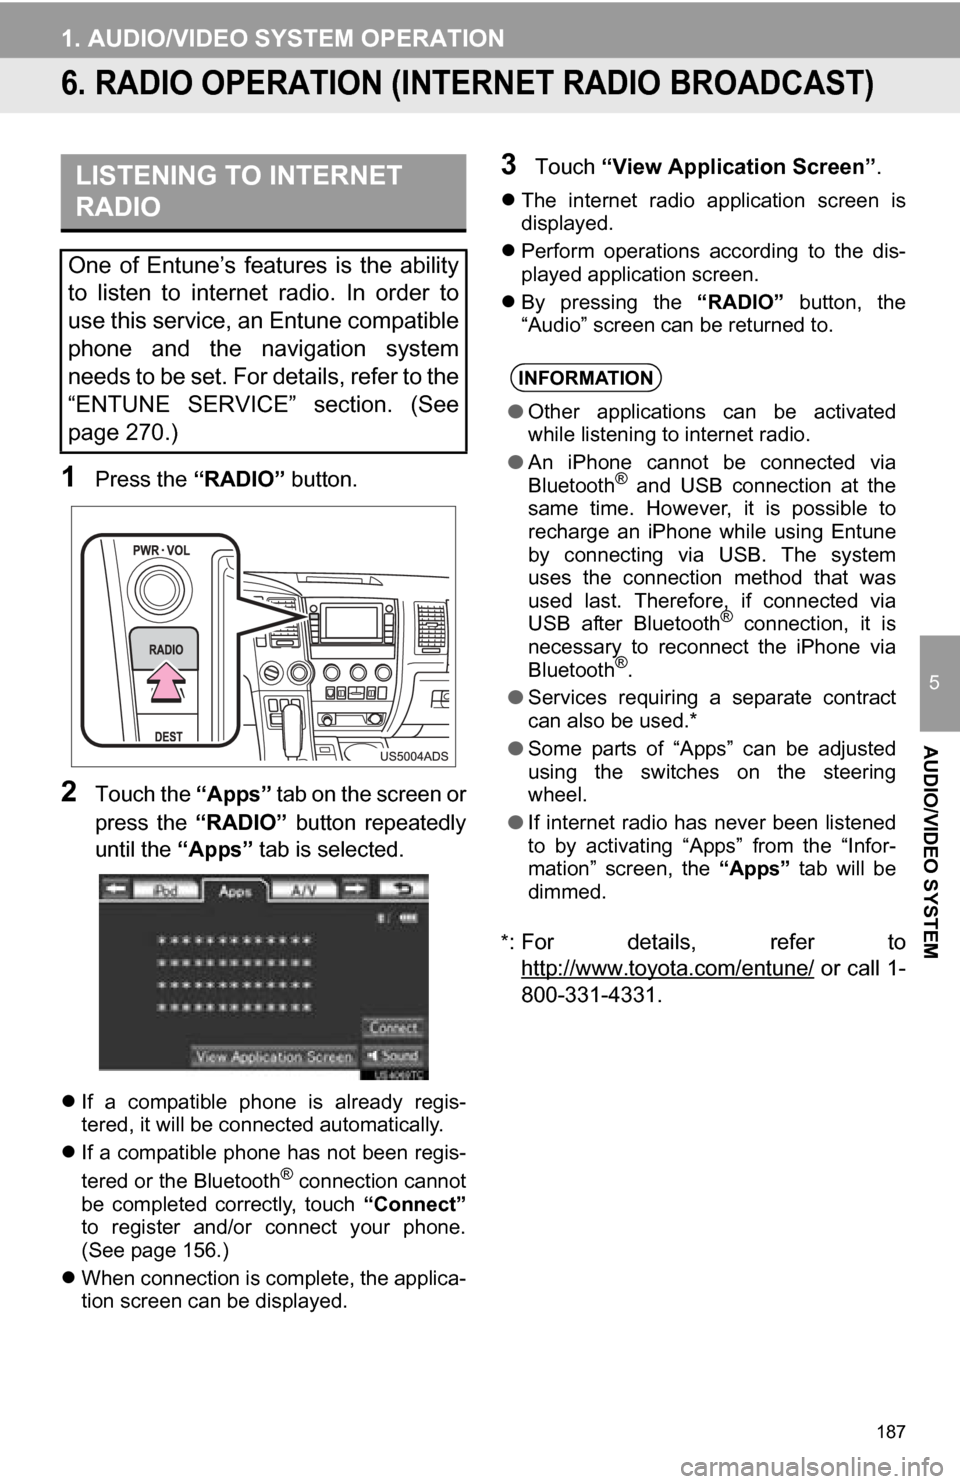
1Press the “RADIO” button.
2Touch the “Apps” tab on the screen or
press the “RADIO” button repeatedly
until the “Apps” tab is selected.
If a compatible phone is already regis-
tered, it will be connected automatically.
If a compatible phone has not been regis-
tered or the Bluetooth
® connection cannot
be completed correctly, touch “Connect”
to register and/or connect your phone.
(See page 156.)
When connection is complete, the applica-
tion screen can be displayed.
3Touch “View Application Screen” .
The internet radio application screen is
displayed.
Perform operations according to the dis-
played application screen.
By pressing the “RADIO” button, the
“Audio” screen can be returned to.
*
: For details, refer to http://www.toyota.com/entune/
or call 1-
800-331-4331.
LISTENING TO INTERNET
RADIO
One of Entune’s features is the ability
to listen to internet radio. In order to
use this service, an Entune compatible
phone and the navigation system
needs to be set. For details, refer to the
“ENTUNE SERVICE” section. (See
page 270.)
INFORMATION
● Other applications can be activated
while listening to internet radio.
● An iPhone cannot be connected via
Bluetooth
® and USB connection at the
same time. However, it is possible to
recharge an iPhone while using Entune
by connecting via USB. The system
uses the connection method that was
used last. Therefore, if connected via
USB after Bluetooth
® connection, it is
necessary to reconnect the iPhone via
Bluetooth
®.
● Services requiring a separate contract
can also be used.*
● Some parts of “Apps” can be adjusted
using the switches on the steering
wheel.
● If internet radio has never been listened
to by activating “Apps” from the “Infor-
mation” screen, the “Apps” tab will be
dimmed.
Page 216 of 328
216
1. AUDIO/VIDEO SYSTEM OPERATION
The portable player will be automatically
connected under the following conditions:
• The engine switch is in either the “ACC”
or “ON” position.
• When “Bluetooth* Power” is switched
from off to on.
• When the portable player is discon-
nected for some reason.
CAUTION
● This equipment complies with IC
radiation exposure limits set forth for
uncontrolled environment and meets
RSS-102 of the IC radio frequency (RF)
Exposure rules. This equipment has
very low levels of RF energy that it
deemed to comply without maximum
permissive exposure evaluation (MPE).
But it is desirable that it should be
installed and operated with at least 20
cm and more between the radiator and
person’s body (excluding extremities:
hands, wrists, feet and ankles).
Cet équipement se conforme aux limites
d’exposition aux radiations établies par
Industrie Canada pour un
environnement non contrôlé ainsi qu’aux
directives d’exposition aux fréquences
radioélectriques (RF) émises par
Industrie Canada dans la norme
CNR-102. Cet équipement émet un
niveau d’énergie RF faible à un point tel
qu’il se conforme sans devoir effectuer
d’évaluation d’exposition maximum
admissible (MPE). Lorsque l’équipement
est utilisé, il est toutefois souhaitable de
laisser au moins 20 cm entre l’antenne
et le corps (à l’exception des
extrémités : mains, poignets, pieds et
chevilles).
● Co-location: This transmitter must not be
co-located or operated in conjunction
with any other antenna or transmitter.
Co-implantation: cet émetteur ne doit
pas être co-implanté ou actionné en
même temps qu’aucune autre antenne
ou émetteur.
CONNECTING A Bluetooth®
AUDIO PLAYER
To use the Bluetooth® audio system, it
is necessary to register a portable
player with the system. Once the porta-
ble player has been registered, it is
possible to listen to the music.
Once the portable player has been reg-
istered, it is possible to listen to music
through the navigation system. (See
“REGISTERING A Bluetooth
® DE-
VICE” on page 157.)
INFORMATION
● For operating the portable player, see
the instruction manual that comes with
it.
WHEN “Bluetooth * Power” IS
ON
Page 238 of 328
238
1. VOICE COMMAND SYSTEM OPERATION
1. VOICE COMMAND SYSTEM
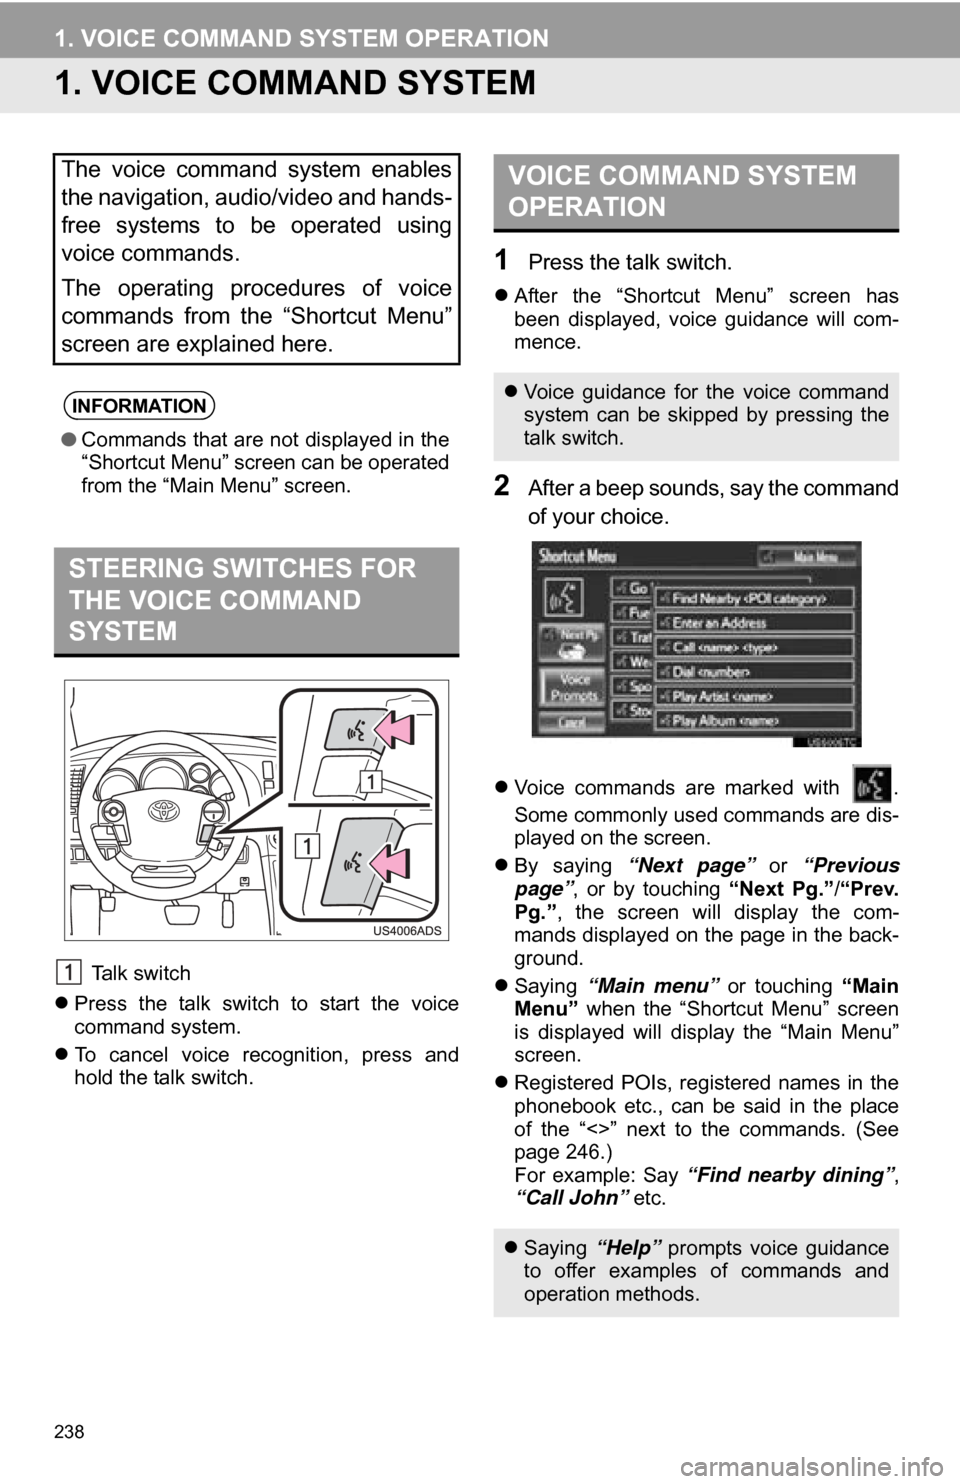
Talk switch
Press the talk switch to start the voice
command system.
To cancel voice recognition, press and
hold the talk switch.
1Press the talk switch.
After the “Shortcut Menu” screen has
been displayed, voice guidance will com-
mence.
2After a beep sounds, say the command
of your choice.
Voice commands are marked with .
Some commonly used commands are dis-
played on the screen.
By saying “Next page” or “Previous
page” , or by touching “Next Pg.”/“Prev.
Pg.” , the screen will display the com-
mands displayed on the page in the back-
ground.
Saying “Main menu” or touching “Main
Menu” when the “Shortcut Menu” screen
is displayed will display the “Main Menu”
screen.
Registered POIs, registered names in the
phonebook etc., can be said in the place
of the “<>” next to the commands. (See
page 246.)
For example: Say “Find nearby dining” ,
“Call John” etc.
The voice command system enables
the navigation, audio/video and hands-
free systems to be operated using
voice commands.
The operating procedures of voice
commands from the “Shortcut Menu”
screen are explained here.
INFORMATION
●Commands that are not displayed in the
“Shortcut Menu” screen can be operated
from the “Main Menu” screen.
STEERING SWITCHES FOR
THE VOICE COMMAND
SYSTEM
VOICE COMMAND SYSTEM
OPERATION
Voice guidance for the voice command
system can be skipped by pressing the
talk switch.
Saying “Help” prompts voice guidance
to offer examples of commands and
operation methods.
Page 239 of 328
239
1. VOICE COMMAND SYSTEM OPERATION
6
VOICE COMMAND SYSTEM
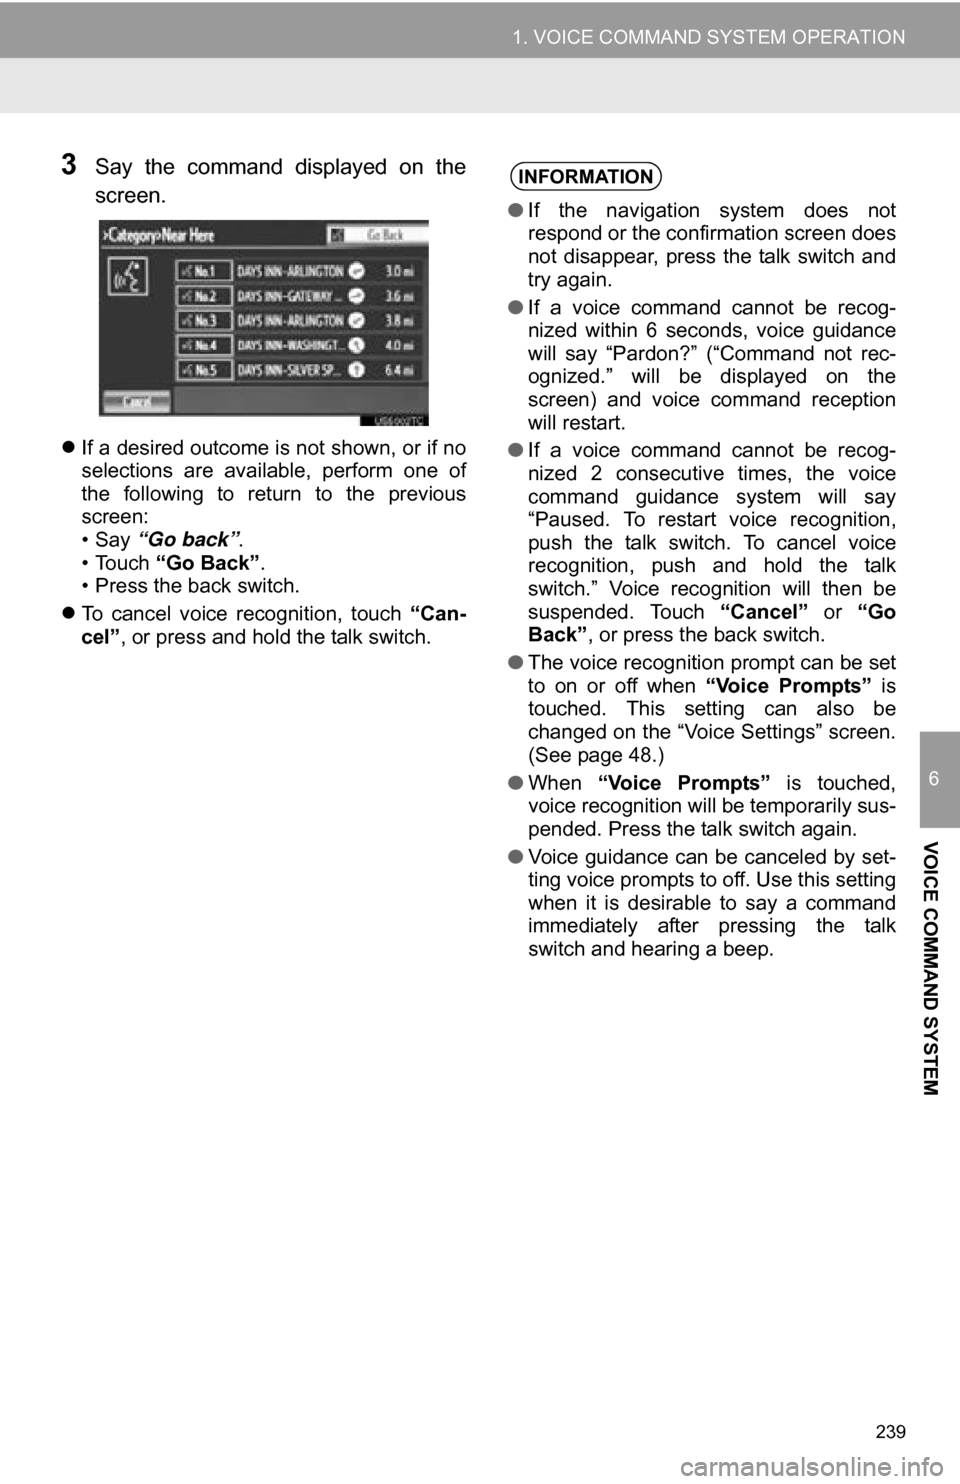
3Say the command displayed on the
screen.
If a desired outcome is not shown, or if no
selections are available, perform one of
the following to return to the previous
screen:
•Say “Go back” .
• Touch “Go Back” .
• Press the back switch.
To cancel voice recognition, touch “Can-
cel”, or press and hold the talk switch.
INFORMATION
● If the navigation system does not
respond or the confirmation screen does
not disappear, press the talk switch and
try again.
● If a voice command cannot be recog-
nized within 6 seconds, voice guidance
will say “Pardon?” (“Command not rec-
ognized.” will be displayed on the
screen) and voice command reception
will restart.
● If a voice command cannot be recog-
nized 2 consecutive times, the voice
command guidance system will say
“Paused. To restart voice recognition,
push the talk switch. To cancel voice
recognition, push and hold the talk
switch.” Voice recognition will then be
suspended. Touch “Cancel” or “Go
Back” , or press the back switch.
● The voice recognition prompt can be set
to on or off when “Voice Prompts” is
touched. This setting can also be
changed on the “Voice Settings” screen.
(See page 48.)
● When “Voice Prompts” is touched,
voice recognition will be temporarily sus-
pended. Press the talk switch again.
● Voice guidance can be canceled by set-
ting voice prompts to off. Use this setting
when it is desirable to say a command
immediately after pressing the talk
switch and hearing a beep.
Page 246 of 328
246
1. VOICE COMMAND SYSTEM OPERATION
4. COMMAND LIST
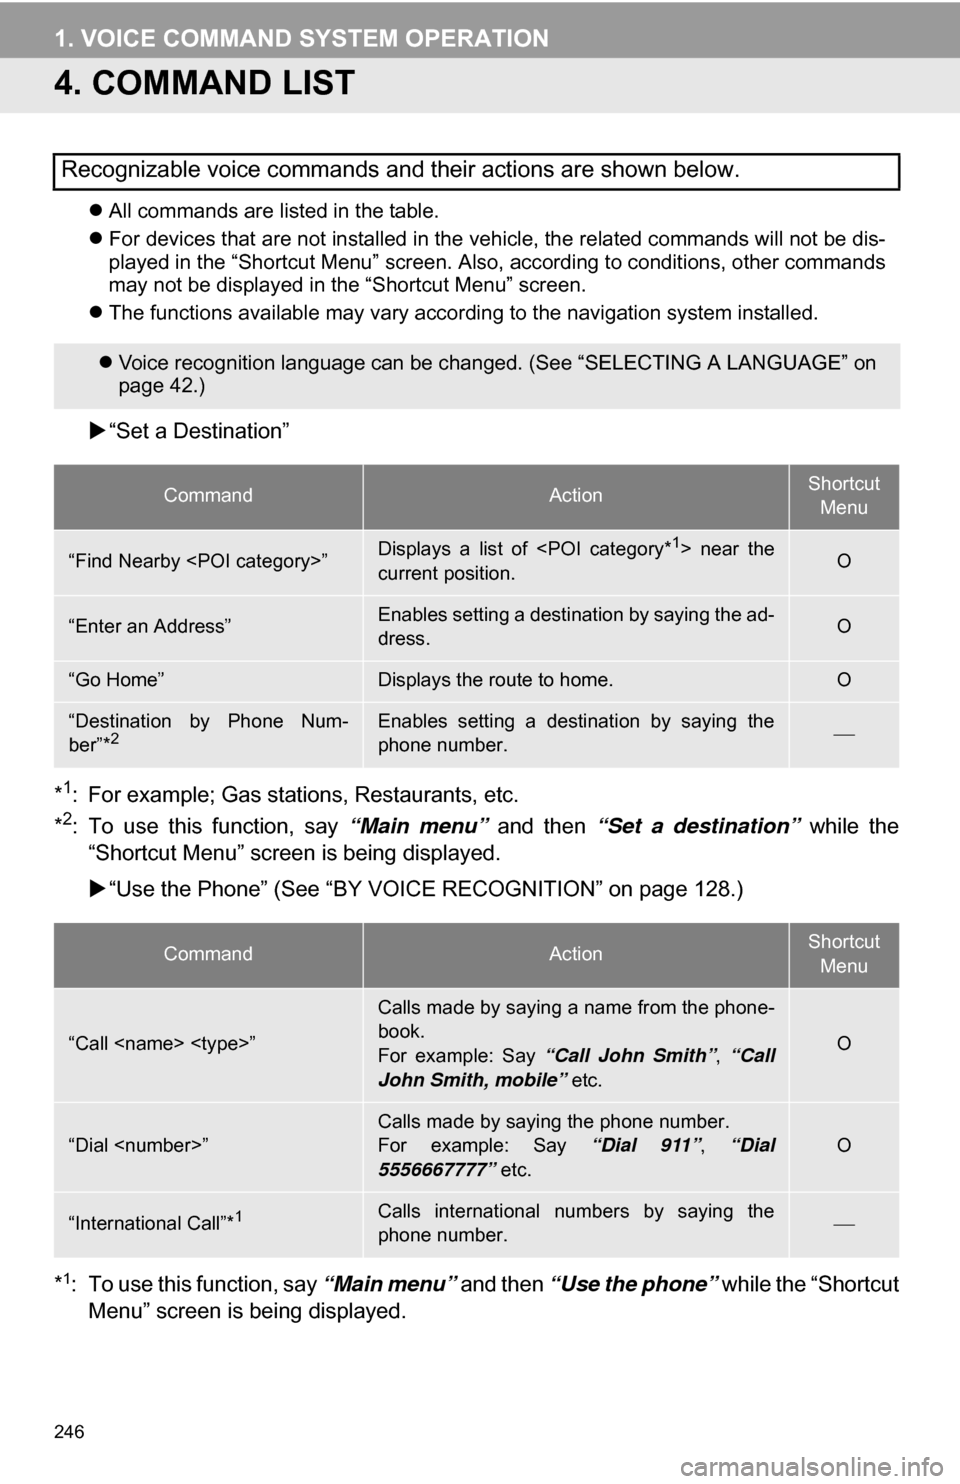
All commands are listed in the table.
For devices that are not installed in the vehicle, the related commands will not be dis-
played in the “Shortcut Menu” screen. Also, according to conditions, other commands
may not be displayed in the “Shortcut Menu” screen.
The functions available may vary according to the navigation system installed.
“Set a Destination”
*
1: For example; Gas stations, Restaurants, etc.
*2: To use this function, say “Main menu” and then “Set a destination” while the
“Shortcut Menu” screen is being displayed.
“Use the Phone” (See “BY VOIC E RECOGNITION” on page 128.)
*
1: To use this function, say “Main menu” and then “Use the phone” while the “Shortcut
Menu” screen is being displayed.
Recognizable voice commands and their actions are shown below.
Voice recognition language can be changed. (See “SELECTING A LANGUAGE” on
page 42.)
CommandActionShortcut
Menu
“Find Nearby
current position.O
“Enter an Address”Enables setting a destination by saying the ad-
dress.O
“Go Home”Displays the route to home.O
“Destination by Phone Num-
ber”*2Enables setting a destination by saying the
phone number.
CommandActionShortcut Menu
“Call
Calls made by saying a name from the phone-
book.
For example: Say “Call John Smith” , “Call
John Smith, mobile” etc.
O
“Dial
For example: Say “Dial 911”, “Dial
5556667777” etc.O
“International Call”*1Calls international numbers by saying the
phone number.
Page 253 of 328
253
7
INFORMATION
3. XM FUNCTION OPERATION
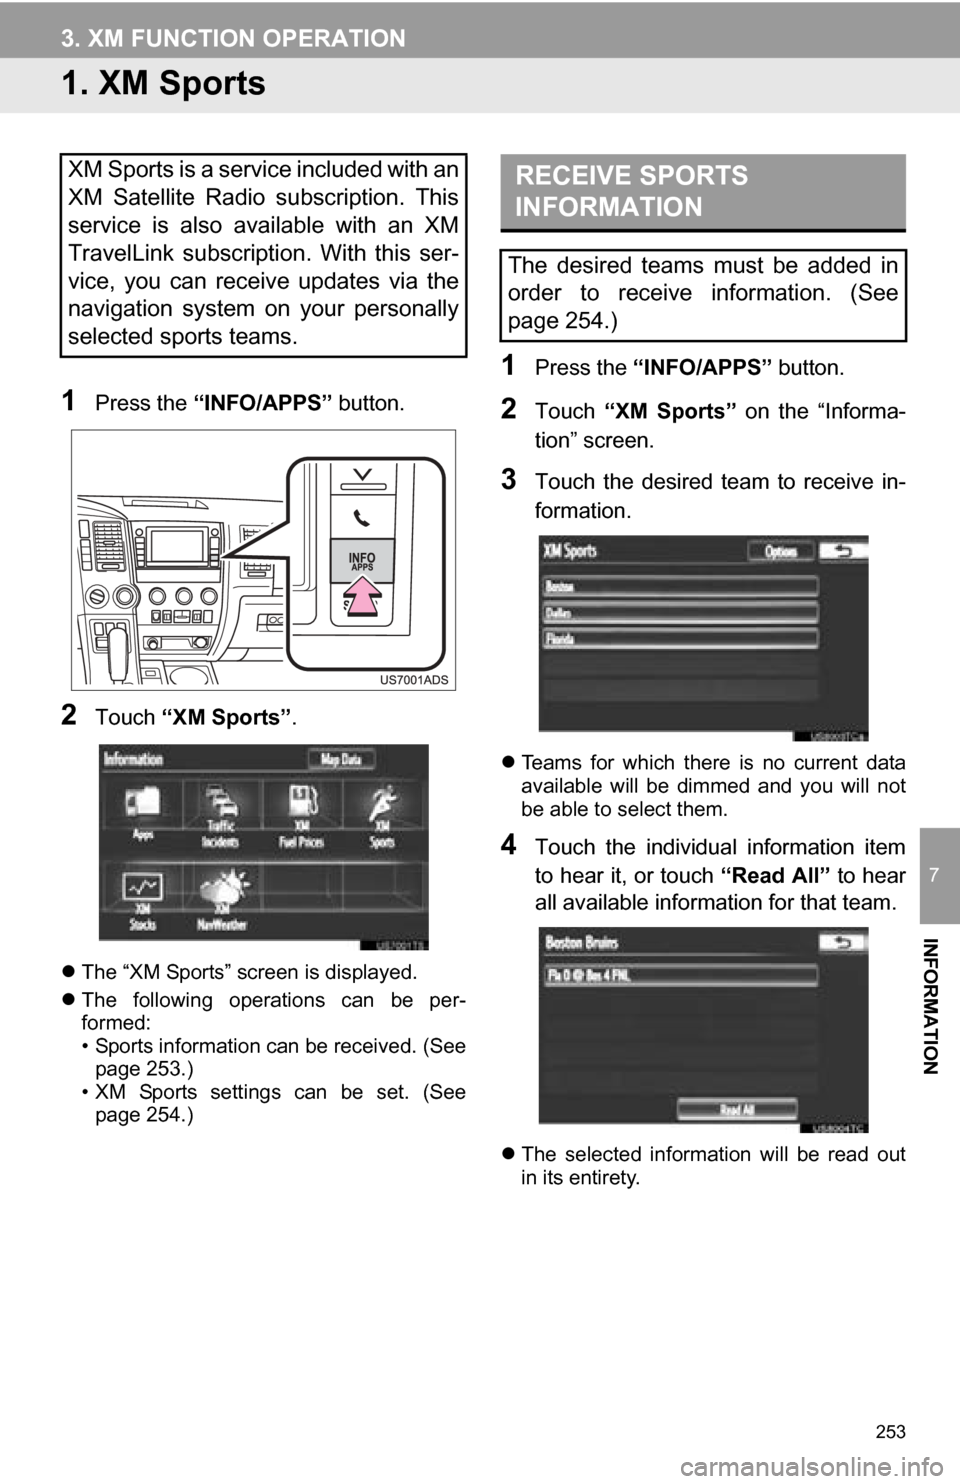
1. XM Sports
1Press the “INFO/APPS” button.
2Touch “XM Sports”.
The “XM Sports” screen is displayed.
The following operations can be per-
formed:
• Sports information can be received. (See
page 253.)
• XM Sports settings can be set. (See page 254.)
1Press the “INFO/APPS” button.
2Touch “XM Sports” on the “Informa-
tion” screen.
3Touch the desired team to receive in-
formation.
Teams for which there is no current data
available will be dimmed and you will not
be able to select them.
4Touch the individual information item
to hear it, or touch “Read All” to hear
all available information for that team.
The selected information will be read out
in its entirety.
XM Sports is a service included with an
XM Satellite Radio subscription. This
service is also available with an XM
TravelLink subscription. With this ser-
vice, you can receive updates via the
navigation system on your personally
selected sports teams.RECEIVE SPORTS
INFORMATION
The desired teams must be added in
order to receive information. (See
page 254.)
Page 256 of 328
256
3. XM FUNCTION OPERATION
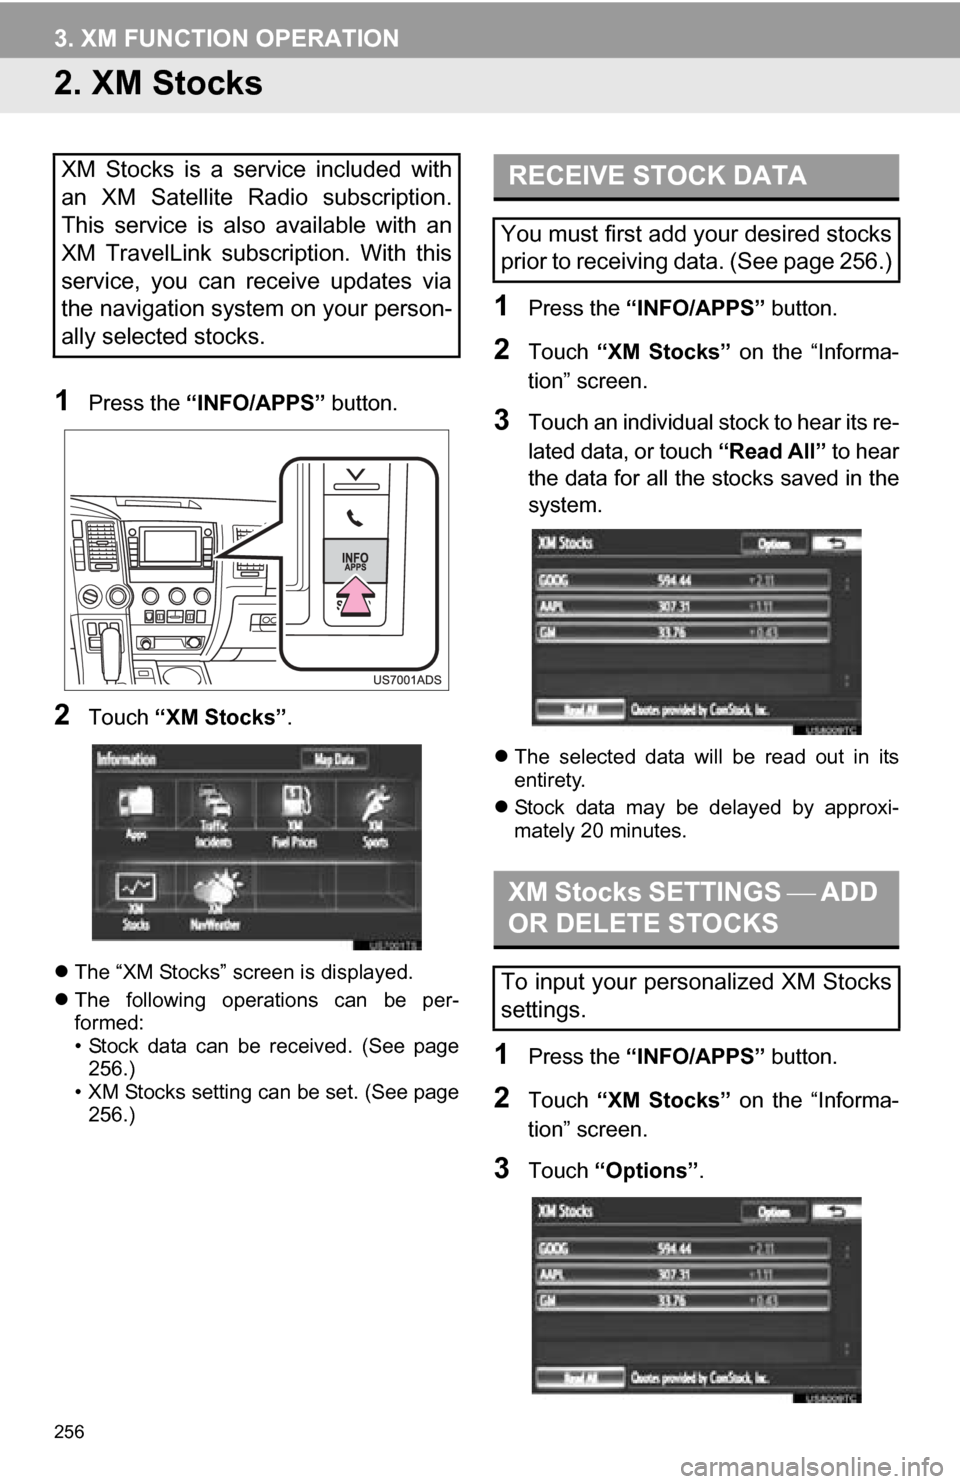
2. XM Stocks
1Press the “INFO/APPS” button.
2Touch “XM Stocks” .
The “XM Stocks” screen is displayed.
The following operations can be per-
formed:
• Stock data can be received. (See page
256.)
• XM Stocks setting can be set. (See page 256.)
1Press the “INFO/APPS” button.
2Touch “XM Stocks” on the “Informa-
tion” screen.
3Touch an individual stock to hear its re-
lated data, or touch “Read All” to hear
the data for all the stocks saved in the
system.
The selected data will be read out in its
entirety.
Stock data may be delayed by approxi-
mately 20 minutes.
1Press the “INFO/APPS” button.
2Touch “XM Stocks” on the “Informa-
tion” screen.
3Touch “Options” .
XM Stocks is a service included with
an XM Satellite Radio subscription.
This service is also available with an
XM TravelLink subscription. With this
service, you can receive updates via
the navigation system on your person-
ally selected stocks.RECEIVE STOCK DATA
You must first add your desired stocks
prior to receiving data. (See page 256.)
XM Stocks SETTINGS ADD
OR DELETE STOCKS
To input your personalized XM Stocks
settings.