change time TOYOTA SEQUOIA 2014 2.G Owner's Manual
[x] Cancel search | Manufacturer: TOYOTA, Model Year: 2014, Model line: SEQUOIA, Model: TOYOTA SEQUOIA 2014 2.GPages: 668, PDF Size: 13.86 MB
Page 362 of 668
362 3-2. Using the multimedia system
Select “OK” when the connection status changes from “Con-
necting...” to “Connected”.
If an error message is displayed, follow the guidance on the screen
to try again.
Registration can be performed from screens other than the
“Bluetooth Setup” screen.
■When registering from th e “Bluetooth Audio” screen
Display the “Bluetooth Audio” screen. ( P. 332)
Select “Select Device”.
Follow the steps in “How to registering a Bluetooth
® device”
from “STEP 2”. ( P. 361)
■ Deleting a Bluetooth
® device
Display the “Bluetooth Setup” screen. ( P. 359)
Select “Remove”.
Select the desired device.
A confirmation message will be displayed, select “Yes” to
delete the device.
Check that a confirmation screen is displayed when the oper-
ation is complete.
Page 365 of 668
365
3-2. Using the multimedia system
3
Interior features
Displaying a Bluetooth® device details
You can confirm and change the registered device details.
■ Bluetooth
® device registration status
Display the “Bluetooth Setup” screen. ( P. 359)
Select the device.
Select “Device Info”.
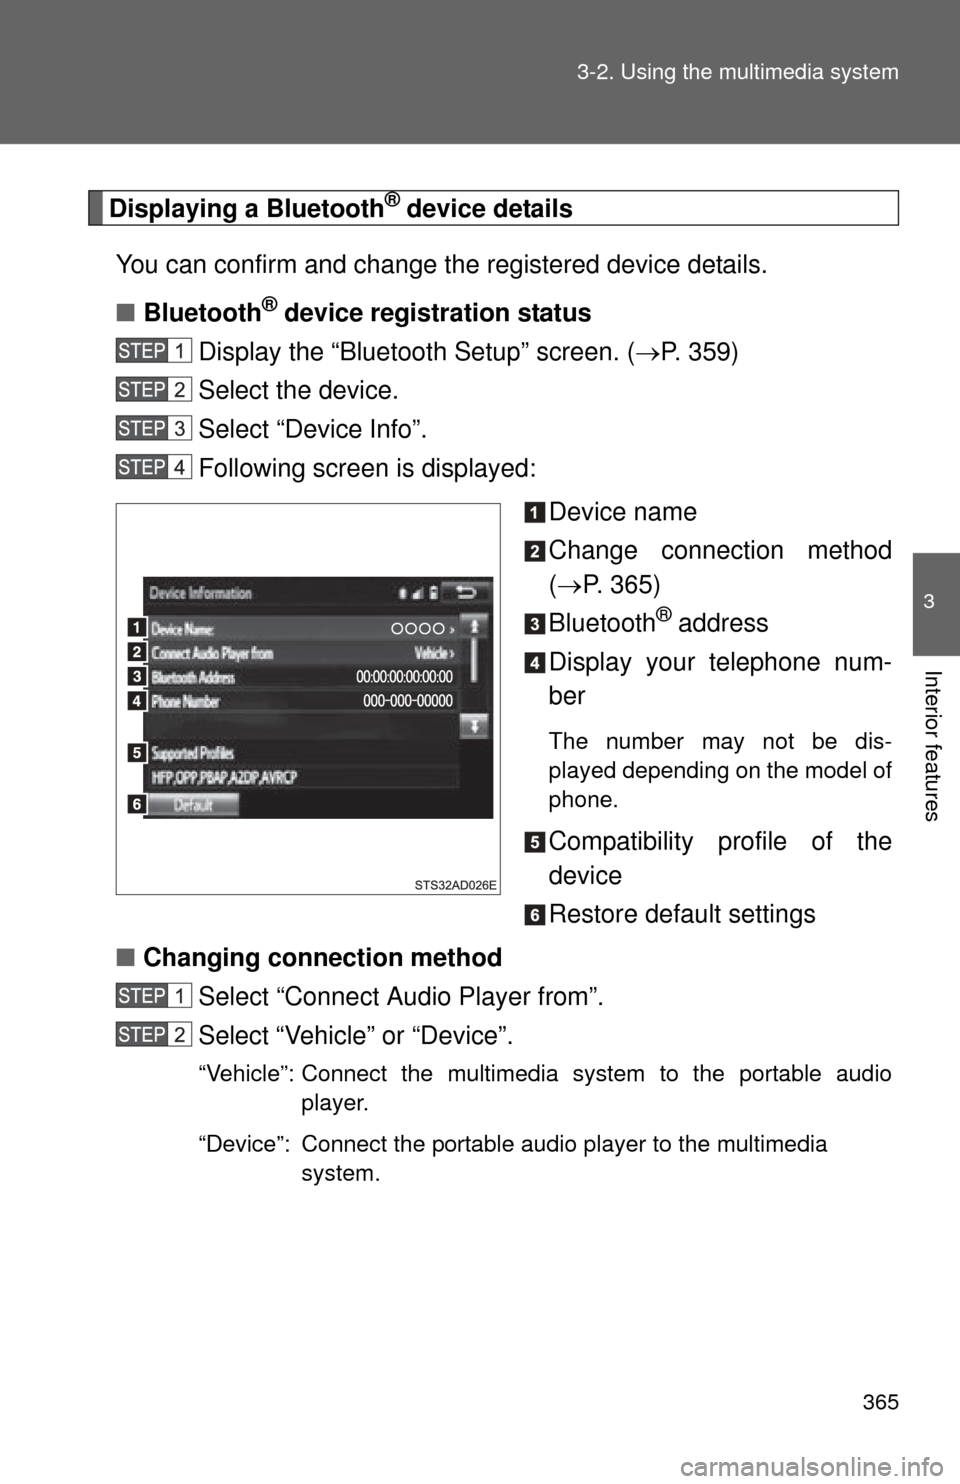
Following screen is displayed:
Device name
Change connection method
( P. 365)
Bluetooth
® address
Display your telephone num-
ber
The number may not be dis-
played depending on the model of
phone.
Compatibility profile of the
device
Restore default settings
■ Changing connection method
Select “Connect Audio Player from”.
Select “Vehicle” or “Device”.
“Vehicle”: Connect the multimedia system to the portable audio player.
“Device”: Connect the portable audio player to the multimedia system.
Page 366 of 668
366 3-2. Using the multimedia system
Detailed Bluetooth® system settings
You can confirm and change the detailed Bluetooth
® settings.
■ How to check and change detailed Bluetooth
® settings
Display the “Bluetooth Setup” screen. ( P. 359)
Select “System Settings”.
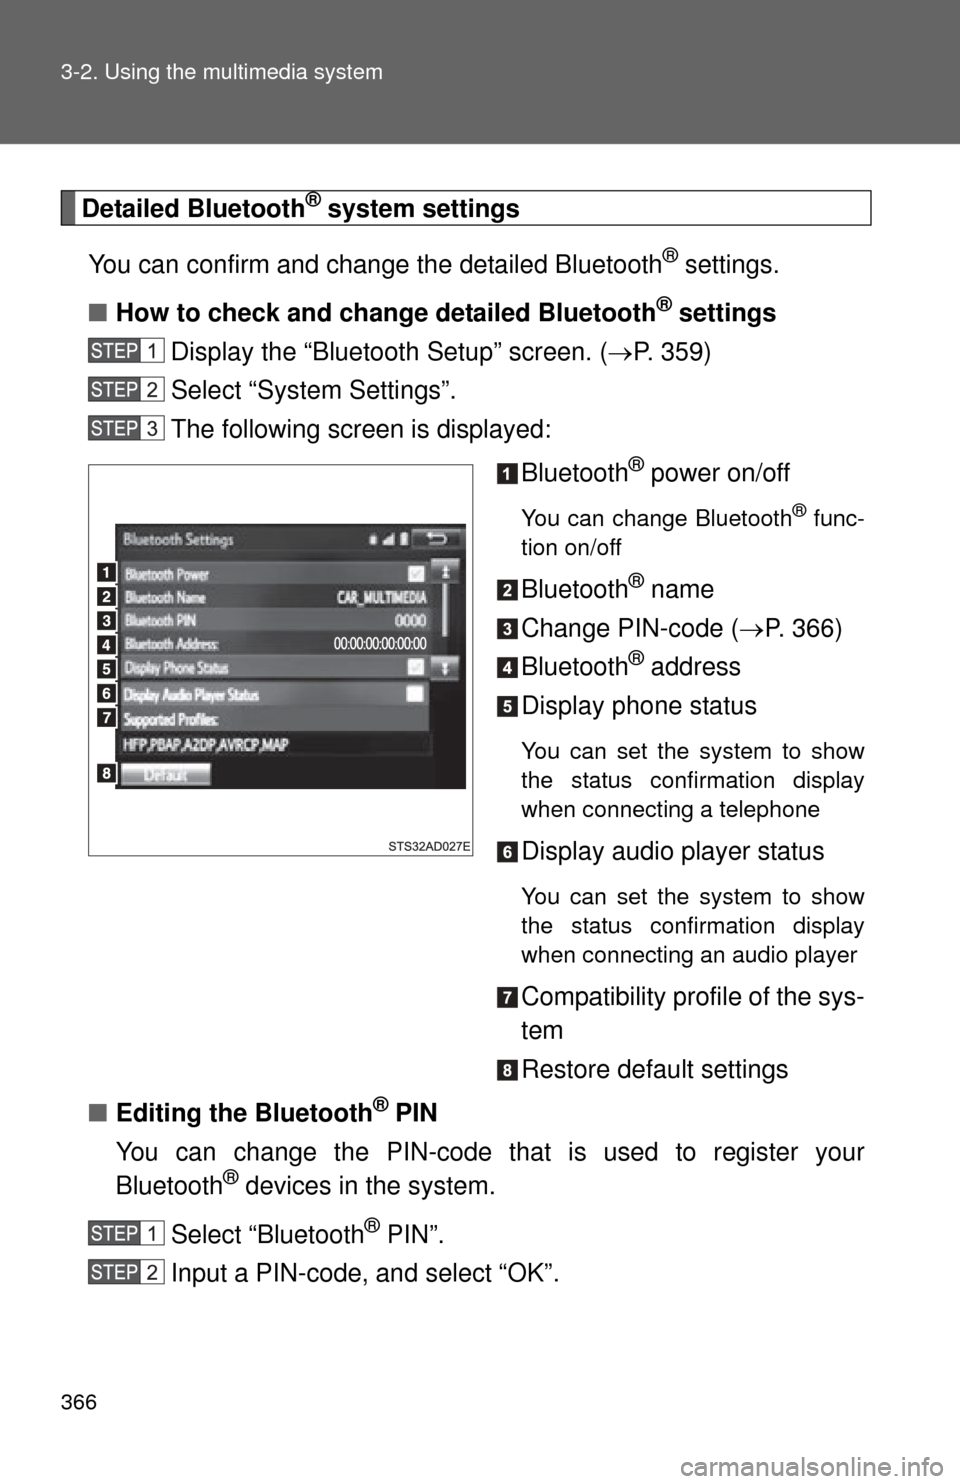
The following screen is displayed:
Bluetooth
® power on/off
You can change Bluetooth® func-
tion on/off
Bluetooth® name
Change PIN-code ( P. 366)
Bluetooth
® address
Display phone status
You can set the system to show
the status confirmation display
when connecting a telephone
Display audio player status
You can set the system to show
the status confirmation display
when connecting an audio player
Compatibility profile of the sys-
tem
Restore default settings
■ Editing the Bluetooth
® PIN
You can change the PIN-code that is used to register your
Bluetooth
® devices in the system.
Select “Bluetooth
® PIN”.
Input a PIN-code, and select “OK”.
Page 371 of 668

371
3-2. Using the multimedia system
3
Interior features
In other situations
SymptomLikely cause Solution
Even though all
conceivable
measures have
been taken, the
symptom status
does not
change.
The cellular phone is not
close enough to this sys-
tem.Bring the cellular phone
closer to this system.
The cellular phone is the
most likely cause of the
symptom.
• Turn the cellular phone
off, remove and reinstall
the battery pack, and
then restart the cellular
phone.
• Enable the cellular phone’s Bluetooth
® con-
nection.
• Stop the cellular phone’s security software and
close all applications.
• Before using an applica- tion installed on the cellu-
lar phone, carefully check
its source and how its
operation might affect
this system.
Page 377 of 668
377
3-2. Using the multimedia system
3
Interior features
■
Reconnecting the portable audio player
If the portable audio player is disconnected due to poor reception when the
engine switch is in the “ACC” or “ON” position, the system automatically
reconnects the portable audio player.
If you have switched off the portable audio player yourself, follow the instruc-
tions below to reconnect:
●Select the portable audio player again
● Enter the portable audio player
■ When you sell your car
Be sure to delete your personal data. ( P. 329)
CAUTION
■FCC WARNING
Changes or modifications not expressly approved by the party responsible
for compliance could void the user’s authority to operate the equipment.
Radio frequency radiation exposure information:
This equipment complies with FCC radiation exposure limits set forth for an
uncontrolled environment.
This equipment should be installed and operated with minimum distance of
7.9 in. (20 cm) between the radiator and your body.
This transmitter must not be co-located operating in conjuction with any
other antenna or transmitter.
■ While driving
Do not use the portable audio player, cellular phone or connect a device to
the Bluetooth
® system.
Page 388 of 668
388 3-2. Using the multimedia system
■To transfer a call
Select “Handset Mode” to change from a hands-free call to a cellu-
lar phone call.
Select “Handset Mode” to off from a cellular phone call to a hands-
free call.
■ Transmit volume setting
Select “Transmit Volume”.
Select the desired level for the transmit volume.
Select “OK”.
■ To hang up
Select .
■Release Tones
●A continuous tone signal is a character string that consists of numbers
and the characters “p” or “w”. (e.g.056133w0123p#1 )
● When the “p” pause tone is used, the tone data up until the next pause
tone will be automatically sent after 2 seconds have elapsed. When the
“w” pause tone is used, the tone data up until the next pause tone will be
automatically sent after a user operation is performed.
● Release tones can be used when automated operation of a phone based
service such as an answering machine or bank phone service is desired.
A phone number with continuous tone signals can be registered in the
contact list.
● Tone data after a “w” pause tone can be operated on voice command
during a call.
Page 396 of 668

396 3-2. Using the multimedia system
Contact/Call history settingsThe contact can be transferred from a Bluetooth
® phone to the sys-
tem. The contact also can be added, edited and deleted.
The call history can be deleted and contact and favorites can be
changed.
Display the “Phone/Message Settings” screen. ( P. 394)
Select “Contact/Call History Settings”.
Select the desired item to be set.
For PBAP compatible
Bluetooth
® phones, select to
set automatic contact/history
transfer on/off. When set to
on, the phone’s contact data
and history are automatically
transferred.
Select to update contacts from
the connected phone.
( P. 397)
Select to sort contacts by the
first name or last name field.
Select to add contacts to the
favorites list. ( P. 401)
Select to delete contacts from
the favorites list. ( P. 402)
Select to display contact
images.
Select to clear contacts from
the call history.
Select to add new contacts to
the contact list.
* ( P. 399)
Select to edit contacts in the
contact list.
* ( P. 399)
Page 401 of 668
401
3-2. Using the multimedia system
3
Interior features
■
Favorites list setting
Up to 15 contacts (maximum of 4 numbers per contact) can be reg-
istered in the favorites list.
● Registering the contacts in the favorites list
Select “Add Favorite”.
Select the desired contact to add to the favorites list.
Dimmed contacts are already stored as a favorite.
Check that a confirmation screen is displayed when the oper-
ation is complete.
When 15 contacts have already been registered to the favorites list
When 15 contacts have already been registered to the favor-
ites list, a registered contact needs to be replaced.
Select “Yes” when the confirmation screen appears to replace
a contact.
Select the contact to be replaced.
Check that a confirmation screen is displayed when the oper-
ation is complete.
Registering contacts in the favorites list in a different way (from the
“Contacts” screen) Display the phone screen. ( P. 380)
Select the “Contacts” tab.
Select at the beginning of the desired contact list name to
be registered in the favorites list.
When selected, is changed to , and the contact is registered
in the favorites list.
Page 402 of 668
402 3-2. Using the multimedia system
Registering contacts in the favorites list in a different way (from the
“Contact Details” screen)Display the phone screen. ( P. 380)
Select the “Contacts” tab or the “Call History” tab and select
the desired contact.
Select “Add Favorite”.
Check that a confirmation screen is displayed when the oper-
ation is complete.
● Deleting the contacts in the favorites list
Select “Remove Favorite”.
Select the desired contacts and select “Remove”.
Select “Yes” when the confirmation screen appears.
Check that a confirmation screen is displayed when the oper-
ation is complete.
Deleting contacts in the favorites list in a different way (from the
“Contacts” screen) Display the phone screen. ( P. 380)
Select the “Contacts” tab.
Select at the beginning of the contact list name to be
deleted from the favorites. list.
When selected, is changed to , and the data is deleted from
the list.
Deleting contacts in the favorites list in a different way (from the
“Contact Details” screen) Display the phone screen. ( P. 380)
Select the “Contacts”, “Call history” tab or the “Favorites” tab
and select the desired contact to delete.
Select “Remove Favorite”.
Select “Yes” when the confirmation screen appears.
Check that a confirmation screen is displayed when the oper-
ation is complete.
Page 403 of 668
403
3-2. Using the multimedia system
3
Interior features
■
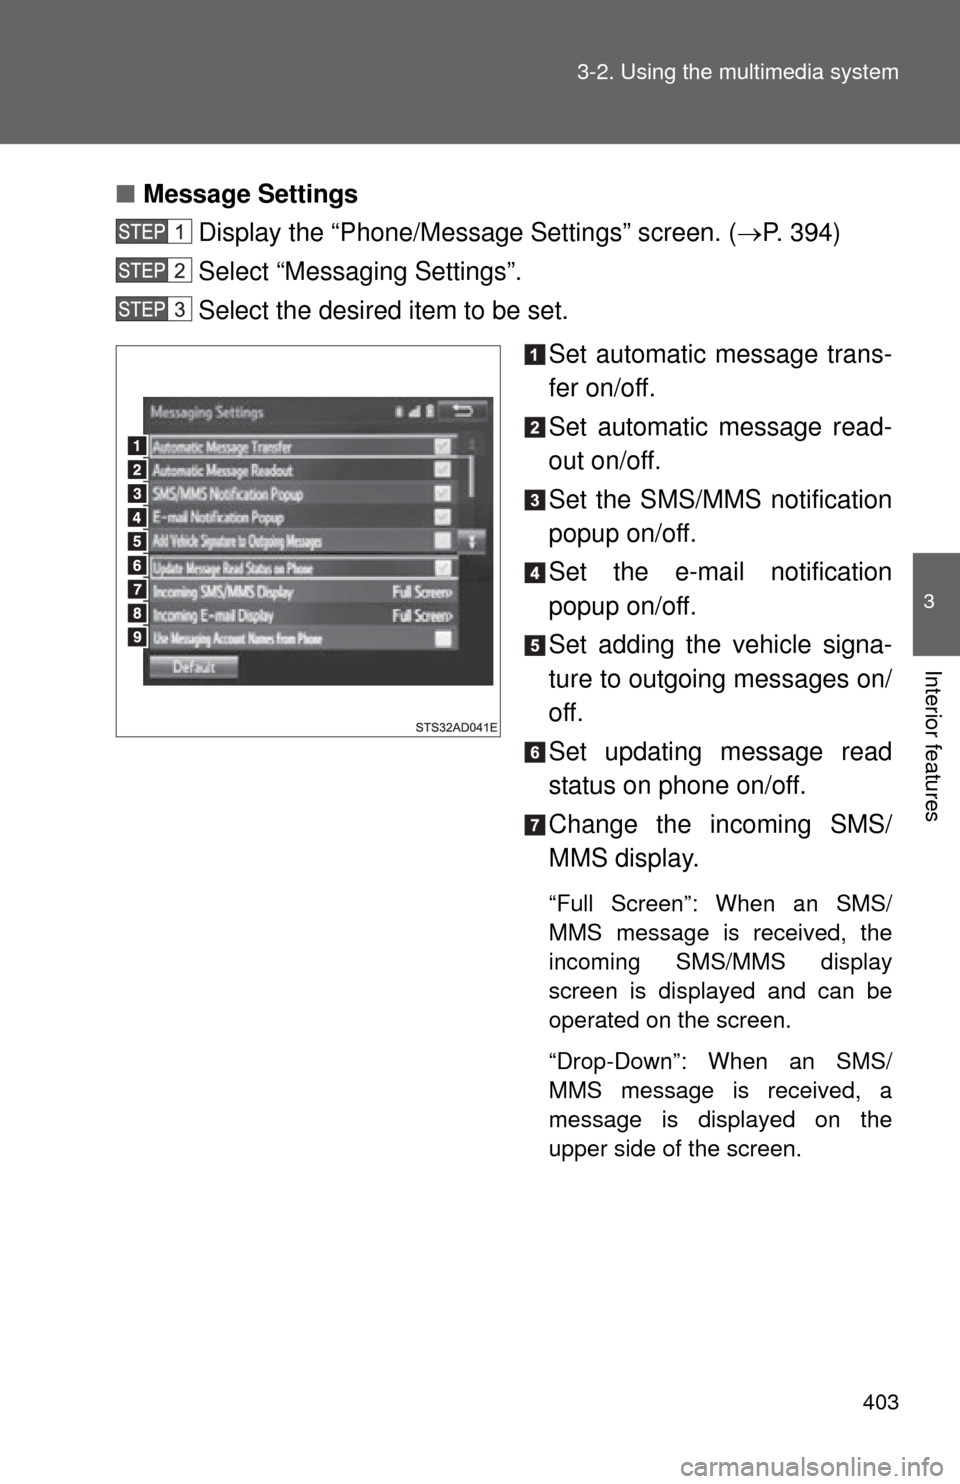
Message Settings
Display the “Phone/Message Settings” screen. ( P. 394)
Select “Messaging Settings”.
Select the desired item to be set.
Set automatic message trans-
fer on/off.
Set automatic message read-
out on/off.
Set the SMS/MMS notification
popup on/off.
Set the e-mail notification
popup on/off.
Set adding the vehicle signa-
ture to outgoing messages on/
off.
Set updating message read
status on phone on/off.
Change the incoming SMS/
MMS display.
“Full Screen”: When an SMS/
MMS message is received, the
incoming SMS/MMS display
screen is displayed and can be
operated on the screen.
“Drop-Down”: When an SMS/
MMS message is received, a
message is displayed on the
upper side of the screen.