TOYOTA SEQUOIA 2014 2.G Repair Manual
Manufacturer: TOYOTA, Model Year: 2014, Model line: SEQUOIA, Model: TOYOTA SEQUOIA 2014 2.GPages: 668, PDF Size: 13.86 MB
Page 61 of 668
61
1-3. Adjustable components (s
eats, mirrors, steering wheel)
1
Before driving
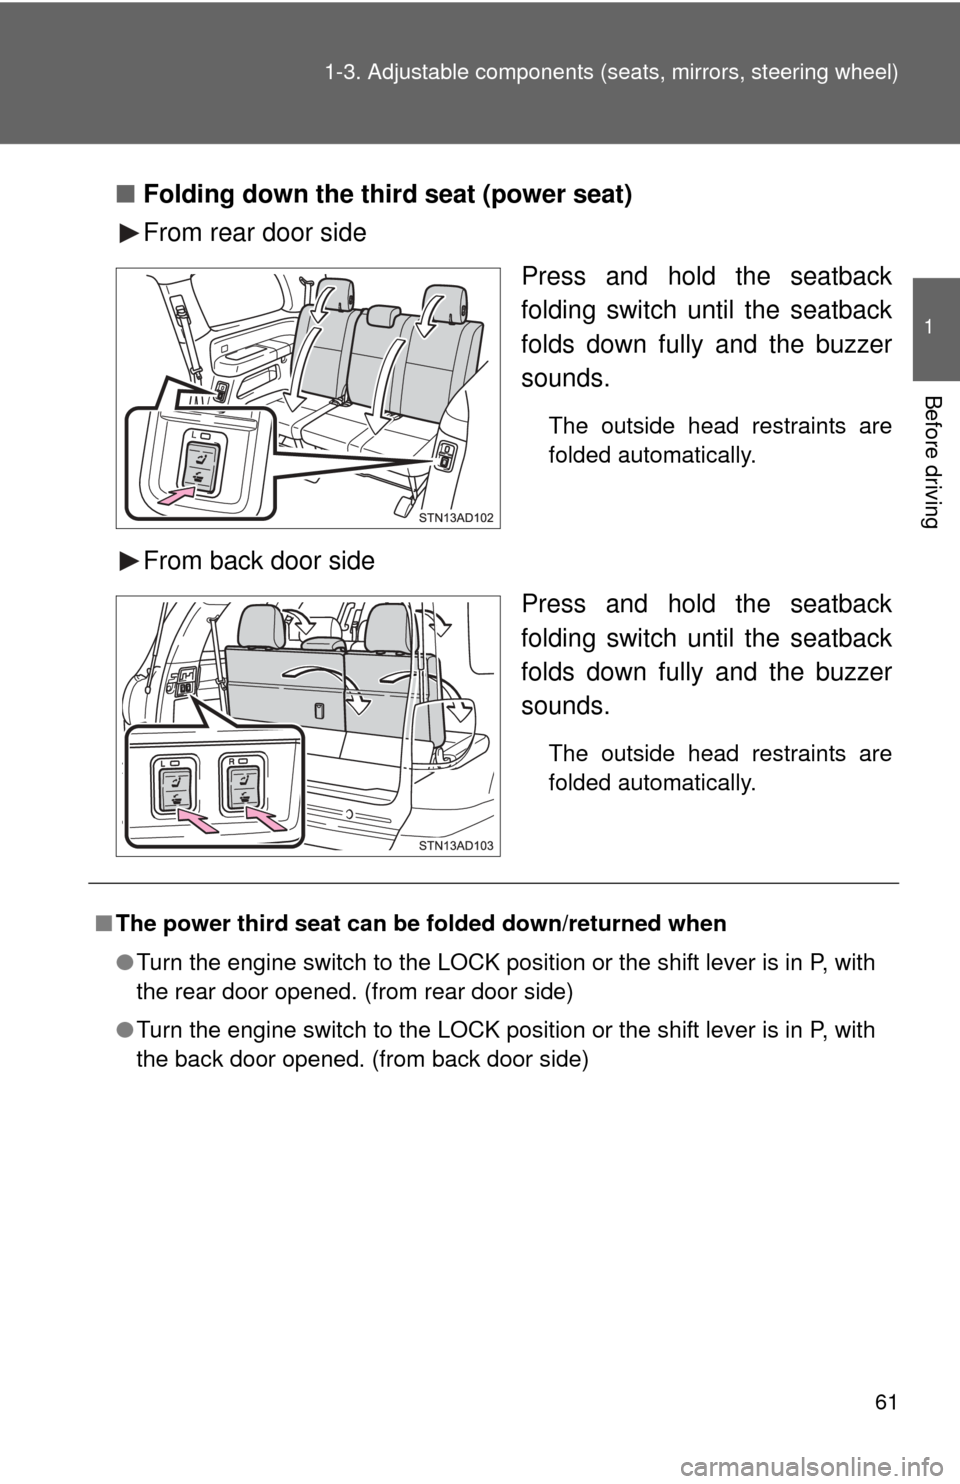
■Folding down the third seat (power seat)
From rear door side
Press and hold the seatback
folding switch until the seatback
folds down fully and the buzzer
sounds.
The outside head restraints are
folded automatically.
From back door sidePress and hold the seatback
folding switch until the seatback
folds down fully and the buzzer
sounds.
The outside head restraints are
folded automatically.
■The power third seat can be folded down/returned when
● Turn the engine switch to the LOCK position or the shift lever is in P, with
the rear door opened. (from rear door side)
● Turn the engine switch to the LOCK position or the shift lever is in P, with
the back door opened. (from back door side)
Page 62 of 668
62 1-3. Adjustable components (seats, mirrors, steering wheel)
CAUTION
■When adjusting a rear seat
●Be careful that the seat does not hit passengers or luggage.
● Do not recline the seat more than necessary when the vehicle is in motion
to reduce the risk of sliding under the lap belt. If the seat is too reclined,
the lap belt may slide past the hips and apply restraint forces directly to the
abdomen or your neck may contact the shoulder belt, increasing the risk of
death or serious injury in the event of an accident.
● Do not depress the second seat release pedal from the third seat while t\
he
second seat is occupied.
● Be careful not to get your hands or feet caught in the seat.
■ Before folding down a rear seat
Do not fold down a rear seat when there are passengers sitting in the rear
seats or when there is luggage placed on/under the rear seats.
■ After adjusting a seat
Observe the following precautions. Failure to do so may result in death or
serious injury.
●Make sure that the seat and seatback are securely locked in position by
lightly rocking them back and forth.
● Check that the seat belts are not twisted or caught under the seat.
NOTICE
■When folding down the seats
The seat belts and buckles must be stowed.
■ Second seatback board weight capacity
Do not place any object heavier than 220 lb. (100 kg) on the second seat-
back board.
■ Before sliding the second center seat to the most forward position
(vehicles with bench type second seat)
Ensure that the cup holder on the front console box is closed.
Page 63 of 668
63
1
1-3. Adjustable components (seats, mirrors, steering wheel)
Before driving
Driving position memor y (driver’s seat)
: If equipped
Your preferred driving position (the position of the driver’s seat,
steering wheel and outside rear view mirrors) can be entered into the
computer’s memory and recalle d with the touch of a button.
Two different driving positions can be entered into memory.
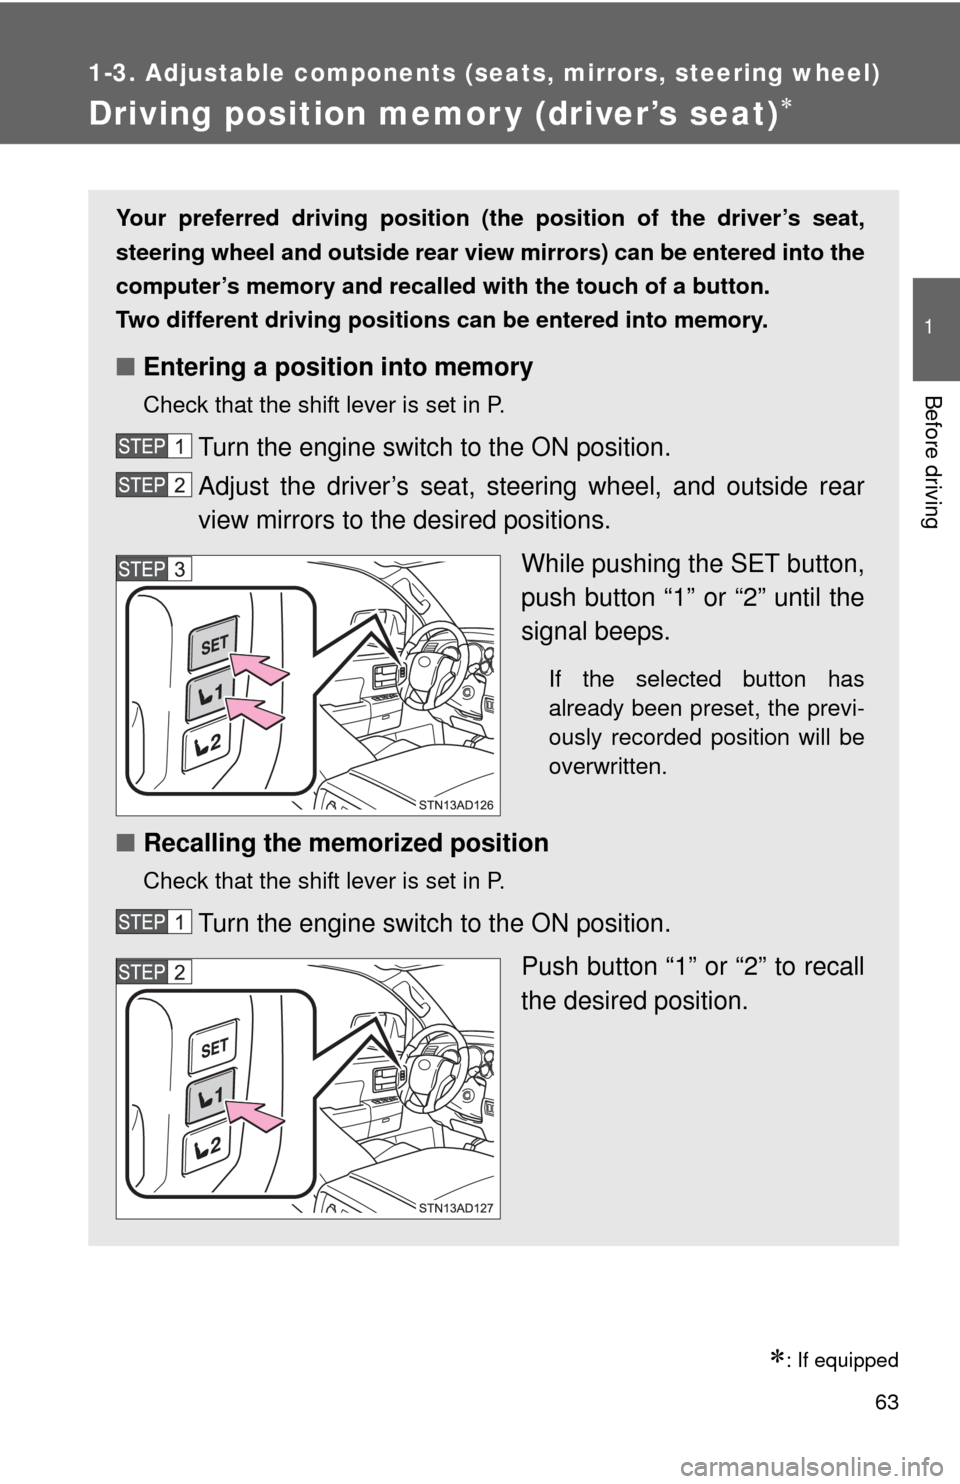
■ Entering a position into memory
Check that the shift lever is set in P.
Turn the engine switch to the ON position.
Adjust the driver’s seat, steering wheel, and outside rear
view mirrors to the desired positions.
While pushing the SET button,
push button “1” or “2” until the
signal beeps.
If the selected button has
already been preset, the previ-
ously recorded position will be
overwritten.
■Recalling the memorized position
Check that the shift lever is set in P.
Turn the engine switch to the ON position.
Push button “1” or “2” to recall
the desired position.
Page 64 of 668
64 1-3. Adjustable components (seats, mirrors, steering wheel)
Linking driving position memory with door unlock operation
Memorized driving positions can be recalled when you unlock the
driver’s door using the wireless remote control and open the driver’s
door.
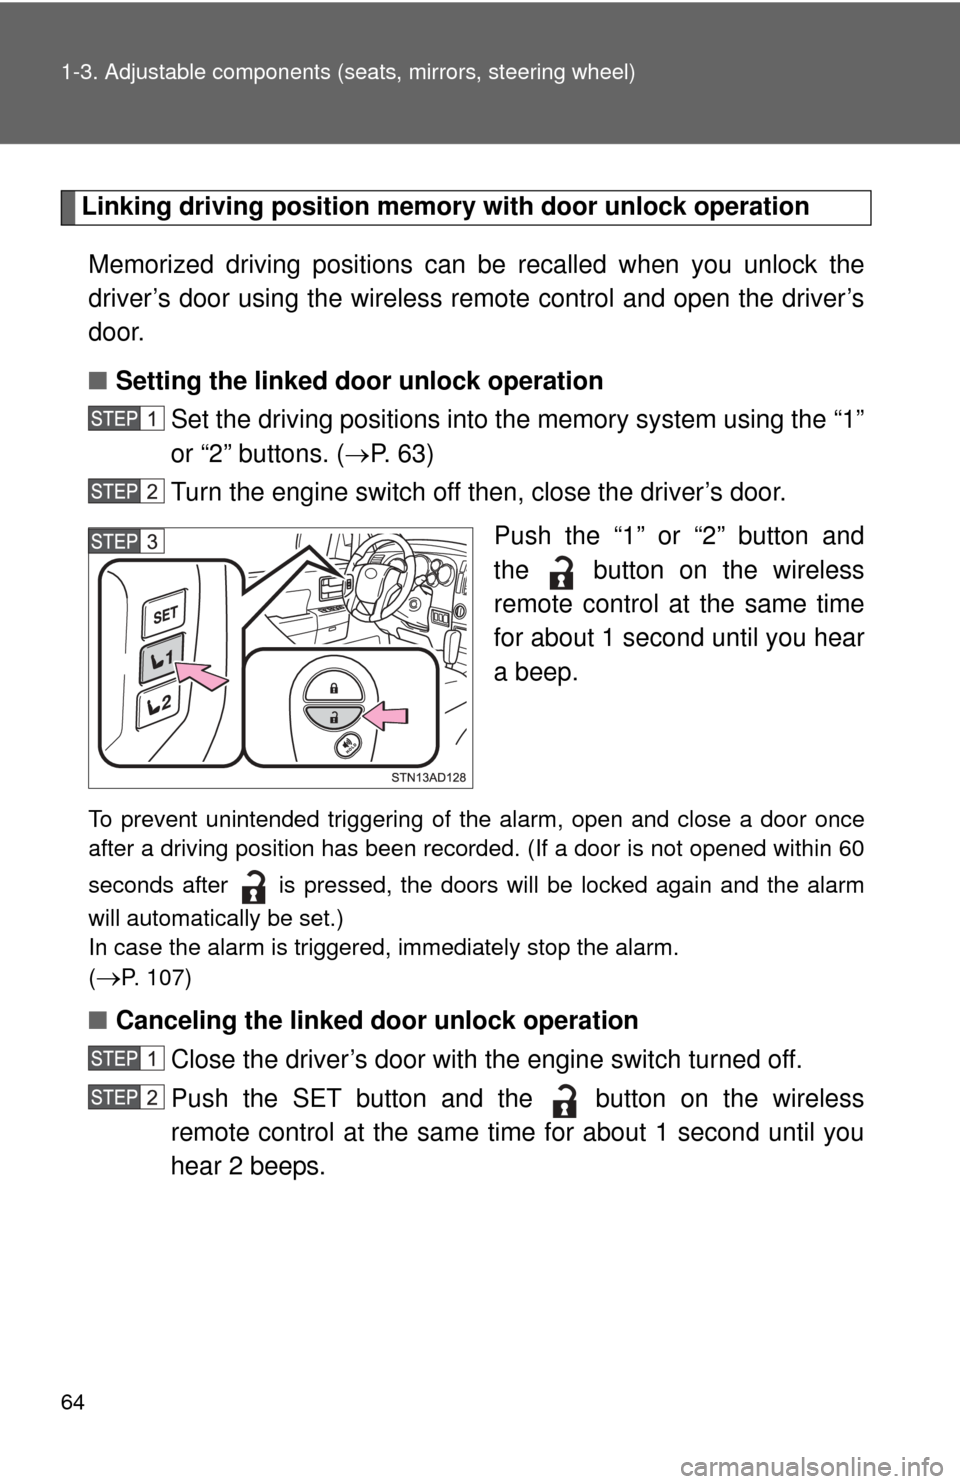
■ Setting the linked door unlock operation
Set the driving positions into the memory system using the “1”
or “2” buttons. ( P. 6 3 )
Turn the engine switch off then, close the driver’s door.
Push the “1” or “2” button and
the button on the wireless
remote control at the same time
for about 1 second until you hear
a beep.
To prevent unintended triggering of the alarm, open and close a door once
after a driving position has been recorded. (If a door is not opened within 60
seconds after is pressed, the doors will be locked again and the alarm
will automatically be set.)
In case the alarm is triggered, immediately stop the alarm.
(
P. 107)
■Canceling the linked door unlock operation
Close the driver’s door with the engine switch turned off.
Push the SET button and the button on the wireless
remote control at the same time for about 1 second until you
hear 2 beeps.
Page 65 of 668
65
1-3. Adjustable components (s
eats, mirrors, steering wheel)
1
Before driving
■Retained accessory power
Each memorized position (except for the tilt and telescopic steering column)
can be activated within 30 seconds after the driver’s door is opened, even if
the key is not in the engine switch.
■ If any position memory button is pushed while the adjustments are
being made
The operation will stop. To reactivate the system, push the button (“1” or “2”)
again.
■ If the battery is disconnected
The memorized positions must be reset because the computer’s memory is
erased when the battery is disconnected.
CAUTION
■Seat adjustment caution
Take care during seat adjustment that the seat does not strike the rear pas-
senger or squeeze your body against the steering wheel.
If this happens, you can stop the movement by pressing another seat posi-
tion memory button.
Page 66 of 668
66
1-3. Adjustable components (seats, mirrors, steering wheel)
Head restraints
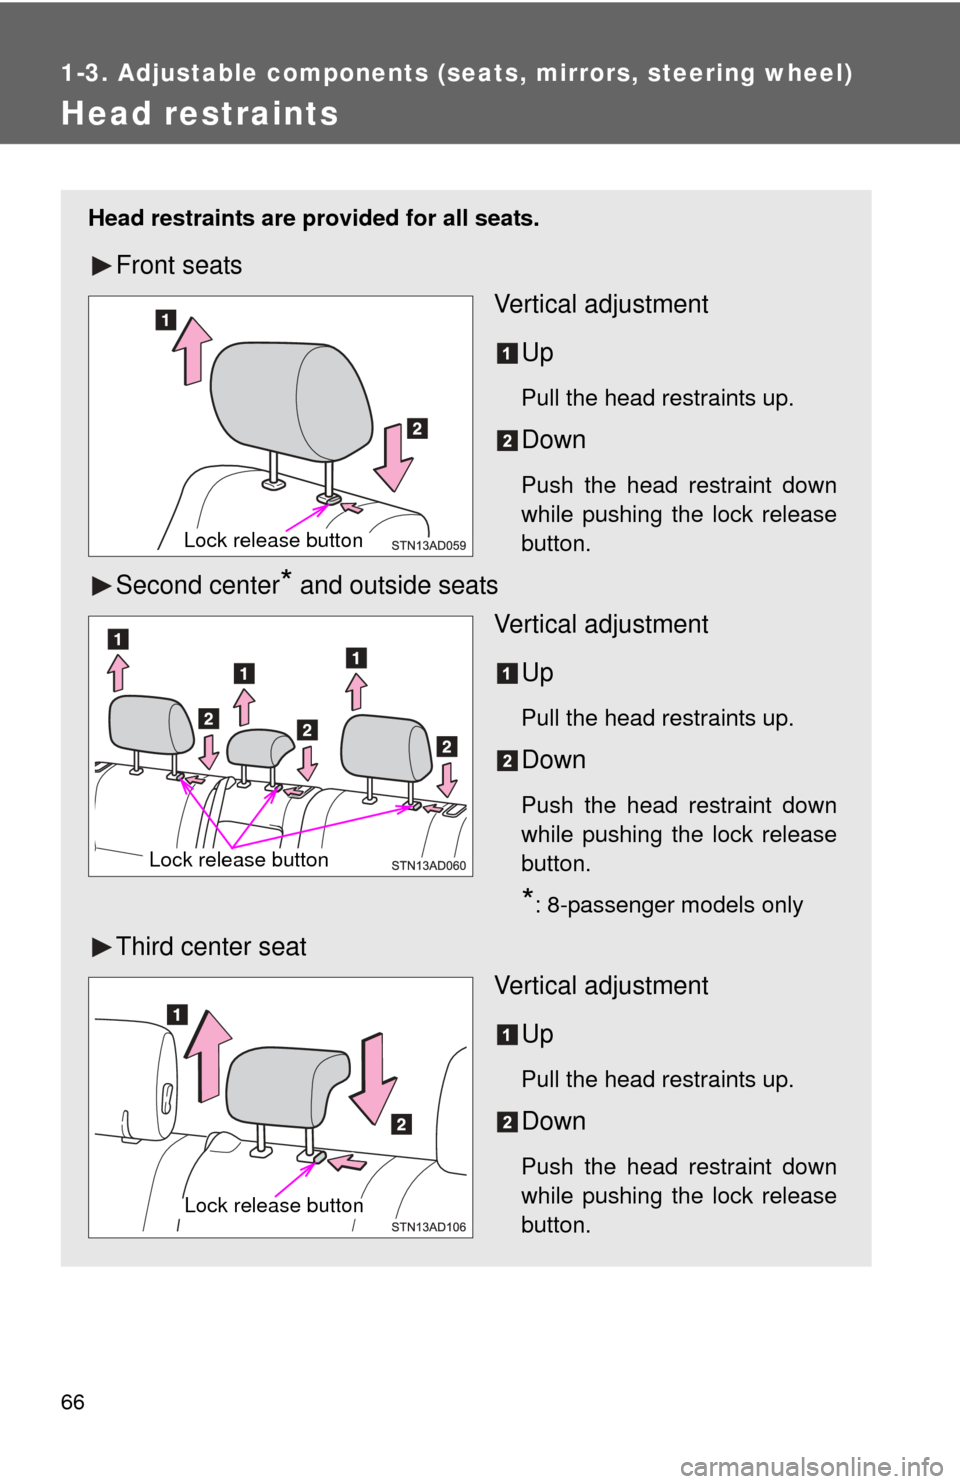
Head restraints are provided for all seats.
Front seatsVertical adjustment
Up
Pull the head restraints up.
Down
Push the head restraint down
while pushing the lock release
button.
Second center* and outside seats Vertical adjustment
Up
Pull the head restraints up.
Down
Push the head restraint down
while pushing the lock release
button.
*: 8-passenger models only
Third center seat Vertical adjustment
Up
Pull the head restraints up.
Down
Push the head restraint down
while pushing the lock release
button.
Lock release button
Lock release button
Lock release button
Page 67 of 668
67
1-3. Adjustable components (s
eats, mirrors, steering wheel)
1
Before driving
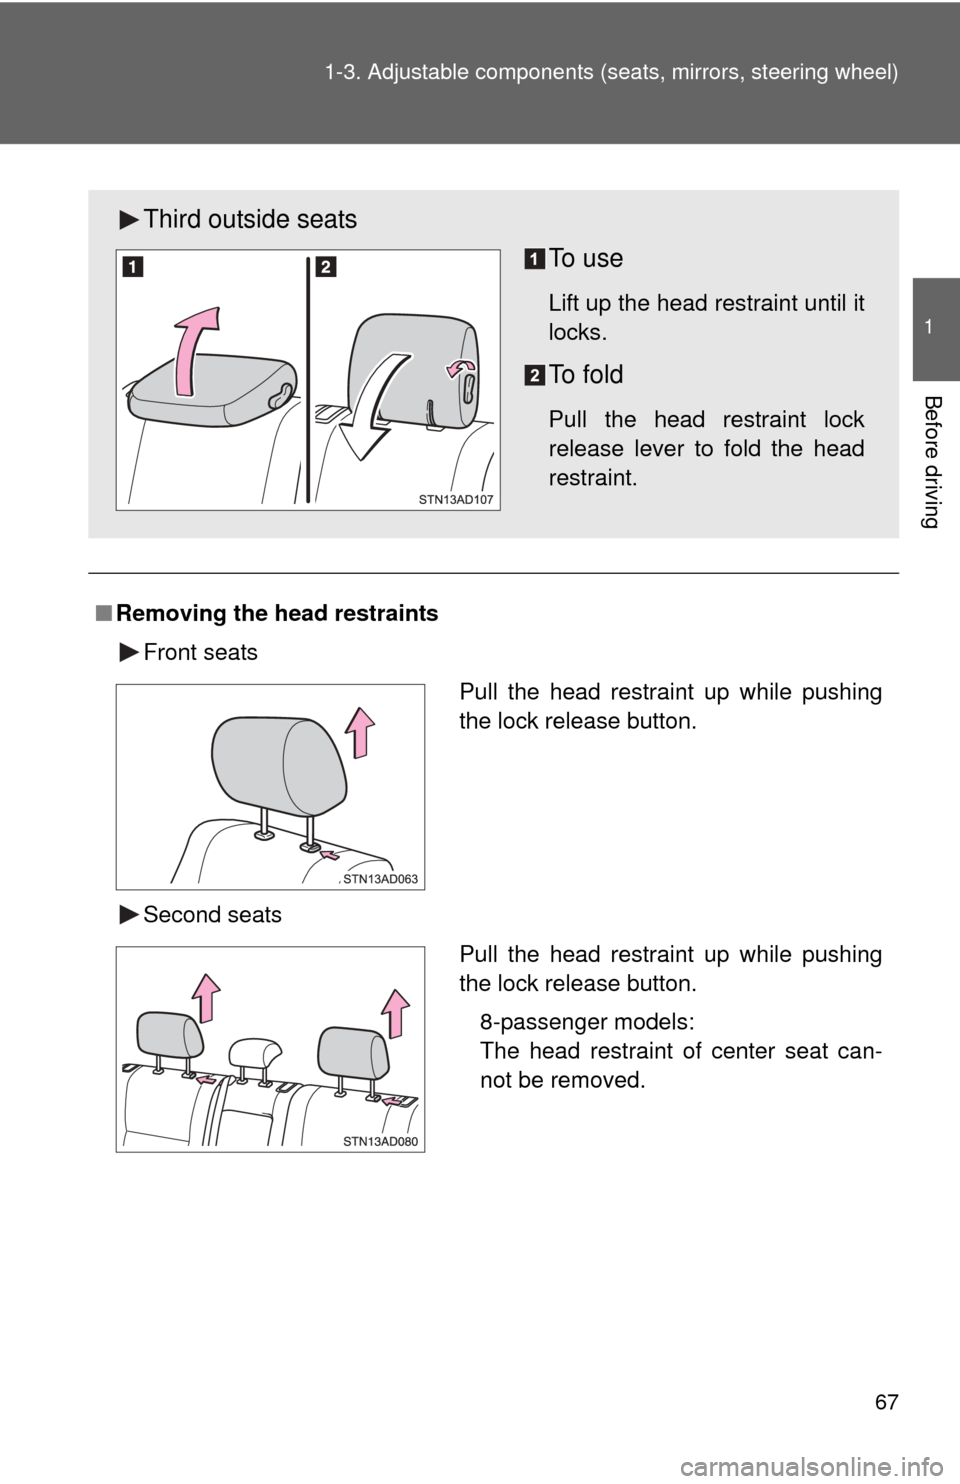
■Removing the head restraints
Front seats
Second seats
Third outside seats To u s e
Lift up the head restraint until it
locks.
To f o l d
Pull the head restraint lock
release lever to fold the head
restraint.
Pull the head restraint up while pushing
the lock release button.
Pull the head restraint up while pushing
the lock release button.
8-passenger models:
The head restraint of center seat can-
not be removed.
Page 68 of 668
68 1-3. Adjustable components (seats, mirrors, steering wheel)
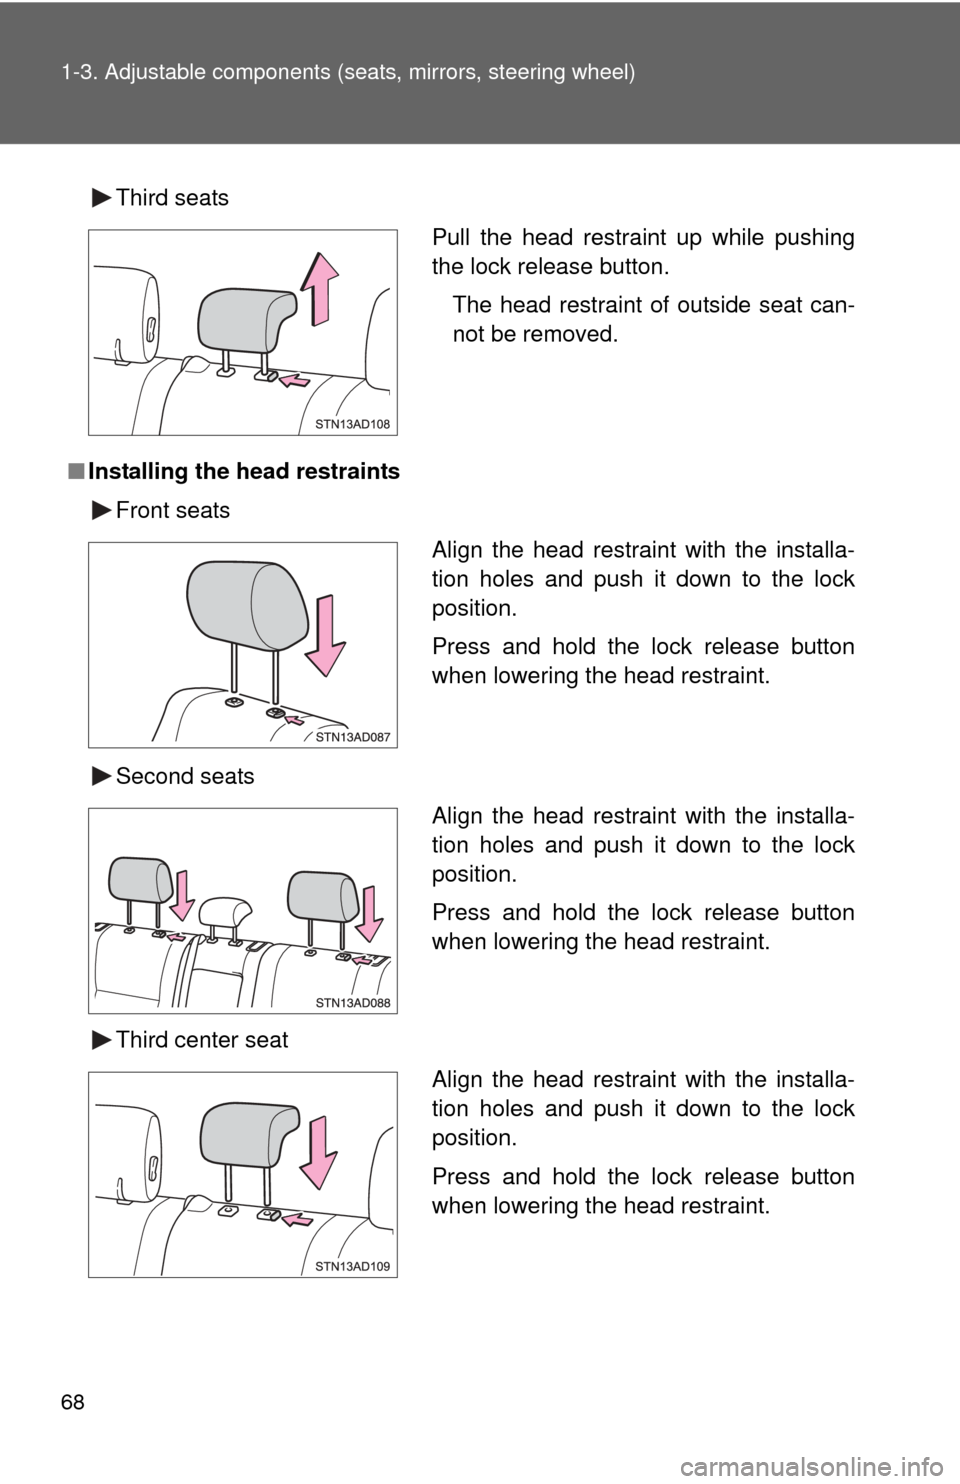
Third seats
■ Installing the head restraints
Front seats
Second seats
Third center seat
Pull the head restraint up while pushing
the lock release button.The head restraint of outside seat can-
not be removed.
Align the head restraint with the installa-
tion holes and push it down to the lock
position.
Press and hold the lock release button
when lowering the head restraint.
Align the head restraint with the installa-
tion holes and push it down to the lock
position.
Press and hold the lock release button
when lowering the head restraint.
Align the head restraint with the installa-
tion holes and push it down to the lock
position.
Press and hold the lock release button
when lowering the head restraint.
Page 69 of 668
69
1-3. Adjustable components (s
eats, mirrors, steering wheel)
1
Before driving
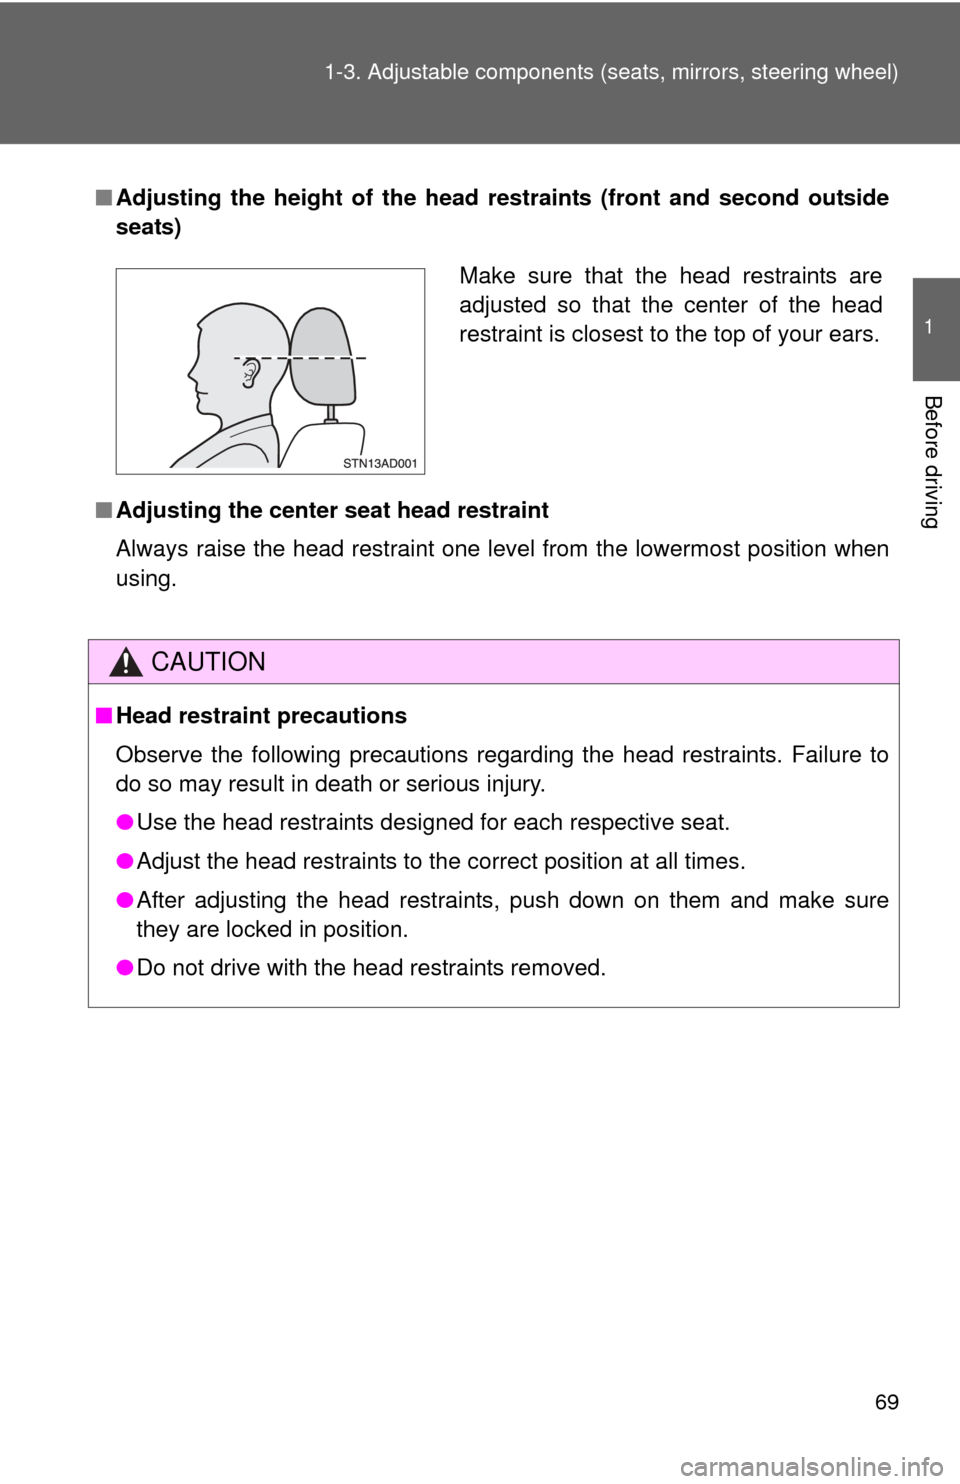
■Adjusting the height of the head restraints (front and second outside
seats)
■ Adjusting the center seat head restraint
Always raise the head restraint one level from the lowermost position wh\
en
using.
CAUTION
■Head restraint precautions
Observe the following precautions regarding the head restraints. Failure to
do so may result in death or serious injury.
●Use the head restraints designed for each respective seat.
● Adjust the head restraints to the correct position at all times.
● After adjusting the head restraints, push down on them and make sure
they are locked in position.
● Do not drive with the head restraints removed.
Make sure that the head restraints are
adjusted so that the center of the head
restraint is closest to the top of your ears.
Page 70 of 668
70
1-3. Adjustable components (seats, mirrors, steering wheel)
Seat belts
Make sure that all occupants are wearing their seat belts before driv-
ing the vehicle.
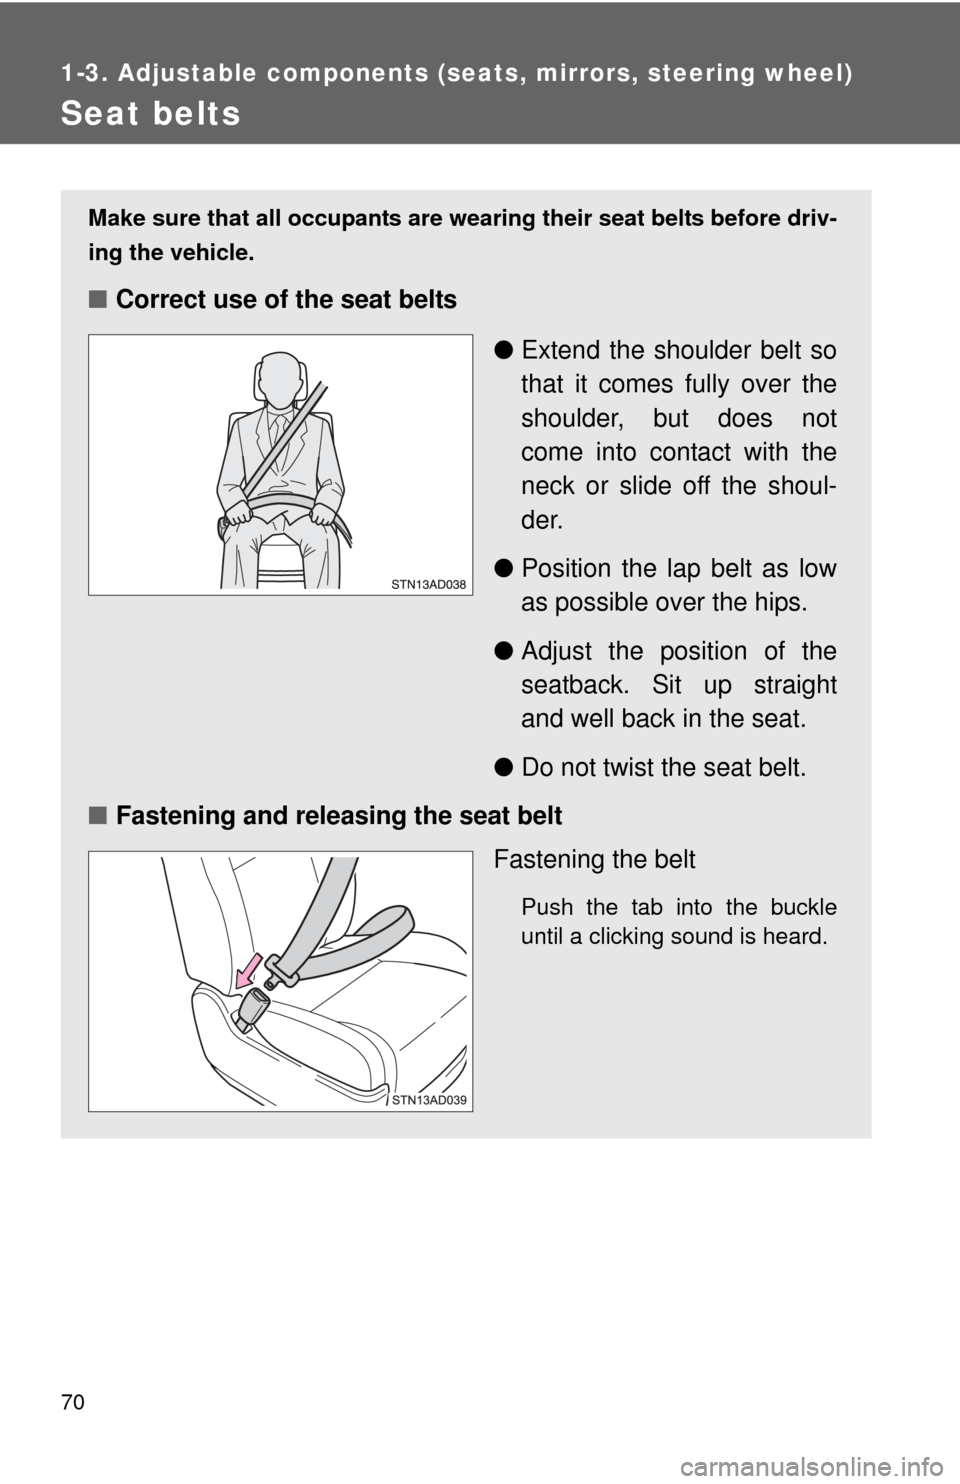
■Correct use of the seat belts
●Extend the shoulder belt so
that it comes fully over the
shoulder, but does not
come into contact with the
neck or slide off the shoul-
der.
● Position the lap belt as low
as possible over the hips.
● Adjust the position of the
seatback. Sit up straight
and well back in the seat.
● Do not twist the seat belt.
■ Fastening and releasing the seat belt
Fastening the belt
Push the tab into the buckle
until a clicking sound is heard.