reset TOYOTA SEQUOIA 2014 2.G Quick Reference Guide
[x] Cancel search | Manufacturer: TOYOTA, Model Year: 2014, Model line: SEQUOIA, Model: TOYOTA SEQUOIA 2014 2.GPages: 21, PDF Size: 10.4 MB
Page 3 of 21

OVERVIEW
FEATURES/OPERATIONS
SAFETY AND EMERGENCY FEATURES
23
OVERVIEW
Instrument panel
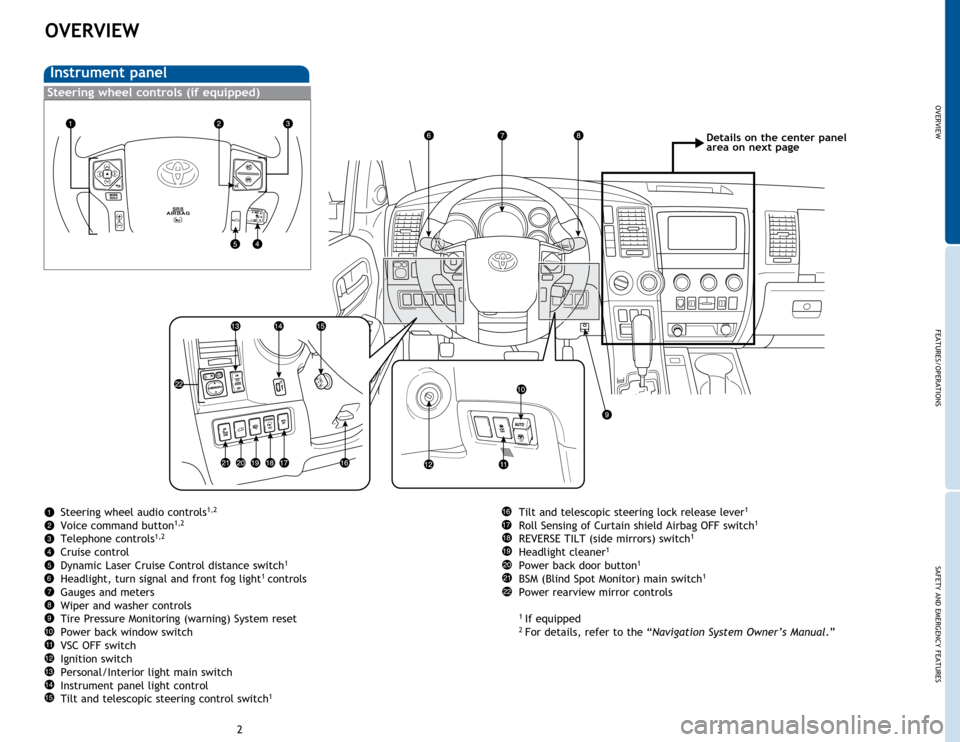
Steering wheel audio controls1,2
Voice command button1,2
Telephone controls1,2
Cruise control
Dynamic Laser Cruise Control distance switch1
Headlight, turn signal and front fog light1 controls
Gauges and meters
Wiper and washer controls
Tire Pressure Monitoring (warning) System reset
Power back window switch
VSC OFF switch
Ignition switch
Personal/Interior light main switch
Instrument panel light control
Tilt and telescopic steering control switch
1
Tilt and telescopic steering lock release lever1
Roll Sensing of Curtain shield Airbag OFF switch1
REVERSE TILT (side mirrors) switch1
Headlight cleaner1
Power back door button1
BSM (Blind Spot Monitor) main switch1
Power rearview mirror controls
1 If equipped2 For details, refer to the “Navigation System Owner’s Manual.”
Steering wheel controls (if equipped)
Details on the center panel
area on next page
Page 4 of 21

OVERVIEW
FEATURES/OPERATIONS
SAFETY AND EMERGENCY FEATURES
45
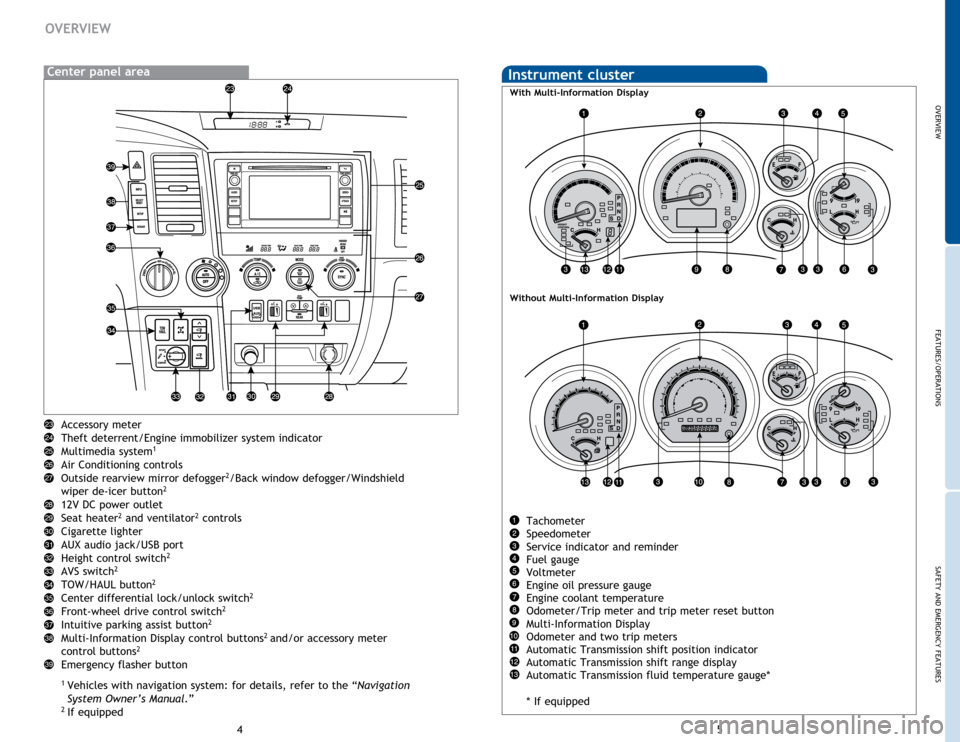
Accessory meter
Theft deterrent/Engine immobilizer system indicator
Multimedia system
1
Air Conditioning controls
Outside rearview mirror defogger2/Back window defogger/Windshield
wiper de-icer button2
12V DC power outlet
Seat heater2 and ventilator2 controls
Cigarette lighter
AUX audio jack/USB port
Height control switch
2
AVS switch2
TOW/HAUL button2
Center differential lock/unlock switch2
Front-wheel drive control switch2
Intuitive parking assist button2
Multi-Information Display control buttons2 and/or accessory meter
control buttons2
Emergency flasher button
1 Vehicles with navigation system: for details, refer to the “Navigation
System Owner’s Manual .”2
If equipped
OVERVIEW
Instrument cluster
Tachometer
Speedometer
Service indicator and reminder
Fuel gauge
Voltmeter
Engine oil pressure gauge
Engine coolant temperature
Odometer/Trip meter and trip meter reset button
Multi-Information Display
Odometer and two trip meters
Automatic Transmission shift position indicator
Automatic Transmission shift range display
Automatic Transmission fluid temperature gauge*
* If equipped
With Multi-Information Display
Without Multi-Information Display
Center panel area
Page 12 of 21

OVERVIEW
FEATURES/OPERATIONS
SAFETY AND EMERGENCY FEATURES
21
20
Moonroof (if equipped)
Sliding operationTilting operation
OpenTilt
CloseClose
FEATURES/OPERATIONS
Tilt and telescopic steering wheel
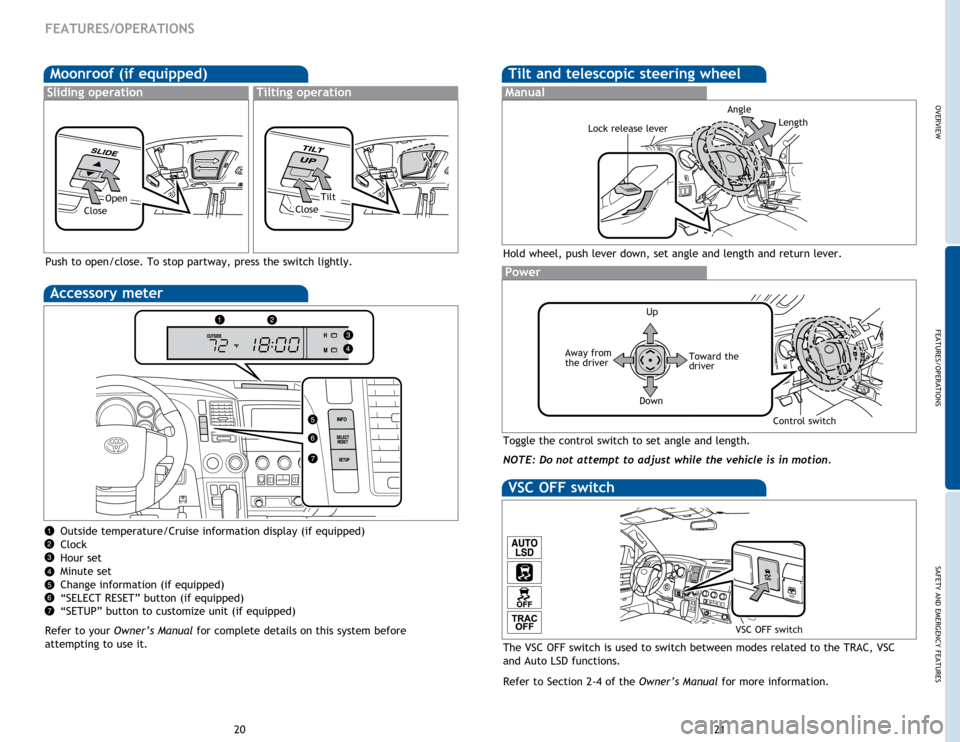
Hold wheel, push lever down, set angle and length and return lever.
Manual
Lock release lever
Angle
Toggle the control switch to set angle and length.
NOTE: Do not attempt to adjust while the vehicle is in motion.
Power
Up
Control switch
Away from
the driver Length
Toward the
driver
Down
The VSC OFF switch is used to switch between modes related to the TRAC, VSC
and Auto LSD functions.
Refer to Section 2-4 of the Owner’s Manual for more information.
VSC OFF switch
VSC OFF switch
Push to open/close. To stop partway, press the switch lightly.
Accessory meter
Outside temperature/Cruise information display (if equipped)
Clock
Hour set
Minute set
Change information (if equipped)
“SELECT RESET” button (if equipped)
“SETUP” button to customize unit (if equipped)
Refer to your Owner’s Manual for complete details on this system before
attempting to use it.
Page 19 of 21

OVERVIEW
FEATURES/OPERATIONS
SAFETY AND EMERGENCY FEATURES
35
34
SAFETY AND EMERGENCY FEATURES
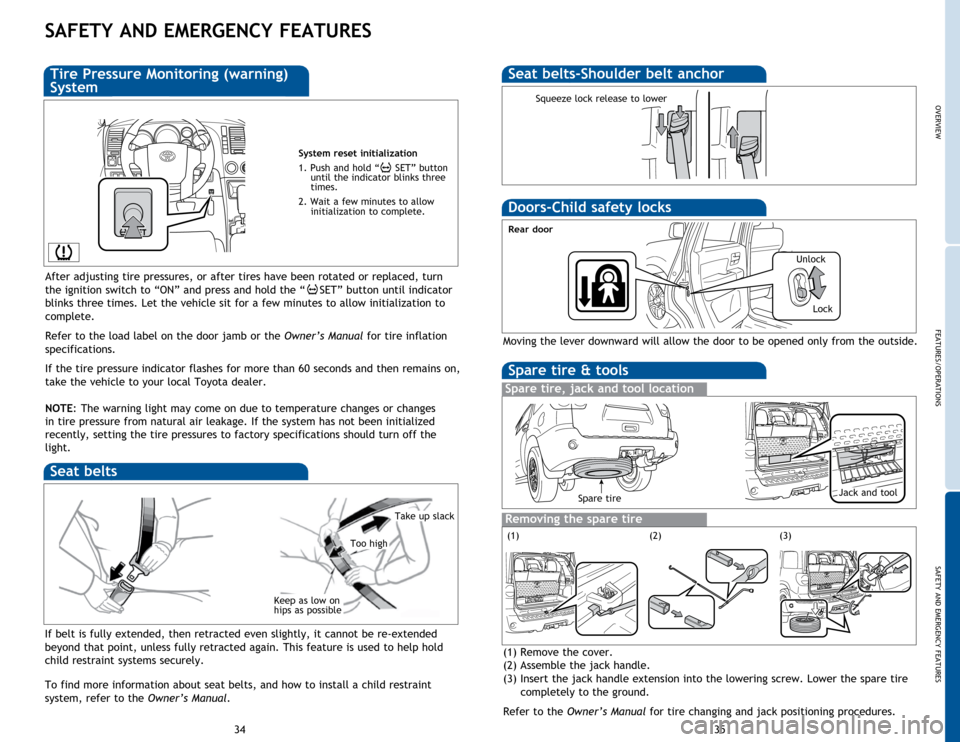
If belt is fully extended, then retracted even slightly, it cannot be re-extended
beyond that point, unless fully retracted again. This feature is used to help hold
child restraint systems securely.
To find more information about seat belts, and how to install a child restraint
system, refer to the Owner’s Manual.
Keep as low on
hips as possible
Take up slack
Too high
Seat belts
System reset initialization
1. Push and hold “
SET” button
until the indicator blinks three
times.
2. Wait a few minutes to allow initialization to complete.
Tire Pressure Monitoring (warning)
System
After adjusting tire pressures, or after tires have been rotated or replaced, turn
the ignition switch to “ON” and press and hold the “
SET” button until indicator
blinks three times. Let the vehicle sit for a few minutes to allow initialization to
complete.
Refer to the load label on the door jamb or the Owner’s Manual for tire inflation
specifications.
If the tire pressure indicator flashes for more than 60 seconds and then remains on,
take the vehicle to your local Toyota dealer.
NOTE: The warning light may come on due to temperature changes or changes
in tire pressure from natural air leakage. If the system has not been initialized
recently, setting the tire pressures to factory specifications should turn off the
light.
Seat belts-Shoulder belt anchor
Squeeze lock release to lower
Spare tire & tools
Spare tire, jack and tool location
Removing the spare tire
(1) Remove the cover.
(2) Assemble the jack handle.
(3) Insert the jack handle extension into the lowering screw. Lower the spare tire
completely to the ground.
Refer to the Owner’s Manual for tire changing and jack positioning procedures.
Moving the lever downward will allow the door to be opened only from the outside.
Rear door
Doors-Child safety locks
(2)(3)
Spare tireJack and tool
(1) Unlock
Lock