turn signal TOYOTA SEQUOIA 2016 2.G User Guide
[x] Cancel search | Manufacturer: TOYOTA, Model Year: 2016, Model line: SEQUOIA, Model: TOYOTA SEQUOIA 2016 2.GPages: 576, PDF Size: 12.74 MB
Page 439 of 576
439
4-3. Do-it-yourself maintenance
4
Maintenance and care
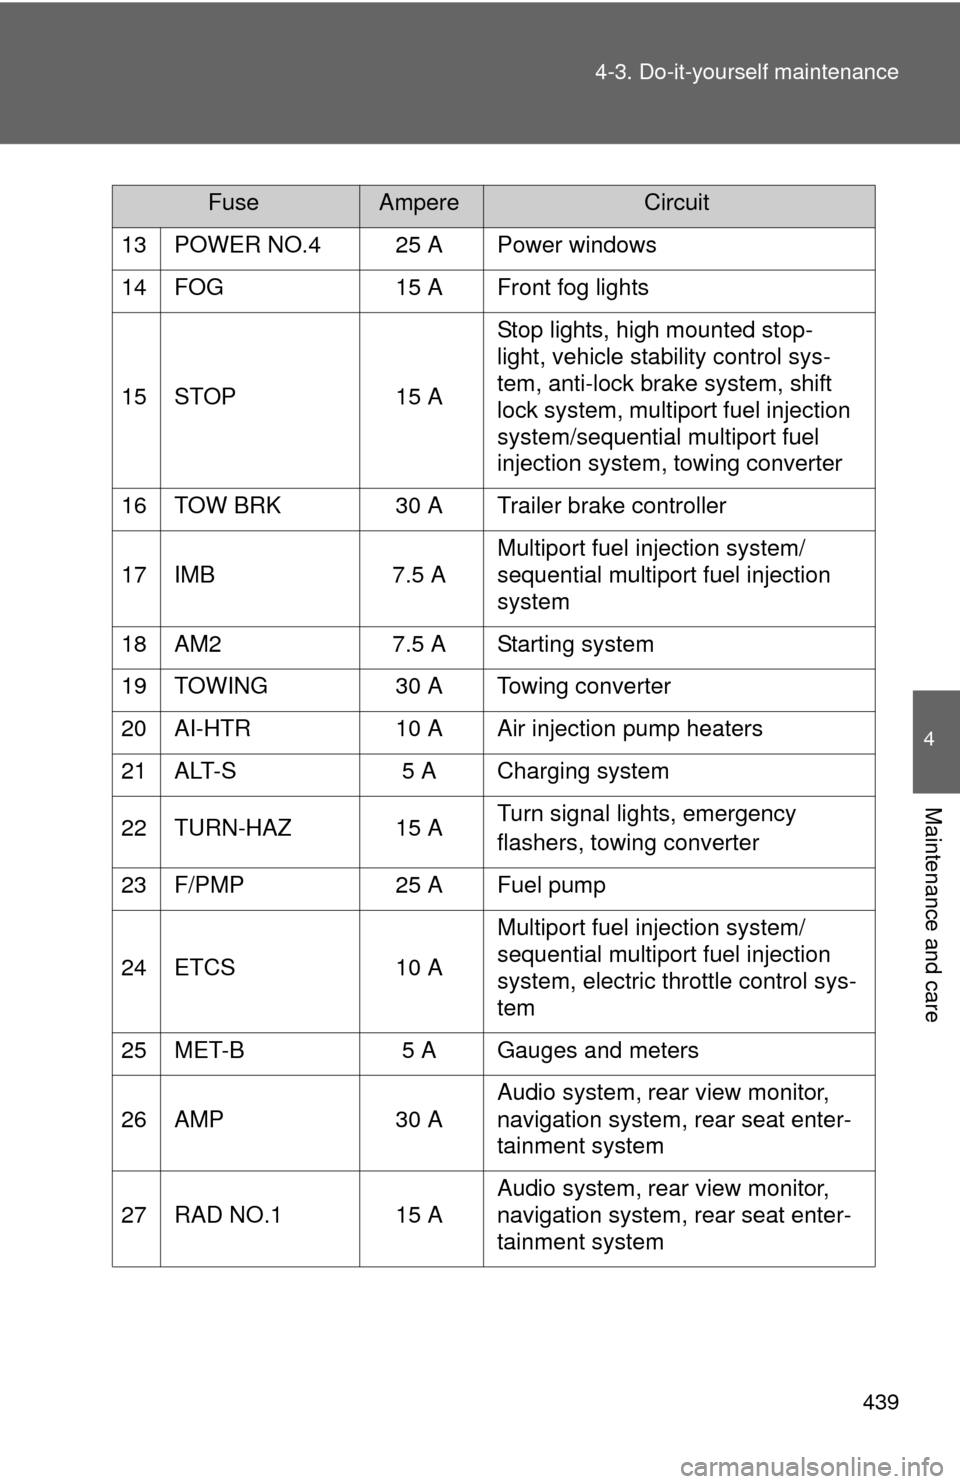
13 POWER NO.4 25 A Power windows
14 FOG
15 A Front fog lights
15 STOP 15 AStop lights, high mounted stop-
light, vehicle stability control sys-
tem, anti-lock brake system, shift
lock system, multiport fuel injection
system/sequential multiport fuel
injection system, towing converter
16 TOW BRK 30 A Trailer brake controller
17 IMB 7.5 AMultiport fuel injection system/
sequential multiport fuel injection
system
18 AM2 7.5 A Starting system
19 TOWING 30 A Towing converter
20 AI-HTR 10 A Air injection pump heaters
21 ALT-S 5 A Charging system
22 TURN-HAZ 15 A Turn signal lights, emergency
flashers, towing converter
23 F/PMP 25 A Fuel pump
24 ETCS 10 AMultiport fuel injection system/
sequential multiport fuel injection
system, electric throttle control sys-
tem
25 MET-B 5 A Gauges and meters
26 AMP 30 AAudio system, rear view monitor,
navigation system, rear seat enter-
tainment system
27 RAD NO.1 15 A Audio system, rear view monitor,
navigation system, rear seat enter-
tainment system
FuseAmpereCircuit
Page 444 of 576
444 4-3. Do-it-yourself maintenance
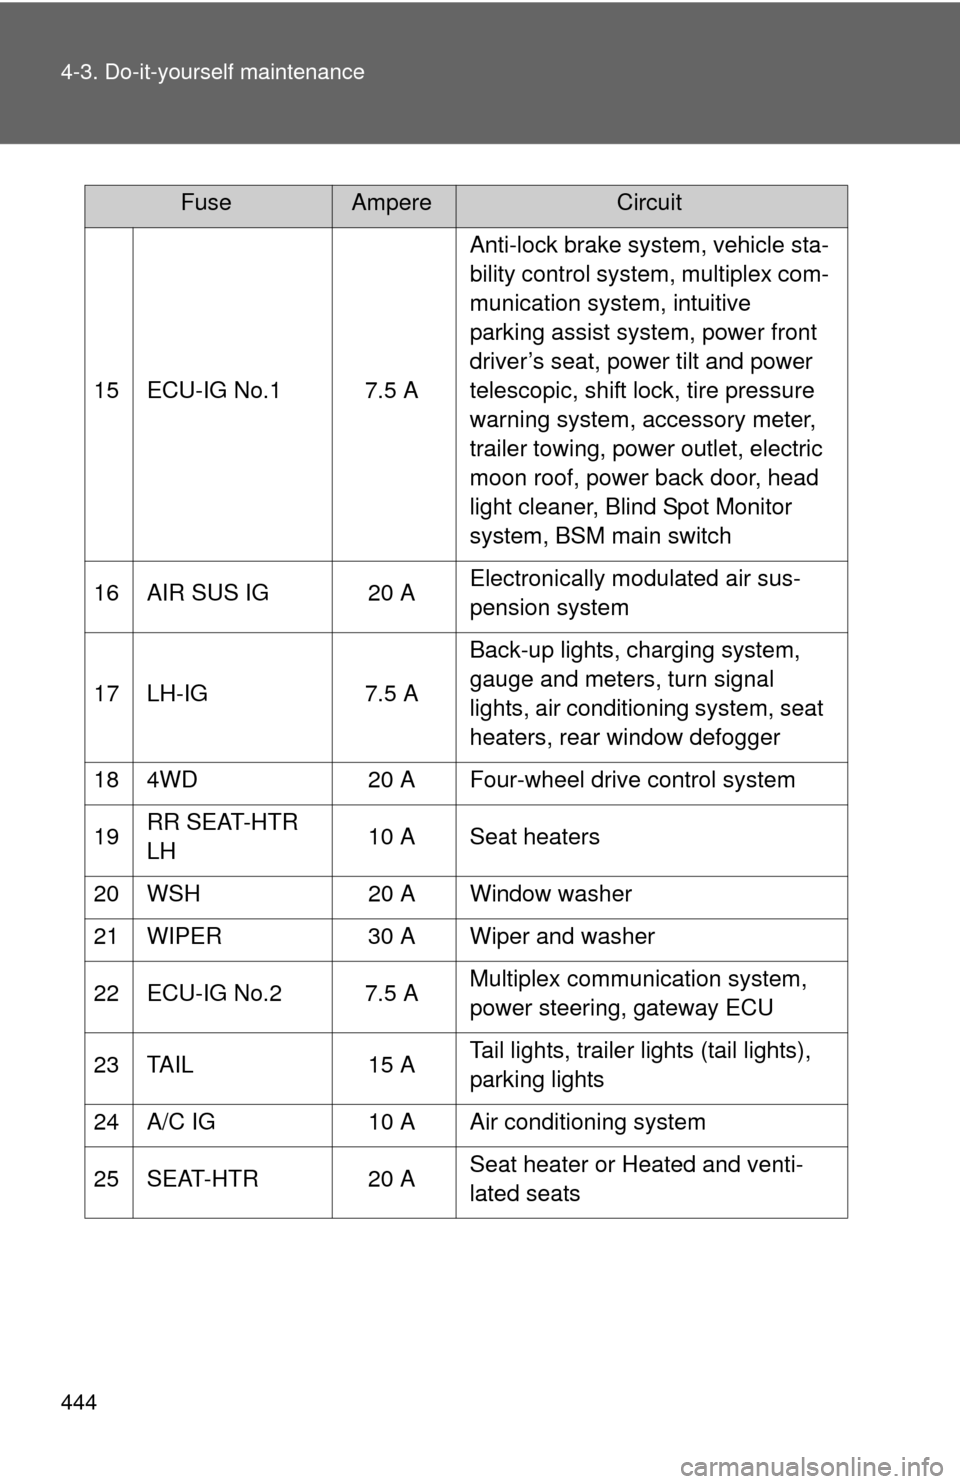
15 ECU-IG No.1 7.5 AAnti-lock brake system, vehicle sta-
bility control system, multiplex com-
munication system, intuitive
parking assist system, power front
driver’s seat, power tilt and power
telescopic, shift lock, tire pressure
warning system, accessory meter,
trailer towing, power outlet, electric
moon roof, power back door, head
light cleaner, Blind Spot Monitor
system, BSM main switch
16 AIR SUS IG 20 A Electronically modulated air sus-
pension system
17 LH-IG 7.5 A Back-up lights, charging system,
gauge and meters, turn signal
lights, air conditioning system, seat
heaters, rear window defogger
18 4WD 20 A Four-wheel drive control system
19 RR SEAT-HTR
LH 10 A Seat heaters
20 WSH 20 A Window washer
21 WIPER 30 A Wiper and washer
22 ECU-IG No.2 7.5 A Multiplex communication system,
power steering, gateway ECU
23 TAIL 15 A Tail lights, trailer lights (tail lights),
parking lights
24 A/C IG 10 A Air conditioning system
25 SEAT-HTR 20 A Seat heater or Heated and venti-
lated seats
FuseAmpereCircuit
Page 447 of 576
447
4-3. Do-it-yourself maintenance
4
Maintenance and care
Light bulbs
You may replace the following bulbs yourself. The difficulty level of
replacement varies depending on the bulb. If necessary bulb
replacement seems difficult to perfor m, contact your Toyota dealer.
For more information about replacing other light bulbs, contact your
Toyota dealer.
■ Prepare a replacement light bulb.
Check the wattage of the light bulb being replaced. ( P. 522)
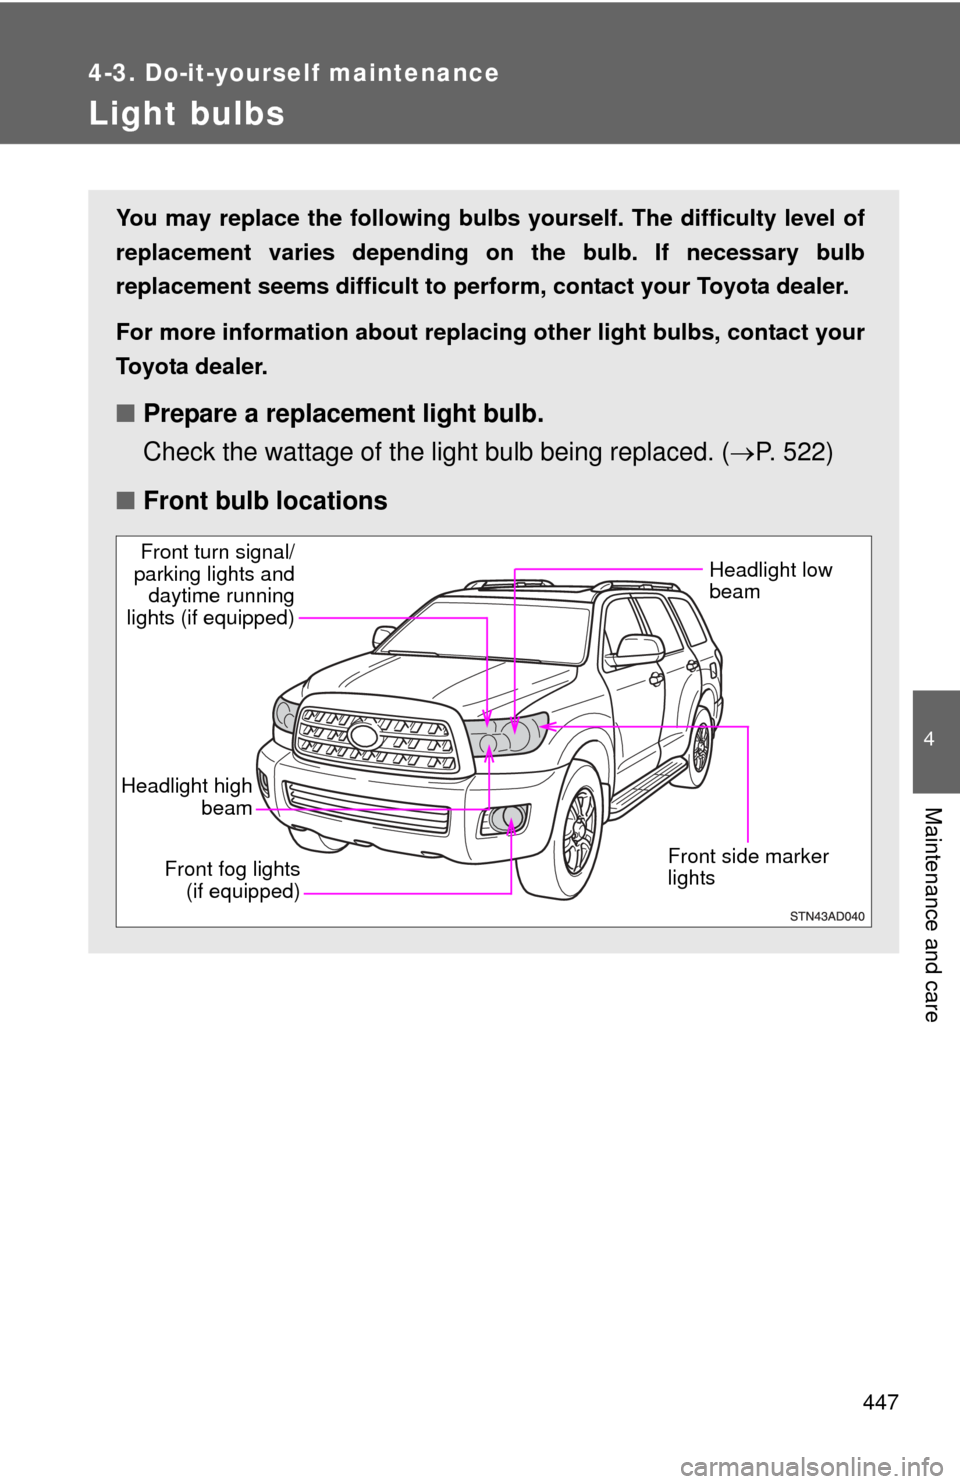
■ Front bulb locations
Headlight low
beam
Front side marker
lights
Headlight high beam
Front fog lights (if equipped)
Front turn signal/
parking lights and daytime running
lights (if equipped)
Page 448 of 576
448 4-3. Do-it-yourself maintenance
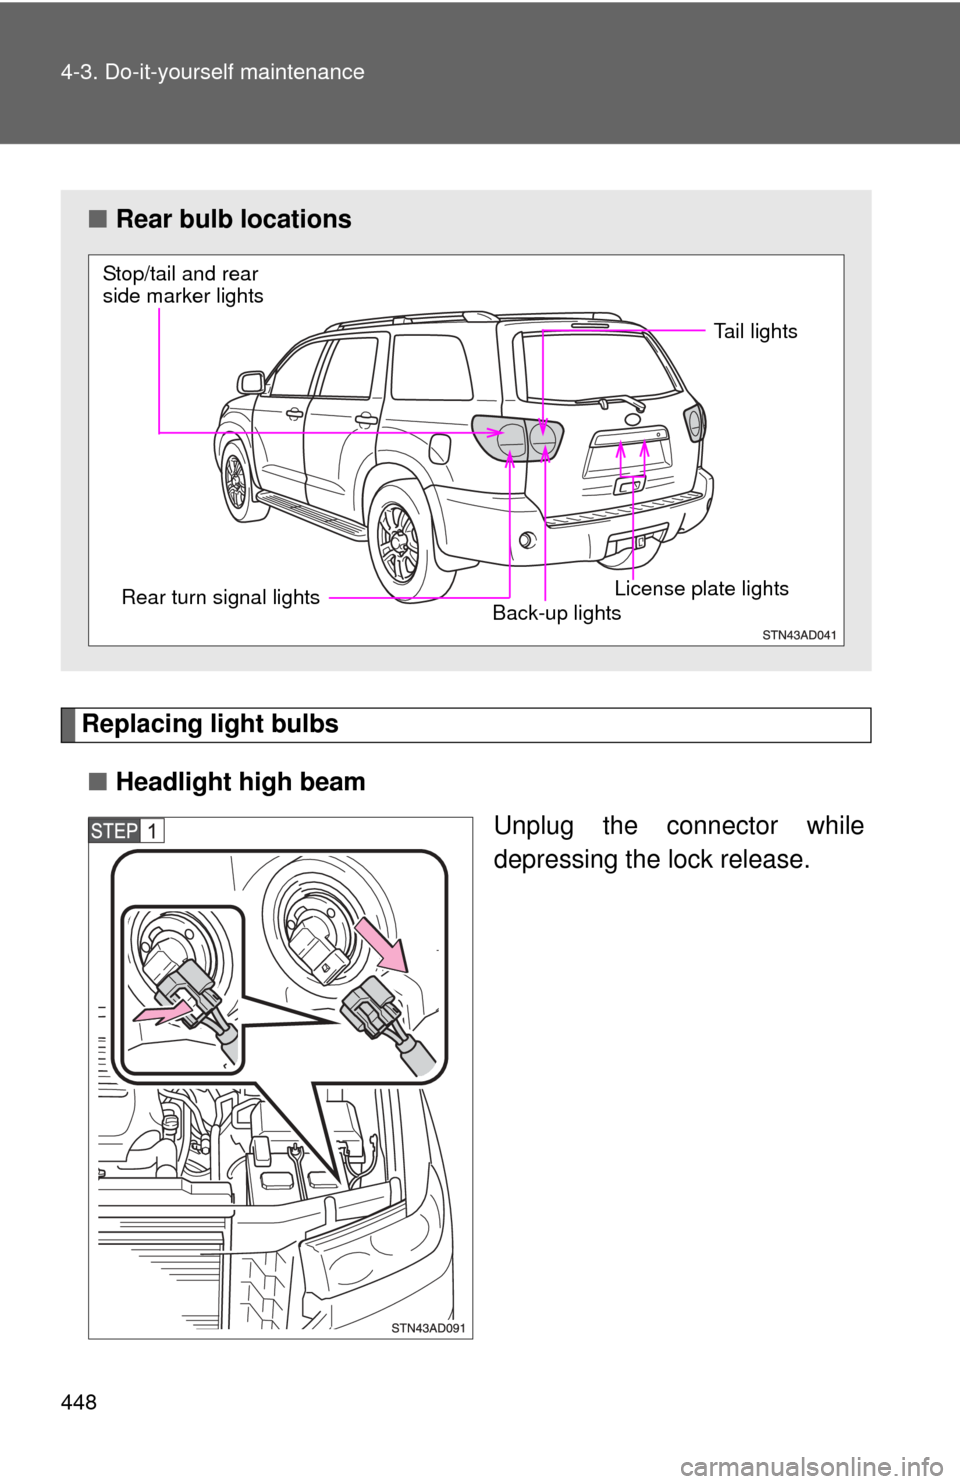
Replacing light bulbs■ Headlight high beam
Unplug the connector while
depressing the lock release.
■Rear bulb locations
Stop/tail and rear
side marker lights
Rear turn signal lights
License plate lightsBack-up lights
Tail lights
Page 450 of 576
450 4-3. Do-it-yourself maintenance
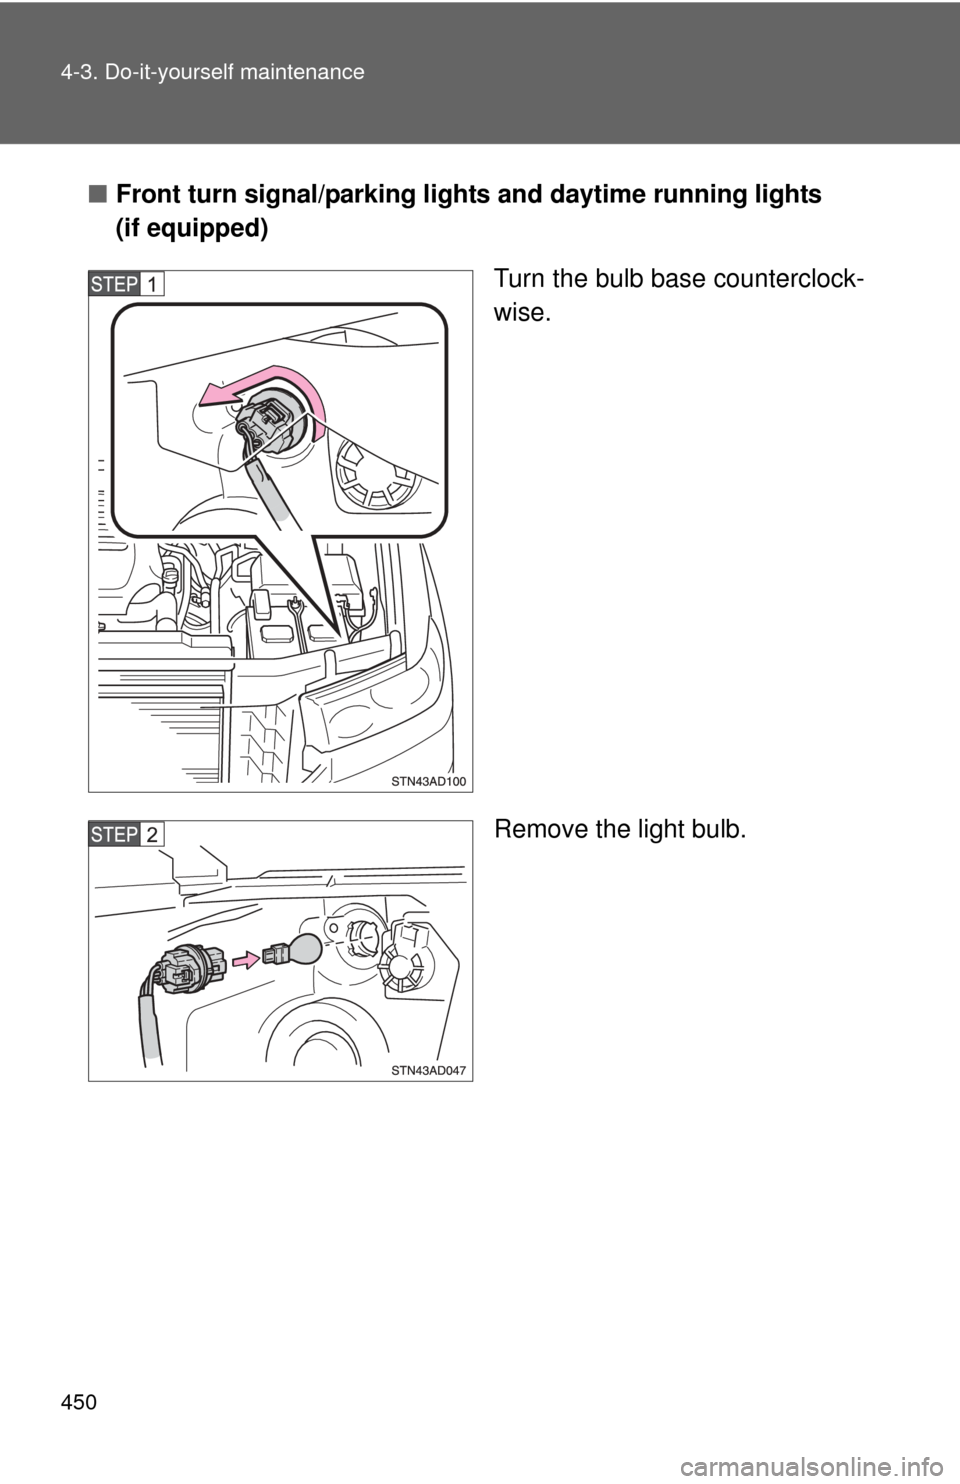
■Front turn signal/parking lights and daytime running lights
(if equipped)
Turn the bulb base counterclock-
wise.
Remove the light bulb.
Page 453 of 576
453
4-3. Do-it-yourself maintenance
4
Maintenance and care
■
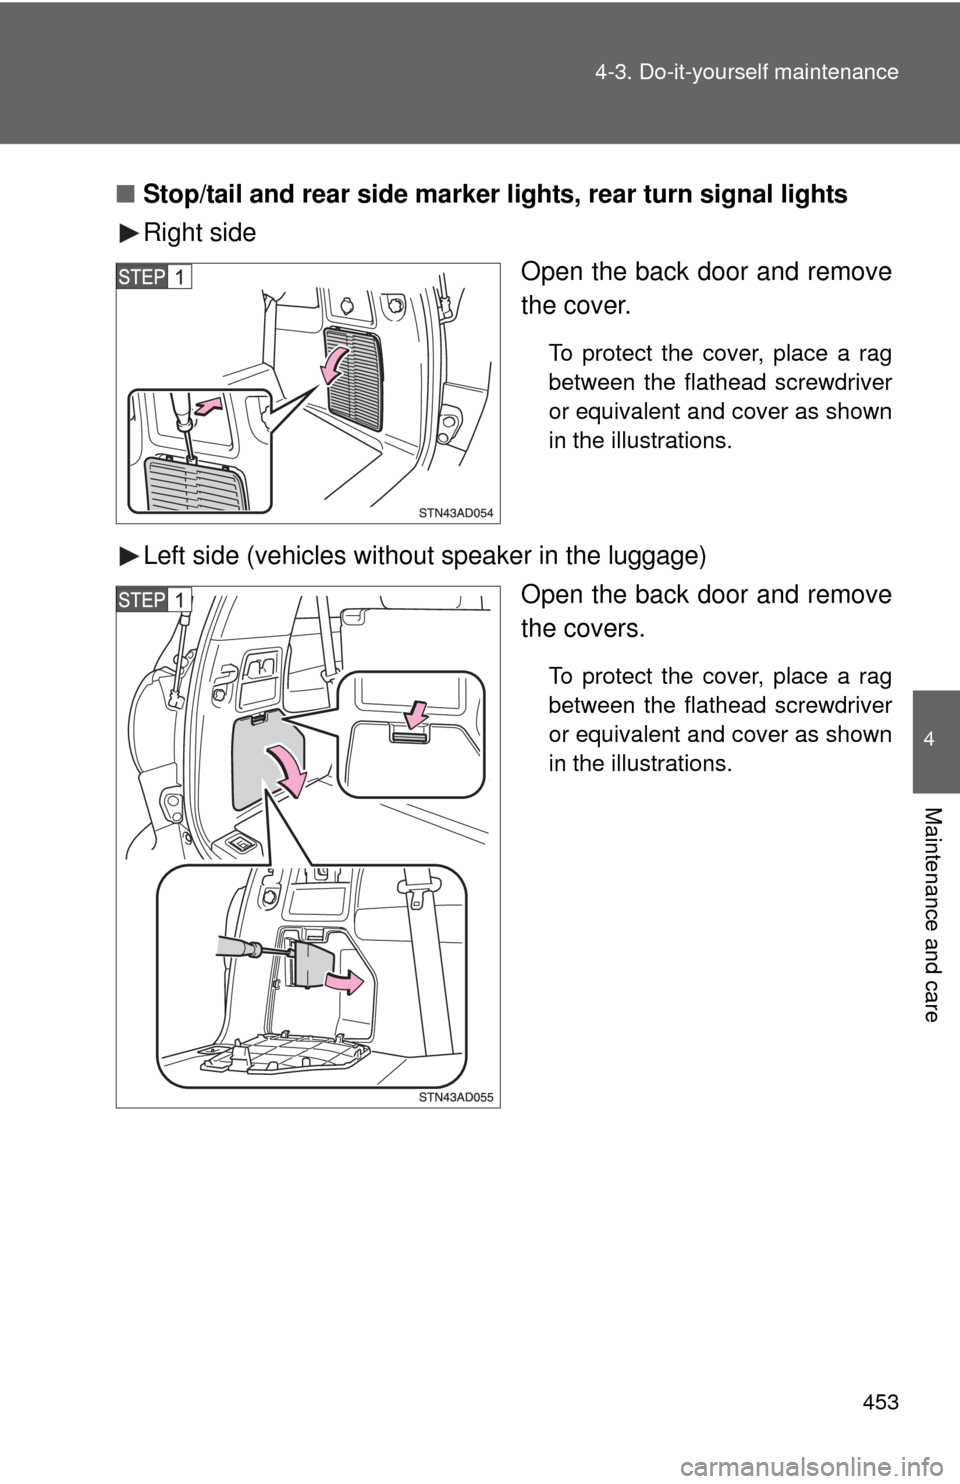
Stop/tail and rear side marker lights, rear turn signal lights
Right side
Open the back door and remove
the cover.
To protect the cover, place a rag
between the flathead screwdriver
or equivalent and cover as shown
in the illustrations.
Left side (vehicles without speaker in the luggage)Open the back door and remove
the covers.
To protect the cover, place a rag
between the flathead screwdriver
or equivalent and cover as shown
in the illustrations.
Page 454 of 576
454 4-3. Do-it-yourself maintenance
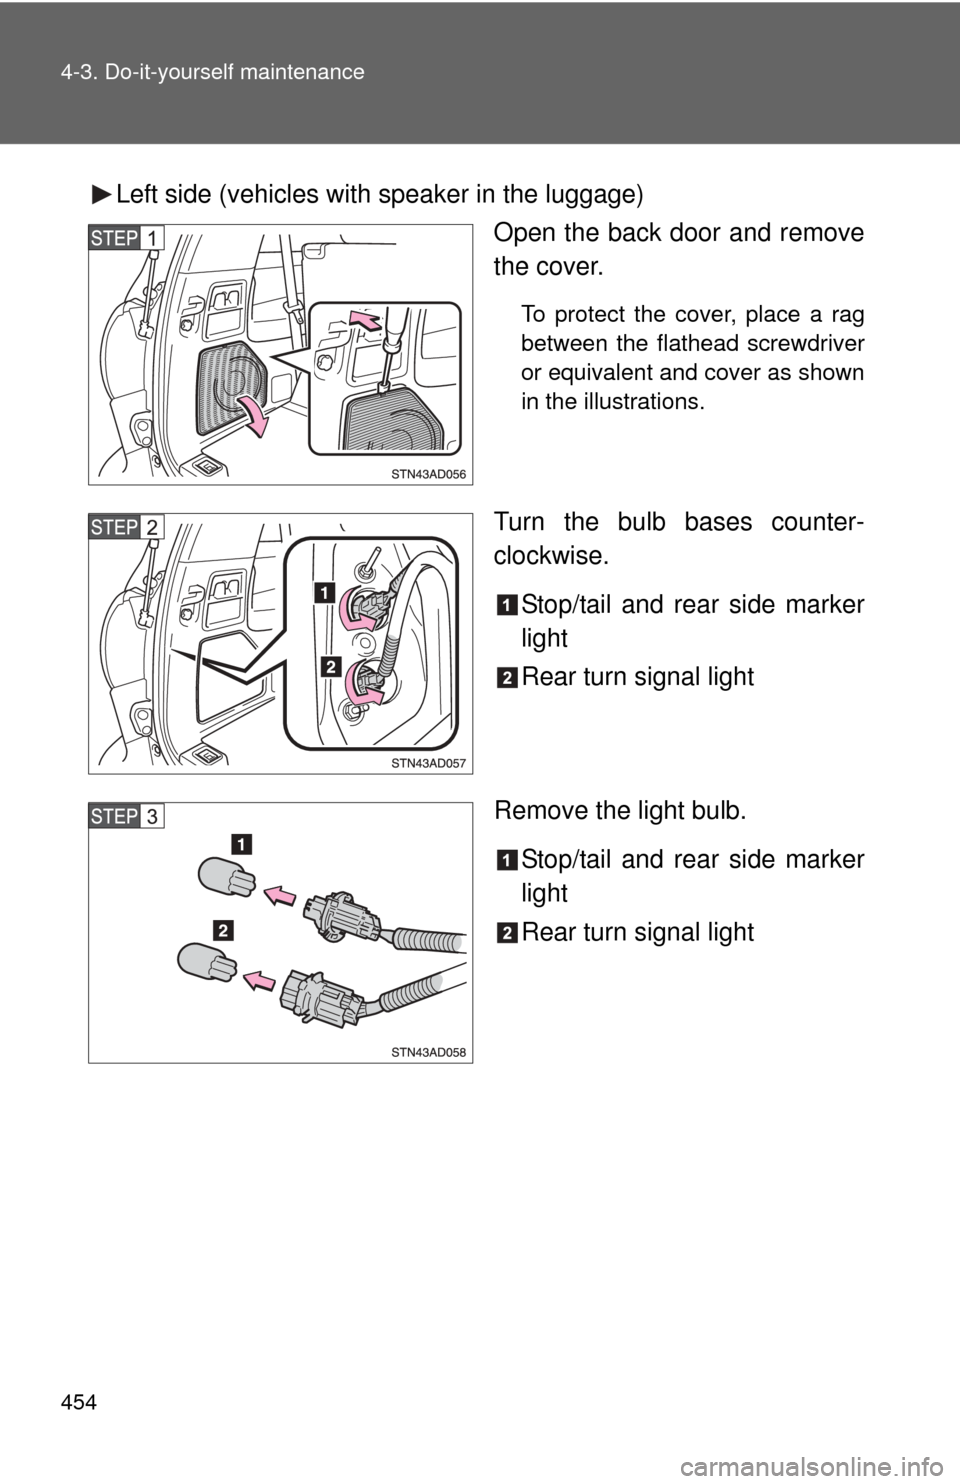
Left side (vehicles with speaker in the luggage)Open the back door and remove
the cover.
To protect the cover, place a rag
between the flathead screwdriver
or equivalent and cover as shown
in the illustrations.
Turn the bulb bases counter-
clockwise.
Stop/tail and rear side marker
light
Rear turn signal light
Remove the light bulb. Stop/tail and rear side marker
light
Rear turn signal light
Page 457 of 576
457
4-3. Do-it-yourself maintenance
4
Maintenance and care
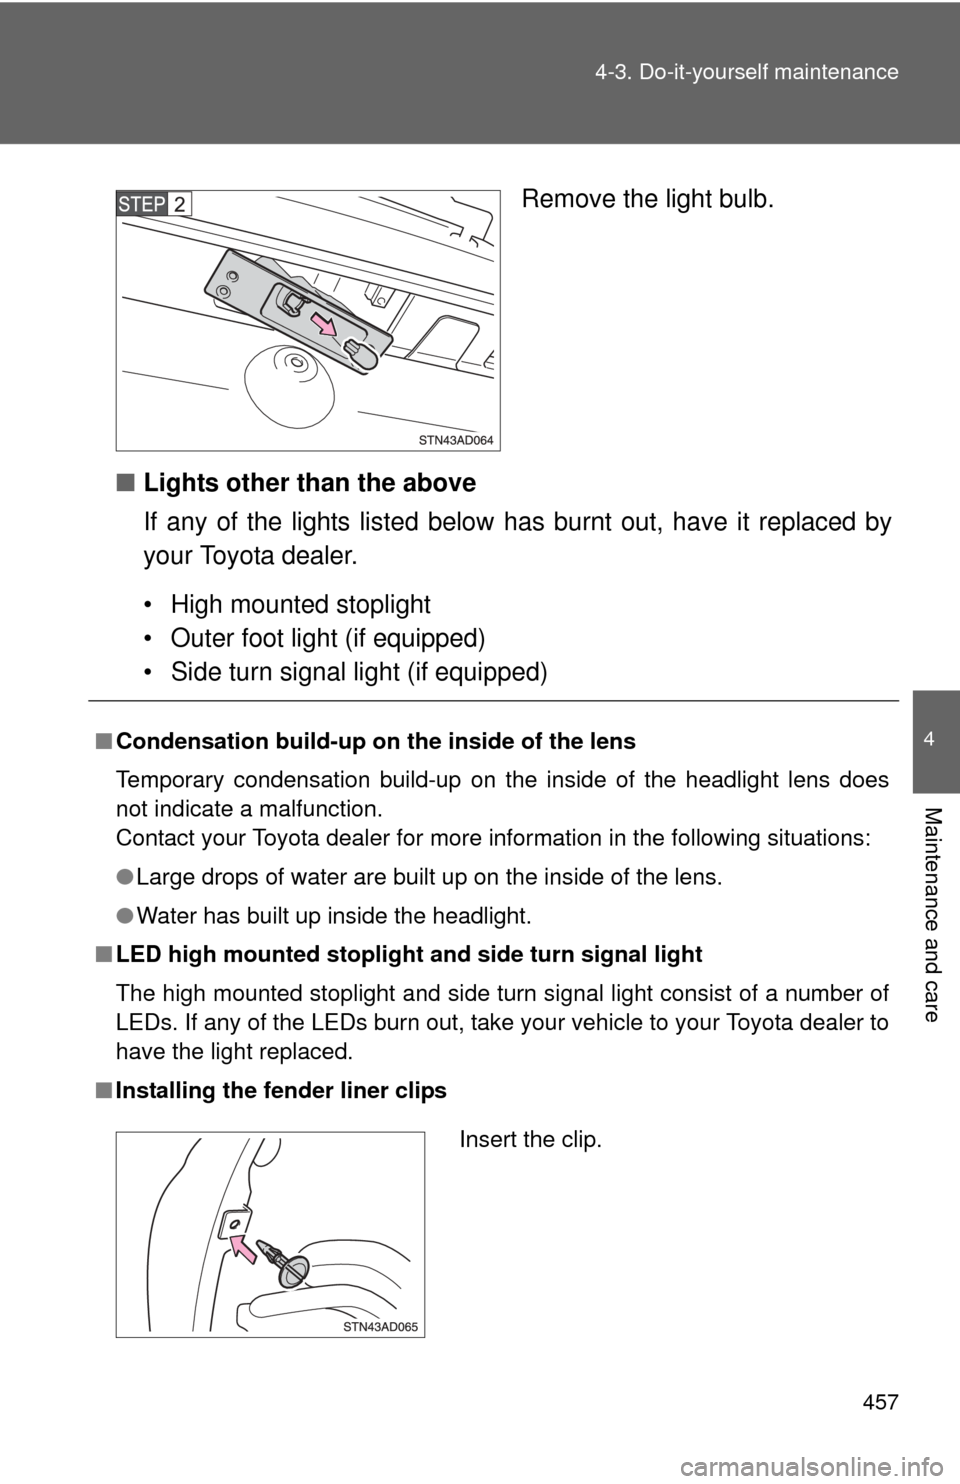
Remove the light bulb.
■ Lights other than the above
If any of the lights listed below has burnt out, have it replaced by
your Toyota dealer.
• High mounted stoplight
• Outer foot light (if equipped)
• Side turn signal light (if equipped)
■ Condensation build-up on th e inside of the lens
Temporary condensation build-up on the inside of the headlight lens does
not indicate a malfunction.
Contact your Toyota dealer for more information in the following situations:
● Large drops of water are built up on the inside of the lens.
● Water has built up inside the headlight.
■ LED high mounted stoplight and side turn signal light
The high mounted stoplight and side turn signal light consist of a number of
LEDs. If any of the LEDs burn out, take your vehicle to your Toyota dealer to
have the light replaced.
■ Installing the fender liner clips
Insert the clip.
Page 460 of 576
460
5-1. Essential information
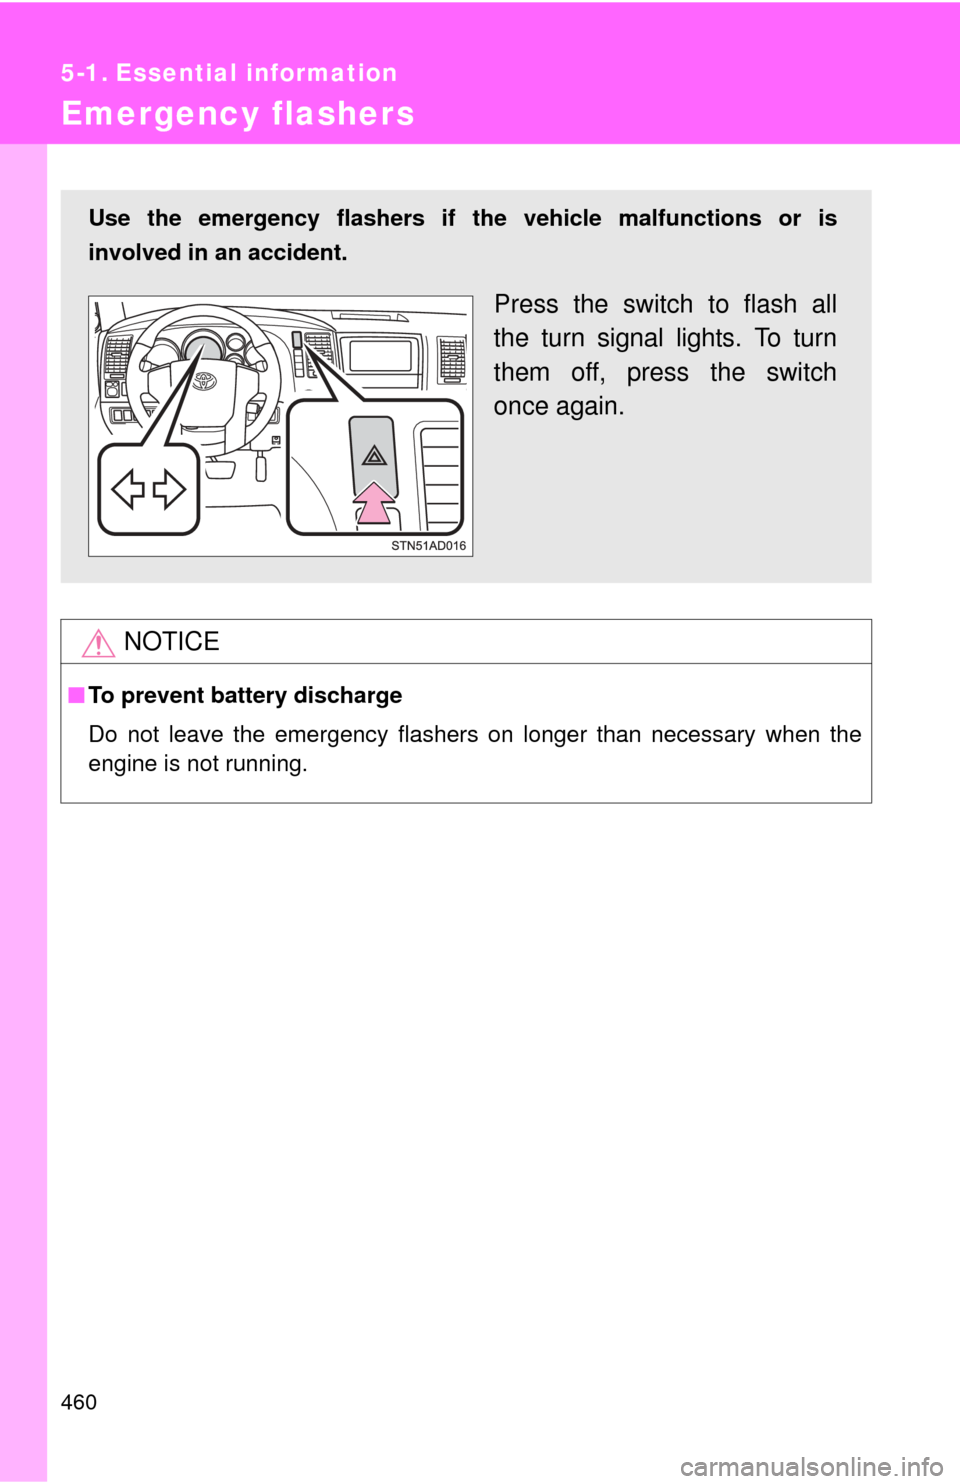
Emergency flashers
NOTICE
■To prevent battery discharge
Do not leave the emergency flashers on longer than necessary when the
engine is not running.
Use the emergency flashers if th e vehicle malfunctions or is
involved in an accident.
Press the switch to flash all
the turn signal lights. To turn
them off, press the switch
once again.
Page 476 of 576
476 5-2. Steps to take in an emergency
■When a tire is replaced with a temporary spare tire
The temporary spare tire is not equipped with the tire pressure warning
valve and transmitter. If a tire goes flat, the tire pressure warning light will
not turn off even though the flat tire is replaced with the temporary spare
tire. Replace the temporary spare tire with the repaired tire and adjust
the proper tire inflatio n pressure. The tire pres sure warning light will turn
off after several minutes.
■If the tire pressure warning system is inoperative
The tire pressure warning system will be disabled in the following condi-
tions:
(When the condition becomes normal, the system will work properly.)
●If tires not equipped with tire pressure warning valves and transmit-
ters are used.
●If the ID code on the tire pressure warning valves and transmitters is
not registered in the tire pressure warning computer.
●If the tire inflation pressure is 73 psi (500 kPa, 5.1 kgf/cm2 or bar) or
higher.
The tire pressure warning system may be disabled in the following condi-
tions:
(When the condition becomes normal, the system will work properly.)
●If electronic devices or facilities using similar radio wave frequencies
are nearby.
●If a radio set at similar frequencies is in use in the vehicle.
●If a window tint that affects the radio wave signals is installed.
●If there is a lot of snow or ice on the vehicle, in particular around the
wheels or wheel housings.
●If non-genuine Toyota wheels are used. (Even if you use Toyota
wheels, the tire pressu re warning system may not work properly with
some types of tires.)
●If tire chains are used.