start TOYOTA SEQUOIA 2016 2.G Owner's Guide
[x] Cancel search | Manufacturer: TOYOTA, Model Year: 2016, Model line: SEQUOIA, Model: TOYOTA SEQUOIA 2016 2.GPages: 576, PDF Size: 12.74 MB
Page 282 of 576

282 2-5. Driving information
Trailer towing tipsYour vehicle will handle differently when towing a trailer. Help to avoid
an accident, death or serious injury, keep the following in mind when
towing:
● Speed limits for towing a trailer vary by state or province. Do not
exceed the posted towing speed limit.
● Toyota recommends that the vehicle-trailer speed limit is 65 mph
(104 km/h) on a flat, straight, dry road. Do not exceed this limit, the
posted towing speed limit or the speed limit for your trailer as set
forth in your trailer owner’s man ual, whichever is lowest. Instability
of the towing vehicle-trailer combin ation (trailer sway) increases as
speed increases. Exceeding speed limits may cause loss of con-
trol.
● Before starting out, check the trailer lights, tires and the vehicle-
trailer connections. Recheck after driving a short distance.
● Practice turning, stopping and reve rsing with the trailer attached in
an area away from traffic until you become accustomed to the feel
of the vehicle-trailer combination.
● Reversing with a trailer attached is difficult and requires practice.
Grip the bottom of the steering wheel and move your hand to the
left to move the trailer to the left. Move your hand to the right to
move the trailer to the right. (This is generally opposite to reversing
without a trailer attached.) Avoid sharp or prolonged turning. Have
someone guide you when reversing to reduce the risk of an acci-
dent.
● As stopping distance is increased when towing a trailer, vehicle-to-
vehicle distance should be increased. For each 10 mph (16 km/h)
of speed, allow at least o ne vehicle and trailer length.
● Avoid sudden braking as you may skid, resulting in the trailer jack-
knifing and loss of vehicle control. This is especially true on wet or
slippery surfaces.
Page 283 of 576

283
2-5. Driving information
2
When driving
●
Avoid jerky starts or sudden acceleration.
● Avoid jerky steering and sharp turns, and slow down before mak-
ing a turn.
● Note that when making a turn, th e trailer wheels will be closer than
the vehicle wheels to the inside of the turn. Compensate by making
a wider than normal turning radius.
● Slow down before making a turn, in crosswinds, on wet or slippery
surfaces, etc.
Increasing vehicle speed can destabilize the trailer.
● Take care when passing other vehicles. Passing requires consider-
able distance. After passing a vehicle, do not forget the length of
your trailer, and be sure you hav e plenty of room before changing
lanes.
● To maintain engine braking efficiency and charging system perfor-
mance when using engine braking, do not use the transmission in
D.
Transmission shift range position must be in 4 in the S mode.
● Instability happens more frequently when descending steep or long
downhill grades. Before descending, slow down and downshift. Do
not make sudden downshifts while descending steep or long down-
hill grades.
● Avoid holding the brake pedal down too long or applying the
brakes too frequently. This could cause the brakes to overheat and
result in reduced braking efficiency.
● Due to the added load of the trailer, your vehicle’s engine may
overheat on hot days (at temperatures over 85°F [30°C]) when
driving up a long or steep grade. If the engine coolant temperature
gauge indicates overheating, immedi ately turn off the air condition-
ing (if in use), pull your vehicle off the road and stop in a safe spot.
( P. 504)
Page 284 of 576
284 2-5. Driving information
●Always place wheel blocks under both the vehicle’s and the
trailer’s wheels when parking. Ap ply the parking brake firmly, and
put the transmission in P. Avoid parking on a slope, but if unavoid-
able, do so only after performing the following:
Apply the brakes and keep them applied.
Have someone place wheel blo cks under both the vehicle’s
and trailer’s wheels.
When the wheel blocks are in place, release the brakes slowly
until the blocks absorb the load.
Apply the parking brake firmly.
Shift into P and turn off the engine.
● When restarting after parking on a slope:
With the transmission in P, start the engine. On vehicles with
an automatic transmission, be sure to keep the brake pedal
pressed.
Shift into a forward gear. If reversing, shift into R.
Release the parking brake and brake pedal, and slowly pull or
back away from the wheel blocks. Stop and apply the brakes.
Have someone retrieve the blocks.
Page 301 of 576
301
3-1. Using the air conditioning system
and defogger
3
Interior features
■When the outside temperature exceeds 75 F (24C) and the air condi-
tioning system is on
● In order to reduce the air conditioning power consumption, the air condi-
tioning system may switch to recirculated air mode automatically. This
may also reduce fuel consumption.
● Recirculated air mode is selected as a default mode when the engine
switch is in the ON position.
● It is possible to switch to outside air mode at any time by pressing
.
■ Window defogger feature
Recirculated air mode may automatically switch to outside air mode in situa-
tions where the windows need to be defogged.
■ When outside temperature approaches 32 F (0 C)
The air conditioning system may not operate even when is pressed.
■ When the indicator on
flashes
Press
and turn off the air conditioning system before turning it on
once more. There may be a problem in the air conditioning system if the indi-
cator continues to flash. Turn the air conditioning system off and have it
inspected by your Toyota dealer.
■ Ventilation and air conditioning odors
●To let fresh air in, set the air conditioning system to the outside air mode.
● During use, various odors from inside and outside the vehicle may enter
into and accumulate in the air conditioning system. This may then cause
odor to be emitted from the vents.
● To reduce potential odors from occurring:
• It is recommended that the air conditioning system be set to outside air
mode prior to turning the vehicle off.
• The start timing of the blower may be delayed for a short period of time immediately after the air conditioning system is started in automatic
mode.
Page 372 of 576
372 3-5. Using the other interior features
■Programming a Rolling Code sys tem (for U.S.A. owners)
If your device is Rolling Code equipped, follow the steps under the
heading “Programming the HomeLink
®” before proceeding with the
steps listed below.
Locate the training button on the ceiling mounted garage door
opener motor. The exact location and color of the button may
vary by brand of garage door opener.
Refer to the operation manual supplied with the garage door opener
for the location of the training button.
Press the training button.
Following this step, you have 30 seconds in which to initiate step 3
below.
Press and hold the vehicle’s programmed HomeLink® button
for 2 seconds and release it. Repeat this step once again. The
garage door may open.
If the garage door opens, the programming process is complete. If
the door does not open, press and release the button a third time.
This third press and release will complete the programming process
by opening the garage door.
The ceiling mounted garage door opener motor should now recog-
nize the HomeLink
® transceiver and operate the garage door.
Repeat the steps above to prog ram another rolling code sys-
tem for any of the remaining HomeLink® buttons.
■ Programming an entry gate (f or U.S.A. owners)/Programming
all devices in the Canadian market
Place your transmitter 1 to 3 in. (25 to 75 mm) away from the
surface of the HomeLink
®.
Keep the indicator on the HomeLink® in view while programming.
Press and hold the selected HomeLink® button.
Repeatedly press and release (cycle) the device’s remote
control button for two seconds each until step 4 is completed.
When the indicator on the HomeLink
® compatible transceiver
start to flashing rapidly, release the buttons.
Page 373 of 576
373
3-5. Using the other interior features
3
Interior features
Test the operation of the HomeLink® by pressing the newly
programmed button. Check to see if the gate/device operates
correctly.
Repeat the steps above to program another device for each of
the remaining HomeLink
® buttons.
■ Programming other devices
To program other devices such as home security systems, home
door locks or lighting, contact your authorized Toyota dealer for
assistance.
■ Reprogramming a button
The individual HomeLink
® buttons cannot be erased but can be
reprogrammed. To reprogram a button, follow the programming
instructions.
Operating the HomeLink®
Press the appropriate HomeLink® button. The HomeLink® indicator
on the HomeLink® transceiver should turn on.
The HomeLink® continues to send a signal for a maximum of 20 seconds
as long as the button is pressed.
Reprogramming a HomeLink® button
Press and hold the desired HomeLink
® button. After 20 seconds, the
HomeLink® indicator light will start flashing slowly. Keep pressing the
HomeLink® button and then follow the “Programming the HomeLink®
(for U.S.A. owners)” instructions. ( P. 370)
Page 397 of 576
397
4-3. Do-it-yourself maintenance
4
Maintenance and care
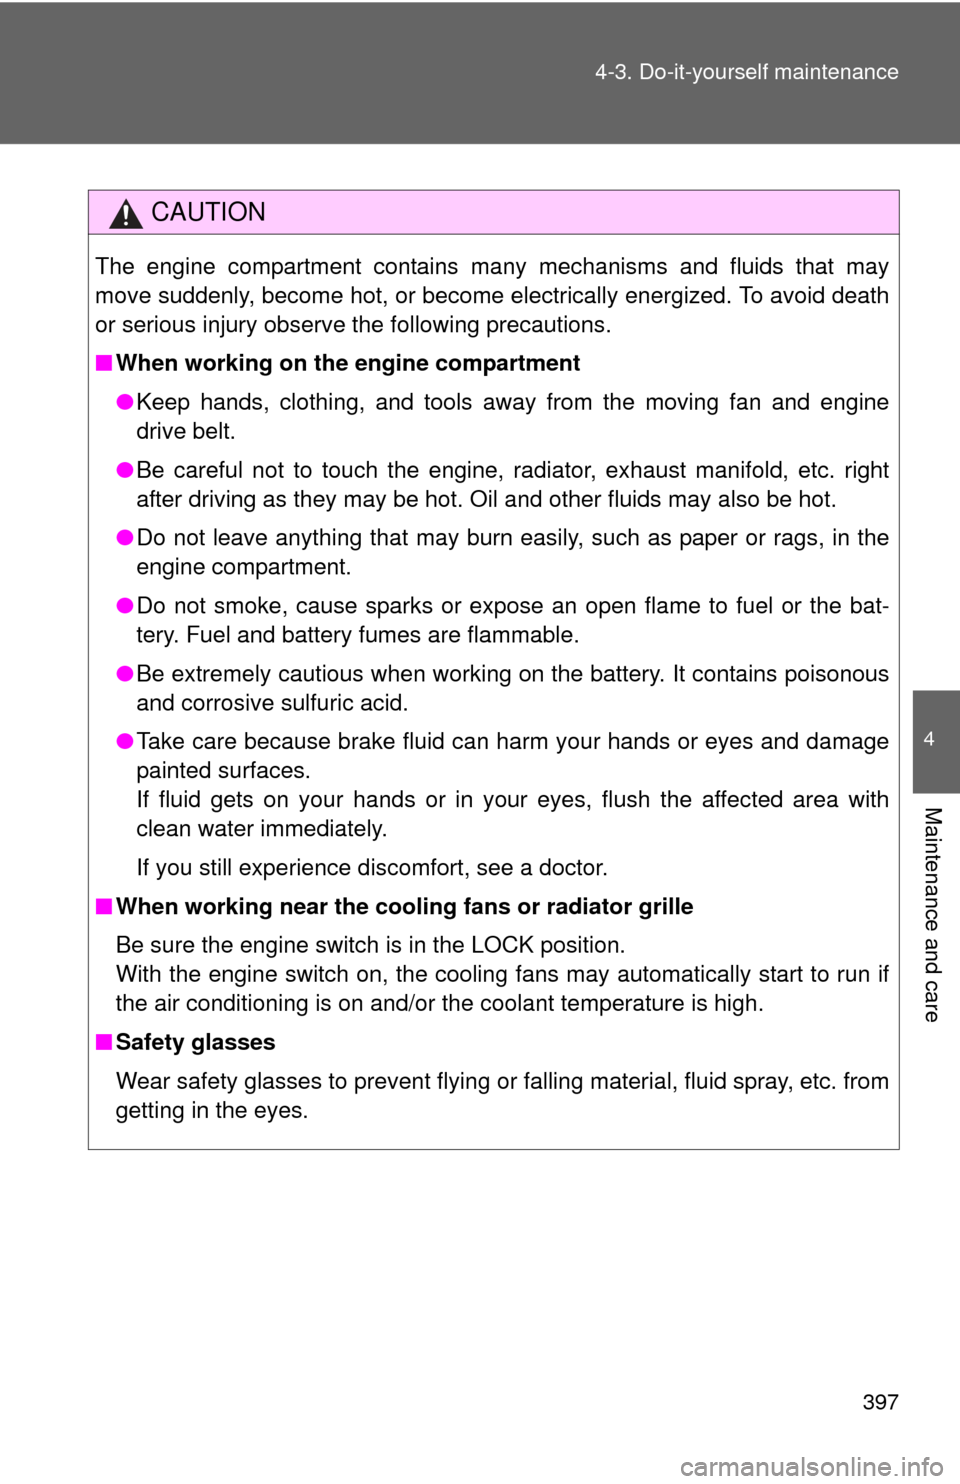
CAUTION
The engine compartment contains many mechanisms and fluids that may
move suddenly, become hot, or become electrically energized. To avoid death
or serious injury observe the following precautions.
■
When working on the engine compartment
●Keep hands, clothing, and tools away from the moving fan and engine
drive belt.
● Be careful not to touch the engine, radiator, exhaust manifold, etc. right
after driving as they may be hot. Oil and other fluids may also be hot.
● Do not leave anything that may burn easily, such as paper or rags, in the
engine compartment.
● Do not smoke, cause sparks or expose an open flame to fuel or the bat-
tery. Fuel and battery fumes are flammable.
● Be extremely cautious when working on the battery. It contains poisonous
and corrosive sulfuric acid.
● Take care because brake fluid can harm your hands or eyes and damage
painted surfaces.
If fluid gets on your hands or in your eyes, flush the affected area with
clean water immediately.
If you still experience discomfort, see a doctor.
■ When working near the cooling fans or radiator grille
Be sure the engine switch is in the LOCK position.
With the engine switch on, the cooling fans may automatically start to run if
the air conditioning is on and/or the coolant temperature is high.
■ Safety glasses
Wear safety glasses to prevent flying or falling material, fluid spray, etc. from
getting in the eyes.
Page 439 of 576
439
4-3. Do-it-yourself maintenance
4
Maintenance and care
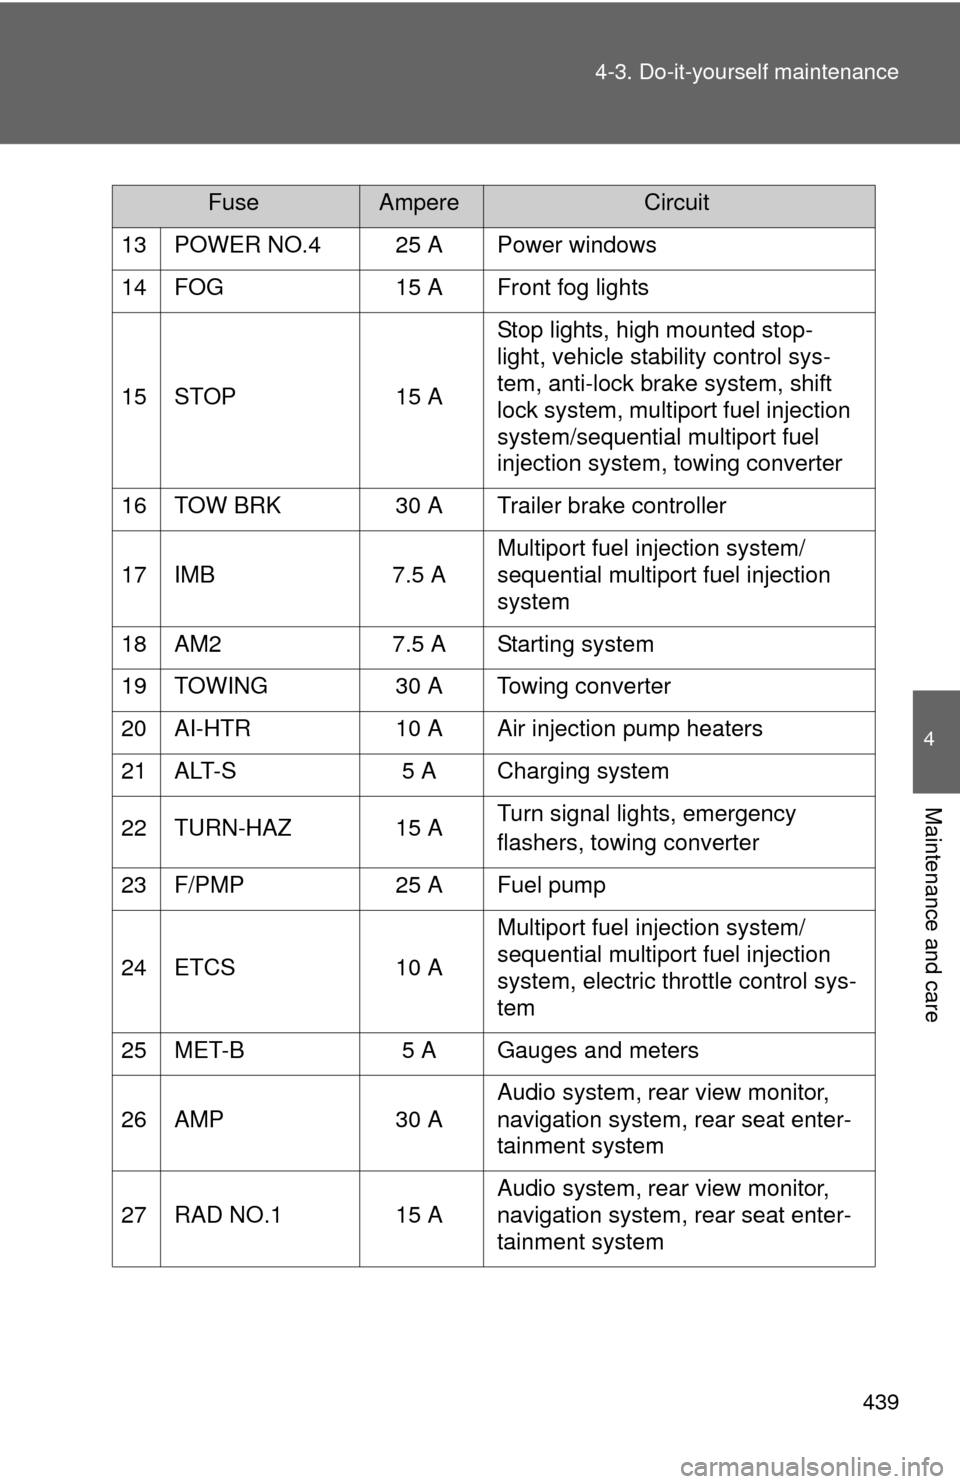
13 POWER NO.4 25 A Power windows
14 FOG
15 A Front fog lights
15 STOP 15 AStop lights, high mounted stop-
light, vehicle stability control sys-
tem, anti-lock brake system, shift
lock system, multiport fuel injection
system/sequential multiport fuel
injection system, towing converter
16 TOW BRK 30 A Trailer brake controller
17 IMB 7.5 AMultiport fuel injection system/
sequential multiport fuel injection
system
18 AM2 7.5 A Starting system
19 TOWING 30 A Towing converter
20 AI-HTR 10 A Air injection pump heaters
21 ALT-S 5 A Charging system
22 TURN-HAZ 15 A Turn signal lights, emergency
flashers, towing converter
23 F/PMP 25 A Fuel pump
24 ETCS 10 AMultiport fuel injection system/
sequential multiport fuel injection
system, electric throttle control sys-
tem
25 MET-B 5 A Gauges and meters
26 AMP 30 AAudio system, rear view monitor,
navigation system, rear seat enter-
tainment system
27 RAD NO.1 15 A Audio system, rear view monitor,
navigation system, rear seat enter-
tainment system
FuseAmpereCircuit
Page 441 of 576
441
4-3. Do-it-yourself maintenance
4
Maintenance and care
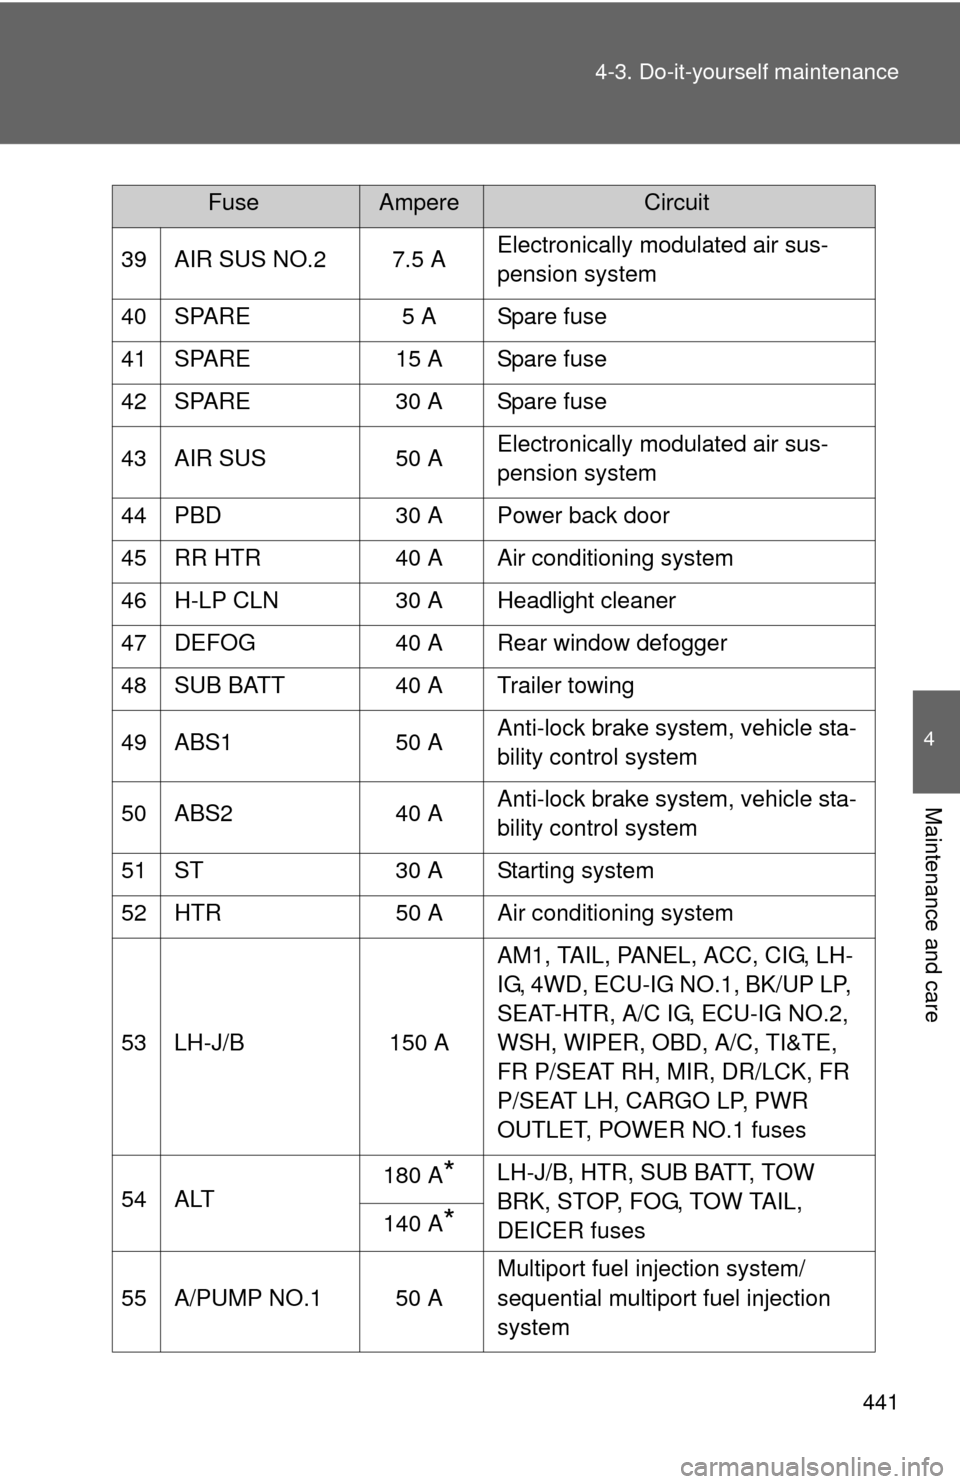
39 AIR SUS NO.2 7.5 A
Electronically modulated air sus-
pension system
40 SPARE 5 A Spare fuse
41 SPARE 15 A Spare fuse
42 SPARE 30 A Spare fuse
43 AIR SUS 50 A Electronically modulated air sus-
pension system
44 PBD 30 A Power back door
45 RR HTR 40 A Air conditioning system
46 H-LP CLN 30 A Headlight cleaner
47 DEFOG 40 A Rear window defogger
48 SUB BATT 40 A Trailer towing
49 ABS1 50 AAnti-lock brake system, vehicle sta-
bility control system
50 ABS2 40 AAnti-lock brake system, vehicle sta-
bility control system
51 ST 30 A Starting system
52 HTR 50 A Air conditioning system
53 LH-J/B 150 AAM1, TAIL, PANEL, ACC, CIG, LH-
IG, 4WD, ECU-IG NO.1, BK/UP LP,
SEAT-HTR, A/C IG, ECU-IG NO.2,
WSH, WIPER, OBD, A/C, TI&TE,
FR P/SEAT RH, MIR, DR/LCK, FR
P/SEAT LH, CARGO LP, PWR
OUTLET, POWER NO.1 fuses
54 ALT 180 A
*LH-J/B, HTR, SUB BATT, TOW
BRK, STOP, FOG, TOW TAIL,
DEICER fuses
140 A
*
55 A/PUMP NO.1 50 A Multiport fuel injection system/
sequential multiport fuel injection
system
FuseAmpereCircuit
Page 443 of 576
443
4-3. Do-it-yourself maintenance
4
Maintenance and care
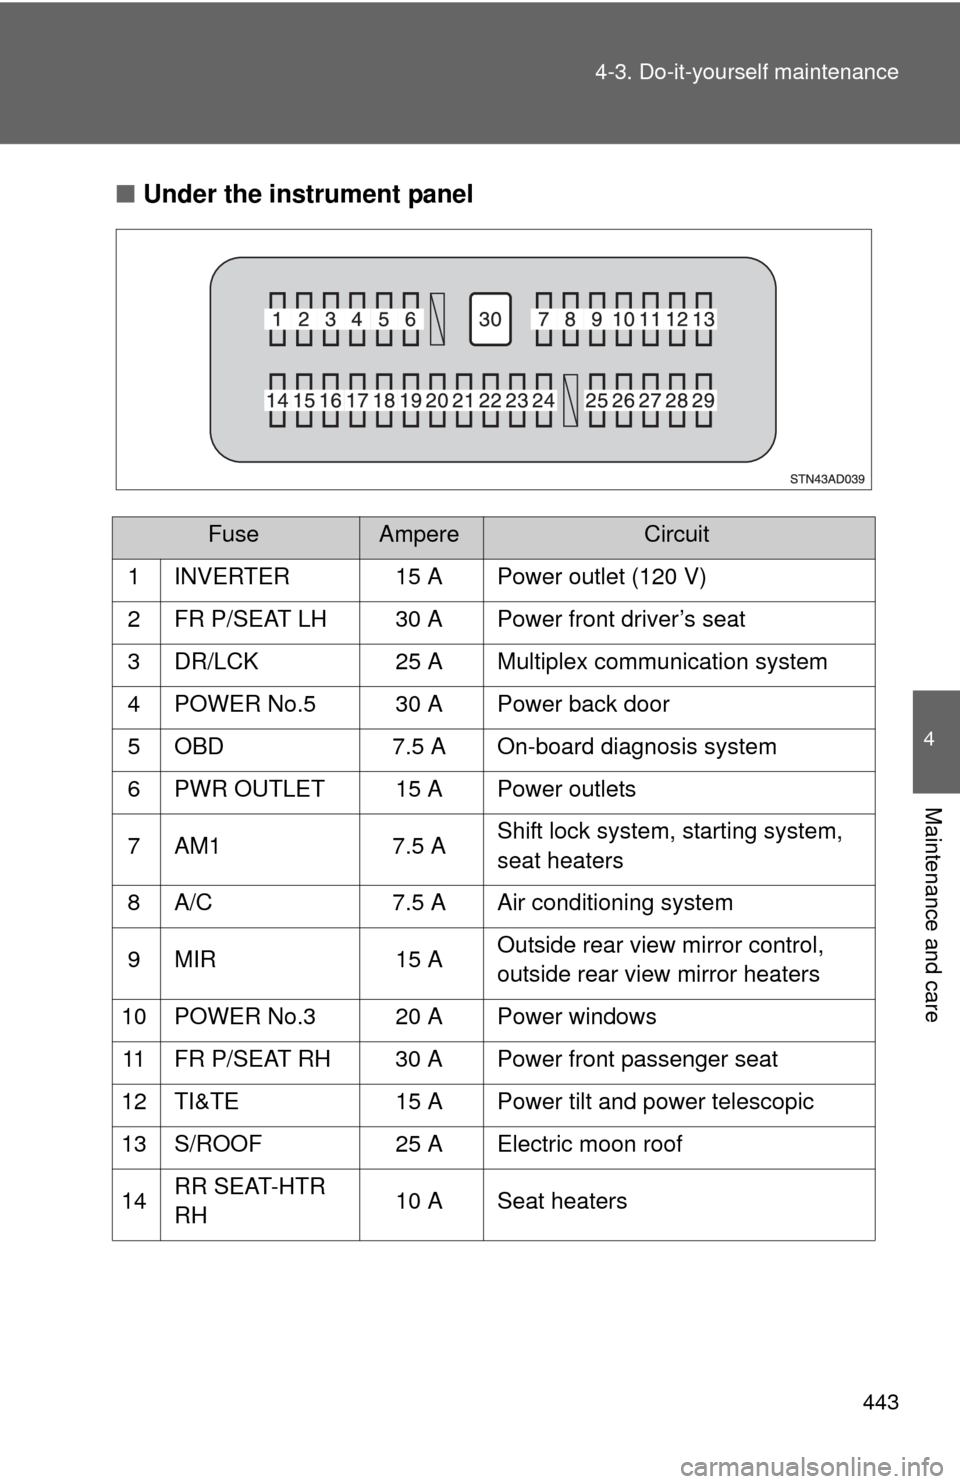
■
Under the instrument panel
FuseAmpereCircuit
1 INVERTER 15 A Power outlet (120 V)
2 FR P/SEAT LH 30 A Power front driver’s seat
3 DR/LCK 25 A Multiplex communication system
4 POWER No.5 30 A Power back door
5 OBD 7.5 A On-board diagnosis system
6 PWR OUTLET 15 A Power outlets
7 AM1 7.5 A Shift lock system, starting system,
seat heaters
8 A/C 7.5 A Air conditioning system
9 MIR 15 A Outside rear view mirror control,
outside rear view mirror heaters
10 POWER No.3 20 A Power windows 11 FR P/SEAT RH 30 A Power front passenger seat
12 TI&TE 15 A Power tilt and power telescopic
13 S/ROOF 25 A Electric moon roof
14 RR SEAT-HTR
RH 10 A Seat heaters