change time TOYOTA SEQUOIA 2019 Accessories, Audio & Navigation (in English)
[x] Cancel search | Manufacturer: TOYOTA, Model Year: 2019, Model line: SEQUOIA, Model: TOYOTA SEQUOIA 2019Pages: 324, PDF Size: 6.76 MB
Page 3 of 324
3
The Navigation System is one of the most technologically advanced vehicle ac-
cessories ever developed. The system receives satellite signals from the Global
Positioning System (GPS) operated by the U.S. Department of Def ense. Using
these signals and other vehicle sensors, the system indicates y our present po-
sition and assists in locating a desired destination.
The navigation system is designed to select efficient routes fr om your present
starting location to your destination. The system is also desig ned to direct you
to a destination that is unfamiliar to you in an efficient mann er. Map database is
made based on AISIN AW maps, whose information source comes fro m HERE
maps. The calculated routes may not be the shortest nor the lea st traffic con-
gested. Your own personal local knowledge or “short cut” may at times be faster
than the calculated routes.
The navigation system’s database includes Point of Interest cat egories to allow
you to easily select destinations such as restaurants and hotels. If a destination
is not in the database, you can enter the street address or a major intersection
close to it and the system will guide you there.
The system will provide both a visual map and audio instructions. The audio in-
structions will announce the distance remaining and the directi on to turn in when
approaching an intersection. These voice instructions will help you keep your
eyes on the road and are timed to provide enough time to allow you to maneu-
ver, change lanes or slow down.
Please be aware that all current vehicle navigation systems have certain limita-
tions that may affect their ability to perform properly. The ac curacy of the vehi-
cle’s position depends on satellite conditions, road configurat ion, vehicle
condition or other circumstances. For more information on the l imitations of the
system, refer to page 290.
NAVIGATION SYSTEM
Page 43 of 324
43
2. Bluetooth® SETTINGS
BASIC FUNCTION
2
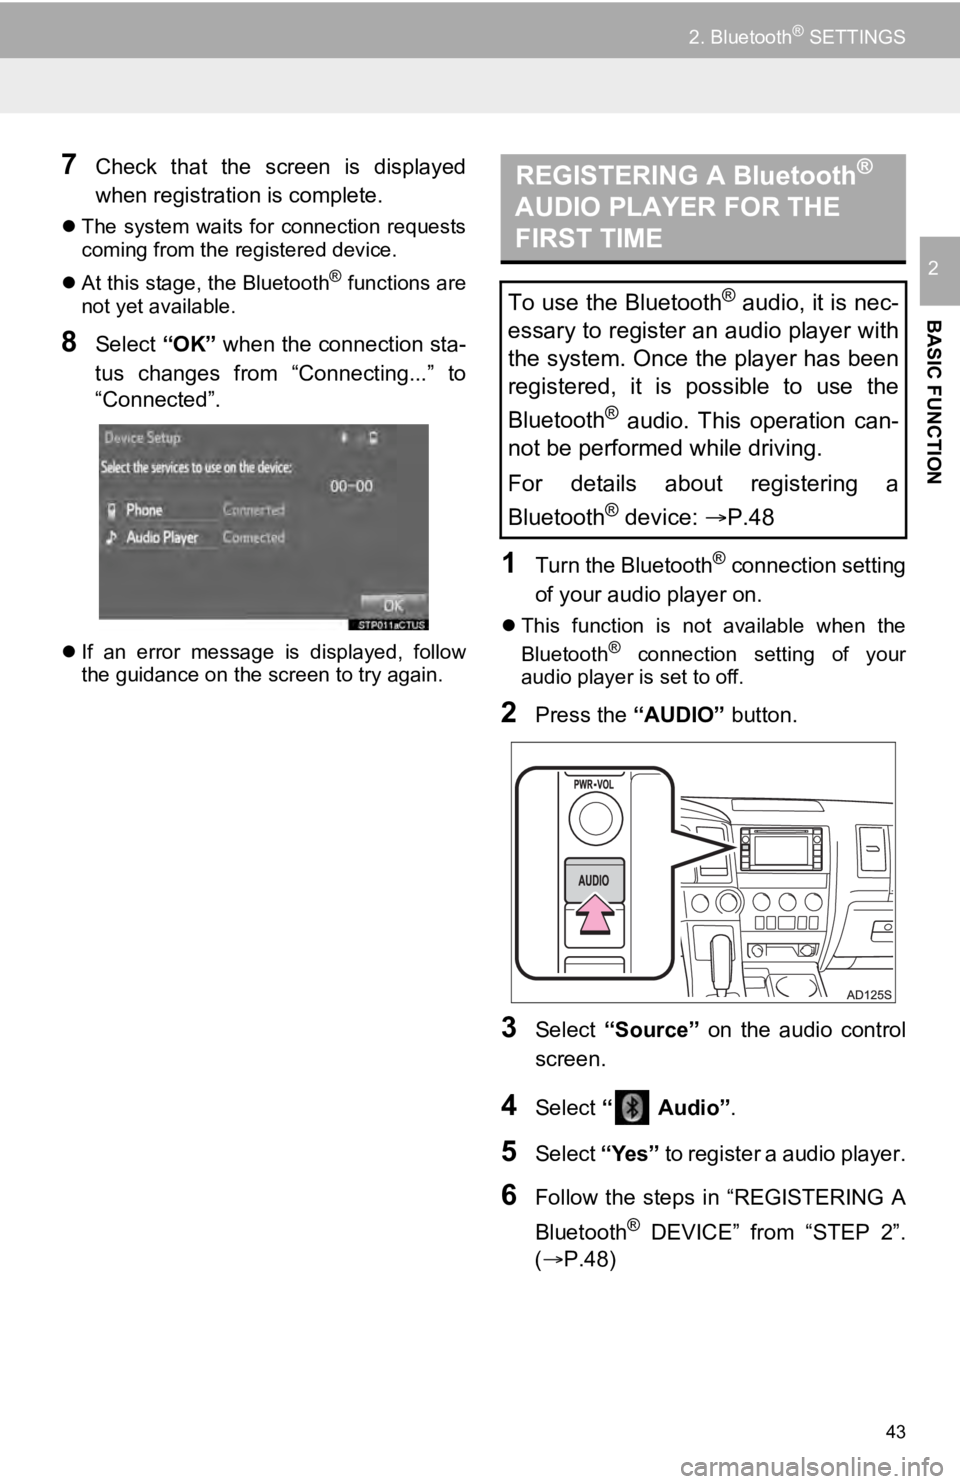
7Check that the screen is displayed
when registration is complete.
The system waits for connection requests
coming from the registered device.
At this stage, the Bluetooth
® functions are
not yet available.
8Select “OK” when the connection sta-
tus changes from “Connecting...” to
“Connected”.
If an error message is displayed, follow
the guidance on the screen to try again.
1Turn the Bluetooth® connection setting
of your audio player on.
This function is not available when the
Bluetooth® connection setting of your
audio player is set to off.
2Press the “AUDIO” button.
3Select “Source” on the audio control
screen.
4Select “ Audio” .
5Select “Yes” to register a audio player.
6Follow the steps in “REGISTERING A
Bluetooth
® DEVICE” from “STEP 2”.
(P.48)
REGISTERING A Bluetooth®
AUDIO PLAYER FOR THE
FIRST TIME
To use the Bluetooth® audio, it is nec-
essary to register an audio player with
the system. Once the player has been
registered, it is possible to use the
Bluetooth
® audio. This operation can-
not be performed while driving.
For details about registering a
Bluetooth
® device: P.48
Page 53 of 324
53
2. Bluetooth® SETTINGS
BASIC FUNCTION
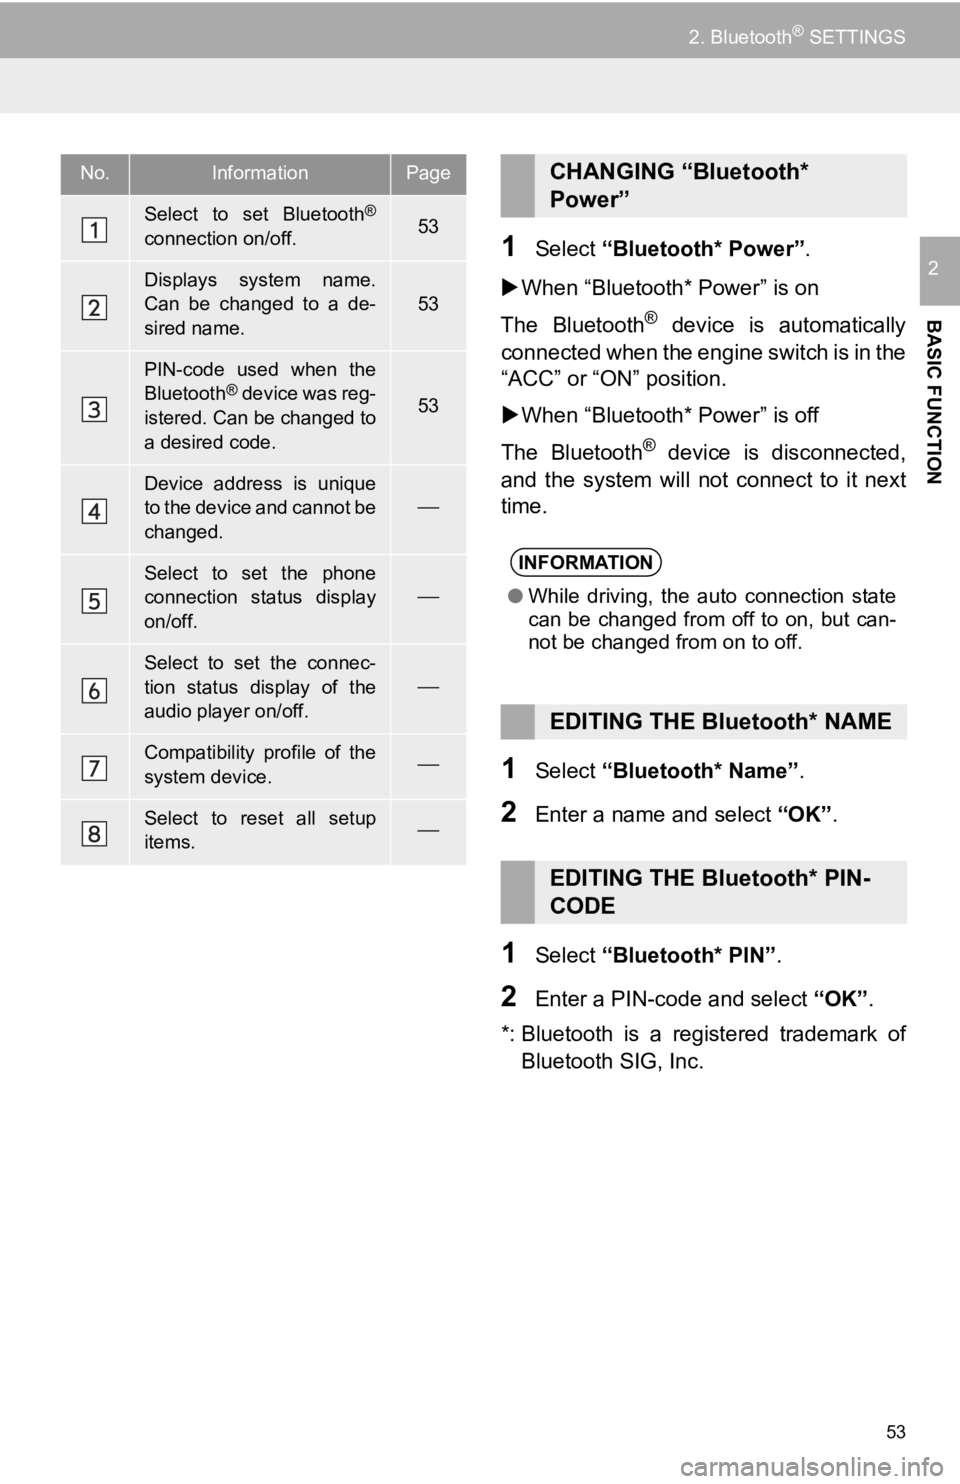
21Select “Bluetooth* Power” .
When “Bluetooth* Power” is on
The Bluetooth
® device is automatically
connected when the engine switch is in the
“ACC” or “ON” position.
When “Bluetooth* Power” is off
The Bluetooth
® device is disconnected,
and the system will not connect to it next
time.
1Select “Bluetooth* Name” .
2Enter a name and select “OK”.
1Select “Bluetooth* PIN” .
2Enter a PIN-code and select “OK”.
*: Bluetooth is a registered trademark of Bluetooth SIG, Inc.
No.InformationPage
Select to set Bluetooth®
connection on/off.53
Displays system name.
Can be changed to a de-
sired name.
53
PIN-code used when the
Bluetooth® device was reg-
istered. Can be changed to
a desired code.53
Device address is unique
to the device and cannot be
changed.
Select to set the phone
connection status display
on/off.
Select to set the connec-
tion status display of the
audio player on/off.
Compatibility profile of the
system device.
Select to reset all setup
items.
CHANGING “Bluetooth*
Power”
INFORMATION
● While driving, the auto connection state
can be changed from off to on, but can-
not be changed from on to off.
EDITING THE Bluetooth* NAME
EDITING THE Bluetooth* PIN-
CODE
Page 55 of 324
55
3. OTHER SETTINGS
BASIC FUNCTION
2
*: Entune Premium Audio only
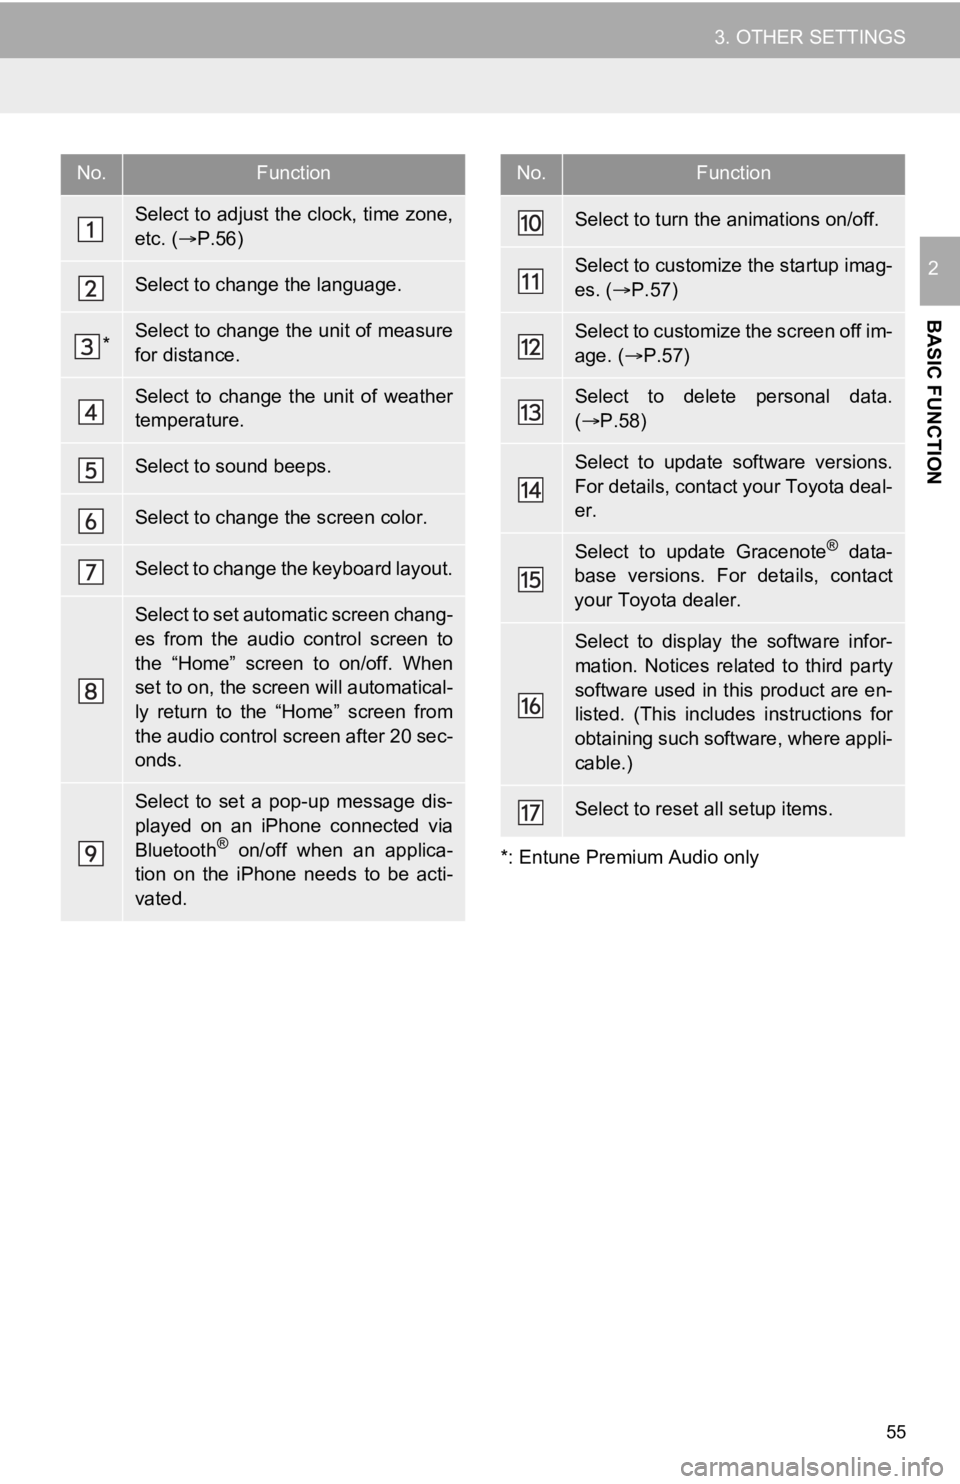
No.Function
Select to adjust the clock, time zone,
etc. ( P.56)
Select to change the language.
*Select to change the unit of measure
for distance.
Select to change the unit of weather
temperature.
Select to sound beeps.
Select to change the screen color.
Select to change the keyboard layout.
Select to set automatic screen chang-
es from the audio control screen to
the “Home” screen to on/off. When
set to on, the screen will automatical-
ly return to the “Home” screen from
the audio control screen after 20 sec-
onds.
Select to set a pop-up message dis-
played on an iPhone connected via
Bluetooth
® on/off when an applica-
tion on the iPhone needs to be acti-
vated.
Select to turn the animations on/off.
Select to customize the startup imag-
es. ( P.57)
Select to customize the screen off im-
age. ( P.57)
Select to delete personal data.
( P.58)
Select to update software versions.
For details, contact your Toyota deal-
er.
Select to update Gracenote® data-
base versions. For details, contact
your Toyota dealer.
Select to display the software infor-
mation. Notices related to third party
software used in this product are en-
listed. (This includes instructions for
obtaining such software, where appli-
cable.)
Select to reset all setup items.
No.Function
Page 56 of 324
56
3. OTHER SETTINGS
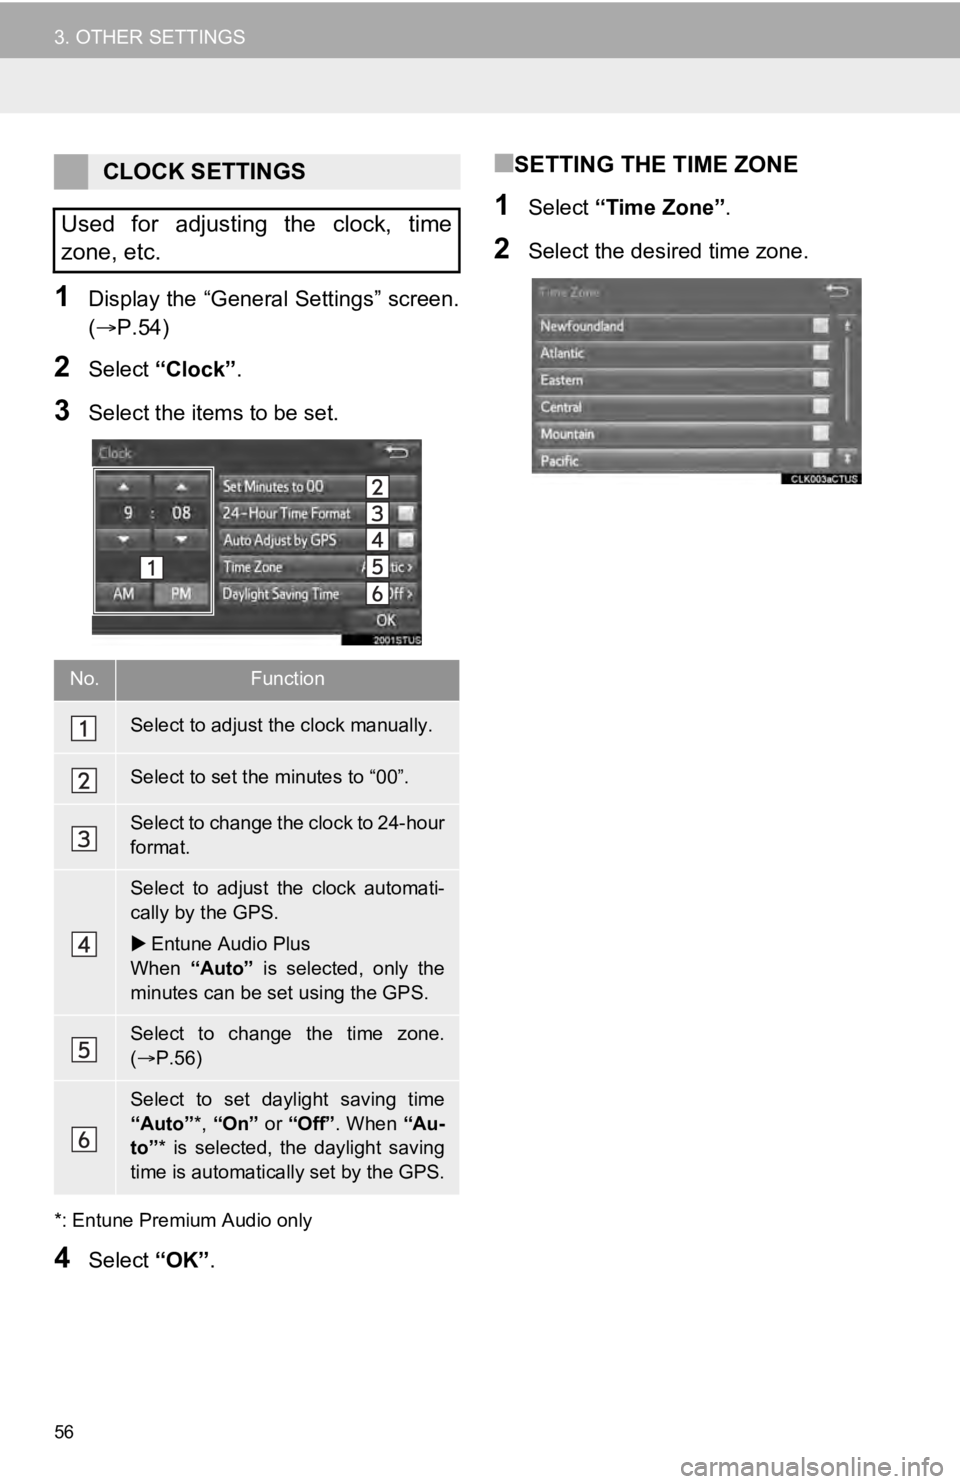
1Display the “General Settings” screen.
(P.54)
2Select “Clock”.
3Select the items to be set.
*: Entune Premium Audio only
4Select “OK”.
■SETTING THE TIME ZONE
1Select “Time Zone” .
2Select the desired time zone.
CLOCK SETTINGS
Used for adjusting the clock, time
zone, etc.
No.Function
Select to adjust the clock manually.
Select to set the minutes to “00”.
Select to change the clock to 24-hour
format.
Select to adjust the clock automati-
cally by the GPS.
Entune Audio Plus
When “Auto” is selected, only the
minutes can be set using the GPS.
Select to change the time zone.
( P.56)
Select to set daylight saving time
“Auto” *, “On” or “Off” . When “Au-
to” * is selected, the daylight saving
time is automatically set by the GPS.
Page 63 of 324
63
3. OTHER SETTINGS
BASIC FUNCTION
2
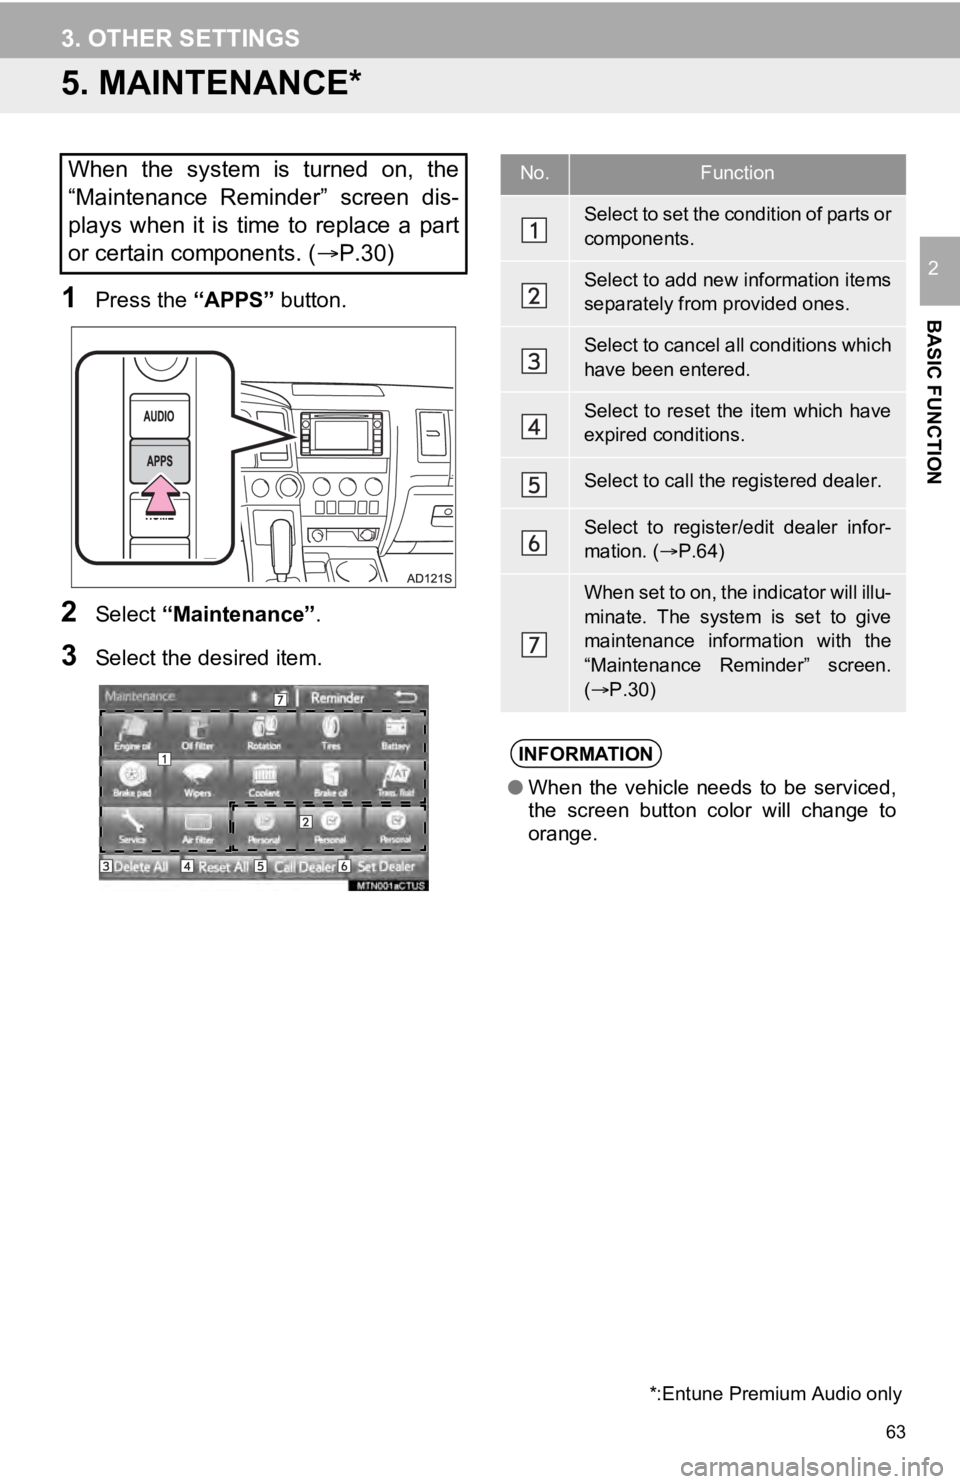
5. MAINTENANCE*
1Press the “APPS” button.
2Select “Maintenance” .
3Select the desired item.
When the system is turned on, the
“Maintenance Reminder” screen dis-
plays when it is time to replace a part
or certain components. ( P.30)
*:Entune Premium Audio only
No.Function
Select to set the condition of parts or
components.
Select to add new information items
separately from provided ones.
Select to cancel all conditions which
have been entered.
Select to reset the item which have
expired conditions.
Select to call the registered dealer.
Select to register/edit dealer infor-
mation. (P.64)
When set to on, the indicator will illu-
minate. The system is set to give
maintenance information with the
“Maintenance Reminder” screen.
( P.30)
INFORMATION
● When the vehicle needs to be serviced,
the screen button color will change to
orange.
Page 81 of 324

81
2. RADIO OPERATION
AUDIO SYSTEM
3
■REFRESHING THE STATION LIST
1Select “Refresh” on the “Station List”
screen and the following screen will be
displayed.
“Cancel Refresh” : Select to cancel the
refresh.
“Source” : Select to change to another au-
dio source while refreshing.
1Select the desired cache radio opera-
tion button.
INFORMATION
● AM/FM sound is muted during refresh
operation.
● In some situations, it may take some
time to update the station list.
CACHING A RADIO
PROGRAM (ENTUNE
PREMIUM AUDIO ONLY)
A radio program can be cached and
played back in a time-shifted manner.
PLAYING BACK THE CACHE
MANUALLY
The broadcast cached in the program
cache can be played back manually.
No.Function
Hides the cache operation buttons
Skips backward 2 minutes
Select and hold: Fast rewinds con-
tinuously
Returns to the live radio broadcast
Select and hold: Fast forwards con-
tinuously
Skips forward 2 minutes
Red bar: Shows what portion of the
cached broadcast is currently play-
ing
Light blue bar: Shows time in which
cache writing is in progress
Page 82 of 324
82
2. RADIO OPERATION
1Select “Station List” .
2FM radio only: Select a desired genre
of station and select a desired station.
The genre list is in the following order:
• Classical
• Country
• EasyLis (Easy Listening)
• Inform (Information)
•Jazz
•News
•Oldies
• Other
• Pop Music
• Religion
•Rock
• R&B (Rhythm and Blues)
• Sports
•Talk
• Traffic (Not available when “HD Radio”
indicator is off.)
• Alert (Emergency Alert)
AUTOMATIC PLAYBACK OF
THE CACHE
If the radio broadcast is interrupted by
another audio output, such as an
incoming phone call, the system will
automatically cache the interrupted
portion and perform time-shift
playback when the interruption ends.
To manually operate the cache
operation: ( P.81)
INFORMATION
●The system can store up to 20 minutes.
Cached data will be erased when the
radio mode or station is changed or
when the audio system is turned off.
● If noise or silence occurs during the
caching process, cache writing will con-
tinue, with the noise or silence recorded
as is. In this case, the cached broadcast
will contain the noise or silence when
played back.
RADIO BROADCAST DATA
SYSTEM
This audio system is equipped with Ra-
dio Broadcast Data Systems (RBDS).
RBDS mode allows text messages to
be received from radio stations that uti-
lize RBDS transmitters.
When RBDS is on, the radio can
— only select stations of a particular
program type,
— display messages from radio sta-
tions,
— search for a stronger signal station.
RBDS features are available only
when listening to an FM station that
broadcasts RBDS information and the
“FM Info” indicator is on.
SELECTING A DESIRED
GENRE
Page 89 of 324
89
2. RADIO OPERATION
AUDIO SYSTEM
3
HOW TO SUBSCRIBE TO XM
Satellite Radio
To listen to a satellite radio broadcast
in the vehicle, a subscription to the XM
Satellite Radio service is necessary.
An XM Satellite Radio is a tuner de-
signed exclusively to receive broad-
casts provided under a separate
subscription. Availability is limited to
the 48 contiguous U.S. states and
some Canadian provinces.
HOW TO SUBSCRIBE
It is necessary to enter into a separate
service agreement with XM Satellite
Radio in order to receive satellite
broadcast programming in the vehicle.
Additional activation and service sub-
scription fees apply that are not includ-
ed in the purchase price of the vehicle
and digital satellite tuner.
For complete information on subscrip-
tion rates and terms, or to subscribe to
XM Satellite Radio:
U.S.A.
Refer to
www.siriusxm.com or call
1-877-447-0011.
Canada
Refer to www.siriusxm.ca
or call
1-877-209-0079.
NOTICE
● XM Radio Services Legal Disclaimers
and Warnings
• Fees and Taxes Subscription fee,
taxes, one time activation fee, and
other fees may apply. Subscription fee
is consumer only. All fees and
programming subject to change.
Subscriptions subject to Customer
Agreement available at
www.siriusxm.com. (U.S.A.) or
www.siriusxm.ca (Canada) XM service
only available in the 48 contiguous
United States and Canada.
Explicit Language NoticeChannels
with frequent explicit language are
indicated with an “XL” preceding the
channel name. Channel blocking is
available for XM Satellite Radio
receivers by notifying XM at;
U.S.A. Customers:
Visit www.siriusxm.com or calling
1-877-447-0011
Canadian Customers:
Visit www.siriusxm.ca or calling
1-877-209-0079
● It is prohibited to copy, decompile, disas-
semble, reverse engineer, hack, manip-
ulate, or otherwise make available any
technology or software incorporated in
receivers compatible with the XM Satel-
lite Radio System or that support the XM
website, the Online Service or any of its
content. Furthermore, the AMBE
® voice
compression software included in this
product is protected by intellectual prop-
erty rights including patent rights, copy-
rights, and trade secrets of Digital Voice
Systems, Inc.
● Note: this applies to XM receivers only
and not XM Ready devices.
Page 92 of 324
92
2. RADIO OPERATION
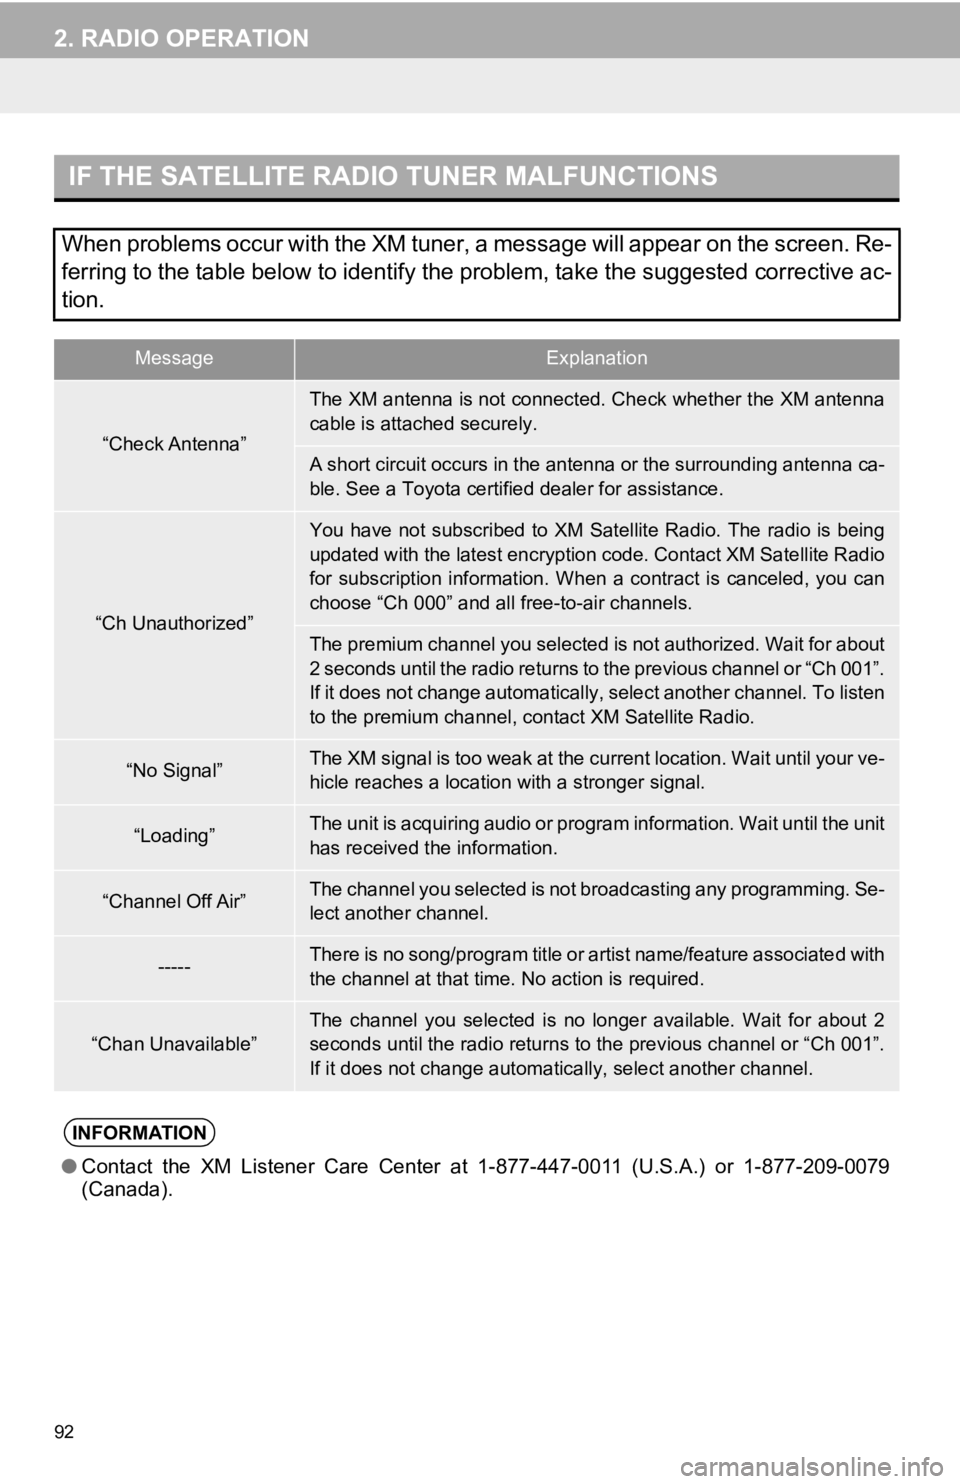
IF THE SATELLITE RADIO TUNER MALFUNCTIONS
When problems occur with the XM tuner, a message will appear on the screen. Re-
ferring to the table below to identify the problem, take the suggested corrective ac-
tion.
MessageExplanation
“Check Antenna”
The XM antenna is not connected. Check whether the XM antenna
cable is attached securely.
A short circuit occurs in the antenna or the surrounding antenna ca-
ble. See a Toyota certified dealer for assistance.
“Ch Unauthorized”
You have not subscribed to XM Satellite Radio. The radio is being
updated with the latest encryption code. Contact XM Satellite R adio
for subscription information. W hen a contract is canceled, you can
choose “Ch 000” and all free-to-air channels.
The premium channel you selected is not authorized. Wait for ab out
2 seconds until the radio retu rns to the previous channel or “C h 001”.
If it does not change automatically, select another channel. To listen
to the premium channel, contact XM Satellite Radio.
“No Signal”The XM signal is too weak at the current location. Wait until y our ve-
hicle reaches a location with a stronger signal.
“Loading”The unit is acquiring audio or program information. Wait until the unit
has received the information.
“Channel Off Air”The channel you selected is not broadcasting any programming. S e-
lect another channel.
-----There is no song/program title or artist name/feature associate d with
the channel at that time. No action is required.
“Chan Unavailable”
The channel you selected is no longer available. Wait for about 2
seconds until the radio returns to the previous channel or “Ch 001”.
If it does not change automatic ally, select another channel.
INFORMATION
●Contact the XM Listener Care Center at 1-877-447-0011 (U.S.A.) or 1-877-209-0079
(Canada).