language TOYOTA SEQUOIA 2019 Accessories, Audio & Navigation (in English)
[x] Cancel search | Manufacturer: TOYOTA, Model Year: 2019, Model line: SEQUOIA, Model: TOYOTA SEQUOIA 2019Pages: 324, PDF Size: 6.76 MB
Page 21 of 324
21
1. CONTROLS AND FEATURES
QUICK GUIDE
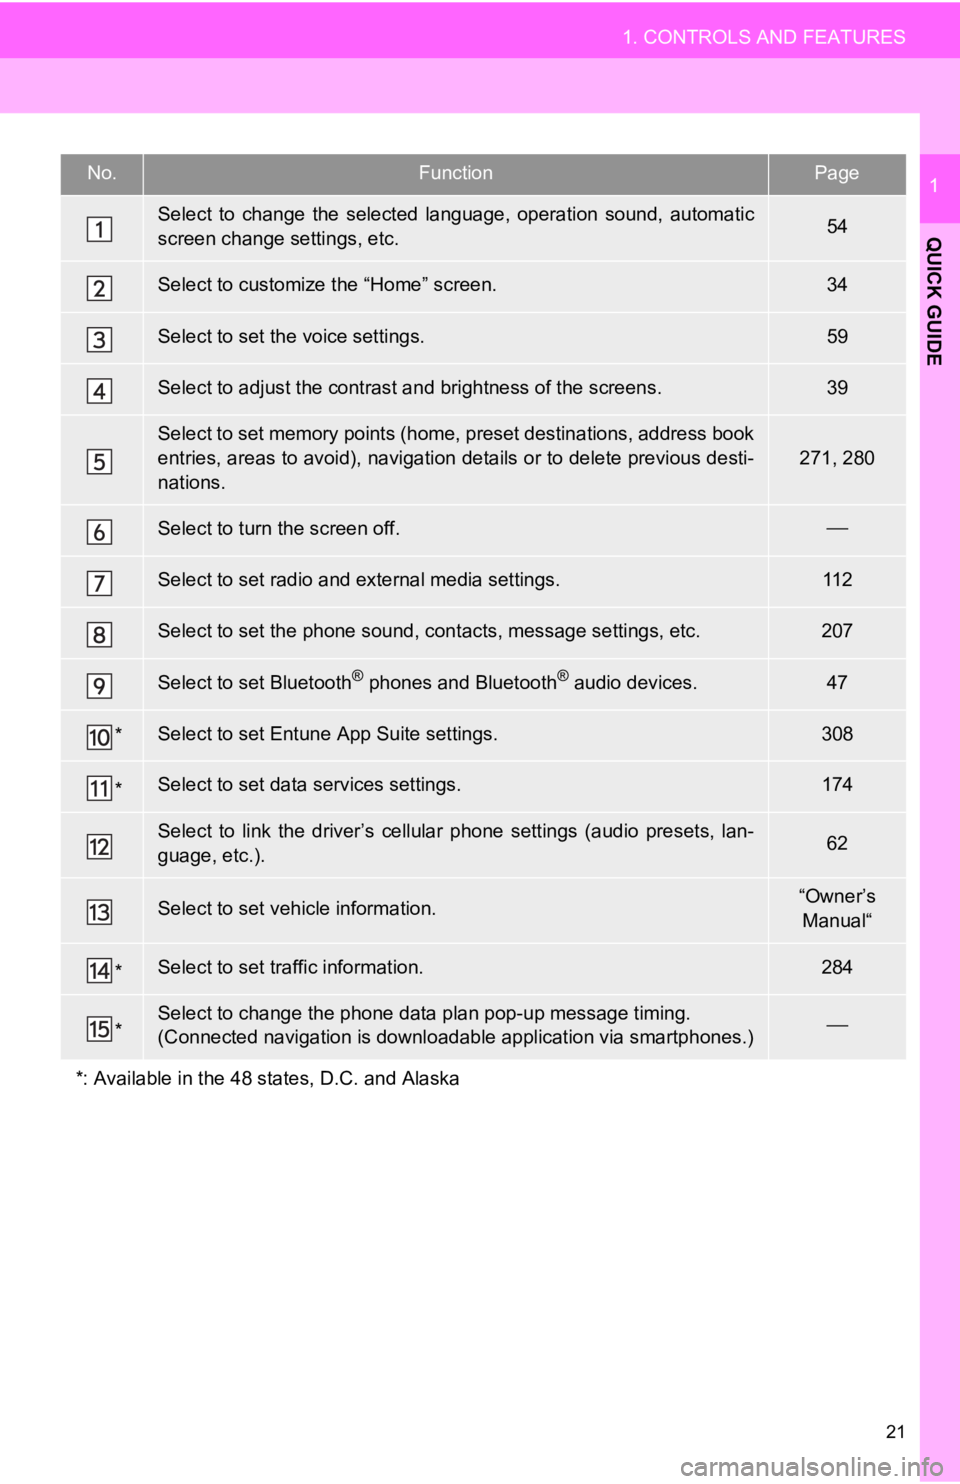
1No.FunctionPage
Select to change the selected language, operation sound, automatic
screen change settings, etc.54
Select to customize the “Home” screen.34
Select to set the voice settings.59
Select to adjust the contrast a nd brightness of the screens.39
Select to set memory points (home, preset destinations, address book
entries, areas to avoid), navigation details or to delete previous desti-
nations.
271, 280
Select to turn the screen off.
Select to set radio and external media settings.11 2
Select to set the phone sound, cont acts, message settings, etc.207
Select to set Bluetooth® phones and Bluetooth® audio devices.47
*Select to set Entune App Suite settings.308
*Select to set data services settings.174
Select to link the driver’s cellular phone settings (audio pres ets, lan-
guage, etc.).62
Select to set vehicle information.“Owner’s Manual“
*Select to set traffic information.284
*Select to change the phone data plan pop-up message timing.
(Connected navigation is downl oadable application via smartphon es.)
*: Available in the 48 st ates, D.C. and Alaska
Page 41 of 324
41
1. BASIC INFORMATION BEFORE OPERATION
BASIC FUNCTION
2
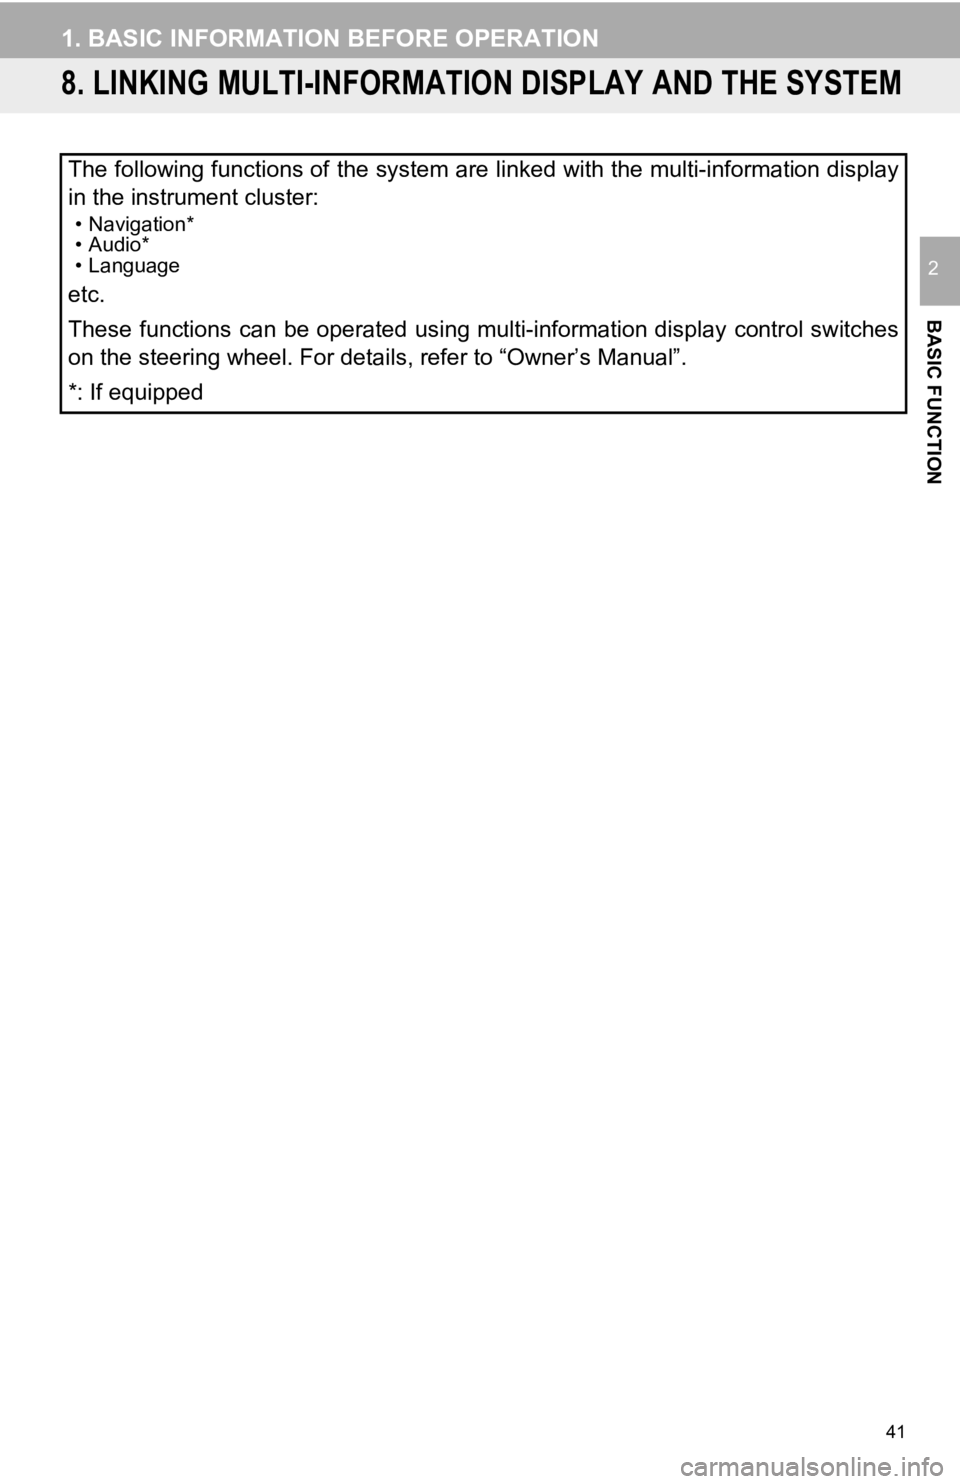
8. LINKING MULTI-INFORMATION DISPLAY AND THE SYSTEM
The following functions of the system are linked with the multi-information display
in the instrument cluster:
• Navigation*
• Audio*
• Language
etc.
These functions can be operated using multi-information display control switches
on the steering wheel. For details, refer to “Owner’s Manual”.
*: If equipped
Page 55 of 324
55
3. OTHER SETTINGS
BASIC FUNCTION
2
*: Entune Premium Audio only
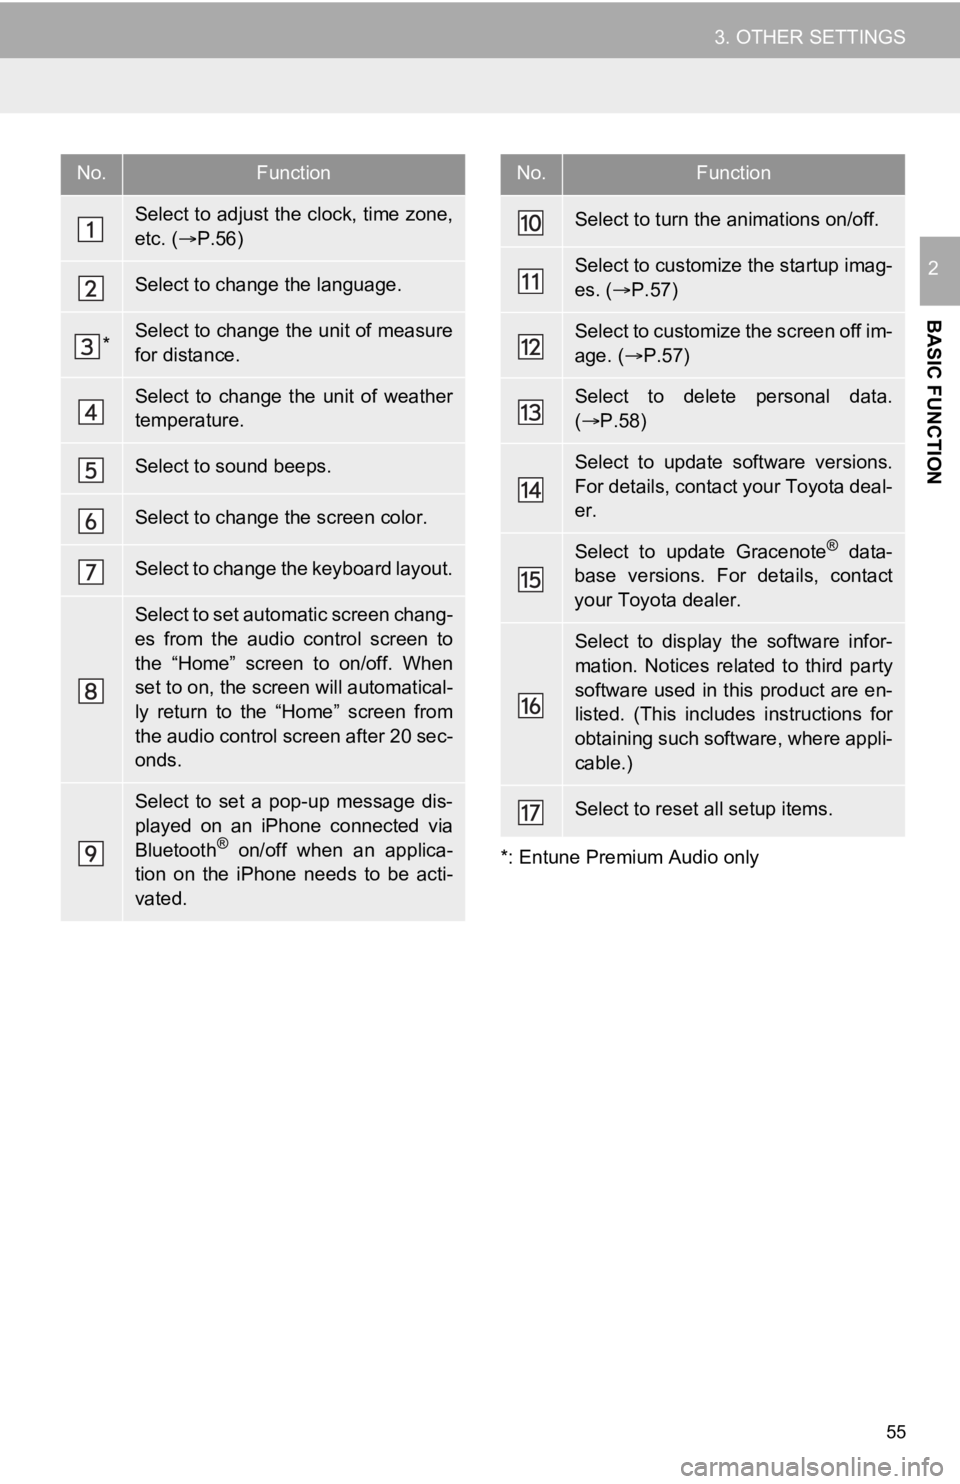
No.Function
Select to adjust the clock, time zone,
etc. ( P.56)
Select to change the language.
*Select to change the unit of measure
for distance.
Select to change the unit of weather
temperature.
Select to sound beeps.
Select to change the screen color.
Select to change the keyboard layout.
Select to set automatic screen chang-
es from the audio control screen to
the “Home” screen to on/off. When
set to on, the screen will automatical-
ly return to the “Home” screen from
the audio control screen after 20 sec-
onds.
Select to set a pop-up message dis-
played on an iPhone connected via
Bluetooth
® on/off when an applica-
tion on the iPhone needs to be acti-
vated.
Select to turn the animations on/off.
Select to customize the startup imag-
es. ( P.57)
Select to customize the screen off im-
age. ( P.57)
Select to delete personal data.
( P.58)
Select to update software versions.
For details, contact your Toyota deal-
er.
Select to update Gracenote® data-
base versions. For details, contact
your Toyota dealer.
Select to display the software infor-
mation. Notices related to third party
software used in this product are en-
listed. (This includes instructions for
obtaining such software, where appli-
cable.)
Select to reset all setup items.
No.Function
Page 62 of 324
62
3. OTHER SETTINGS
4. DRIVER SETTINGS
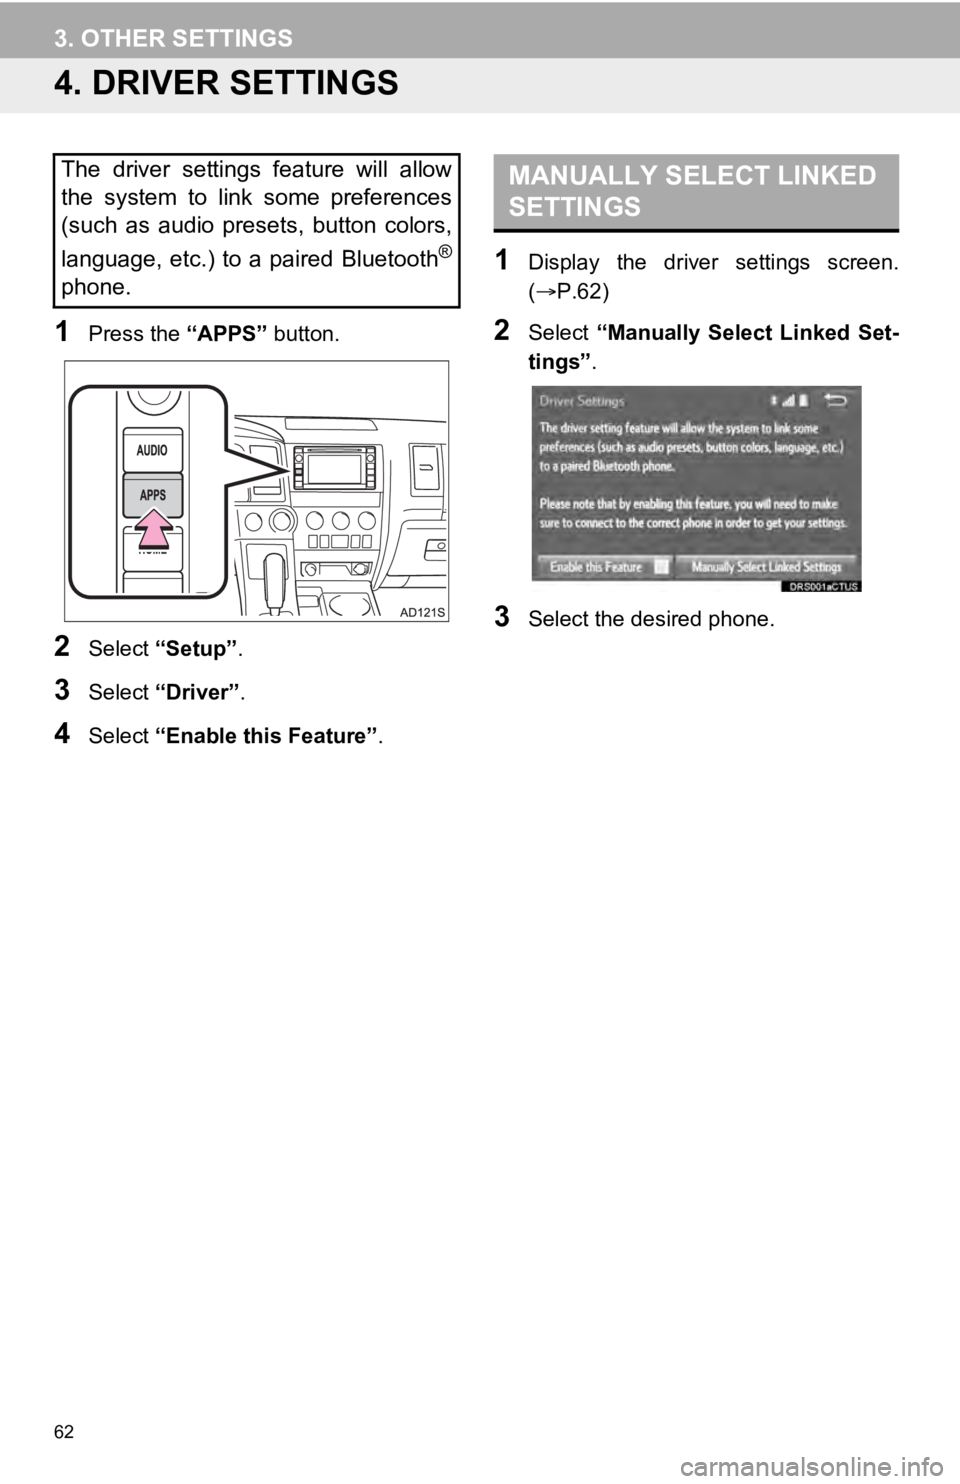
1Press the “APPS” button.
2Select “Setup” .
3Select “Driver” .
4Select “Enable this Feature” .
1Display the driver settings screen.
(P.62)
2Select “Manually Select Linked Set-
tings” .
3Select the desired phone.
The driver settings feature will allow
the system to link some preferences
(such as audio presets, button colors,
language, etc.) to a paired Bluetooth
®
phone.
MANUALLY SELECT LINKED
SETTINGS
Page 89 of 324
89
2. RADIO OPERATION
AUDIO SYSTEM
3
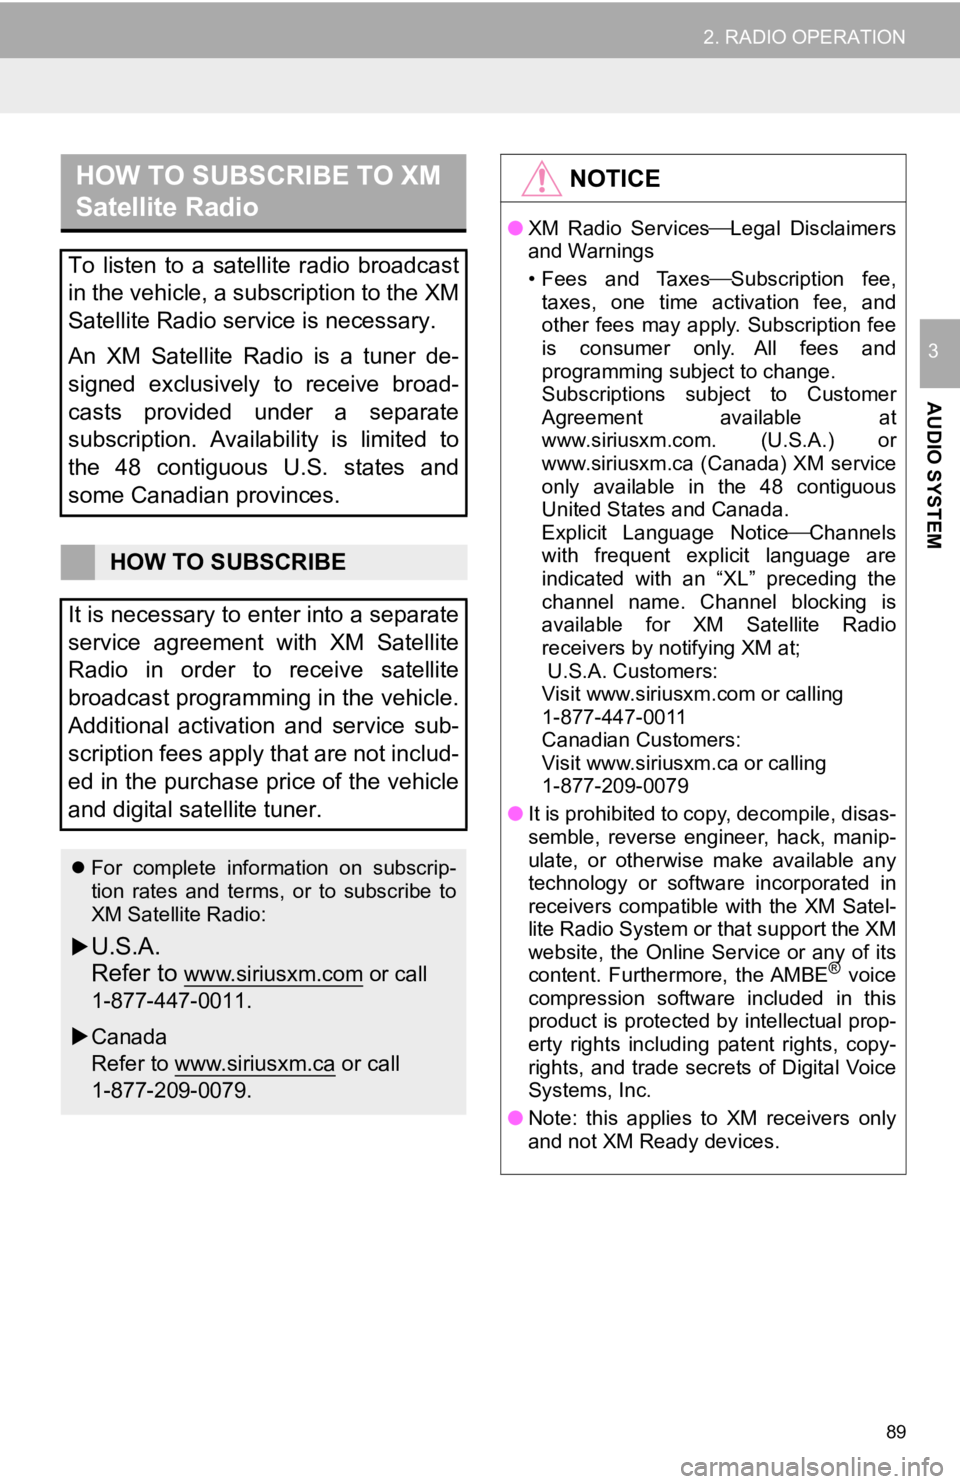
HOW TO SUBSCRIBE TO XM
Satellite Radio
To listen to a satellite radio broadcast
in the vehicle, a subscription to the XM
Satellite Radio service is necessary.
An XM Satellite Radio is a tuner de-
signed exclusively to receive broad-
casts provided under a separate
subscription. Availability is limited to
the 48 contiguous U.S. states and
some Canadian provinces.
HOW TO SUBSCRIBE
It is necessary to enter into a separate
service agreement with XM Satellite
Radio in order to receive satellite
broadcast programming in the vehicle.
Additional activation and service sub-
scription fees apply that are not includ-
ed in the purchase price of the vehicle
and digital satellite tuner.
For complete information on subscrip-
tion rates and terms, or to subscribe to
XM Satellite Radio:
U.S.A.
Refer to
www.siriusxm.com or call
1-877-447-0011.
Canada
Refer to www.siriusxm.ca
or call
1-877-209-0079.
NOTICE
● XM Radio Services Legal Disclaimers
and Warnings
• Fees and Taxes Subscription fee,
taxes, one time activation fee, and
other fees may apply. Subscription fee
is consumer only. All fees and
programming subject to change.
Subscriptions subject to Customer
Agreement available at
www.siriusxm.com. (U.S.A.) or
www.siriusxm.ca (Canada) XM service
only available in the 48 contiguous
United States and Canada.
Explicit Language NoticeChannels
with frequent explicit language are
indicated with an “XL” preceding the
channel name. Channel blocking is
available for XM Satellite Radio
receivers by notifying XM at;
U.S.A. Customers:
Visit www.siriusxm.com or calling
1-877-447-0011
Canadian Customers:
Visit www.siriusxm.ca or calling
1-877-209-0079
● It is prohibited to copy, decompile, disas-
semble, reverse engineer, hack, manip-
ulate, or otherwise make available any
technology or software incorporated in
receivers compatible with the XM Satel-
lite Radio System or that support the XM
website, the Online Service or any of its
content. Furthermore, the AMBE
® voice
compression software included in this
product is protected by intellectual prop-
erty rights including patent rights, copy-
rights, and trade secrets of Digital Voice
Systems, Inc.
● Note: this applies to XM receivers only
and not XM Ready devices.
Page 139 of 324
139
7. REAR SEAT ENTERTAINMENT SYSTEM OPERATION
AUDIO SYSTEM
3
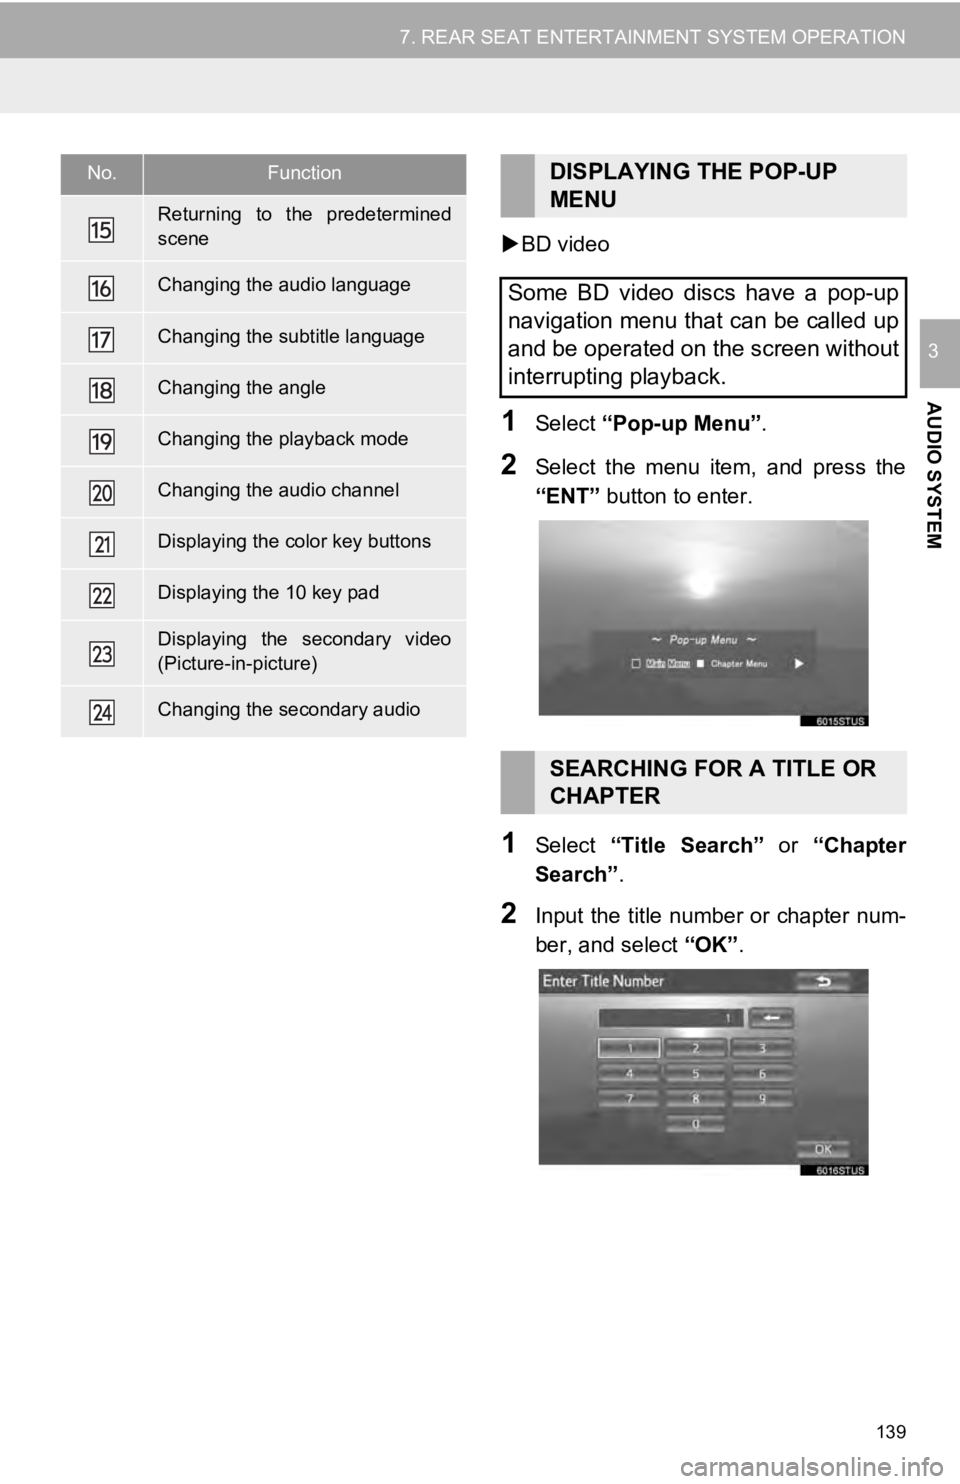
BD video
1Select “Pop-up Menu”.
2Select the menu item, and press the
“ENT” button to enter.
1Select “Title Search” or “Chapter
Search” .
2Input the title number or chapter num-
ber, and select “OK”.
Returning to the predetermined
scene
Changing the audio language
Changing the subtitle language
Changing the angle
Changing the playback mode
Changing the audio channel
Displaying the color key buttons
Displaying the 10 key pad
Displaying the secondary video
(Picture-in-picture)
Changing the secondary audio
No.FunctionDISPLAYING THE POP-UP
MENU
Some BD video discs have a pop-up
navigation menu that can be called up
and be operated on the screen without
interrupting playback.
SEARCHING FOR A TITLE OR
CHAPTER
Page 140 of 324
140
7. REAR SEAT ENTERTAINMENT SYSTEM OPERATION
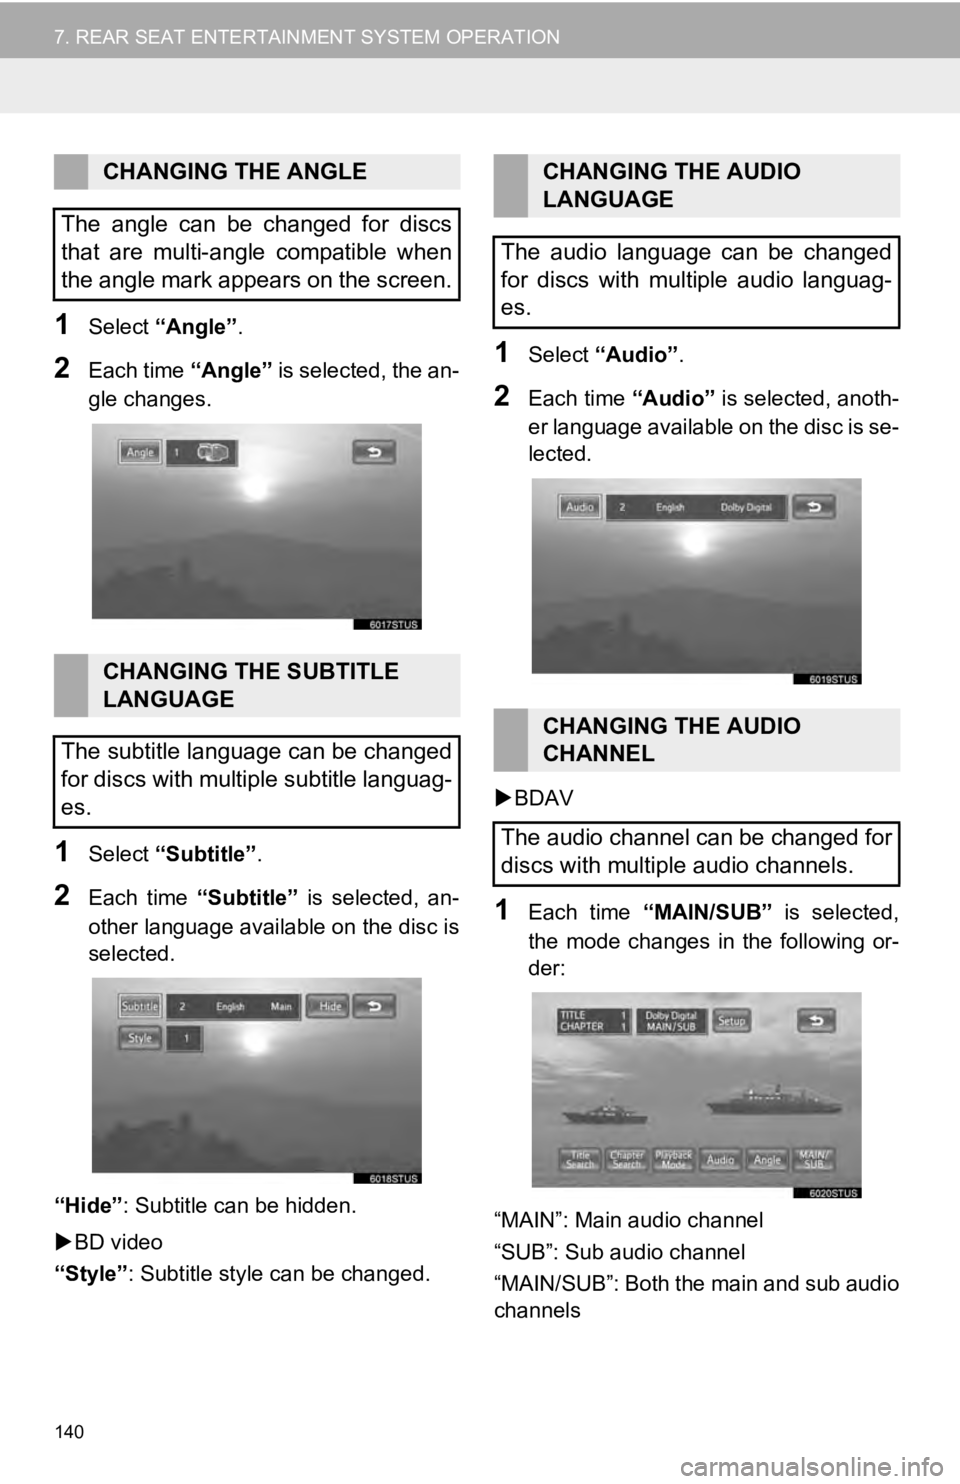
1Select “Angle” .
2Each time “Angle” is selected, the an-
gle changes.
1Select “Subtitle” .
2Each time “Subtitle” is selected, an-
other language availa ble on the disc is
selected.
“Hide” : Subtitle can be hidden.
BD video
“Style” : Subtitle style can be changed.
1Select “Audio” .
2Each time “Audio” is selected, anoth-
er language available on the disc is se-
lected.
BDAV
1Each time “MAIN/SUB” is selected,
the mode changes in the following or-
der:
“MAIN”: Main audio channel
“SUB”: Sub audio channel
“MAIN/SUB”: Both the main and sub audio
channels
CHANGING THE ANGLE
The angle can be changed for discs
that are multi-angle compatible when
the angle mark appears on the screen.
CHANGING THE SUBTITLE
LANGUAGE
The subtitle language can be changed
for discs with multiple subtitle languag-
es.
CHANGING THE AUDIO
LANGUAGE
The audio language can be changed
for discs with multiple audio languag-
es.
CHANGING THE AUDIO
CHANNEL
The audio channel can be changed for
discs with multiple audio channels.
Page 143 of 324
143
7. REAR SEAT ENTERTAINMENT SYSTEM OPERATION
AUDIO SYSTEM
3
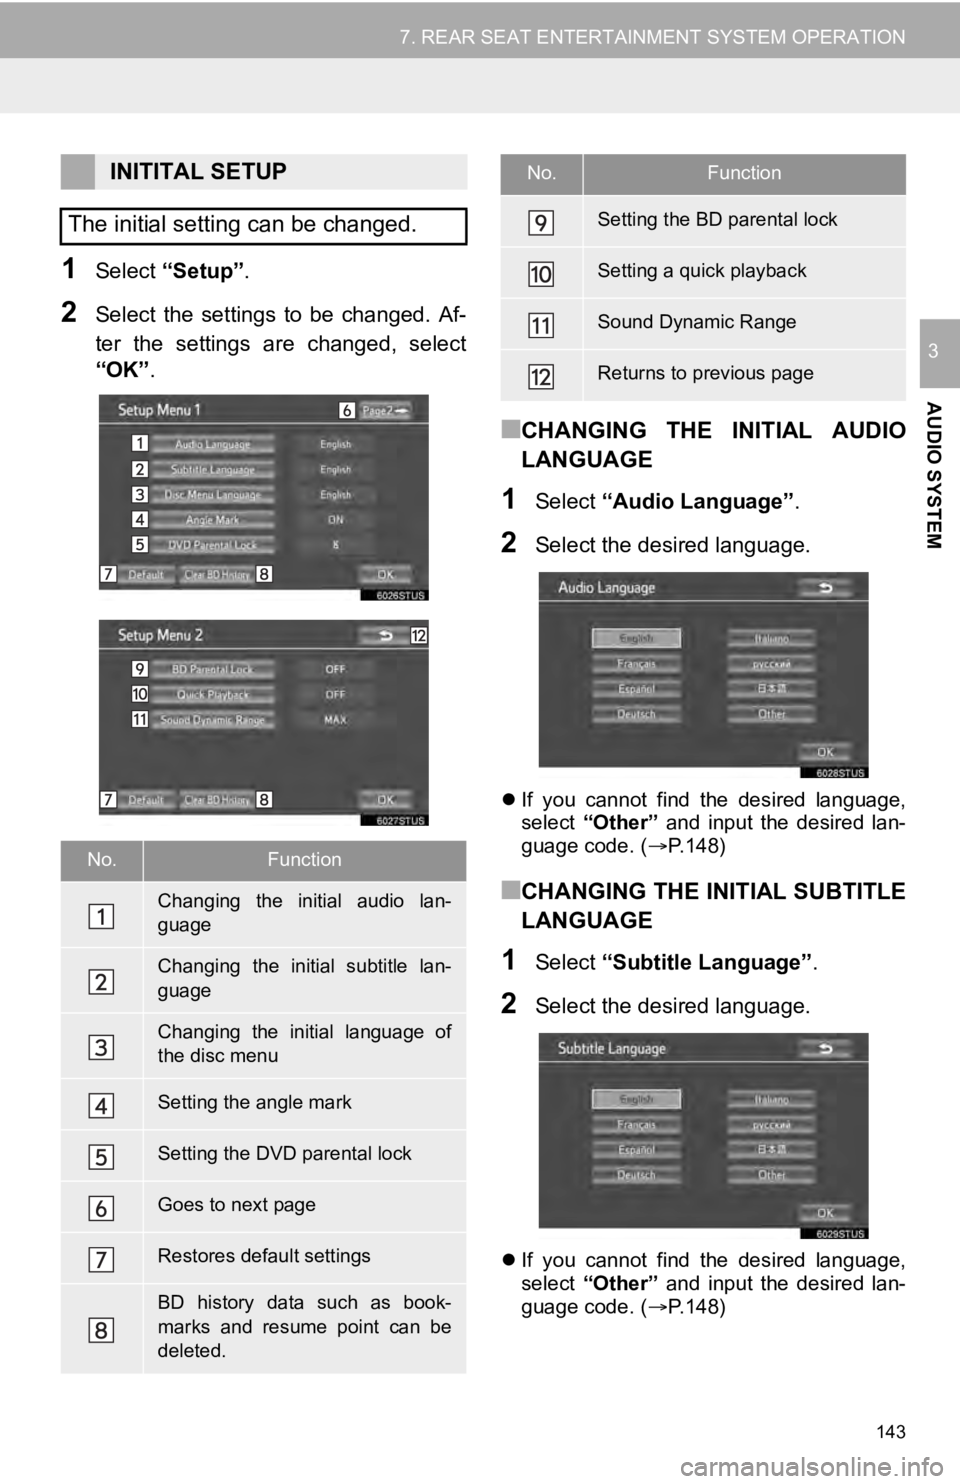
1Select “Setup” .
2Select the settings to be changed. Af-
ter the settings are changed, select
“OK”.
■CHANGING THE INITIAL AUDIO
LANGUAGE
1Select “Audio Language” .
2Select the desired language.
If you cannot find the desired language,
select “Other” and input the desired lan-
guage code. ( P.148)
■CHANGING THE INITIAL SUBTITLE
LANGUAGE
1Select “Subtitle Language” .
2Select the desired language.
If you cannot find the desired language,
select “Other” and input the desired lan-
guage code. ( P.148)
INITITAL SETUP
The initial setting can be changed.
No.Function
Changing the initial audio lan-
guage
Changing the initial subtitle lan-
guage
Changing the initial language of
the disc menu
Setting the angle mark
Setting the DVD parental lock
Goes to next page
Restores default settings
BD history data such as book-
marks and resume point can be
deleted.
Setting the BD parental lock
Setting a quick playback
Sound Dynamic Range
Returns to previous page
No.Function
Page 144 of 324
144
7. REAR SEAT ENTERTAINMENT SYSTEM OPERATION
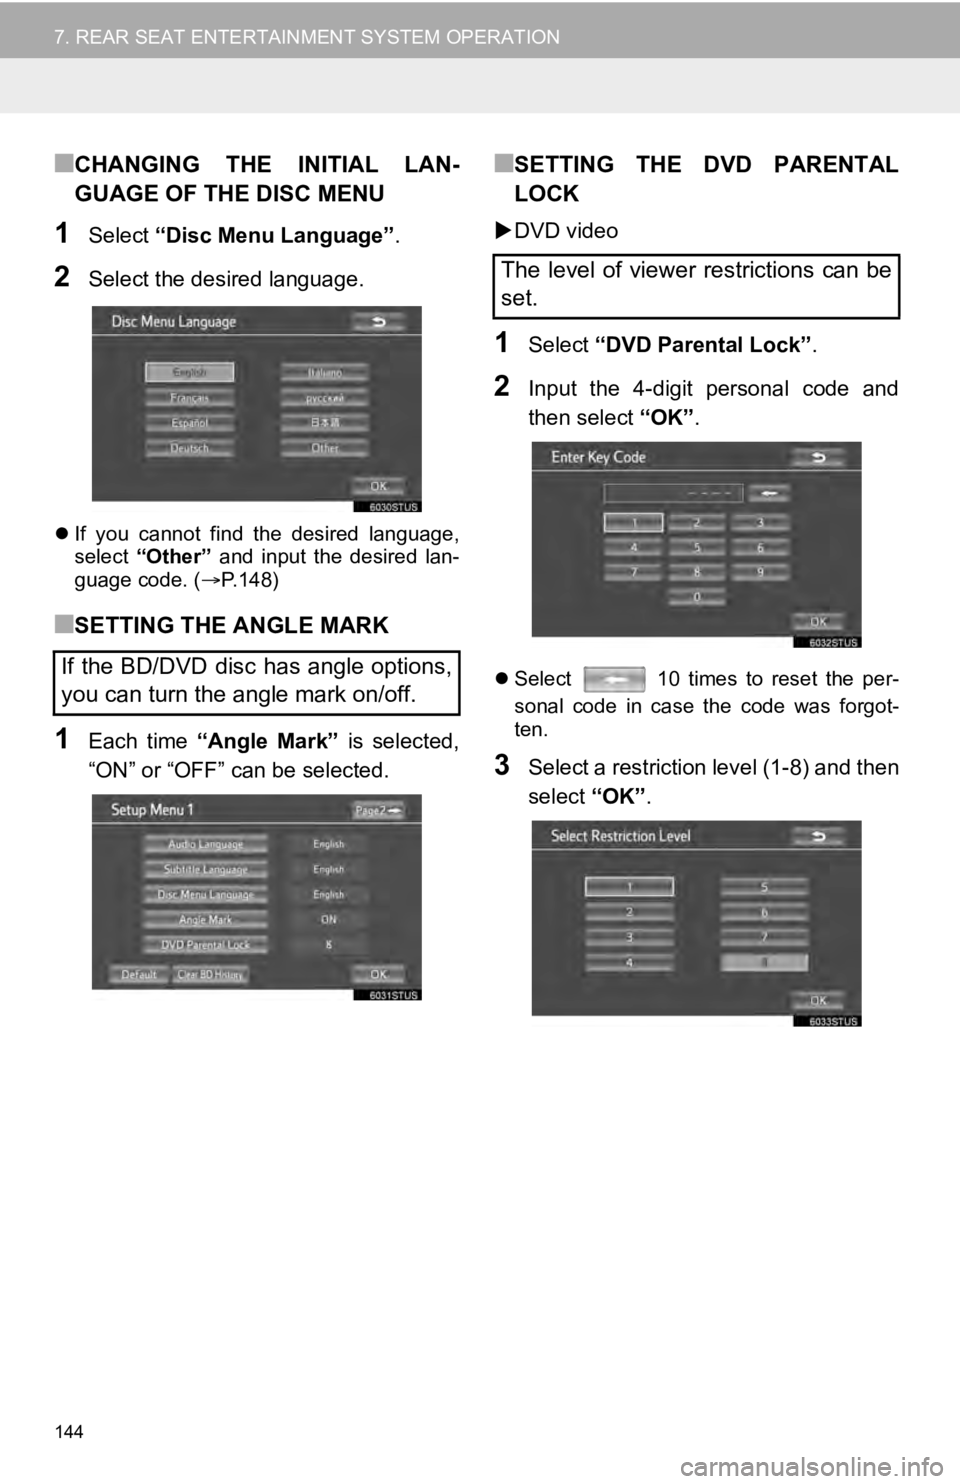
■CHANGING THE INITIAL LAN-
GUAGE OF THE DISC MENU
1Select “Disc Menu Language” .
2Select the desired language.
If you cannot find the desired language,
select “Other” and input the desired lan-
guage code. ( P.148)
■SETTING THE ANGLE MARK
1Each time “Angle Mark” is selected,
“ON” or “OFF” can be selected.
■SETTING THE DVD PARENTAL
LOCK
DVD video
1Select “DVD Parental Lock” .
2Input the 4-digit personal code and
then select “OK”.
Select 10 times to reset the per-
sonal code in case the code was forgot-
ten.
3Select a restriction level (1-8) and then
select “OK”.
If the BD/DVD disc has angle options,
you can turn the angle mark on/off.
The level of viewer restrictions can be
set.
Page 146 of 324
146
7. REAR SEAT ENTERTAINMENT SYSTEM OPERATION
Compatible media
Media that can be used for playback are
BD-ROMs, BD-Rs, BD-REs, DVD-ROMs,
DVD-Rs and DVD-RWs.
Compatible disc formats
Disc formats that can be used for playback
are AVCHD* BD video formats, BDAV for-
mats, AVCHD formats, and DVD video for-
mats
*: For AVCHD playback, use a disc with
data that was saved using a video re-
cording device. .mts and .m2ts files can-
not be played by themselves.
This player conforms to NTSC/PAL color
TV formats.
Region codes
Some BD/DVD video discs have a region
code indicating the region in which you can
use the BD/DVD video disc.
If the BD video disc is not labeled “A” or
“ABC” or if the DVD video disc is not la-
beled “1” or “ALL”, you cannot use it on this
player.
If you attempt to play BD/DVD video discs
with incompatible region codes on this
player, an error message appears on the
screen. Even if the BD/DVD video disc
does not have a region code, in some cas-
es it cannot be used.
When storing content on BD-R, BD-RE,
DVD-R or DVD-RW discs, they must be
finalized using a recorder. Discs that are
not finalized cannot be played by this sys-
tem.
Discs that are recorded with multi session
cannot be played by this system.
BD-Live™ is not supported.
BD/DVD VIDEO DISCS
BD/DVD VIDEO DISCS
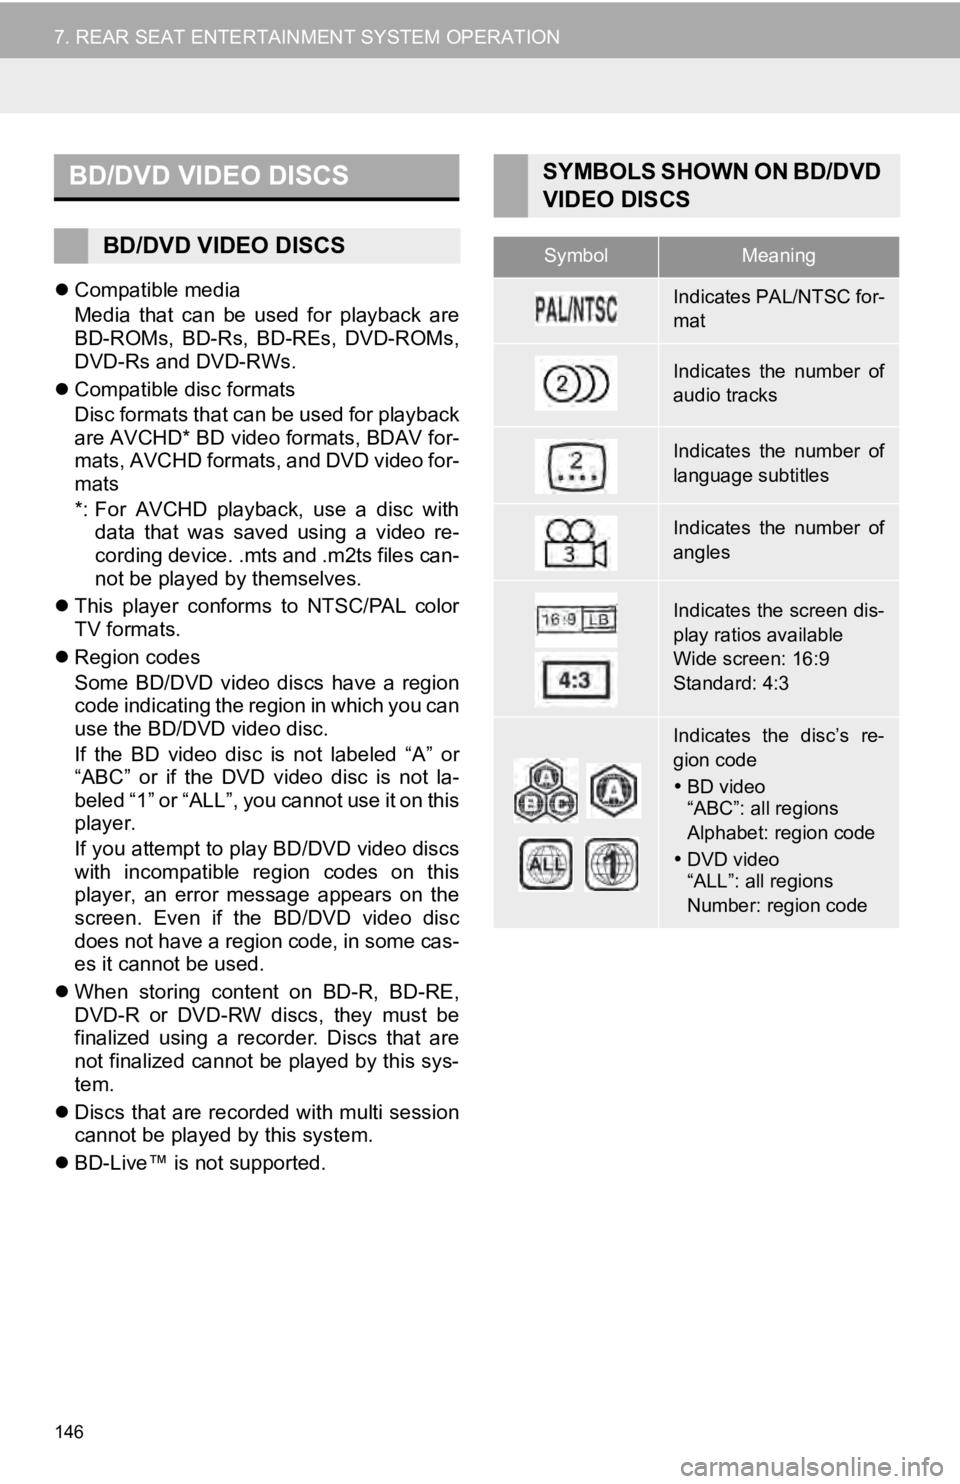
SYMBOLS SHOWN ON BD/DVD
VIDEO DISCS
SymbolMeaning
Indicates PAL/NTSC for-
mat
Indicates the number of
audio tracks
Indicates the number of
language subtitles
Indicates the number of
angles
Indicates the screen dis-
play ratios available
Wide screen: 16:9
Standard: 4:3
Indicates the disc’s re-
gion code
BD video
“ABC”: all regions
Alphabet: region code
DVD video
“ALL”: all regions
Number: region code