reset TOYOTA SEQUOIA 2020 Accessories, Audio & Navigation (in English)
[x] Cancel search | Manufacturer: TOYOTA, Model Year: 2020, Model line: SEQUOIA, Model: TOYOTA SEQUOIA 2020Pages: 310, PDF Size: 14.4 MB
Page 170 of 310
1724-8. Rear seat entertainment system operation
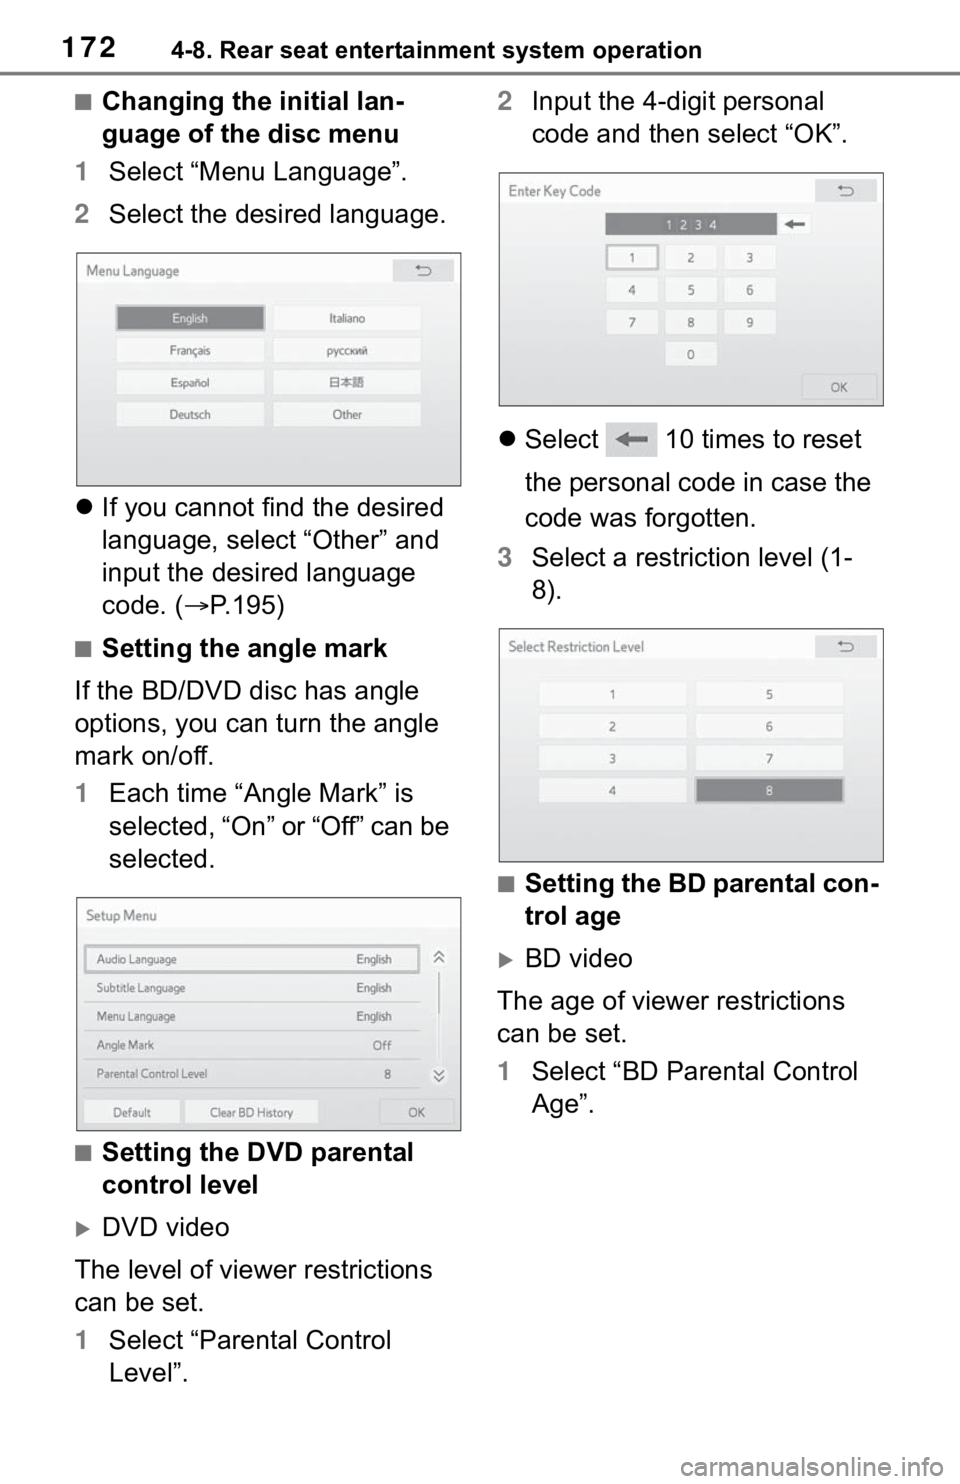
■Changing the initial lan-
guage of the disc menu
1 Select “Menu Language”.
2 Select the desired language.
If you cannot find the desired
language, select “Other” and
input the desired language
code. ( P.195)
■Setting the angle mark
If the BD/DVD disc has angle
options, you can turn the angle
mark on/off.
1 Each time “Angle Mark” is
selected, “On” or “Off” can be
selected.
■Setting the DVD parental
control level
DVD video
The level of viewer restrictions
can be set.
1 Select “Parental Control
Level”. 2
Input the 4-digit personal
code and then select “OK”.
Select 10 times to reset
the personal code in case the
code was forgotten.
3 Select a restriction level (1-
8).
■Setting the BD parental con-
trol age
BD video
The age of viewer restrictions
can be set.
1 Select “BD Parental Control
Age”.
Page 171 of 310
1734-8. Rear seat entertainment system operation
4
Audio/visual system
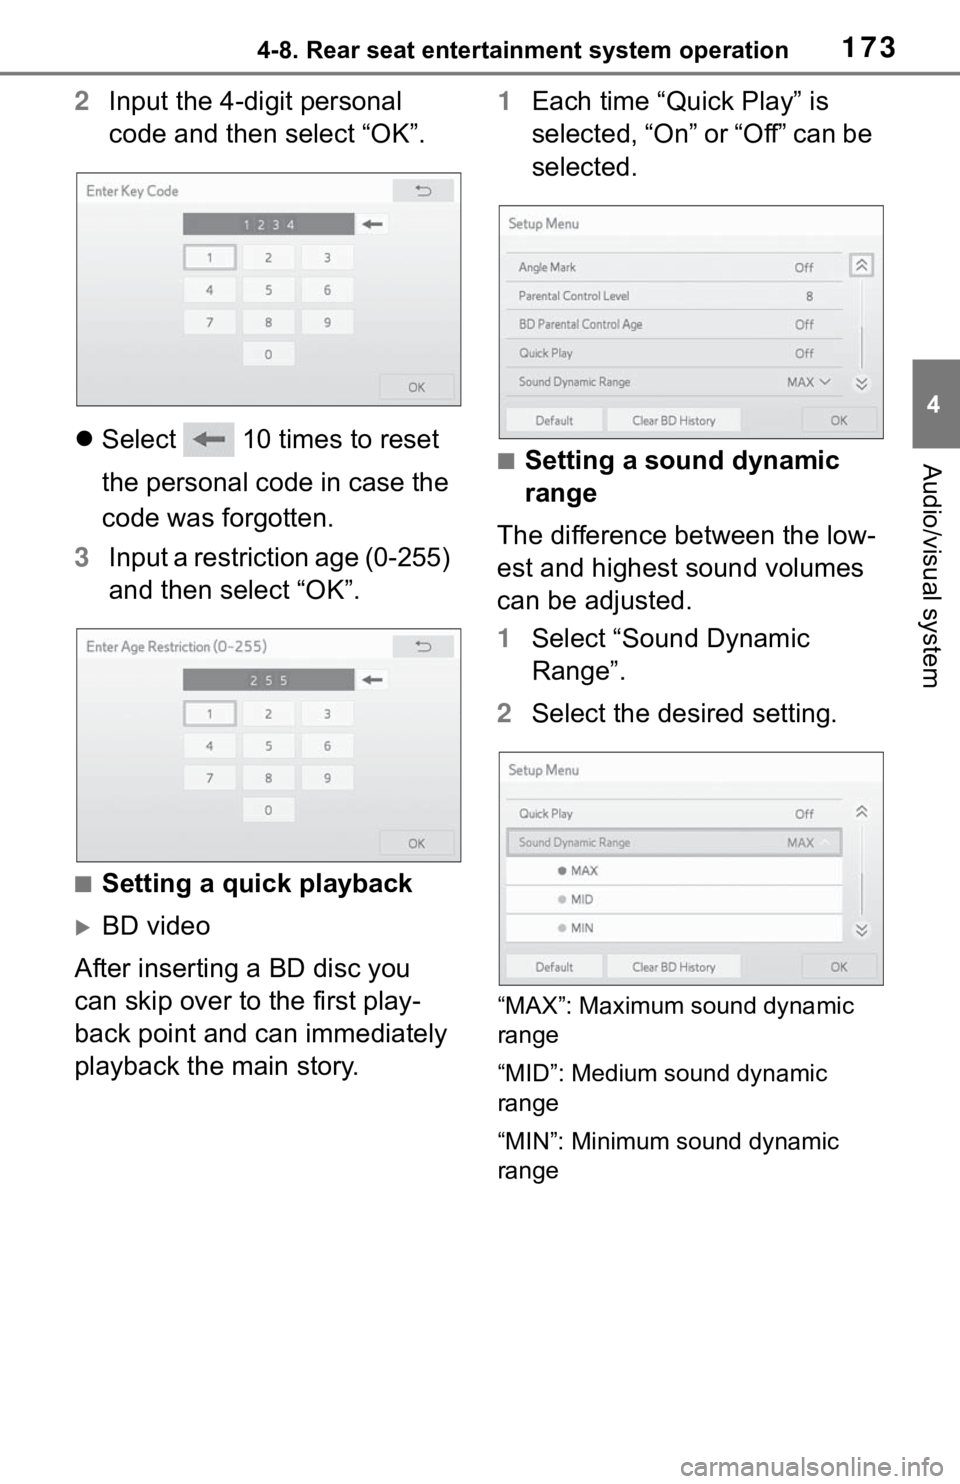
2Input the 4-digit personal
code and then select “OK”.
Select 10 times to reset
the personal code in case the
code was forgotten.
3 Input a restriction age (0-255)
and then select “OK”.
■Setting a quick playback
BD video
After inserting a BD disc you
can skip over to the first play-
back point and can immediately
playback the main story. 1
Each time “Quick Play” is
selected, “On” or “Off” can be
selected.
■Setting a sound dynamic
range
The difference between the low-
est and highest sound volumes
can be adjusted.
1 Select “Sound Dynamic
Range”.
2 Select the desired setting.
“MAX”: Maximum sound dynamic
range
“MID”: Medium sound dynamic
range
“MIN”: Minimum sound dynamic
range
Page 223 of 310
2255-1. Voice command system operation
5
Voice command system
commands will be unavailable.
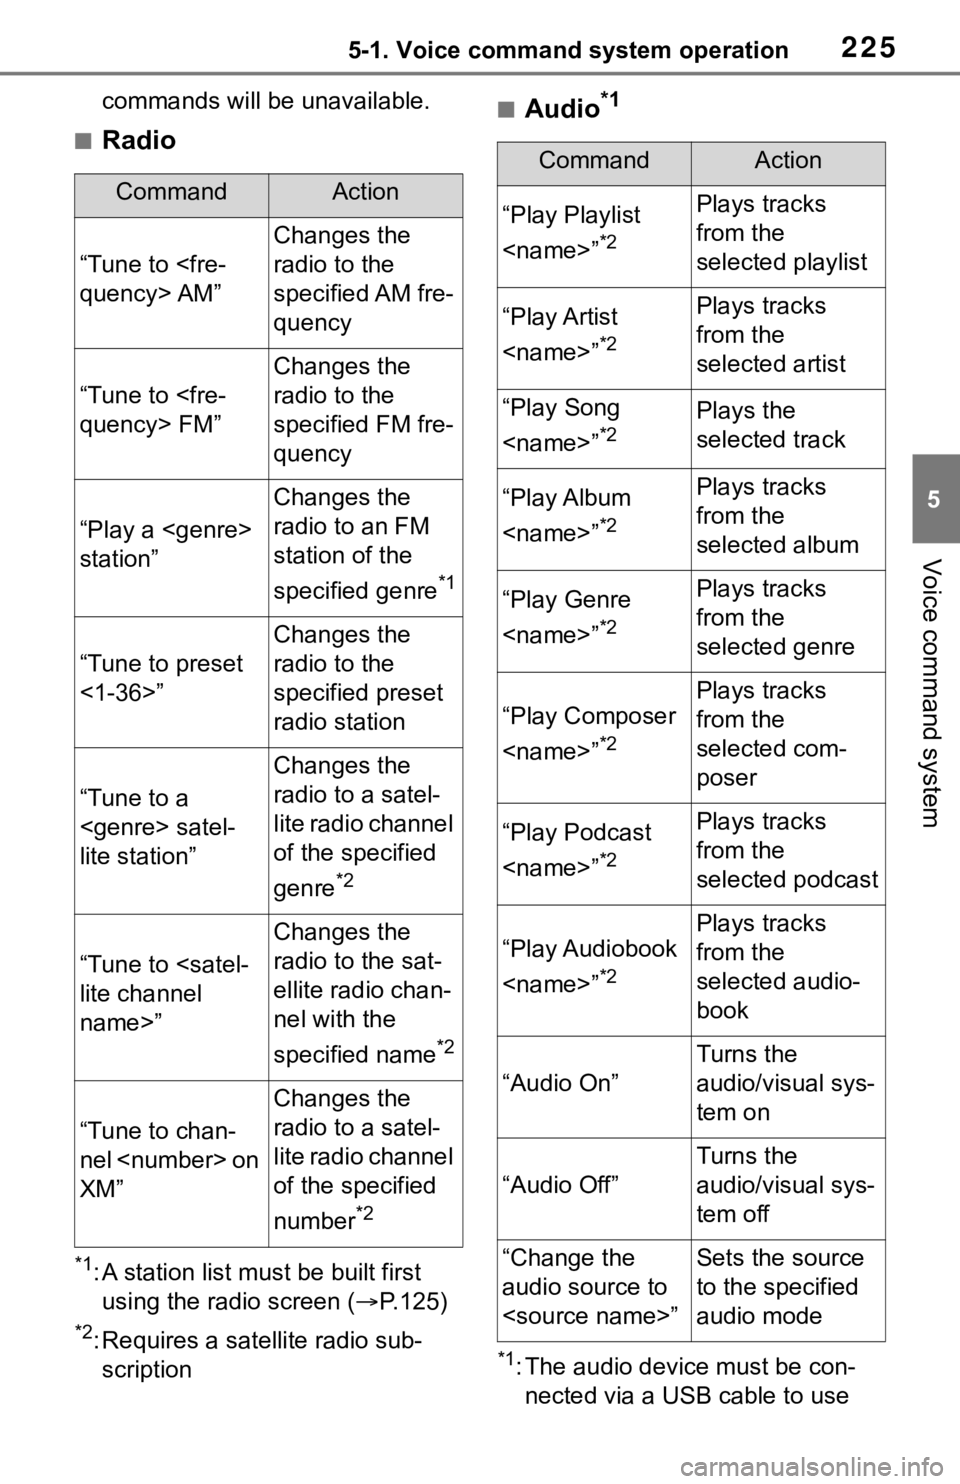
■Radio
*1: A station list must be built first
using the radio screen ( P.125)
*2: Requires a satellite radio sub-
scription
■Audio*1
*1: The audio device must be con-nected via a USB cable to use
CommandAction
“Tune to
Changes the
radio to the
specified AM fre-
quency
“Tune to
Changes the
radio to the
specified FM fre-
quency
“Play a
station”
Changes the
radio to an FM
station of the
specified genre
*1
“Tune to preset
<1-36>”
Changes the
radio to the
specified preset
radio station
“Tune to a
lite station”
Changes the
radio to a satel-
lite radio channel
of the specified
genre
*2
“Tune to
name>”
Changes the
radio to the sat-
ellite radio chan-
nel with the
specified name
*2
“Tune to chan-
nel
XM”
Changes the
radio to a satel-
lite radio channel
of the specified
number
*2
CommandAction
“Play Playlist
*2
Plays tracks
from the
selected playlist
“Play Artist
*2
Plays tracks
from the
selected artist
“Play Song
*2Plays the
selected track
“Play Album
*2
Plays tracks
from the
selected album
“Play Genre
*2
Plays tracks
from the
selected genre
“Play Composer
*2
Plays tracks
from the
selected com-
poser
“Play Podcast
*2
Plays tracks
from the
selected podcast
“Play Audiobook
*2
Plays tracks
from the
selected audio-
book
“Audio On”
Turns the
audio/visual sys-
tem on
“Audio Off”
Turns the
audio/visual sys-
tem off
“Change the
audio source to
to the specified
audio mode
Page 257 of 310
2598-1. Phone operation (Hands-free system for cellular phones)
8
Phone
tooth® phone, reply function is not
available.
■Editing quick reply mes-
sages
This operation cannot be per-
formed while driving.
1 Select corresponding to
the desired message to edit.
2 Select “OK” when editing is
completed.
●To reset the edited quick reply
messages, select “Default”.
●Quick message 1 ( “I am driving
and will arrive in approximately
[##] minutes.”)
*:
This message cannot be edited
and will automatica lly fill in [##]
with the navigation calculated esti-
mated time of arrival on the con-
firm message screen.
If there are waypoints set, [##] to
the next waypoint will be shown.
If there is no route currently set in
the navigation system, quick mes-
sage 1 cannot be selected.
*: Premium Audio only
Calls can be made to an e-
mail/SMS/MMS message
sender’s phone number.
This operation can be per-
formed while driving.
■Calling from e-
mail/SMS/MMS message
display
1 Display the message screen.
( P.256)
2 Select the desired message.
3 Select , or press the
switch on the steering wheel.
If there are 2 or more phone
numbers, select the desired
number.
4 Check that the dialing screen
is displayed.
■Calling from a number
within a message
Calls can be made to a number
identified in a message’s text
area.
This operation cannot be per-
formed while driving.
1 Display the message screen.
( P.256)
2 Select the desired message.
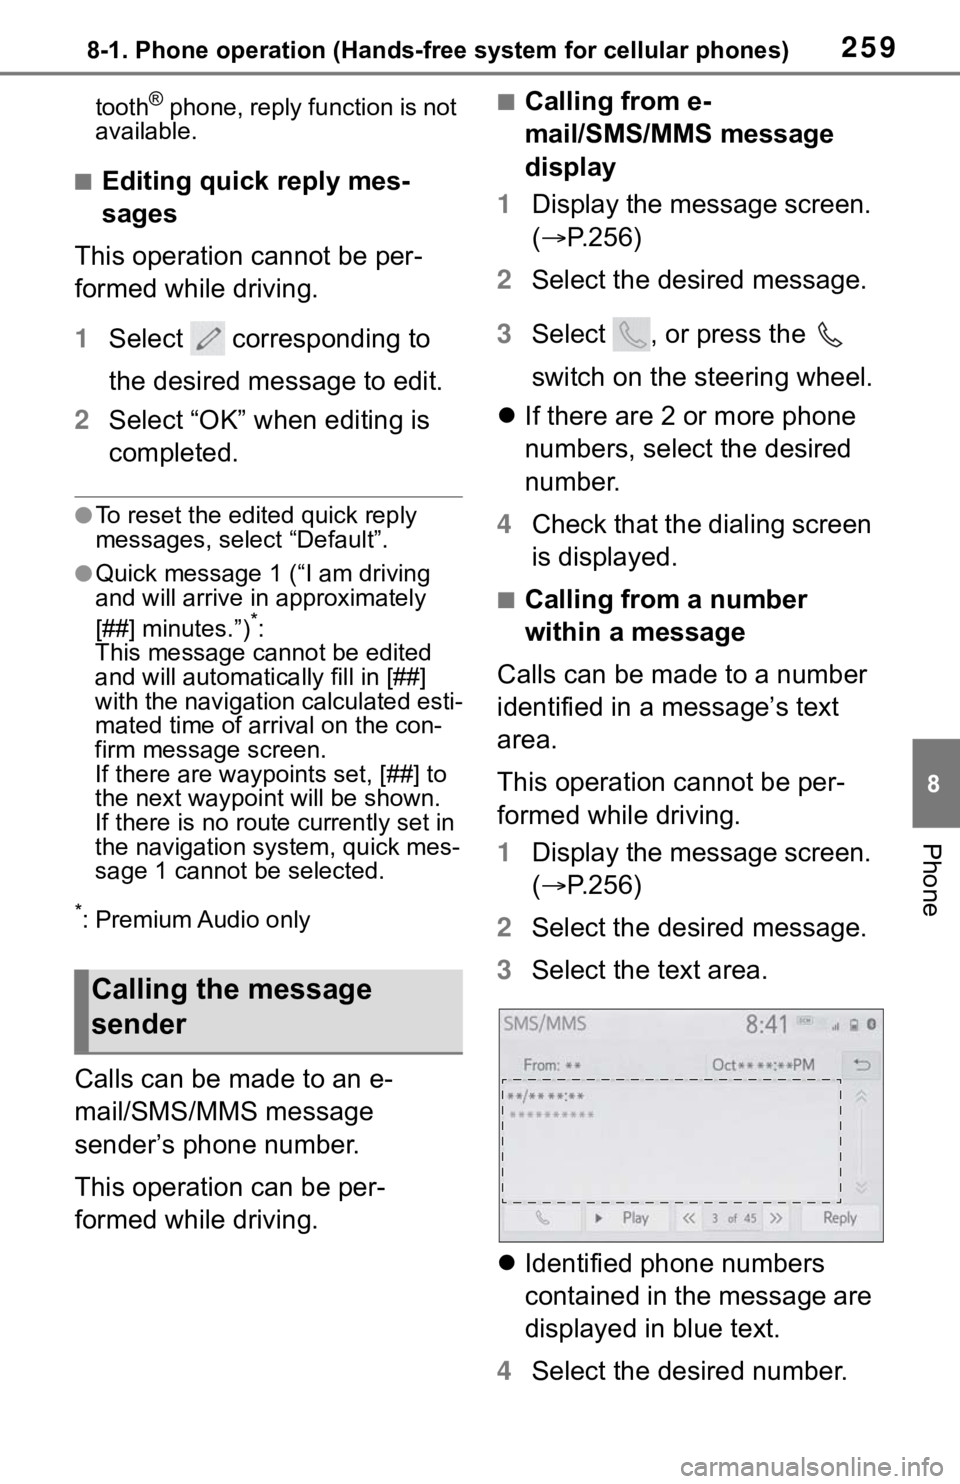
3 Select the text area.
Identified phone numbers
contained in the message are
displayed in blue text.
4 Select the desired number.
Calling the message
sender
Page 260 of 310
2628-2. Setup
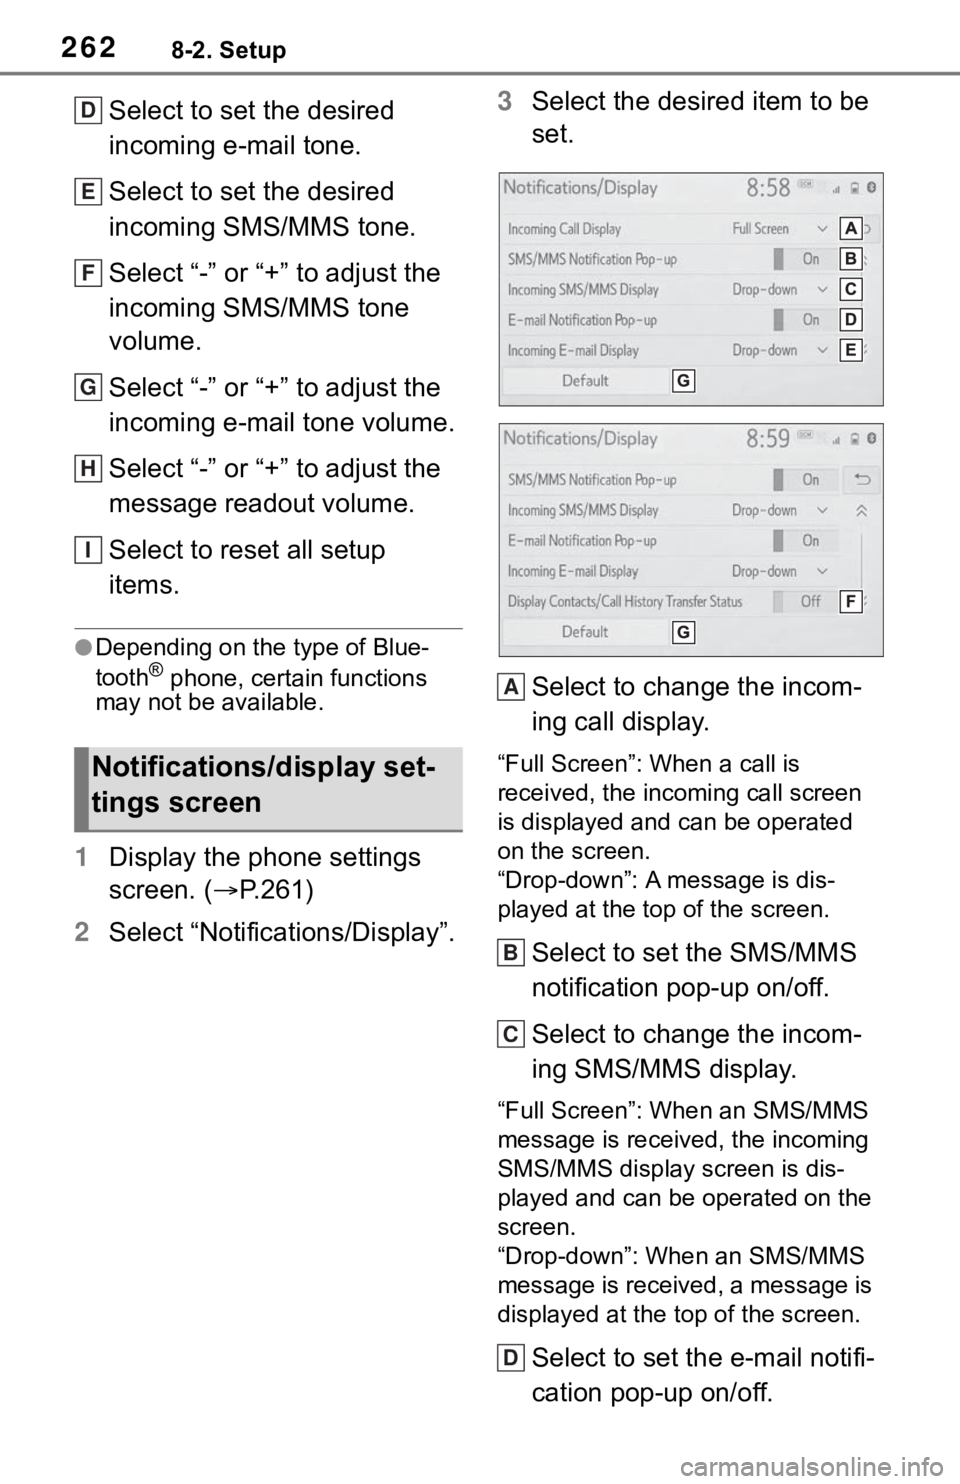
Select to set the desired
incoming e-mail tone.
Select to set the desired
incoming SMS/MMS tone.
Select “-” or “+” to adjust the
incoming SMS/MMS tone
volume.
Select “-” or “+” to adjust the
incoming e-mail tone volume.
Select “-” or “+” to adjust the
message readout volume.
Select to reset all setup
items.
●Depending on the type of Blue-
tooth® phone, certain functions
may not be available.
1 Display the phone settings
screen. ( P.261)
2 Select “Notifications/Display”. 3
Select the desired item to be
set.
Select to change the incom-
ing call display.
“Full Screen”: W hen a call is
received, the incoming call screen
is displayed and can be operated
on the screen.
“Drop-down”: A message is dis-
played at the top of the screen.
Select to set the SMS/MMS
notification pop-up on/off.
Select to change the incom-
ing SMS/MMS display.
“Full Screen”: When an SMS/MMS
message is received, the incoming
SMS/MMS display screen is dis-
played and can be operated on the
screen.
“Drop-down”: When an SMS/MMS
message is received, a message is
displayed at the top of the screen.
Select to set the e-mail notifi-
cation pop-up on/off.
Notifications/display set-
tings screen
D
E
F
G
H
I
A
B
C
D
Page 261 of 310
2638-2. Setup
8
Phone
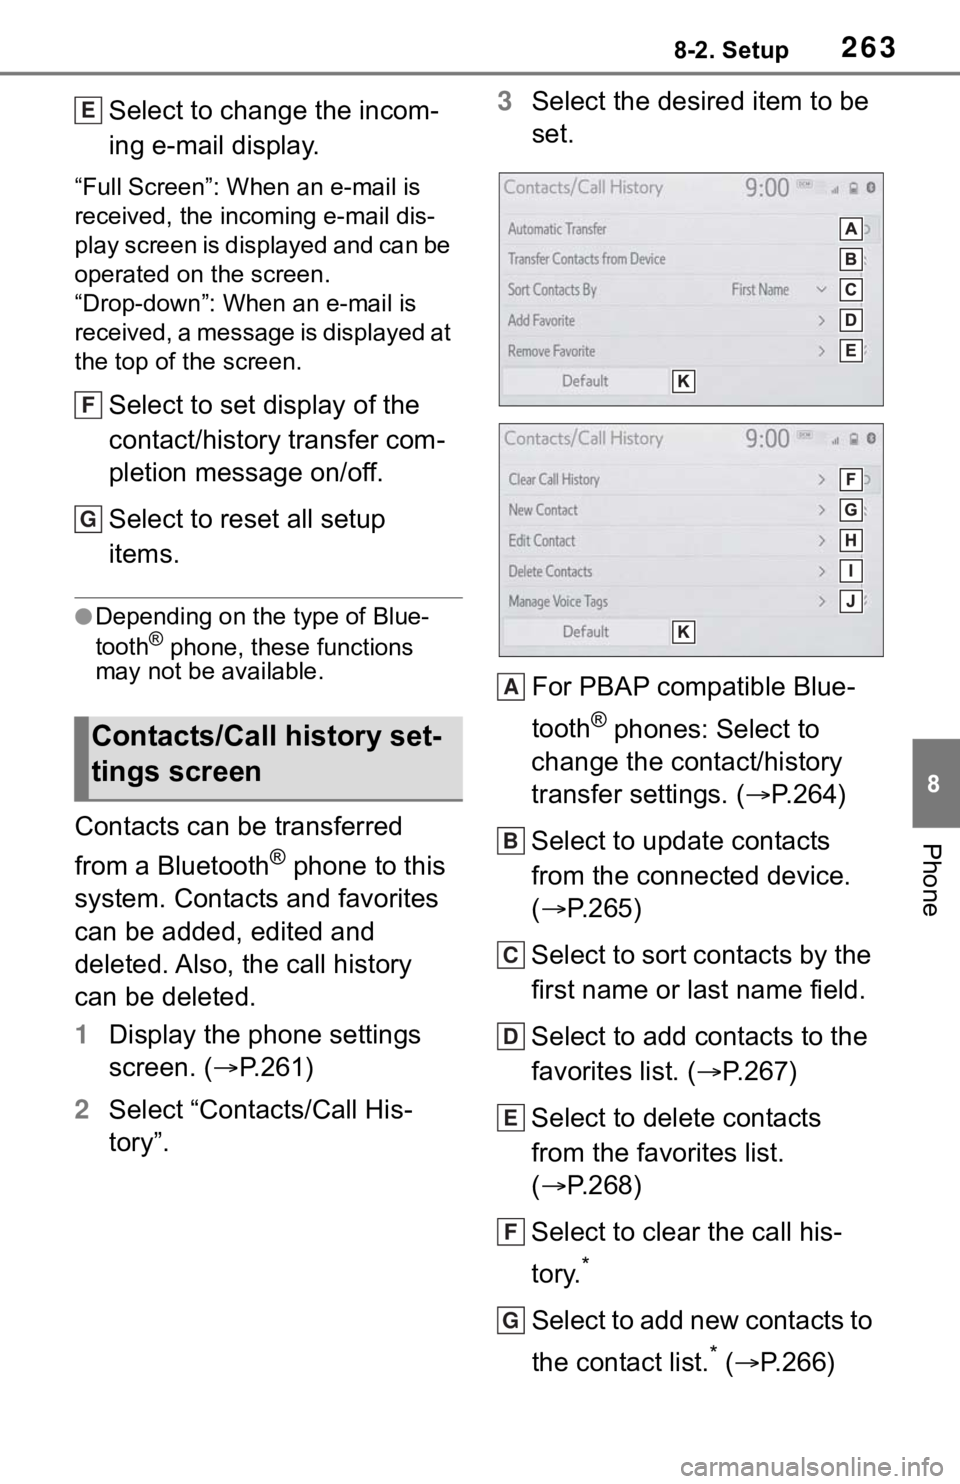
Select to change the incom-
ing e-mail display.
“Full Screen”: When an e-mail is
received, the inco ming e-mail dis-
play screen is displayed and can be
operated on the screen.
“Drop-down”: When an e-mail is
received, a message is displayed at
the top of the screen.
Select to set display of the
contact/history transfer com-
pletion message on/off.
Select to reset all setup
items.
●Depending on the type of Blue-
tooth® phone, these functions
may not be available.
Contacts can be transferred
from a Bluetooth
® phone to this
system. Contacts and favorites
can be added, edited and
deleted. Also, the call history
can be deleted.
1 Display the phone settings
screen. ( P.261)
2 Select “Contacts/Call His-
tory”. 3
Select the desired item to be
set.
For PBAP compatible Blue-
tooth
® phones: Select to
change the contact/history
transfer settings. ( P.264)
Select to update contacts
from the connected device.
( P.265)
Select to sort contacts by the
first name or last name field.
Select to add contacts to the
favorites list. ( P.267)
Select to delete contacts
from the favorites list.
( P.268)
Select to clear the call his-
tory.
*
Select to add new contacts to
the contact list.
* ( P.266)
Contacts/Call history set-
tings screen
E
F
G
A
B
C
D
E
F
G
Page 262 of 310
2648-2. Setup
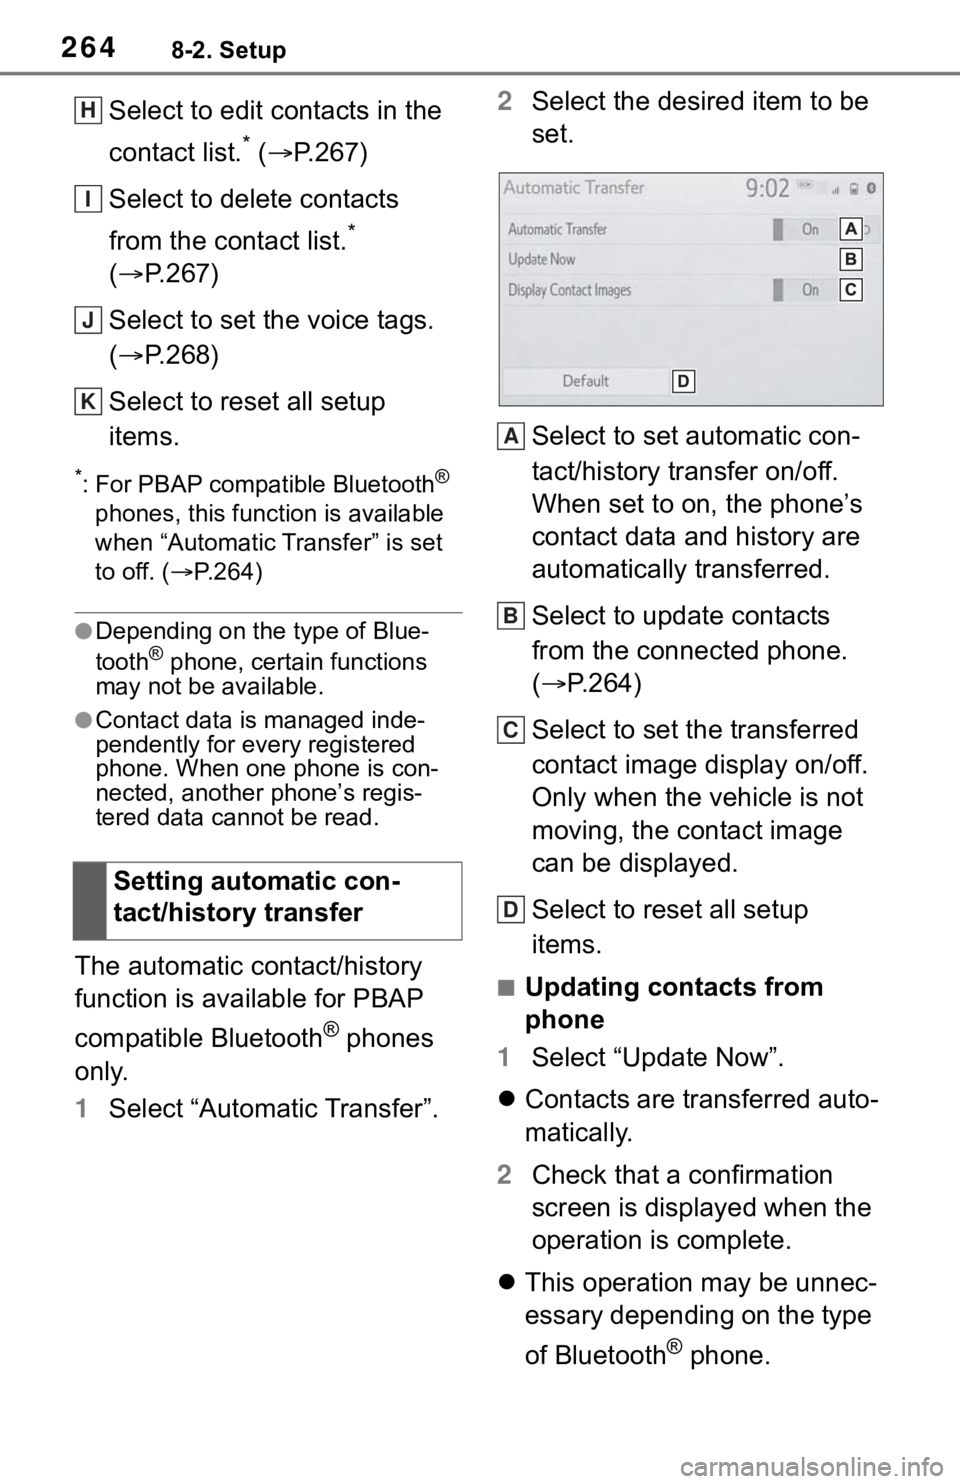
Select to edit contacts in the
contact list.
* ( P.267)
Select to delete contacts
from the contact list.
*
( P.267)
Select to set the voice tags.
( P.268)
Select to reset all setup
items.
*: For PBAP compatible Bluetooth®
phones, this function is available
when “Automatic Transfer” is set
to off. ( P.264)
●Depending on the type of Blue-
tooth® phone, certain functions
may not be available.
●Contact data is managed inde-
pendently for every registered
phone. When one phone is con-
nected, another phone’s regis-
tered data cannot be read.
The automatic contact/history
function is available for PBAP
compatible Bluetooth
® phones
only.
1 Select “Automatic Transfer”. 2
Select the desired item to be
set.
Select to set automatic con-
tact/history transfer on/off.
When set to on, the phone’s
contact data and history are
automatically transferred.
Select to update contacts
from the connected phone.
( P.264)
Select to set the transferred
contact image display on/off.
Only when the vehicle is not
moving, the contact image
can be displayed.
Select to reset all setup
items.
■Updating contacts from
phone
1 Select “Update Now”.
Contacts are transferred auto-
matically.
2 Check that a confirmation
screen is displayed when the
operation is complete.
This operation may be unnec-
essary depending on the type
of Bluetooth
® phone.
Setting automatic con-
tact/history transfer
H
I
J
K
A
B
C
D
Page 267 of 310
2698-2. Setup
8
Phone
do so in a quiet area.
“Play”: Select to play the voice tag.
4Select “OK” when voice tag
registration is complete.
■Editing a voice tag
1 Select “Edit”.
2 Select the desired contact to
edit.
3 Follow the steps in “Register-
ing a voice tag” from step 3 .
( P.268)
■Deleting the voice tag
1 Select “Delete”.
2 Select the desired contact
and select “Delete”.
3 Select “Yes” when the confir-
mation screen appears.
●Multiple data can be selected and
deleted at the same time.
●Voice tags are deleted when the
set language of the system is
changed. ( P. 6 0 )
1 Display the phone settings
screen. ( P.261)
2 Select “Messaging”. 3
Select the desired item to be
set.
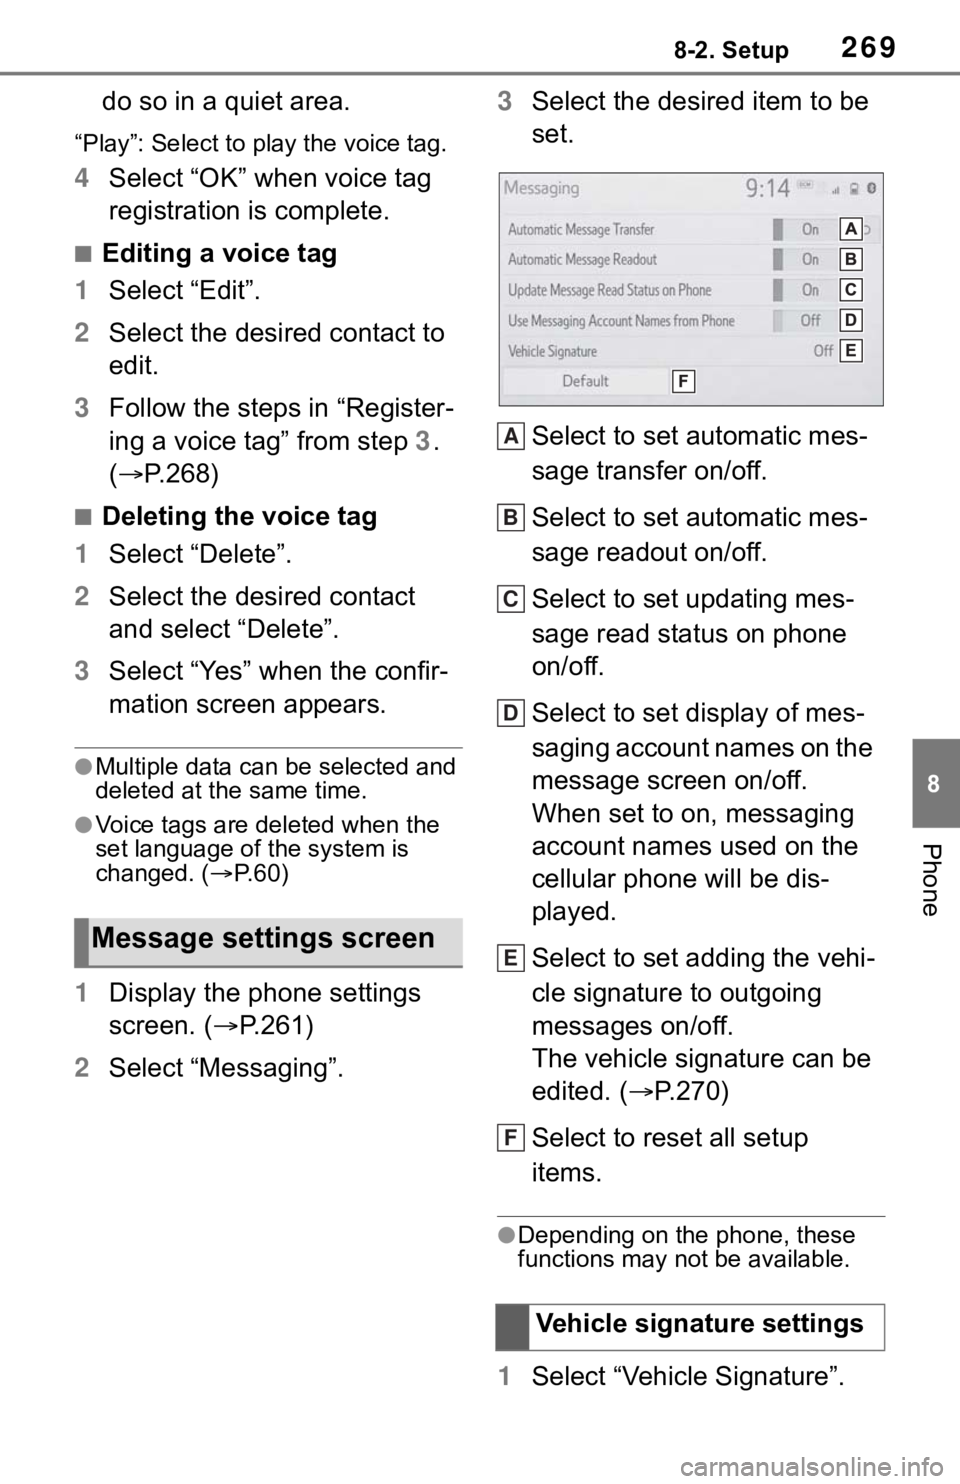
Select to set automatic mes-
sage transfer on/off.
Select to set automatic mes-
sage readout on/off.
Select to set updating mes-
sage read status on phone
on/off.
Select to set display of mes-
saging account names on the
message screen on/off.
When set to on, messaging
account names used on the
cellular phone will be dis-
played.
Select to set adding the vehi-
cle signature to outgoing
messages on/off.
The vehicle signature can be
edited. ( P.270)
Select to reset all setup
items.
●Depending on the phone, these
functions may not be available.
1 Select “Vehicle Signature”.
Message settings screen
Vehicle signature settings
A
B
C
D
E
F
Page 268 of 310
2708-2. Setup
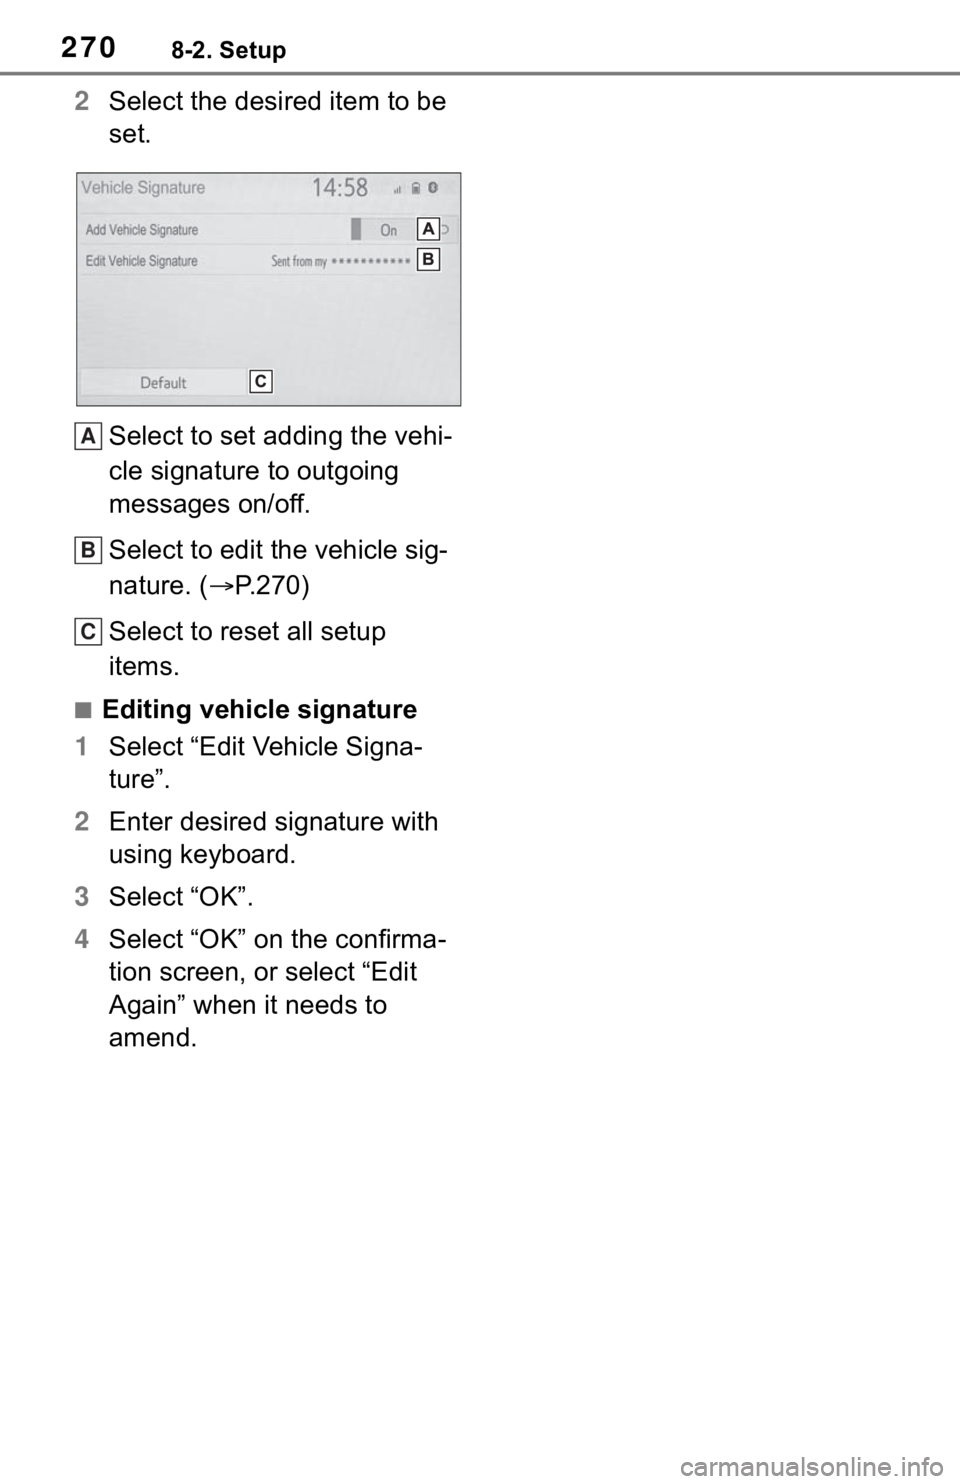
2Select the desired item to be
set.
Select to set adding the vehi-
cle signature to outgoing
messages on/off.
Select to edit the vehicle sig-
nature. ( P.270)
Select to reset all setup
items.
■Editing vehicle signature
1 Select “Edit Vehicle Signa-
ture”.
2 Enter desired signature with
using keyboard.
3 Select “OK”.
4 Select “OK” on the confirma-
tion screen, or select “Edit
Again” when it needs to
amend.
A
B
C
Page 279 of 310
2819-1. Connected services overview
9
Connected services
connected-services
in the United States,
https://www.toyota.ca/connected
in Canada, and
http://www.toyotapr.com/
connected-servicesin Puerto Rico.
●These functions are not made
available in some countries or
areas. Availability of functions of
the Toyota apps is dependent on
network reception level.
■Initializing personal data
The personal data used in appli-
cations can be reset. ( P.63)
The following personal data
can be deleted and returned
to their default settings:
• Downloaded contents
• Radio stations that were listened
to
●Once initialized, the data and set-
tings will be erased. Pay much
attention when initializing the data.
■Settings required to use
Toyota mobile application
Perform the settings in the fol-
lowing order.
1 Download the Toyota mobile
application to your smart-
phone.
2 Open the Toyota mobile
application on your smart
phone and follow instruc-
tions. Bluetooth
® Pairing is
required.
In order to use Toyota mobile appli-
cation, the following must first be
performed:
Register a Bluetooth® phone
with the hands-free system.
( P.36)
●Applications can only be used
when the Toyota mobile applica-
tion has been downloaded to your
smartphone, and the application is
running.
●Toyota mobile application opera-
tional procedures can also be con-
firmed by visiting
https://www.toyota.com/
connected-services
in the United States,
https://www.toyota.ca/connected
in Canada, and
http://www.toyotapr.com/
connected-services
in Puerto Rico.
●If a Toyota mobile application is
used while iPod audio/video is
being played back, system opera-
tion may become unstable.
Preparation before using
Toyota mobile application