change time TOYOTA SEQUOIA 2022 User Guide
[x] Cancel search | Manufacturer: TOYOTA, Model Year: 2022, Model line: SEQUOIA, Model: TOYOTA SEQUOIA 2022Pages: 592, PDF Size: 10.82 MB
Page 280 of 592

2804-5. Using the driving support systems
SEQUOIA_OM_USA_OM0C047U
Example of constant speed cruising
When there are no vehicles ahead
The vehicle travels at the speed set by the driver. The desired vehicle-to-
vehicle distance can also be set by operating the vehicle-to-ve hicle dis-
tance switch.
Example of deceleration crui sing and follow-up cruising
When a preceding vehicle driving slower than the set speed
appears
When a vehicle is detected running ahead of you, the system automatically
decelerates your vehicle. When a greater reduction in vehicle s peed is
necessary, the system applies the brakes (the stop lights will come on at
this time). The system will respond to changes in the speed of the vehicle
ahead in order to maintain the vehicle-to-vehicle distance set by the driver.
Approach warning warns you when the system cannot decelerate su ffi-
ciently to prevent your vehicle fr om closing in on the vehicle ahead.
Example of acceleration
When there are no longer any preceding vehicles driving slower
than the set speed
The system accelerates until the set speed is reached. The syst em then
returns to constant speed cruising.
Page 282 of 592
2824-5. Using the driving support systems
SEQUOIA_OM_USA_OM0C047U
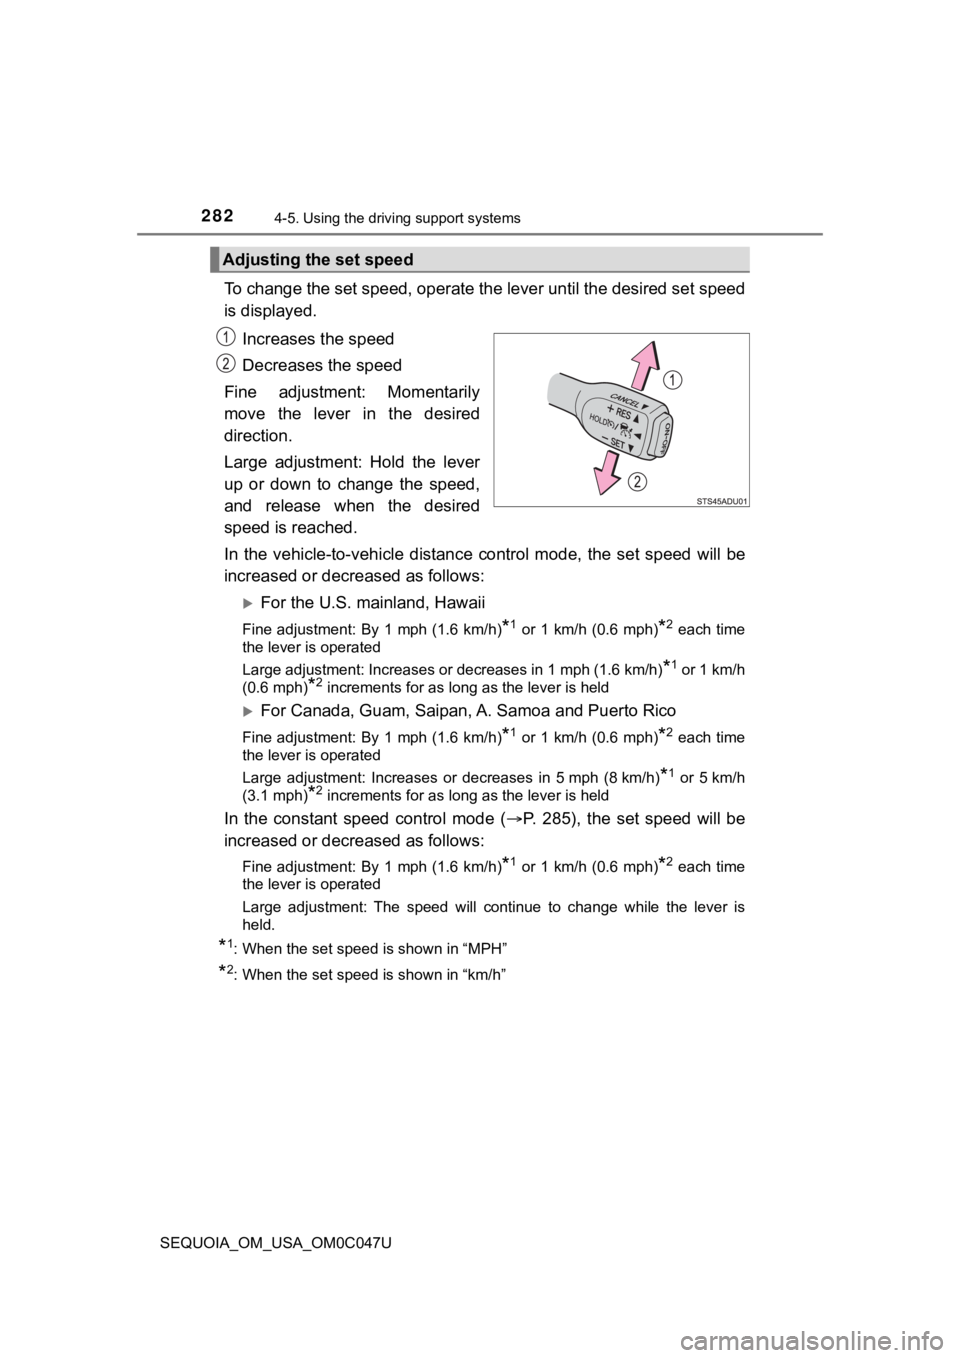
To change the set speed, operate the lever until the desired se t speed
is displayed.
Increases the speed
Decreases the speed
Fine adjustment: Momentarily
move the lever in the desired
direction.
Large adjustment: Hold the lever
up or down to change the speed,
and release when the desired
speed is reached.
In the vehicle-to-vehicle distance control mode, the set speed will be
increased or decreased as follows:
For the U.S. mainland, Hawaii
Fine adjustment: By 1 mph (1.6 km/h)*1 or 1 km/h (0.6 mph)*2 each time
the lever is operated
Large adjustment: Increases or decreases in 1 mph (1.6 km/h)
*1 or 1 km/h
(0.6 mph)
*2 increments for as long as the lever is held
For Canada, Guam, Saipan, A. Samoa and Puerto Rico
Fine adjustment: By 1 mph (1.6 km/h)*1 or 1 km/h (0.6 mph)*2 each time
the lever is operated
Large adjustment: Increases or decreases in 5 mph (8 km/h)
*1 or 5 km/h
(3.1 mph)
*2 increments for as long as the lever is held
In the constant speed control mode ( P. 285), the set speed will be
increased or decreased as follows:
Fine adjustment: By 1 mph (1.6 km/h)*1 or 1 km/h (0.6 mph)*2 each time
the lever is operated
Large adjustment: The speed will continue to change while the l ever is
held.
*1: When the set speed is shown in “MPH”
*2: When the set speed is shown in “km/h”
Adjusting the set speed
Page 315 of 592

3154-5. Using the driving support systems
4
Driving
SEQUOIA_OM_USA_OM0C047U
NOTICE
■Be careful in any place where overhead space is limited.
When changing to a higher mode or after unloading, the vehicle height will
rise. This may cause damage to the vehicle.
■ Do not select “LO” mode when driving on bumpy roads.
If the underbody of the vehicle touches a rugged road surface, the vehicle
may be damaged.
■ Do not change the vehicle height frequently.
The compressor might overheat and cause the operation to stop.
■ When on the extremely uneven roads with rocks
Sometimes the vehicle height is not adjusted because it is judg ed as
uneven road driving.
Page 343 of 592
3435-1. Using the air conditioning system and defogger
5
Interior features
SEQUOIA_OM_USA_OM0C047U■
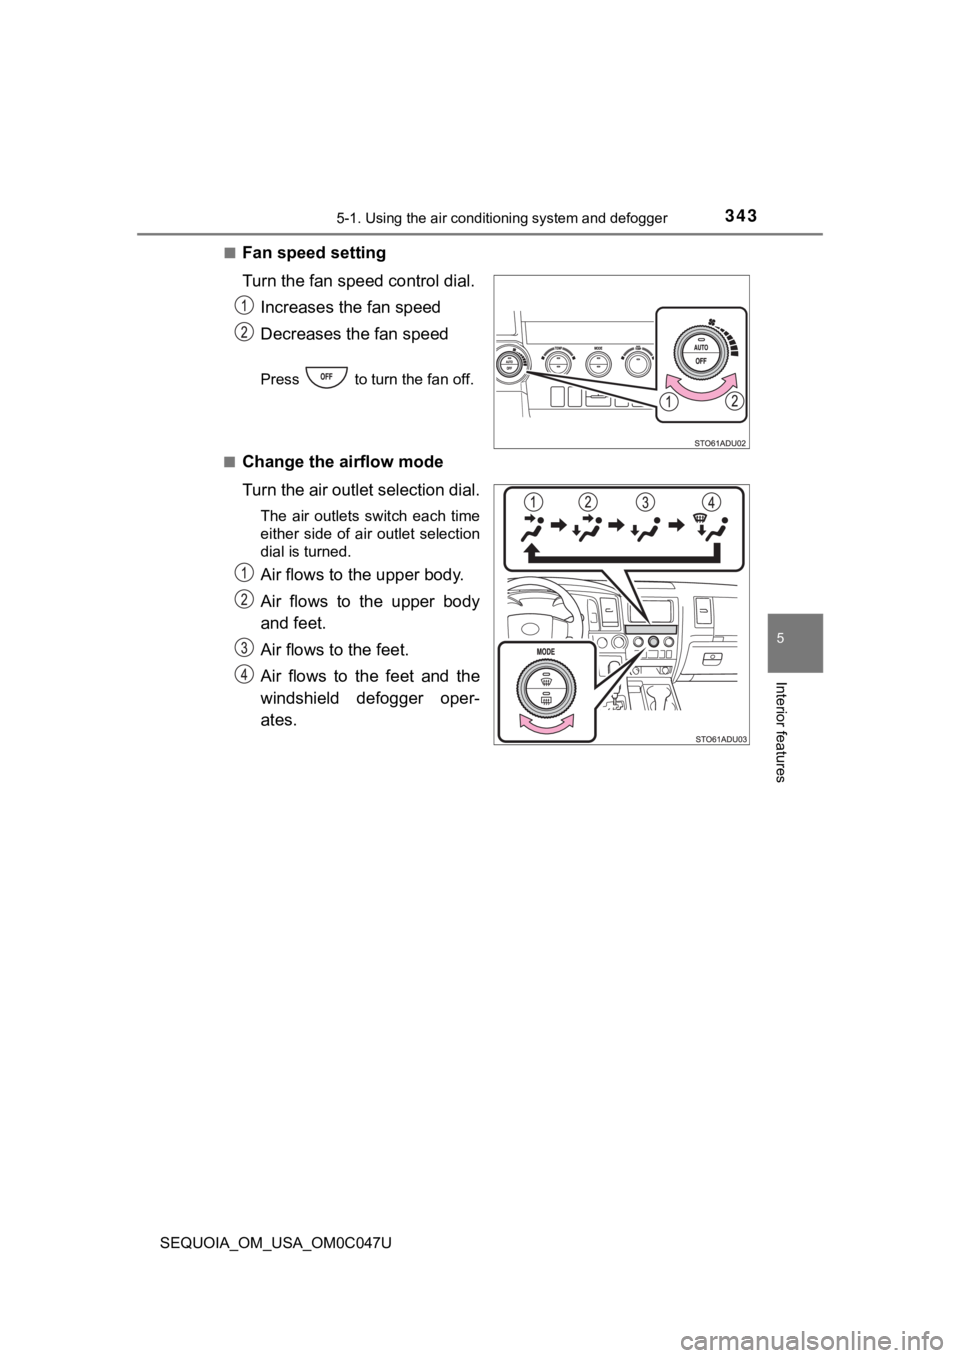
Fan speed setting
Turn the fan speed
control dial.
Increases the fan speed
Decreases the fan speed
Press to turn the fan off.
■
Change the airflow mode
Turn the air outlet selection dial.
The air outlets switch each time
either side of air outlet selection
dial is turned.
Air flows to the upper body.
Air flows to the upper body
and feet.
Air flows to the feet.
Air flows to the feet and the
windshield defogger oper-
ates.
Page 346 of 592
3465-1. Using the air conditioning system and defogger
SEQUOIA_OM_USA_OM0C047U■
Adjusting the temperature setting
Press .
Press to increase the temperature and to decrease
it.
The air conditioning system switches between individual and simultane-
ous modes each time is pressed.
■
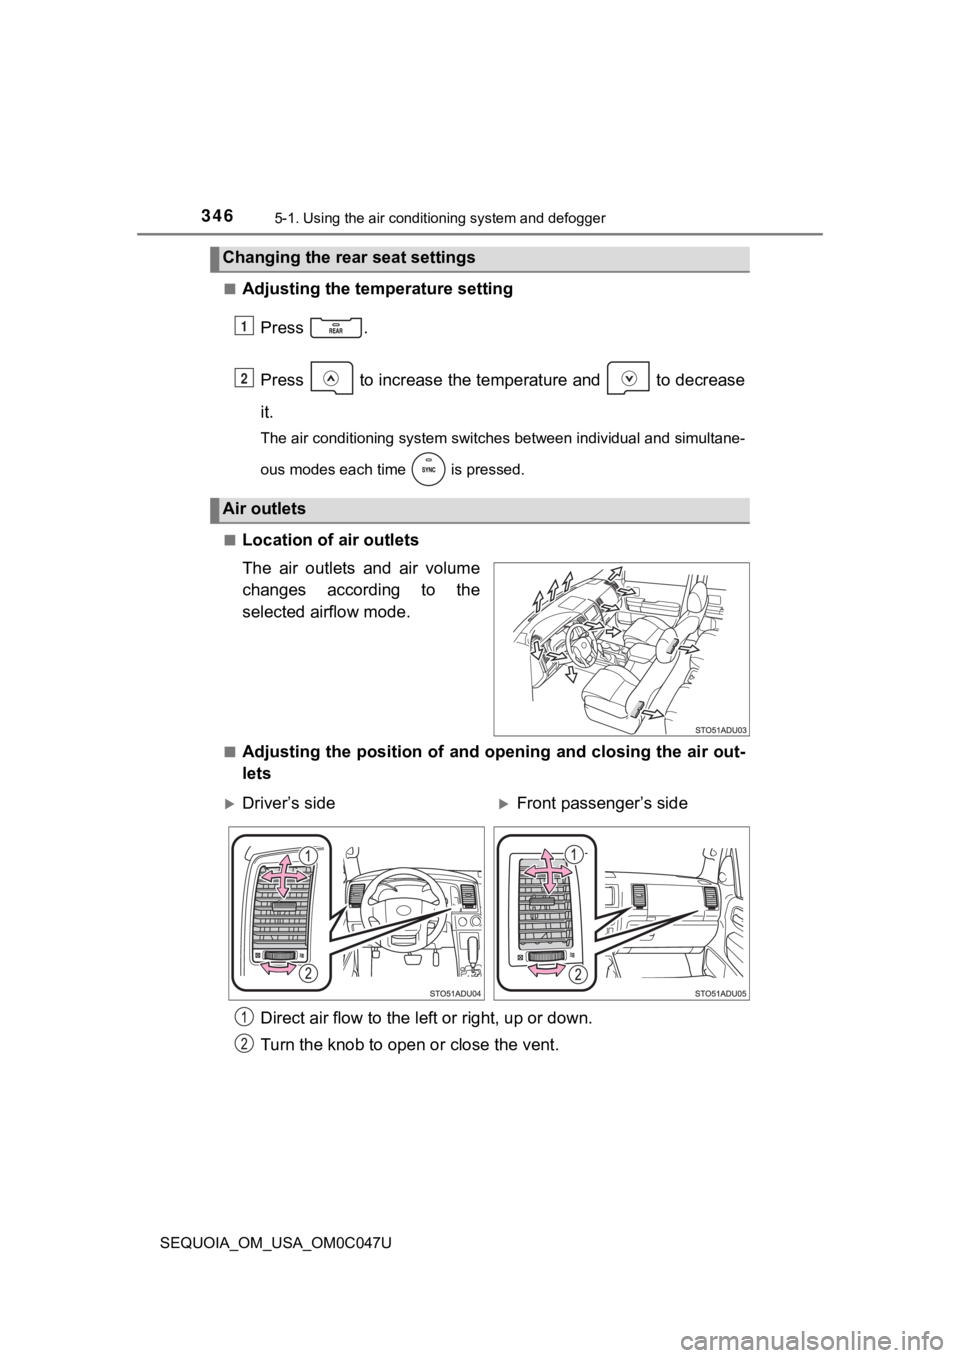
Location of a ir outlets
The air outlets and air volume
changes according to the
selected airflow mode.
■Adjusting the position of and opening and closing the air out-
lets
Changing the rear seat settings
Air outlets
1
2
Driver’s sideFront passenger’s side
Direct air flow to the le ft or right, up or down.
Turn the knob to open o r close the vent.
Page 430 of 592
4306-3. Do-it-yourself maintenance
SEQUOIA_OM_USA_OM0C047U
◆Initializing the tire pressure warning system
■The tire pressure warning system must be initialized in the fol-
lowing circumstances:
● When rotating the tires.
● When the tire inflation pressure is changed such as when chang-
ing tire size. (When there are multiple specified pressures)
● After registeri ng the ID codes. ( P. 431)
When the tire pressure warning sy stem is initialized, the current tire
inflation pressure is set as the benchmark pressure.
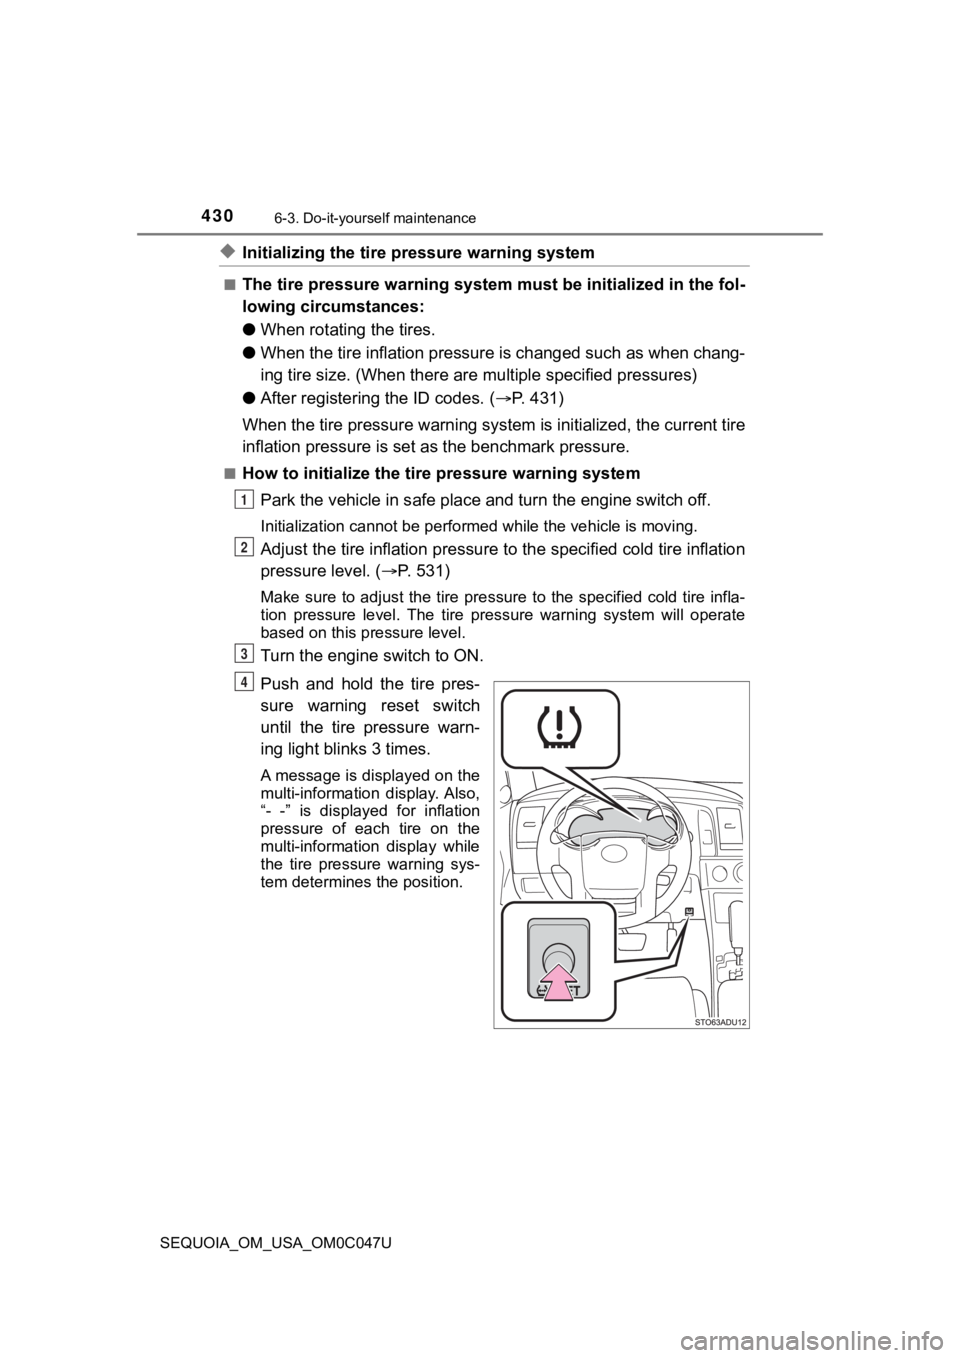
■How to initialize the tire pressure warning system
Park the vehicle in s afe place and turn the engine switch off.
Initialization cannot be perfo rmed while the vehicle is moving.
Adjust the tire inflation pressure to the specified cold tire i nflation
pressure level. ( P. 531)
Make sure to adjust the tire pre ssure to the specified cold tire infla-
tion pressure level. The tire pressure warning system will oper ate
based on this pr essure level.
Turn the engine switch to ON.
Push and hold the tire pres-
sure warning reset switch
until the tire pressure warn-
ing light blinks 3 times.
A message is displayed on the
multi-information display. Also,
“- -” is displayed for inflation
pressure of each tire on the
multi-information display while
the tire pressure warning sys-
tem determines the position.
1
2
3
4
Page 435 of 592

4356-3. Do-it-yourself maintenance
6
Maintenance and care
SEQUOIA_OM_USA_OM0C047U■
The initialization operation
●Make sure to carry out initializ
ation after adjusting the tire inflation pres-
sure.
Also, make sure the tires are co ld before carrying out initialization or tire
inflation pressure adjustment.
●If you have accidentally turned the engine switch to OFF during initial-
ization, it is not necessary to press the reset switch again as initialization
will restart automatically when the engine switch has been turned to ON
for the next time.
●If you accidentally press the reset switch when initialization is not neces-
sary, adjust the tire inflation pressure to the specified level when the
tires are cold, and cond uct initialization again.
●While the position of each tire is being determined and the inf lation pres-
sures are not being displayed on the multi-information display, if the
inflation pressure of a tire drops, the tire pressure warning l ight will come
on.
■Warning performance of the tire pressure warning system
The warning of the tire pressu re warning system will change in accor-
dance with the conditions under which it was initialized. For t his reason,
the system may give a warning even if the tire pressure does no t reach a
low enough level, or if the pressure is higher than the pressur e that was
adjusted to when the sys tem was initialized.
■When initialization of the tire pressure warning system has fai led
Initialization may take longer to complete if the vehicle is driven on an
unpaved road. When performing ini tialization, drive on a paved road if
possible. Depending on the driving environment and condition of the tires,
initialization will be completed i n approximately 10 to 30 minutes. If initial-
ization is not complete after dr iving approximately 10 to 30 mi nutes, con-
tinue driving for a while.
If the inflation pressure of each tire is not displayed after d riving for
approximately 1 hour, perf orm the following procedure.
●Park the vehicle in a safe place for approximately 20 minutes. Then
drive straight (with occasional left and right turns) at approx imately
25 mph (40 km/h) or more for approximately 10 to 30 minutes.
However, in the following situatio ns, the tire inflation pressure will not be
recorded and the system will not operate properly. Perform initialization
again.
●When operating the tire pressure warning reset switch, the tire pressure
warning light does not blink 3 times.
●After performing initialization, t he tire pressure warning light blinks for
1 minute then stays on while driving about 20 minutes.
If the inflation pressure of eac h tire is still not displayed, have the vehicle
inspected by you r Toyota dealer.
Page 504 of 592
5047-2. Steps to take in an emergency
SEQUOIA_OM_USA_OM0C047U
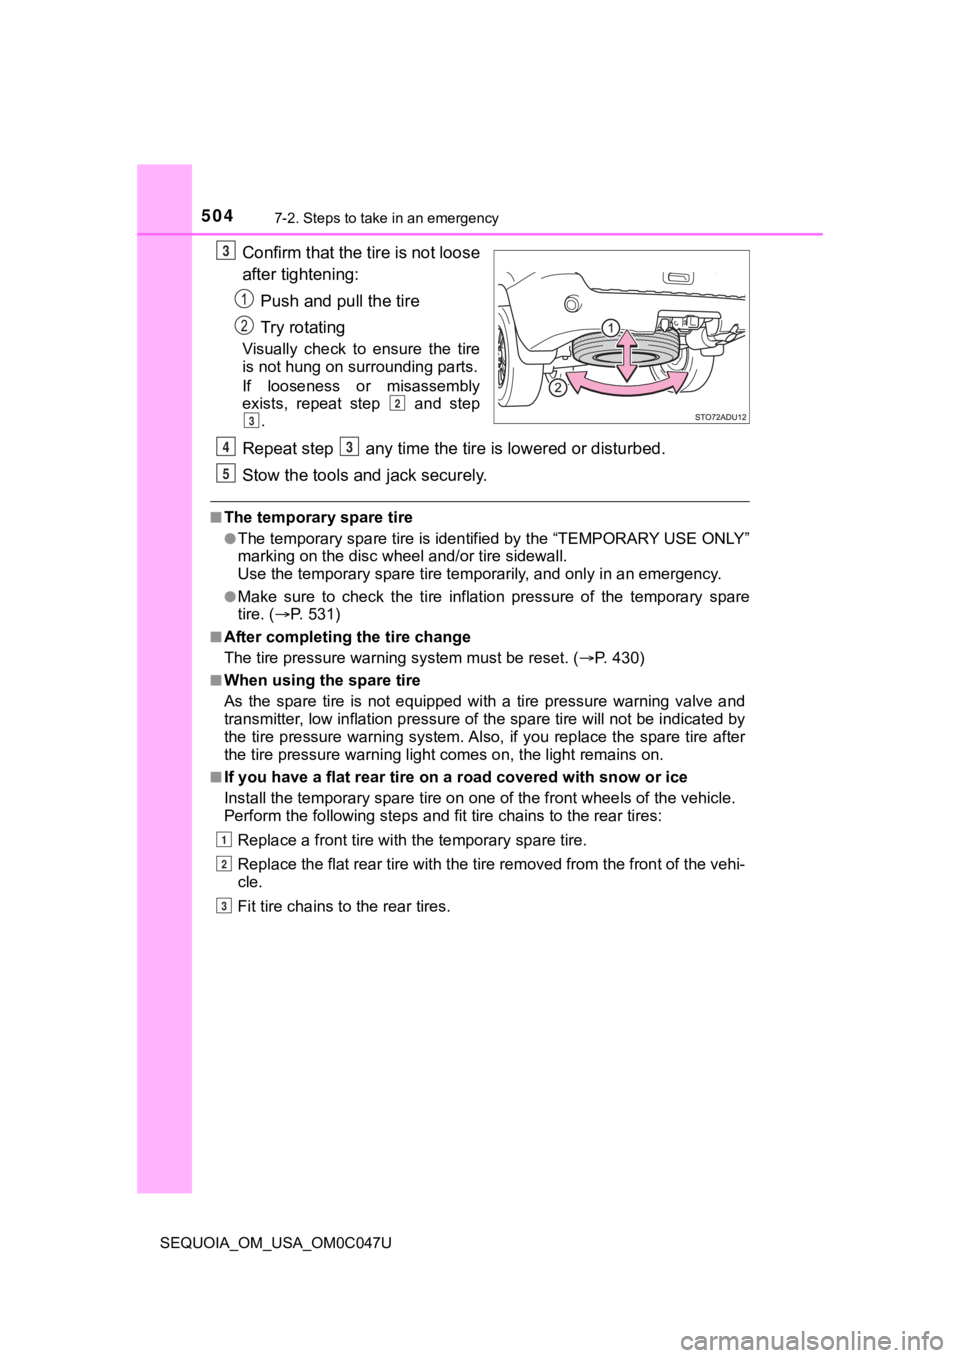
Confirm that the tire is not loose
after tightening:Push and pull the tire
Try rotating
Visually check to ensure the tire
is not hung on su rrounding parts.
If looseness or misassembly
exists, repeat step and step .
Repeat step any time the tire is lowered or disturbed.
Stow the tools and jack securely.
■The temporary spare tire
●The temporary spare tire is iden tified by the “TEMPORARY USE ON LY ”
marking on the disc wheel and/or tire sidewall.
Use the temporary spare tire temp orarily, and only in an emergency.
●Make sure to check the tire inflation pressure of the temporary spare
tire. ( P. 5 3 1 )
■After completing the tire change
The tire pressure warni ng system must be reset. ( P. 430)
■When using the spare tire
As the spare tire is not equipped with a tire pressure warning valve and
transmitter, low inflation pre ssure of the spare tire will not be indicated by
the tire pressure warning system. Also, if you replace the spar e tire after
the tire pressure wa rning light comes on, the light remains on.
■If you have a flat rear tire on a road covered with snow or ice
Install the temporary spare tire on one of the front wheels of the vehicle.
Perform the following steps and fit tire chains to the rear tires:
Replace a front tire with the temporary spare tire.
Replace the flat rear tire with the tire removed from the front of the vehi-
cle.
Fit tire chains to the rear tires.
3
2
3
43
5
1
2
3
Page 510 of 592

5107-2. Steps to take in an emergency
SEQUOIA_OM_USA_OM0C047U
■Stopping the engine
Shift the shift lever to P and press the engine switch as you normally do when
stopping the engine.
■ Replacing the key battery
As the above procedure is a temporary measure, it is recommende d that the
electronic key battery be replaced immediately when the battery is depleted.
( P. 448)
■ Changing engine switch modes
Within 10 seconds of the buzzer sounding, release the brake ped al and press
the engine switch.
The engine does not start and modes will be changed each time t he switch is
pressed. ( P. 215)
Page 549 of 592
5498-2. Customization
8
Vehicle specifications
SEQUOIA_OM_USA_OM0C047U
Select the setting to be changed. Change each setting.
For items that can be enabled/disabled, and for items with an
operating time that can be changed, select “On” or “Off”, or se lect
the desired operating time.
For items with sensor sensitivit y that can be changed, select “+”
or “-” to choose the desired level, then select “OK”.
A message indicating that the s ettings are being saved will
appear. Do not perform any other operations while this message
is displayed.
■Changing by using the multi-information display
Press “<” or “>” of the meter control switches, select .
Press “ ” or “ ” of the meter control switches, select “Meter
Settings”, and then press .
Press “ ” or “ ” of the meter control switches, select the item,
and then press .
Press “ ” or “ ” of the meter control switches, select the desired
setting, and then press .
Some function settings are changed simultaneously with other func-
tions being customized. Contact your Toyota dealer for further details.
Settings that can be changed usi ng the multi-information display.
Settings that can be changed u sing the multimedia system.
Settings that can be chan ged by your Toyota dealer.
Definition of symbols: O = A vailable, — = Not available
Customizable features
6
7
1
2
3
4