sensor TOYOTA SEQUOIA HYBRID 2023 User Guide
[x] Cancel search | Manufacturer: TOYOTA, Model Year: 2023, Model line: SEQUOIA HYBRID, Model: TOYOTA SEQUOIA HYBRID 2023Pages: 628, PDF Size: 14.27 MB
Page 142 of 628

1423-2. Opening, closing and locking the doors
Owners Manual_USA_M0C043_en
●When the vehicle is parked in a
pay parking spot where radio
waves are emitted.
■Note for the entry function
●Even when the electronic key is
within the effective range (detec-
tion areas), the system may not
operate properly in the following
cases:
• The electronic key is too close to the window or outside door han-
dle, near the ground, or in a high
place when the doors are locked
or unlocked.
• The electronic key is near the
ground or in a high place, or too
close to the center of the rear
bumper.
• The electronic key is on the instru- ment panel, or floor, or in the door
pockets or glove box when the
hybrid system is s tarted or power
switch modes are changed.
●Do not leave the electronic key on
top of the instrument panel or near
the door pockets when exiting the
vehicle. Depending on the radio
wave reception conditions, it may
be detected by the antenna out-
side the cabin and the doors will
become lockable from the outside,
possibly trapping the electronic
key inside the vehicle.
●As long as the electronic key is
within the effective range, the
doors may be locked or unlocked
by anyone. However, only the
doors detecting the electronic key
can be used to unl ock the vehicle.
●Even if the electronic key is not
inside the vehicle, it may be possi-
ble to start the hybrid system if the
electronic key is near the window.
●The doors may unlock or lock if a
large amount of water splashes on
the door handle, such as in the
rain or in a car wash, when the
electronic key is within the effec-
tive range. (The doors will auto-
matically be locked after
approximately 60 seconds if the doors or the glass hatch are not
opened and closed.)
●If the wireless remote control is
used to lock the doors when the
electronic key is near the vehicle,
there is a possib
ility that the door
may not be unlocked by the entry
function. (Use the wireless remote
control to unlock the doors.)
●Touching the door lock sensor
while wearing gloves may delay or
prevent lock operation.
●When the lock operation is per-
formed using the lock sensor, rec-
ognition signals will be shown up
to two consecutive times. After
this, no recognition signals will be
given.
●If the door handle becomes wet
while the electronic key is within
the effective range, the door may
lock and unlock repeatedly. In this
case, follow the following correc-
tion procedures to wash the vehi-
cle:
• Place the electronic key in a loca-
tion 6 ft. (2 m) or more away from
the vehicle. (Take care to ensure
that the key is not stolen.)
• Set the electronic key to battery- saving mode to disable the smart
key system. ( P.141)
●If the electronic key is inside the
vehicle and a door handle
becomes wet during a car wash, a
message may be shown on the
multi-information display and a
buzzer will sound outside the vehi-
cle. To turn off the alarm, lock all
the doors.
●The lock sensor may not work
properly if it comes into contact
with ice, snow, m ud, etc. Clean
the lock sensor and attempt to
operate it again.
●A sudden approach to the effec-
tive range or door handle may pre-
vent the doors from being
unlocked. In this case, return the
door handle to the original position
and check that t he doors unlock
Page 160 of 628
1603-4. Adjusting the steering wheel and mirrors
Owners Manual_USA_M0C043_en
Responding to the level of
brightness of the headlights of
vehicles behind, the reflected
light is automatically reduced.
Turn the automatic anti-glare
function mode on/off
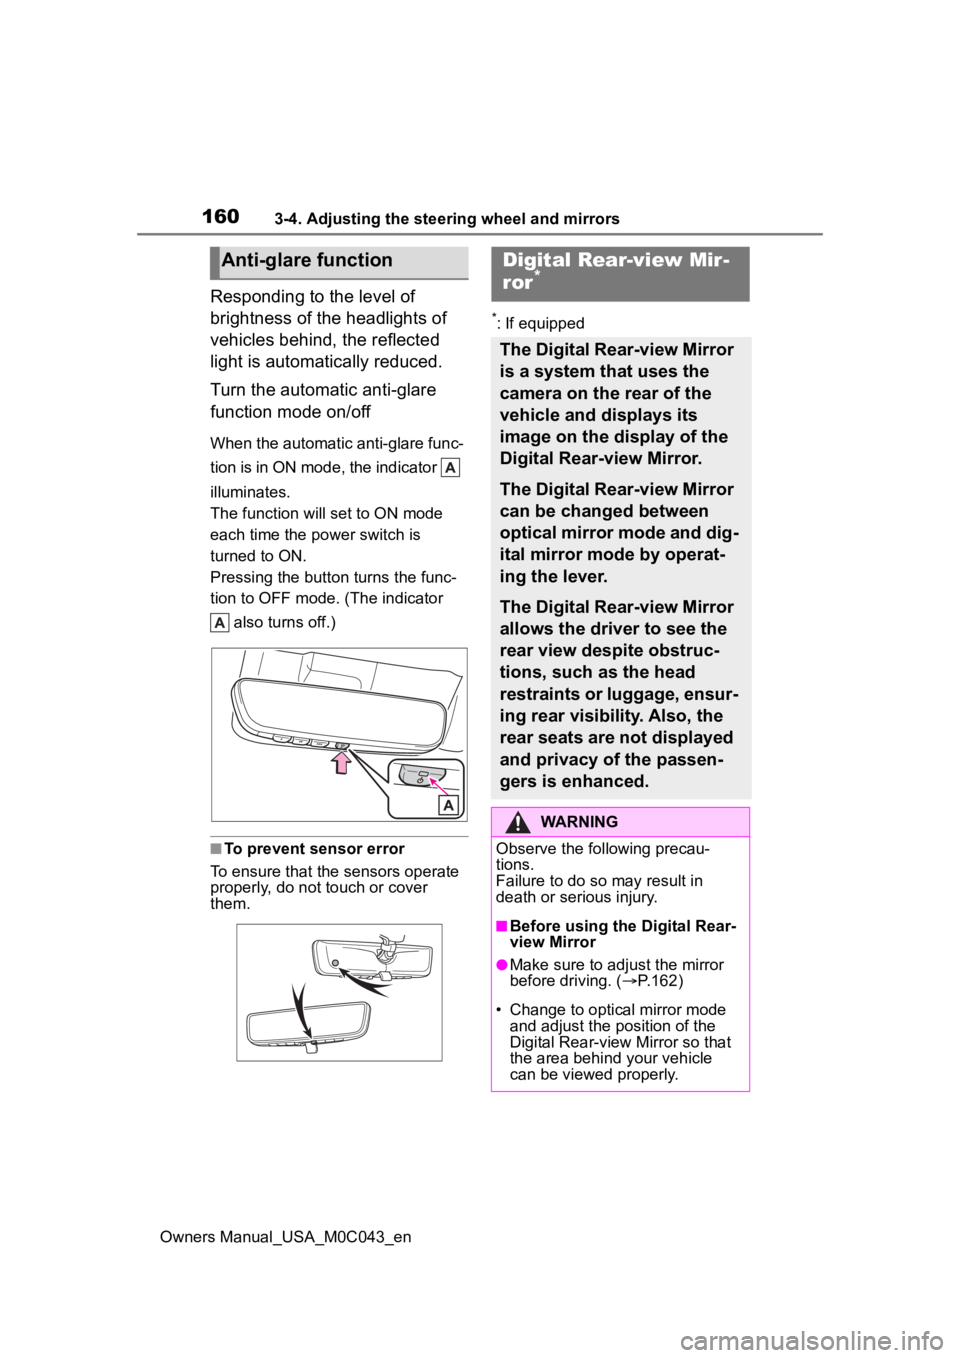
When the automatic anti-glare func-
tion is in ON mode, the indicator
illuminates.
The function will set to ON mode
each time the power switch is
turned to ON.
Pressing the button turns the func-
tion to OFF mode. (The indicator also turns off.)
■To prevent sensor error
To ensure that the sensors operate
properly, do not touch or cover
them.
*: If equipped
Anti-glare functionDigital Rear-view Mir-
ror*
The Digital Rear-view Mirror
is a system that uses the
camera on the rear of the
vehicle and displays its
image on the display of the
Digital Rear-view Mirror.
The Digital Rear-view Mirror
can be changed between
optical mirror mode and dig-
ital mirror mode by operat-
ing the lever.
The Digital Rear-view Mirror
allows the driver to see the
rear view despite obstruc-
tions, such as the head
restraints or luggage, ensur-
ing rear visibility. Also, the
rear seats are not displayed
and privacy of the passen-
gers is enhanced.
WARNING
Observe the following precau-
tions.
Failure to do so may result in
death or serious injury.
■Before using the Digital Rear-
view Mirror
●Make sure to adjust the mirror
before driving. ( P.162)
• Change to optical mirror mode and adjust the position of the
Digital Rear-view Mirror so that
the area behind your vehicle
can be viewed properly.
Page 164 of 628
1643-4. Adjusting the steering wheel and mirrors
Owners Manual_USA_M0C043_en
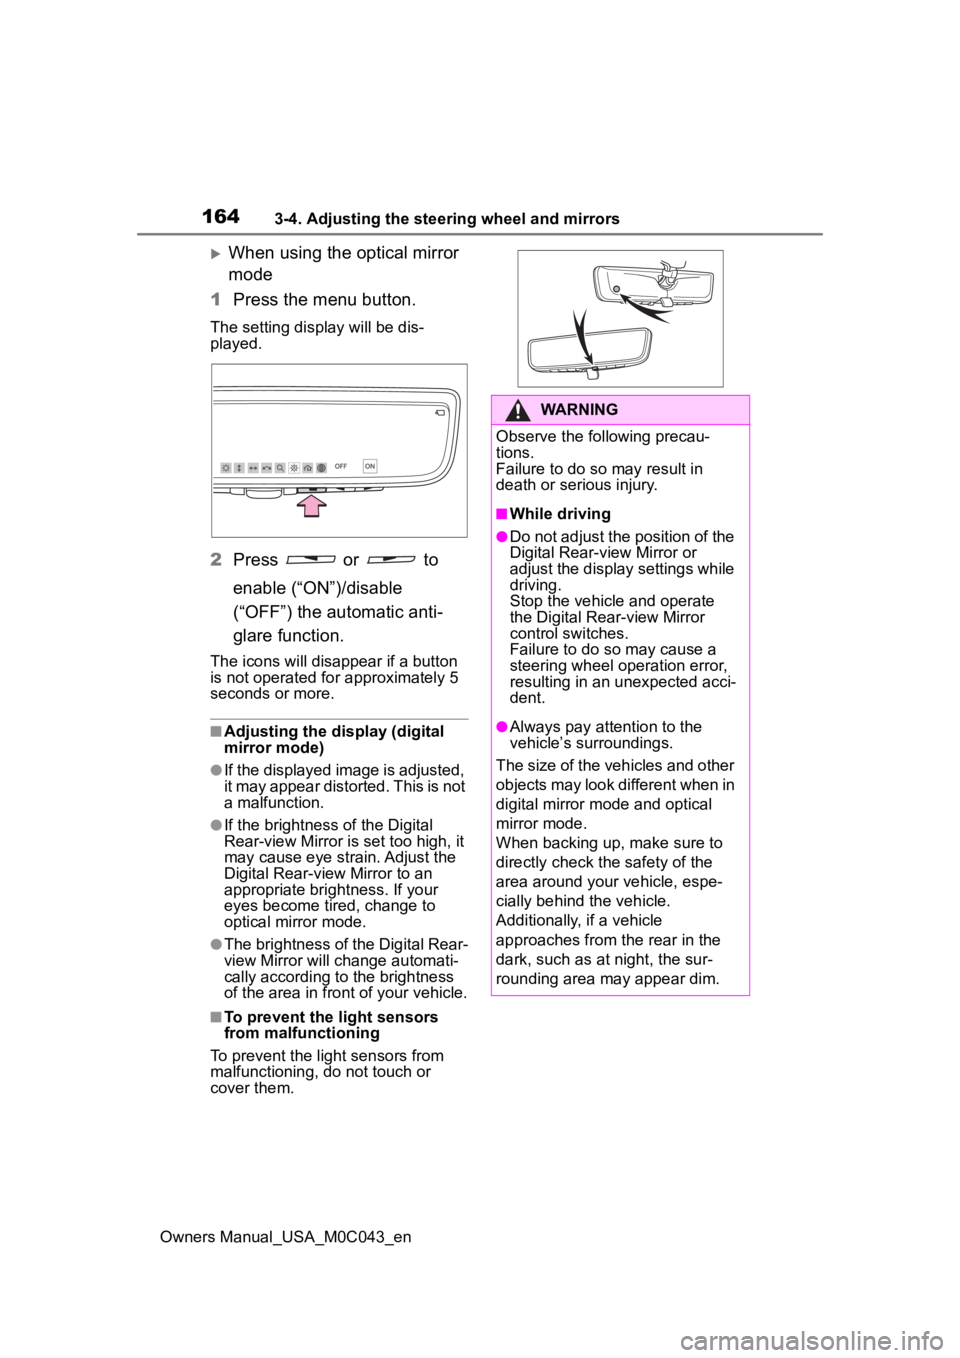
When using the optical mirror
mode
1 Press the menu button.
The setting display will be dis-
played.
2Press or to
enable (“ON”)/disable
(“OFF”) the automatic anti-
glare function.
The icons will disappear if a button
is not operated fo r approximately 5
seconds or more.
■Adjusting the display (digital
mirror mode)
●If the displayed image is adjusted,
it may appear distorted. This is not
a malfunction.
●If the brightness of the Digital
Rear-view Mirror is set too high, it
may cause eye strain. Adjust the
Digital Rear-view Mirror to an
appropriate brightness. If your
eyes become tired, change to
optical mirror mode.
●The brightness of the Digital Rear-
view Mirror will ch ange automati-
cally according to the brightness
of the area in front of your vehicle.
■To prevent the light sensors
from malfunctioning
To prevent the light sensors from
malfunctioning, do not touch or
cover them.
WARNING
Observe the following precau-
tions.
Failure to do so may result in
death or serious injury.
■While driving
●Do not adjust the position of the
Digital Rear-view Mirror or
adjust the display settings while
driving.
Stop the vehicle and operate
the Digital Rear-view Mirror
control switches.
Failure to do so may cause a
steering wheel operation error,
resulting in an unexpected acci-
dent.
●Always pay attention to the
vehicle’s surroundings.
The size of the vehicles and other
objects may look different when in
digital mirror mode and optical
mirror mode.
When backing up, make sure to
directly check the safety of the
area around your vehicle, espe-
cially behind the vehicle.
Additionally, if a vehicle
approaches from the rear in the
dark, such as at night, the sur-
rounding area may appear dim.
Page 228 of 628
2284-3. Operating the lights and wipers
Owners Manual_USA_M0C043_en
4-3.Operating the lights and wipers
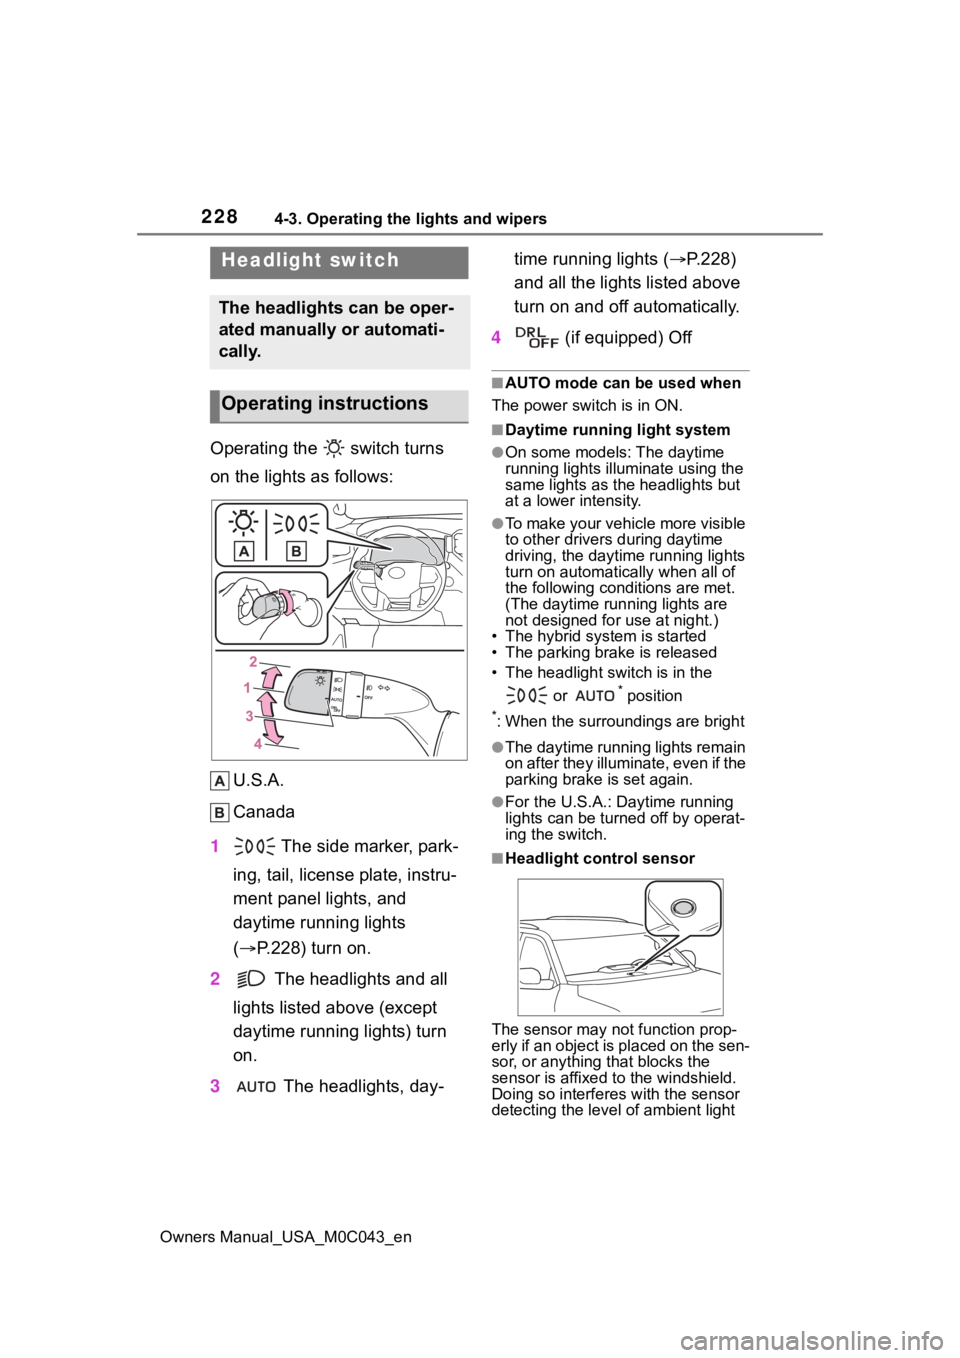
Operating the switch turns
on the lights as follows:U.S.A.
Canada
1 The side marker, park-
ing, tail, license plate, instru-
ment panel lights, and
daytime running lights
( P.228) turn on.
2 The headlights and all
lights listed above (except
daytime running lights) turn
on.
3 The headlights, day- time running lights (
P.228)
and all the lights listed above
turn on and off automatically.
4 (if equipped) Off
■AUTO mode can be used when
The power switch is in ON.
■Daytime running light system
●On some models: The daytime
running lights illu minate using the
same lights as the headlights but
at a lower intensity.
●To make your vehicle more visible
to other drivers during daytime
driving, the daytime running lights
turn on automatically when all of
the following conditions are met.
(The daytime running lights are
not designed for use at night.)
• The hybrid system is started
• The parking brake is released
• The headlight switch is in the
or
* position
*: When the surroundings are bright
●The daytime running lights remain
on after they illuminate, even if the
parking brake is set again.
●For the U.S.A.: Daytime running
lights can be turned off by operat-
ing the switch.
■Headlight control sensor
The sensor may not function prop-
erly if an object is placed on the sen-
sor, or anything that blocks the
sensor is affixed to the windshield.
Doing so interferes with the sensor
detecting the level of ambient light
Headlight switch
The headlights can be oper-
ated manually or automati-
cally.
Operating instructions
Page 233 of 628

2334-3. Operating the lights and wipers
Owners Manual_USA_M0C043_en
4
Driving
• In bad weather ( rain, snow, fog,
sandstorms, etc.)
• The windshield is obscured by
fog, mist, ice, dirt, etc.
• The windshield is cracked or dam- aged
• The front camera is deformed or
dirty
• When the temperature of the front
camera is extremely high
• Surrounding brightness levels are equal to those of h eadlights, tail
lights or fog lights
• When headlights or tail lights of vehicles ahead are turned off,
dirty, changing color, or not aimed
properly
• When the vehicle is hit by water,
snow, dust, etc. from a preceding
vehicle
• When driving thr ough an area of
intermittently changing brightness
and darkness
• When frequently and repeatedly
driving ascending/descending
roads, or roads with rough, bumpy
or uneven surfaces (such as
stone-paved roads, gravel roads,
etc.)
• When frequently and repeatedly
taking curves or driving on a wind-
ing road
• There is a highly reflective object
ahead of the vehicle, such as a
sign or mirror
• The back of a vehicle ahead is
highly reflective, such as a con-
tainer on a truck
• The vehicle’s headlights are dam-
aged or dirty, or are not aimed
properly
• The vehicle is listing or titling due
to a flat tire, a trailer being towed,
etc.
• The high beam and low beam are
repeatedly being switched
between in an abnormal manner
• The driver believes that the high beam may be causing problems
or distress to other drivers or
pedestrians nearby■Temporarily lowering sensor
sensitivity
The sensitivity of the sensor can be
temporarily lowered.
1 Turn the power s witch off while
the following conditions are met.
●The headlight switch is in or
.
●The headlight switch lever is in
low beam position.
●Automatic High Beam switch is
on.
2 Turn the power switch to ON.
3 Within 60 seconds after step 2,
repeat pushing the headlight
switch lever to the high beam
position then pulling it to the orig-
inal position quickly 10 times,
then leave the lever in the origi-
nal position.
4 If the sensitivity is changed, the
AHB indicator is turn on and off 3
times.
Automatic High Beam (headlights)
may turn on even when the vehicle
is stopped.
■Switching to the high
beams
Push the lever away from you.
The AHB indicator will turn off and
the high beam indi cator will turn on.
Pull the lever to its original position
to activate the Automatic High
Beam system.
Turning the high beams
on/off manually
Page 236 of 628
2364-3. Operating the lights and wipers
Owners Manual_USA_M0C043_en
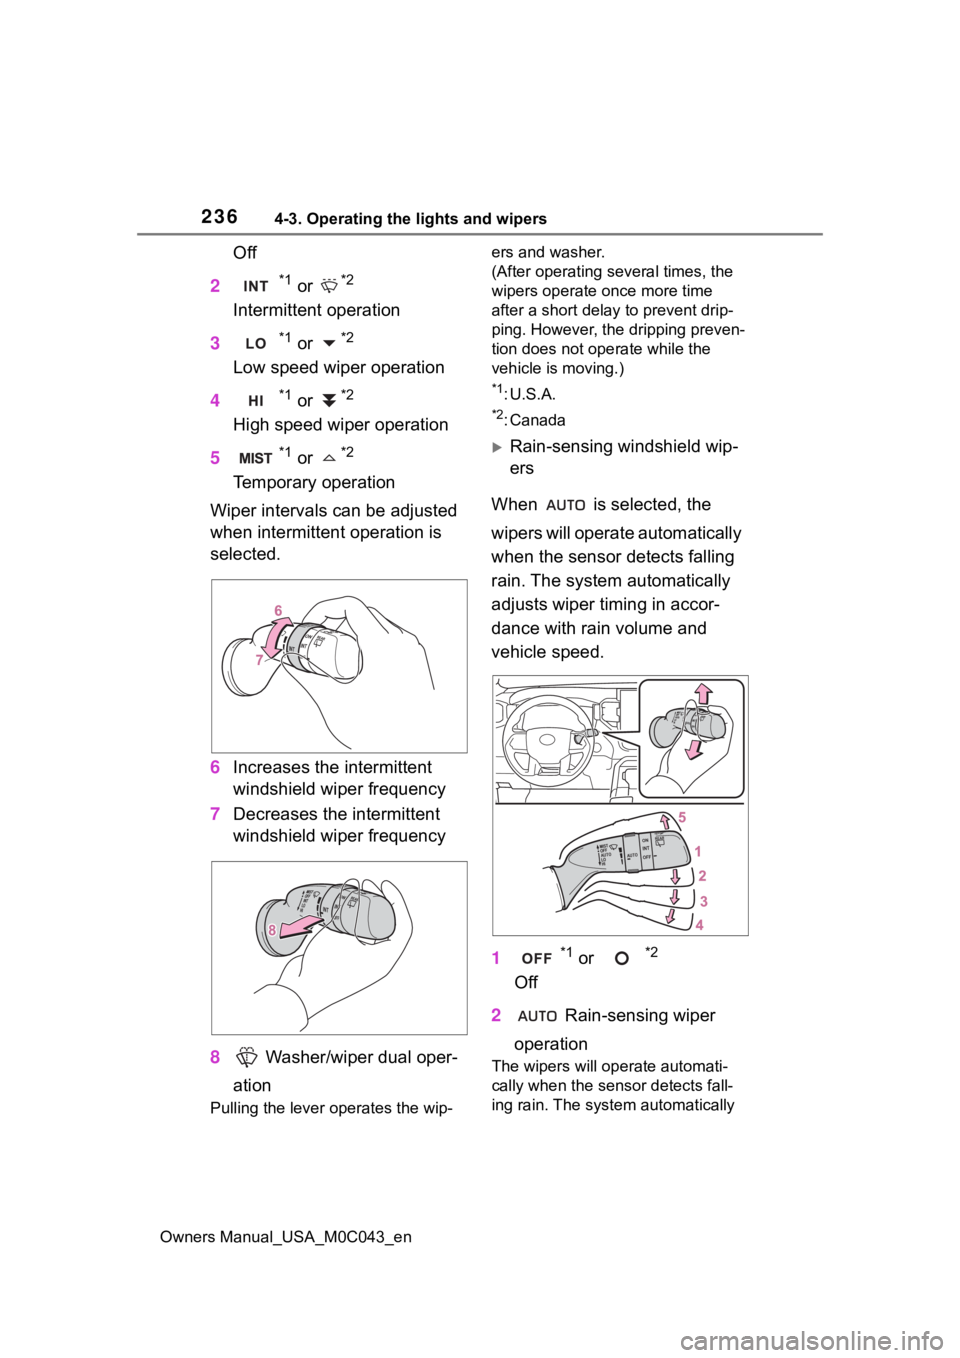
Off
2
*1 or *2
Intermittent operation
3
*1 or *2
Low speed wiper operation
4
*1 or *2
High speed wiper operation
5
*1 or *2
Temporary operation
Wiper intervals can be adjusted
when intermittent operation is
selected.
6 Increases the intermittent
windshield wiper frequency
7 Decreases the intermittent
windshield wiper frequency
8 Washer/wiper dual oper-
ation
Pulling the lever o perates the wip- ers and washer.
(After operating several times, the
wipers operate once more time
after a short delay to prevent drip-
ping. However, the dripping preven-
tion does not operate while the
vehicle is moving.)
*1:U.S.A.
*2: Canada
Rain-sensing windshield wip-
ers
When is selected, the
wipers will operate automatically
when the sensor detects falling
rain. The system automatically
adjusts wiper timing in accor-
dance with rain volume and
vehicle speed.
1
*1 or *2
Off
2 Rain-sensing wiper
operation
The wipers will op erate automati-
cally when the sensor detects fall-
ing rain. The syst em automatically
Page 237 of 628
2374-3. Operating the lights and wipers
Owners Manual_USA_M0C043_en
4
Driving
adjusts wiper timing in accordance
with rain volume and vehicle speed.
3*1 or *2
Low speed wiper operation
4
*1 or *2
High speed wiper operation
5
*1 or *2
Temporary operation
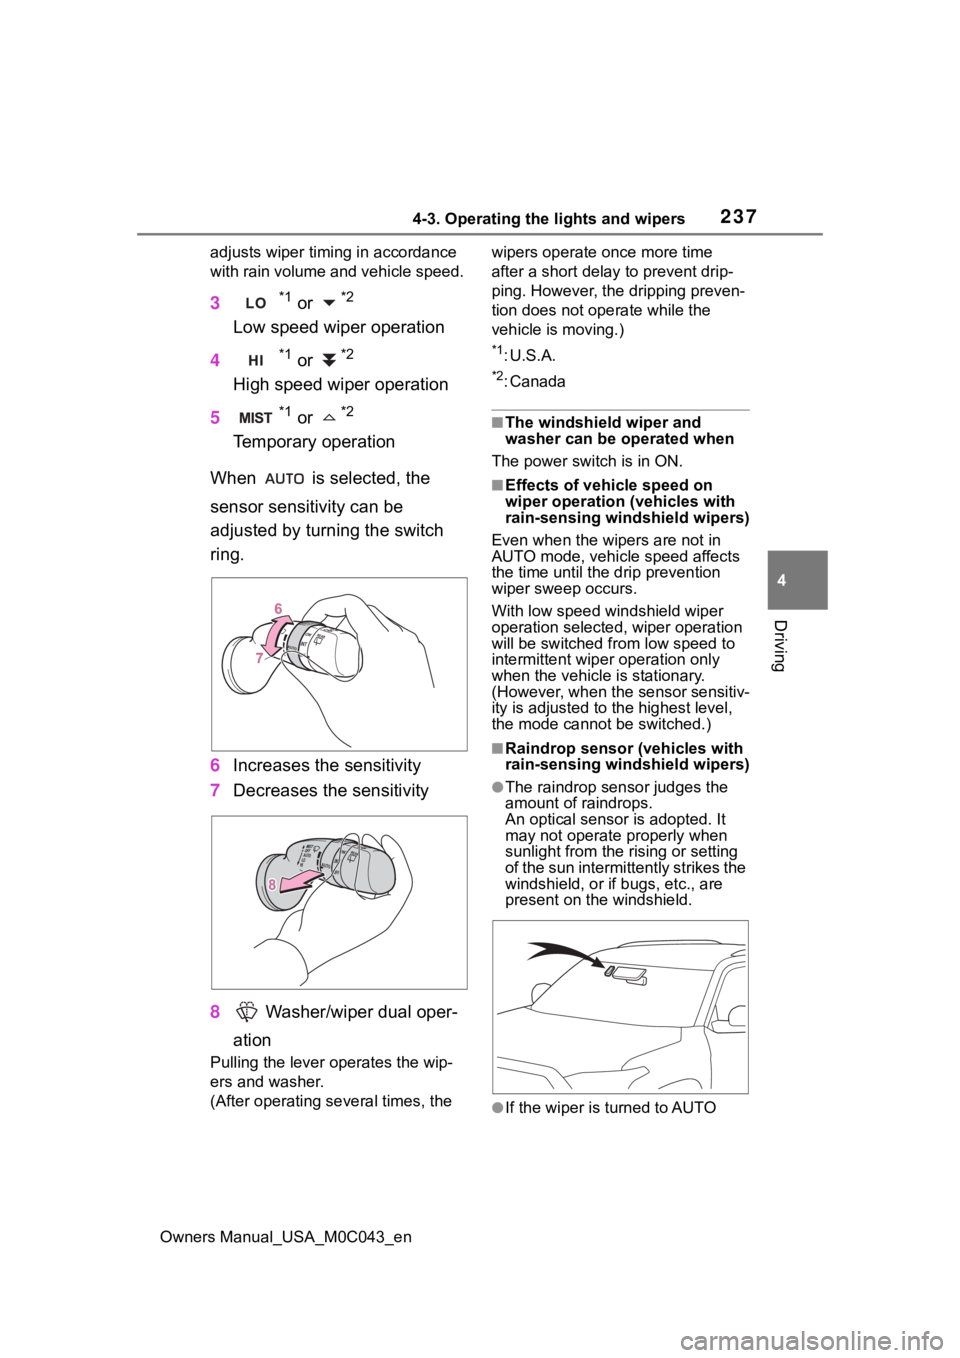
When is selected, the
sensor sensitivity can be
adjusted by turning the switch
ring.
6 Increases the sensitivity
7 Decreases the sensitivity
8 Washer/wiper dual oper-
ation
Pulling the lever o perates the wip-
ers and washer.
(After operating several times, the wipers operate once more time
after a short delay to prevent drip-
ping. However, the dripping preven-
tion does not operate while the
vehicle is moving.)
*1:U.S.A.
*2: Canada
■The windshield wiper and
washer can be operated when
The power switch is in ON.
■Effects of vehicle speed on
wiper operation (vehicles with
rain-sensing windshield wipers)
Even when the wipers are not in
AUTO mode, vehicle speed affects
the time until the drip prevention
wiper sweep occurs.
With low speed windshield wiper
operation selected, wiper operation
will be switched fro m low speed to
intermittent wiper operation only
when the vehicle is stationary.
(However, when the sensor sensitiv-
ity is adjusted to the highest level,
the mode cannot be switched.)
■Raindrop sensor (vehicles with
rain-sensing windshield wipers)
●The raindrop sensor judges the
amount of raindrops.
An optical sensor is adopted. It
may not operate properly when
sunlight from the rising or setting
of the sun intermittently strikes the
windshield, or if b ugs, etc., are
present on the windshield.
●If the wiper is turned to AUTO
Page 238 of 628
2384-3. Operating the lights and wipers
Owners Manual_USA_M0C043_enmode while the powe
r switch is in
ON, the wipers will operate once
to show that AUTO mode is acti-
vated.
●If the temperature of the raindrop
sensor is 185°F (85°C) or higher,
or 5°F (-15°C) or lower, automatic
operation may not occur. In this
case, operate the wipers in any
mode other than AUTO mode.
■If no windshield washer fluid
sprays
Check that the wash er nozzles are
not blocked if there is washer fluid in
the windshield washer fluid reser-
v oi r.
WARNING
■Caution regarding the use of
windshield wipers in AUTO
mode (vehicles with rain-
sensing windshield wipers)
The windshield wipers may oper-
ate unexpectedly if the sensor is
touched or the windshield is sub-
ject to vibration in AUTO mode.
Take care that your fingers or any-
thing else do not become caught
in the windshield wipers.
■Caution regarding the use of
washer fluid
When it is cold, do not use the
washer fluid until the windshield
becomes warm. The fluid may
freeze on the windshield and
cause low visibility. This may lead
to an accident, resulting in death
or serious injury.
NOTICE
■When there is no washer fluid
spray from the nozzle
Damage to the washer fluid pump
may be caused if the lever is
pulled toward you and held con-
tinually.
■When a nozzle becomes
blocked
In this case, contact your Toyota
dealer.
Do not try to clear it with a pin or
other object. The nozzle will be
damaged.
■To prevent 12-volt battery dis-
charge
Do not leave the wipers on longer
than necessary when the hybrid
system is off.
Page 244 of 628
2444-5. Using the driving support systems
Owners Manual_USA_M0C043_en
4-5.Using the driving support systems
■PCS (Pre-Collision System)
P.249
■LTA (Lane Tracing Assist)
P.261
■AHB (Automatic High
Beam)
P.231
■RSA (Road Sign Assist)*
P.272
*: If equipped
■Dynamic radar cruise con-
trol with full-speed range
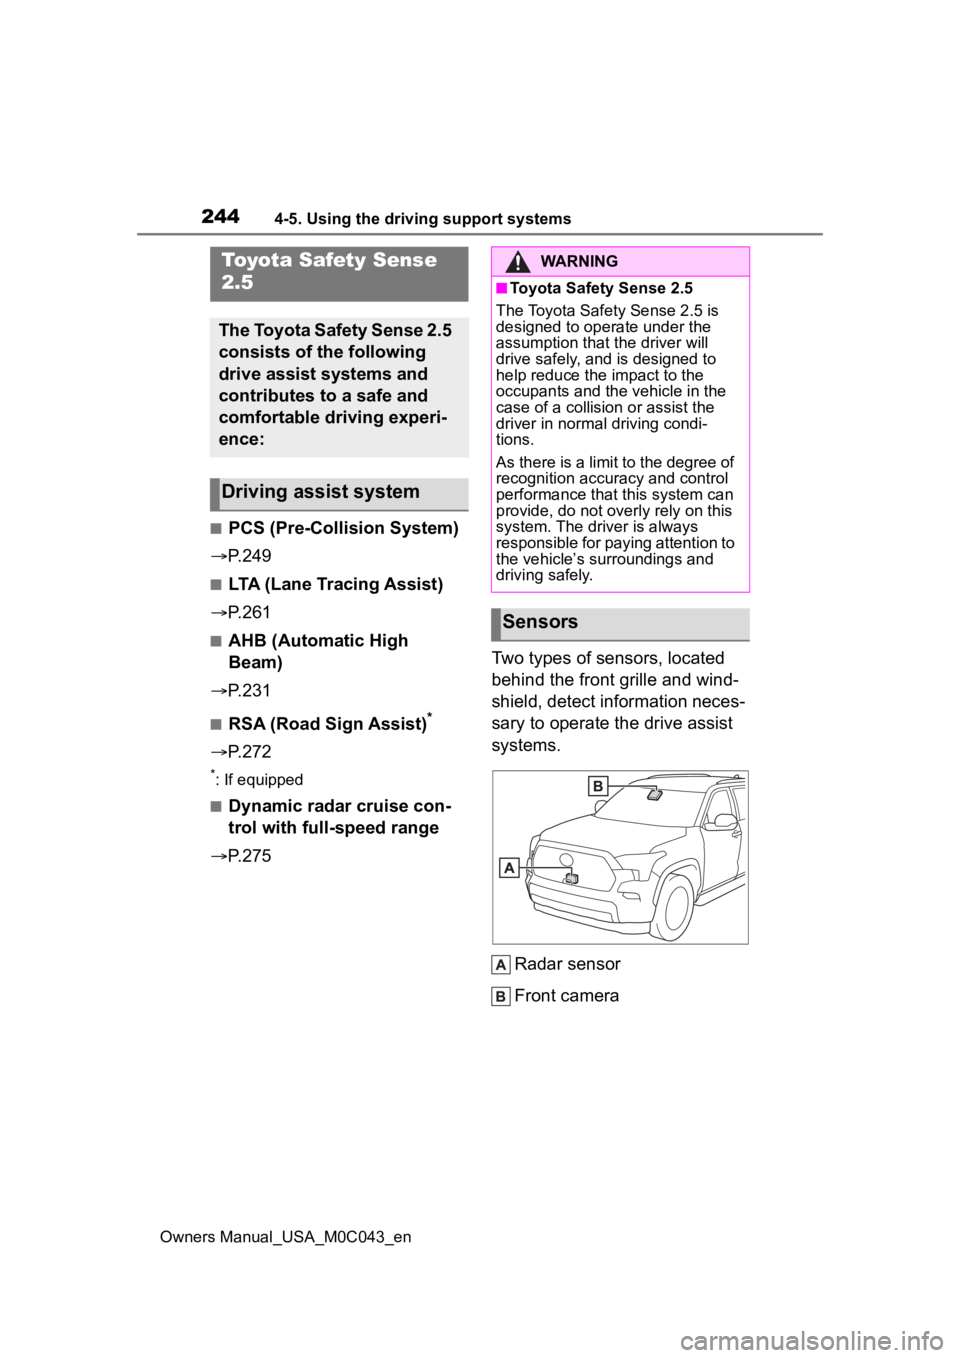
P.275 Two types of sensors, located
behind the front grille and wind-
shield, detect information neces-
sary to operate the drive assist
systems.
Radar sensor
Front camera
Toyota Safety Sense
2.5
The Toyota Safety Sense 2.5
consists of the following
drive assist systems and
contributes to a safe and
comfortable driving experi-
ence:
Driving assist system
WARNING
■Toyota Safety Sense 2.5
The Toyota Safety Sense 2.5 is
designed to operate under the
assumption that the driver will
drive safely, and is designed to
help reduce the impact to the
occupants and the vehicle in the
case of a collision or assist the
driver in normal driving condi-
tions.
As there is a limit to the degree of
recognition accuracy and control
performance that this system can
provide, do not overly rely on this
system. The driver is always
responsible for paying attention to
the vehicle’s su rroundings and
driving safely.
Sensors
Page 245 of 628
2454-5. Using the driving support systems
Owners Manual_USA_M0C043_en
4
Driving
WARNING
■To avoid malfunction of the
radar sensor
Observe the following precau-
tions.
Otherwise, the radar sensor may
not operate properly, possibly
leading to an accident resulting in
death or serious injury.
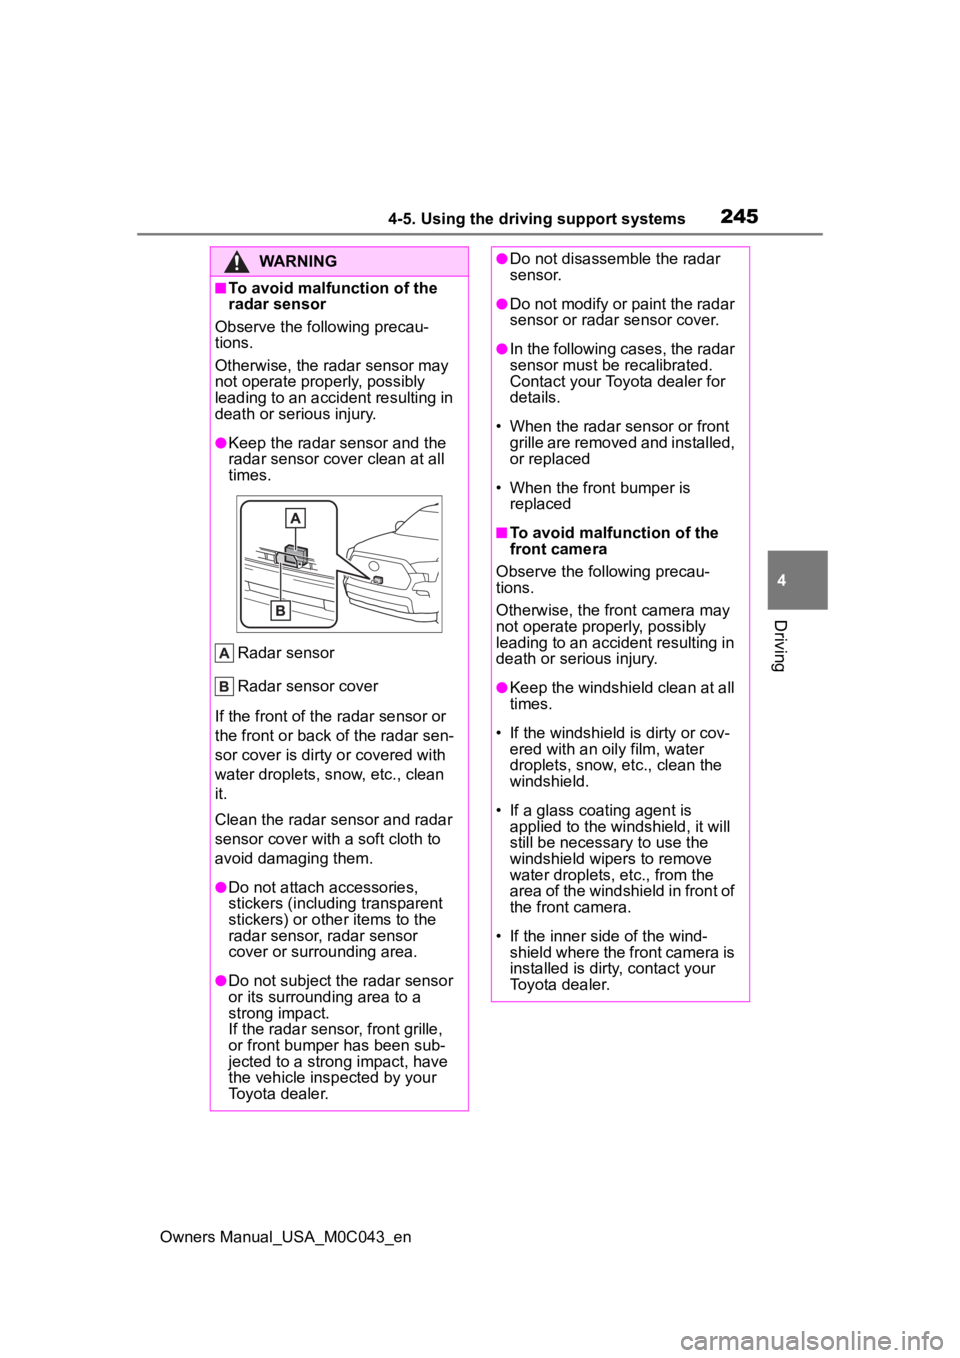
●Keep the radar sensor and the
radar sensor cover clean at all
times.
Radar sensor
Radar sensor cover
If the front of the r adar sensor or
the front or back of the radar sen-
sor cover is dirty or covered with
water droplets, snow, etc., clean
it.
Clean the radar sensor and radar
sensor cover with a soft cloth to
avoid damaging them.
●Do not attach accessories,
stickers (including transparent
stickers) or other items to the
radar sensor, radar sensor
cover or surrounding area.
●Do not subject the radar sensor
or its surrounding area to a
strong impact.
If the radar sensor, front grille,
or front bumper has been sub-
jected to a strong impact, have
the vehicle insp ected by your
Toyota dealer.
●Do not disassemble the radar
sensor.
●Do not modify or paint the radar
sensor or radar sensor cover.
●In the following cases, the radar
sensor must be recalibrated.
Contact your Toyota dealer for
details.
• When the radar s ensor or front
grille are removed and installed,
or replaced
• When the front bumper is replaced
■To avoid malfunction of the
front camera
Observe the following precau-
tions.
Otherwise, the f ront camera may
not operate properly, possibly
leading to an accident resulting in
death or serious injury.
●Keep the windshield clean at all
times.
• If the windshield is dirty or cov-
ered with an o ily film, water
droplets, snow, etc., clean the
windshield.
• If a glass coating agent is applied to the windshield, it will
still be necessary to use the
windshield wipers to remove
water droplets, etc., from the
area of the windshield in front of
the front camera.
• If the inner side of the wind- shield where the front camera is
installed is dirty, contact your
Toyota dealer.