transmission solenoid wire TOYOTA SIENNA 2007 Service Owner's Manual
[x] Cancel search | Manufacturer: TOYOTA, Model Year: 2007, Model line: SIENNA, Model: TOYOTA SIENNA 2007Pages: 3000, PDF Size: 52.26 MB
Page 1519 of 3000
AX–136U151E AUTOMATIC TRANSAXLE – VALVE BODY ASSEMBLY
AX
REMOVAL
1. REMOVE ENGINE UNDER COVER NO.1
2. DISCONNECT CABLE FROM NEGATIVE BATTERY
TERMINAL
3. DRAIN AUTOMATIC TRANSAXLE FLUID (See page
AX-131)
4. REMOVE AUTOMATIC TRANSAXLE OIL PAN SUB-
ASSEMBLY
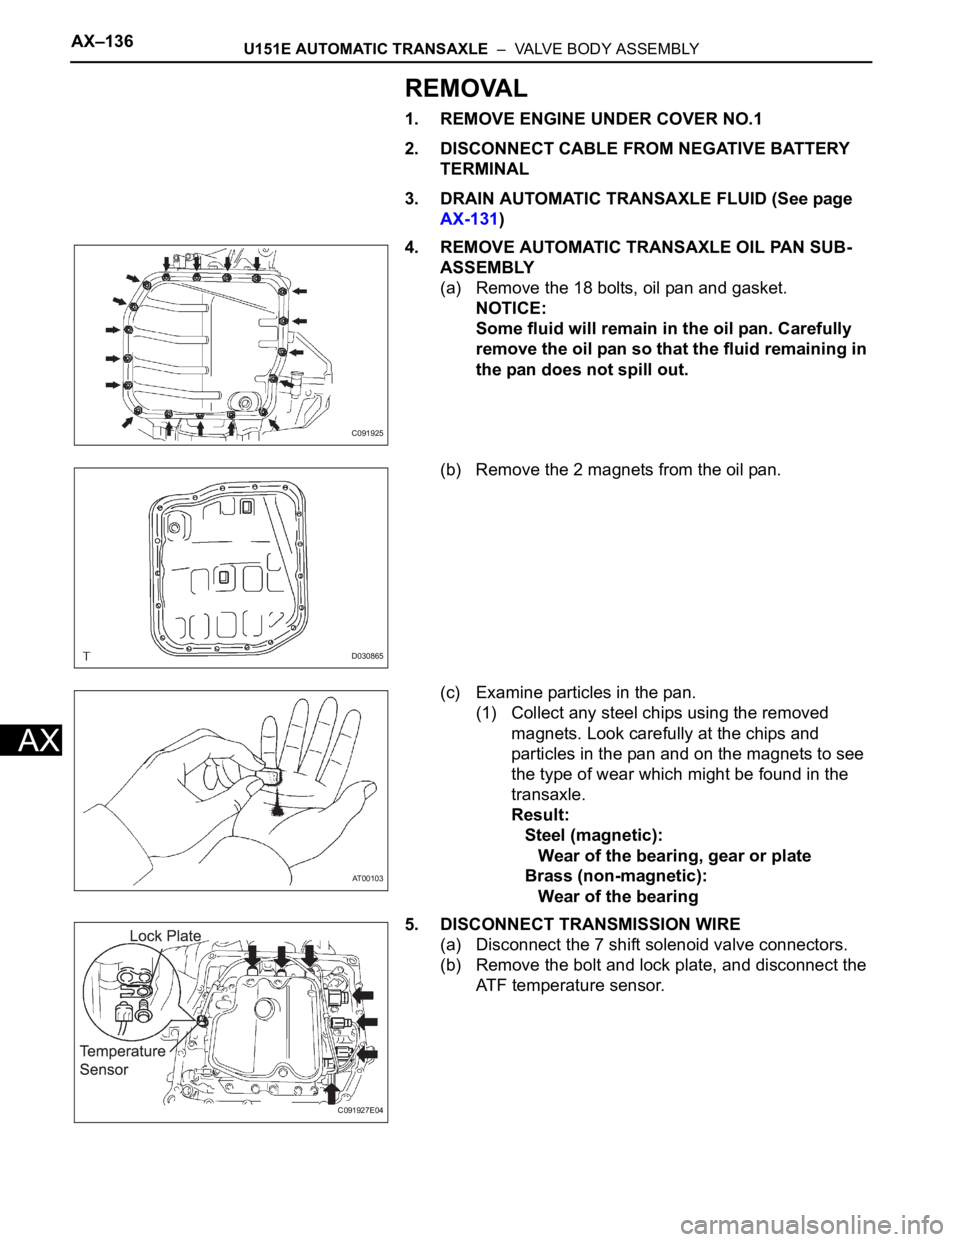
(a) Remove the 18 bolts, oil pan and gasket.
NOTICE:
Some fluid will remain in the oil pan. Carefully
remove the oil pan so that the fluid remaining in
the pan does not spill out.
(b) Remove the 2 magnets from the oil pan.
(c) Examine particles in the pan.
(1) Collect any steel chips using the removed
magnets. Look carefully at the chips and
particles in the pan and on the magnets to see
the type of wear which might be found in the
transaxle.
Result:
Steel (magnetic):
Wear of the bearing, gear or plate
Brass (non-magnetic):
Wear of the bearing
5. DISCONNECT TRANSMISSION WIRE
(a) Disconnect the 7 shift solenoid valve connectors.
(b) Remove the bolt and lock plate, and disconnect the
ATF temperature sensor.
C091925
D030865
AT00103
C091927E04
Page 1524 of 3000
U151E AUTOMATIC TRANSAXLE – VALVE BODY ASSEMBLYAX–141
AX
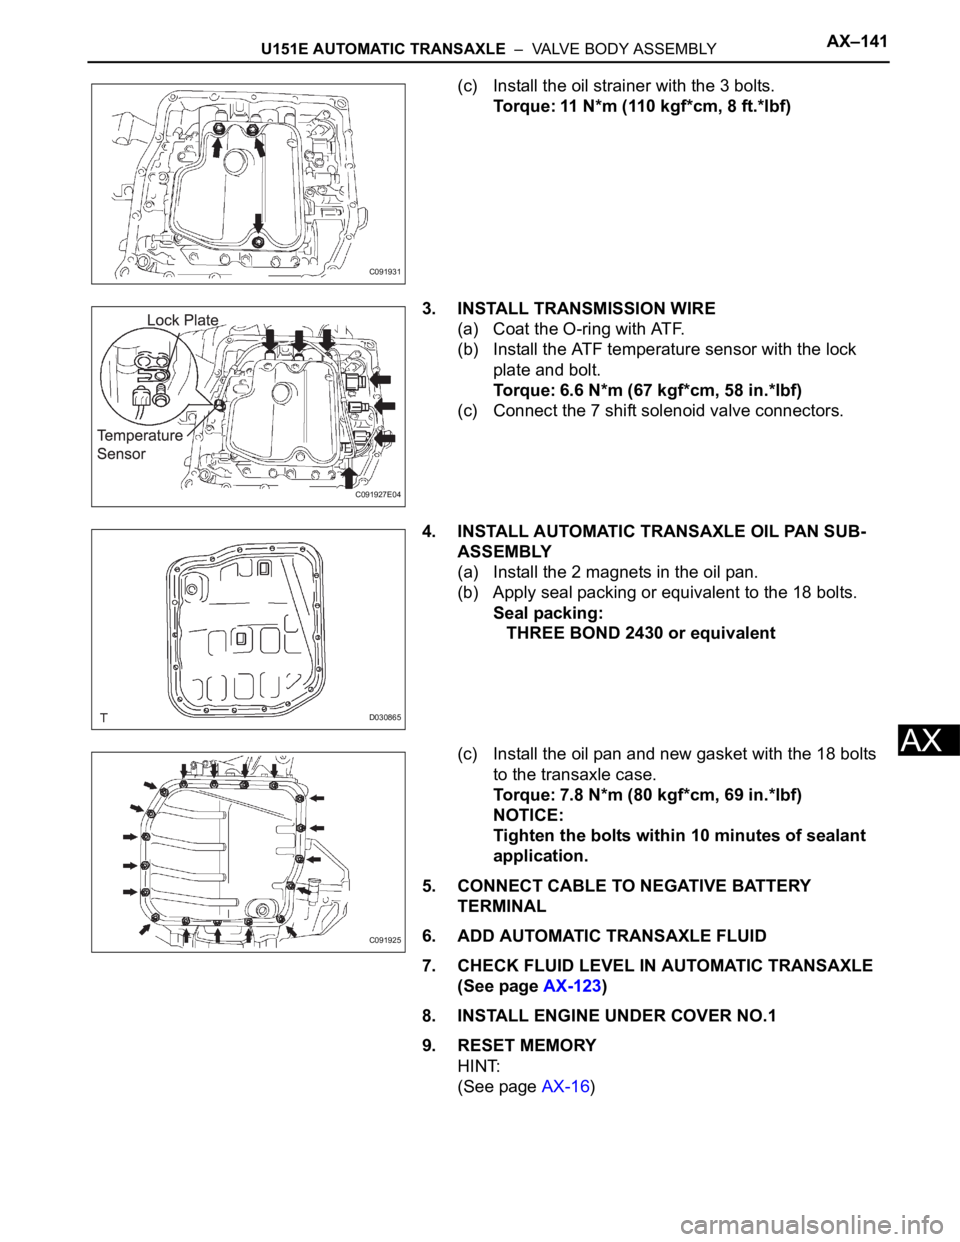
(c) Install the oil strainer with the 3 bolts.
Torque: 11 N*m (110 kgf*cm, 8 ft.*lbf)
3. INSTALL TRANSMISSION WIRE
(a) Coat the O-ring with ATF.
(b) Install the ATF temperature sensor with the lock
plate and bolt.
Torque: 6.6 N*m (67 kgf*cm, 58 in.*lbf)
(c) Connect the 7 shift solenoid valve connectors.
4. INSTALL AUTOMATIC TRANSAXLE OIL PAN SUB-
ASSEMBLY
(a) Install the 2 magnets in the oil pan.
(b) Apply seal packing or equivalent to the 18 bolts.
Seal packing:
THREE BOND 2430 or equivalent
(c) Install the oil pan and new gasket with the 18 bolts
to the transaxle case.
Torque: 7.8 N*m (80 kgf*cm, 69 in.*lbf)
NOTICE:
Tighten the bolts within 10 minutes of sealant
application.
5. CONNECT CABLE TO NEGATIVE BATTERY
TERMINAL
6. ADD AUTOMATIC TRANSAXLE FLUID
7. CHECK FLUID LEVEL IN AUTOMATIC TRANSAXLE
(See page AX-123)
8. INSTALL ENGINE UNDER COVER NO.1
9. RESET MEMORY
HINT:
(See page AX-16)
C091931
C091927E04
D030865
C091925
Page 1558 of 3000
U151E AUTOMATIC TRANSAXLE – AUTOMATIC TRANSAXLE UNITAX–179
AX
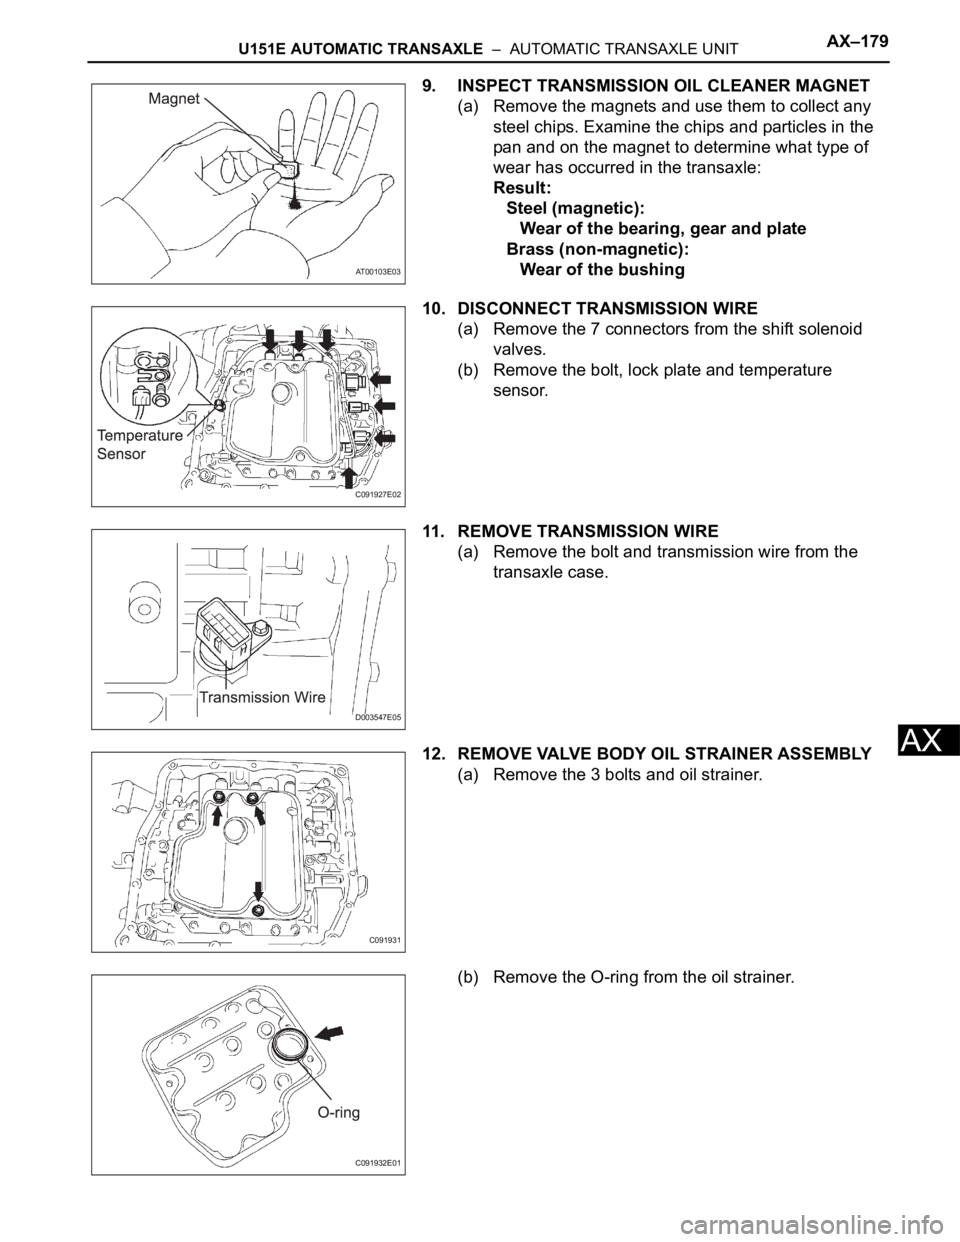
9. INSPECT TRANSMISSION OIL CLEANER MAGNET
(a) Remove the magnets and use them to collect any
steel chips. Examine the chips and particles in the
pan and on the magnet to determine what type of
wear has occurred in the transaxle:
Result:
Steel (magnetic):
Wear of the bearing, gear and plate
Brass (non-magnetic):
Wear of the bushing
10. DISCONNECT TRANSMISSION WIRE
(a) Remove the 7 connectors from the shift solenoid
valves.
(b) Remove the bolt, lock plate and temperature
sensor.
11. REMOVE TRANSMISSION WIRE
(a) Remove the bolt and transmission wire from the
transaxle case.
12. REMOVE VALVE BODY OIL STRAINER ASSEMBLY
(a) Remove the 3 bolts and oil strainer.
(b) Remove the O-ring from the oil strainer.
AT00103E03
C091927E02
D003547E05
C091931
C091932E01
Page 1613 of 3000

U151E AUTOMATIC TRANSAXLE – AUTOMATIC TRANSAXLE UNITAX–227
AX
64. INSTALL TRANSAXLE CASE 2ND BRAKE GASKET
(a) Coat a new transaxle case 2nd brake gasket with
ATF, and install it to the transaxle case.
NOTICE:
Be sure not to damage the lip of the transaxle
case brake gasket when inserting the gasket to
the case. Apply sufficient ATF to the gasket
before installation. Be careful about the
direction of parts.
65. INSTALL GOVERNOR APPLY GASKET NO.1
(a) Coat a new governor apply gasket No.1 with ATF,
and install it to the transaxle case.
NOTICE:
Be sure not to damage the lip of the transaxle
case brake gasket when inserting the gasket to
the case. Apply sufficient ATF to the gasket
before installation. Be careful about the
direction of parts.
66. INSTALL TRANSMISSION WIRE
(a) Coat a new O-ring with ATF, and install it to the
transmission wire.
NOTICE:
Make sure that the O-ring is not twisted,
protruded, or pinched when installing the wire
transmission to the transaxle case. Apply
sufficient ATF to the O-ring before installation.
(b) Install the transmission wire retaining bolt.
Torque: 5.4 N*m (55 kgf*cm, 48 in.*lbf)
67. CONNECT TRANSMISSION WIRE
(a) Coat an O-ring of the ATF temperature sensor with
AT F.
(b) Install the ATF temperature sensor with the lock
plate and bolt.
Torque: 6.6 N*m (67 kgf*cm, 58 in.*lbf)
(c) Connect the 7 solenoid connectors.
NOTICE:
• Connect the connectors A, B, C, D, E, F, G, in
the order from shortest to longest.
• Apply ATF to the bolt.
C083128
C083127
D003636E01
D003547E06
C091927E05
Page 1623 of 3000
U151E AUTOMATIC TRANSAXLE – AUTOMATIC TRANSAXLE UNITAX–179
AX
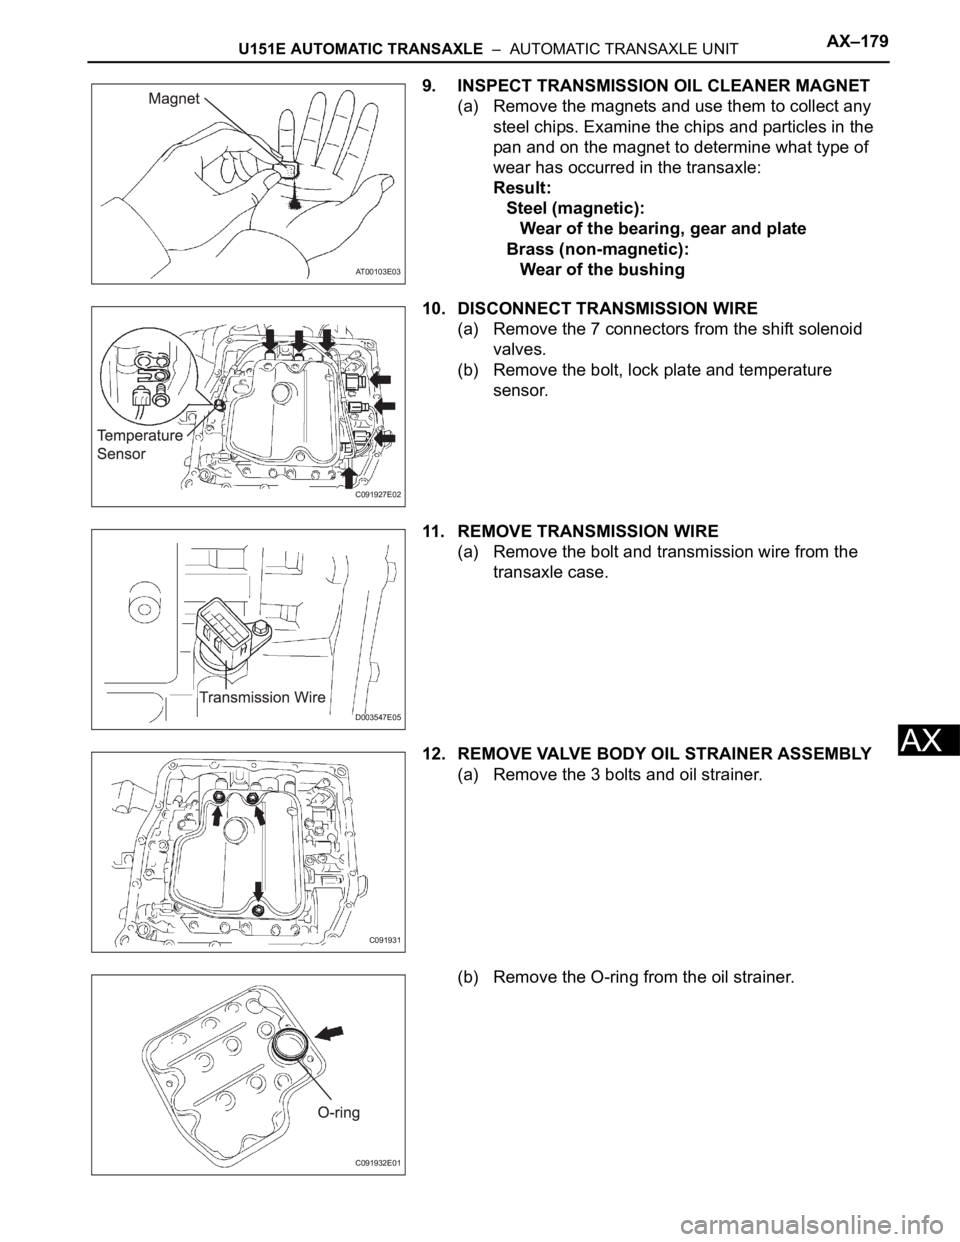
9. INSPECT TRANSMISSION OIL CLEANER MAGNET
(a) Remove the magnets and use them to collect any
steel chips. Examine the chips and particles in the
pan and on the magnet to determine what type of
wear has occurred in the transaxle:
Result:
Steel (magnetic):
Wear of the bearing, gear and plate
Brass (non-magnetic):
Wear of the bushing
10. DISCONNECT TRANSMISSION WIRE
(a) Remove the 7 connectors from the shift solenoid
valves.
(b) Remove the bolt, lock plate and temperature
sensor.
11. REMOVE TRANSMISSION WIRE
(a) Remove the bolt and transmission wire from the
transaxle case.
12. REMOVE VALVE BODY OIL STRAINER ASSEMBLY
(a) Remove the 3 bolts and oil strainer.
(b) Remove the O-ring from the oil strainer.
AT00103E03
C091927E02
D003547E05
C091931
C091932E01
Page 1699 of 3000
AX–16U151F AUTOMATIC TRANSAXLE – AUTOMATIC TRANSAXLE SYSTEM
AX
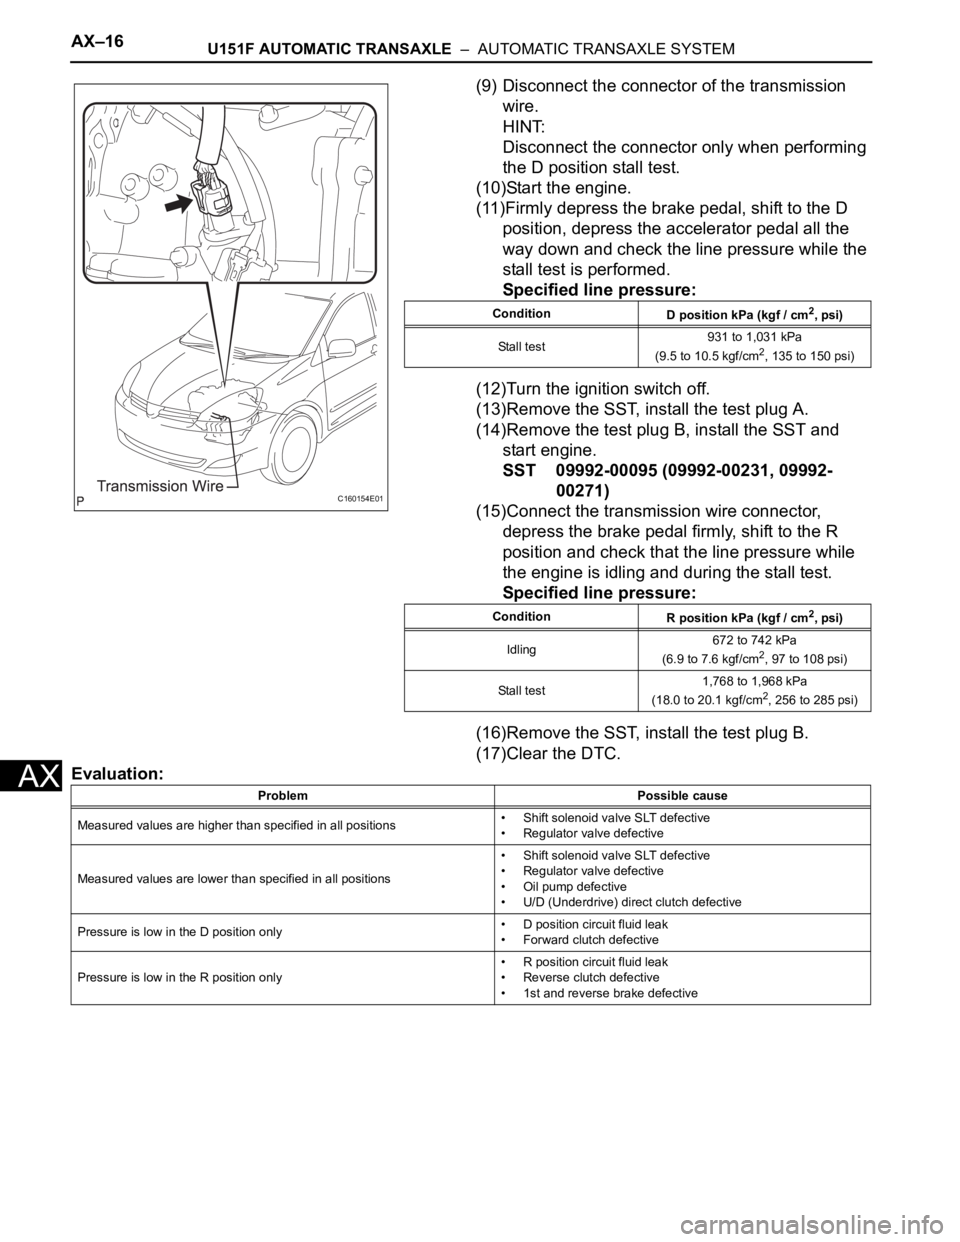
(9) Disconnect the connector of the transmission
wire.
HINT:
Disconnect the connector only when performing
the D position stall test.
(10)Start the engine.
(11)Firmly depress the brake pedal, shift to the D
position, depress the accelerator pedal all the
way down and check the line pressure while the
stall test is performed.
Specified line pressure:
(12)Turn the ignition switch off.
(13)Remove the SST, install the test plug A.
(14)Remove the test plug B, install the SST and
start engine.
SST 09992-00095 (09992-00231, 09992-
00271)
(15)Connect the transmission wire connector,
depress the brake pedal firmly, shift to the R
position and check that the line pressure while
the engine is idling and during the stall test.
Specified line pressure:
(16)Remove the SST, install the test plug B.
(17)Clear the DTC.
Evaluation:
C160154E01
Condition
D position kPa (kgf / cm2, psi)
Stall test931 to 1,031 kPa
(9.5 to 10.5 kgf/cm
2, 135 to 150 psi)
Condition
R position kPa (kgf / cm
2, psi)
Idling672 to 742 kPa
(6.9 to 7.6 kgf/cm
2, 97 to 108 psi)
Stall test1,768 to 1,968 kPa
(18.0 to 20.1 kgf/cm
2, 256 to 285 psi)
Problem Possible cause
Measured values are higher than specified in all positions• Shift solenoid valve SLT defective
• Regulator valve defective
Measured values are lower than specified in all positions• Shift solenoid valve SLT defective
• Regulator valve defective
• Oil pump defective
• U/D (Underdrive) direct clutch defective
Pressure is low in the D position only• D position circuit fluid leak
• Forward clutch defective
Pressure is low in the R position only• R position circuit fluid leak
• Reverse clutch defective
• 1st and reverse brake defective
Page 1714 of 3000
AX–42U151F AUTOMATIC TRANSAXLE – AUTOMATIC TRANSAXLE SYSTEM
AX
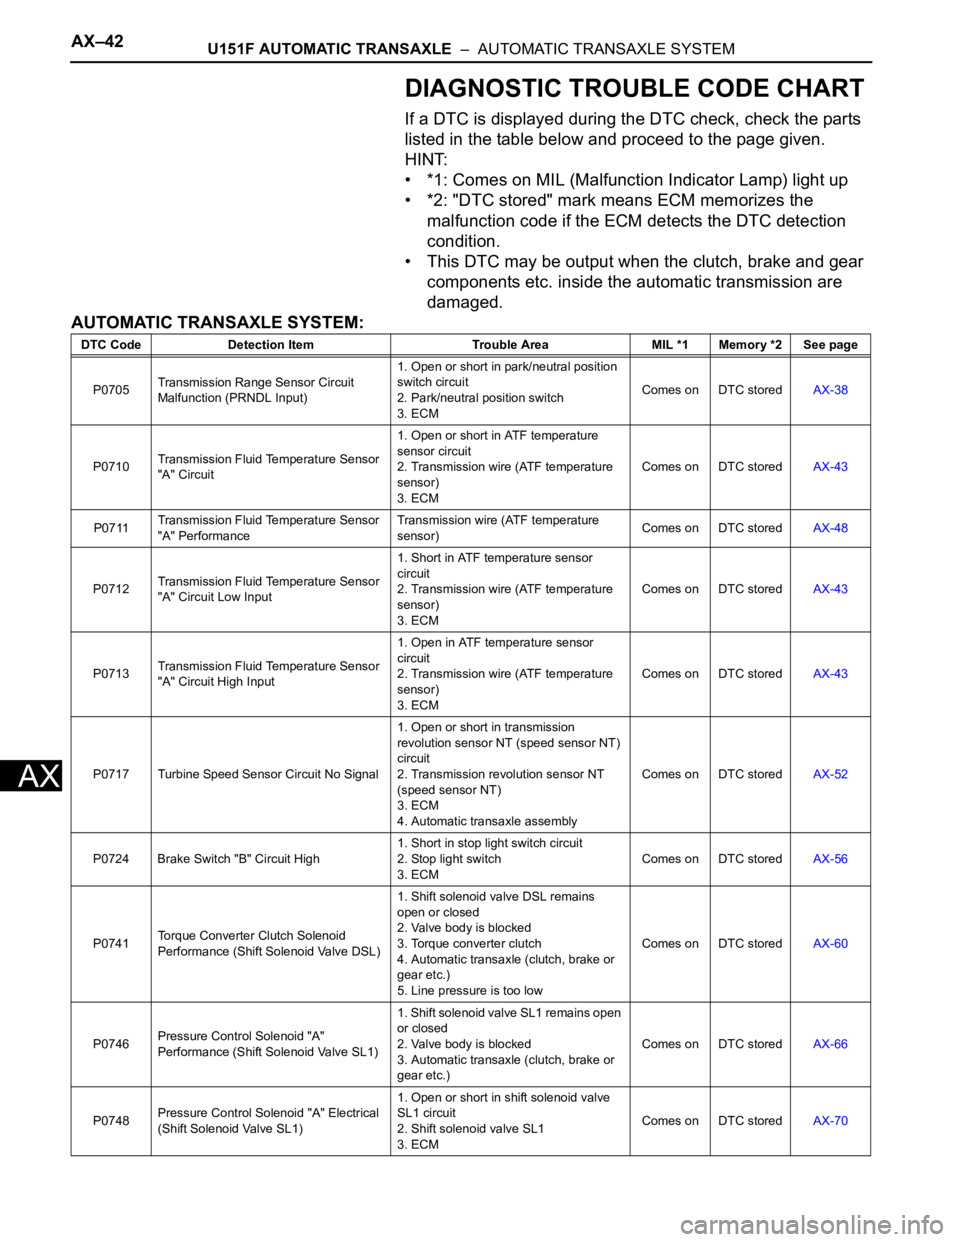
DIAGNOSTIC TROUBLE CODE CHART
If a DTC is displayed during the DTC check, check the parts
listed in the table below and proceed to the page given.
HINT:
• *1: Comes on MIL (Malfunction Indicator Lamp) light up
• *2: "DTC stored" mark means ECM memorizes the
malfunction code if the ECM detects the DTC detection
condition.
• This DTC may be output when the clutch, brake and gear
components etc. inside the automatic transmission are
damaged.
AUTOMATIC TRANSAXLE SYSTEM:
DTC Code Detection Item Trouble Area MIL *1 Memory *2 See page
P0705Transmission Range Sensor Circuit
Malfunction (PRNDL Input)1. Open or short in park/neutral position
switch circuit
2. Park/neutral position switch
3. ECMComes on DTC storedAX-38
P0710Transmission Fluid Temperature Sensor
"A" Circuit1. Open or short in ATF temperature
sensor circuit
2. Transmission wire (ATF temperature
sensor)
3. ECMComes on DTC storedAX-43
P0711Transmission Fluid Temperature Sensor
"A" PerformanceTransmission wire (ATF temperature
sensor)Comes on DTC storedAX-48
P0712Transmission Fluid Temperature Sensor
"A" Circuit Low Input1. Short in ATF temperature sensor
circuit
2. Transmission wire (ATF temperature
sensor)
3. ECMComes on DTC storedAX-43
P0713Transmission Fluid Temperature Sensor
"A" Circuit High Input1. Open in ATF temperature sensor
circuit
2. Transmission wire (ATF temperature
sensor)
3. ECMComes on DTC storedAX-43
P0717 Turbine Speed Sensor Circuit No Signal1. Open or short in transmission
revolution sensor NT (speed sensor NT)
circuit
2. Transmission revolution sensor NT
(speed sensor NT)
3. ECM
4. Automatic transaxle assemblyComes on DTC storedAX-52
P0724 Brake Switch "B" Circuit High1. Short in stop light switch circuit
2. Stop light switch
3. ECMComes on DTC storedAX-56
P0741Torque Converter Clutch Solenoid
Performance (Shift Solenoid Valve DSL)1. Shift solenoid valve DSL remains
open or closed
2. Valve body is blocked
3. Torque converter clutch
4. Automatic transaxle (clutch, brake or
gear etc.)
5. Line pressure is too lowComes on DTC storedAX-60
P0746Pressure Control Solenoid "A"
Performance (Shift Solenoid Valve SL1)1. Shift solenoid valve SL1 remains open
or closed
2. Valve body is blocked
3. Automatic transaxle (clutch, brake or
gear etc.)Comes on DTC storedAX-66
P0748Pressure Control Solenoid "A" Electrical
(Shift Solenoid Valve SL1)1. Open or short in shift solenoid valve
SL1 circuit
2. Shift solenoid valve SL1
3. ECMComes on DTC storedAX-70
Page 1743 of 3000

U151F AUTOMATIC TRANSAXLE – AUTOMATIC TRANSAXLE SYSTEMAX–71
AX
(a) Connect the transmission wire connector.
(b) Disconnect the ECM connector.
(c) Measure the resistance according to the value(s) in the
table below.
Standard resistance
NG
OK
(a) Remove the shift solenoid valve DSL.
(b) Measure the resistance according to the value(s) in the
table below.
Standard resistance
(c) Connect the positive (+) lead to the terminal of the
solenoid connector, and the negative (-) lead to the
solenoid body.
OK:
The solenoid valve makes an operating sound.
NG
OK
OK:
The connectors and pins are securely installed.
There is no open or short on the wire harness.
NG
OK
3CHECK HARNESS AND CONNECTOR (TRANSMISSION WIRE - ECM)
C152056E03
Tester ConnectionSpecified Condition
20C (68F)
E10-11 (DSL) - Body ground 11 to 13
REPAIR OR REPLACE HARNESS OR
CONNECTOR
4INSPECT SHIFT SOLENOID VALVE DSL
C113970E08
Tester ConnectionSpecified Condition
20C (68F)
Solenoid Connector (DSL) - Solenoid
Body (DSL)11 to 13
REPLACE SHIFT SOLENOID VALVE DSL
5CHECK TRANSMISSION WIRE
REPAIR OR REPLACE TRANSMISSION
WIRE
Page 1751 of 3000

U151F AUTOMATIC TRANSAXLE – AUTOMATIC TRANSAXLE SYSTEMAX–79
AX
(a) Connect the transmission wire connector to the
transaxle.
(b) Disconnect the connector from the ECM.
(c) Measure the resistance according to the value(s) in the
table below.
Standard resistance
(d) Measure the resistance according to the value(s) in the
table below.
Standard resistance (Check for short)
NG
OK
(a) Remove the shift solenoid valve SL1.
(b) Measure the resistance according to the value(s) in the
table below.
Standard resistance
(c) Connect the positive (+) lead with a 21 W bulb to
terminal 2 and the negative (-) lead to terminal 1 of the
solenoid valve connector, then check the movement of
the valve.
OK:
The solenoid makes an operating sound.
NG
2CHECK HARNESS AND CONNECTOR (TRANSMISSION WIRE - ECM)
C152056E04
Tester ConnectionSpecified Condition
20C (68F)
E10-19 (SL1+) - E10-18 (SL1-) 5.0 to 5.6
Tester Connection Specified Condition
E10-19 (SL1+) - Body ground
10 k
or higher
E10-18 (SL1-) - Body ground
REPAIR OR REPLACE HARNESS OR
CONNECTOR
REPLACE ECM
3INSPECT SHIFT SOLENOID VALVE SL1
G020767E79
Tester ConnectionSpecified Condition
20C (68F)
1 - 2 5.0 to 5.6
REPLACE SHIFT SOLENOID VALVE SL1
Page 1768 of 3000

AX–96U151F AUTOMATIC TRANSAXLE – AUTOMATIC TRANSAXLE SYSTEM
AX
(a) Connect the transmission wire connector to the
transaxle.
(b) Disconnect the connector from the ECM.
(c) Measure the resistance according to the value(s) in the
table below.
Standard resistance
(d) Measure the resistance according to the value(s) in the
table below.
OK:
Standard resistance (Check for short)
NG
OK
(a) Remove the shift solenoid valve SL2.
(b) Measure the resistance according to the value(s) in the
table below.
Standard resistance
(c) Connect the positive (+) lead with a 21 W bulb to
terminal 2 and the negative (-) lead to terminal 1 of the
solenoid valve connector, then check the movement of
the valve.
OK:
The solenoid makes an operating sound.
NG
2CHECK HARNESS AND CONNECTOR (TRANSMISSION WIRE - ECM)
C160512E02
Tester ConnectionSpecified Condition
20C (68F)
E10-15 (SL2+) - E10-14 (SL2-) 5.0 to 5.6
Tester Connection Specified Condition
E10-15 (SL2+) - Body ground
10 k
or higher
E10-14 (SL2-) - Body ground
REPAIR OR REPLACE HARNESS OR
CONNECTOR
REPLACE ECM
3INSPECT SHIFT SOLENOID VALVE SL2
G020767E80
Tester ConnectionSpecified Condition
20C (68F)
1 - 2 5.0 to 5.6
REPLACE SHIFT SOLENOID VALVE SL2