oil pressure TOYOTA SIENNA 2007 Service Workshop Manual
[x] Cancel search | Manufacturer: TOYOTA, Model Year: 2007, Model line: SIENNA, Model: TOYOTA SIENNA 2007Pages: 3000, PDF Size: 52.26 MB
Page 1503 of 3000
AX–16U151E AUTOMATIC TRANSAXLE – AUTOMATIC TRANSAXLE SYSTEM
AX
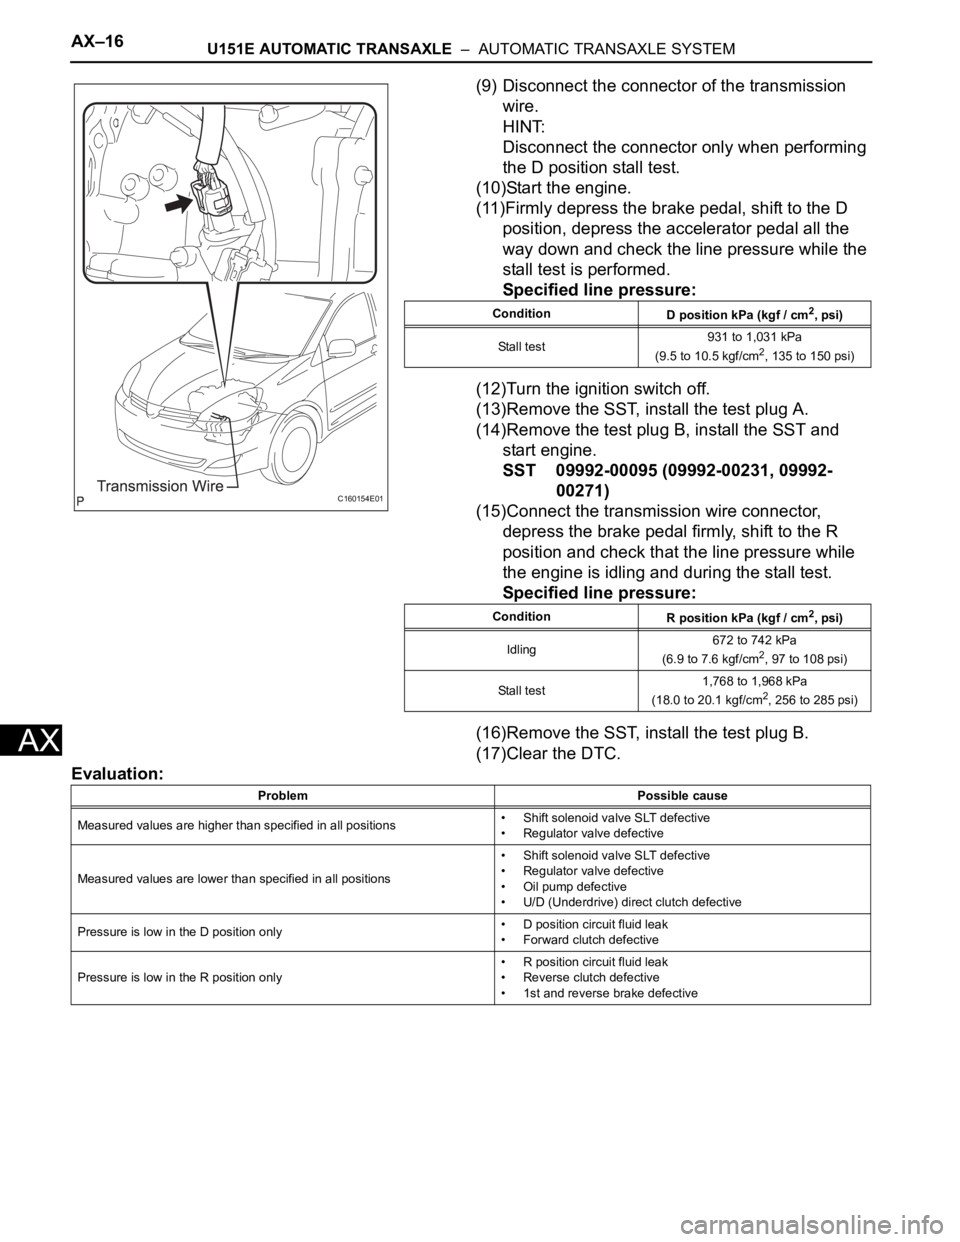
(9) Disconnect the connector of the transmission
wire.
HINT:
Disconnect the connector only when performing
the D position stall test.
(10)Start the engine.
(11)Firmly depress the brake pedal, shift to the D
position, depress the accelerator pedal all the
way down and check the line pressure while the
stall test is performed.
Specified line pressure:
(12)Turn the ignition switch off.
(13)Remove the SST, install the test plug A.
(14)Remove the test plug B, install the SST and
start engine.
SST 09992-00095 (09992-00231, 09992-
00271)
(15)Connect the transmission wire connector,
depress the brake pedal firmly, shift to the R
position and check that the line pressure while
the engine is idling and during the stall test.
Specified line pressure:
(16)Remove the SST, install the test plug B.
(17)Clear the DTC.
Evaluation:
C160154E01
Condition
D position kPa (kgf / cm2, psi)
Stall test931 to 1,031 kPa
(9.5 to 10.5 kgf/cm
2, 135 to 150 psi)
Condition
R position kPa (kgf / cm
2, psi)
Idling672 to 742 kPa
(6.9 to 7.6 kgf/cm
2, 97 to 108 psi)
Stall test1,768 to 1,968 kPa
(18.0 to 20.1 kgf/cm
2, 256 to 285 psi)
Problem Possible cause
Measured values are higher than specified in all positions• Shift solenoid valve SLT defective
• Regulator valve defective
Measured values are lower than specified in all positions• Shift solenoid valve SLT defective
• Regulator valve defective
• Oil pump defective
• U/D (Underdrive) direct clutch defective
Pressure is low in the D position only• D position circuit fluid leak
• Forward clutch defective
Pressure is low in the R position only• R position circuit fluid leak
• Reverse clutch defective
• 1st and reverse brake defective
Page 1589 of 3000
U151E AUTOMATIC TRANSAXLE – AUTOMATIC TRANSAXLE UNITAX–203
AX
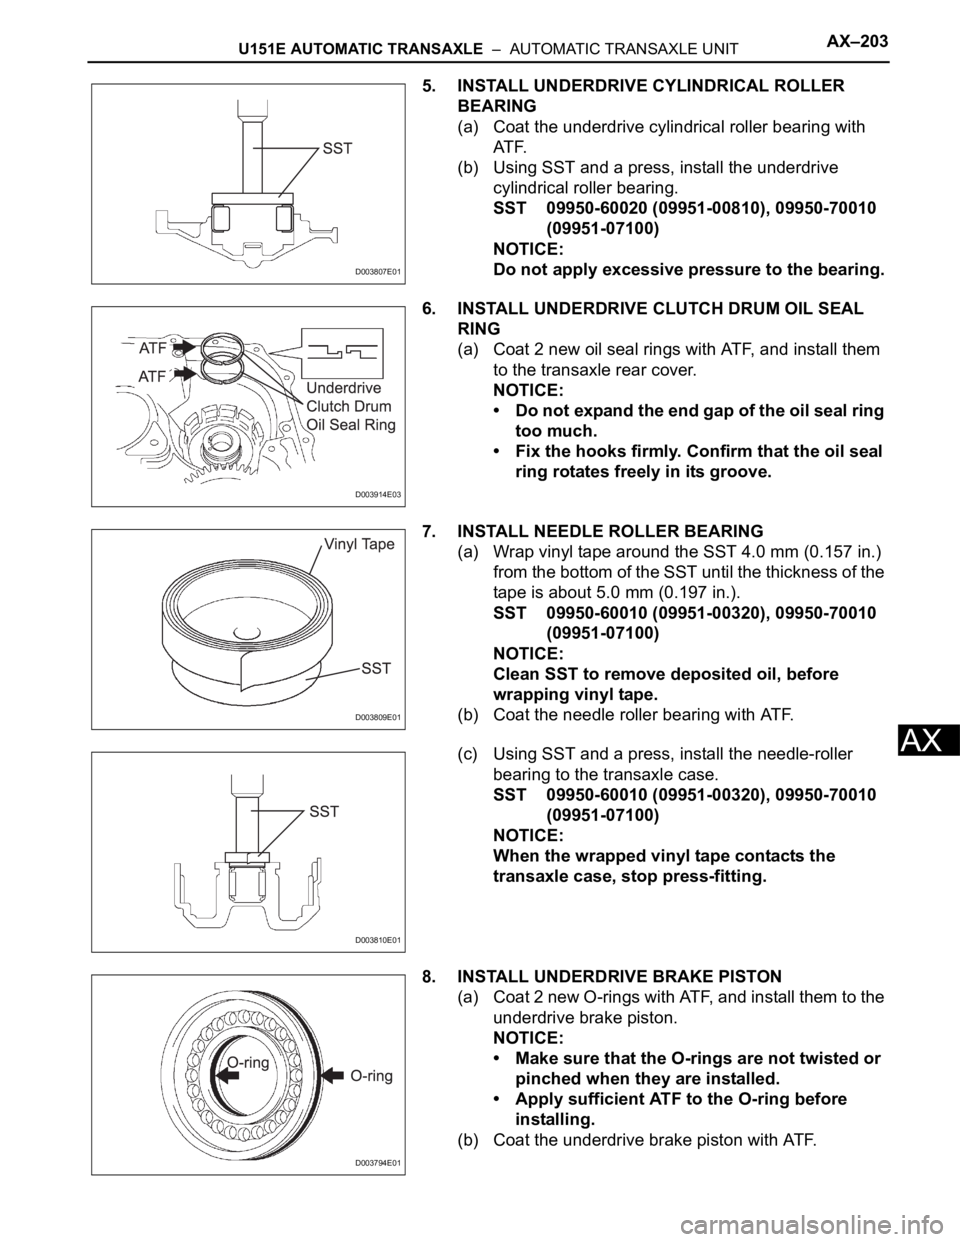
5. INSTALL UNDERDRIVE CYLINDRICAL ROLLER
BEARING
(a) Coat the underdrive cylindrical roller bearing with
AT F.
(b) Using SST and a press, install the underdrive
cylindrical roller bearing.
SST 09950-60020 (09951-00810), 09950-70010
(09951-07100)
NOTICE:
Do not apply excessive pressure to the bearing.
6. INSTALL UNDERDRIVE CLUTCH DRUM OIL SEAL
RING
(a) Coat 2 new oil seal rings with ATF, and install them
to the transaxle rear cover.
NOTICE:
• Do not expand the end gap of the oil seal ring
too much.
• Fix the hooks firmly. Confirm that the oil seal
ring rotates freely in its groove.
7. INSTALL NEEDLE ROLLER BEARING
(a) Wrap vinyl tape around the SST 4.0 mm (0.157 in.)
from the bottom of the SST until the thickness of the
tape is about 5.0 mm (0.197 in.).
SST 09950-60010 (09951-00320), 09950-70010
(09951-07100)
NOTICE:
Clean SST to remove deposited oil, before
wrapping vinyl tape.
(b) Coat the needle roller bearing with ATF.
(c) Using SST and a press, install the needle-roller
bearing to the transaxle case.
SST 09950-60010 (09951-00320), 09950-70010
(09951-07100)
NOTICE:
When the wrapped vinyl tape contacts the
transaxle case, stop press-fitting.
8. INSTALL UNDERDRIVE BRAKE PISTON
(a) Coat 2 new O-rings with ATF, and install them to the
underdrive brake piston.
NOTICE:
• Make sure that the O-rings are not twisted or
pinched when they are installed.
• Apply sufficient ATF to the O-ring before
installing.
(b) Coat the underdrive brake piston with ATF.
D003807E01
D003914E03
D003809E01
D003810E01
D003794E01
Page 1699 of 3000
AX–16U151F AUTOMATIC TRANSAXLE – AUTOMATIC TRANSAXLE SYSTEM
AX
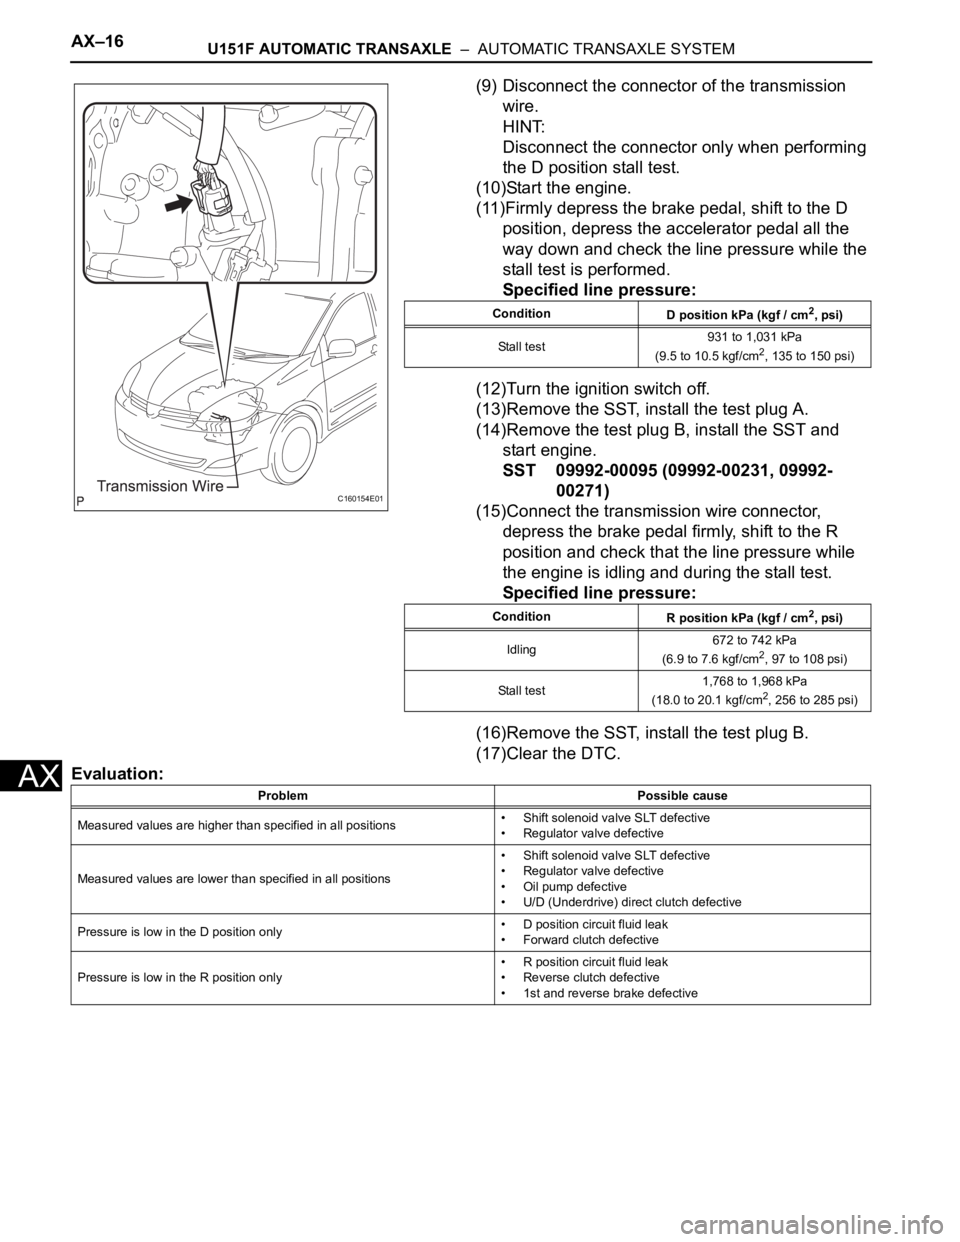
(9) Disconnect the connector of the transmission
wire.
HINT:
Disconnect the connector only when performing
the D position stall test.
(10)Start the engine.
(11)Firmly depress the brake pedal, shift to the D
position, depress the accelerator pedal all the
way down and check the line pressure while the
stall test is performed.
Specified line pressure:
(12)Turn the ignition switch off.
(13)Remove the SST, install the test plug A.
(14)Remove the test plug B, install the SST and
start engine.
SST 09992-00095 (09992-00231, 09992-
00271)
(15)Connect the transmission wire connector,
depress the brake pedal firmly, shift to the R
position and check that the line pressure while
the engine is idling and during the stall test.
Specified line pressure:
(16)Remove the SST, install the test plug B.
(17)Clear the DTC.
Evaluation:
C160154E01
Condition
D position kPa (kgf / cm2, psi)
Stall test931 to 1,031 kPa
(9.5 to 10.5 kgf/cm
2, 135 to 150 psi)
Condition
R position kPa (kgf / cm
2, psi)
Idling672 to 742 kPa
(6.9 to 7.6 kgf/cm
2, 97 to 108 psi)
Stall test1,768 to 1,968 kPa
(18.0 to 20.1 kgf/cm
2, 256 to 285 psi)
Problem Possible cause
Measured values are higher than specified in all positions• Shift solenoid valve SLT defective
• Regulator valve defective
Measured values are lower than specified in all positions• Shift solenoid valve SLT defective
• Regulator valve defective
• Oil pump defective
• U/D (Underdrive) direct clutch defective
Pressure is low in the D position only• D position circuit fluid leak
• Forward clutch defective
Pressure is low in the R position only• R position circuit fluid leak
• Reverse clutch defective
• 1st and reverse brake defective
Page 1789 of 3000
U151F AUTOMATIC TRANSAXLE – AUTOMATIC TRANSAXLE SYSTEMAX–117
AX
SYSTEM DESCRIPTION
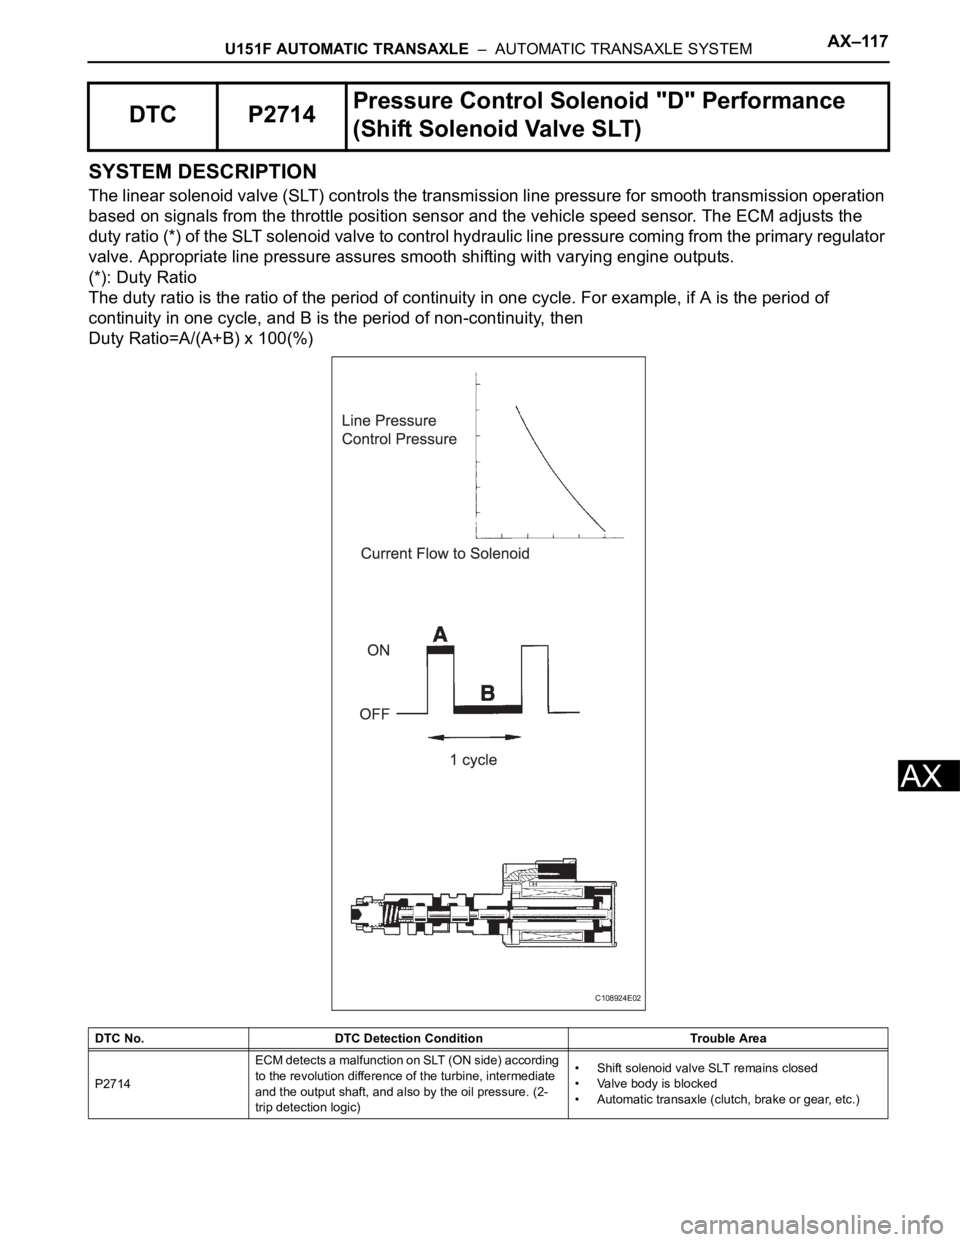
The linear solenoid valve (SLT) controls the transmission line pressure for smooth transmission operation
based on signals from the throttle position sensor and the vehicle speed sensor. The ECM adjusts the
duty ratio (*) of the SLT solenoid valve to control hydraulic line pressure coming from the primary regulator
valve. Appropriate line pressure assures smooth shifting with varying engine outputs.
(*): Duty Ratio
The duty ratio is the ratio of the period of continuity in one cycle. For example, if A is the period of
continuity in one cycle, and B is the period of non-continuity, then
Duty Ratio=A/(A+B) x 100(%)
DTC P2714Pressure Control Solenoid "D" Performance
(Shift Solenoid Valve SLT)
DTC No. DTC Detection Condition Trouble Area
P2714ECM detects a malfunction on SLT (ON side) according
to the revolution difference of the turbine, intermediate
and the output shaft, and also by the oil pressure. (2-
trip detection logic)• Shift solenoid valve SLT remains closed
• Valve body is blocked
• Automatic transaxle (clutch, brake or gear, etc.)
C108924E02
Page 1790 of 3000
AX–118U151F AUTOMATIC TRANSAXLE – AUTOMATIC TRANSAXLE SYSTEM
AX
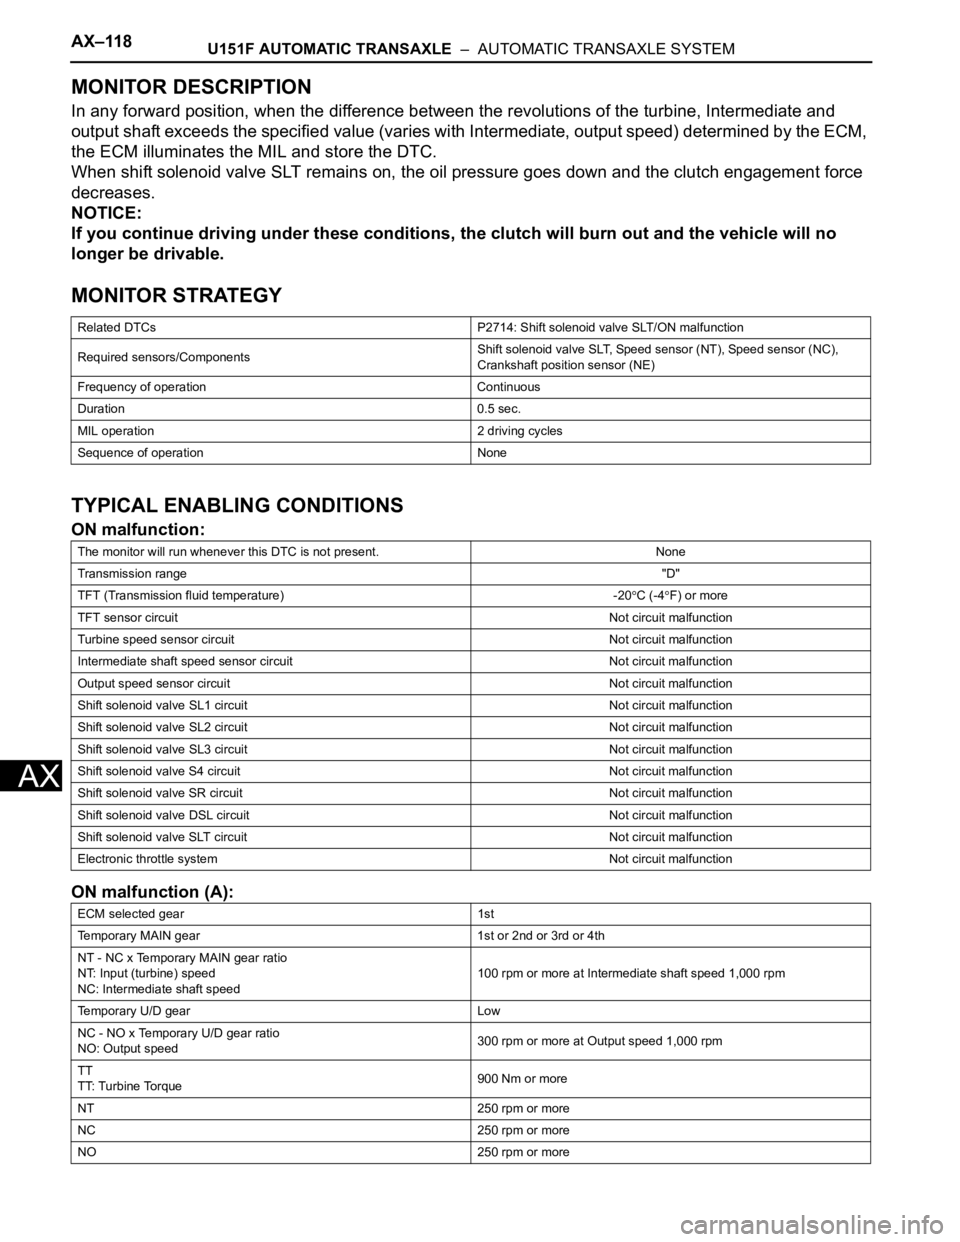
MONITOR DESCRIPTION
In any forward position, when the difference between the revolutions of the turbine, Intermediate and
output shaft exceeds the specified value (varies with Intermediate, output speed) determined by the ECM,
the ECM illuminates the MIL and store the DTC.
When shift solenoid valve SLT remains on, the oil pressure goes down and the clutch engagement force
decreases.
NOTICE:
If you continue driving under these conditions, the clutch will burn out and the vehicle will no
longer be drivable.
MONITOR STRATEGY
TYPICAL ENABLING CONDITIONS
ON malfunction:
ON malfunction (A):
Related DTCs P2714: Shift solenoid valve SLT/ON malfunction
Required sensors/ComponentsShift solenoid valve SLT, Speed sensor (NT), Speed sensor (NC),
Crankshaft position sensor (NE)
Frequency of operation Continuous
Duration 0.5 sec.
MIL operation 2 driving cycles
Sequence of operation None
The monitor will run whenever this DTC is not present. None
Transmission range"D"
TFT (Transmission fluid temperature) -20
C (-4F) or more
TFT sensor circuitNot circuit malfunction
Turbine speed sensor circuit Not circuit malfunction
Intermediate shaft speed sensor circuit Not circuit malfunction
Output speed sensor circuitNot circuit malfunction
Shift solenoid valve SL1 circuit Not circuit malfunction
Shift solenoid valve SL2 circuit Not circuit malfunction
Shift solenoid valve SL3 circuit Not circuit malfunction
Shift solenoid valve S4 circuit Not circuit malfunction
Shift solenoid valve SR circuit Not circuit malfunction
Shift solenoid valve DSL circuit Not circuit malfunction
Shift solenoid valve SLT circuit Not circuit malfunction
Electronic throttle systemNot circuit malfunction
ECM selected gear 1st
Temporary MAIN gear 1st or 2nd or 3rd or 4th
NT - NC x Temporary MAIN gear ratio
NT: Input (turbine) speed
NC: Intermediate shaft speed100 rpm or more at Intermediate shaft speed 1,000 rpm
Temporary U/D gear Low
NC - NO x Temporary U/D gear ratio
NO: Output speed300 rpm or more at Output speed 1,000 rpm
TT
TT: Turbine Torque900 Nm or more
NT 250 rpm or more
NC 250 rpm or more
NO 250 rpm or more
Page 1809 of 3000
AX–16U151F AUTOMATIC TRANSAXLE – AUTOMATIC TRANSAXLE SYSTEM
AX
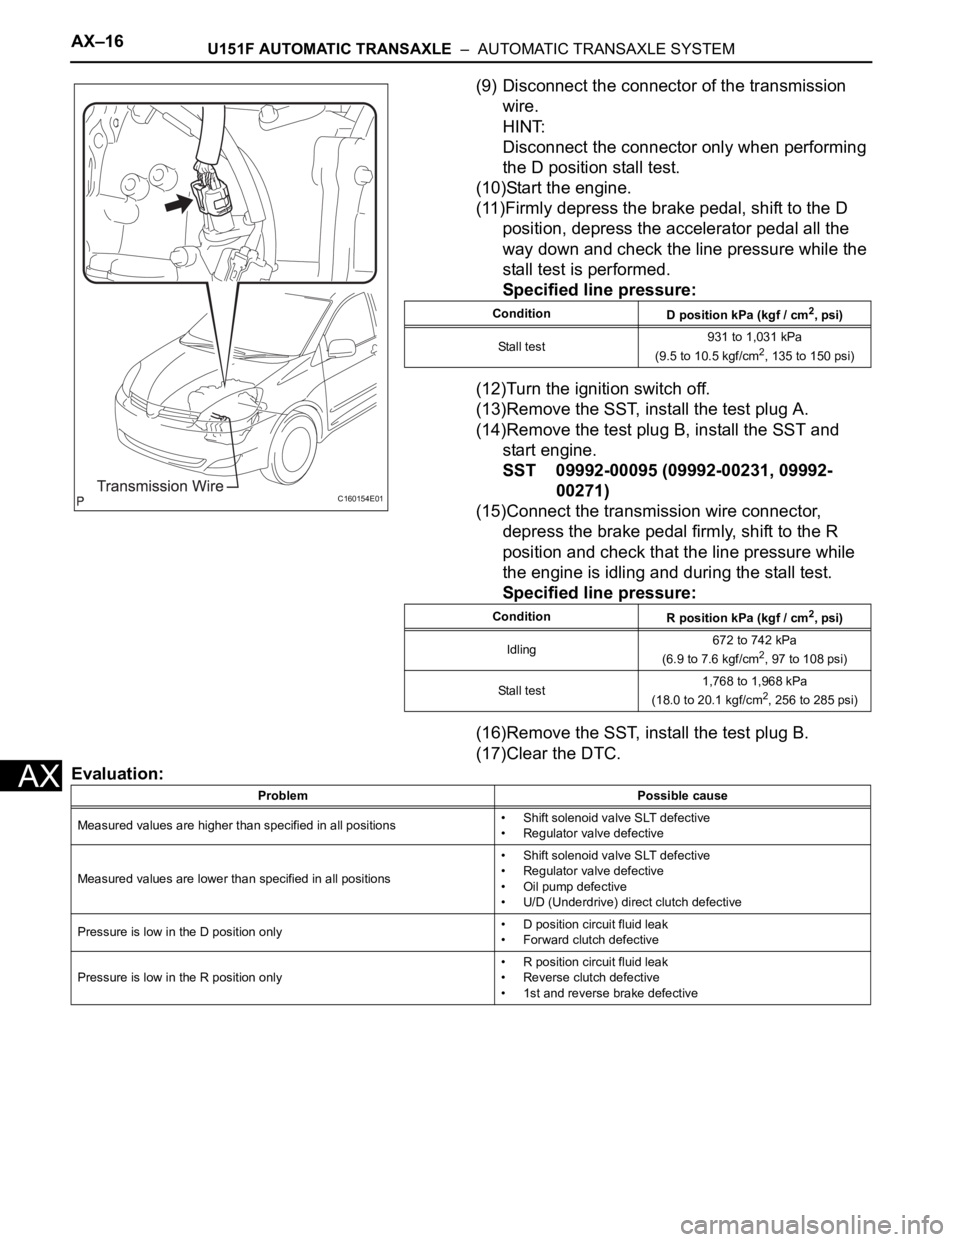
(9) Disconnect the connector of the transmission
wire.
HINT:
Disconnect the connector only when performing
the D position stall test.
(10)Start the engine.
(11)Firmly depress the brake pedal, shift to the D
position, depress the accelerator pedal all the
way down and check the line pressure while the
stall test is performed.
Specified line pressure:
(12)Turn the ignition switch off.
(13)Remove the SST, install the test plug A.
(14)Remove the test plug B, install the SST and
start engine.
SST 09992-00095 (09992-00231, 09992-
00271)
(15)Connect the transmission wire connector,
depress the brake pedal firmly, shift to the R
position and check that the line pressure while
the engine is idling and during the stall test.
Specified line pressure:
(16)Remove the SST, install the test plug B.
(17)Clear the DTC.
Evaluation:
C160154E01
Condition
D position kPa (kgf / cm2, psi)
Stall test931 to 1,031 kPa
(9.5 to 10.5 kgf/cm
2, 135 to 150 psi)
Condition
R position kPa (kgf / cm
2, psi)
Idling672 to 742 kPa
(6.9 to 7.6 kgf/cm
2, 97 to 108 psi)
Stall test1,768 to 1,968 kPa
(18.0 to 20.1 kgf/cm
2, 256 to 285 psi)
Problem Possible cause
Measured values are higher than specified in all positions• Shift solenoid valve SLT defective
• Regulator valve defective
Measured values are lower than specified in all positions• Shift solenoid valve SLT defective
• Regulator valve defective
• Oil pump defective
• U/D (Underdrive) direct clutch defective
Pressure is low in the D position only• D position circuit fluid leak
• Forward clutch defective
Pressure is low in the R position only• R position circuit fluid leak
• Reverse clutch defective
• 1st and reverse brake defective
Page 1890 of 3000
U151F AUTOMATIC TRANSAXLE – AUTOMATIC TRANSAXLE UNITAX–207
AX
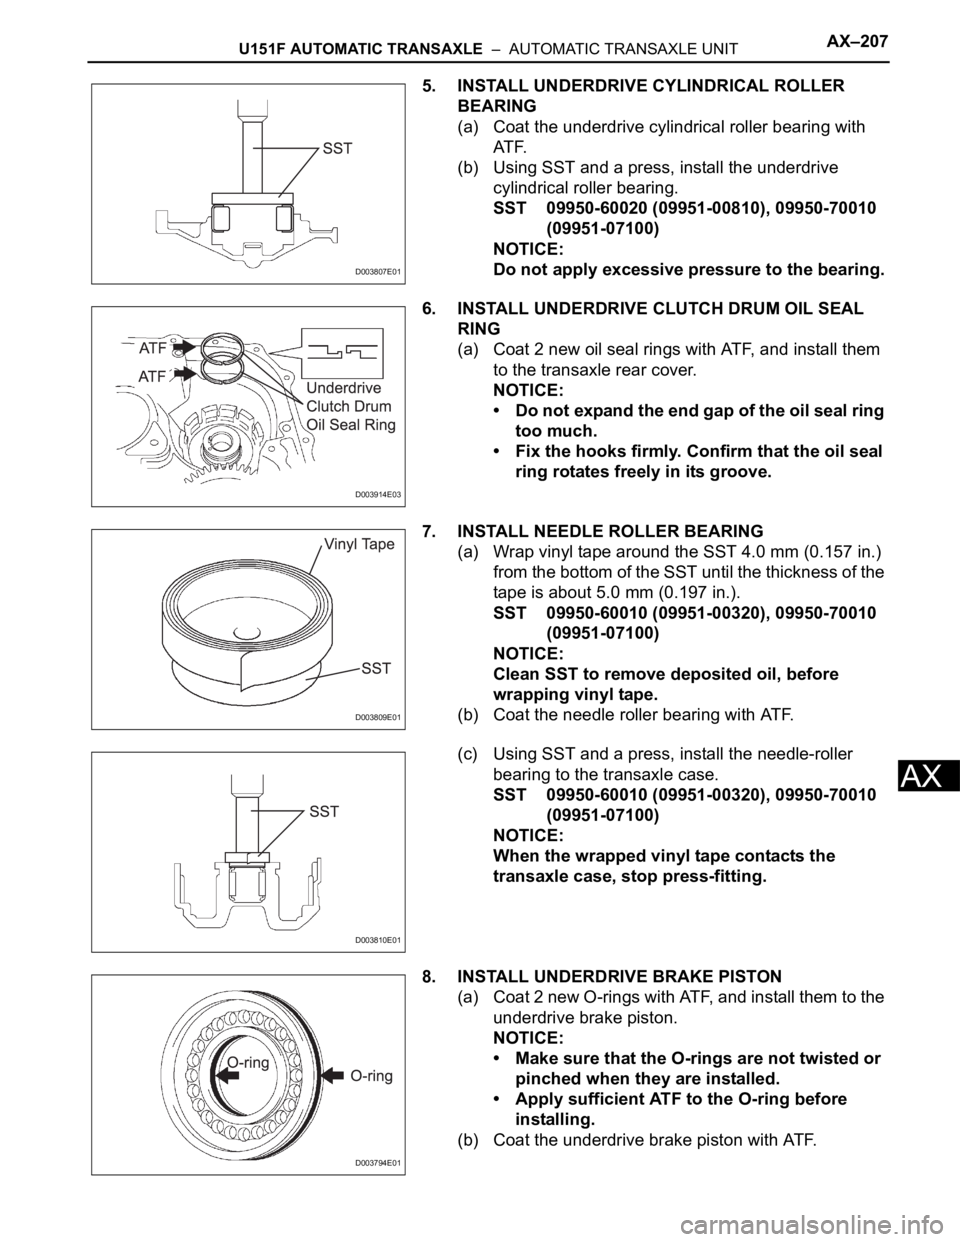
5. INSTALL UNDERDRIVE CYLINDRICAL ROLLER
BEARING
(a) Coat the underdrive cylindrical roller bearing with
AT F.
(b) Using SST and a press, install the underdrive
cylindrical roller bearing.
SST 09950-60020 (09951-00810), 09950-70010
(09951-07100)
NOTICE:
Do not apply excessive pressure to the bearing.
6. INSTALL UNDERDRIVE CLUTCH DRUM OIL SEAL
RING
(a) Coat 2 new oil seal rings with ATF, and install them
to the transaxle rear cover.
NOTICE:
• Do not expand the end gap of the oil seal ring
too much.
• Fix the hooks firmly. Confirm that the oil seal
ring rotates freely in its groove.
7. INSTALL NEEDLE ROLLER BEARING
(a) Wrap vinyl tape around the SST 4.0 mm (0.157 in.)
from the bottom of the SST until the thickness of the
tape is about 5.0 mm (0.197 in.).
SST 09950-60010 (09951-00320), 09950-70010
(09951-07100)
NOTICE:
Clean SST to remove deposited oil, before
wrapping vinyl tape.
(b) Coat the needle roller bearing with ATF.
(c) Using SST and a press, install the needle-roller
bearing to the transaxle case.
SST 09950-60010 (09951-00320), 09950-70010
(09951-07100)
NOTICE:
When the wrapped vinyl tape contacts the
transaxle case, stop press-fitting.
8. INSTALL UNDERDRIVE BRAKE PISTON
(a) Coat 2 new O-rings with ATF, and install them to the
underdrive brake piston.
NOTICE:
• Make sure that the O-rings are not twisted or
pinched when they are installed.
• Apply sufficient ATF to the O-ring before
installing.
(b) Coat the underdrive brake piston with ATF.
D003807E01
D003914E03
D003809E01
D003810E01
D003794E01
Page 2337 of 3000

TIRE AND WHEEL – TIRE PRESSURE WARNING VALVE AND TRANSMITTERTW–85
TW
(b) Install the washer on the tire pressure warning valve
and transmitter from the rim side and tighten the
nut.
Torque: 4.0 N*m (41 kgf*cm, 35 in.*lbf)
NOTICE:
• No further tightening is required once the nut
is tightened to the specified torque.
• Check that there is no foreign matter on the
washer and nut.
• If replacing the tire pressure warning valve
and transmitter, make sure that the new
grommet, washer, and nut are used.
• Check that there is no oil, water, or lubricant
around the rim hole, tire pressure warning
valve and transmitter, washer, and nut.
Failing to do so may result in improper
installation.
(c) Set the wheel disc to the mounting machine and
install the lower tire bead. Position the main body of
the tire pressure warning valve and transmitter in
the shaded area shown in the illustration.
NOTICE:
• If the tire pressure warning valve and
transmitter is positioned outside this area, it
will be interfered with the tire bead, and may
cause damage to the tire pressure warning
valve and transmitter.
• If the use of lubricant is required when
installing the bead, do not apply the lubricant
directly to the tire pressure warning valve and
transmitter.
(d) Install the upper bead.
NOTICE:
Make sure that the tire bead and tool do not
interfere with the main body of the tire pressure
warning valve and transmitter and that it is not
clamped by the bead.
(e) After the tire is inflated, the valve nut may be loose.
Retighten the nut to the specified torque and then
check for air leaks with soapy water.
Torque: 4.0 N*m (41 kgf*cm, 35 in.*lbf)
NOTICE:
No further tightening is required once the nut is
tightened to the specified torque.
2. INSTALL FRONT WHEEL
Torque: 103 N*m (1050 kgf*cm, 76 ft.*lbf)
3. INSTALL REAR WHEEL
Torque: 103 N*m (1050 kgf*cm, 76 ft.*lbf)
4. INSPECT TIRES
HINT:
See page TW-2.
C156696E01
C137868E01
Page 2725 of 3000
PS–14POWER STEERING – VANE PUMP
PS
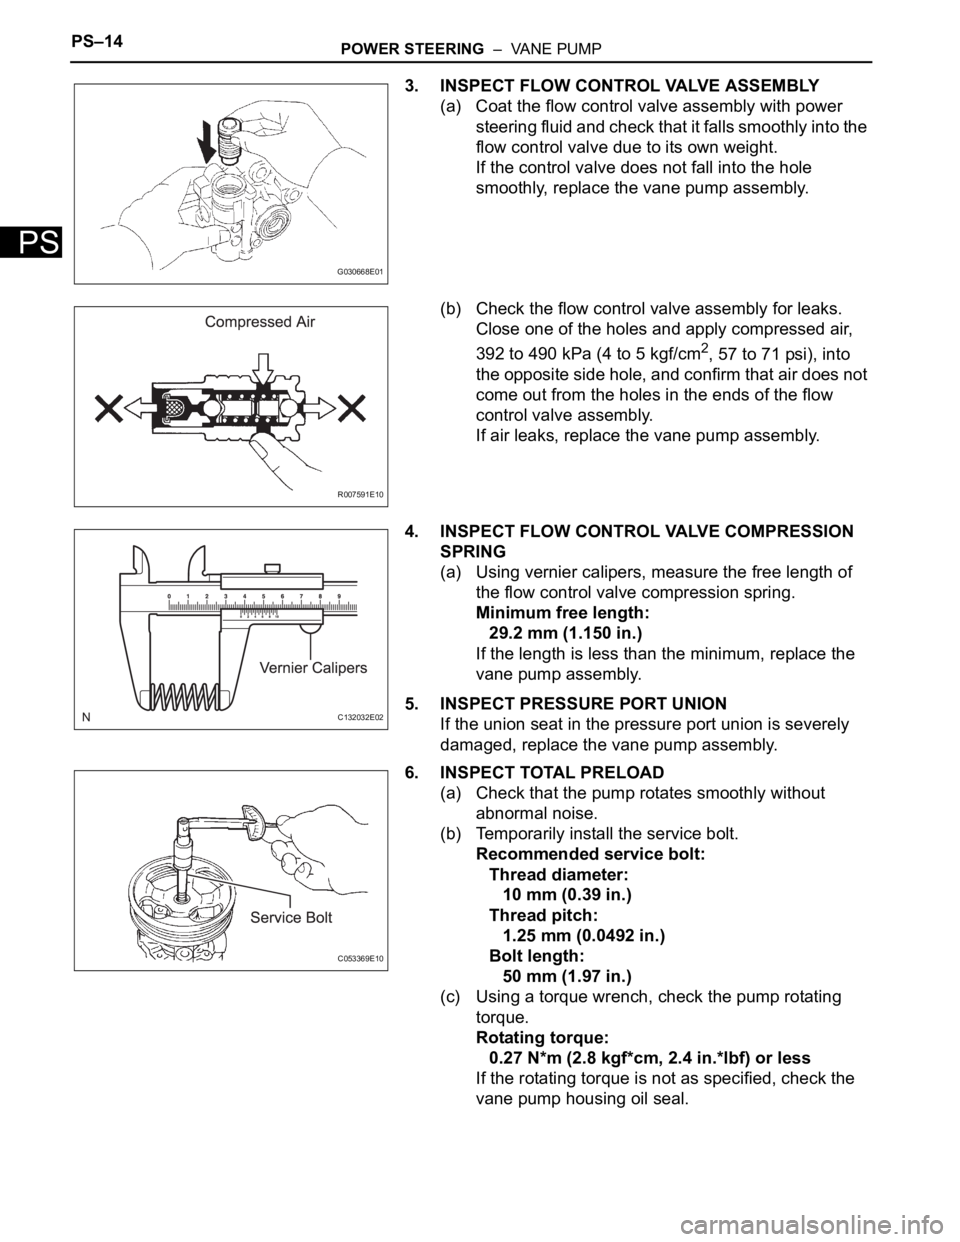
3. INSPECT FLOW CONTROL VALVE ASSEMBLY
(a) Coat the flow control valve assembly with power
steering fluid and check that it falls smoothly into the
flow control valve due to its own weight.
If the control valve does not fall into the hole
smoothly, replace the vane pump assembly.
(b) Check the flow control valve assembly for leaks.
Close one of the holes and apply compressed air,
392 to 490 kPa (4 to 5 kgf/cm
2, 57 to 71 psi), into
the opposite side hole, and confirm that air does not
come out from the holes in the ends of the flow
control valve assembly.
If air leaks, replace the vane pump assembly.
4. INSPECT FLOW CONTROL VALVE COMPRESSION
SPRING
(a) Using vernier calipers, measure the free length of
the flow control valve compression spring.
Minimum free length:
29.2 mm (1.150 in.)
If the length is less than the minimum, replace the
vane pump assembly.
5. INSPECT PRESSURE PORT UNION
If the union seat in the pressure port union is severely
damaged, replace the vane pump assembly.
6. INSPECT TOTAL PRELOAD
(a) Check that the pump rotates smoothly without
abnormal noise.
(b) Temporarily install the service bolt.
Recommended service bolt:
Thread diameter:
10 mm (0.39 in.)
Thread pitch:
1.25 mm (0.0492 in.)
Bolt length:
50 mm (1.97 in.)
(c) Using a torque wrench, check the pump rotating
torque.
Rotating torque:
0.27 N*m (2.8 kgf*cm, 2.4 in.*lbf) or less
If the rotating torque is not as specified, check the
vane pump housing oil seal.
G030668E01
R007591E10
C132032E02
C053369E10
Page 2915 of 3000
AIR CONDITIONING – REFRIGERANTAC–171
AC
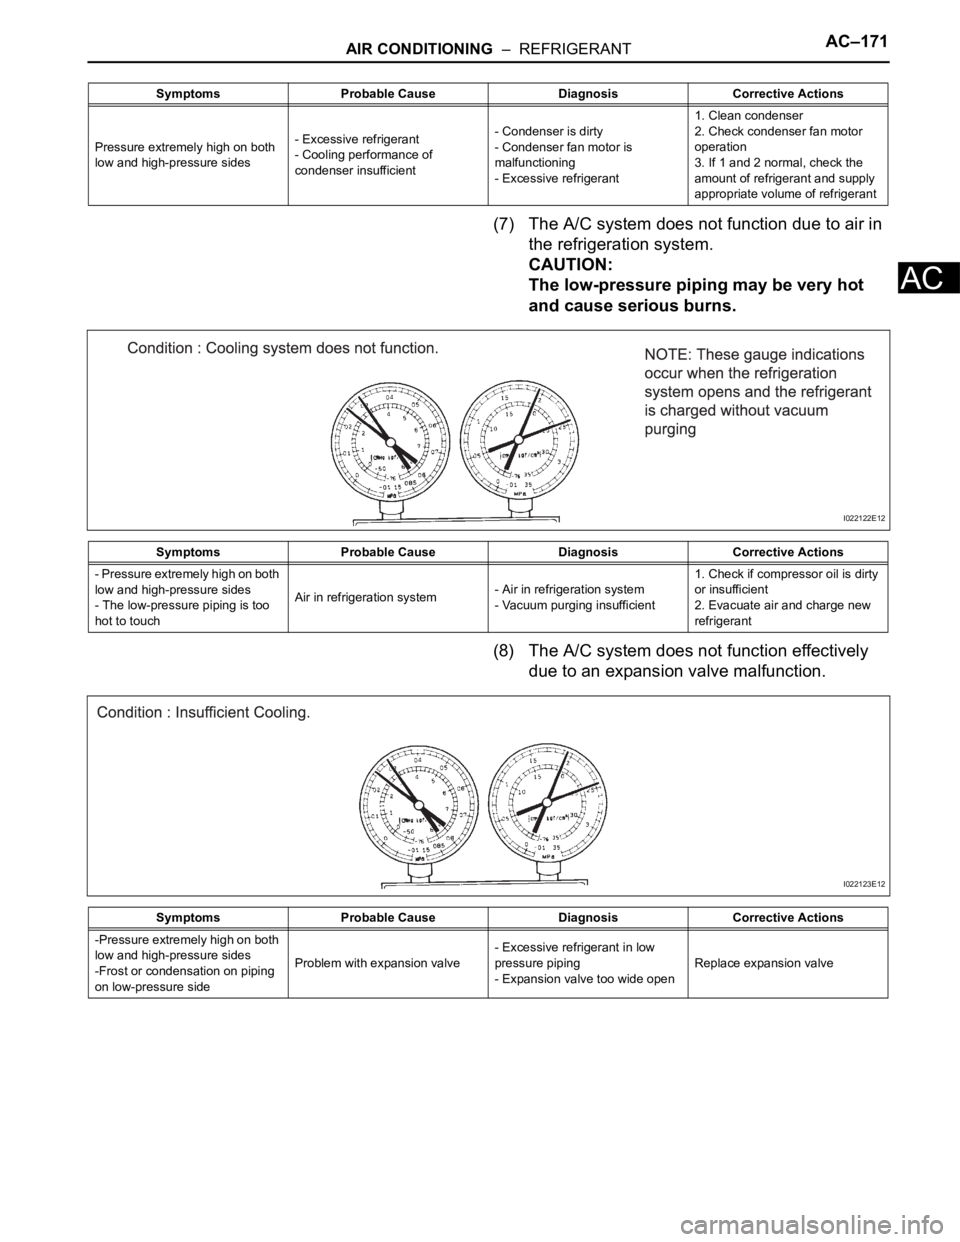
(7) The A/C system does not function due to air in
the refrigeration system.
CAUTION:
The low-pressure piping may be very hot
and cause serious burns.
(8) The A/C system does not function effectively
due to an expansion valve malfunction.
Symptoms Probable Cause Diagnosis Corrective Actions
Pressure extremely high on both
low and high-pressure sides- Excessive refrigerant
- Cooling performance of
condenser insufficient- Condenser is dirty
- Condenser fan motor is
malfunctioning
- Excessive refrigerant1. Clean condenser
2. Check condenser fan motor
operation
3. If 1 and 2 normal, check the
amount of refrigerant and supply
appropriate volume of refrigerant
Symptoms Probable Cause Diagnosis Corrective Actions
- Pressure extremely high on both
low and high-pressure sides
- The low-pressure piping is too
hot to touchAir in refrigeration system- Air in refrigeration system
- Vacuum purging insufficient1. Check if compressor oil is dirty
or insufficient
2. Evacuate air and charge new
refrigerant
I022122E12
Symptoms Probable Cause Diagnosis Corrective Actions
-Pressure extremely high on both
low and high-pressure sides
-Frost or condensation on piping
on low-pressure sideProblem with expansion valve- Excessive refrigerant in low
pressure piping
- Expansion valve too wide openReplace expansion valve
I022123E12