set clock TOYOTA SIENNA 2009 XL20 / 2.G Owners Manual
[x] Cancel search | Manufacturer: TOYOTA, Model Year: 2009, Model line: SIENNA, Model: TOYOTA SIENNA 2009 XL20 / 2.GPages: 592, PDF Size: 12.86 MB
Page 4 of 592
TABLE OF CONTENTSIndex
4
Security and system setup ................................ 350
Using the phone book ........ 353
3-5. Using the interior lights ... 361 Interior lights list ................. 361
• Personal/interior light main switch ...................... 362
• Personal/interior lights...... 362
• Luggage compartment light .................................. 363
3-6. Using the storage features ........................... 364
List of storage features....... 364
• Glove box ......................... 365
• Console box ..................... 365
• Coin holder ....................... 369
• Cup holders ...................... 370
• Bottle holders ................... 374
• Auxiliary boxes ................. 375
• Trays ................................ 380
• Note pad holder ............... 381
3-7. Other interior features ..... 383 Sun visors .......................... 383
Vanity mirrors ..................... 384
Clock .................................. 385
Conversation mirror............ 386
Power outlets ..................... 387
Seat heaters ....................... 390
Armrests ............................. 392
Rear side sunshades ......... 393
Grocery bag hooks ............. 394
Coat hooks ......................... 396
Seatback tables.................. 397
Front seat side table........... 399
Floor mat ............................ 401 Luggage compartment
features ............................ 402
Garage door opener ........... 405
Garage door opener box .... 410
Compass ............................ 413
4-1. Maintenance and care ...... 418 Cleaning and protecting the vehicle exterior ........... 418
Cleaning and protecting the vehicle interior ............ 421
4-2. Maintenance ...................... 424 Maintenance requirements .................... 424
General maintenance ......... 426
Emission inspection and maintenance (I/M)
programs .......................... 429
4-3. Do-it-yourself maintenance ................... 430
Do-it-yourself service precautions ....................... 430
Hood ................................... 434
Positioning a floor jack........ 436
Engine compartment .......... 438
Tires.................................... 454
Tire inflation pressure ......... 463
Wheels................................ 467
Air conditioning filter ........... 469
Wireless remote control battery .............................. 472
Checking and replacing fuses ................................. 474
4Maintenance and care
Page 240 of 592
240
3-1. Using the air conditioning system and defogger
Front manual air conditioning system (if equipped)
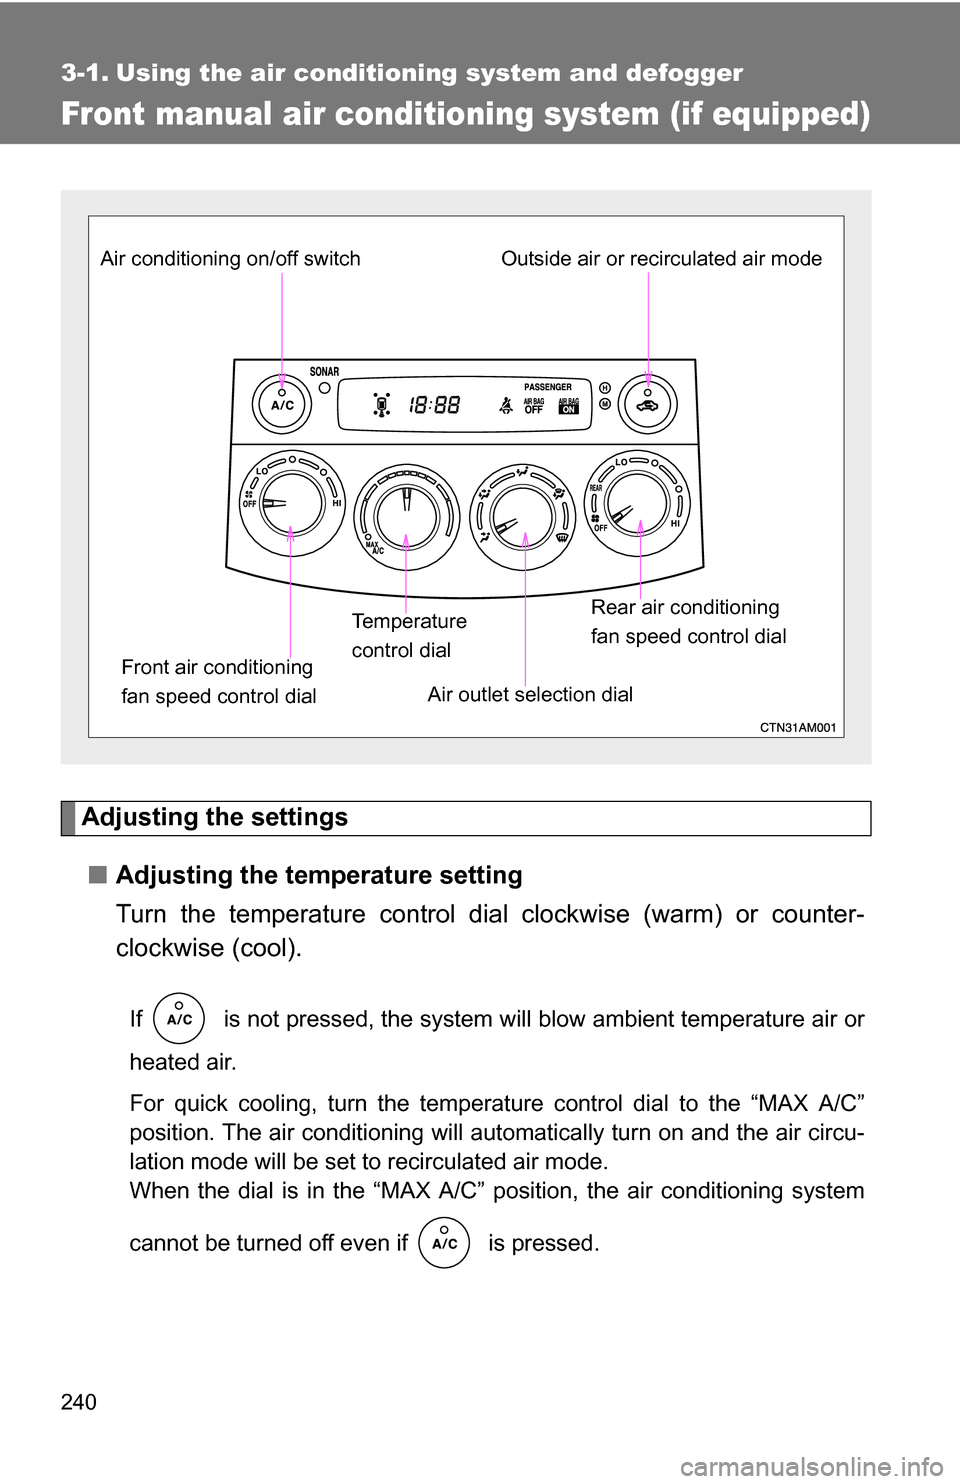
Adjusting the settings
■ Adjusting the temperature setting
Turn the temperature control dial clockwise (warm) or counter-
clockwise (cool).
If is not pressed, the system will blow ambient temperature air or
heated air.
For quick cooling, turn the temperature control dial to the “MAX A/C”
position. The air conditioning will automatically turn on and the air circu-
lation mode will be set to recirculated air mode.
When the dial is in the “MAX A/C” position, the air conditioning system
cannot be turned off even if is pressed.
Front air conditioning
fan speed control dial Air outlet selection dial
Air conditioning on/off switch
Temperature
control dialOutside air or recirculated air mode
Rear air conditioning
fan speed control dial
Page 241 of 592
241
3-1. Using the air conditioning system
and defogger
3
Interior features
■Adjusting the fan speed
Turn the fan speed control dial clockwise (increase) or counter-
clockwise (decrease).
Set the dial to “OFF” to turn the fan off.
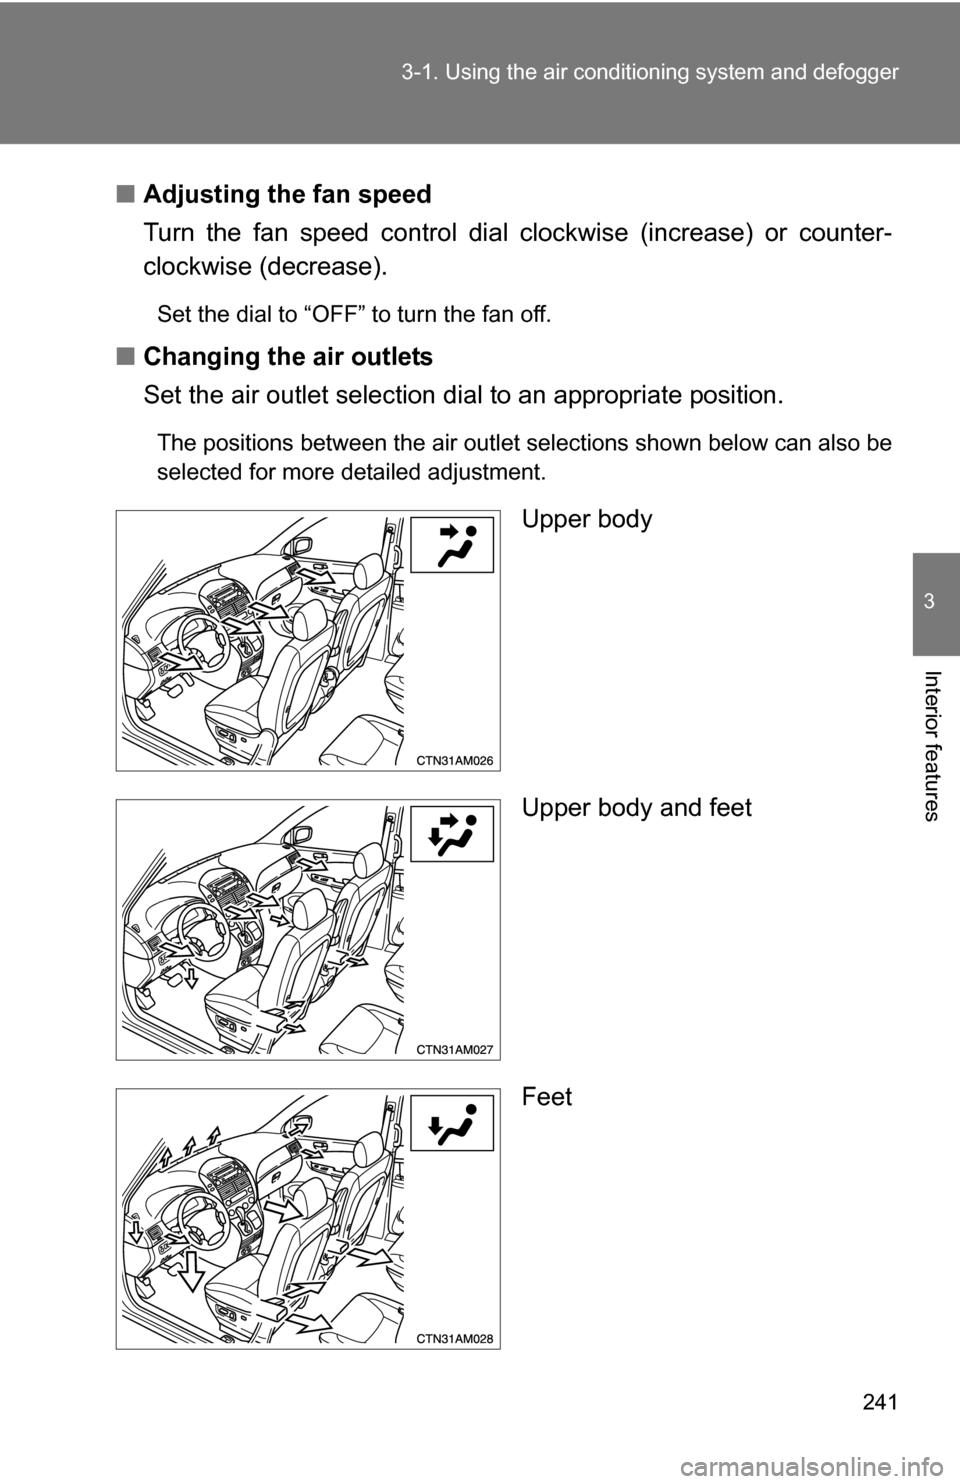
■ Changing the air outlets
Set the air outlet selection di al to an appropriate position.
The positions between the air outlet selections shown below can also be
selected for more detailed adjustment.
Upper body
Upper body and feet
Feet
Page 243 of 592
243
3-1. Using the air conditioning system
and defogger
3
Interior features
Changing the rear setting
■ Adjusting the fan speed
Turn the rear fan speed control dial clockwise (increase) or counter-
clockwise (decrease).
When the rear fan speed control dial is turned to “REAR”, rear fan speed
can be operated from the rear air conditioning control panel. ( P. 253)
When the front or rear fan speed control dial is turned to “OFF”, the rear
air conditioning system is turned off.
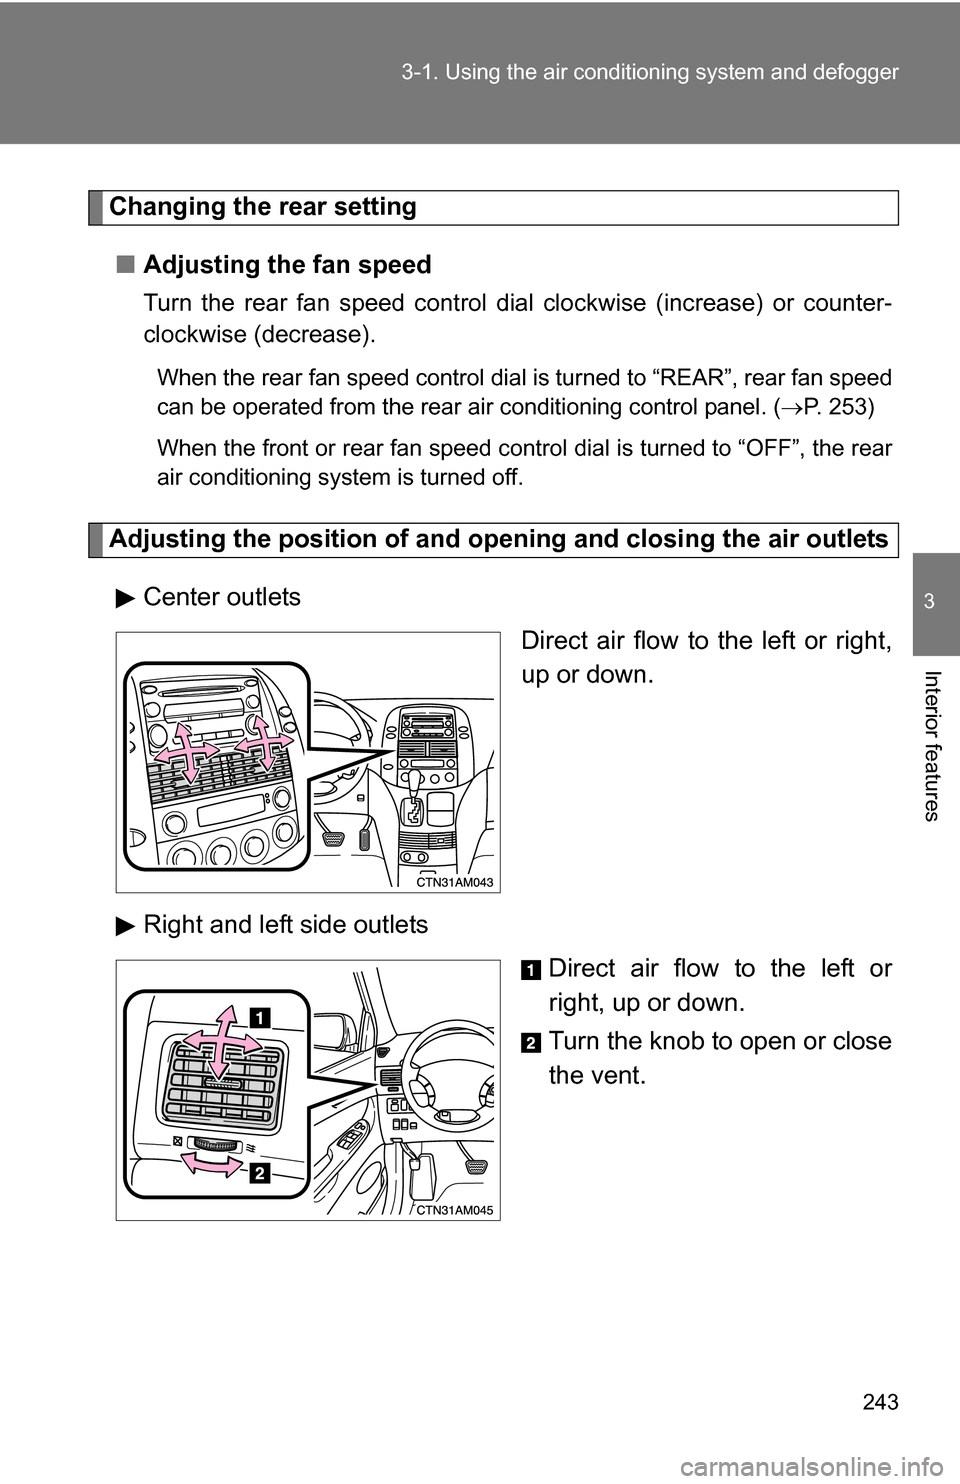
Adjusting the position of and opening and closing the air outlets
Center outlets Direct air flow to the left or right,
up or down.
Right and left side outlets Direct air flow to the left or
right, up or down.
Turn the knob to open or close
the vent.
Page 253 of 592
253
3-1. Using the air conditioning system and defogger
3
Interior features
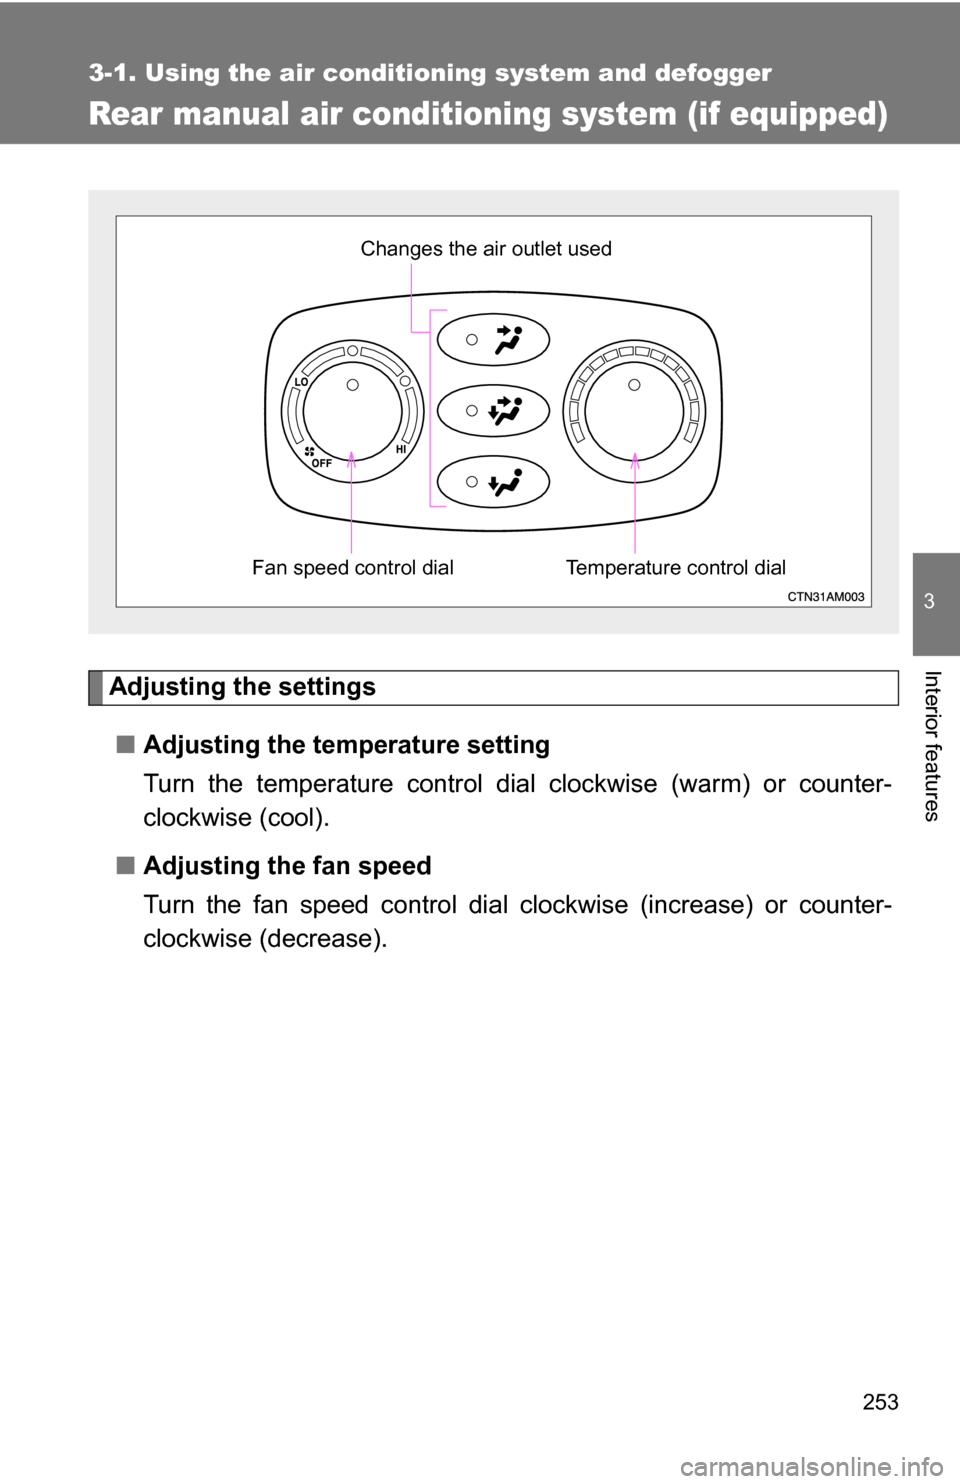
Rear manual air conditioning system (if equipped)
Adjusting the settings
■ Adjusting the temperature setting
Turn the temperature control dial clockwise (warm) or counter-
clockwise (cool).
■ Adjusting the fan speed
Turn the fan speed control dial clockwise (increase) or counter-
clockwise (decrease).
Temperature control dial
Changes the air outlet used
Fan speed control dial
Page 351 of 592
351
3-4. Using the hand
s-free phone system (for cellular phone)
3
Interior features
Enter the registered PIN using a voice command or .
Enter a new PIN using a voice command or .
When using , input the code 1 digit at a time.
Locking or unlocking the phone book
Select “Phonebook lock (Phbk Lock)” or “Phonebook unlock
(Phbk Unlock)” using a voice command or .
Input the PIN by either of the following methods and select
“Confirm” using a voice command or :
a. Press and say the registered PIN.
b. Input a registered PIN using .
Setting voice guidance volume
Select “Guidance Vol” using .
Change the voice guidance volume.
To decrease the volume: Turn counterclockwise.
To increase the volume: Turn clockwise.
STEP2
STEP3
STEP1
STEP2
STEP1
STEP2
Page 385 of 592
385
3-7. Other interior features
3
Interior features
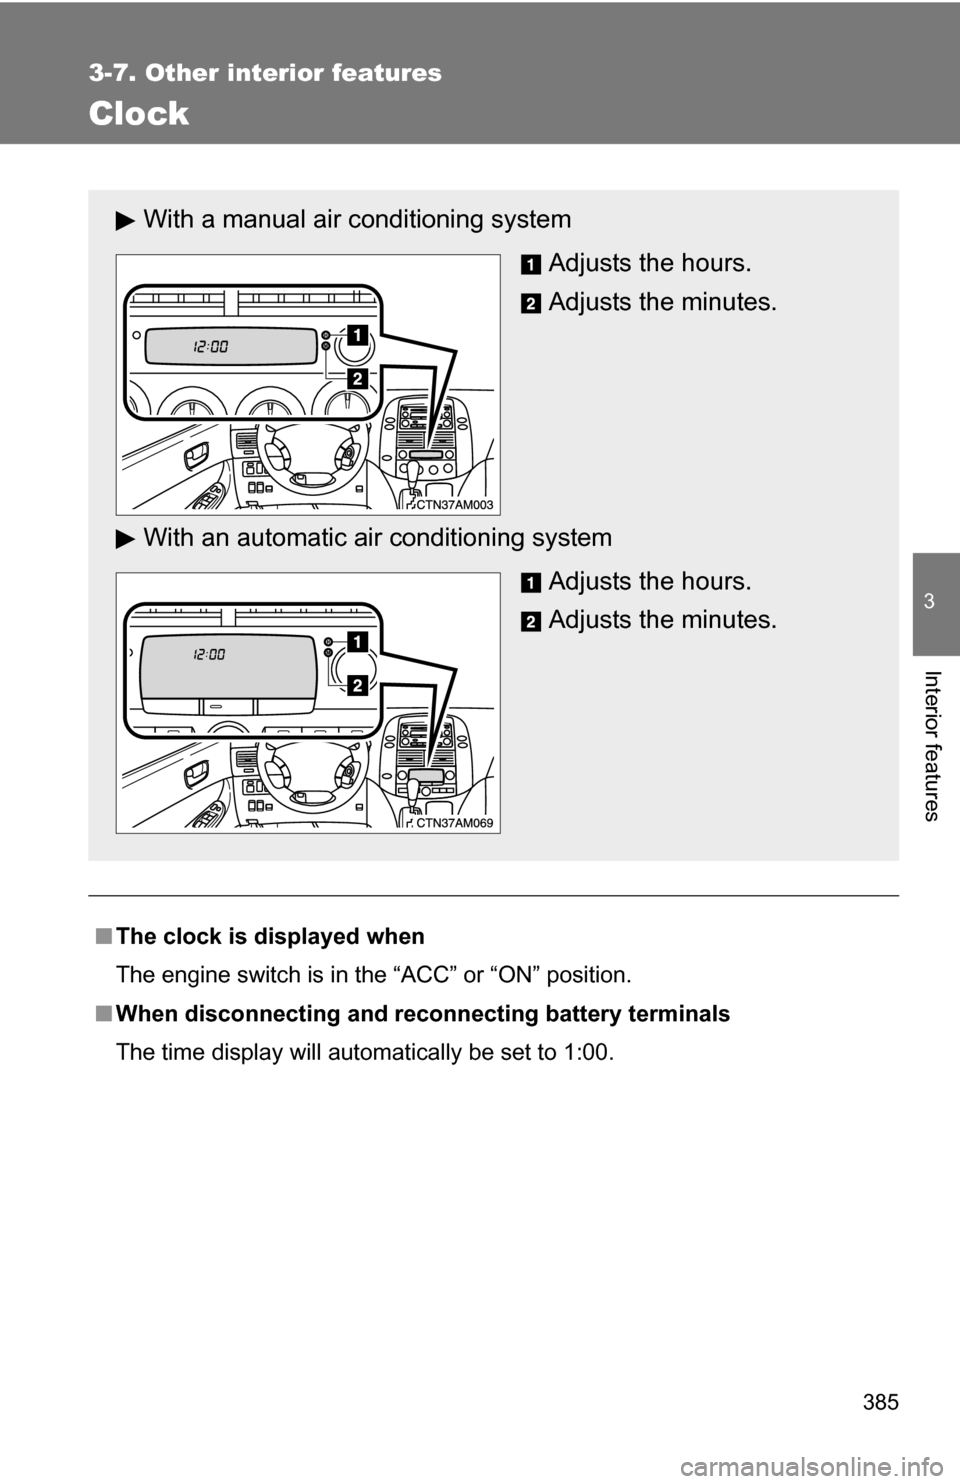
Clock
■The clock is displayed when
The engine switch is in the “ACC” or “ON” position.
■ When disconnecting and reco nnecting battery terminals
The time display will automatically be set to 1:00.
With a manual air conditioning system
Adjusts the hours.
Adjusts the minutes.
With an automatic ai r conditioning system
Adjusts the hours.
Adjusts the minutes.