transmission TOYOTA SIENNA 2009 XL20 / 2.G Owners Manual
[x] Cancel search | Manufacturer: TOYOTA, Model Year: 2009, Model line: SIENNA, Model: TOYOTA SIENNA 2009 XL20 / 2.GPages: 592, PDF Size: 12.86 MB
Page 2 of 592
TABLE OF CONTENTSIndex
2
1-1. Key information .................. 26Keys ..................................... 26
1-2. Opening, closing and
locking the doors ............. 27
Wireless remote control ....... 27
Front doors ........................... 33
Sliding doors ........................ 37
Back door ............................. 47
1-3. Adjustable components
(seats, mirrors,
steering wheel) ................. 56
Front seats ........................... 56
Second seats ....................... 59
Third seats ........................... 61
Seating configurations.......... 63
Driving position memory....... 80
Head restraints ..................... 82
Seat belts ............................. 84
Steering wheel ..................... 93
Anti-glare inside rear view mirror .................................. 94
Outside rear view mirrors ..... 96
1-4. Opening a nd closing the
window s ............................ 99
Power windows .................... 99
Quarter windows ................ 101
Moon roof ........................... 103
1-5. Refueling ........................... 106 Opening the fuel tank cap ................................... 106 1-6. Theft deterrent system ..... 110
Engine immobilizer system .............................. 110
Alarm .................................. 112
Theft prevention labels (for U.S.A.) ....................... 114
1-7. Safety information ............ 115 Correct driving posture ....... 115
SRS airbags ....................... 117
Front passenger occupant classification system ......... 129
Child restraint systems ....... 135
Installing child restraints ..... 139
2-1. Driving procedures........... 158 Driving the vehicle .............. 158
Engine (ignition) switch....... 167
Automatic transmission ...... 170
Turn signal lever ................. 172
Parking brake ..................... 173
2-2. Instrument cl uster and
information display ........ 174
Gauges and meters ............ 174
Indicators and warning lights ................................. 177
Trip information display ...... 181
2-3. Operating the li ghts and
wipers .............................. 185
Headlight switch ................. 185
Fog light switch ................... 190
1Before driving
2When driving
Page 76 of 592
76 1-3. Adjustable components (seats, mirrors, steering wheel)
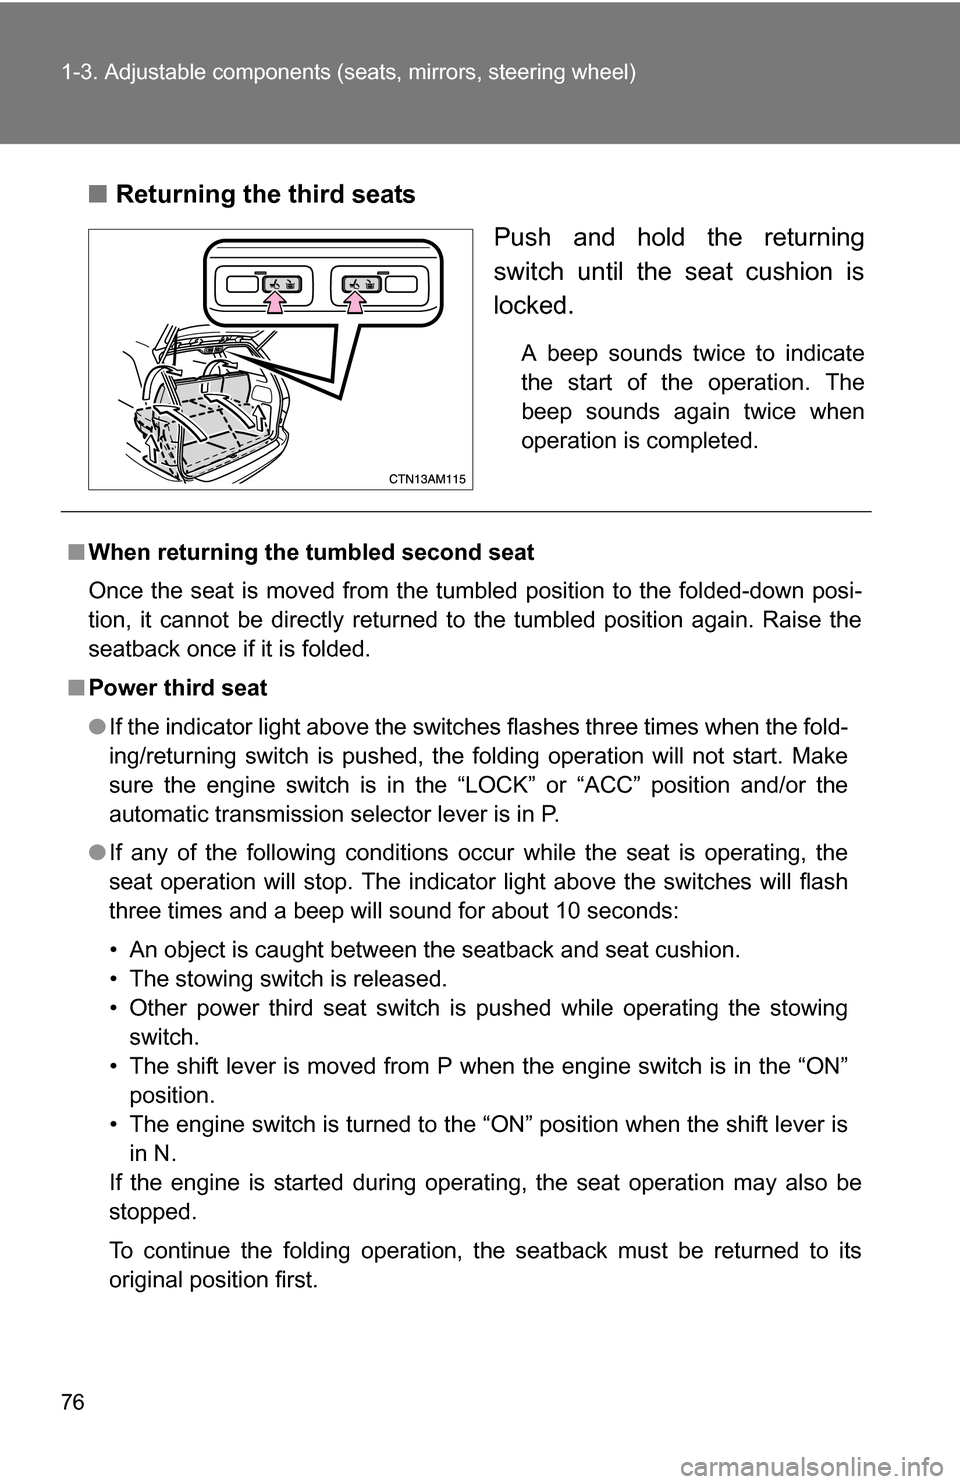
■Returning the third seats
Push and hold the returning
switch until the seat cushion is
locked.
A beep sounds twice to indicate
the start of the operation. The
beep sounds again twice when
operation is completed.
■When returning the tumbled second seat
Once the seat is moved from the tumbled position to the folded-down posi-
tion, it cannot be directly returned to the tumbled position again. Raise the
seatback once if it is folded.
■ Power third seat
●If the indicator light above the switches flashes three times when the fold-
ing/returning switch is pushed, the folding operation will not start. Make
sure the engine switch is in the “LOCK” or “ACC” position and/or the
automatic transmission selector lever is in P.
● If any of the following conditions occur while the seat is operating, the
seat operation will stop. The indicator light above the switches will flash
three times and a beep will sound for about 10 seconds:
• An object is caught between the seatback and seat cushion.
• The stowing switch is released.
• Other power third seat switch is pushed while operating the stowing
switch.
• The shift lever is moved from P when the engine switch is in the “ON” position.
• The engine switch is turned to the “ON” position when the shift lever is in N.
If the engine is started during operating, the seat operation may also be
stopped.
To continue the folding operation, the seatback must be returned to its
original position first.
Page 157 of 592

When driving2
157
2-1. Driving procedures ........ 158Driving the vehicle............ 158
Engine (ignition) switch .... 167
Automatic transmission .... 170
Turn signal lever .............. 172
Parking brake ................... 173
2-2. Instrument cluster and information display...... 174
Gauges and meters ......... 174
Indicators and warning lights .............................. 177
Trip information display .... 181 2-3. Operating the lights and
wipers ........................... 185
Headlight switch ............... 185
Fog light switch ................ 190
Windshield wipers and washer ........................... 191
Rear window wiper and washer ........................... 193
2-4. Using other driving systems ........................ 194
Cruise control ................... 194
Dynamic laser cruise control ............................ 197
Intuitive parking assist...... 209
Driving assist systems ..... 215
2-5. Driving information ........ 219 Cargo and luggage .......... 219
Vehicle load limits ............ 225
Winter driving tips ............ 226
Trailer towing ................... 229
Dinghy towing .................. 237
Page 170 of 592
170
2-1. Driving procedures
Automatic transmission
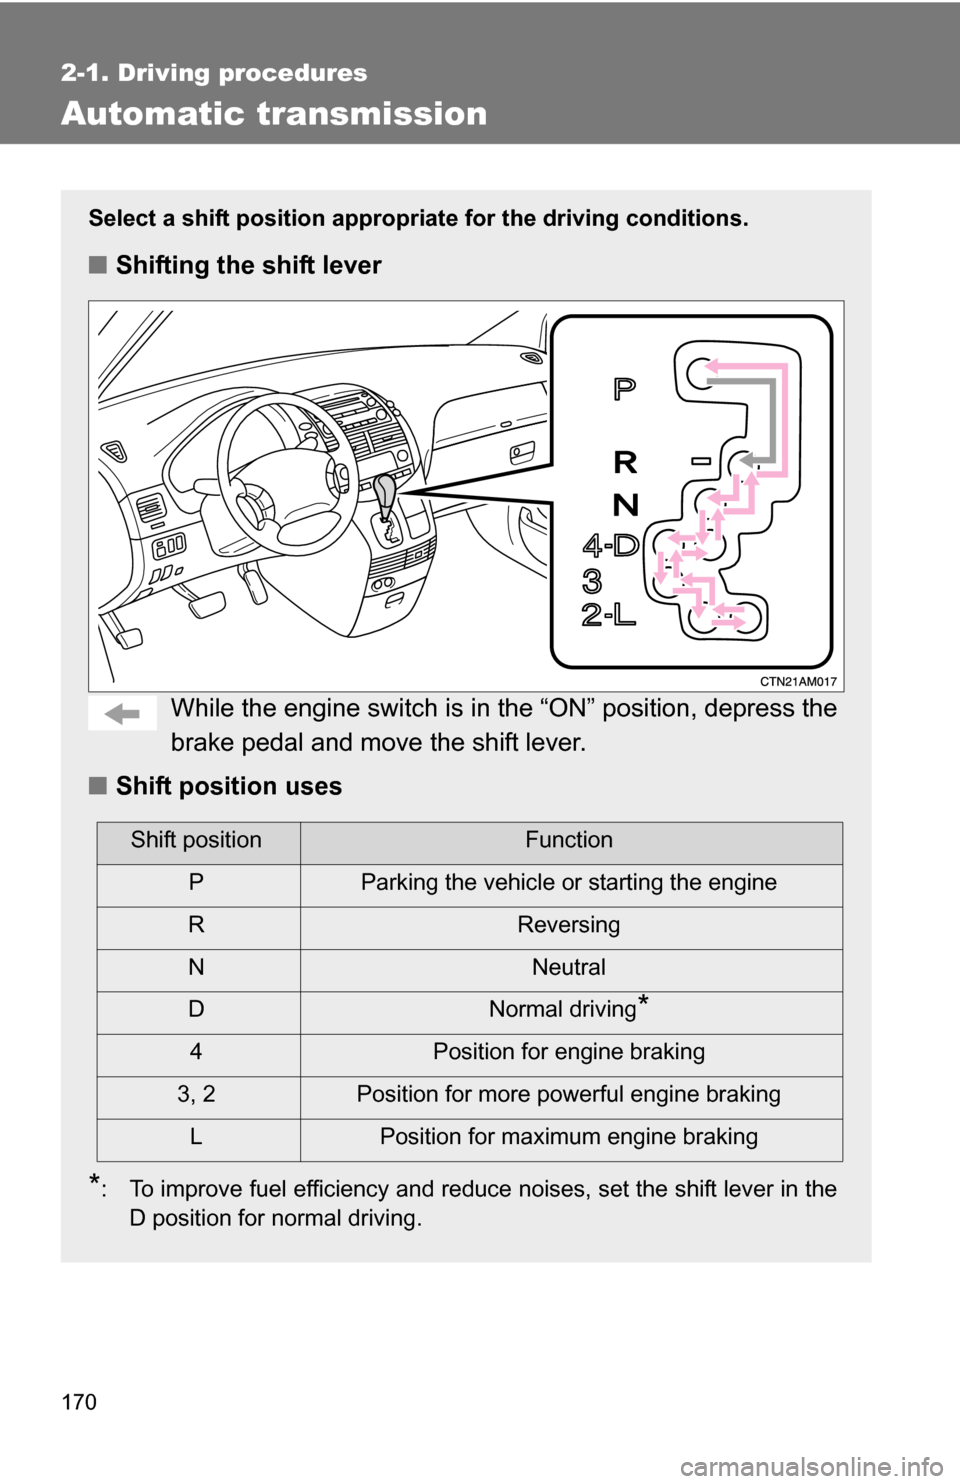
Select a shift position appropriate for the driving conditions.
■Shifting the shift lever
While the engine switch is in the “ON” position, depress the
brake pedal and move the shift lever.
■ Shift position uses
*: To improve fuel efficiency and reduce noises, set the shift lever in the
D position for normal driving.
Shift positionFunction
P Parking the vehicle or starting the engine
R Reversing
N Neutral
D Normal driving
*
4 Position for engine braking
3, 2 Position for more powerful engine braking
L Position for maximum engine braking
Page 231 of 592
231
2-5. Driving information
2
When driving
Hitch
Trailer hitch assemblies have different weight capacities established
by the hitch manufacturer. Even th ough the vehicle may be rated for
towing a higher weight, the operat or must never exceed the maxi-
mum weight rating specified for the trailer hitch.
■ Before towing
●Ensure that your vehicle’s tires are properly inflated. ( P. 463)
● Trailer tires should be inflated according to the trailer manufacturer's rec-
ommendation.
● All trailer lights must work in order to be legal.
● Confirm all lights work each time you connect them.
● Check that your vehicle remains level when a loaded or unloaded trailer
is hitched. Do not drive if the vehicle is not level, and check for improper
tongue load, overloading, worn suspension, or other possible causes.
● Make sure the trailer cargo is securely loaded.
● Check that your rear view mirrors c onform to any federal, state/provincial
or local regulations. If they do not, inst all rear view mirrors appropriate for
towing purposes.
■ Break-in schedule
Toyota recommends that you do not use a new vehicle or a vehicle with any
new power train components (engine, transmission, differential, wheel bear-
ings, etc.) to tow a trailer for the first 500 miles (800 km) of driving.
■ Maintenance
●If you tow a trailer, your vehicle will require more frequent maintenance
due to the additional load. (See “Scheduled Maintenance Guide” or
“Owner's Manual Supplement”.)
● Retighten the fixing bolts of the towing ball and bracket after approxi-
mately 600 miles (1000 km) of trailer towing.
Page 235 of 592
![TOYOTA SIENNA 2009 XL20 / 2.G Owners Manual 235
2-5. Driving information
2
When driving
●
Due to the added load of the trailer, your vehicles engine may
overheat on hot days (at temperatures over 85°F [30°C]) when
driving up a long or stee TOYOTA SIENNA 2009 XL20 / 2.G Owners Manual 235
2-5. Driving information
2
When driving
●
Due to the added load of the trailer, your vehicles engine may
overheat on hot days (at temperatures over 85°F [30°C]) when
driving up a long or stee](/img/14/6800/w960_6800-234.png)
235
2-5. Driving information
2
When driving
●
Due to the added load of the trailer, your vehicle's engine may
overheat on hot days (at temperatures over 85°F [30°C]) when
driving up a long or steep grade. If the engine coolant temperature
gauge indicates overheating, immedi ately turn off the air condition-
ing (if in use), pull your vehicle off the road and stop in a safe spot.
( P. 536)
● Always place wheel blocks under both the vehicle and the trailer
wheels when parking. Apply the parking brake firmly, and put the
transmission in P. Avoid parking on a slope, but if unavoidable, do
so only after performing the following:
Apply the brakes and keep them applied.
Have someone place wheel blocks under both the vehicle and
trailer wheels.
When the wheel blocks are in pl ace, release the brakes slowly
until the blocks absorb the load.
Apply the parking brake firmly.
Shift into P and turn off the engine.
● When restarting after parking on a slope:
With the transmission in P, start the engine. Be sure to keep
the brake pedal pressed.
Shift into a forward gear. If reversing, shift into R.
Release the parking brake and brake pedal, and slowly pull or
back away from the wheel blocks. Stop and apply the brakes.
Have someone retrieve the blocks.
STEP1
STEP2
STEP3
STEP4
STEP5
STEP1
STEP2
STEP3
STEP4
Page 313 of 592
313
3-3. Using the rear audio system
3
Interior features
■
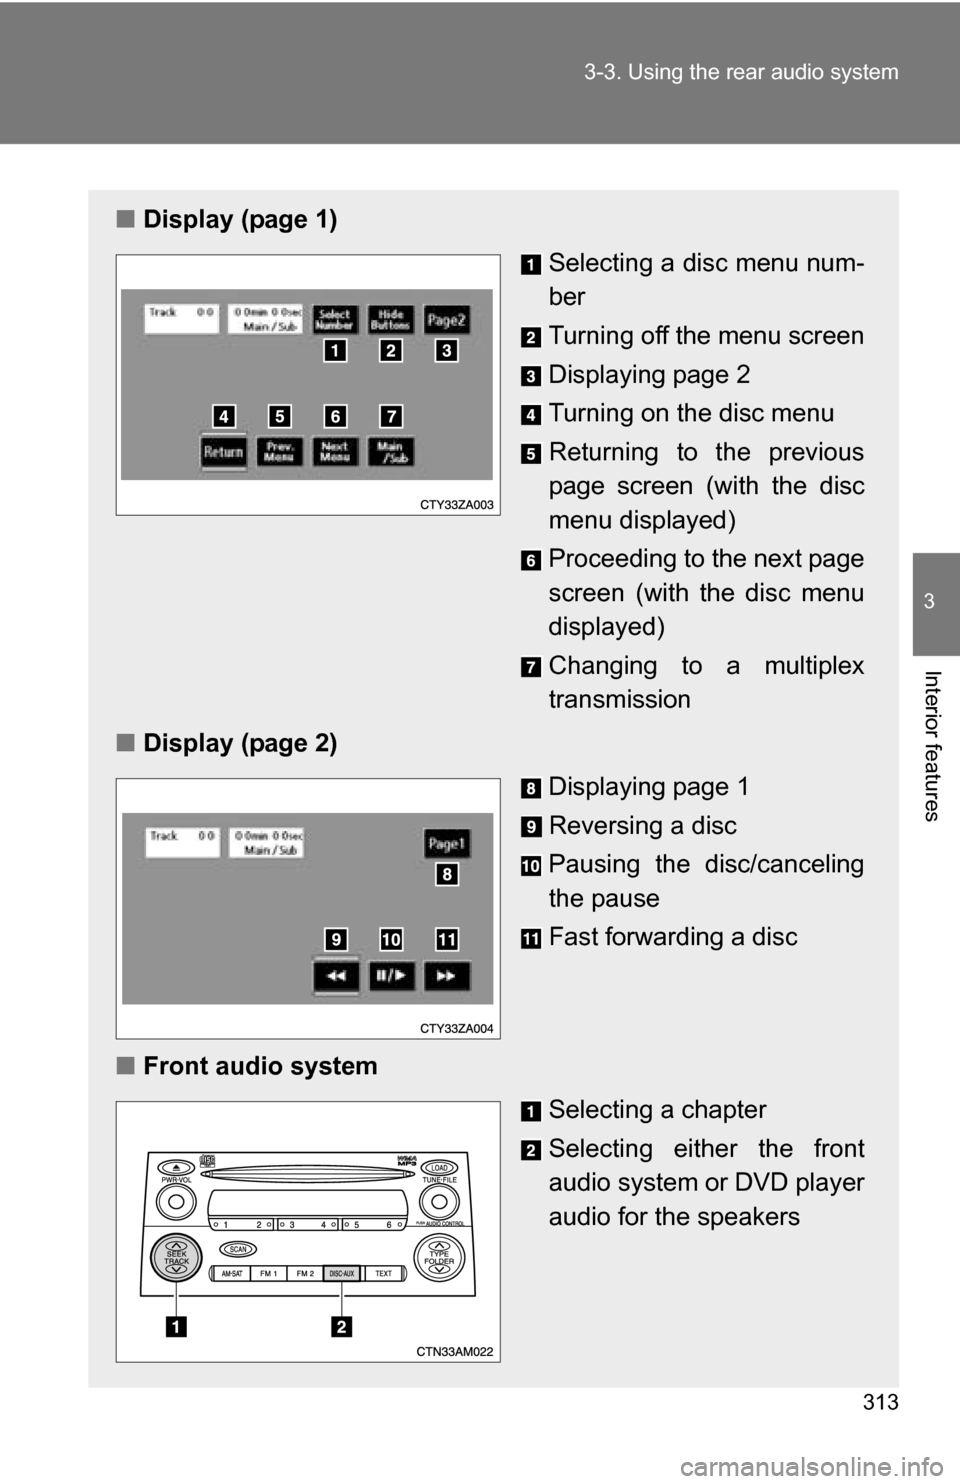
Display (page 1)
Selecting a disc menu num-
ber
Turning off the menu screen
Displaying page 2
Turning on the disc menu
Returning to the previous
page screen (with the disc
menu displayed)
Proceeding to the next page
screen (with the disc menu
displayed)
Changing to a multiplex
transmission
■ Display (page 2)
Displaying page 1
Reversing a disc
Pausing the disc/canceling
the pause
Fast forwarding a disc
■ Front audio system
Selecting a chapter
Selecting either the front
audio system or DVD player
audio for the speakers
Page 427 of 592
427
4-2. Maintenance
4
Maintenance and care
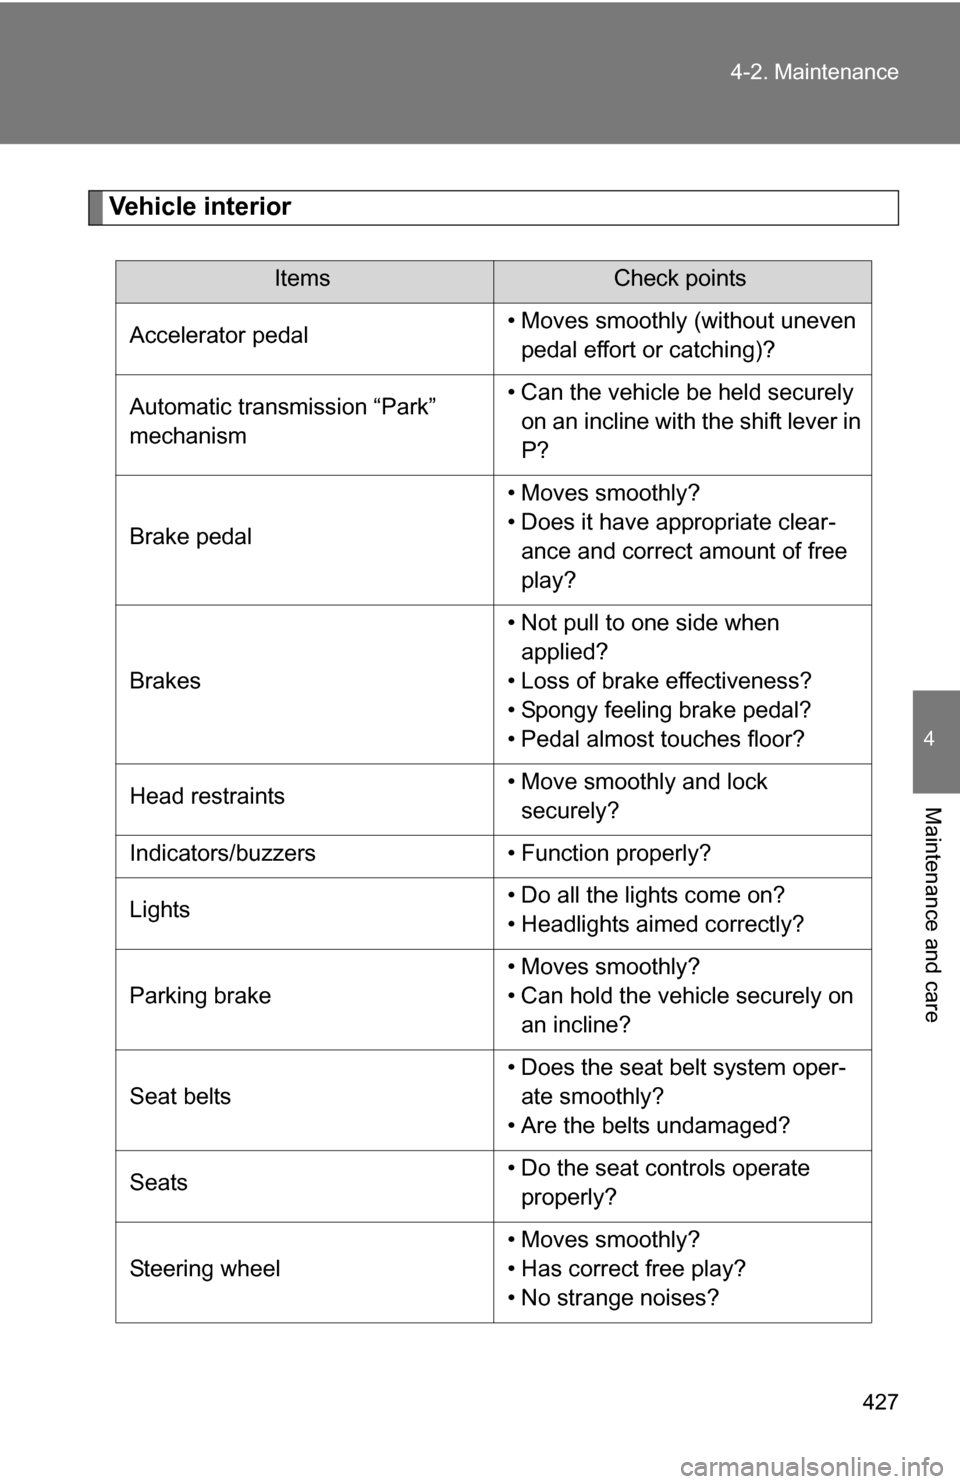
Vehicle interior
ItemsCheck points
Accelerator pedal • Moves smoothly (without uneven
pedal effort or catching)?
Automatic transmission “Park”
mechanism • Can the vehicle be held securely
on an incline with the shift lever in
P?
Brake pedal • Moves smoothly?
• Does it have appropriate clear-
ance and correct amount of free
play?
Brakes • Not pull to one side when
applied?
• Loss of brake effectiveness?
• Spongy feeling brake pedal?
• Pedal almost touches floor?
Head restraints • Move smoothly and lock
securely?
Indicators/buzzers • Function properly?
Lights • Do all the lights come on?
• Headlights aimed correctly?
Parking brake • Moves smoothly?
• Can hold the vehicle securely on
an incline?
Seat belts • Does the seat belt system oper-
ate smoothly?
• Are the belts undamaged?
Seats • Do the seat controls operate
properly?
Steering wheel • Moves smoothly?
• Has correct free play?
• No strange noises?
Page 431 of 592
431
4-3. Do-it-yourself maintenance
4
Maintenance and care
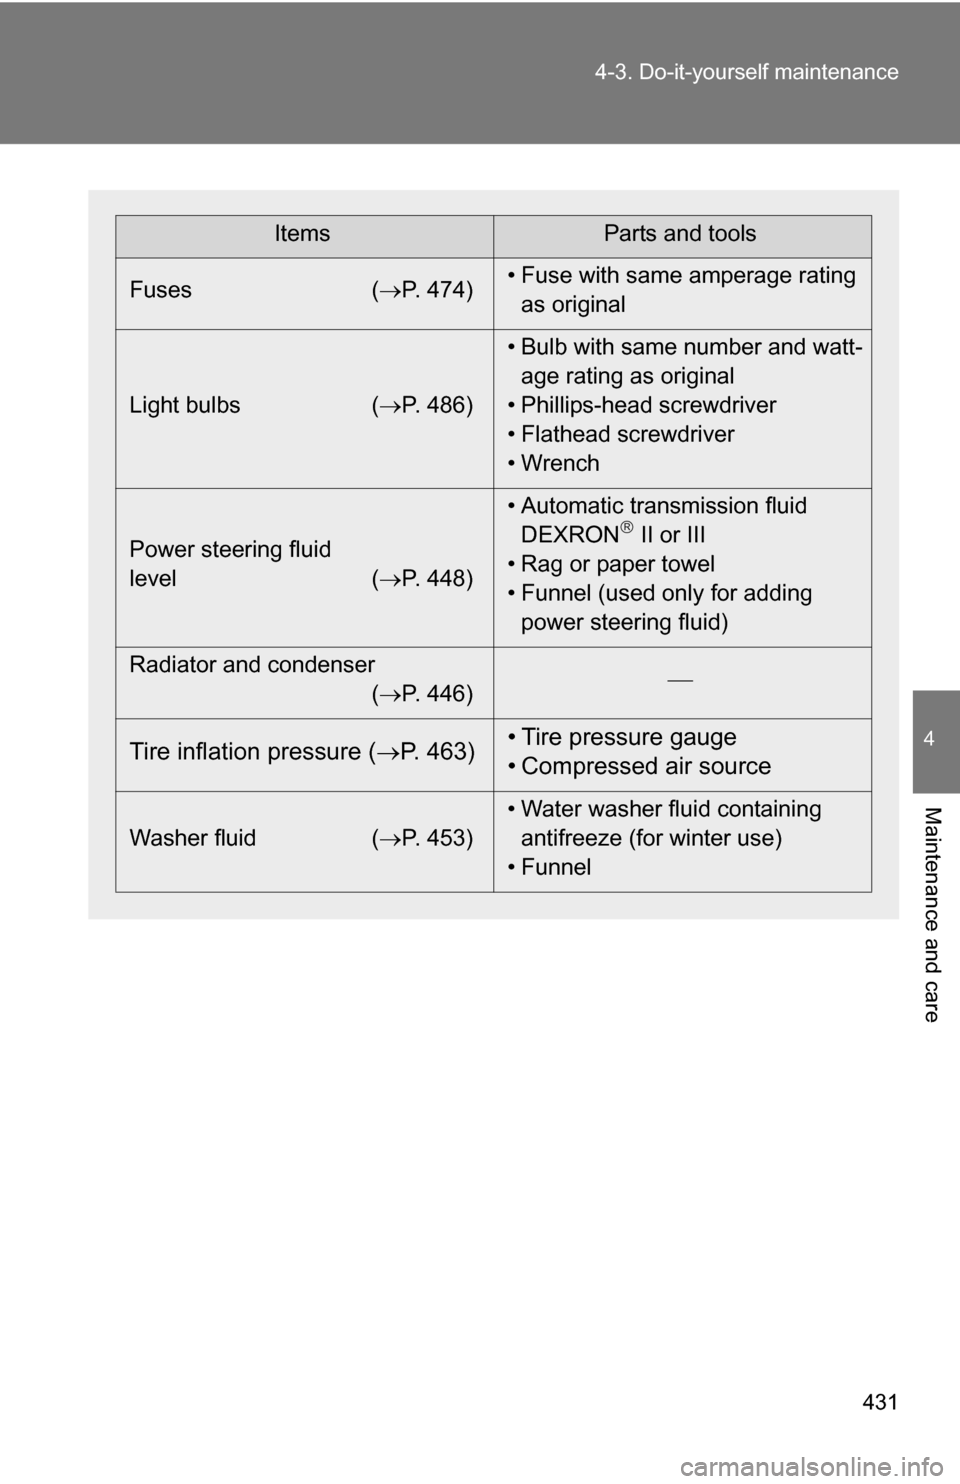
ItemsParts and tools
Fuses ( P. 474)• Fuse with same amperage rating
as original
Light bulbs ( P. 486)• Bulb with same number and watt-
age rating as original
• Phillips-head screwdriver
• Flathead screwdriver
• Wrench
Power steering fluid
level ( P. 448)• Automatic transmission fluid
DEXRON
II or III
• Rag or paper towel
• Funnel (used only for adding power steering fluid)
Radiator and condenser (P. 446)
Tire inflation pressure (
P. 463) • Tire pressure gauge
• Compressed air source
Washer fluid
(P. 453) • Water washer fluid containing
antifreeze (for winter use)
• Funnel
Page 448 of 592
448 4-3. Do-it-yourself maintenance
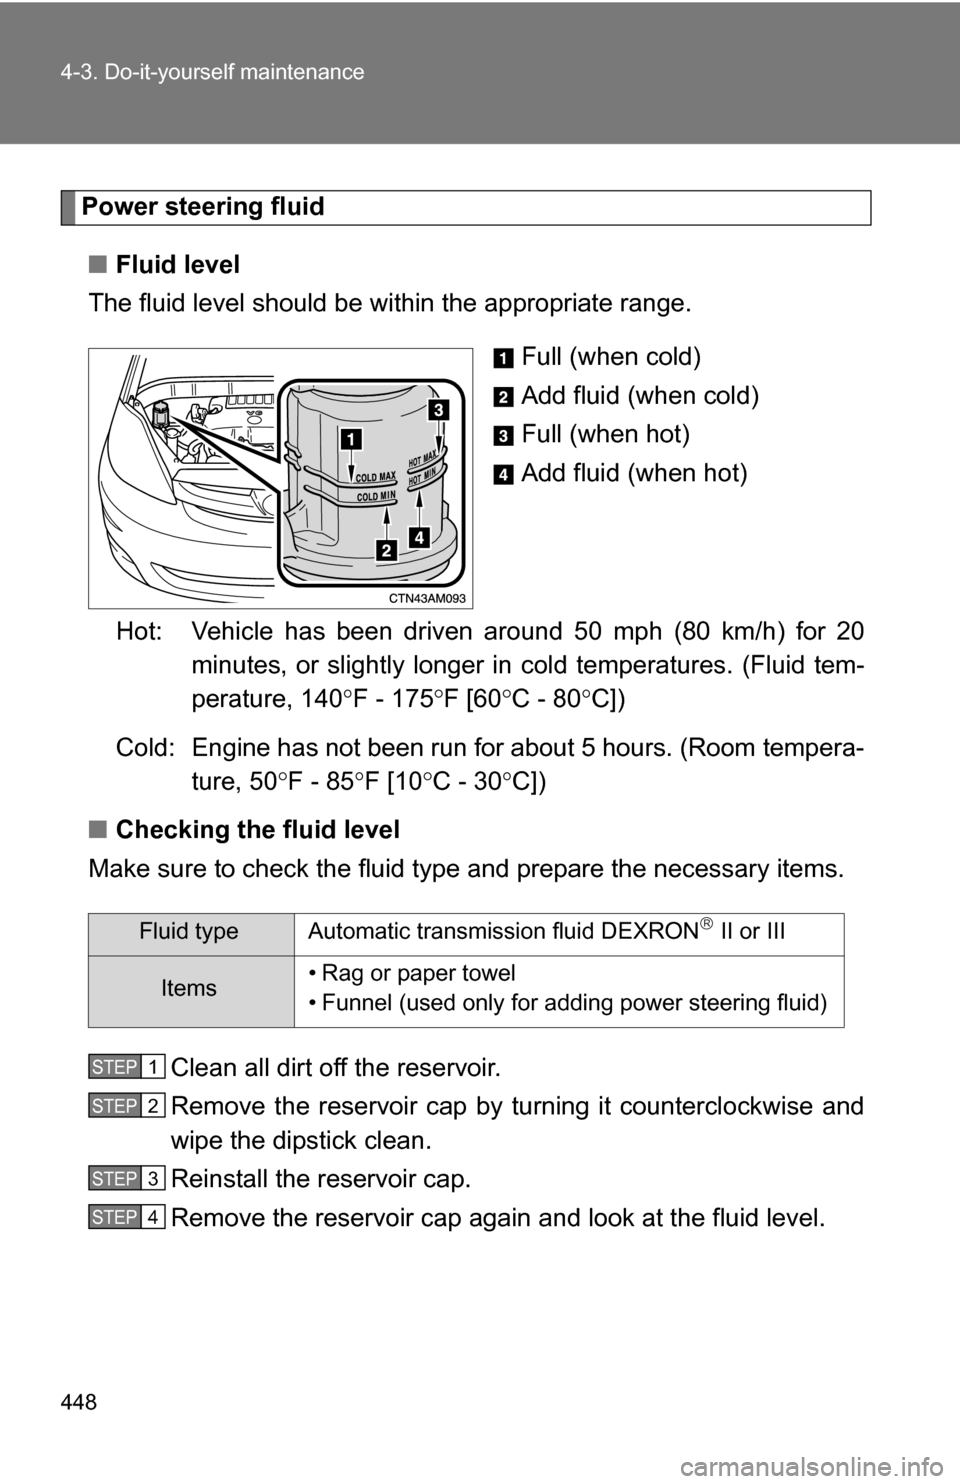
Power steering fluid■ Fluid level
The fluid level should be within the appropriate range.
Full (when cold)
Add fluid (when cold)
Full (when hot)
Add fluid (when hot)
Hot: Vehicle has been driven around 50 mph (80 km/h) for 20 minutes, or slightly longer in cold temperatures. (Fluid tem-
perature, 140 F - 175F [60C - 80 C])
Cold: Engine has not been run for about 5 hours. (Room tempera- ture, 50 F - 85F [10C - 30C])
■ Checking the fluid level
Make sure to check the fluid type and prepare the necessary items.
Clean all dirt off the reservoir.
Remove the reservoir cap by turning it counterclockwise and
wipe the dipstick clean.
Reinstall the reservoir cap.
Remove the reservoir cap again and look at the fluid level.
Fluid type Automatic transmission fluid DEXRON II or III
Items• Rag or paper towel
• Funnel (used only for adding power steering fluid)
STEP1
STEP2
STEP3
STEP4