change wheel TOYOTA SIENNA 2018 Owners Manual (in English)
[x] Cancel search | Manufacturer: TOYOTA, Model Year: 2018, Model line: SIENNA, Model: TOYOTA SIENNA 2018Pages: 584, PDF Size: 14.47 MB
Page 41 of 584

411-1. For safe use
SIENNA_OM_OM08019U_(U)
1
For safety and security
Your vehicle is equipped with ADVANCED AIRBAGS designed based
on the US motor vehicle safety standards (FMVSS208). The airbag
sensor assembly (ECU) controls airbag deployment based on infor-
mation obtained from the sensors etc. shown in the system compo -
nents diagram above. This informat ion includes crash severity and
occupant information. As the airbags deploy, a chemical reactio n in
the inflators quickly fills the airbags with non-toxic gas to h elp restrain
the motion of t he occupants.
WARNING
■SRS airbag precautions
Observe the following precautions regarding the SRS airbags.
Failure to do so may cause death or serious injury.
● The driver and all passengers in the vehicle must wear their se at belts
properly.
The SRS airbags are supplemental devices to be used with the se at belts.
● The SRS driver airbag deploys with considerable force, and can cause
death or serious injury especially if the driver is very close to the airbag.
The National Highway Traffic Safety Administration (NHTSA) advi ses:
Since the risk zone for the driver’s airbag is the first 2 - 3 in. (50 - 75 mm)
of inflation, placing yourself 10 in. (250 mm) from your driver airbag pro-
vides you with a clear margin of safety. This distance is measured from
the center of the steering wheel to your breastbone. If you sit less than 10
in. (250 mm) away now, you can change your driving position in several
ways:
• Move your seat to the rear as far as you can while still reach ing the ped-
als comfortably.
• Slightly recline the back of the seat.
Although vehicle designs vary, many drivers can achieve the 10 in. (250
mm) distance, even with the driver seat all the way forward, si mply by
reclining the back of the seat somewhat. If reclining the back of your
seat makes it hard to see the road, raise yourself by using a f irm, non-
slippery cushion, or raise the seat if your vehicle has that feature.
• If your steering wheel is adjustable, tilt it downward. This points the air-
bag toward your chest instead of your head and neck.
The seat should be adjusted as recommended by NHTSA above, whil e
still maintaining control of the foot pedals, steering wheel, and your view
of the instrument panel controls.
Page 202 of 584

202
SIENNA_OM_OM08019U_(U)
4-1. Before driving
NOTICE
■When driving the vehicle
● Do not depress the accelerator and brake pedals at the same tim e during
driving, as this may restrain the engine output.
● Do not use the accelerator pedal or depress the accelerator and brake
pedals at the same time to hold the vehicle on a hill.
■ When parking the vehicle
Always set the parking brake, and shift the shift lever to P. F ailure to do so
may cause the vehicle to move or the vehicle may accelerate sud denly if
the accelerator pedal is accidentally depressed.
■ Avoiding damage to vehicle parts
● Do not turn the steering wheel fully in either direction and ho ld it there for
an extended period of time.
Doing so may damage the power steering motor.
● When driving over bumps in the road, drive as slowly as possibl e to avoid
damaging the wheels, underside of the vehicle, etc.
■ If you get a flat tire while driving
A flat or damaged tire may cause the following situations. Hold the steering
wheel firmly and gradually depress the brake pedal to slow down the vehi-
cle.
● It may be difficult to control your vehicle.
● The vehicle will make abnormal sounds or vibrations.
● The vehicle will lean abnormally.
Information on what to do in case of a flat tire. ( P. 485, 499)
■ When encountering flooded roads
Do not drive on a road that has flooded after heavy rain etc. D oing so may
cause the following serious damage to the vehicle:
● Engine stalling
● Short in electrical components
● Engine damage caused by water immersion
In the event that you drive on a flooded road and the vehicle i s flooded, be
sure to have your Toyota dealer check the following:
● Brake function
● Changes in quantity and quality of oil and fluid used for the e ngine, tran-
saxle, transfer (AWD models), rear differential (AWD models), e tc.
● Lubricant condition for the bearings and suspension joints (whe re possi-
ble) and the function of all joints, bearings, etc.
Page 231 of 584
SIENNA_OM_OM08019U_(U)
2314-2. Driving procedures
4
Driving
■Steering lock
After turning the engine switch off and opening and closing the doors, the
steering wheel will be locked due to the steering lock function.
Operating the engine switch again automatically cancels the ste ering lock.
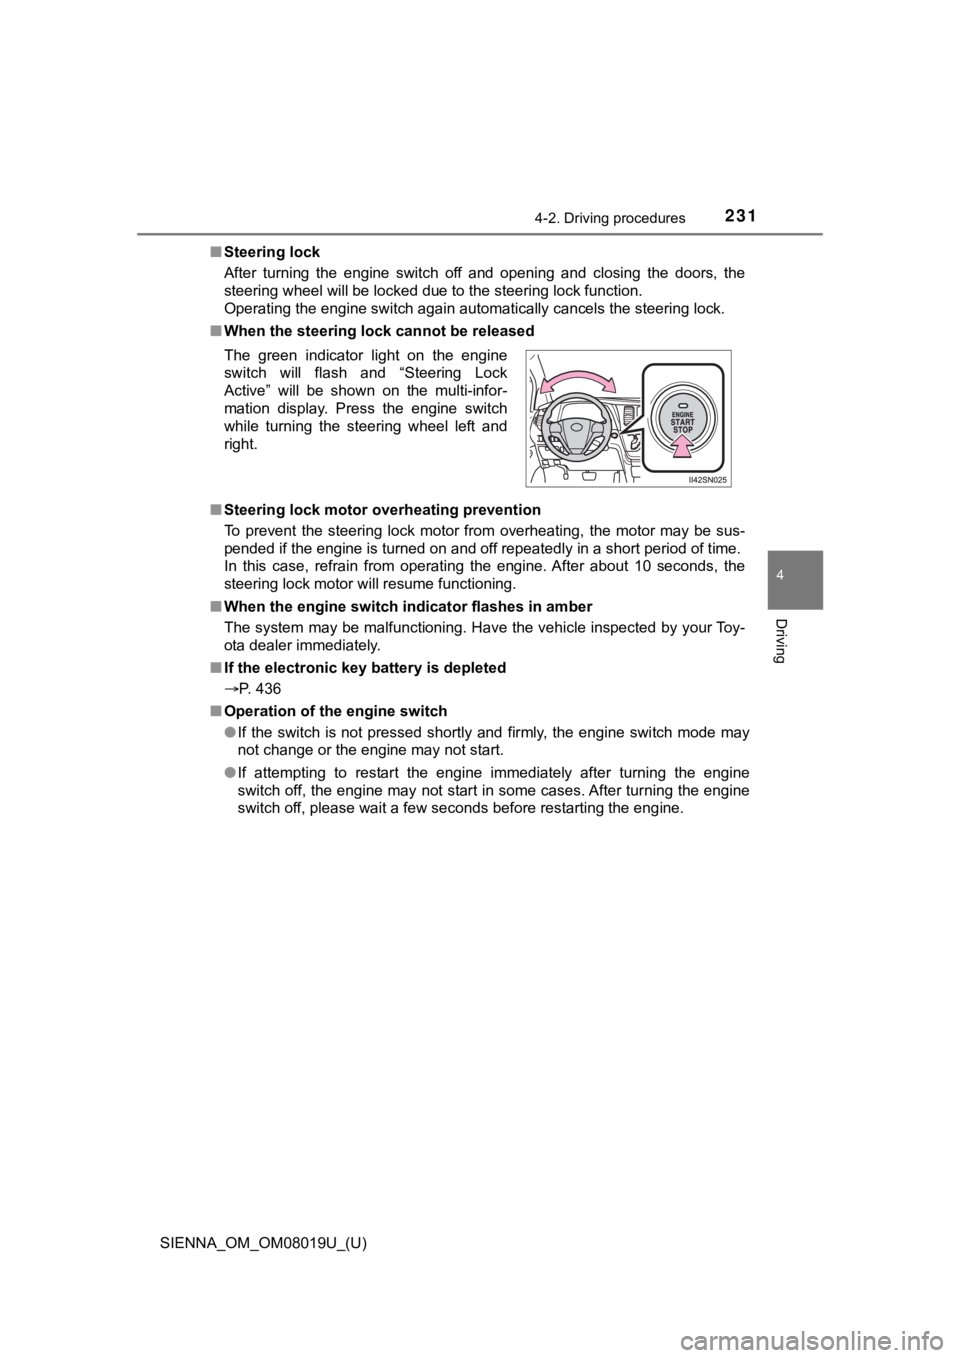
■ When the steering lock cannot be released
■ Steering lock motor overheating prevention
To prevent the steering lock motor from overheating, the motor may be sus-
pended if the engine is turned on and off repeatedly in a short period of time.
In this case, refrain from operating the engine. After about 10 seconds, the
steering lock motor will resume functioning.
■ When the engine switch indicator flashes in amber
The system may be malfunctioning. Have the vehicle inspected by your Toy-
ota dealer immediately.
■ If the electronic key battery is depleted
P. 436
■ Operation of the engine switch
●If the switch is not pressed shortly and firmly, the engine swi tch mode may
not change or the engine may not start.
● If attempting to restart the engine immediately after turning t he engine
switch off, the engine may not start in some cases. After turni ng the engine
switch off, please wait a few seconds before restarting the eng ine.
The green indicator light on the engine
switch will flash and “Steering Lock
Active” will be shown on the multi-infor-
mation display. Press the engine switch
while turning the steering wheel left and
right.
Page 268 of 584

268
SIENNA_OM_OM08019U_(U)
4-5. Using the driving support systems
WARNING
■Limitations of the pre-collision system
● The driver is solely responsible for safe driving. Always drive safely, taking
care to observe your surroundings.
Do not use the pre-collision system instead of normal braking o perations
under any circumstances. This system will not prevent collision s or lessen
collision damage or injury in every situation. Do not overly re ly on this sys-
tem. Failure to do so may lead to an accident, resulting in dea th or serious
injury.
● Although this system is designed to help avoid a collision or h elp reduce
the impact of the collision, its effectiveness may change according to vari-
ous conditions, therefore the system may not always be able to achieve
the same level of performance.
Read the following conditions carefully. Do not overly rely on this system
and always drive carefully.
• Conditions under which the system may operate even if there is no pos-
sibility of a collision: P. 273
• Conditions under which the system may not operate properly: P. 275
● Do not attempt to test the operation of the pre-collision system yourself, as
the system may not operate properly, possibly leading to an acc ident.
■ Pre-collision braking
● When the pre-collision braking function is operating, a large a mount of
braking force will be applied.
● If the vehicle is stopped by the operation of the pre-collision braking func-
tion, the pre-collision braking function operation will be canceled after
approximately 2 seconds. Depress the brake pedal as necessary.
● The pre-collision braking function may not operate if certain o perations are
performed by the driver. If the accelerator pedal is being depressed
strongly or the steering wheel is being turned, the system may determine
that the driver is taking evasive action and possibly prevent t he pre-colli-
sion braking function from operating.
● In some situations, while the pre-collision braking function is operating,
operation of the function may be canceled if the accelerator pedal is
depressed strongly or the steering wheel is turned and the syst em deter-
mines that the driver is taking evasive action.
● If the brake pedal is being depressed, the system may determine that the
driver is taking evasive action and possibly delay the operation timing of
the pre-collision braking function.
Page 273 of 584
SIENNA_OM_OM08019U_(U)
2734-5. Using the driving support systems
4
Driving
■Cancelation of the pre-collision braking
If either of the following occur while the pre-collision brakin g function is oper-
ating, it will be canceled:
● The accelerator pedal is depressed strongly.
● The steering wheel is turned sharply or abruptly.
■ Conditions under which the system may operate even if there is no pos-
sibility of a collision
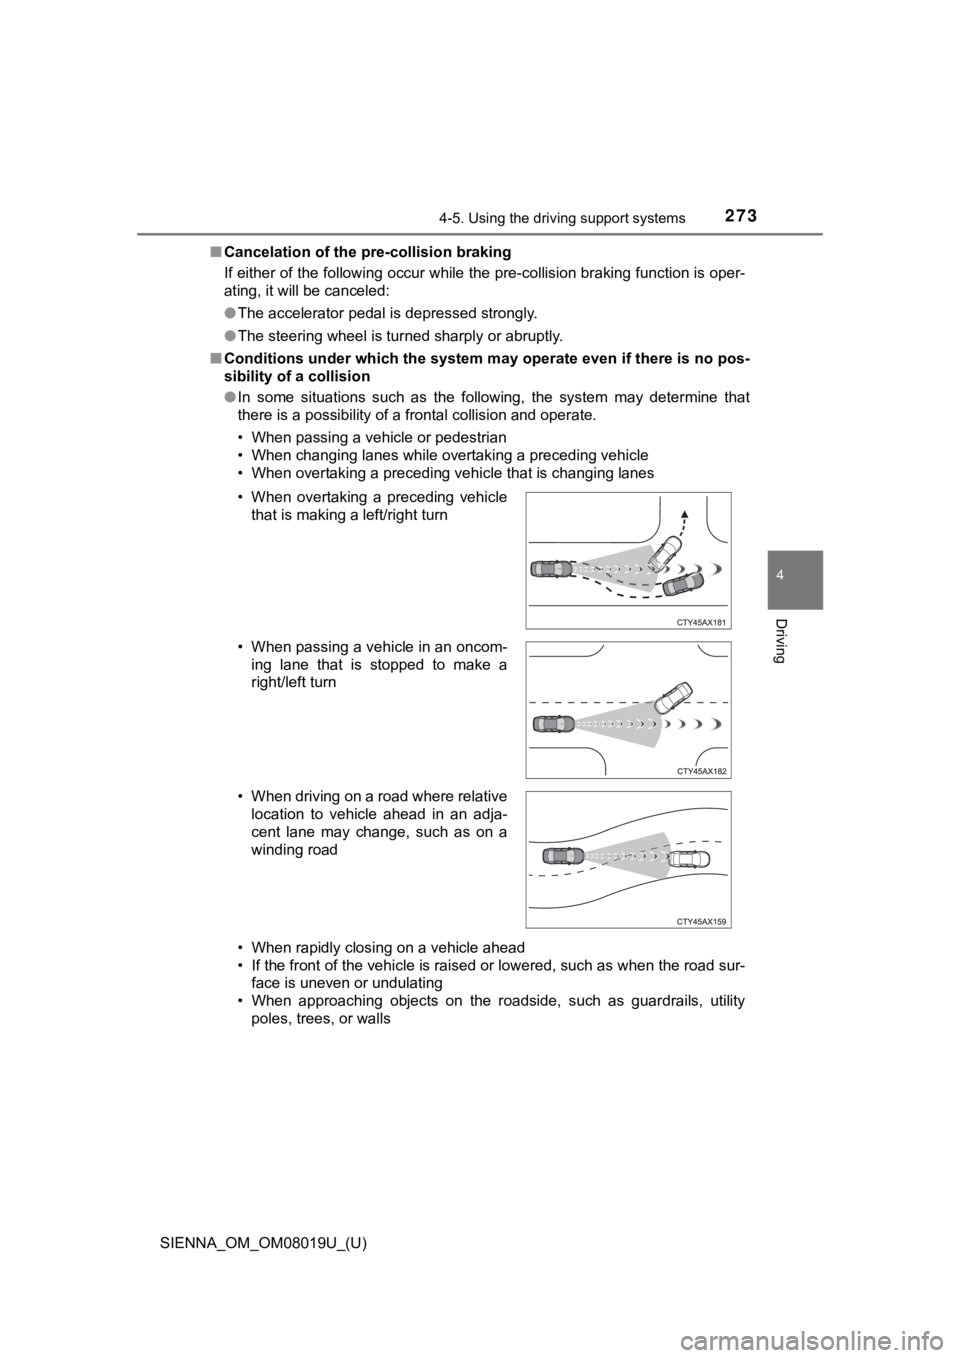
● In some situations such as the following, the system may determ ine that
there is a possibility of a frontal collision and operate.
• When passing a vehicle or pedestrian
• When changing lanes while overtaking a preceding vehicle
• When overtaking a preceding vehicle that is changing lanes
• When rapidly closing on a vehicle ahead
• If the front of the vehicle is raised or lowered, such as when the road sur-
face is uneven or undulating
• When approaching objects on the roadside, such as guardrails, utility
poles, trees, or walls
• When overtaking a preceding vehicle
that is making a left/right turn
• When passing a vehicle in an oncom- ing lane that is stopped to make a
right/left turn
• When driving on a road where relative location to vehicle ahead in an adja-
cent lane may change, such as on a
winding road
Page 276 of 584
276
SIENNA_OM_OM08019U_(U)
4-5. Using the driving support systems
• If a vehicle ahead makes an abrupt maneuver (such as sudden sw erving,
acceleration or deceleration)
• When suddenly cutting behind a preceding vehicle
• When driving in inclement weather such as heavy rain, fog, snow or a
sandstorm
• When the vehicle is hit by water, snow, dust, etc. from a vehicle ahead
• When driving through steam or smoke
• When driving in a place where the surrounding brightness changes sud- denly, such as at the entrance or exit of a tunnel
• When a very bright light, such as the sun or the headlights of oncoming
traffic, shines directly into the camera sensor
• When the surrounding area is dim, such as at dawn or dusk, or while at
night or in a tunnel
• After the engine has started the vehicle has not been driven for a certain amount of time
• While making a left/right turn and for a few seconds after mak ing a left/
right turn
• While driving on a curve and for a few seconds after driving o n a curve
• If your vehicle is skidding
• If the wheels are misaligned
• If a wiper blade is blocking the camera sensor
• The vehicle is wobbling.
• The vehicle is being driven at extremely high speeds.
• When driving on a hill
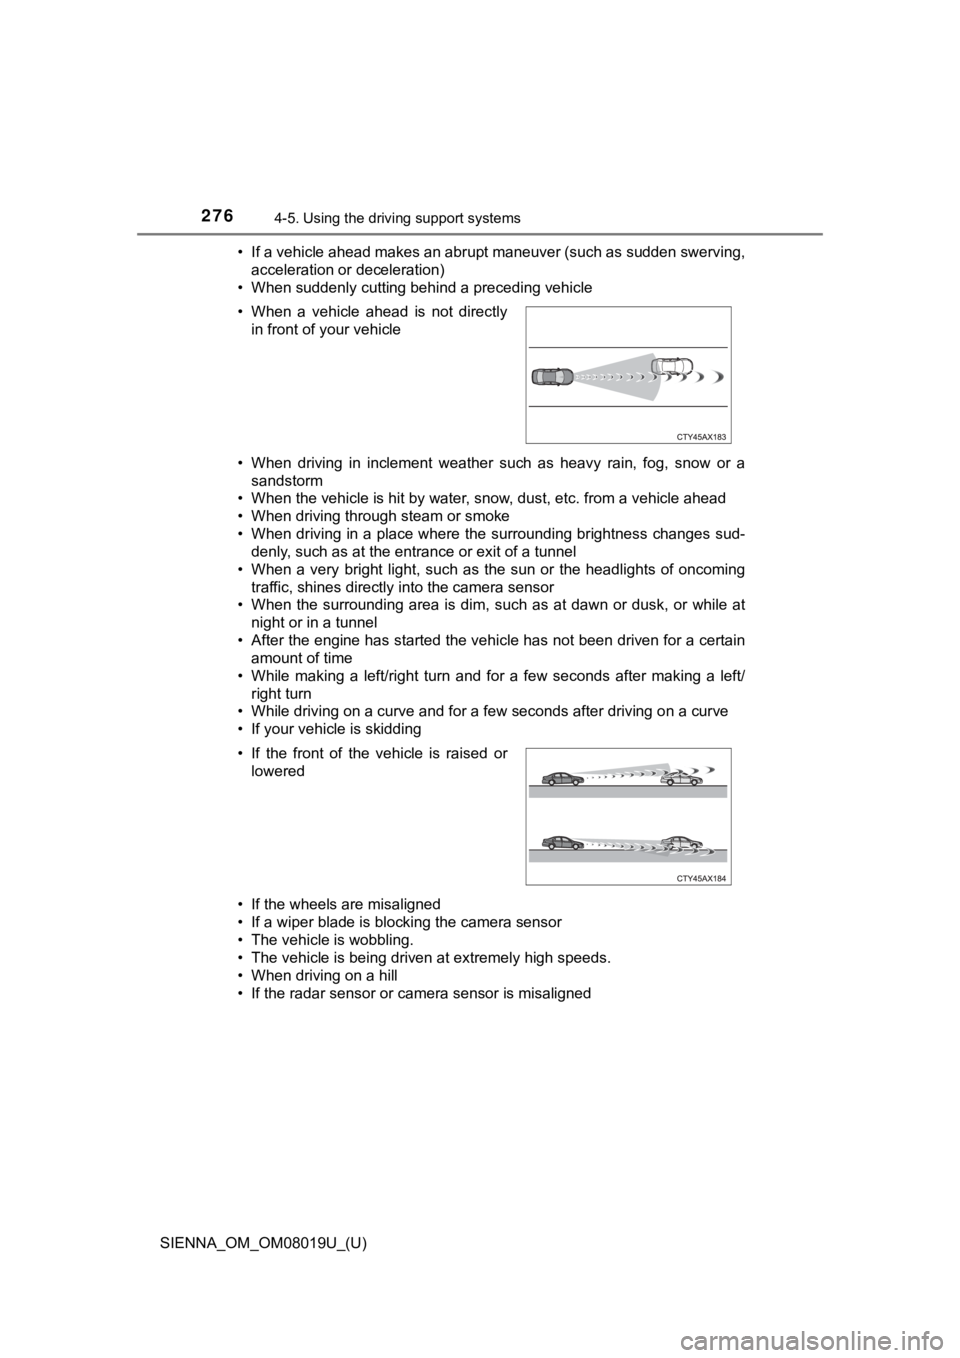
• If the radar sensor or camera sensor is misaligned • When a vehicle ahead is not directly in front of your vehicle
• If the front of the vehicle is raised or lowered
Page 288 of 584
288
SIENNA_OM_OM08019U_(U)
4-5. Using the driving support systems
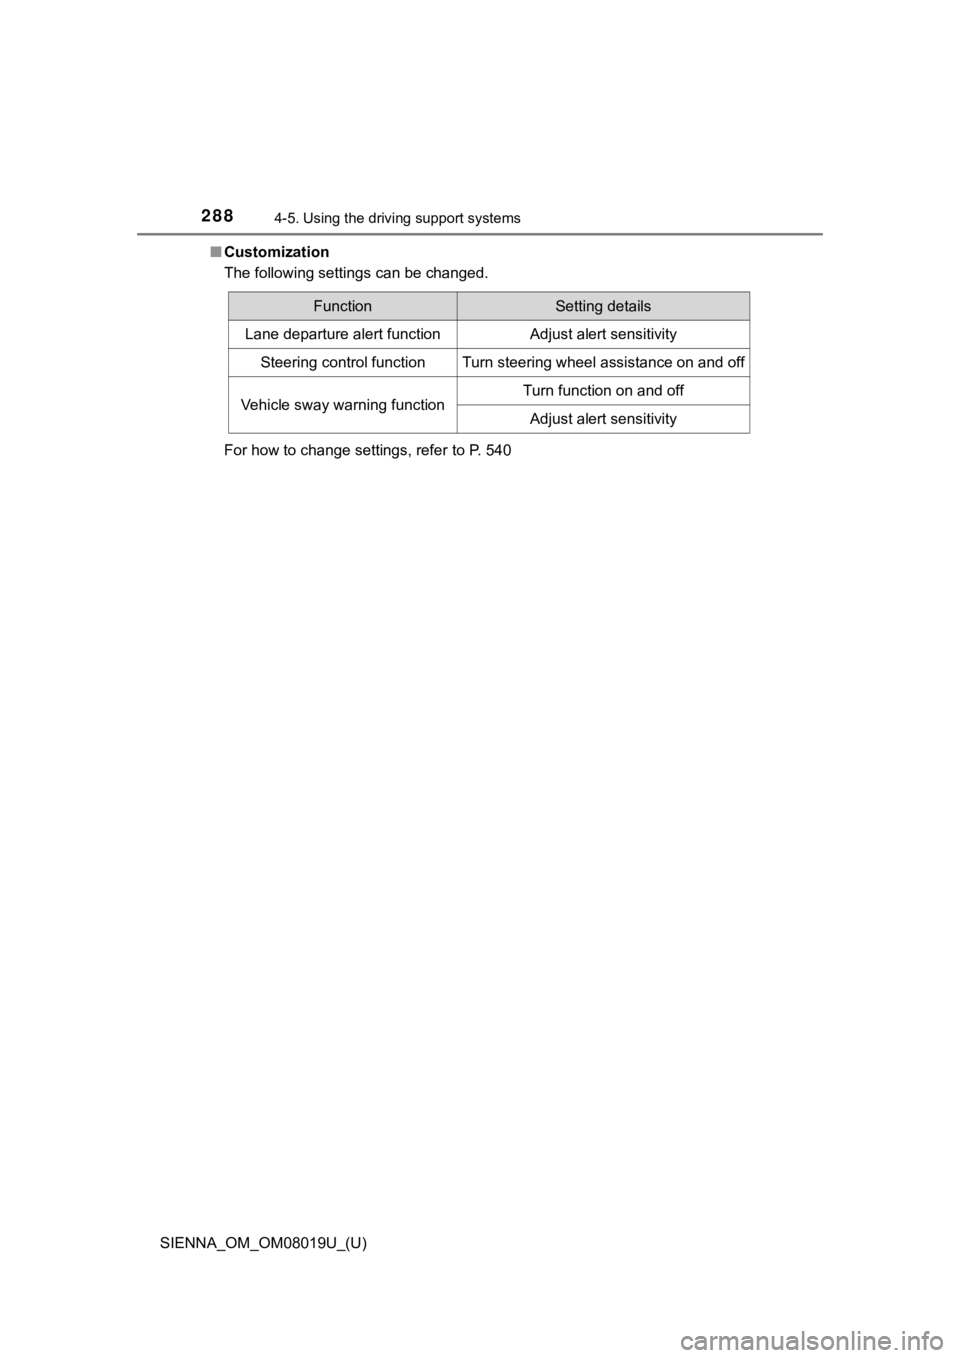
■Customization
The following settings can be changed.
For how to change settings, refer to P. 540
FunctionSetting details
Lane departure alert functionAdjust alert sensitivity
Steering control functionTurn steering wheel assistance on and off
Vehicle sway warning functionTurn function on and off
Adjust alert sensitivity
Page 421 of 584

SIENNA_OM_OM08019U_(U)
4216-3. Do-it-yourself maintenance
6
Maintenance and care
Your vehicle is equipped with a tire pressure warning system that uses
tire pressure warning valves and transmitters to detect low tire infla-
tion pressure before serious problems arise. ( P. 474)
Vehicles with compact spare tire: The compact spare tire is not
equipped with the tire pressure w arning valve and transmitters.
◆Installing tire pressure warning valves and transmitters
When replacing tires or wheels, tire pressure warning valves an d
transmitters must also be installed.
When new tire pressure warning valves and transmitters are
installed, new ID codes must be registered in the tire pressure
warning computer and the tire pressure warning system must be
initialized. Have tire pressure warning valve and transmitter I D
codes registered by your Toyota dealer. ( P. 422)
◆Initializing the tire pressure warning system
When the tire size is changed, the tire pressure warning system
must be initialized.
When the tire pressure warning sy stem is initialized, the current tire
inflation pressure is set as the benchmark pressure.
■How to initialize the tire pressure warning system
Park the vehicle in a safe place and turn the engine switch off .
Initialization cannot be performed while the vehicle is moving.
Adjust the tire inflation pressure to the specified cold tire i nflation
pressure level. ( P. 522)
Make sure to adjust the tire pre ssure to the specified cold tire infla-
tion pressure level. The tire pressure warning system will oper ate
based on this pr essure level.
Turn the engine switch to the “ON” position (vehicles without a
smart key system) or IGNITION ON mode (vehicles with a smart
key system).
Tire pressure warning system
1
2
3
Page 478 of 584
4787-2. Steps to take in an emergency
SIENNA_OM_OM08019U_(U)
WARNING
■If both the ABS and the brake s ystem warning lights remain on
Stop your vehicle in a safe place immediately and contact your To y o t a
dealer. The vehicle will become extremely unstable during braki ng, and the
ABS system may fail, which could cause an accident resulting in death or
serious injury.
■ When the electric power steering system warning light comes on
The steering wheel may become extremely heavy.
When steering wheel operations are heavier than usual, grip the steering
wheel firmly and operate it using more force than usual.
■
If the tire pressure warning light comes on
Be sure to observe the following precautions. Failure to do so could
cause a loss of vehicle control and result in death or serious injury.
Vehicles with standard tires:
●Stop your vehicle in a safe place as soon as possible. Adjust t he tire
inflation pressure immediately.
●If the tire pressure warning light comes on even after tire inf lation pres-
sure adjustment, it is probable that you have a flat tire. Chec k the tires.
If a tire is flat, change it with the spare tire and have the f lat tire
repaired by the nearest Toyota dealer.
●Avoid abrupt maneuvering and braking. If the vehicle tires dete riorate,
you could lose control of the steering wheel or the brakes.
Vehicles with run-flat tires:
●Decelerate to the lowest appropriate speed as soon as possible. Do
not drive over 50 mph (80 km/h).
●Check and adjust the tire infl ation pressure immediately.
●If the tire pressure warning light comes on even after tire inf lation pres-
sure adjustment, it is probable that you have a flat tire. Have the tire
replaced by the nearest Toyota dealer.
●Avoid abrupt maneuvering and braking. If the vehicle tires dete riorate,
you could lose control of the steering wheel or the brakes.
■If a blowout or sudden air leakage should occur
The tire pressure warning system may not activate immediately.
Page 496 of 584

4967-2. Steps to take in an emergency
SIENNA_OM_OM08019U_(U)
■The compact spare tire
●The compact spare tire is identified by the label “TEMPORARY USE
ONLY” on the tire sidewall.
Use the compact spar e tire temporarily, and only in an emergenc y.
●Make sure to check the tire inflation pressure of the compact s pare tire.
( P. 5 2 4 )
■After completing the tire change
The tire pressure warni ng system must be reset. ( P. 421)
■When using the compact spare tire
As the compact spare tire is not equipped with a tire pressure warning
valve and transmitter, low inflation pressure of the spare tire will not be
indicated by the tire pressure warning system. Also, if you rep lace the
compact spare tire after the tire pressure warning light comes on, the light
remains on.
■When the compact spa re tire is equipped
The vehicle becomes lower when driving with the compact spare t ire
compared to when driving with standard tires
■If you have a flat front tire on a road covered with snow or ic e
Install the compact spare tire on one of the rear wheels of the vehicle.
Perform the following steps and f it tire chains to the front tires:
Replace a rear tire with the compact spare tire.
Replace the flat front tire with the tire removed from the rear of the vehi-
cle.
Fit tire chains to the front tires.
1
2
3