remote control TOYOTA SIENNA HYBRID 2021 Accessories, Audio & Navigation (in English)
[x] Cancel search | Manufacturer: TOYOTA, Model Year: 2021, Model line: SIENNA HYBRID, Model: TOYOTA SIENNA HYBRID 2021Pages: 332, PDF Size: 11.73 MB
Page 39 of 332
392-2. Connectivity settings
2
Basic function
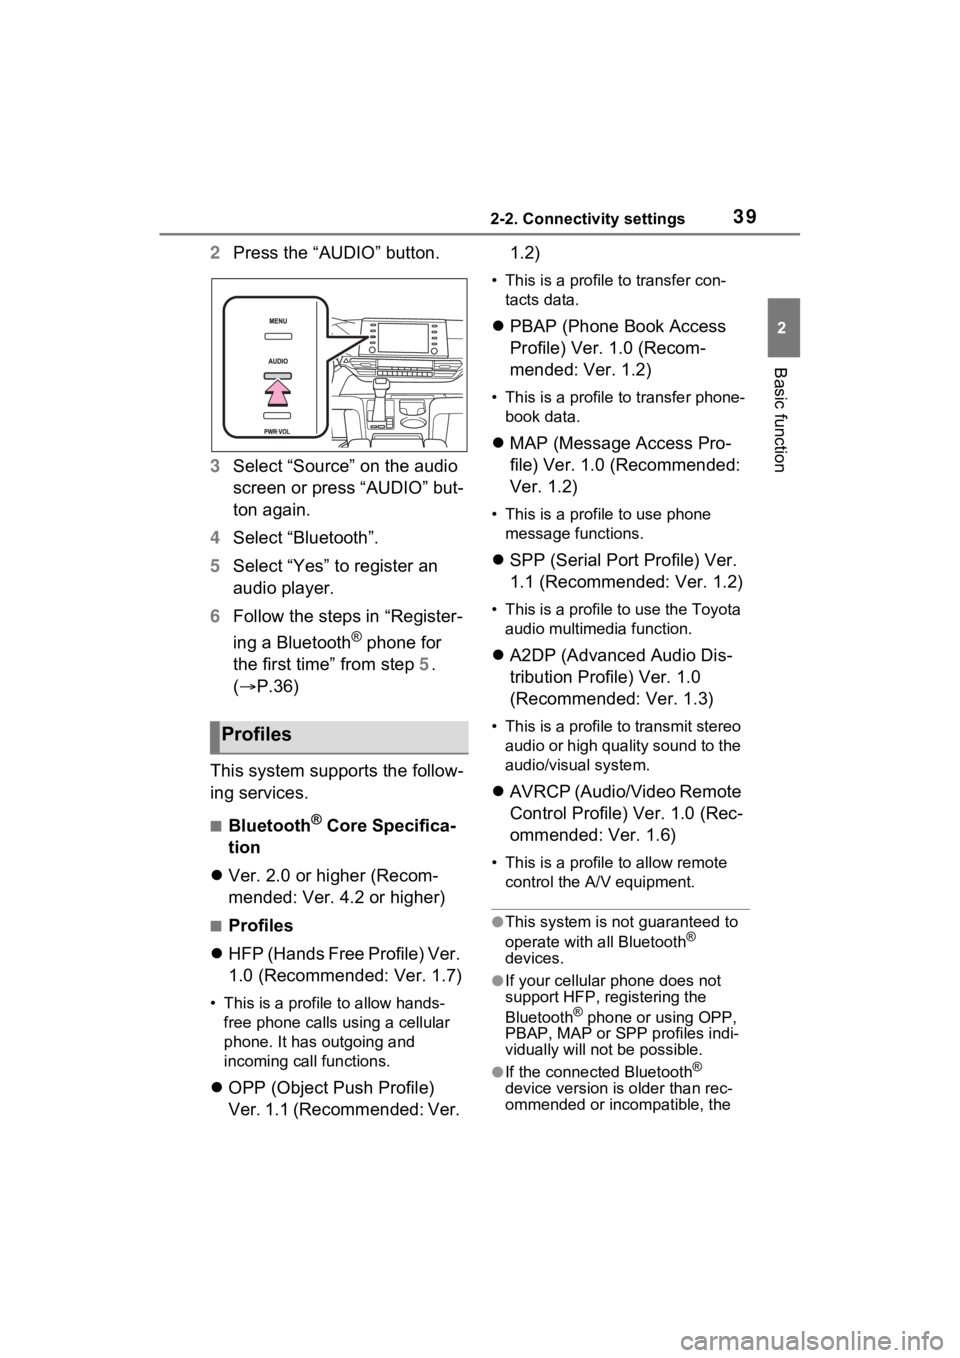
2Press the “AUDIO” button.
3 Select “Source” on the audio
screen or press “AUDIO” but-
ton again.
4 Select “Bluetooth”.
5 Select “Yes” to register an
audio player.
6 Follow the steps in “Register-
ing a Bluetooth
® phone for
the first time” from step 5.
( P.36)
This system supports the follow-
ing services.
■Bluetooth® Core Specifica-
tion
Ver. 2.0 or higher (Recom-
mended: Ver. 4.2 or higher)
■Profiles
HFP (Hands Free Profile) Ver.
1.0 (Recommended: Ver. 1.7)
• This is a profile to allow hands-
free phone calls using a cellular
phone. It has outgoing and
incoming call functions.
OPP (Object Push Profile)
Ver. 1.1 (Recommended: Ver. 1.2)
• This is a profile to transfer con-
tacts data.
PBAP (Phone Book Access
Profile) Ver. 1.0 (Recom-
mended: Ver. 1.2)
• This is a profile to transfer phone-
book data.
MAP (Message Access Pro-
file) Ver. 1.0 (Recommended:
Ver. 1.2)
• This is a profile to use phone
message functions.
SPP (Serial Port Profile) Ver.
1.1 (Recommended: Ver. 1.2)
• This is a profile to use the Toyota
audio multimedia function.
A2DP (Advanced Audio Dis-
tribution Profile) Ver. 1.0
(Recommended: Ver. 1.3)
• This is a profile to transmit stereo
audio or high quality sound to the
audio/visual system.
AVRCP (Audio/Video Remote
Control Profile) Ver. 1.0 (Rec-
ommended: Ver. 1.6)
• This is a profile to allow remote
control the A/V equipment.
●This system is not guaranteed to
operate with all Bluetooth®
devices.
●If your cellular phone does not
support HFP, registering the
Bluetooth
® phone or using OPP,
PBAP, MAP or SPP profiles indi-
vidually will not be possible.
●If the connected Bluetooth®
device version is older than rec-
ommended or incompatible, the
Profiles
Page 144 of 332
1444-4. Audio/visual remote controls
4-4.Audio/visual remote controls
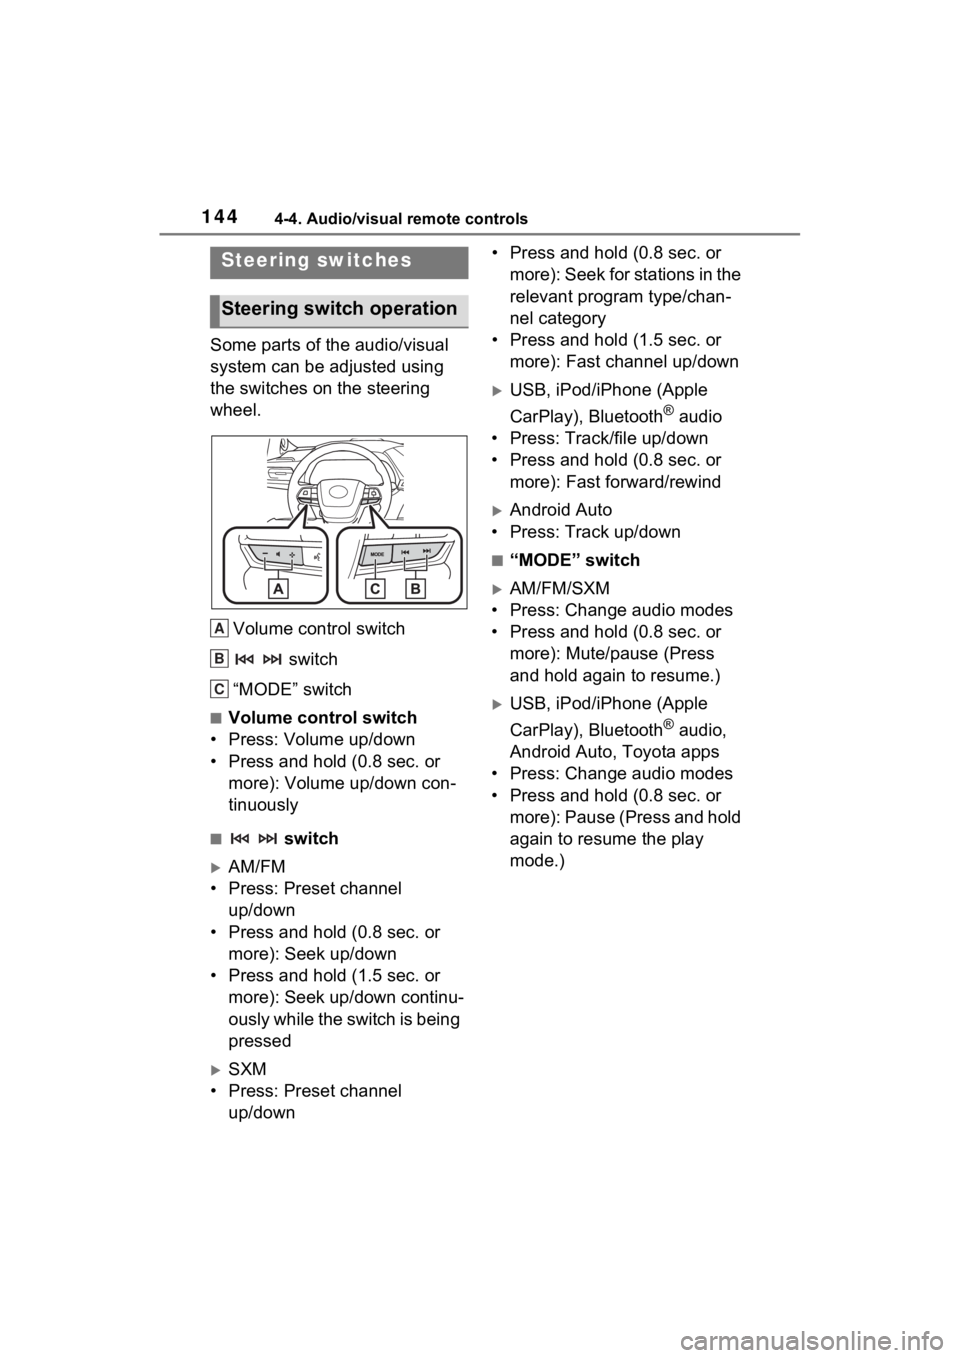
Some parts of the audio/visual
system can be adjusted using
the switches on the steering
wheel.Volume control switch switch
“MODE” switch
■Volume control switch
• Press: Volume up/down
• Press and hold (0.8 sec. or more): Volume up/down con-
tinuously
■ switch
AM/FM
• Press: Preset channel up/down
• Press and hold (0.8 sec. or more): Seek up/down
• Press and hold (1.5 sec. or more): Seek up/down continu-
ously while the switch is being
pressed
SXM
• Press: Preset channel up/down • Press and hold (0.8 sec. or
more): Seek for stations in the
relevant program type/chan-
nel category
• Press and hold (1.5 sec. or more): Fast channel up/down
USB, iPod/iPhone (Apple
CarPlay), Bluetooth
® audio
• Press: Track/file up/down
• Press and hold (0.8 sec. or more): Fast forward/rewind
Android Auto
• Press: Track up/down
■“MODE” switch
AM/FM/SXM
• Press: Change audio modes
• Press and hold (0.8 sec. or more): Mute/pause (Press
and hold again to resume.)
USB, iPod/iPhone (Apple
CarPlay), Bluetooth
® audio,
Android Auto, Toyota apps
• Press: Change audio modes
• Press and hold (0.8 sec. or more): Pause (Press and hold
again to resume the play
mode.)
Steering switches
Steering switch operation
A
B
C
Page 158 of 332
1584-7. Rear seat entertainment system operation
4-7.Rear seat entertainment system operation
*: If equipped
The following operations can be
performed:
Using the remote controller
( P.159)
Connecting a device to rear
HDMI input port ( P.161)
Changing audio output
( P.162)
Selecting the source
( P.162)
Operating the rear seat enter-
tainment system from the
front seats ( P.163)
Rear seat entertainment sys-
tem operation ( P.164)
Rear display settings
( P.171)
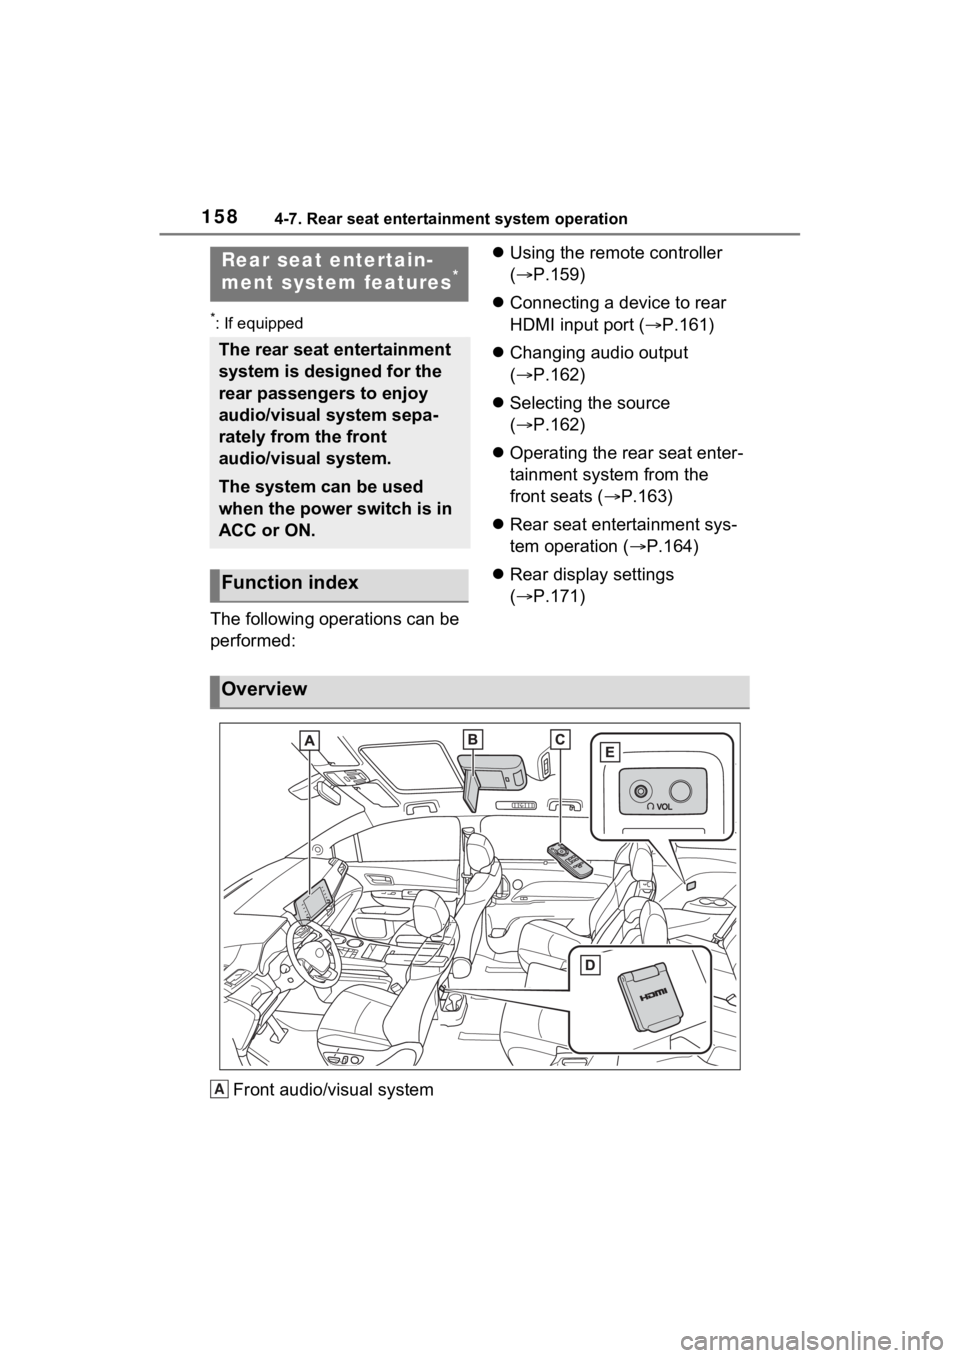
Front audio/visual system
Rear seat entertain-
ment system features*
The rear seat entertainment
system is designed for the
rear passengers to enjoy
audio/visual system sepa-
rately from the front
audio/visual system.
The system can be used
when the power switch is in
ACC or ON.
Function index
Overview
A
Page 159 of 332
1594-7. Rear seat entertainment system operation
4
Audio/visual system
Rear display
Remote controller
HDMI input port
Headphone volume control dials and headphone jacks
The system cannot be operated
by touching the switches on the
rear display directly.
The rear seat entertainment
system can be operated with the
remote controller.
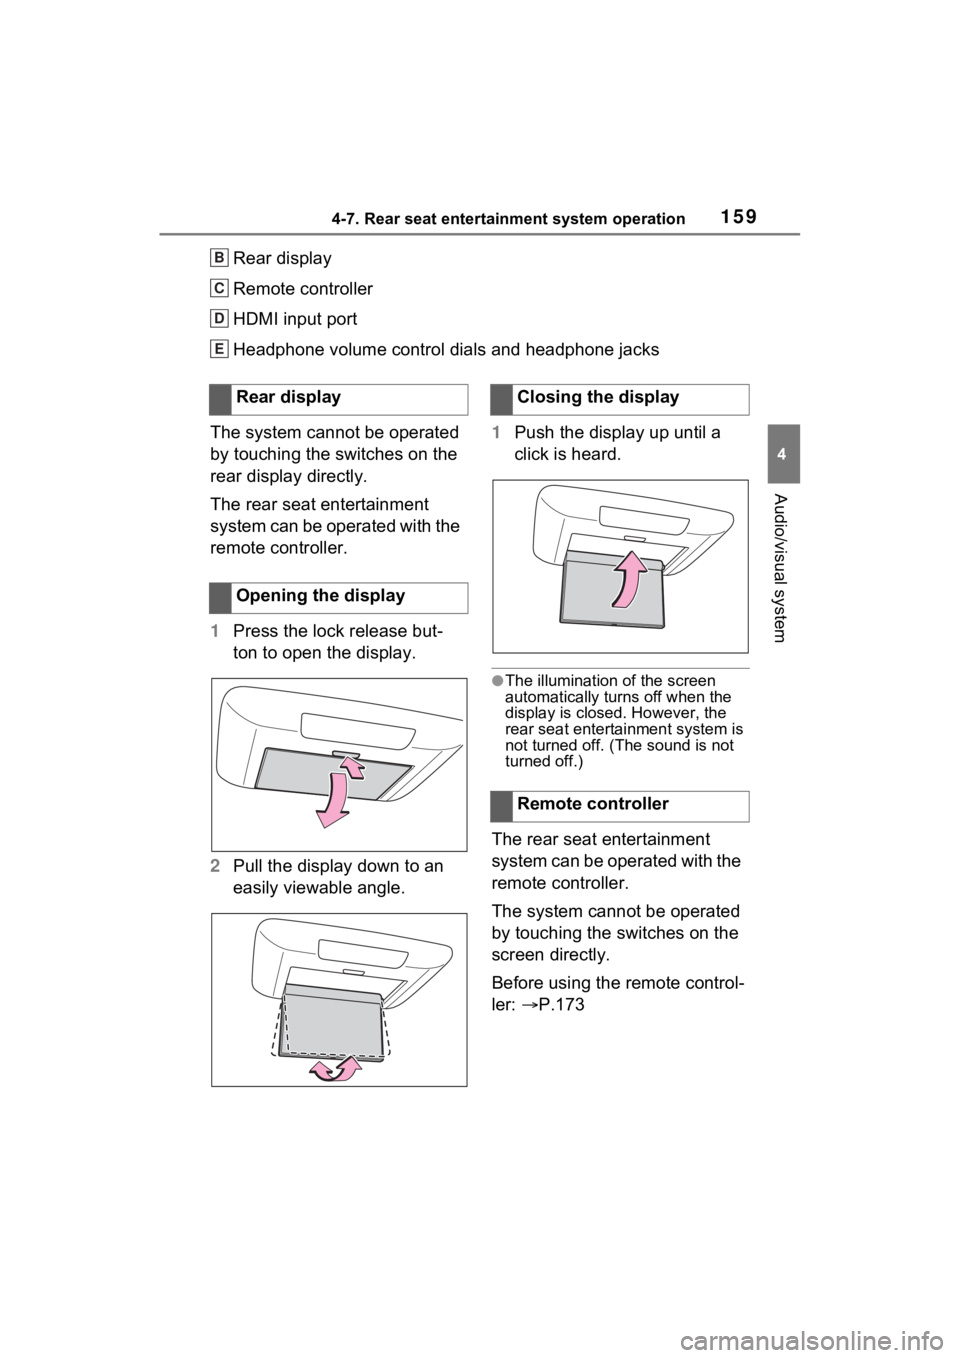
1 Press the lock release but-
ton to open the display.
2 Pull the display down to an
easily viewable angle. 1
Push the display up until a
click is heard.
●The illumination of the screen
automatically turn s off when the
display is closed. However, the
rear seat entertainment system is
not turned o ff. (The sound is not
turned off.)
The rear seat entertainment
system can be operated with the
remote controller.
The system cannot be operated
by touching the switches on the
screen directly.
Before using the remote control-
ler: P.173
B
C
D
E
Rear display
Opening the displayClosing the display
Remote controller
Page 160 of 332
1604-7. Rear seat entertainment system operation
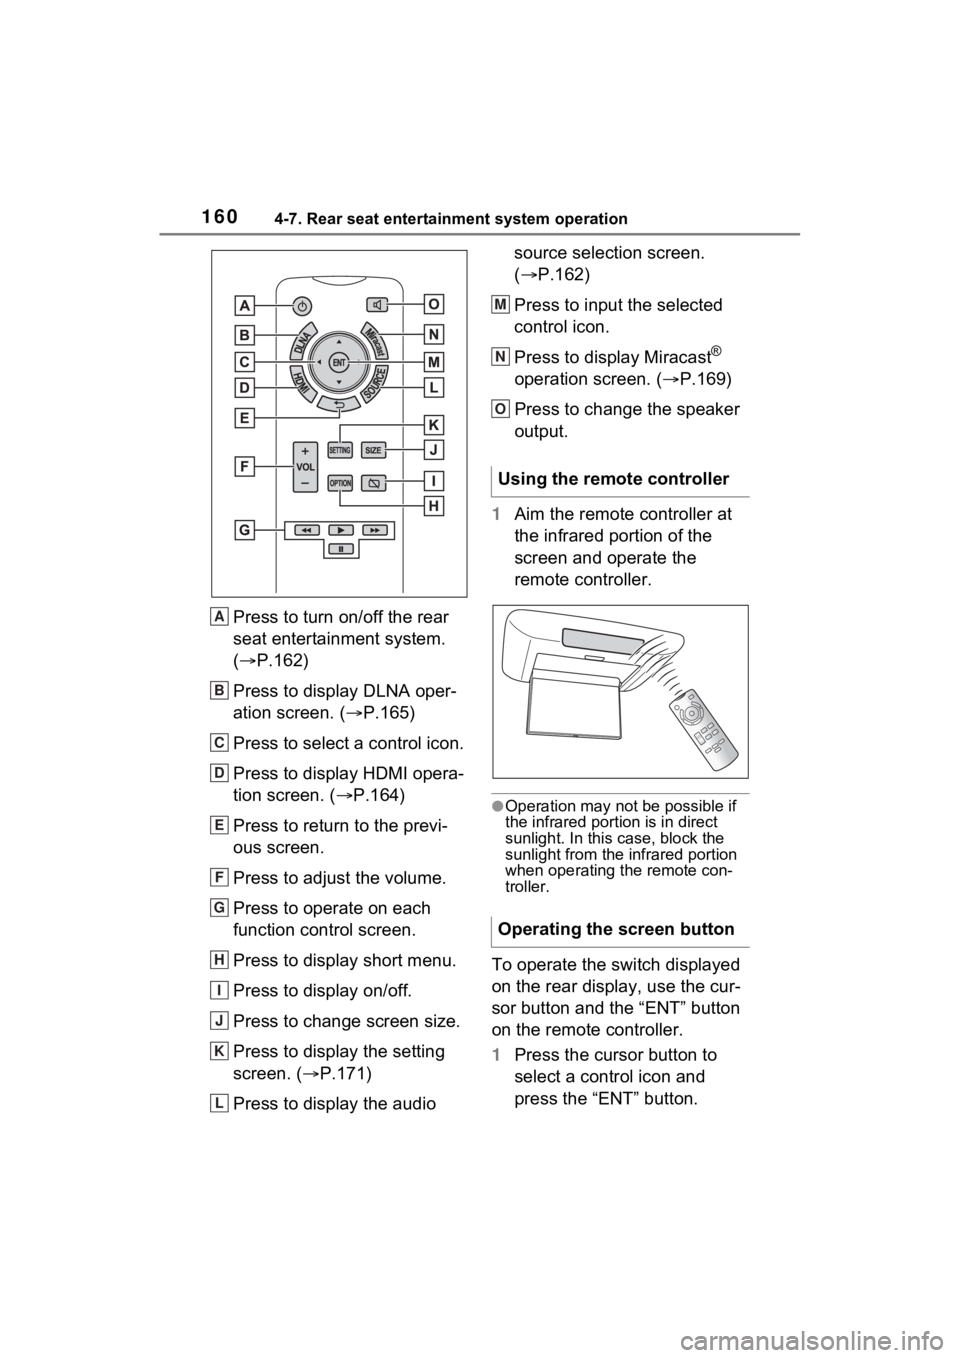
Press to turn on/off the rear
seat entertainment system.
(P.162)
Press to display DLNA oper-
ation screen. ( P.165)
Press to select a control icon.
Press to display HDMI opera-
tion screen. ( P.164)
Press to return to the previ-
ous screen.
Press to adjust the volume.
Press to operate on each
function control screen.
Press to display short menu.
Press to display on/off.
Press to change screen size.
Press to display the setting
screen. ( P.171)
Press to display the audio source selection screen.
(
P.162)
Press to input the selected
control icon.
Press to display Miracast
®
operation screen. ( P.169)
Press to change the speaker
output.
1 Aim the remote controller at
the infrared portion of the
screen and operate the
remote controller.
●Operation may not be possible if
the infrared portion is in direct
sunlight. In this case, block the
sunlight from the infrared portion
when operating the remote con-
troller.
To operate the switch displayed
on the rear display, use the cur-
sor button and the “ENT” button
on the remote controller.
1Press the cursor button to
select a control icon and
press the “ENT” button.
A
B
C
D
E
F
G
H
I
J
K
L
Using the remote controller
Operating the screen button
M
N
O
Page 162 of 332
1624-7. Rear seat entertainment system operation
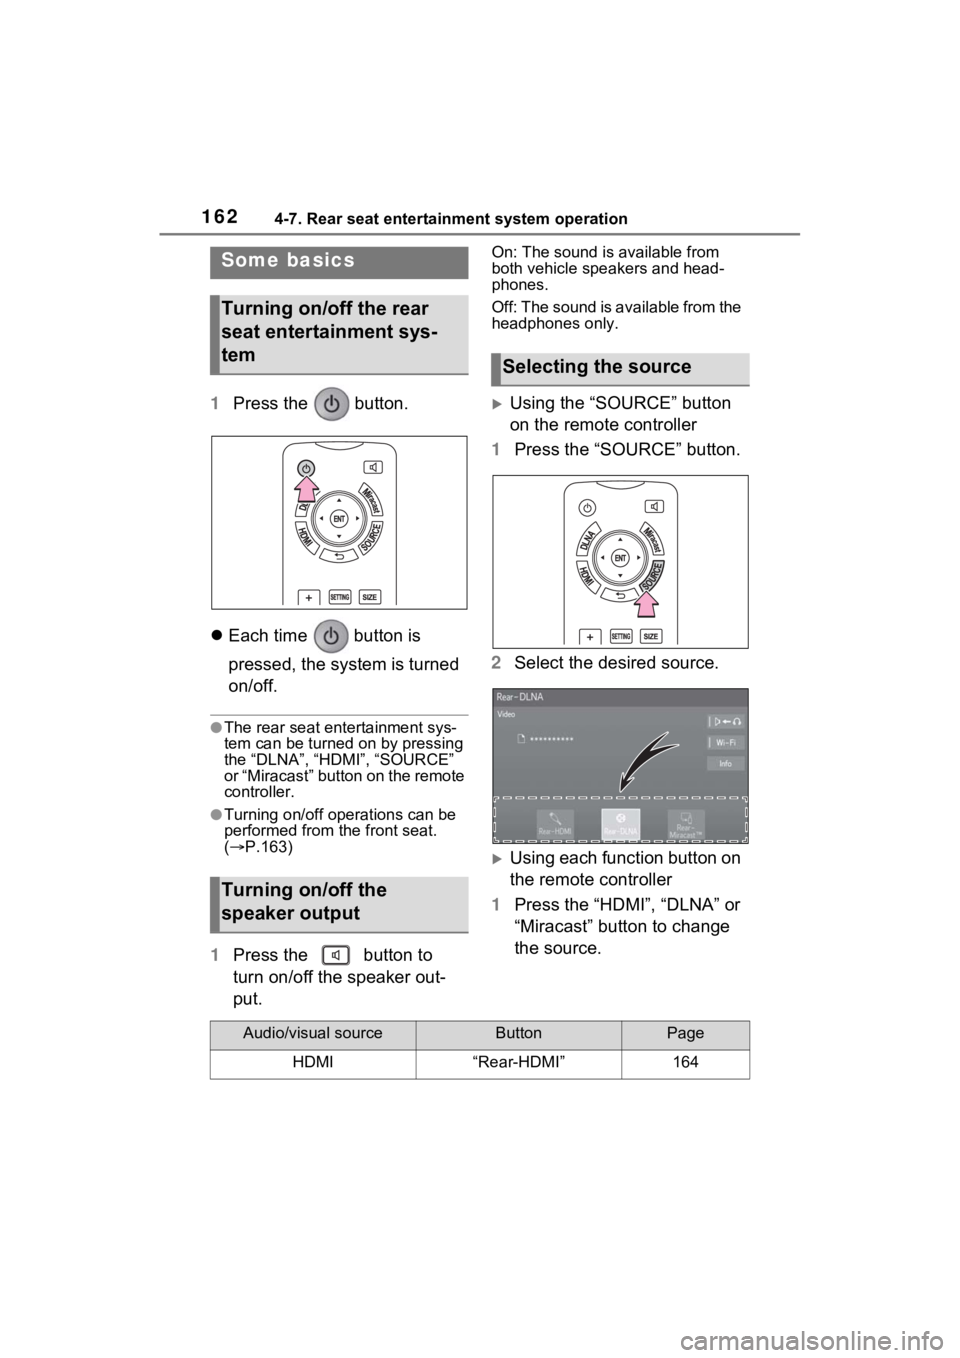
1Press the button.
Each time button is
pressed, the system is turned
on/off.
●The rear seat entertainment sys-
tem can be turned on by pressing
the “DLNA”, “HDMI”, “SOURCE”
or “Miracast” button on the remote
controller.
●Turning on/off operations can be
performed from the front seat.
( P.163)
1 Press the button to
turn on/off the speaker out-
put.
On: The sound is available from
both vehicle speakers and head-
phones.
Off: The sound is available from the
headphones only.
Using the “SOURCE” button
on the remote controller
1 Press the “SOURCE” button.
2 Select the desired source.
Using each function button on
the remote controller
1 Press the “HDMI”, “DLNA” or
“Miracast” button to change
the source.
Some basics
Turning on/off the rear
seat entertainment sys-
tem
Turning on/off the
speaker output
Selecting the source
Audio/visual sourceButtonPage
HDMI“Rear-HDMI”164
Page 164 of 332
1644-7. Rear seat entertainment system operation
entertainment systemThis system correspond with
some of HDMI device remote
control. Available remote control
functions depend on the con-
nected device.
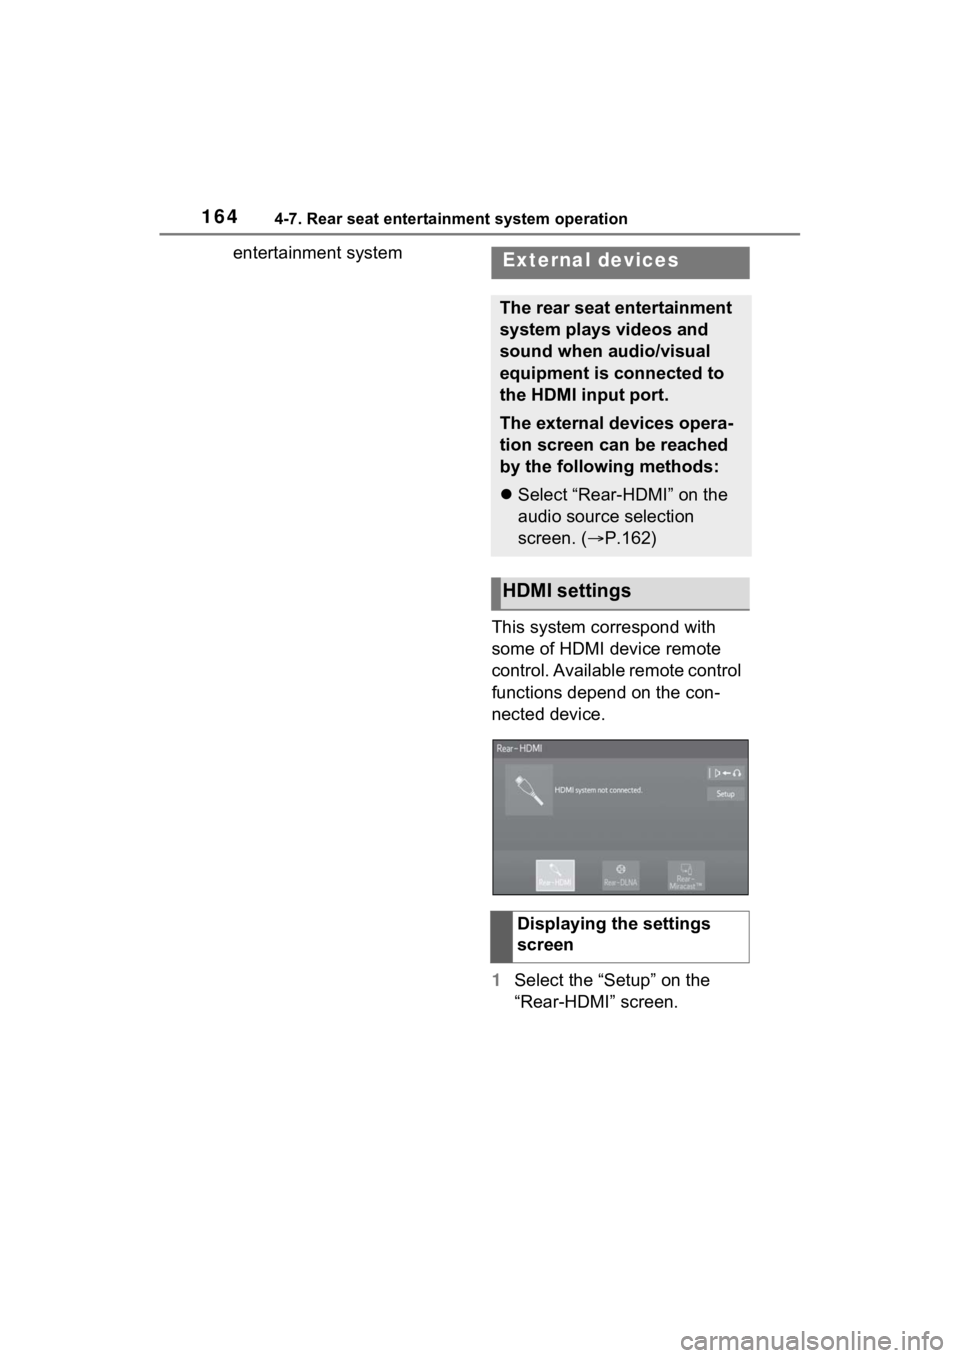
1Select the “Setup” on the
“Rear-HDMI” screen.External devices
The rear seat entertainment
system plays videos and
sound when audio/visual
equipment is connected to
the HDMI input port.
The external devices opera-
tion screen can be reached
by the following methods:
Select “Rear-HDMI” on the
audio source selection
screen. ( P.162)
HDMI settings
Displaying the settings
screen
Page 166 of 332
1664-7. Rear seat entertainment system operation
any Wi-Fi® connections to the rear
seat entertainment system will be
severed.
Using the “SOURCE” button
on the remote controller
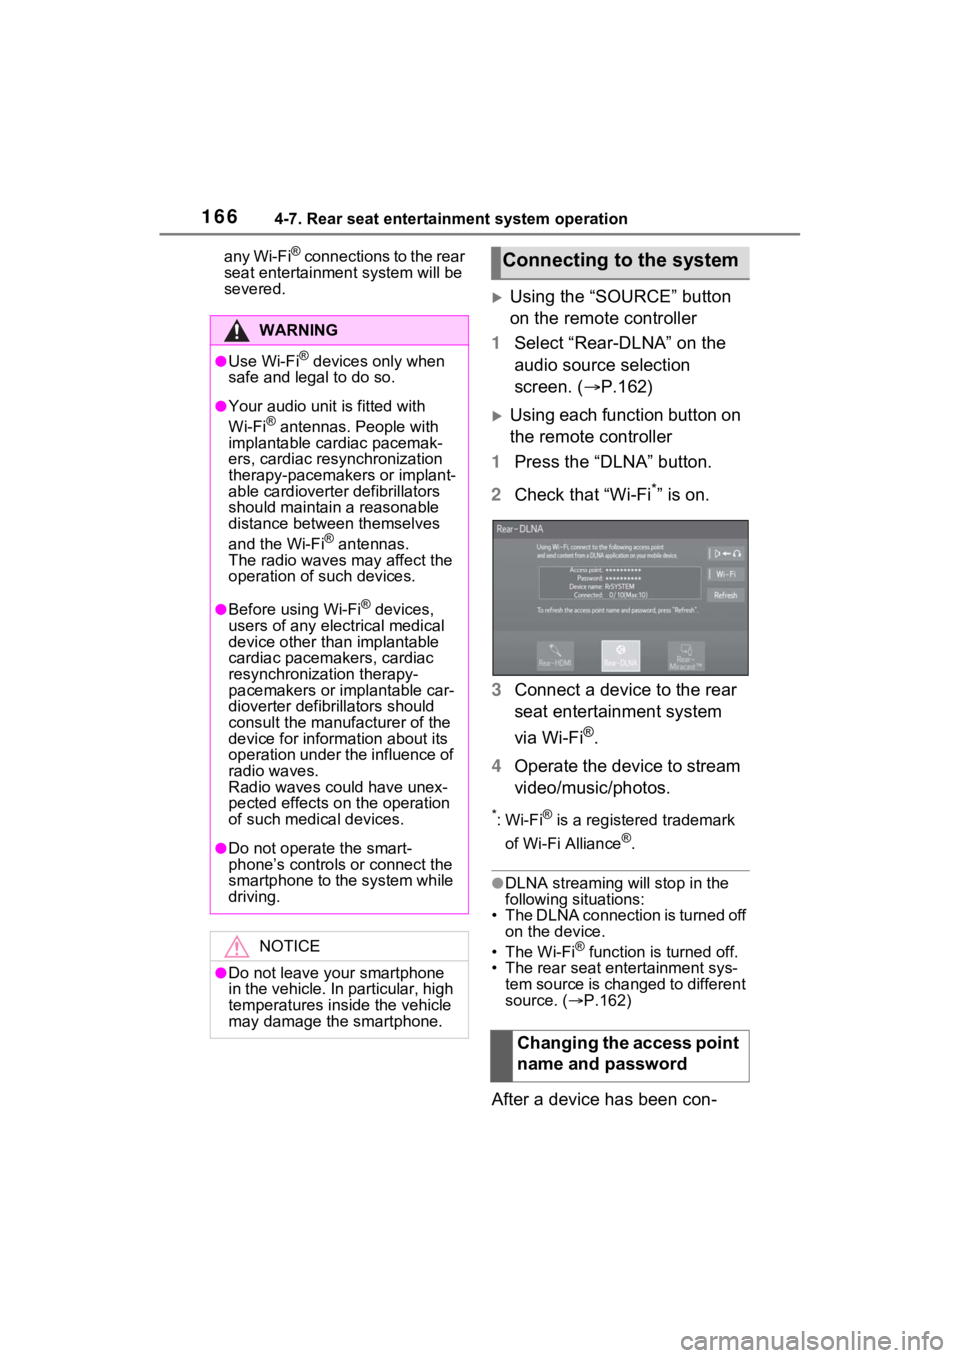
1 Select “Rear-DLNA” on the
audio source selection
screen. ( P.162)
Using each function button on
the remote controller
1 Press the “DLNA” button.
2 Check that “Wi-Fi
*” is on.
3 Connect a device to the rear
seat entertainment system
via Wi-Fi
®.
4 Operate the device to stream
video/music/photos.
*:Wi-Fi® is a registered trademark
of Wi-Fi Alliance
®.
●DLNA streaming will stop in the
following situations:
• The DLNA connection is turned off
on the device.
•The Wi-Fi
® function is turned off.
• The rear seat entertainment sys- tem source is changed to different
source. ( P.162)
After a device has been con-
WARNING
●Use Wi-Fi® devices only when
safe and legal to do so.
●Your audio unit is fitted with
Wi-Fi® antennas. People with
implantable cardiac pacemak-
ers, cardiac resynchronization
therapy-pacemakers or implant-
able cardioverter defibrillators
should maintain a reasonable
distance between themselves
and the Wi-Fi
® antennas.
The radio waves may affect the
operation of such devices.
●Before using Wi-Fi® devices,
users of any electrical medical
device other than implantable
cardiac pacemakers, cardiac
resynchronization therapy-
pacemakers or implantable car-
dioverter defibrillators should
consult the manufacturer of the
device for information about its
operation under the influence of
radio waves.
Radio waves could have unex-
pected effects on the operation
of such medical devices.
●Do not operate the smart-
phone’s controls o r connect the
smartphone to the system while
driving.
NOTICE
●Do not leave your smartphone
in the vehicle. In particular, high
temperatures inside the vehicle
may damage the smartphone.
Connecting to the system
Changing the access point
name and password
Page 167 of 332
1674-7. Rear seat entertainment system operation
4
Audio/visual system
nected to the vehicle Wi-Fi®
access point once, the access
point information will remain on
the device, enabling it automati-
cally connect the next time the
device is brought within access
point range, unless the access
point name or password is
changed.
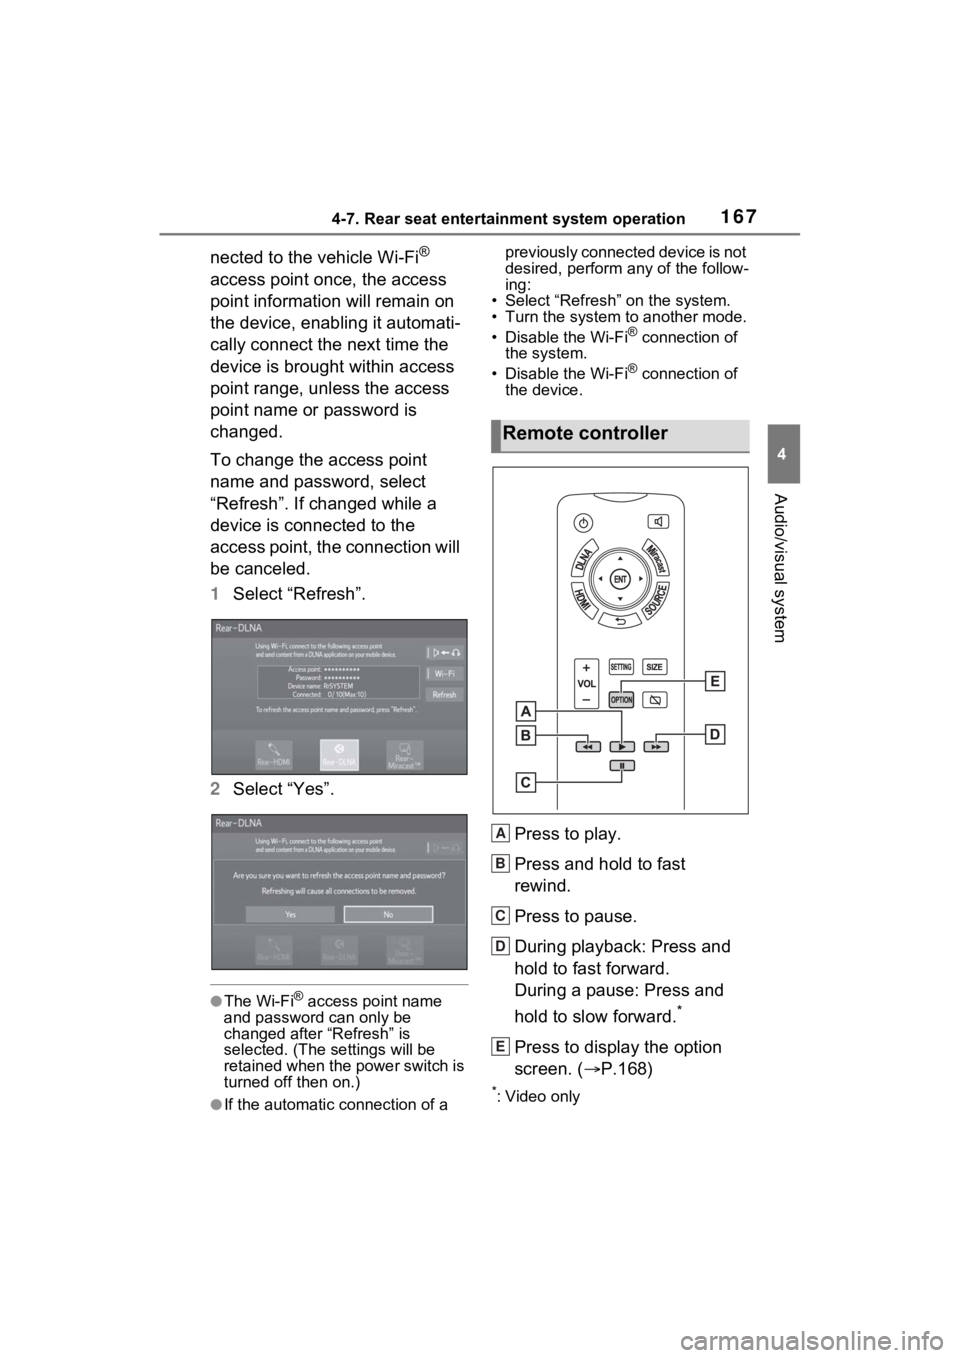
To change the access point
name and password, select
“Refresh”. If changed while a
device is connected to the
access point, the connection will
be canceled.
1 Select “Refresh”.
2 Select “Yes”.
●The Wi-Fi® access point name
and password can only be
changed after “Refresh” is
selected. (The settings will be
retained when the power switch is
turned off then on.)
●If the automatic connection of a previously connected device is not
desired, perform any of the follow-
ing:
• Select “Refresh” on the system.
• Turn the system to another mode.
• Disable the Wi-Fi
® connection of
the system.
• Disable the Wi-Fi
® connection of
the device.
Press to play.
Press and hold to fast
rewind.
Press to pause.
During playback: Press and
hold to fast forward.
During a pause: Press and
hold to slow forward.
*
Press to display the option
screen. ( P.168)
*: Video only
Remote controller
A
B
C
D
E
Page 168 of 332
1684-7. Rear seat entertainment system operation
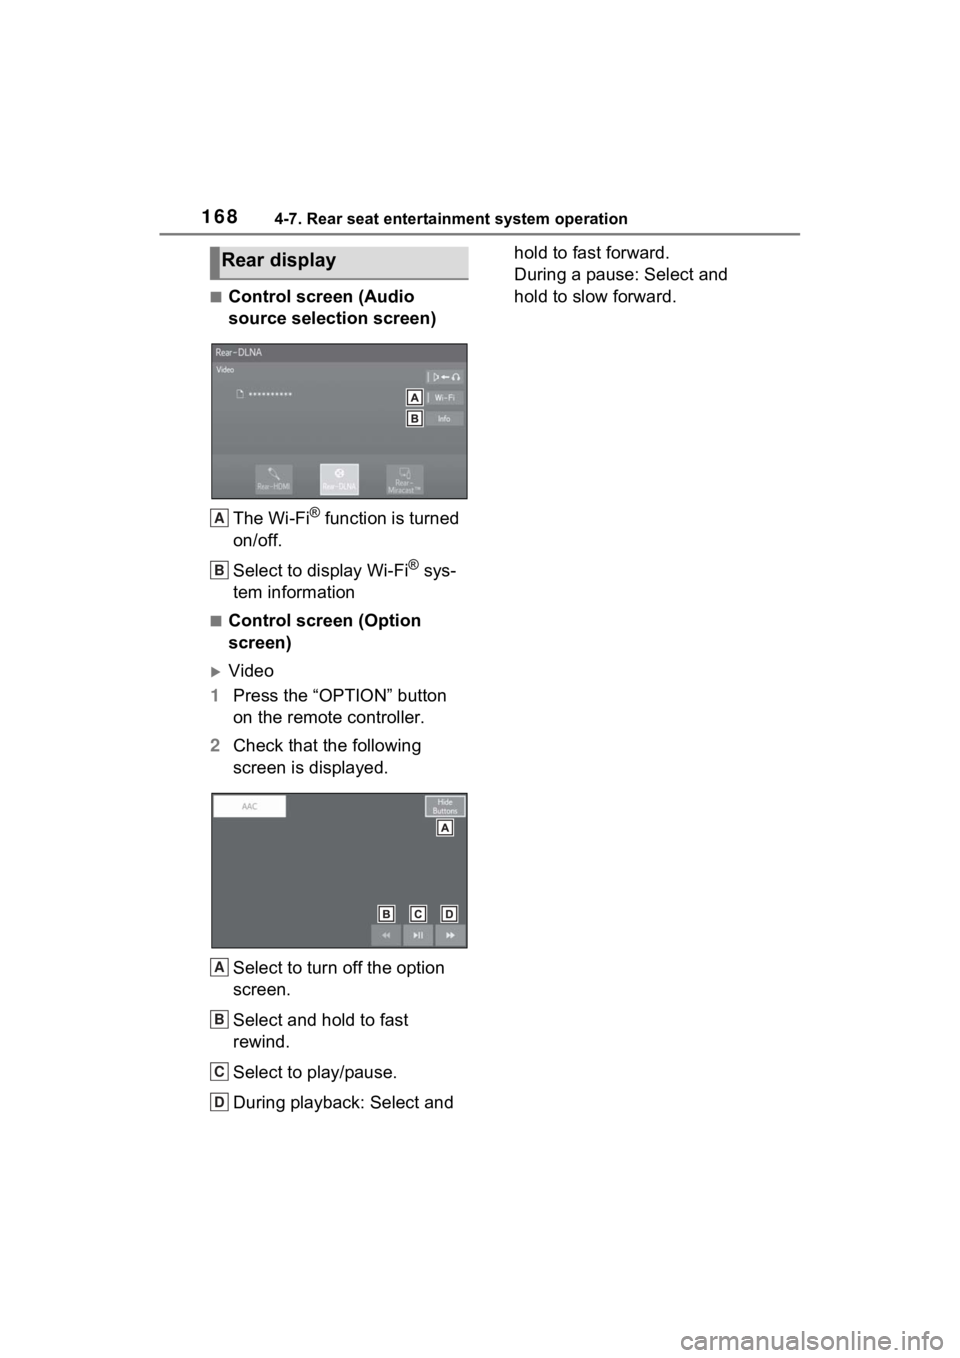
■Control screen (Audio
source selection screen)The Wi-Fi
® function is turned
on/off.
Select to display Wi-Fi
® sys-
tem information
■Control screen (Option
screen)
Video
1 Press the “OPTION” button
on the remote controller.
2 Check that the following
screen is displayed.
Select to turn off the option
screen.
Select and hold to fast
rewind.
Select to play/pause.
During playback: Select and hold to fast forward.
During a pause: Select and
hold to slow forward.
Rear display
A
B
A
B
C
D