buttons TOYOTA SIENNA HYBRID 2021 Owners Manual (in English)
[x] Cancel search | Manufacturer: TOYOTA, Model Year: 2021, Model line: SIENNA HYBRID, Model: TOYOTA SIENNA HYBRID 2021Pages: 601, PDF Size: 32.07 MB
Page 23 of 601
23Pictorial index
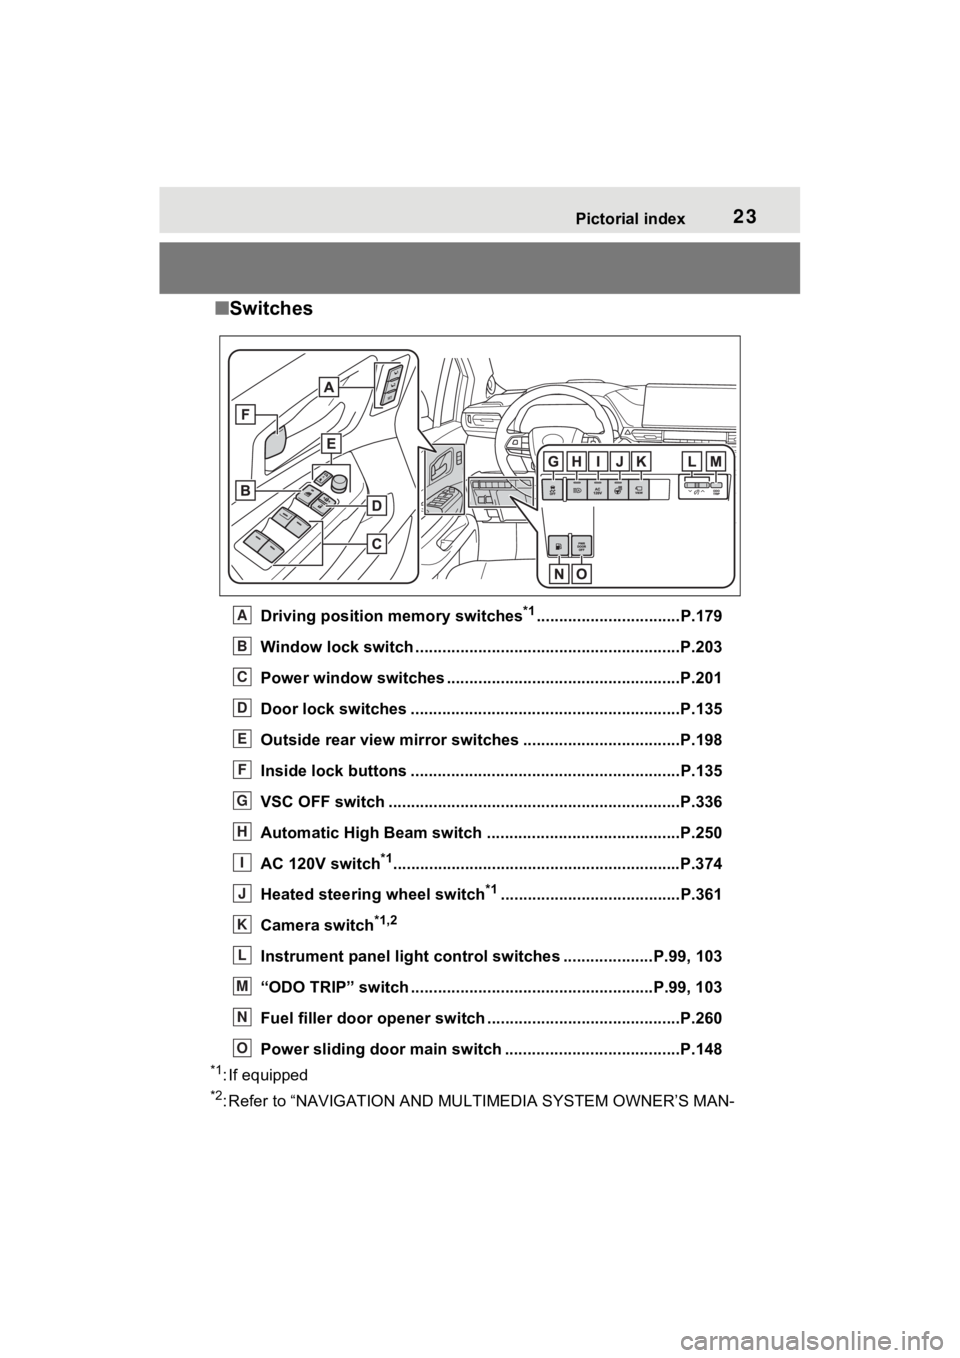
■Switches
Driving position memory switches*1................................P.179
Window lock switch ............................................. ..............P.203
Power window switches ....... .............................................P.201
Door lock switches ............................................................P.135
Outside rear view mirror swi tches ...................................P.198
Inside lock buttons ............................................ ................P.135
VSC OFF switch .................................................................P.336
Automatic High Beam switch ..................................... ......P.250
AC 120V switch
*1............................................................... .P.374
Heated steering wheel switch
*1........................................P.361
Camera switch
*1,2
Instrument panel light control switches ....................P.99 , 103
“ODO TRIP” switch .............................................. ........P.99, 103
Fuel filler door opener swi tch ...........................................P.260
Power sliding door main switch ................................. ......P.148
*1: If equipped
*2: Refer to “NAVIGATION AND MULTIMEDIA SYSTEM OWNER’S MAN-
A
B
C
D
E
F
G
H
I
J
K
L
M
N
O
Page 129 of 601
1283-1. Key information
3-1.Key information
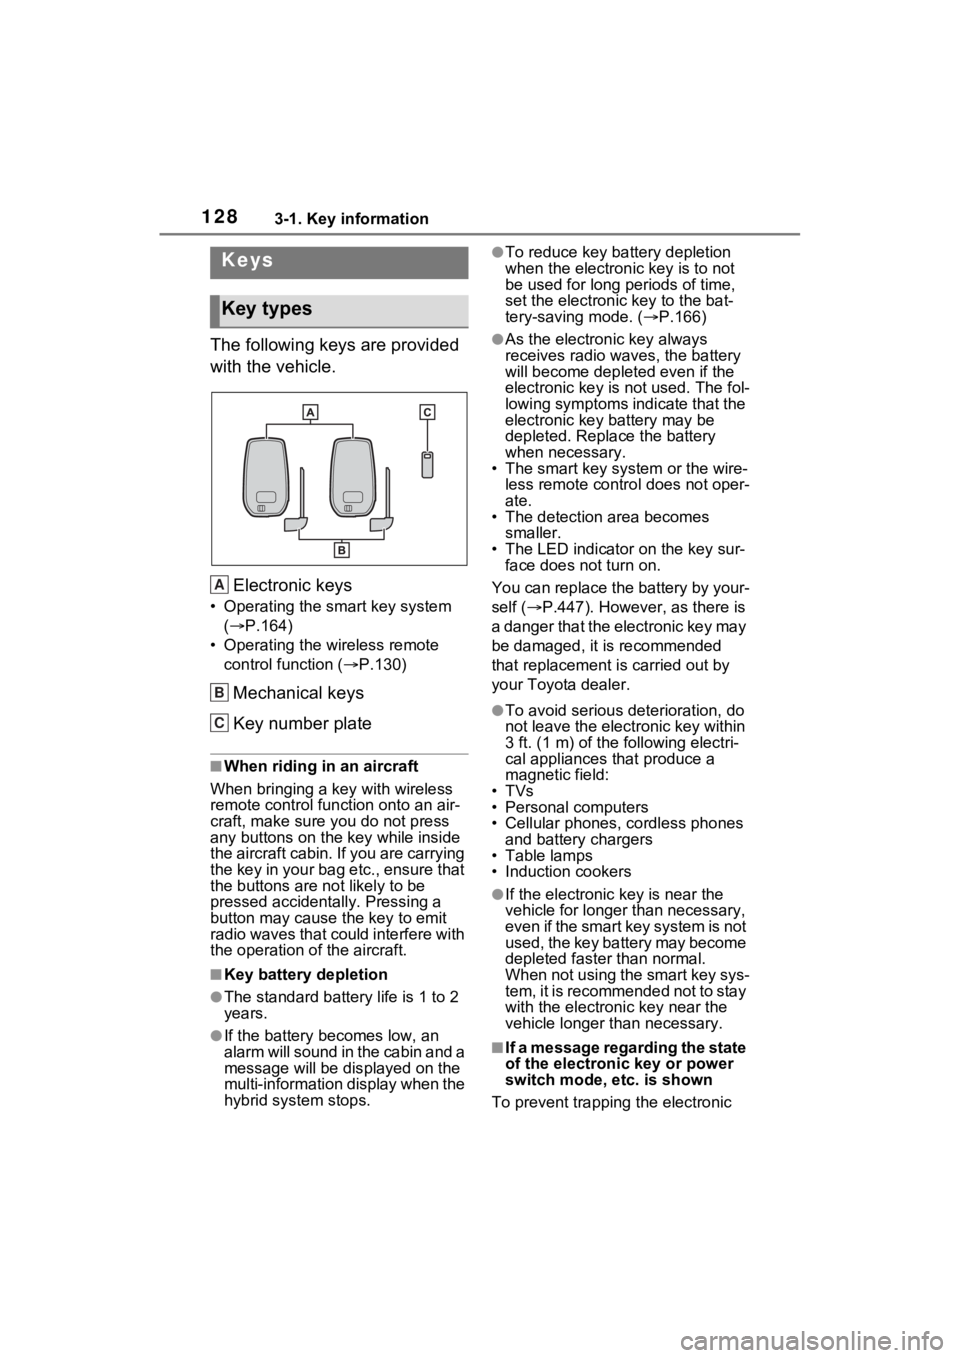
The following keys are provided
with the vehicle.Electronic keys
• Operating the smart key system ( P.164)
• Operating the wireless remote control function ( P.130)
Mechanical keys
Key number plate
■When riding in an aircraft
When bringing a key with wireless
remote control function onto an air-
craft, make sure y ou do not press
any buttons on the key while inside
the aircraft cabin. If you are carrying
the key in your bag etc., ensure that
the buttons are not likely to be
pressed accidentally. Pressing a
button may cause the key to emit
radio waves that could interfere with
the operation of the aircraft.
■Key battery depletion
●The standard battery life is 1 to 2
years.
●If the battery becomes low, an
alarm will sound in the cabin and a
message will be dis played on the
multi-information display when the
hybrid system stops.
●To reduce key battery depletion
when the electronic key is to not
be used for long periods of time,
set the electronic key to the bat-
tery-saving mode. ( P.166)
●As the electronic key always
receives radio waves, the battery
will become depleted even if the
electronic key is not used. The fol-
lowing symptoms indicate that the
electronic key battery may be
depleted. Replace the battery
when necessary.
• The smart key system or the wire-
less remote contro l does not oper-
ate.
• The detection area becomes
smaller.
• The LED indicator on the key sur- face does not turn on.
You can replace the battery by your-
self ( P.447). However, as there is
a danger that the electronic key may
be damaged, it is recommended
that replacement is carried out by
your Toyota dealer.
●To avoid serious deterioration, do
not leave the electronic key within
3 ft. (1 m) of the following electri-
cal appliances that produce a
magnetic field:
•TVs
• Personal computers
• Cellular phones, cordless phones and battery chargers
• Table lamps
• Induction cookers
●If the electronic key is near the
vehicle for longer than necessary,
even if the smart key system is not
used, the key battery may become
depleted faster than normal.
When not using the smart key sys-
tem, it is recommended not to stay
with the electronic key near the
vehicle longer than necessary.
■If a message regarding the state
of the electronic key or power
switch mode, e tc. is shown
To prevent trapping the electronic
Keys
Key types
A
B
C
Page 134 of 601
1333-2. Opening, closing and locking the doors
3
Before driving
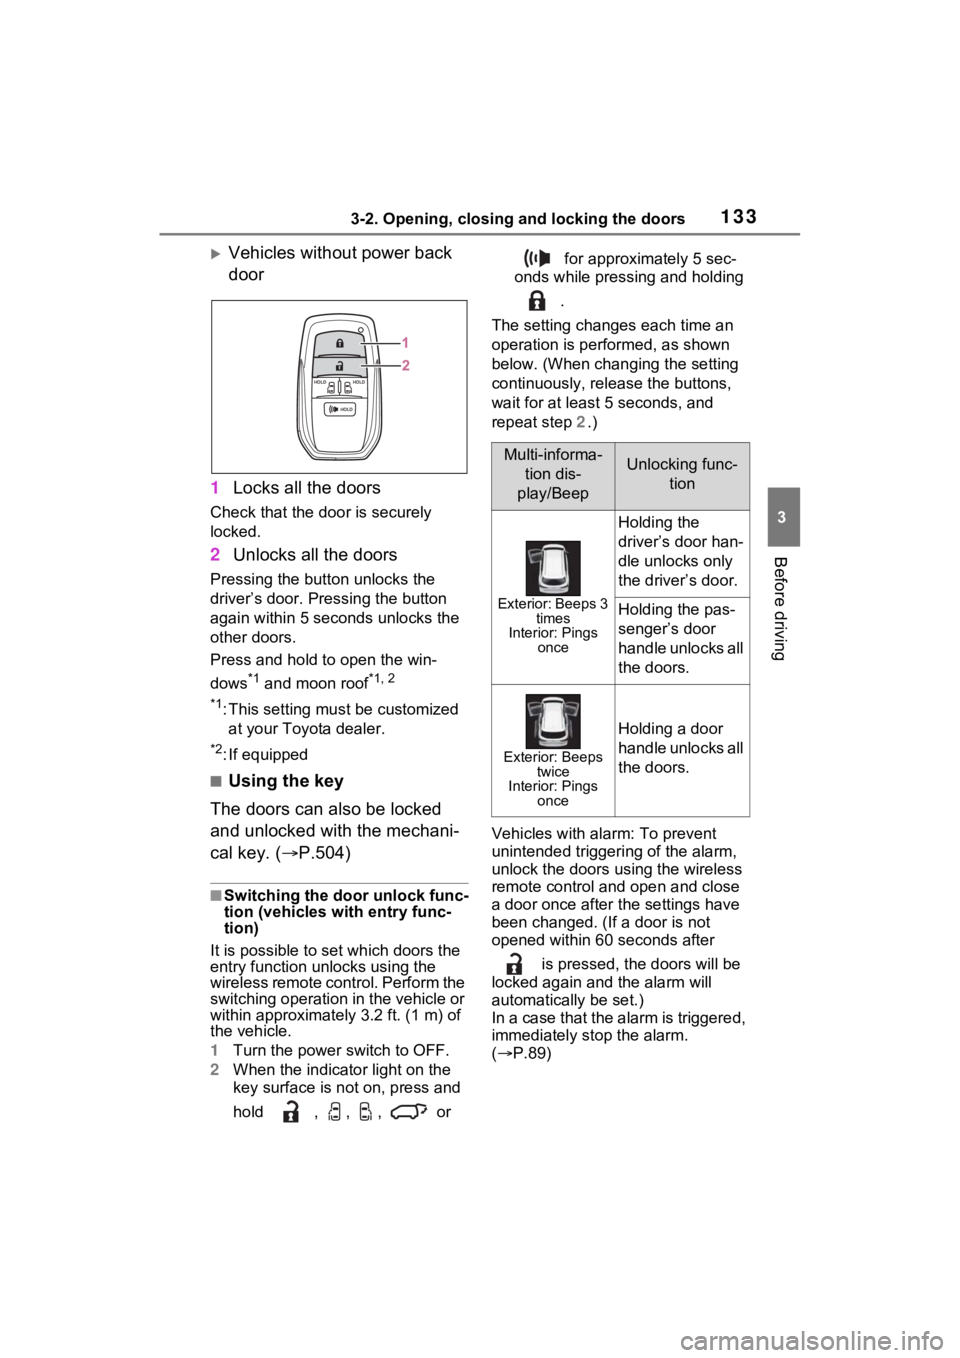
Vehicles without power back
door
1 Locks all the doors
Check that the door is securely
locked.
2Unlocks all the doors
Pressing the button unlocks the
driver’s door. Pressing the button
again within 5 seconds unlocks the
other doors.
Press and hold to open the win-
dows
*1 and moon roof*1, 2
*1
:This setting mu st be customized
at your Toyota dealer.
*2: If equipped
■Using the key
The doors can also be locked
and unlocked with the mechani-
cal key. ( P.504)
■Switching the door unlock func-
tion (vehicles with entry func-
tion)
It is possible to set which doors the
entry function unlocks using the
wireless remote control. Perform the
switching operation in the vehicle or
within approximately 3.2 ft. (1 m) of
the vehicle.
1 Turn the power switch to OFF.
2 When the indicator light on the
key surface is not on, press and
hold , , , or for approximately 5 sec-
onds while pressing and holding
.
The setting changes each time an
operation is per formed, as shown
below. (When changing the setting
continuously, release the buttons,
wait for at least 5 seconds, and
repeat step 2 .)
Vehicles with alarm: To prevent
unintended triggeri ng of the alarm,
unlock the doors using the wireless
remote control and open and close
a door once after the settings have
been changed. (If a door is not
opened within 60 seconds after
is pressed, the doors will be
locked again and the alarm will
automatically be set.)
In a case that the alarm is triggered,
immediately stop the alarm.
( P.89)
Multi-informa-
tion dis-
play/BeepUnlocking func- tion
Exterior: Beeps 3 times
Interior: Pings once
Holding the
driver’s door han-
dle unlocks only
the driver’s door.
Holding the pas-
senger’s door
handle unlocks all
the doors.
Exterior: Beeps twice
Interior: Pings once
Holding a door
handle unlocks all
the doors.
Page 136 of 601
1353-2. Opening, closing and locking the doors
3
Before driving
of a sliding door. Therefore,
depending on the situation, the
rear seat reminder function may
not operate and you may still for-
get the luggage, etc. on the rear
seat, or it may operate unneces-
sarily.
●The rear seat reminder function
can be enabled/disabled.
( P.541)
■Customization
Settings (e.g. unlocking function
using a key) can be changed.
(Customizable features: P.543)
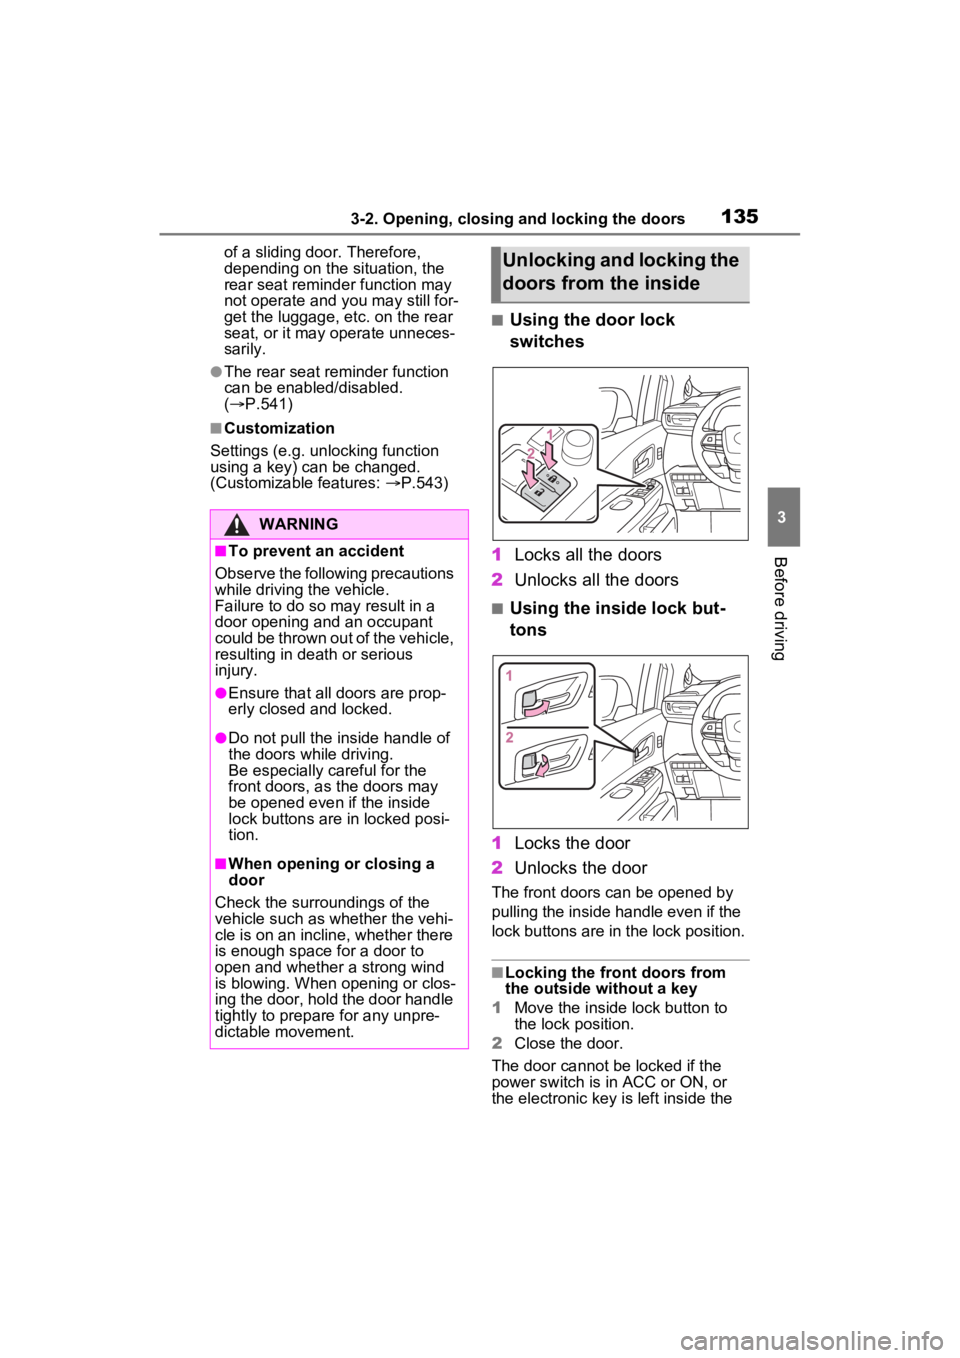
■Using the door lock
switches
1 Locks all the doors
2 Unlocks all the doors
■Using the inside lock but-
tons
1 Locks the door
2 Unlocks the door
The front doors can be opened by
pulling the inside handle even if the
lock buttons are in the lock position.
■Locking the front doors from
the outside without a key
1 Move the inside lock button to
the lock position.
2 Close the door.
The door cannot be locked if the
power switch is in ACC or ON, or
the electronic key is left inside the
WARNING
■To prevent an accident
Observe the following precautions
while driving t he vehicle.
Failure to do so m ay result in a
door opening and an occupant
could be thrown out of the vehicle,
resulting in dea th or serious
injury.
●Ensure that all doors are prop-
erly closed and locked.
●Do not pull the inside handle of
the doors while driving.
Be especially careful for the
front doors, as the doors may
be opened even if the inside
lock buttons are in locked posi-
tion.
■When opening or closing a
door
Check the surroundings of the
vehicle such as whether the vehi-
cle is on an incline, whether there
is enough space for a door to
open and whether a strong wind
is blowing. When opening or clos-
ing the door, hold the door handle
tightly to prepare for any unpre-
dictable movement.
Unlocking and locking the
doors from the inside
Page 167 of 601
1663-2. Opening, closing and locking the doors
wireless remote control or the
mechanical key, to unlock the
doors.
■Turning an electronic key to
battery-saving mode
●When battery-saving mode is set,
battery depletion is minimized by
stopping the electronic key from
receiving radio waves.
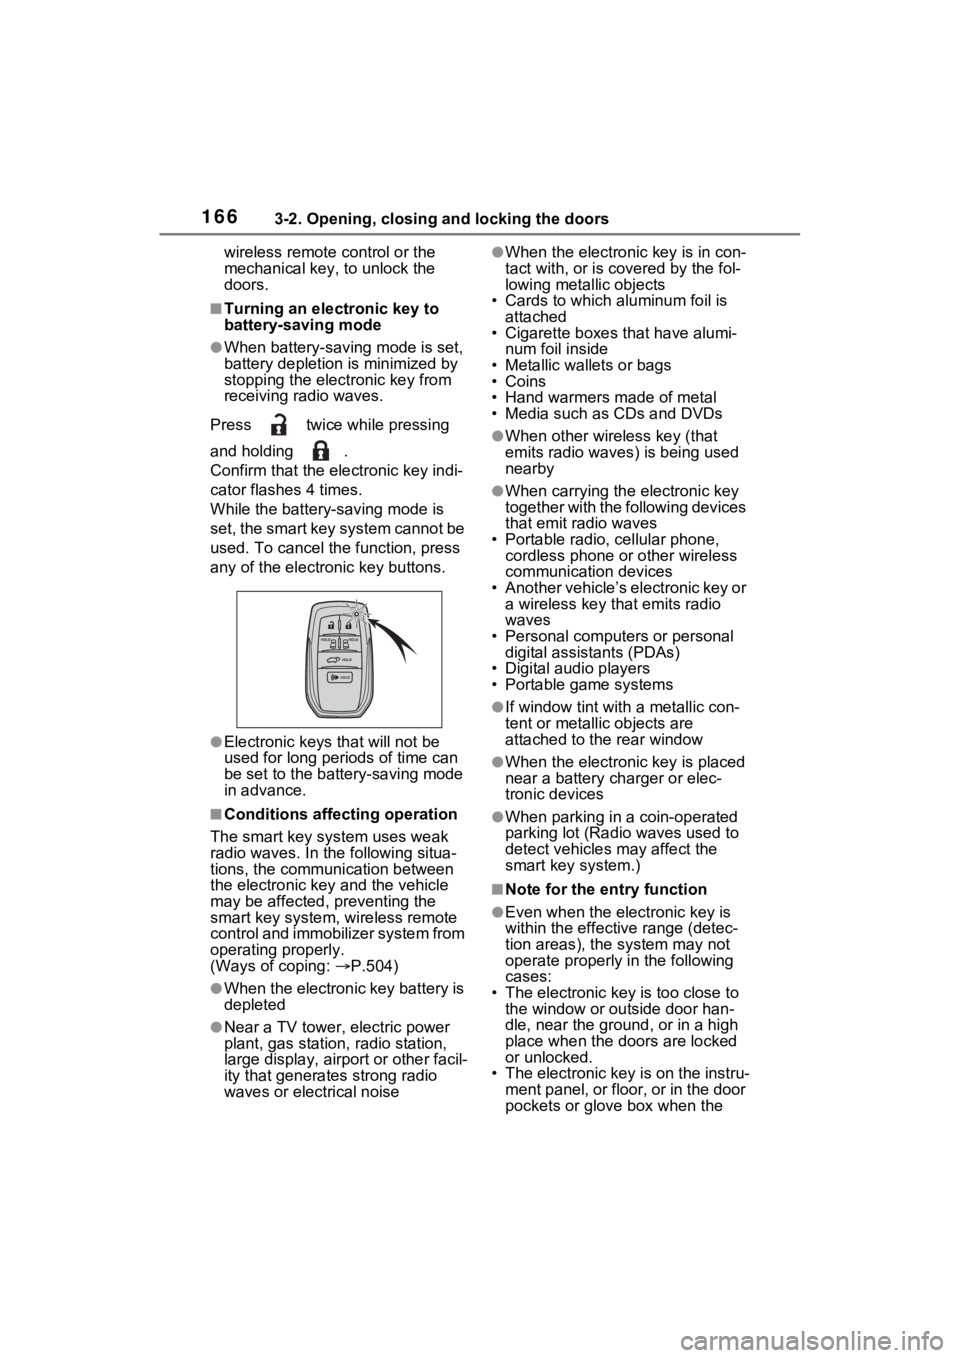
Press twice while pressing
and holding .
Confirm that the electronic key indi-
cator flashes 4 times.
While the battery-saving mode is
set, the smart key system cannot be
used. To cancel the function, press
any of the electronic key buttons.
●Electronic keys that will not be
used for long periods of time can
be set to the battery-saving mode
in advance.
■Conditions affecting operation
The smart key system uses weak
radio waves. In the following situa-
tions, the communication between
the electronic key and the vehicle
may be affected, preventing the
smart key system, wireless remote
control and immobilizer system from
operating properly.
(Ways of coping: P.504)
●When the electronic key battery is
depleted
●Near a TV tower, electric power
plant, gas station , radio station,
large display, airpo rt or other facil-
ity that generates strong radio
waves or electrical noise
●When the electronic key is in con-
tact with, or is c overed by the fol-
lowing metallic objects
• Cards to which aluminum foil is
attached
• Cigarette boxes that have alumi-
num foil inside
• Metallic wallets or bags
•Coins
• Hand warmers made of metal
• Media such as CDs and DVDs
●When other wireless key (that
emits radio waves) is being used
nearby
●When carrying the electronic key
together with the following devices
that emit radio waves
• Portable radio, cellular phone, cordless phone or other wireless
communication devices
• Another vehicle’s electronic key or a wireless key that emits radio
waves
• Personal computers or personal digital assistants (PDAs)
• Digital audio players
• Portable game systems
●If window tint wit h a metallic con-
tent or metallic objects are
attached to the rear window
●When the electronic key is placed
near a battery charger or elec-
tronic devices
●When parking in a coin-operated
parking lot (Radio waves used to
detect vehicles may affect the
smart key system.)
■Note for the entry function
●Even when the electronic key is
within the effective range (detec-
tion areas), the system may not
operate properly in the following
cases:
• The electronic key is too close to
the window or outside door han-
dle, near the ground, or in a high
place when the doors are locked
or unlocked.
• The electronic key is on the instru- ment panel, or floor, or in the door
pockets or glove box when the
Page 180 of 601
1793-3. Adjusting the seats
3
Before driving
The shift lever has been
shifted to P.
The power switch has been
turned off.
The driver’ seat belt has been
unfastened.
When any of the following has
been performed, the driver’ seat
and steering wheel automati-
cally return to their original posi-
tions.
The power switch has been
turned to ACC or ON.
The driver’ seat belt has been
fastened.
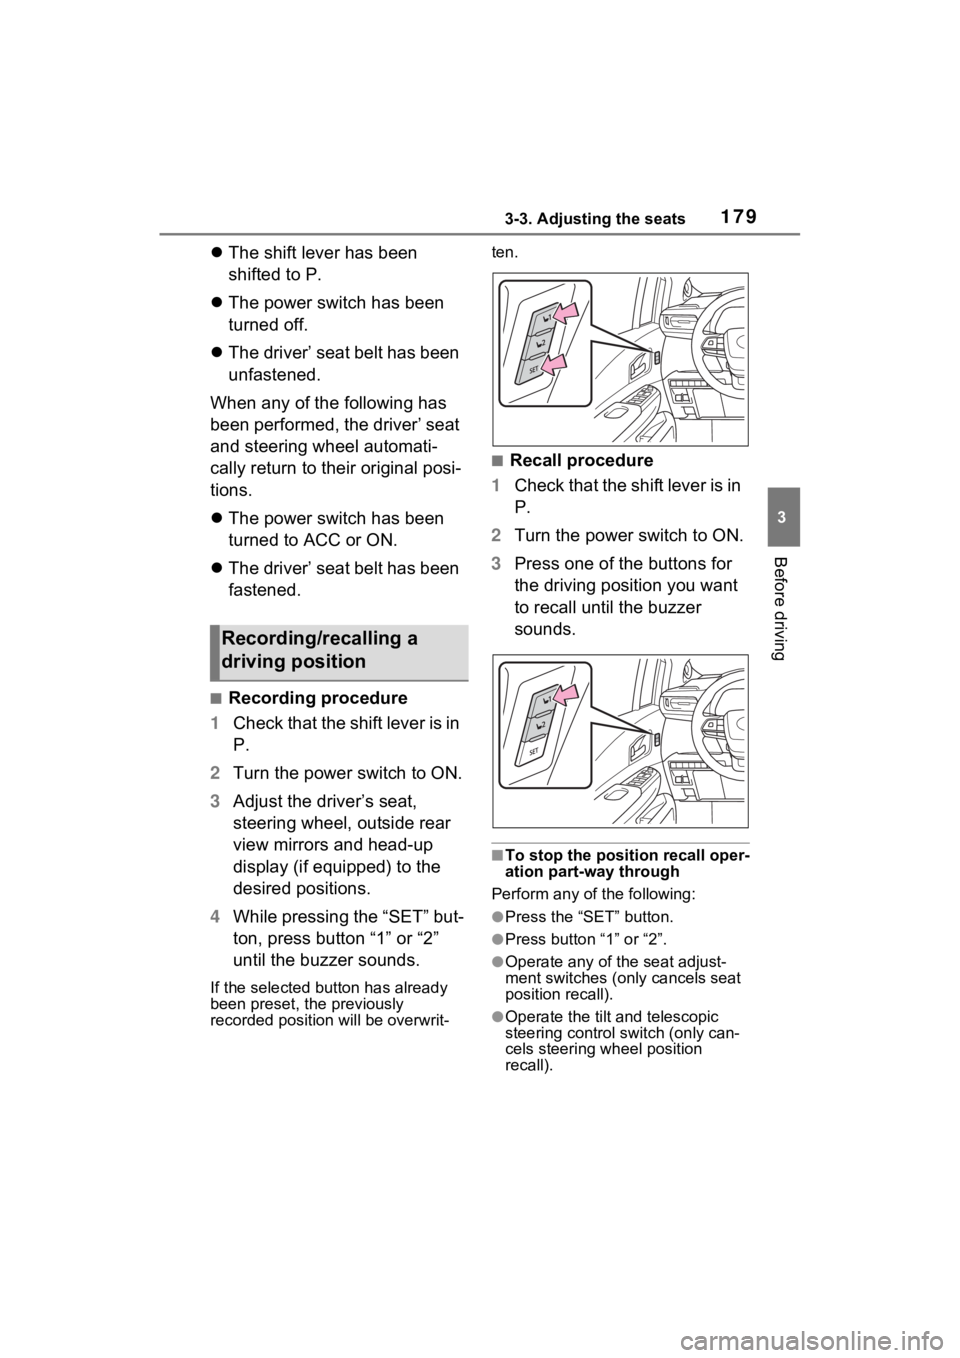
■Recording procedure
1 Check that the shift lever is in
P.
2 Turn the power switch to ON.
3 Adjust the driver’s seat,
steering wheel, outside rear
view mirrors and head-up
display (if equipped) to the
desired positions.
4 While pressing the “SET” but-
ton, press button “1” or “2”
until the buzzer sounds.
If the selected button has already
been preset, the previously
recorded position will be overwrit- ten.
■Recall procedure
1 Check that the shift lever is in
P.
2 Turn the power switch to ON.
3 Press one of the buttons for
the driving position you want
to recall until the buzzer
sounds.
■To stop the position recall oper-
ation part-way through
Perform any of the following:
●Press the “SET” button.
●Press button “1” or “2”.
●Operate any of t he seat adjust-
ment switches (only cancels seat
position recall).
●Operate the tilt and telescopic
steering control switch (only can-
cels steering wheel position
recall).
Recording/recalling a
driving position
Page 241 of 601
2404-2. Driving procedures
the shift release button is pushed
first, the shift lock will not be
released.
■Shift lock system
The shift lock system is a system to
prevent accidental operation of the
shift lever in starting.
The shift lever can be shifted from P
only when the pow er switch is in
ON, the brake pedal is depressed
and the shift release button is
pushed.
■If the shift lever cannot be
shifted from P
First, check whether the brake pedal
is being depressed.
If the shift lever cannot be shifted
even though the brake pedal is
depressed and the shift release but-
ton is pushed, there may be a prob-
lem with the shift lock system. Have
the vehicle insp ected by your
Toyota dealer immediately.
The following steps may be used as
an emergency measure to ensure
that the shift lev er can be shifted.
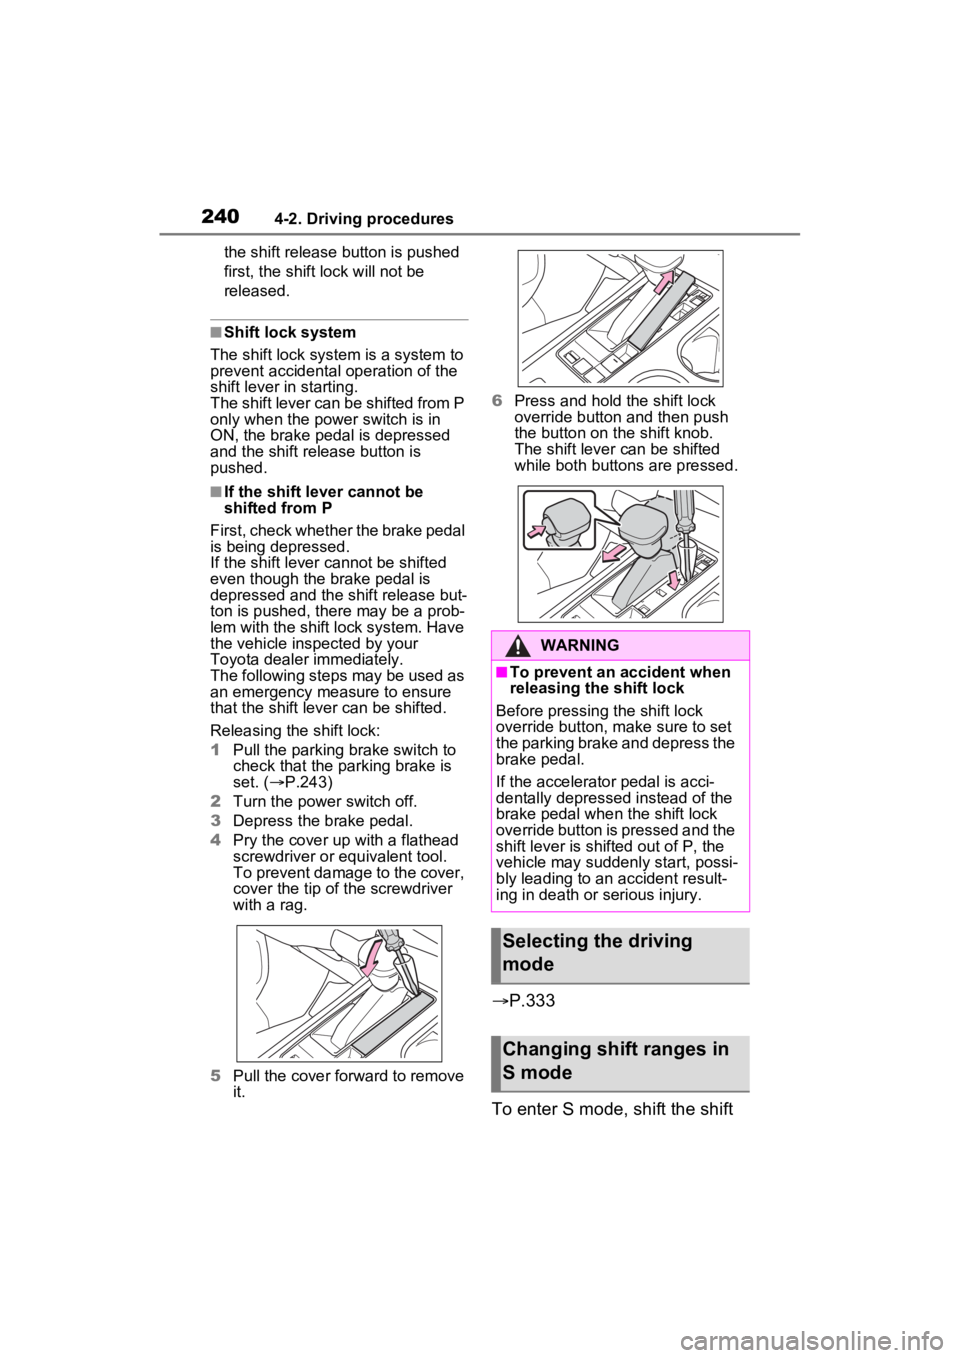
Releasing the shift lock:
1 Pull the parking brake switch to
check that the parking brake is
set. ( P.243)
2 Turn the power switch off.
3 Depress the brake pedal.
4 Pry the cover up with a flathead
screwdriver or equivalent tool.
To prevent damage to the cover,
cover the tip of the screwdriver
with a rag.
5 Pull the cover forward to remove
it. 6
Press and hold the shift lock
override button and then push
the button on the shift knob.
The shift lever can be shifted
while both buttons are pressed.
P.333
To enter S mode, shift the shift
WARNING
■To prevent an accident when
releasing the shift lock
Before pressing the shift lock
override button, m ake sure to set
the parking brake and depress the
brake pedal.
If the accelerator pedal is acci-
dentally depressed instead of the
brake pedal when the shift lock
override button is pressed and the
shift lever is shifted out of P, the
vehicle may suddenly start, possi-
bly leading to an accident result-
ing in death or serious injury.
Selecting the driving
mode
Changing shift ranges in
S mode
Page 393 of 601
3925-4. Using the other interior features
*: If equipped
The HomeLink® wireless control
system in your vehicle has 3
buttons which can be pro-
grammed to operate 3 different
devices. Refer to the program-
ming methods on the following
pages to determine the method
which is appropriate for the
device.
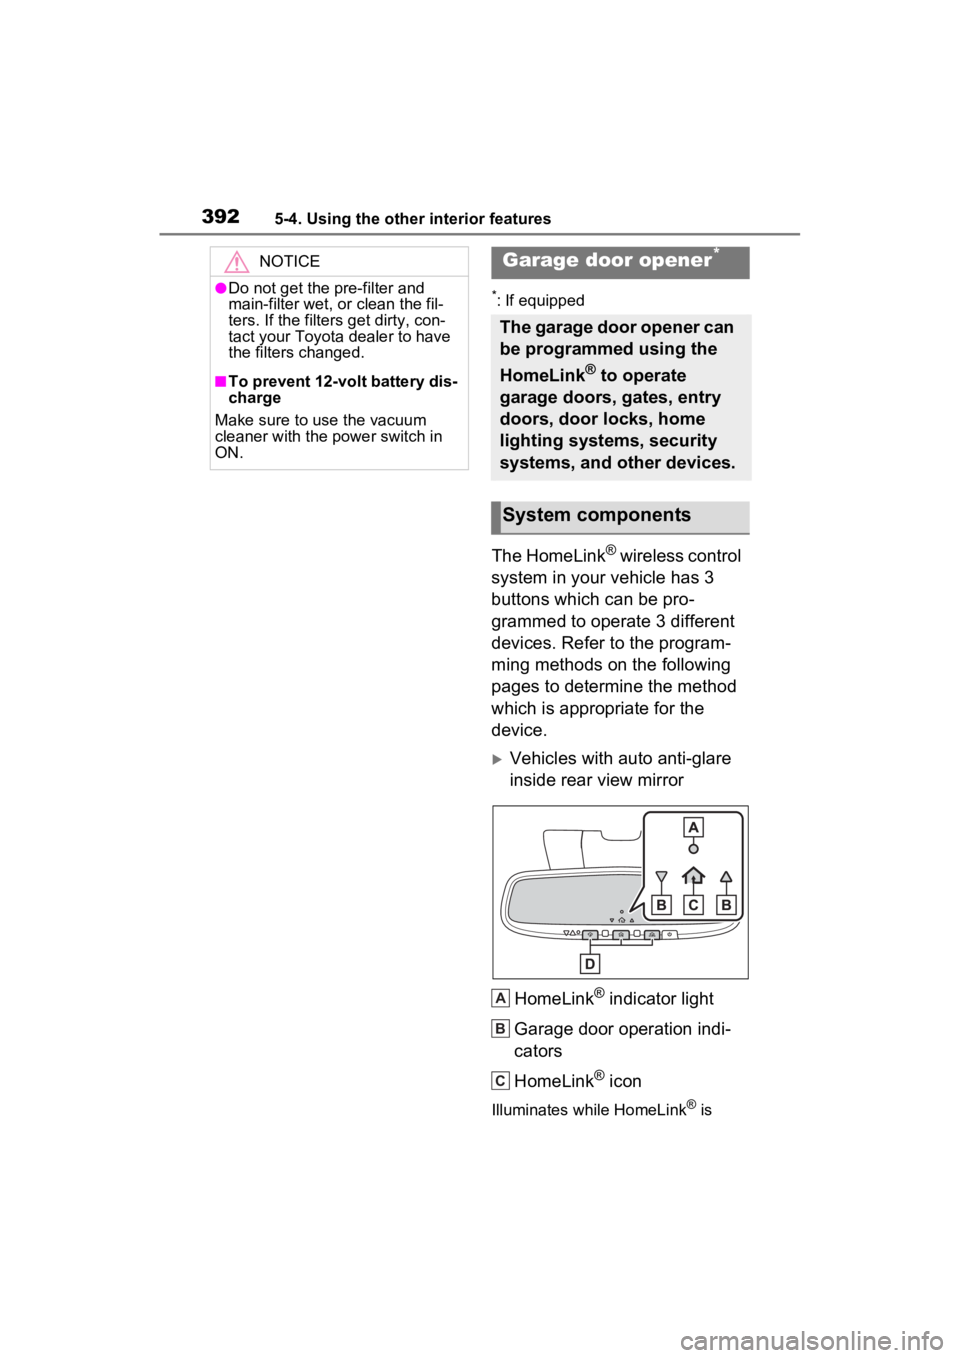
Vehicles with auto anti-glare
inside rear view mirror
HomeLink
® indicator light
Garage door operation indi-
cators
HomeLink
® icon
Illuminates while HomeLink® is
NOTICE
●Do not get the pre-filter and
main-filter wet, or clean the fil-
ters. If the filters get dirty, con-
tact your Toyota dealer to have
the filters changed.
■To prevent 12-volt battery dis-
charge
Make sure to use the vacuum
cleaner with the power switch in
ON.
Garage door opener*
The garage door opener can
be programmed using the
HomeLink
® to operate
garage doors, gates, entry
doors, door locks, home
lighting systems, security
systems, and other devices.
System components
A
B
C
Page 394 of 601
3935-4. Using the other interior features
5
Interior features
operating.
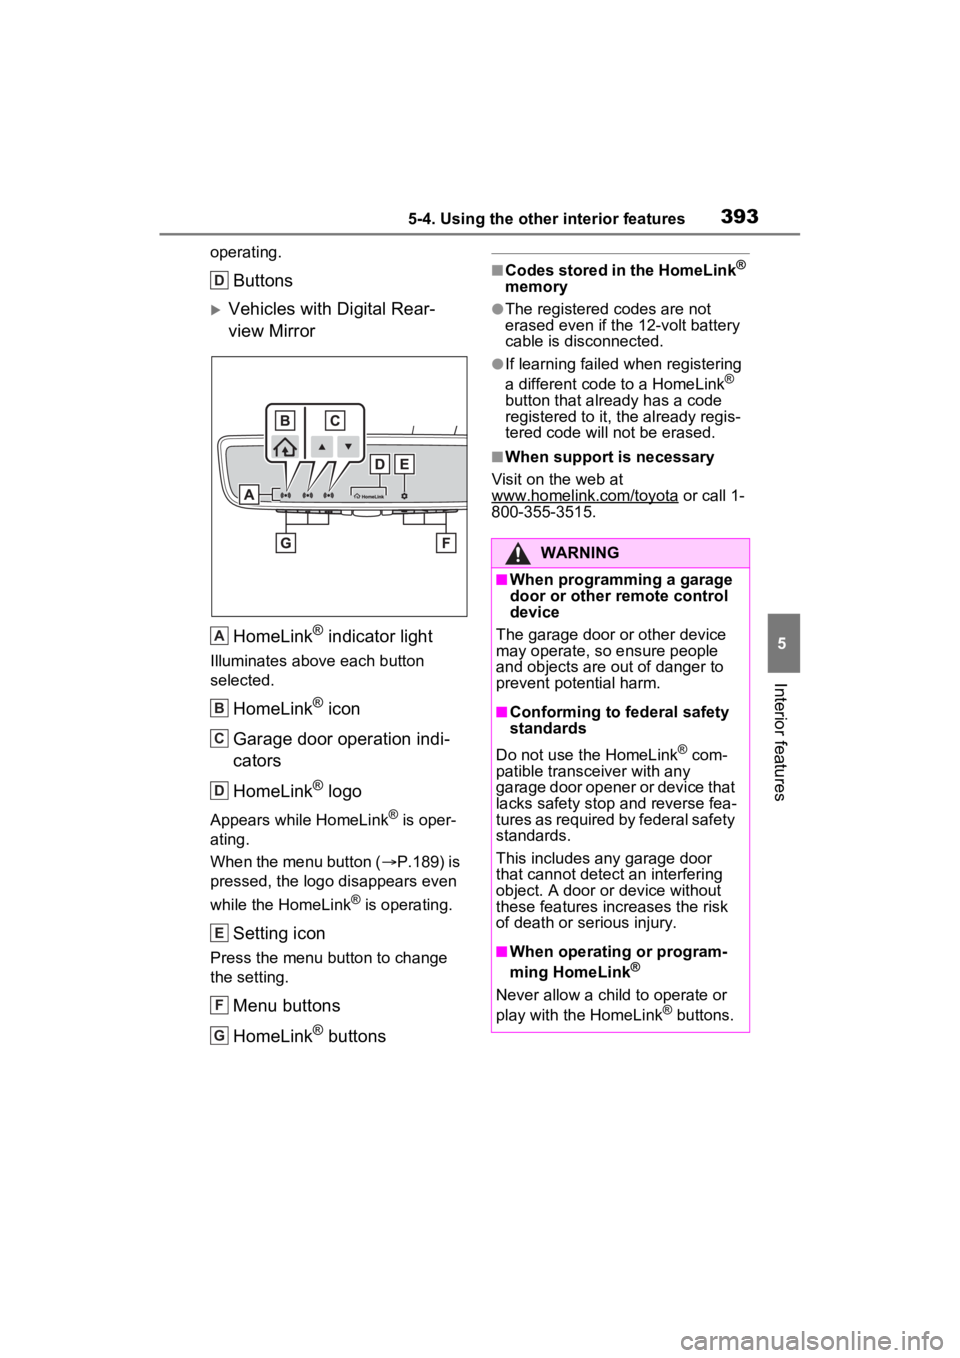
Buttons
Vehicles with Digital Rear-
view MirrorHomeLink
® indicator light
Illuminates above each button
selected.
HomeLink® icon
Garage door operation indi-
cators
HomeLink
® logo
Appears while HomeLink® is oper-
ating.
When the menu button ( P.189) is
pressed, the logo disappears even
while the HomeLink
® is operating.
Setting icon
Press the menu button to change
the setting.
Menu buttons
HomeLink
® buttons
■Codes stored in the HomeLink®
memory
●The registered codes are not
erased even if the 12-volt battery
cable is disconnected.
●If learning failed when registering
a different code to a HomeLink®
button that already has a code
registered to it, the already regis-
tered code will not be erased.
■When support is necessary
Visit on the web at
www.homelink.com/toyota
or call 1-
800-355-3515.
D
A
B
C
D
E
F
G
WARNING
■When programming a garage
door or other remote control
device
The garage door or other device
may operate, so ensure people
and objects are out of danger to
prevent potential harm.
■Conforming to federal safety
standards
Do not use the HomeLink
® com-
patible transce iver with any
garage door opener or device that
lacks safety stop and reverse fea-
tures as required by federal safety
standards.
This includes any garage door
that cannot detect an interfering
object. A door or device without
these features increases the risk
of death or serious injury.
■When operating or program-
ming HomeLink®
Never allow a child to operate or
play with the HomeLink® buttons.
Page 395 of 601
3945-4. Using the other interior features
■Before programming
HomeLink
®
During programming, it is pos-
sible that garage doors,
gates, or other devices may
operate. For this reason,
make sure that people and
objects are clear of the
garage door or other devices
to prevent injury or other
potential harm.
It is recommended that a new
battery be placed in the
remote control transmitter for
successful programming.
Garage door opener motors
manufactured after 1995 may
be equipped with rolling code
protection. If this is the case,
you may need a stepladder or
other sturdy, safe device to
reach the “Learn” or “Smart”
button on the garage door
opener motor.
■Programming HomeLink®
Steps 2 through 4 must be per-
formed within 60 seconds, oth-
erwise the HomeLink
® indicator
light will stop flashing and pro-
gramming will not be success-
fully completed.
1 Vehicles with Digital Rear
view Mirror: Press the
HomeLink
® button or menu
button When the HomeLink
® button is pressed: Home-
link
® Training Tutorial will be
displayed to assist you pro-
gramming the HomeLink
®.
When the menu button is pressed:
Press the menu button and
select the “SET UP”. Homelink
®
Training Tutoria l will be displayed
to assist you programming the
HomeLink
®.
2 Press and release the
HomeLink
® button you want
to program and check that
the HomeLink
® indicator light
flashes (orange).
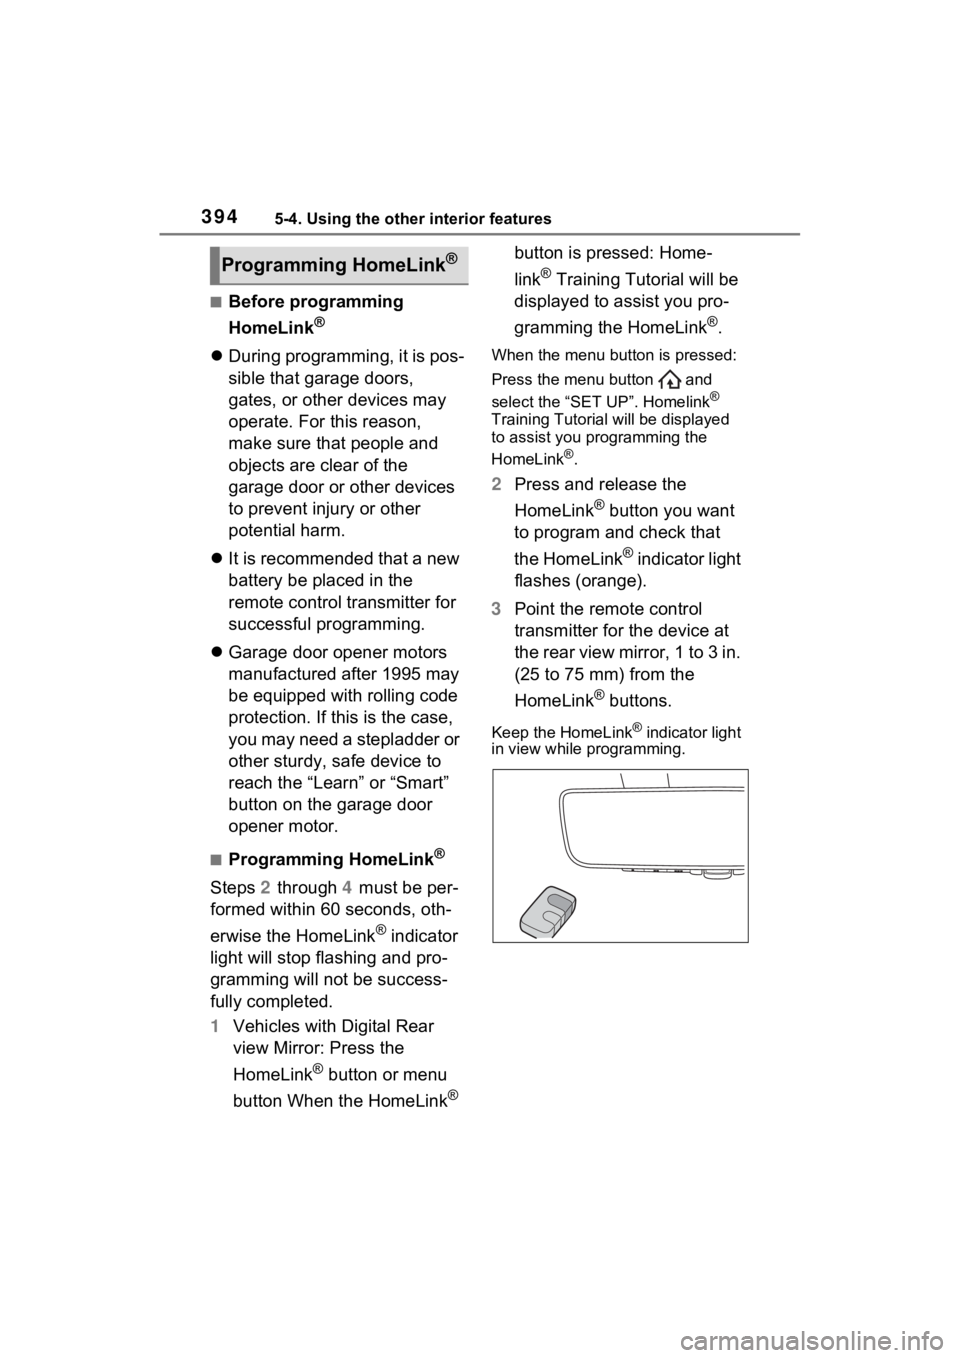
3 Point the remote control
transmitter for the device at
the rear view mirror, 1 to 3 in.
(25 to 75 mm) from the
HomeLink
® buttons.
Keep the HomeLink® indicator light
in view while programming.
Programming HomeLink®