hood release TOYOTA TACOMA 1997 Owners Manual
[x] Cancel search | Manufacturer: TOYOTA, Model Year: 1997, Model line: TACOMA, Model: TOYOTA TACOMA 1997Pages: 221, PDF Size: 2.02 MB
Page 14 of 221

14
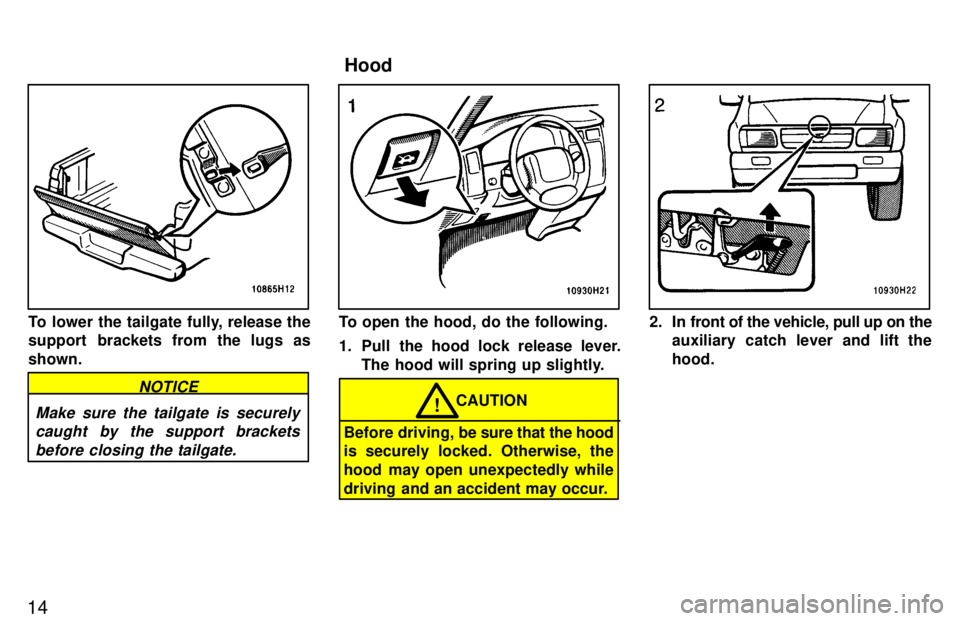
To lower the tailgate fully, release the
support brackets from the lugs as shown.
Make sure the tailgate is securelycaught by the support brackets
before closing the tailgate.
NOTICE
To open the hood, do the following.
1. Pull the hood lock release lever. The hood will spring up slightly.
Before driving, be sure that the hood
is securely locked. Otherwise, the
hood may open unexpectedly while
driving and an accident may occur.
CAUTION!
2. In front of the vehicle, pull up on the auxiliary catch lever and lift the hood.
Hood
Page 30 of 221

30
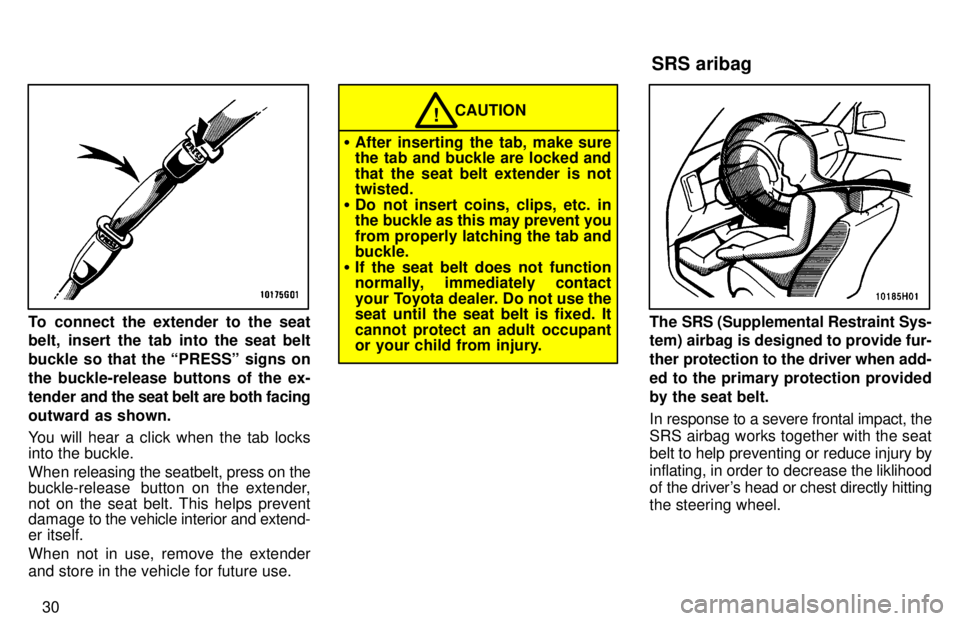
To connect the extender to the seat
belt, insert the tab into the seat belt
buckle so that the PRESSº signs onthe buckle-release buttons of the ex-
tender and the seat belt are both facing
outward as shown.
You will hear a click when the tab locks into the buckle.
When releasing the seatbelt, press on the
buckle-release button on the extender,not on the seat belt. This helps prevent
damage to the vehicle interior and extend- er itself.
When not in use, remove the extender
and store in the vehicle for future use.
CAUTION!
� After inserting the tab, make sure
the tab and buckle are locked and
that the seat belt extender is not twisted.
� Do not insert coins, clips, etc. in
the buckle as this may prevent you
from properly latching the tab and buckle.
� If the seat belt does not function
normally, immediately contact
your Toyota dealer. Do not use the
seat until the seat belt is fixed. It cannot protect an adult occupant
or your child from injury.
The SRS (Supplemental Restraint Sys-
tem) airbag is designed to provide fur-
ther protection to the driver when add-
ed to the primary protection providedby the seat belt.
In response to a severe frontal impact, the
SRS airbag works together with the seat
belt to help preventing or reduce injury byinflating, in order to decrease the liklihood
of the driver's head or chest directly hitting the steering wheel. SRS aribag
Page 170 of 221

169
Tire surface and wheel nuts Check the tires carefully
for cuts, damage
or excessive wear. See Chapter 7-2 for
additional information. When checking the tires, make sure no nuts are missing,
and check the nuts for looseness. T ighten
them if necessary.
Tire rotation
Rotate the tires every 12000 km (7500
miles). See Chapter 7-2 for additional in- formation.
Fluid leaks Check underneath for leaking fuel, oil, wa-
ter or other fluid after the vehicle has been
parked for a while. If you smell fuel fumes
or notice any leak, have the cause found
and corrected immediately. Doors and engine hood Check that all doors including tailgate op- erate smoothly and all latches lock se-
curely. M ake sure the engine hood secon-
dary latch secures the hood from opening
when the primary latch is released. INSIDE THE VEHICLE Items listed below should be checked
regularly, e.g. while performing peri-
odic services, cleaning the vehicle,etc. Lights Make sure the headlights, stop lights, tail lights, turn signal lights, and other lights are all working. Check headlight aim. Service reminder indicators and
warn-
ing buzzers Check that all service reminder indicators
and warning buzzers function properly. Steering wheel
Be alert for changes in steering condition, such as hard steering or strange noise. Seats Check that all front seat controls such as
seat adjusters, seatback recliner, etc. op- erate smoothly and that all latches lock
securely in any position. Check that the
head restraints move up and down
smoothly and that the locks hold securely
in any latched position. For folding-down
seatback (bench seat), check that the
latches lock securely. Seat belts
Check that the seat belt system such as
buckles, retractors and anchors operate
properly
and smoothly. Make sure the belt
webbing is not cut, frayed, worn or dam-aged. Accelerator pedal Check the pedal for smooth operation and
uneven pedal effort or catching. Clutch pedal Check the pedal for smooth operation. Brake pedal Check the pedal for smooth operation and
that the pedal has the proper clearance. Check the brake booster function. Brakes
At a safe place, check that the brakes do not pull to one side when applied. Parking brake Check that the lever has the proper travel and that, on a safe incline, your vehicle is
held securely with only the parking brake applied.
Page 198 of 221

197
Light
Bulbs and
Units
Bulb and Unit No.WType
Headlight Interior light Normal cabXtra-cab
Ð Ð5
10C C
Personal lightsÐ5C
Door courtesy lightsÐ3C
Glovebox lightÐ1.4B
A: Single end bulbs
B: Wedge base bulbs C: Double end bulbsD: HB2 halogen bulbs
1. Loosen the parking light unit re-
taining screws and remove the
units unplugging the connectors.2. Open the hood. Release the clipsand remove the radiator grille.
The clips can be released with a flat-
blade screwdriver as shown.
ÐHeadlight units
Page 200 of 221

199
1. Open the hood. Unplug the con-nector. Remove the rubber cover.
If the connector is tight, wiggle it.2. Release the bulb retaining spring and remove the bulb. Install a new
bulb and the bulb retaining spring.
To install a bulb, align the tabs of the bulb with the cutouts of the mounting hole.3. Install the rubber cover with the TOPº mark upward and snuggle
on the boss. Then inset the connec-
tor.
Make sure the rubber cover fits snugly on
the connector and the headlight body.
Aiming is not necessary after replacing
the bulb. When aiming adjustment is nec-
essary, contact your Toyota dealer.
ÐHeadlight bulbs