key TOYOTA TACOMA 2010 (in English) User Guide
[x] Cancel search | Manufacturer: TOYOTA, Model Year: 2010, Model line: TACOMA, Model: TOYOTA TACOMA 2010Pages: 532, PDF Size: 15.03 MB
Page 96 of 532
96 1-7. Safety information
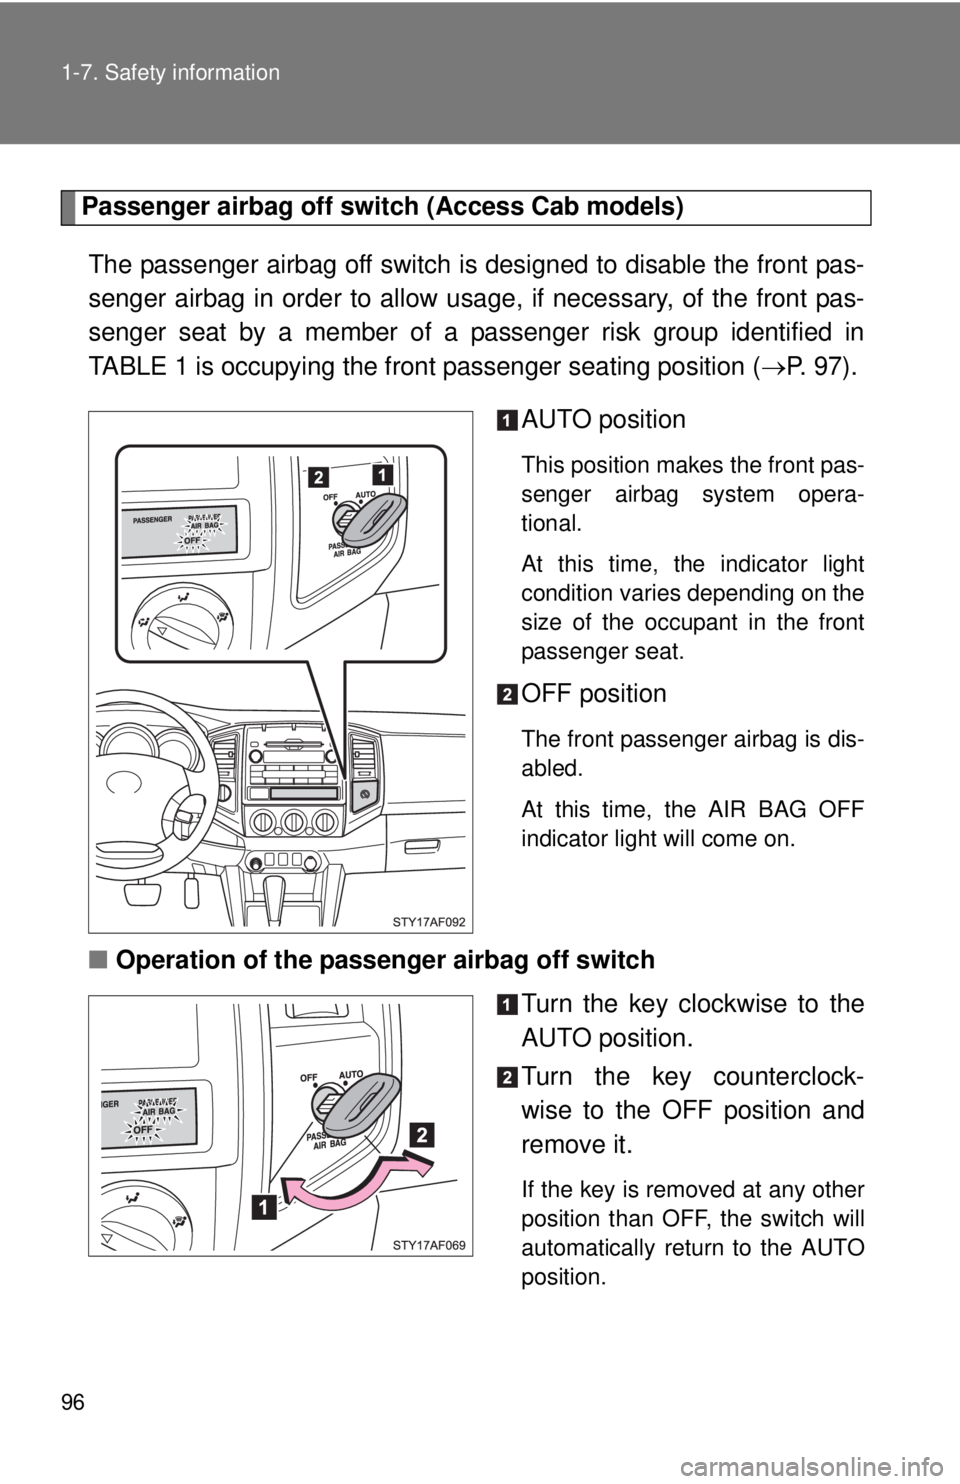
Passenger airbag off switch (Access Cab models)
The passenger airbag off switch is designed to disable the front pas-
senger airbag in order to allow usage, if necessary, of the front pas-
senger seat by a member of a passenger risk group identified in
TABLE 1 is occupying the front passenger seating position (P. 97).
AUTO position
This position makes the front pas-
senger airbag system opera-
tional.
At this time, the indicator light
condition varies depending on the
size of the occupant in the front
passenger seat.
OFF position
The front passenger airbag is dis-
abled.
At this time, the AIR BAG OFF
indicator light will come on.
■Operation of the passenger airbag off switch
Turn the key clockwise to the
AUTO position.
Turn the key counterclock-
wise to the OFF position and
remove it.
If the key is removed at any other
position than OFF, the switch will
automatically return to the AUTO
position.
Page 109 of 532

109 1-7. Safety information
1
Before driving
CAUTION
■Child restraint precautions
●Regular Cab models: Toyota strongly urges use of a proper child restraint
system which conforms to the size of the child.
●Access Cab and Double Cab models: Toyota strongly urges the use of a
proper child restraint system that conforms to the size of the child, installed
on the rear seat. According to accident statistics, the child is safer when
properly restrained in the rear seat than in the front seat.
●Access Cab models: Never put infant or child age 1 to 12 in a passenger
risk group on the front passenger seat with the passenger airbag off switch
in the AUTO position. In the event of an accident, the force of the rapid
inflation of the front passenger airbag can cause death or serious injury to
the child. If you must put infant or child age 1 to 12 in a passenger risk
group on the front passenger seat, make sure that the passenger airbag
off switch is in the OFF position with the key removed and that the indica-
tor light is on. (P. 97)
●Regular Cab and Double Cab models: Never install a rear-facing child
restraint system on the front passenger seat even if the AIR BAG OFF
indicator light is illuminated. In the event of an accident, the force of the
rapid inflation of the front passenger airbag can cause death or serious
injury to the child if the rear-facing child restraint system is installed on the
front passenger seat.
Page 110 of 532
110 1-7. Safety information
CAUTION
■Child restraint precautions
●Double Cab models: A forward-facing child restraint system may be
installed on the front passenger seat only when it is unavoidable. A child
restraint system that requires a top tether strap should not be used in the
front passenger seat since there is no top tether strap anchor for the front
passenger seat. Adjust the seatback as upright as possible and always
move the seat as far back as possible even if AIR BAG OFF indicator light
is illuminated, because the front passenger airbag could inflate with con-
siderable speed and force. Otherwise, the child may be killed or seriously
injured.
●Access Cab models: A forward-facing child restraint system which belongs
to a passenger risk group should never be installed on the front passenger
seat with the passenger airbag off switch in the AUTO position, because
the force of the deploying airbag could cause death or serious injury to the
child in forward seating position. (P. 97)
●Regular Cab models: Do not install a child restraint system on the center
seat if it interferes with driving operations such as gear shifting. In this
case, install the child restraint system on the right passenger seat.
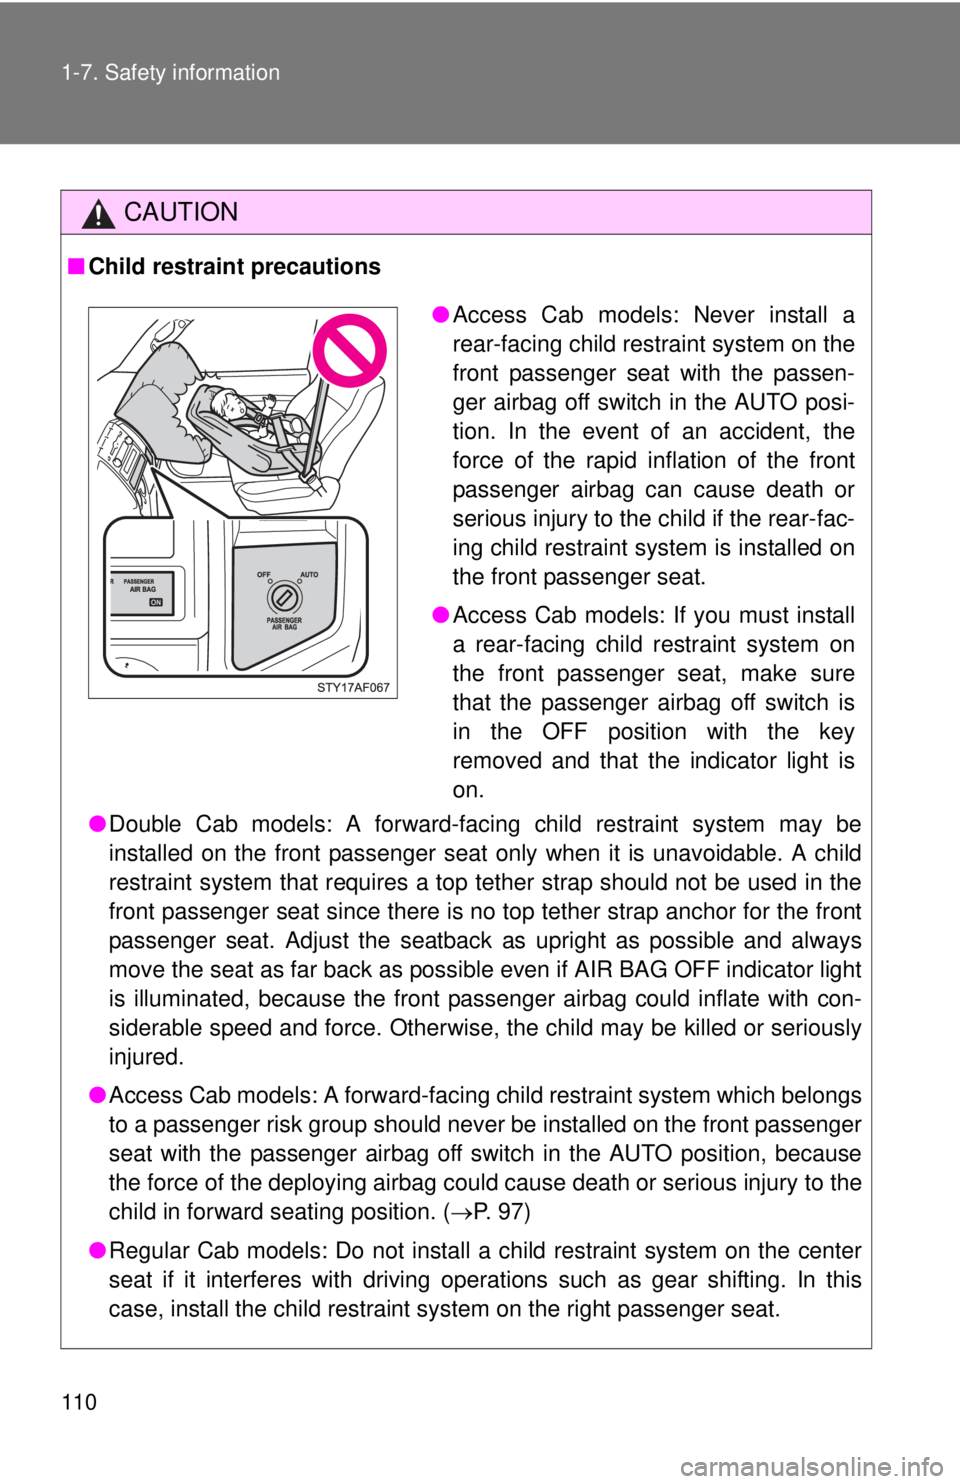
●Access Cab models: Never install a
rear-facing child restraint system on the
front passenger seat with the passen-
ger airbag off switch in the AUTO posi-
tion. In the event of an accident, the
force of the rapid inflation of the front
passenger airbag can cause death or
serious injury to the child if the rear-fac-
ing child restraint system is installed on
the front passenger seat.
●Access Cab models: If you must install
a rear-facing child restraint system on
the front passenger seat, make sure
that the passenger airbag off switch is
in the OFF position with the key
removed and that the indicator light is
on.
Page 115 of 532
115 1-7. Safety information
1
Before driving
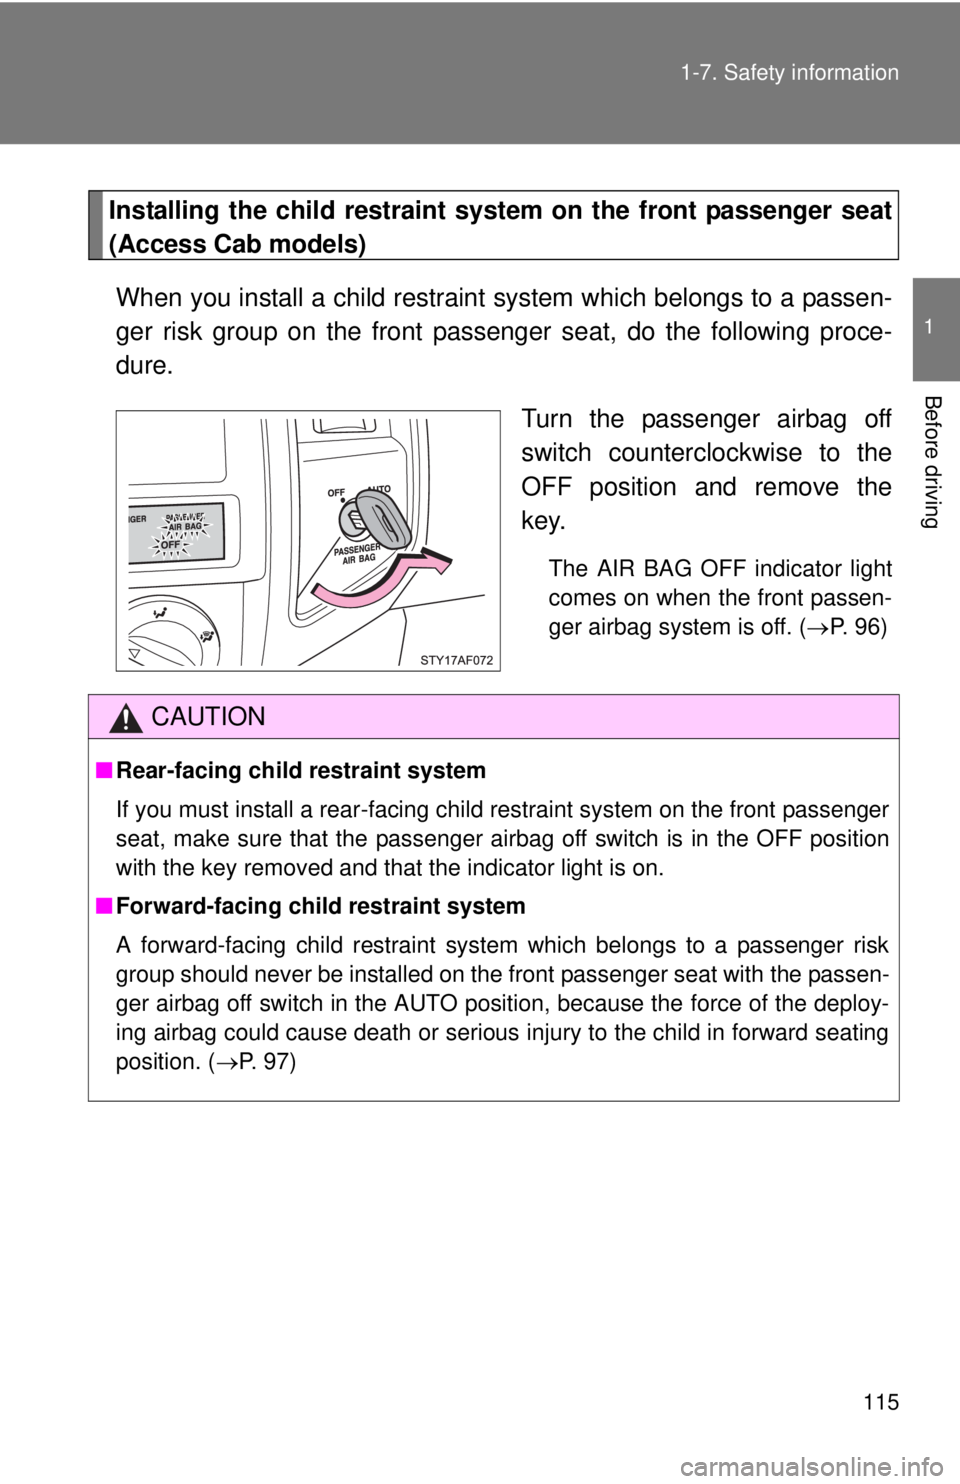
Installing the child restraint system on the front passenger seat
(Access Cab models)
When you install a child restraint system which belongs to a passen-
ger risk group on the front passenger seat, do the following proce-
dure.
Turn the passenger airbag off
switch counterclockwise to the
OFF position and remove the
key.
The AIR BAG OFF indicator light
comes on when the front passen-
ger airbag system is off. (P. 96)
CAUTION
■Rear-facing child restraint system
If you must install a rear-facing child restraint system on the front passenger
seat, make sure that the passenger airbag off switch is in the OFF position
with the key removed and that the indicator light is on.
■Forward-facing child restraint system
A forward-facing child restraint system which belongs to a passenger risk
group should never be installed on the front passenger seat with the passen-
ger airbag off switch in the AUTO position, because the force of the deploy-
ing airbag could cause death or serious injury to the child in forward seating
position. (P. 97)
Page 135 of 532
135 2-1. Driving procedures
2
When driving
Starting on a steep uphill
Automatic transmission
With the brake pedal depressed, firmly set the parking brake
and shift the shift lever to D.
Gently depress the accelerator pedal.
Release the parking brake.
Manual transmission
With the parking brake firmly set and the clutch pedal fully
depressed, shift the shift lever to 1.
■Parking the vehicle
Automatic transmission
With the shift lever in D, depress the brake pedal.
Set the parking brake. (P. 154)
Shift the shift lever to P. (P. 147)
When parking on a hill, if necessary, block the wheels.
Turn the engine switch off to stop the engine.
Lock the door, making sure that you have the key on your
person.
Manual transmission
With the clutch pedal fully depressed, depress the brake
pedal.
Set the parking brake. (P. 154)
Shift the shift lever to N. (P. 150)
When parking on a hill, shift the shift lever to 1 or R. If necessary,
block the wheels.
Turn the engine switch off to stop the engine.
Lock the door, making sure that you have the key on your
person.
Page 144 of 532
144
2-1. Driving procedures
Engine (ignition) switch
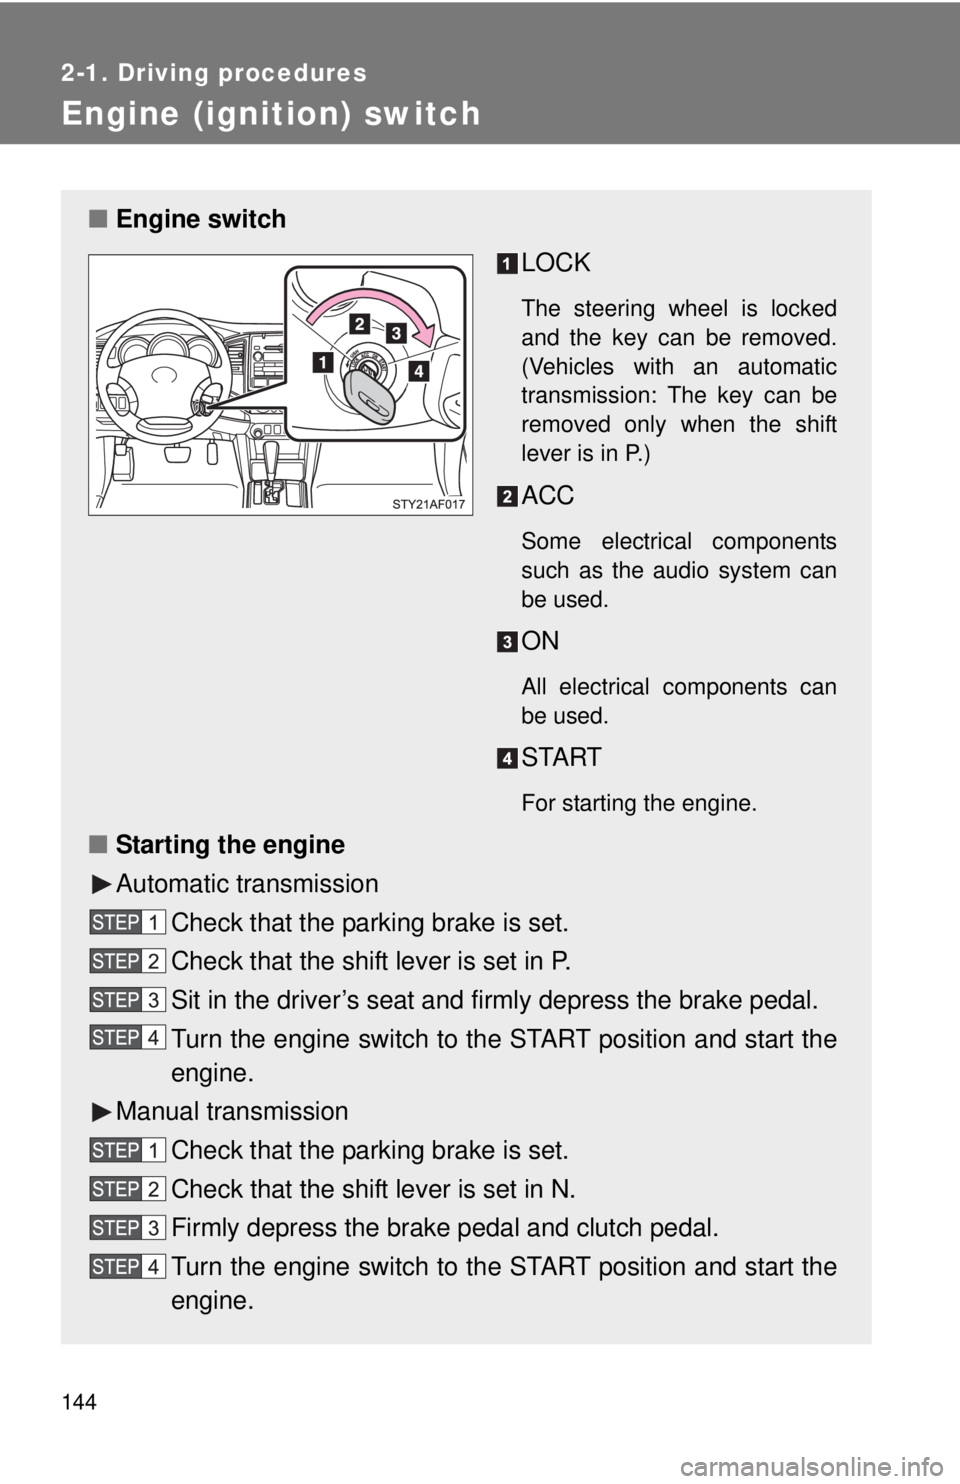
■Engine switch
LOCK
The steering wheel is locked
and the key can be removed.
(Vehicles with an automatic
transmission: The key can be
removed only when the shift
lever is in P.)
ACC
Some electrical components
such as the audio system can
be used.
ON
All electrical components can
be used.
START
For starting the engine.
■Starting the engine
Automatic transmission
Check that the parking brake is set.
Check that the shift lever is set in P.
Sit in the driver’s seat and firmly depress the brake pedal.
Turn the engine switch to the START position and start the
engine.
Manual transmission
Check that the parking brake is set.
Check that the shift lever is set in N.
Firmly depress the brake pedal and clutch pedal.
Turn the engine switch to the START position and start the
engine.
Page 145 of 532
145 2-1. Driving procedures
2
When driving
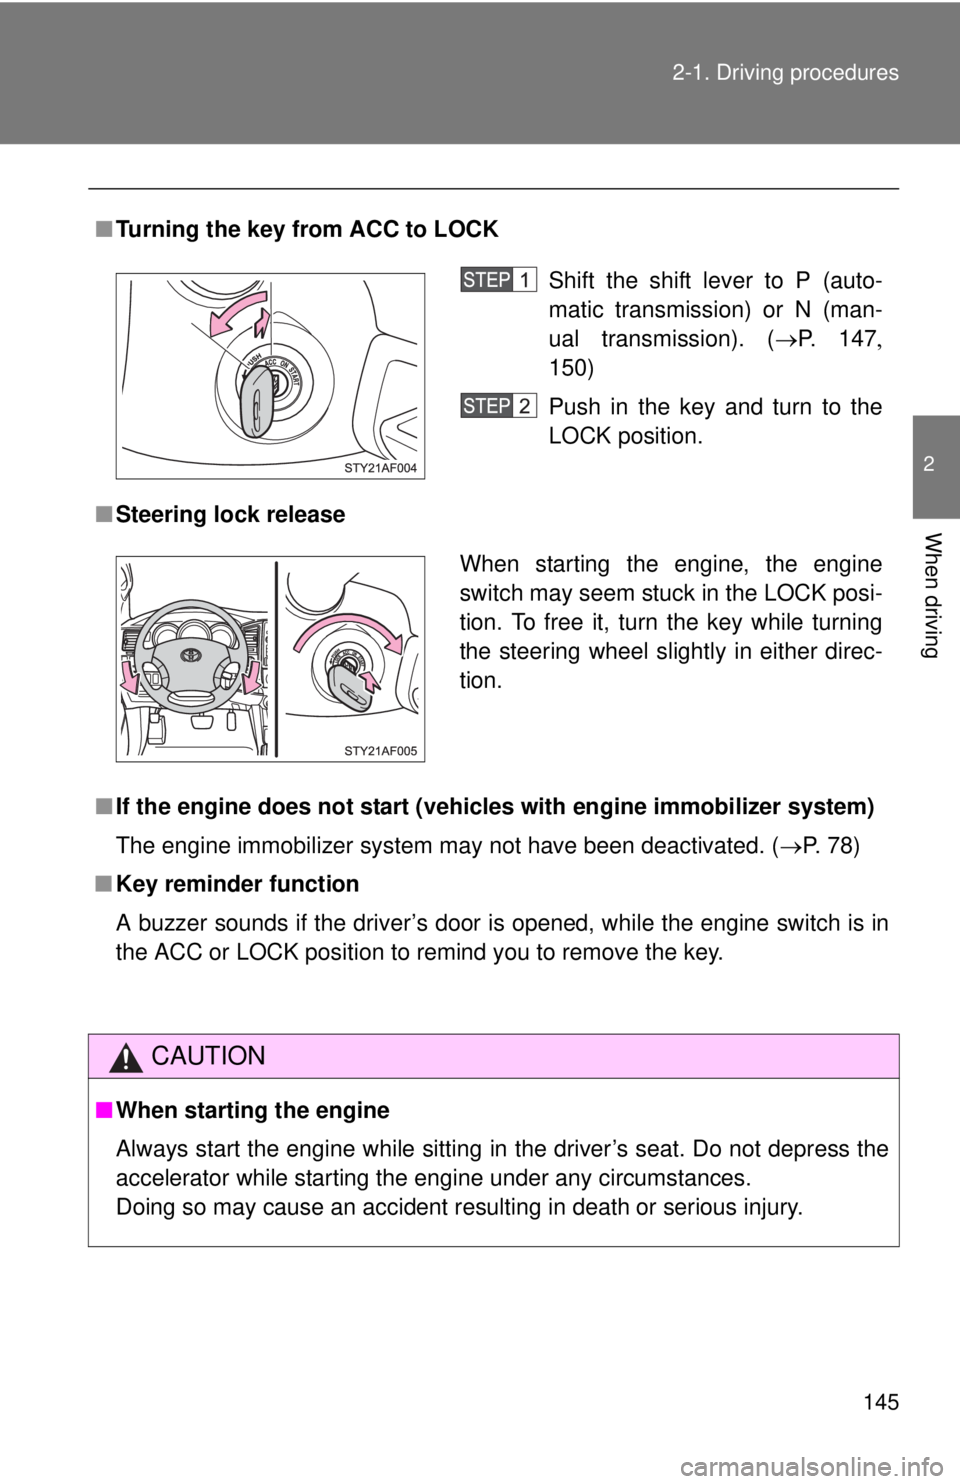
■Turning the key from ACC to LOCK
■Steering lock release
■If the engine does not start (vehicles with engine immobilizer system)
The engine immobilizer system may not have been deactivated. (P. 78)
■Key reminder function
A buzzer sounds if the driver’s door is opened, while the engine switch is in
the ACC or LOCK position to remind you to remove the key.
CAUTION
■When starting the engine
Always start the engine while sitting in the driver’s seat. Do not depress the
accelerator while starting the engine under any circumstances.
Doing so may cause an accident resulting in death or serious injury.
Shift the shift lever to P (auto-
matic transmission) or N (man-
ual transmission). (P. 147
150)
Push in the key and turn to the
LOCK position.
When starting the engine, the engine
switch may seem stuck in the LOCK posi-
tion. To free it, turn the key while turning
the steering wheel slightly in either direc-
tion.
Page 275 of 532
275 3-3. Using the hands-free phone system (for cellular phone)
3
Interior and exterior features
Register a phone name by either of the following methods.
a. Select “(RECORD NAME)” by using , and say aloud
the name you would like to register for the phone.
b. Press and say aloud the name you would like to reg-
ister for the phone.
You will hear voice guidance instructing you to confirm the input.
Select “Confirm” by using a voice command or .
A passkey is displayed and heard, and voice guidance instruction for
inputting the passkey into the cellular phone is heard.
Input the passkey into the cellular phone.
Refer to the manual that comes with the cellular phone for the oper-
ation of the phone.
Guidance for registration completion is heard.
Menu list of the hands-free phone system
■Voice commands (MENU ITEMS)
First menuSecond
menuThird menuOperation detail
Dial by name - -Dialing by inputting a name
registered in the phone
book
Dial by num-
ber--Dialing by inputting a phone
number
Redial
(REDIAL)--Dialing a phone number
stored in the outgoing his-
tory memory
Page 277 of 532

277 3-3. Using the hands-free phone system (for cellular phone)
3
Interior and exterior features
Setup
(SETUP)Security
(SECU-
RITY)Set PIN
(SET PIN)Setting a PIN
Phone book
lock
(PHBK
LOCK)Locking the phone book
Phone book
unlock
(PHBK
UNLOCK)Unlocking the phone book
Phone
setup
(PHONE
SETUP)Pair phone
(PAIR
PHONE)Registering a cellular
phone to be used
Select phone
(SELECT
PHONE)Selecting a cellular phone
to be used
Change name
(CHANGE
NAME)Changing a registered
name of a cellular phone
List phones
(LIST
PHONES)Listing the registered cellu-
lar phones
Set passkey
(SET
PASSKEY)Changing the passkey
Delete
(DELETE)Deleting a registered cellu-
lar phone
(SYSTEM
SETUP)(GUIDANCE
VOL)Setting voice guidance vol-
ume
(INITIALIZE) Initialization
First menuSecond
menuThird menuOperation detail
Page 279 of 532
279 3-3. Using the hands-free phone system (for cellular phone)
3
Interior and exterior features
■Automatic adjustment of volume
When vehicle speed is 50 mph (80 km/h) or more, the volume automatically
increases. The volume returns to the previous volume setting when vehicle
speed drops to 43 mph (70 km/h) or less.
■When using a voice command
●For numbers, speak a combination of single digits from zero to nine, #
(pound), (star), and + (plus).
●Speak the command correctly and clearly.
■The system may not recognize your voice in the following situations:
●When driving on a rough road
●When driving at high speeds
●When air is blowing out of the vents onto the microphone
●When the air conditioning fan emits a loud noise
■The following cannot be performed while driving:
●Operating the system with
●Registering a cellular phone to the system
■Changing the passkey
P. 288