ABS TOYOTA TACOMA 2010 Owners Manual (in English)
[x] Cancel search | Manufacturer: TOYOTA, Model Year: 2010, Model line: TACOMA, Model: TOYOTA TACOMA 2010Pages: 532, PDF Size: 15.03 MB
Page 41 of 532
41 1-2. Opening, closing and locking the doors
1
Before driving
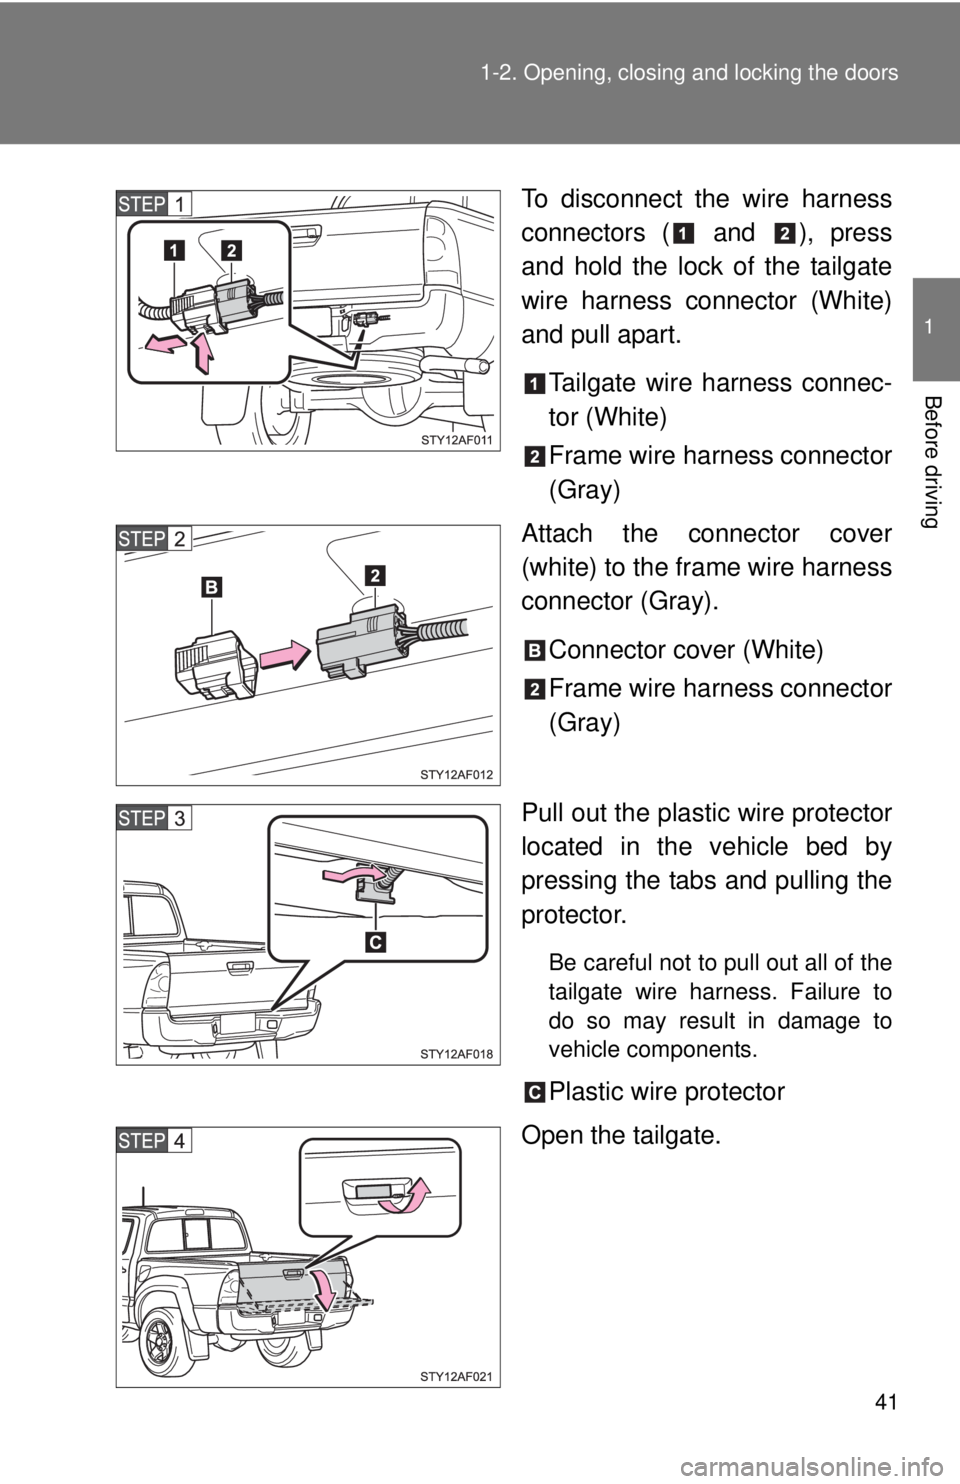
To disconnect the wire harness
connectors ( and ), press
and hold the lock of the tailgate
wire harness connector (White)
and pull apart.
Tailgate wire harness connec-
tor (White)
Frame wire harness connector
(Gray)
Attach the connector cover
(white) to the frame wire harness
connector (Gray).
Connector cover (White)
Frame wire harness connector
(Gray)
Pull out the plastic wire protector
located in the vehicle bed by
pressing the tabs and pulling the
protector.
Be careful not to pull out all of the
tailgate wire harness. Failure to
do so may result in damage to
vehicle components.
Plastic wire protector
Open the tailgate.
Page 162 of 532
162 2-2. Gauges and meters
CAUTION
■If a safety system warning light does not come on
Should a safety system light such as ABS and the SRS airbag warning light
not come on when you start the engine, this could mean that these systems
are not available to help protect you in an accident, which could result in
death or serious injury. Have the vehicle inspected by your Toyota dealer
immediately if this occurs.
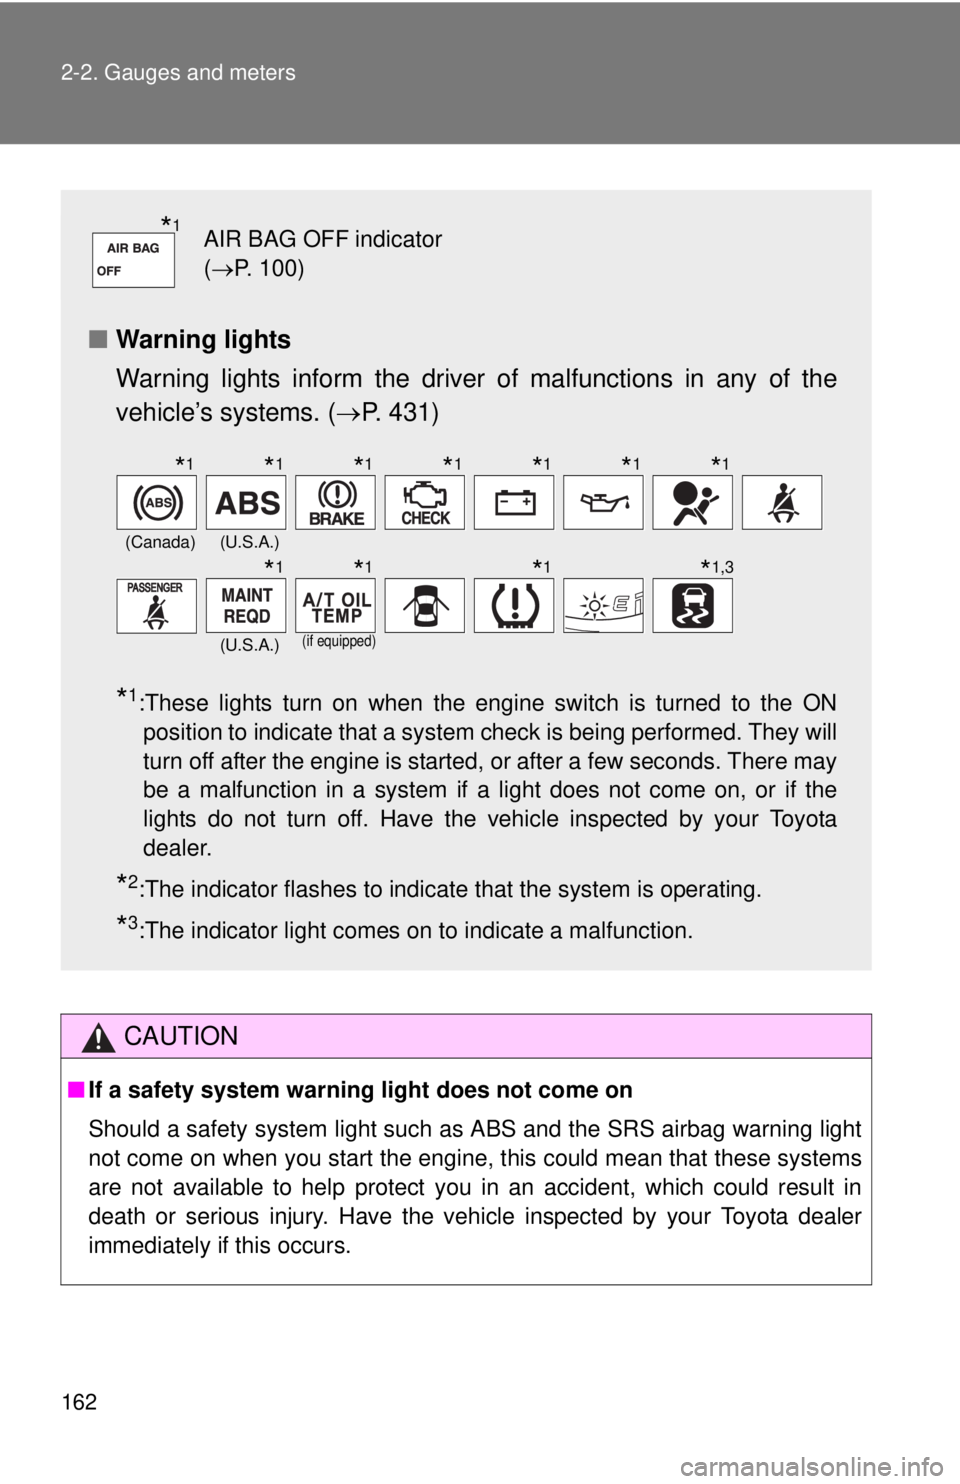
■Warning lights
Warning lights inform the driver of malfunctions in any of the
vehicle’s systems. (P. 431)
*1:These lights turn on when the engine switch is turned to the ON
position to indicate that a system check is being performed. They will
turn off after the engine is started, or after a few seconds. There may
be a malfunction in a system if a light does not come on, or if the
lights do not turn off. Have the vehicle inspected by your Toyota
dealer.
*2:The indicator flashes to indicate that the system is operating.
*3:The indicator light comes on to indicate a malfunction.
*1AIR BAG OFF indicator
(P. 100)
(Canada)(U.S.A.)
(U.S.A.)
(if equipped)
*1*1*1*1*1*1*1
*1*1*1*1,3
Page 186 of 532
186 2-4. Using other driving systems
Manual transmission
4WD models: Before using the rear differential lock system.
Stop the vehicle or reduce your speed to less than 2 mph (3
km/h). Depress the clutch pedal and put the front-wheel drive
control switch in the L4 position to see if this is sufficient. If
this has no effect, additionally use the rear differential lock
system.
Be sure to stop the wheels.
Depress the clutch pedal.
Press the RR DIFF LOCK switch.
After the rear differential is locked, the indicator will come on.
Slowly release the clutch pedal.
Unlock the rear differential as soon as the vehicle moves.
To unlock the rear differential, push the switch again.
■Locking the rear differential
●When the rear differential is locked, VSC is automatically turned off.
(The rear differential lock and VSC OFF indicators come on.)
●The following systems do not operate when the rear differential is locked.
It is normal operation for the ABS warning light and VSC OFF indicator to
be on at this time. If the DAC switch turns on, the downhill assist control
system indicator light flashes.
•ABS
• Brake assist system
•VSC
•TRAC
• Downhill assist control system
• Hill-start assist control system
■The rear differential lock is disengaged when
Shift the front-wheel drive control switch to H2 or H4 position. (4WD models)
Never forget to turn off the switch after using this feature.
Page 191 of 532
191
2-4. Using other driving systems
2
When driving
Driving assist systems
To help enhance driving safety and performance, the following sys-
tems operate automatically in response to various driving situations.
Be aware, however, that these systems are supplementary and
should not be relied upon too heavily when operating the vehicle.
■ABS (Anti-lock Brake System)
Helps to prevent wheel lock when the brakes are applied suddenly, or if
the brakes are applied while driving on a slippery road surface.
■Brake Assist
Generates an increased level of braking force after the brake pedal is
depressed, while the system detects a panic stop situation.
■VSC (Vehicle Stability Control)
Helps the driver to control skidding when swerving suddenly or turning
on slippery road surfaces.
■TRAC (Traction Control)
Maintains drive power and prevents the rear wheels (2WD models) or
four wheels (4WD models) from spinning when starting the vehicle or
accelerating on slippery roads.
■Hill-start assist control (if equipped)
Helps prevent the vehicle from rolling backwards when starting on an
incline or slippery slope. It operates for approximately 5 seconds at
maximum.
Page 193 of 532
193 2-4. Using other driving systems
2
When driving
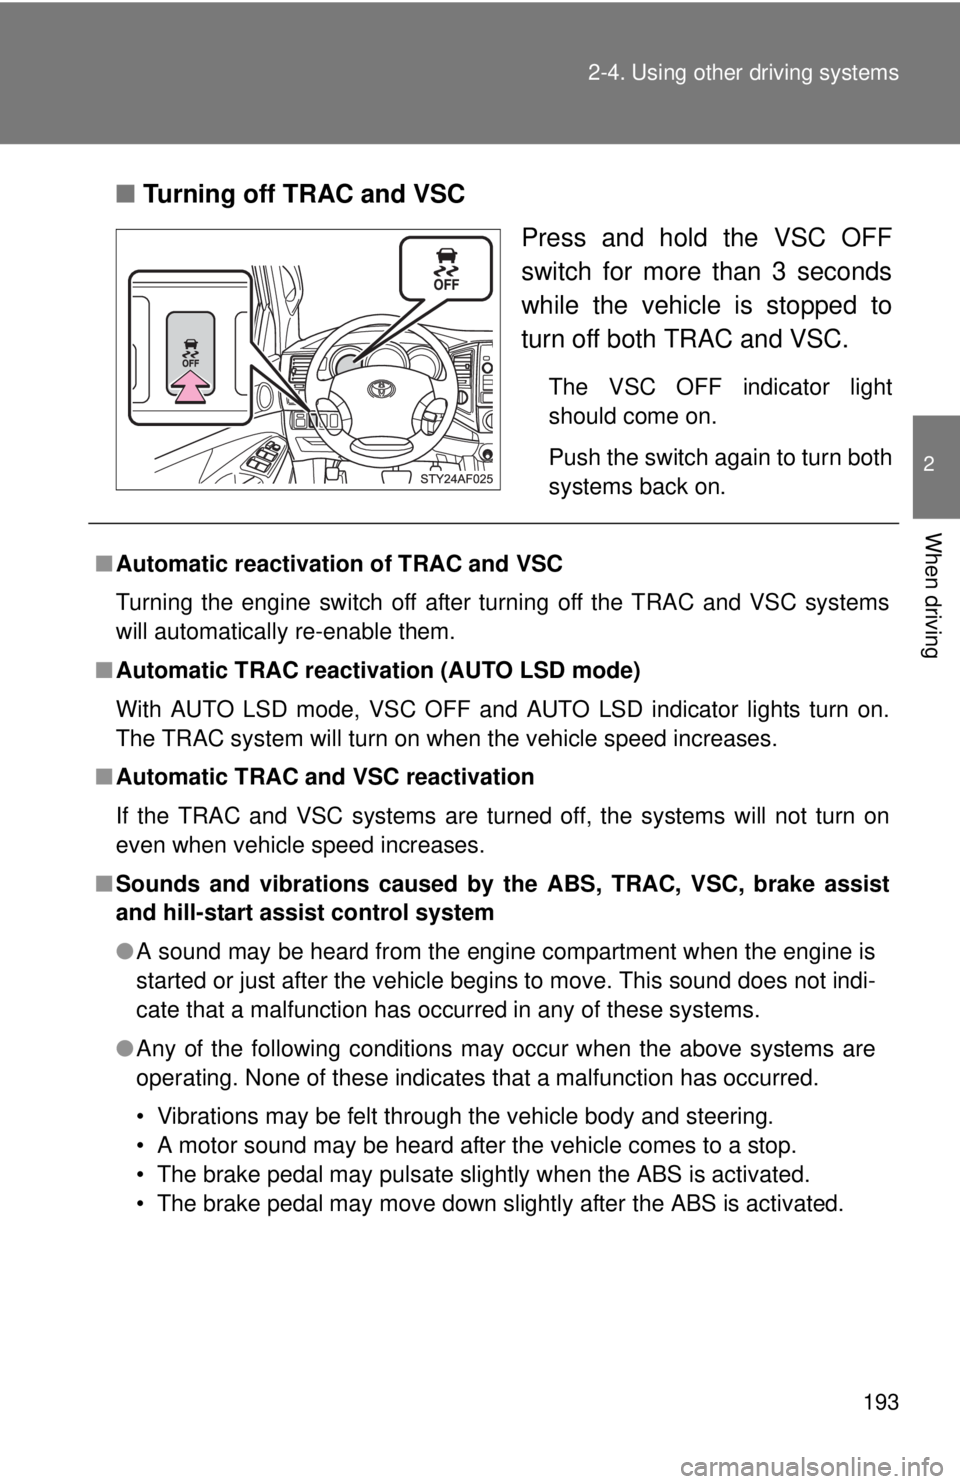
■Turning off TRAC and VSC
Press and hold the VSC OFF
switch for more than 3 seconds
while the vehicle is stopped to
turn off both TRAC and VSC.
The VSC OFF indicator light
should come on.
Push the switch again to turn both
systems back on.
■Automatic reactivation of TRAC and VSC
Turning the engine switch off after turning off the TRAC and VSC systems
will automatically re-enable them.
■Automatic TRAC reactivation (AUTO LSD mode)
With AUTO LSD mode, VSC OFF and AUTO LSD indicator lights turn on.
The TRAC system will turn on when the vehicle speed increases.
■Automatic TRAC and VSC reactivation
If the TRAC and VSC systems are turned off, the systems will not turn on
even when vehicle speed increases.
■Sounds and vibrations caused by the ABS, TRAC, VSC, brake assist
and hill-start assist control system
●A sound may be heard from the engine compartment when the engine is
started or just after the vehicle begins to move. This sound does not indi-
cate that a malfunction has occurred in any of these systems.
●Any of the following conditions may occur when the above systems are
operating. None of these indicates that a malfunction has occurred.
• Vibrations may be felt through the vehicle body and steering.
• A motor sound may be heard after the vehicle comes to a stop.
• The brake pedal may pulsate slightly when the ABS is activated.
• The brake pedal may move down slightly after the ABS is activated.
Page 195 of 532
195 2-4. Using other driving systems
2
When driving
CAUTION
■The ABS does not operate effectively when
●The limits of the gripping performance have been exceeded.
●The vehicle hydroplanes while driving at high speed on the wet or slick
road.
■Stopping distance when the ABS is operating will exceed that of nor-
mal conditions
The ABS is not designed to shorten the vehicle’s stopping distance. Always
maintain a safe distance from the vehicle in front of you in the following situ-
ations.
●When driving on dirt, gravel or snow-covered roads
●When driving with tire chains
●When driving over bumps in the road
●When driving over roads with potholes or roads with uneven roads
■When VSC is activated
The slip indicator flashes and a warning buzzer sounds. Always drive care-
fully. Reckless driving may cause an accident. Exercise particular care when
the indicator flashes and a buzzer sounds.
■TRAC may not operate effectively when
Directional control and power may not be achievable while driving on slip-
pery road surfaces, even if TRAC is operating.
Do not drive the vehicle in conditions where stability and power may be lost.
■If the hill-start assist control does not operate effectively
Do not overly rely on the hill-start assist control. The hill start assist control
may not operate effectively on steep inclines and roads covered in ice.
■Replacing tires
Make sure that all tires are of the same size, brand, tread pattern and total
load capacity. In addition, make sure that the tires are inflated to the appro-
priate tire pressure level.
The ABS and VSC will not function correctly if different tires are fitted on the
vehicle.
Contact your Toyota dealer for further information when replacing tires or
wheels.
Page 225 of 532
225 2-5. Driving information
2
When driving
Apply the brakes and keep them applied.
Have someone place wheel blocks under both the vehicle and
trailer wheels.
When the wheel blocks are in place, release the brakes slowly
until the blocks absorb the load.
Apply the parking brake firmly.
Shift into 1 or R (manual transmission) or P (automatic trans-
mission) and turn off the engine.
●When restarting after parking on a slope:
With the transmission in P (automatic transmission) or the
clutch pedal (manual transmission) depressed, start the
engine. On vehicles with an automatic transmission, be sure
to keep the brake pedal pressed.
Shift into a forward gear. If reversing, shift into R.
Release the parking brake (also brake pedal on vehicles with
an automatic transmission), and slowly pull or back away from
the wheel blocks. Stop and apply the brakes.
Have someone retrieve the blocks.
CAUTION
■To avoid an accident
●Do not exceed 45 mph (72 km/h) or posted towing speed limit, whichever
is lower. As instability (swaying) of the towing vehicle-trailer combination
increases as speed increases, exceeding 45 mph (72 km/h) may cause
loss of control.
●Slow down and downshift before descending steep or long downhill
grades. Do not make sudden downshifts.
●Avoid holding the brake pedal down too long or too frequently. This could
cause the brakes to overheat and result in reduced braking efficiency.
Page 371 of 532
371 4-3. Do-it-yourself maintenance
4
Maintenance and care
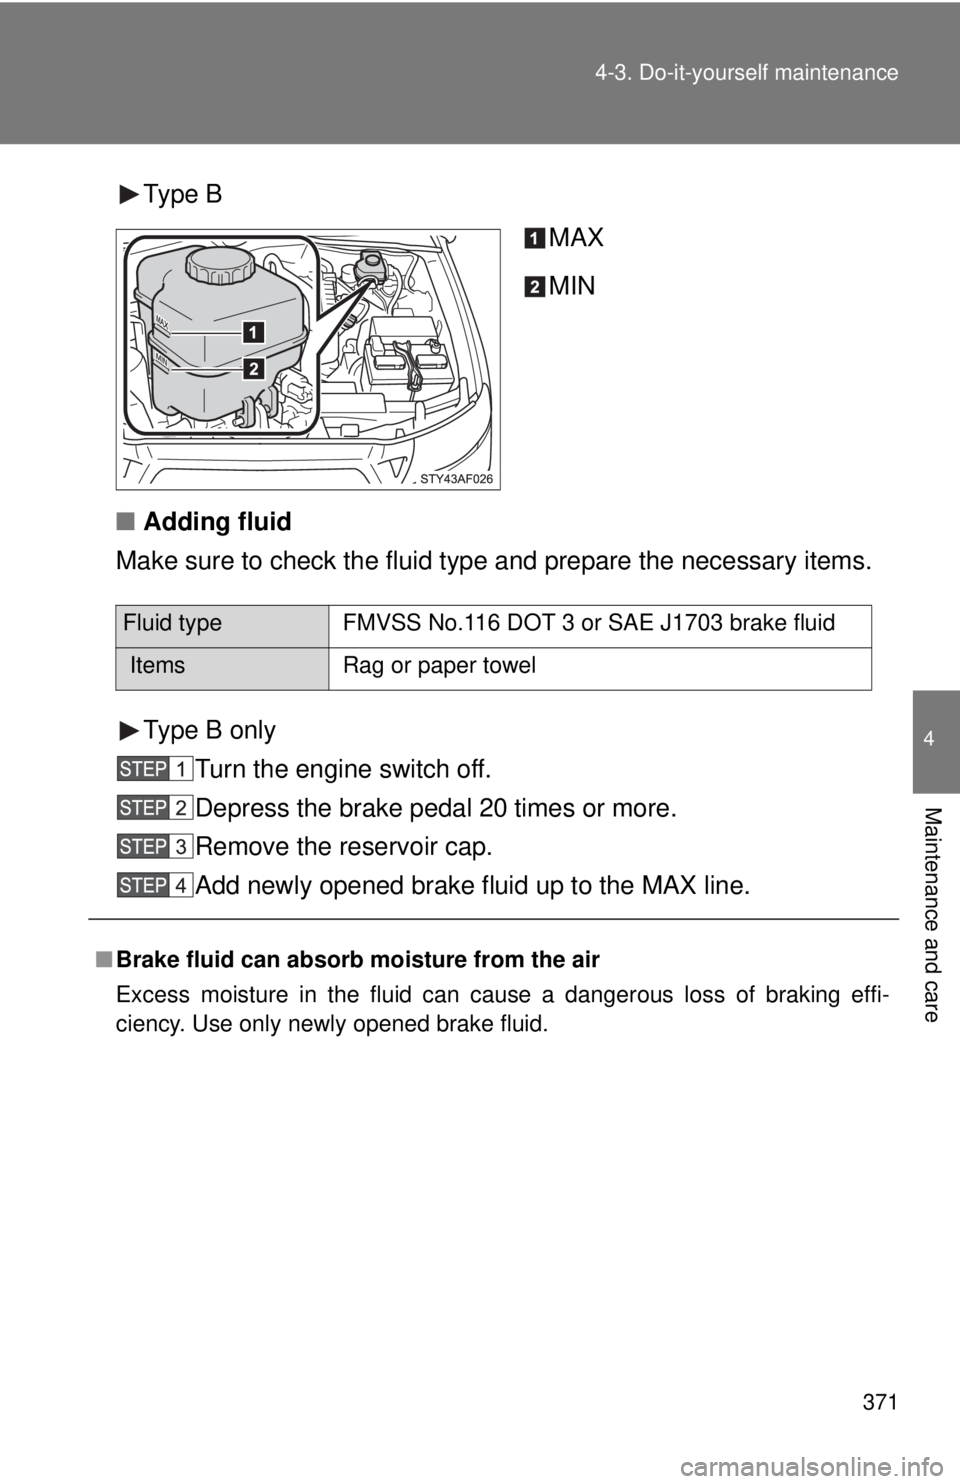
Type B
MAX
MIN
■Adding fluid
Make sure to check the fluid type and prepare the necessary items.
Type B only
Turn the engine switch off.
Depress the brake pedal 20 times or more.
Remove the reservoir cap.
Add newly opened brake fluid up to the MAX line.
Fluid type FMVSS No.116 DOT 3 or SAE J1703 brake fluid
Items Rag or paper towel
■Brake fluid can absorb moisture from the air
Excess moisture in the fluid can cause a dangerous loss of braking effi-
ciency. Use only newly opened brake fluid.
Page 403 of 532

403 4-3. Do-it-yourself maintenance
4
Maintenance and care
18 EFI 20 AMultiport fuel injection system/
sequential multiport fuel injection
system
19 HORN 10 A Horn
20 A/F HEATER 15 AMultiport fuel injection system/
sequential multiport fuel injection
system
21 ECU-B 7.5 AWireless remote control system, air
conditioning system, multiplex
communication system, meter and
gauge, clock, front passenger
occupant classification system
22 DOME 7.5 A Interior light, personal lights
23 RADIO NO.1 10 A Audio system
24 STA 7.5 AStarting system, multiport fuel
injection system/sequential multi-
port fuel injection system, meter
and gauge, clutch start cancel
switch
25 Spare 10 A Spare fuse
26 Spare 15 A Spare fuse
27 J/B 50 ATAIL, AC SKT, DR LCK, D FR P/W,
D RR P/W, P FR P/W and P RR P/
W fuses
28 AM1 50 AACC, IG1, IG1 NO.2, WIP, WSH,
4WD and STA fuses
29 HEATER 50 A A/C fuse, air conditioning system
30 ABS NO.1 50 AAnti-lock brake system, vehicle sta-
bility control system
31 AM2 30 AIGN and GAUGE fuses, multiport
fuel injection system/sequential
multiport fuel injection system
FuseAmpereCircuit
Page 404 of 532

404 4-3. Do-it-yourself maintenance
*: Replace the fuse with one of the same ampere rating as the original32 A/PUMP 50 AMultiport fuel injection system/
sequential multiport fuel injection
system
33 ABS NO.2 30 AAnti-lock brake system, vehicle sta-
bility control system
34 AC SKT 100 A Cigarette lighter, power outlets
35 ALT120 A* AM1, AC SKT, HEATER, FR FOG,
STOP, OBD, J/B, TOWING TAIL,
TOWING BRK and BATT CHG
fuses 140 A*
FuseAmpereCircuit