USB TOYOTA TACOMA 2013 Accessories, Audio & Navigation (in English)
[x] Cancel search | Manufacturer: TOYOTA, Model Year: 2013, Model line: TACOMA, Model: TOYOTA TACOMA 2013Pages: 228, PDF Size: 3.73 MB
Page 6 of 228
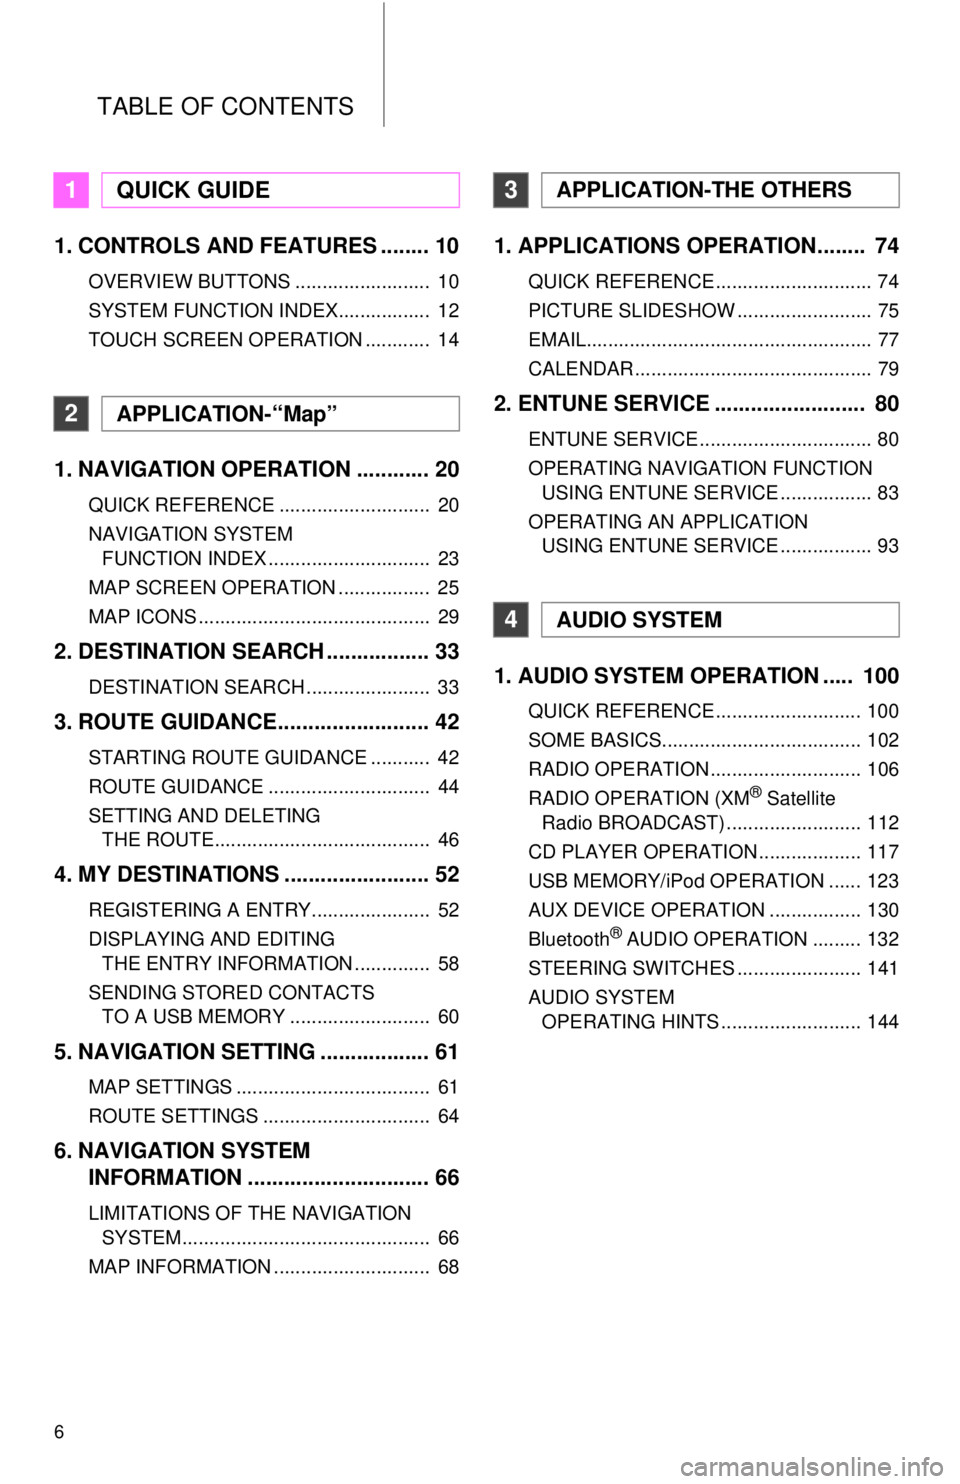
TABLE OF CONTENTS
6
1. CONTROLS AND FEATURES ........ 10
OVERVIEW BUTTONS ......................... 10
SYSTEM FUNCTION INDEX................. 12
TOUCH SCREEN OPERATION ............ 14
1. NAVIGATION OPERATION ............ 20
QUICK REFERENCE ............................ 20
NAVIGATION SYSTEM FUNCTION INDEX .............................. 23
MAP SCREEN OPERATION ................. 25
MAP ICONS ........................................... 29
2. DESTINATION SEARCH ................. 33
DESTINATION SEARCH ....................... 33
3. ROUTE GUIDANCE... ...................... 42
STARTING ROUTE GUIDANCE ........... 42
ROUTE GUIDANCE .............................. 44
SETTING AND DELETING
THE ROUTE........................................ 46
4. MY DESTINATIONS ........................ 52
REGISTERING A ENTRY...................... 52
DISPLAYING AND EDITING THE ENTRY INFORMATION .............. 58
SENDING STORED CONTACTS TO A USB MEMORY .......................... 60
5. NAVIGATION SETTING .................. 61
MAP SETTINGS .................................... 61
ROUTE SETTINGS ............................... 64
6. NAVIGATION SYSTEM INFORMATION .............................. 66
LIMITATIONS OF THE NAVIGATION
SYSTEM.............................................. 66
MAP INFORMATION ............................. 68
1. APPLICATIONS OPERATION........ 74
QUICK REFERENCE ............................. 74
PICTURE SLIDESHOW ......................... 75
EMAIL..................................................... 77
CALENDAR ............................................ 79
2. ENTUNE SERVICE ......................... 80
ENTUNE SERVICE ................................ 80
OPERATING NAVIGATION FUNCTION USING ENTUNE SERVICE ................. 83
OPERATING AN APPLICATION USING ENTUNE SERVICE ................. 93
1. AUDIO SYSTEM OPER ATION ..... 100
QUICK REFERENCE ........................... 100
SOME BASICS..................................... 102
RADIO OPERATION ............................ 106
RADIO OPERATION (XM
® Satellite
Radio BROADCAST) ......................... 112
CD PLAYER OPERATION ................... 117
USB MEMORY/iPod OPERATION ...... 123
AUX DEVICE OPERATION ................. 130
Bluetooth
® AUDIO OPERATION ......... 132
STEERING SWITCHES ....................... 141
AUDIO SYSTEM OPERATING HINTS .......................... 144
1QUICK GUIDE
2APPLICATION-“Map”
3APPLICATION-THE OTHERS
4AUDIO SYSTEM
Page 12 of 228
12
1. CONTROLS AND FEATURES
2. SYSTEM FUNCTION INDEX
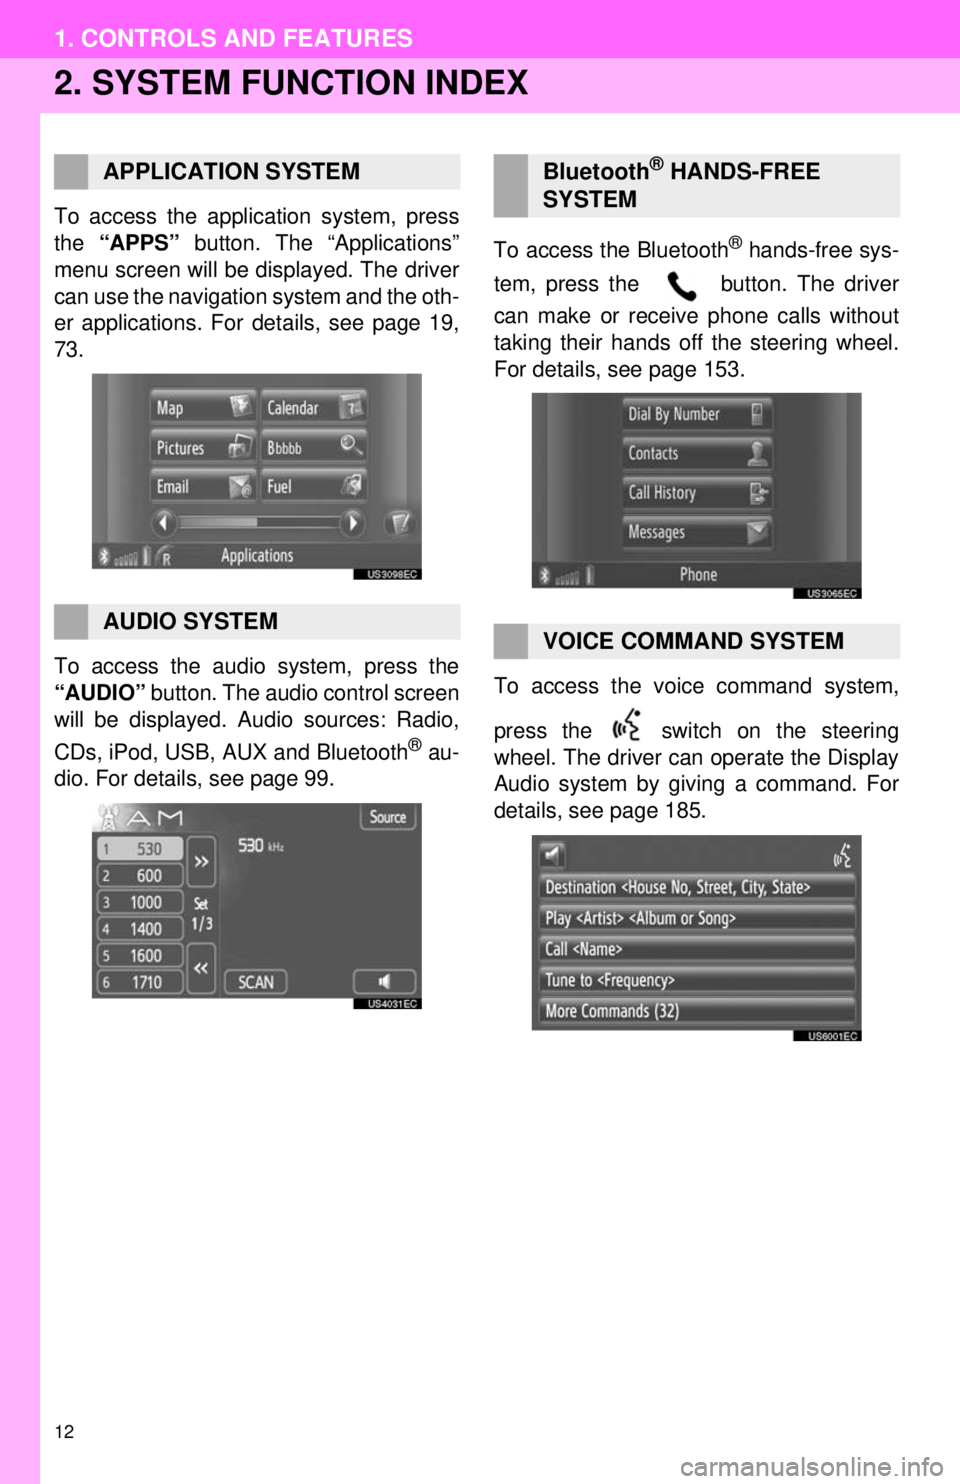
To access the application system, press
the “APPS” button. The “Applications”
menu screen will be displayed. The driver
can use the navigation system and the oth-
er applications. For details, see page 19,
73.
To access the audio system, press the
“AUDIO” button. The audio control screen
will be displayed. Audio sources: Radio,
CDs, iPod, USB, AUX and Bluetooth
® au-
dio. For details, see page 99. To access the Bluetooth
® hands-free sys-
tem, press the button. The driver
can make or receive phone calls without
taking their hands off the steering wheel.
For details, see page 153.
To access the vo ice command system,
press the switch on the steering
wheel. The driver can operate the Display
Audio system by giving a command. For
details, see page 185.
APPLICATION SYSTEM
AUDIO SYSTEM
Bluetooth® HANDS-FREE
SYSTEM
VOICE COMMAND SYSTEM
Page 19 of 228
2
19
1
2
3
4
5
7
8
9
6
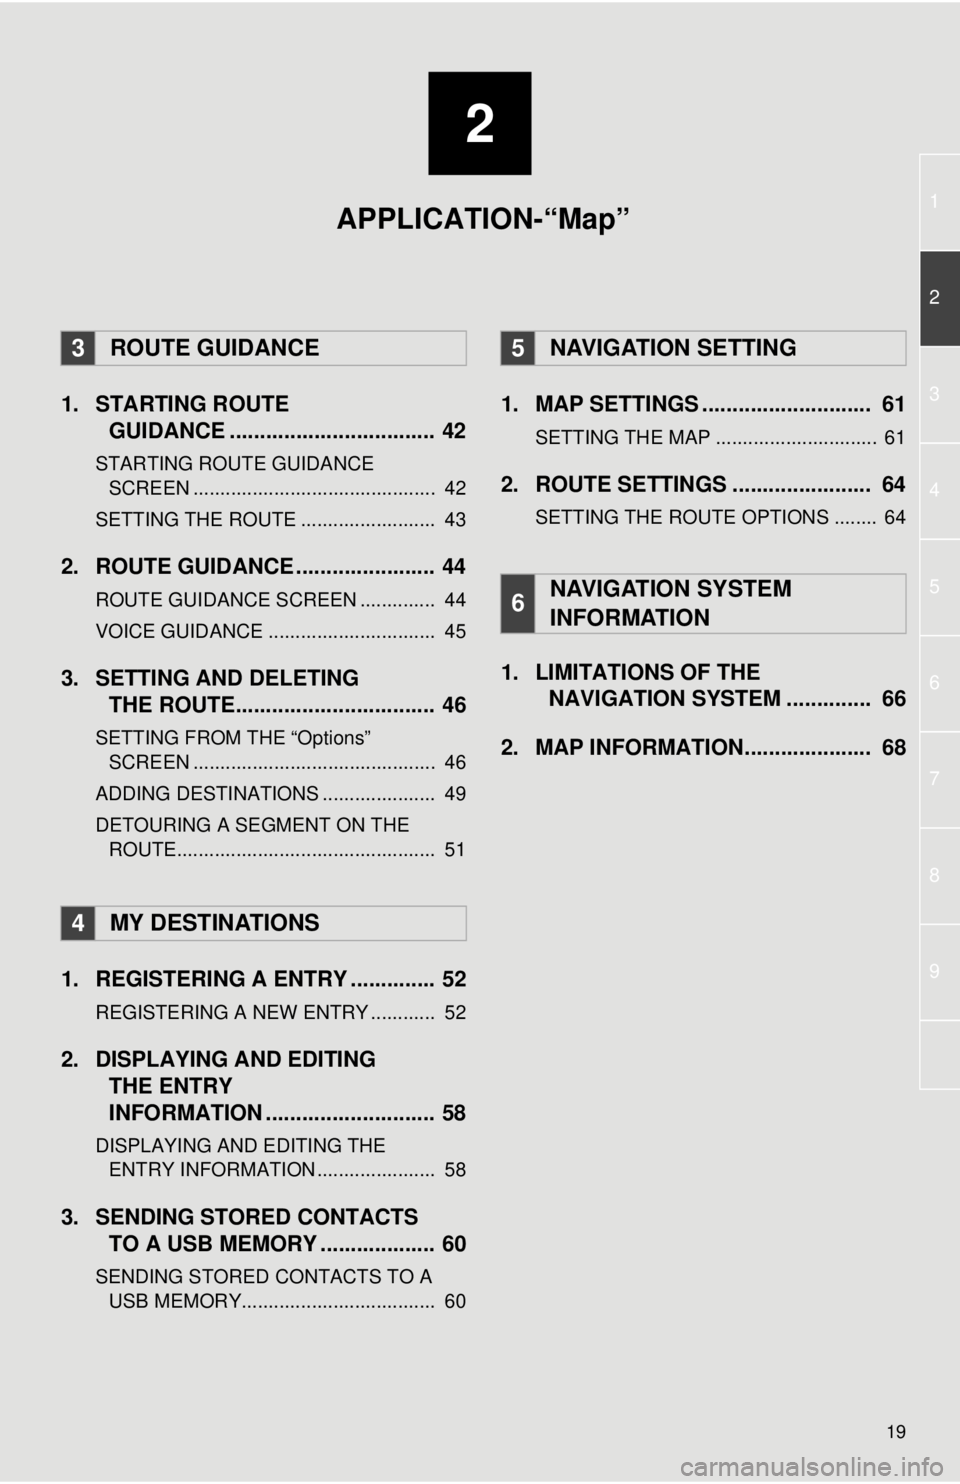
1. STARTING ROUTEGUIDANCE .............. .................... 42
STARTING ROUTE GUIDANCE
SCREEN ............................................. 42
SETTING THE ROUTE ......................... 43
2. ROUTE GUIDANCE ..... .................. 44
ROUTE GUIDANCE SCREEN .............. 44
VOICE GUIDANCE ............................... 45
3. SETTING AND DELETING
THE ROUTE................................. 46
SETTING FROM THE “Options”
SCREEN ............................................. 46
ADDING DESTINATIONS ..................... 49
DETOURING A SEGMENT ON THE ROUTE................................................ 51
1. REGISTERING A ENTRY .............. 52
REGISTERING A NEW ENTRY ............ 52
2. DISPLAYING AND EDITING THE ENTRY
INFORMATION ............................ 58
DISPLAYING AND EDITING THE
ENTRY INFORMATION ...................... 58
3. SENDING STORED CONTACTS TO A USB MEMORY ................... 60
SENDING STORED CONTACTS TO A
USB MEMOR Y.................................... 60
1. MAP SETTINGS ............................ 61
SETTING THE MAP .............................. 61
2. ROUTE SETTINGS ....................... 64
SETTING THE ROUTE OPTIONS ........ 64
1. LIMITATIONS OF THE
NAVIGATION SYSTEM .............. 66
2. MAP INFORMATION..................... 68
3ROUTE GUIDANCE
4MY DESTINATIONS
5NAVIGATION SETTING
6NAVIGATION SYSTEM
INFORMATION
APPLICATION-“Map”
Page 20 of 228
20
1. NAVIGATION OPERATION
1. QUICK REFERENCE
“Applications” menu screen
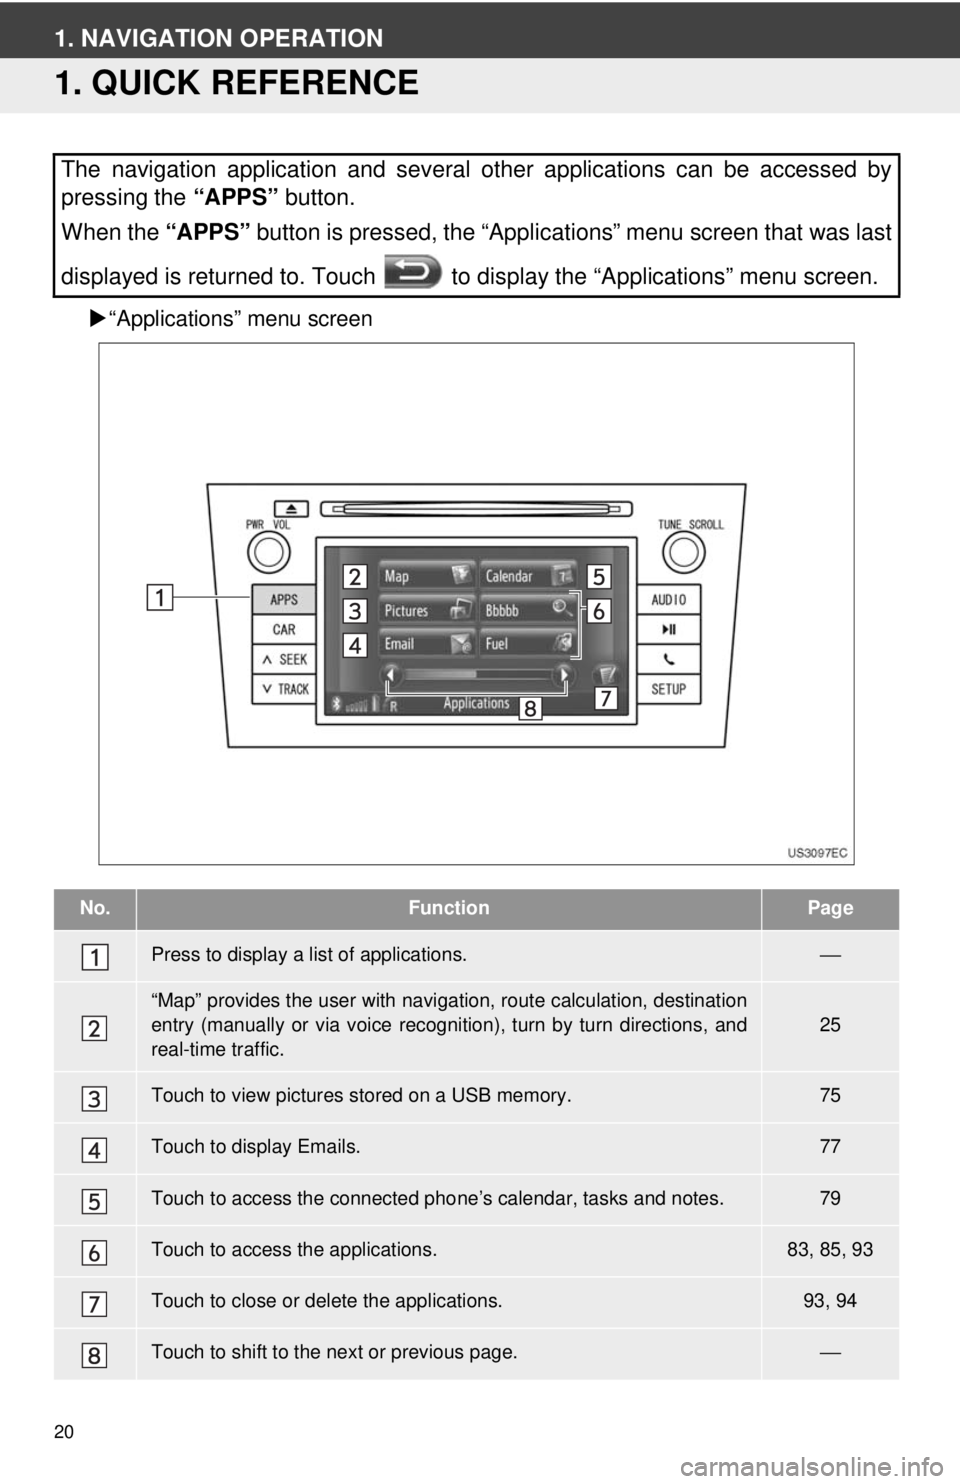
The navigation application and several other applications can be accessed by
pressing the “APPS” button.
When the “APPS” button is pressed, the “Applications” menu screen that was last
displayed is returned to. Touch to display the “Applications” menu screen.
No.FunctionPage
Press to display a list of applications.⎯
“Map” provides the user with navigat ion, route calculation, destination
entry (manually or via voice recognition), turn by turn directions, and
real-time traffic.25
Touch to view pictures stored on a USB memory.75
Touch to display Emails.77
Touch to access the connected pho ne’s calendar, tasks and notes.79
Touch to access the applications.83, 85, 93
Touch to close or delete the applications.93, 94
Touch to shift to the next or previous page.⎯
Page 56 of 228
56
4. MY DESTINATIONS
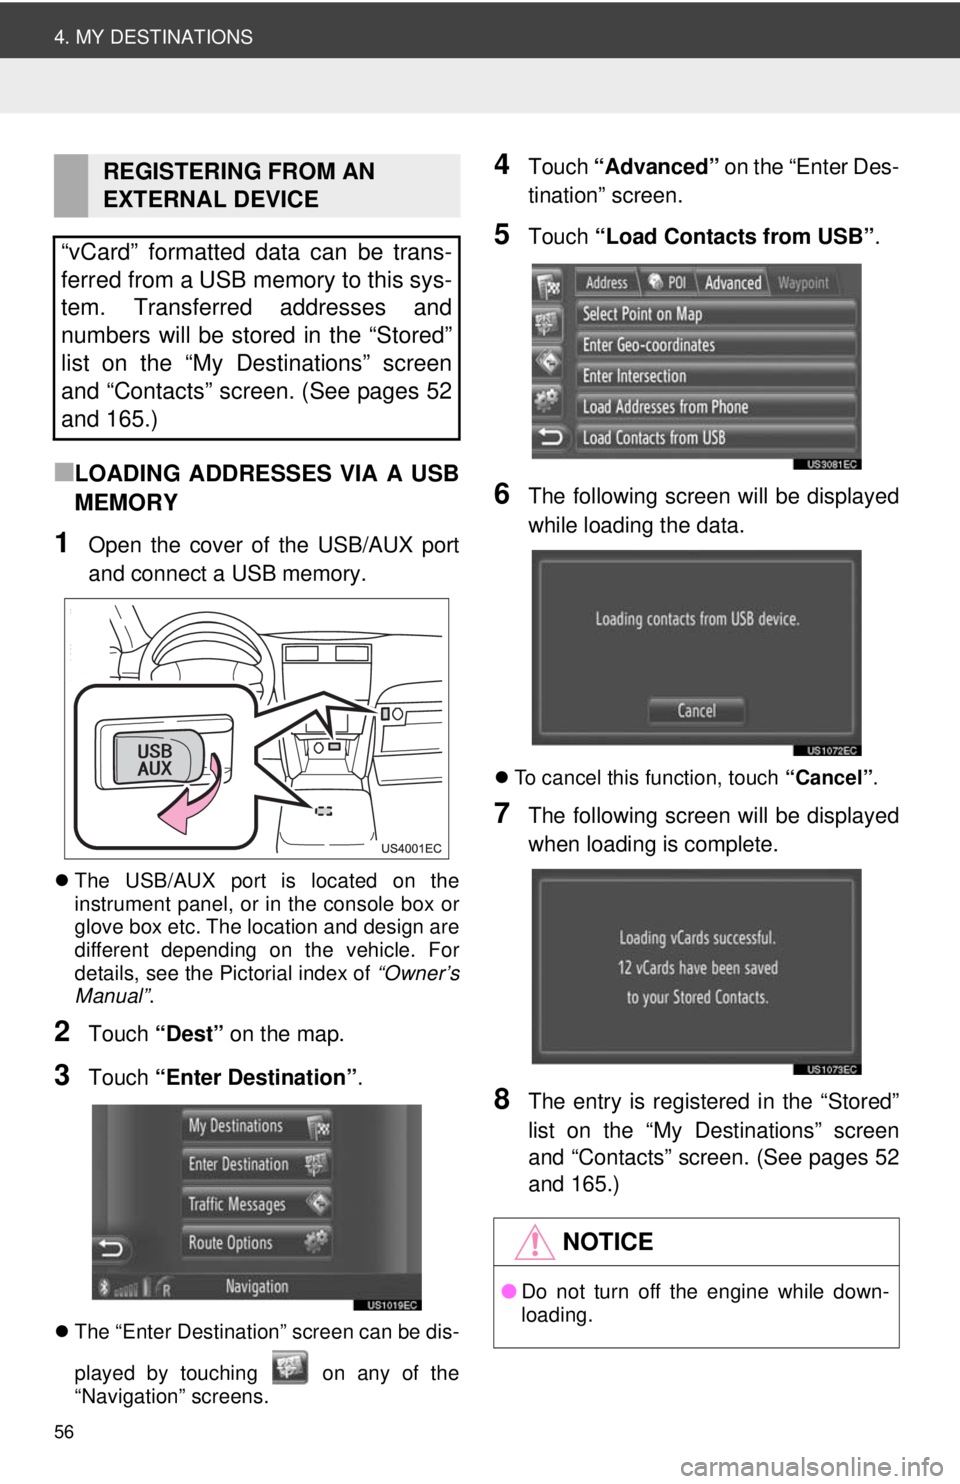
■LOADING ADDRESSES VIA A USB
MEMORY
1Open the cover of the USB/AUX port
and connect a USB memory.
The USB/AUX port is located on the
instrument panel, or in the console box or
glove box etc. The location and design are
different depending on the vehicle. For
details, see the Pictorial index of “Owner’s
Manual” .
2Touch “Dest” on the map.
3Touch “Enter Destination” .
The “Enter Destination” screen can be dis-
played by touching on any of the
“Navigation” screens.
4Touch “Advanced” on the “Enter Des-
tination” screen.
5Touch “Load Contacts from USB” .
6The following screen will be displayed
while loading the data.
To cancel this function, touch “Cancel”.
7The following screen will be displayed
when loading is complete.
8The entry is registered in the “Stored”
list on the “My Destinations” screen
and “Contacts” screen. (See pages 52
and 165.)
REGISTERING FROM AN
EXTERNAL DEVICE
“vCard” formatted data can be trans-
ferred from a USB memory to this sys-
tem. Transferred addresses and
numbers will be stored in the “Stored”
list on the “My Destinations” screen
and “Contacts” screen. (See pages 52
and 165.)
NOTICE
● Do not turn off the engine while down-
loading.
Page 60 of 228
60
4. MY DESTINATIONS
3. SENDING STORED CONTACTS TO A USB MEMORY
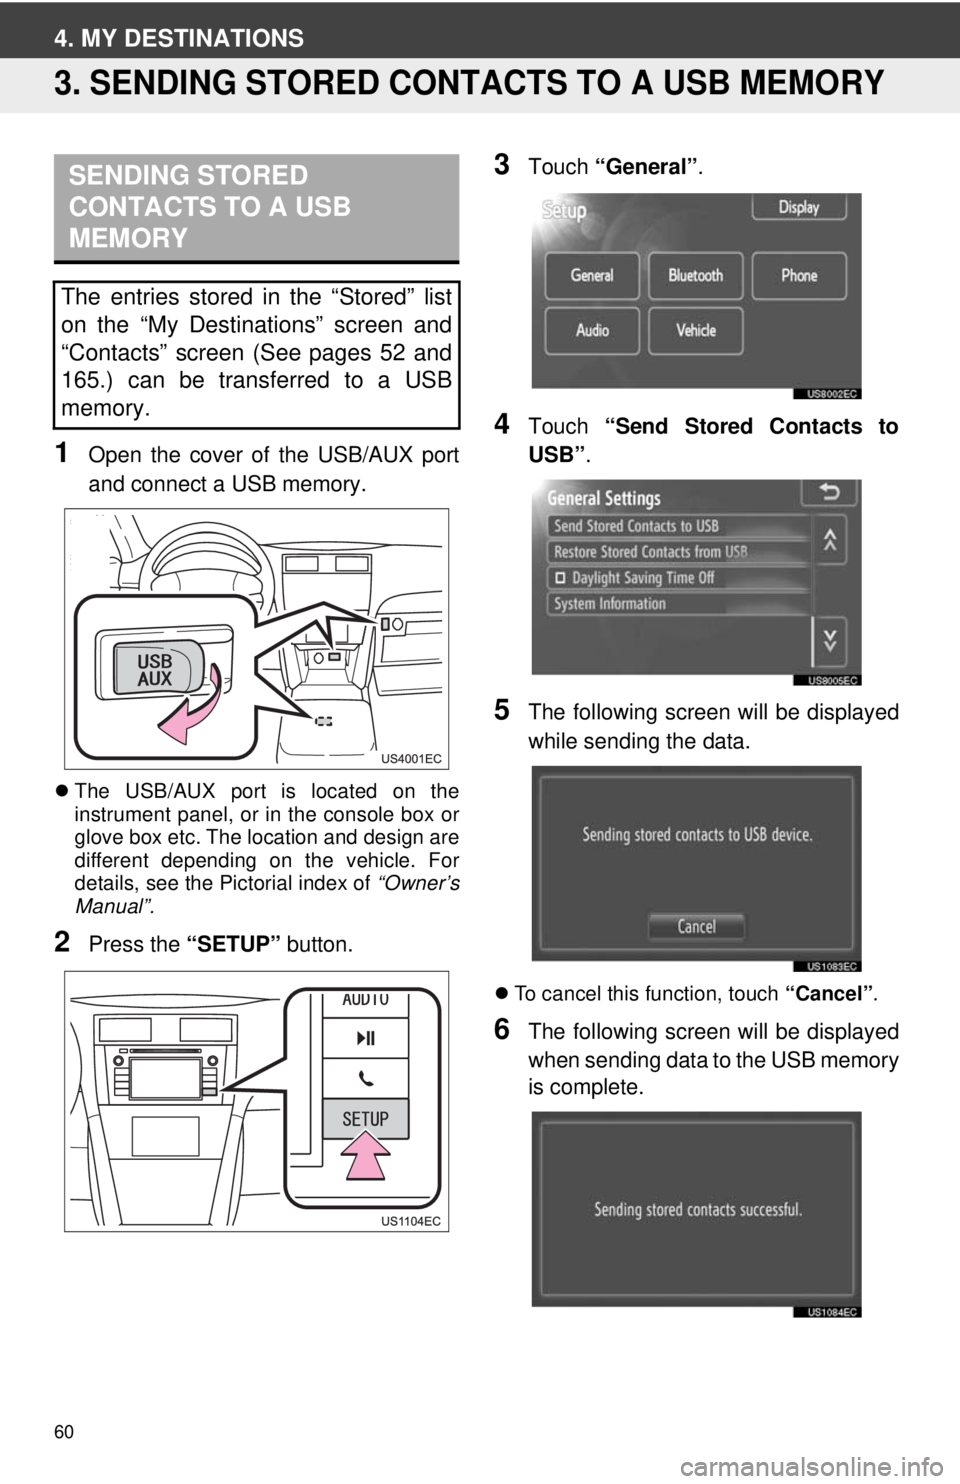
1Open the cover of the USB/AUX port
and connect a USB memory.
The USB/AUX port is located on the
instrument panel, or in the console box or
glove box etc. The location and design are
different depending on the vehicle. For
details, see the Pictorial index of “Owner’s
Manual”.
2Press the “SETUP” button.
3Touch “General” .
4Touch “Send Stored Contacts to
USB” .
5The following screen will be displayed
while sending the data.
To cancel this function, touch “Cancel”.
6The following screen will be displayed
when sending data to the USB memory
is complete.
SENDING STORED
CONTACTS TO A USB
MEMORY
The entries stored in the “Stored” list
on the “My Destinations” screen and
“Contacts” screen (See pages 52 and
165.) can be transferred to a USB
memory.
Page 74 of 228
74
1. APPLICATIONS OPERATION
1. QUICK REFERENCE
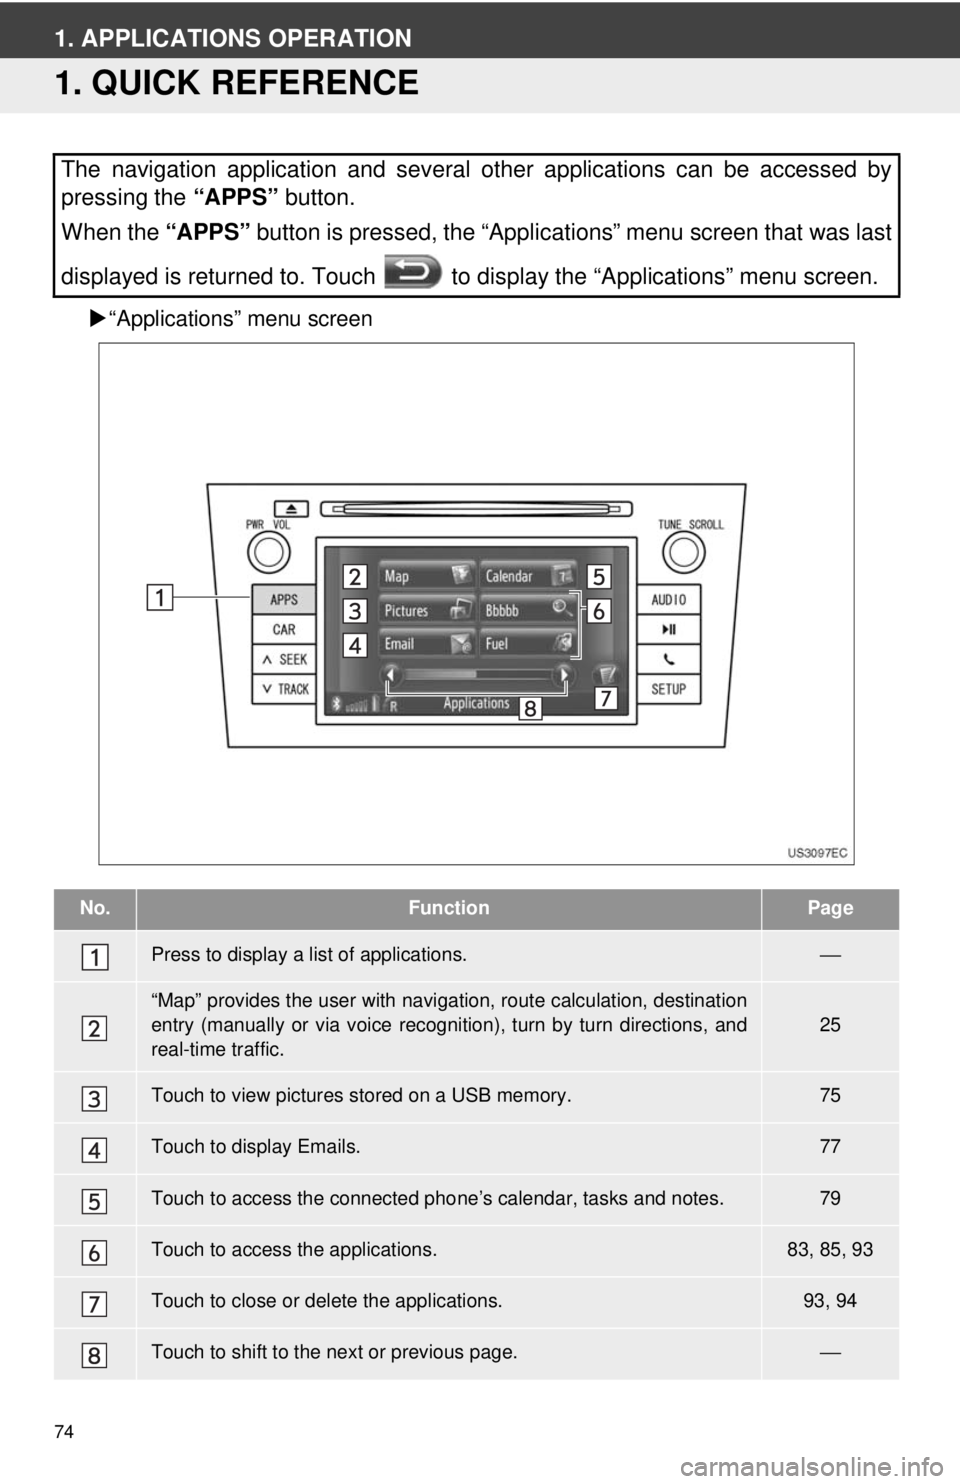
“Applications” menu screen
The navigation application and several other applications can be accessed by
pressing the “APPS” button.
When the “APPS” button is pressed, the “Applications” menu screen that was last
displayed is returned to. Touch to display the “Applications” menu screen.
No.FunctionPage
Press to display a list of applications.⎯
“Map” provides the user with navigat ion, route calculation, destination
entry (manually or via voice recognition), turn by turn directions, and
real-time traffic.25
Touch to view pictures stored on a USB memory.75
Touch to display Emails.77
Touch to access the connected pho ne’s calendar, tasks and notes.79
Touch to access the applications.83, 85, 93
Touch to close or delete the applications.93, 94
Touch to shift to the next or previous page.⎯
Page 75 of 228
75
3
APPLICATION-THE OTHERS
1. APPLICATIONS OPERATION
2. PICTURE SLIDESHOW
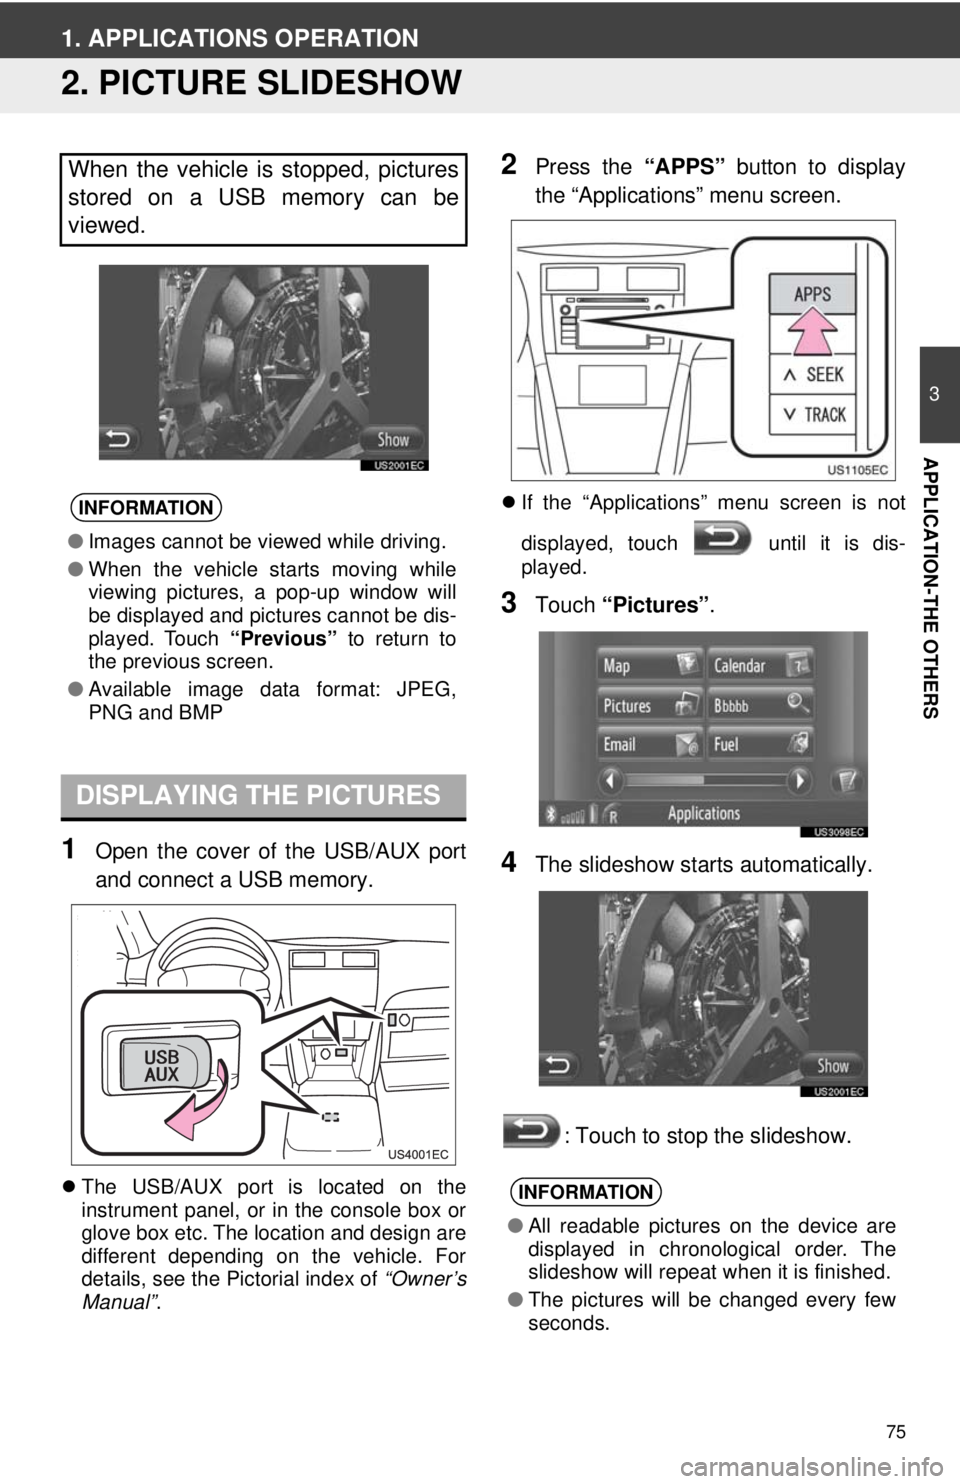
1Open the cover of the USB/AUX port
and connect a USB memory.
The USB/AUX port is located on the
instrument panel, or in the console box or
glove box etc. The location and design are
different depending on the vehicle. For
details, see the Pictorial index of “Owner’s
Manual” .
2Press the “APPS” button to display
the “Applications” menu screen.
If the “Applications” menu screen is not
displayed, touch until it is dis-
played.
3Touch “Pictures” .
4The slideshow starts automatically.
: Touch to stop the slideshow.
When the vehicle is stopped, pictures
stored on a USB memory can be
viewed.
INFORMATION
●Images cannot be viewed while driving.
● When the vehicle starts moving while
viewing pictures, a pop-up window will
be displayed and pictures cannot be dis-
played. Touch “Previous” to return to
the previous screen.
● Available image data format: JPEG,
PNG and BMP
DISPLAYING THE PICTURES
INFORMATION
●All readable pictures on the device are
displayed in chronological order. The
slideshow will repeat when it is finished.
● The pictures will be changed every few
seconds.
Page 99 of 228
4
99
1
2
3
4
5
6
7
8
9
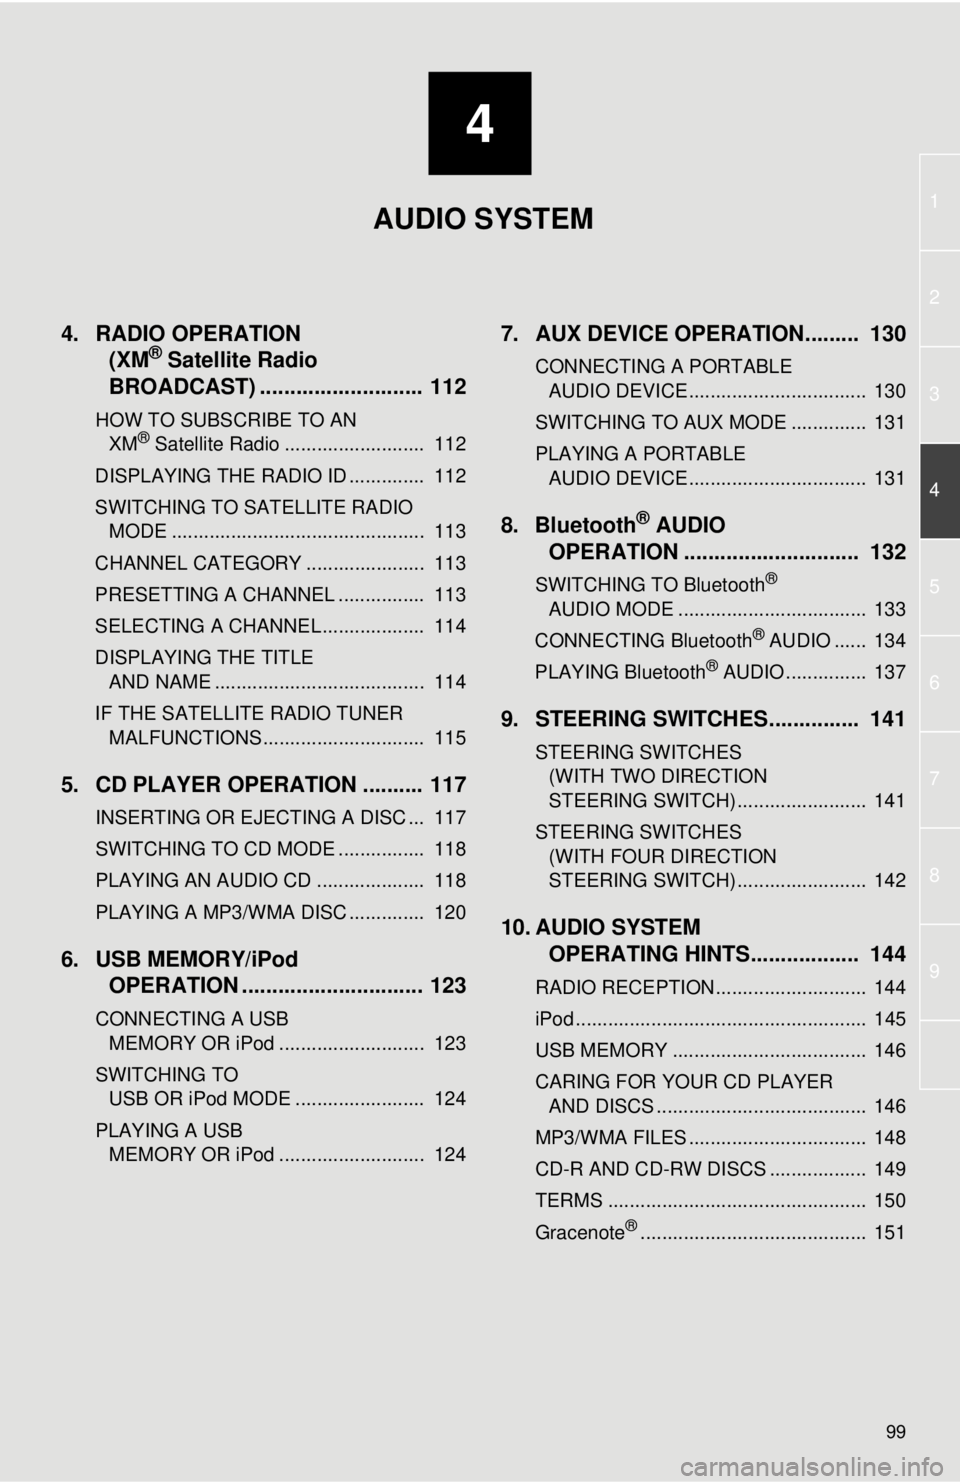
4. RADIO OPERATION(XM® Satellite Radio
BROADCAST) ........... ................ 112
HOW TO SUBSCRIBE TO AN
XM® Satellite Radio .......................... 112
DISPLAYING THE RADIO ID .............. 112
SWITCHING TO SATELLITE RADIO MODE ............................................... 113
CHANNEL CATEGORY ...................... 113
PRESETTING A CHANNEL ................ 113
SELECTING A CHANNEL ................... 114
DISPLAYING THE TITLE AND NAME ....................................... 114
IF THE SATELLITE RADIO TUNER MALFUNCTIONS .............................. 115
5. CD PLAYER OPERATION .......... 117
INSERTING OR EJECTING A DISC ... 117
SWITCHING TO CD MODE ................ 118
PLAYING AN AUDIO CD .................... 118
PLAYING A MP3/WMA DISC .............. 120
6. USB MEMORY/iPod OPERATION .............................. 123
CONNECTING A USB
MEMORY OR iPod ........................... 123
SWITCHING TO USB OR iPod MODE ........................ 124
PLAYING A USB MEMORY OR iPod ........................... 124
7. AUX DEVICE OPERATION......... 130
CONNECTING A PORTABLE AUDIO DEVICE ................................. 130
SWITCHING TO AUX MODE .............. 131
PLAYING A PORTABLE AUDIO DEVICE ................................. 131
8. Bluetooth® AUDIO
OPERATION ............................. 132
SWITCHING TO Bluetooth®
AUDIO MODE ................................... 133
CONNECTING Bluetooth
® AUDIO ...... 134
PLAYING Bluetooth® AUDIO ............... 137
9. STEERING SWITCHES............... 141
STEERING SWITCHES (WITH TWO DIRECTION
STEERING SWITCH) ........................ 141
STEERING SWITCHES (WITH FOUR DIRECTION
STEERING SWITCH) ........................ 142
10. AUDIO SYSTEM OPERATING HINTS.................. 144
RADIO RECEPTION............................ 144
iPod ...................................................... 145
USB MEMORY .................................... 146
CARING FOR YOUR CD PLAYER
AND DISCS ....................................... 146
MP3/WMA FILES ................................. 148
CD-R AND CD-RW DISCS .................. 149
TERMS ................................................ 150
Gracenote
®.......................................... 151
AUDIO SYSTEM
Page 104 of 228
104
1. AUDIO SYSTEM OPERATION
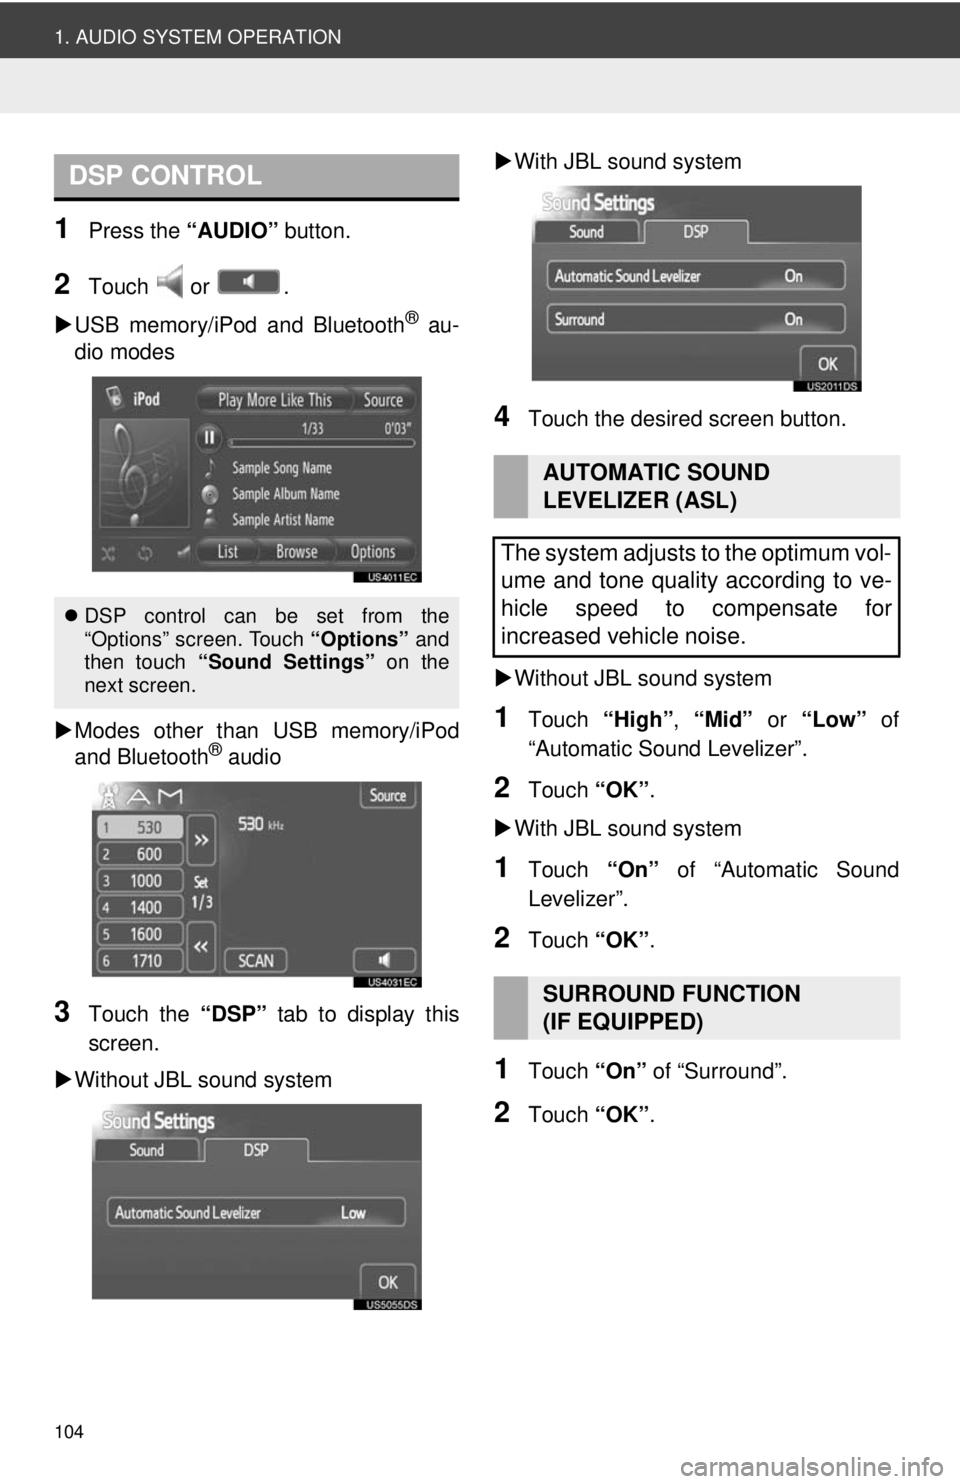
1Press the “AUDIO” button.
2Touch or .
USB memory/iPod and Bluetooth
® au-
dio modes
Modes other than USB memory/iPod
and Bluetooth
® audio
3Touch the “DSP” tab to display this
screen.
Without JBL sound system
With JBL sound system
4Touch the desired screen button.
Without JBL sound system
1Touch “High”, “Mid” or “Low” of
“Automatic Sound Levelizer”.
2Touch “OK”.
With JBL sound system
1Touch “On” of “Automatic Sound
Levelizer”.
2Touch “OK”.
1Touch “On” of “Surround”.
2Touch “OK”.
DSP CONTROL
DSP control can be set from the
“Options” screen. Touch “Options” and
then touch “Sound Settings” on the
next screen.
AUTOMATIC SOUND
LEVELIZER (ASL)
The system adjusts to the optimum vol-
ume and tone quality according to ve-
hicle speed to compensate for
increased vehicle noise.
SURROUND FUNCTION
(IF EQUIPPED)