glove box TOYOTA TACOMA 2013 Accessories, Audio & Navigation (in English)
[x] Cancel search | Manufacturer: TOYOTA, Model Year: 2013, Model line: TACOMA, Model: TOYOTA TACOMA 2013Pages: 228, PDF Size: 3.73 MB
Page 56 of 228
56
4. MY DESTINATIONS
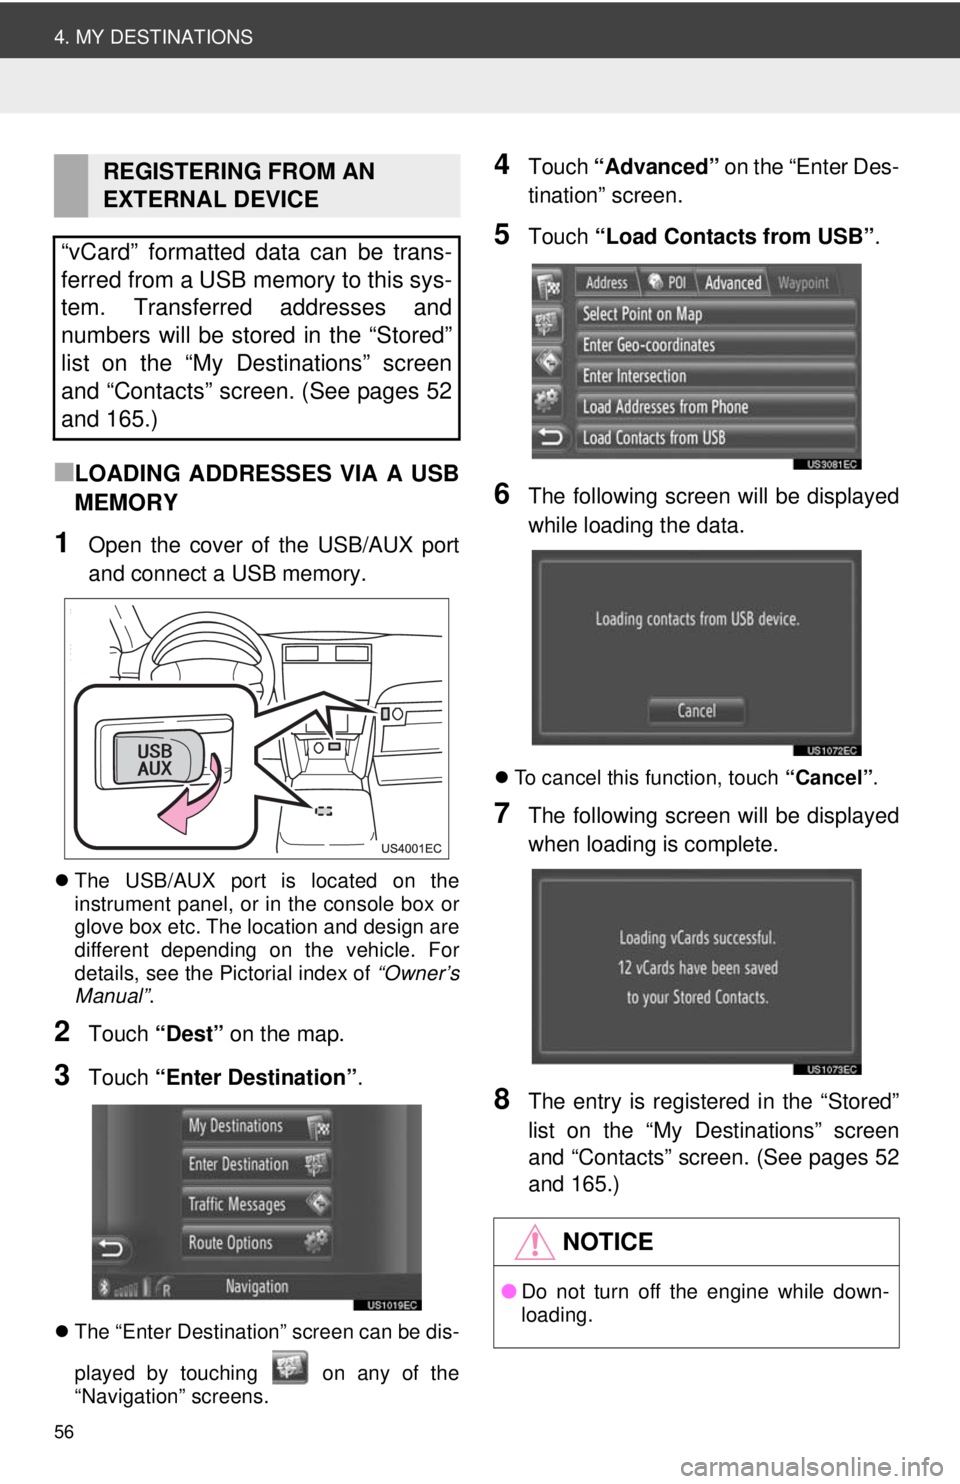
■LOADING ADDRESSES VIA A USB
MEMORY
1Open the cover of the USB/AUX port
and connect a USB memory.
The USB/AUX port is located on the
instrument panel, or in the console box or
glove box etc. The location and design are
different depending on the vehicle. For
details, see the Pictorial index of “Owner’s
Manual” .
2Touch “Dest” on the map.
3Touch “Enter Destination” .
The “Enter Destination” screen can be dis-
played by touching on any of the
“Navigation” screens.
4Touch “Advanced” on the “Enter Des-
tination” screen.
5Touch “Load Contacts from USB” .
6The following screen will be displayed
while loading the data.
To cancel this function, touch “Cancel”.
7The following screen will be displayed
when loading is complete.
8The entry is registered in the “Stored”
list on the “My Destinations” screen
and “Contacts” screen. (See pages 52
and 165.)
REGISTERING FROM AN
EXTERNAL DEVICE
“vCard” formatted data can be trans-
ferred from a USB memory to this sys-
tem. Transferred addresses and
numbers will be stored in the “Stored”
list on the “My Destinations” screen
and “Contacts” screen. (See pages 52
and 165.)
NOTICE
● Do not turn off the engine while down-
loading.
Page 60 of 228
60
4. MY DESTINATIONS
3. SENDING STORED CONTACTS TO A USB MEMORY
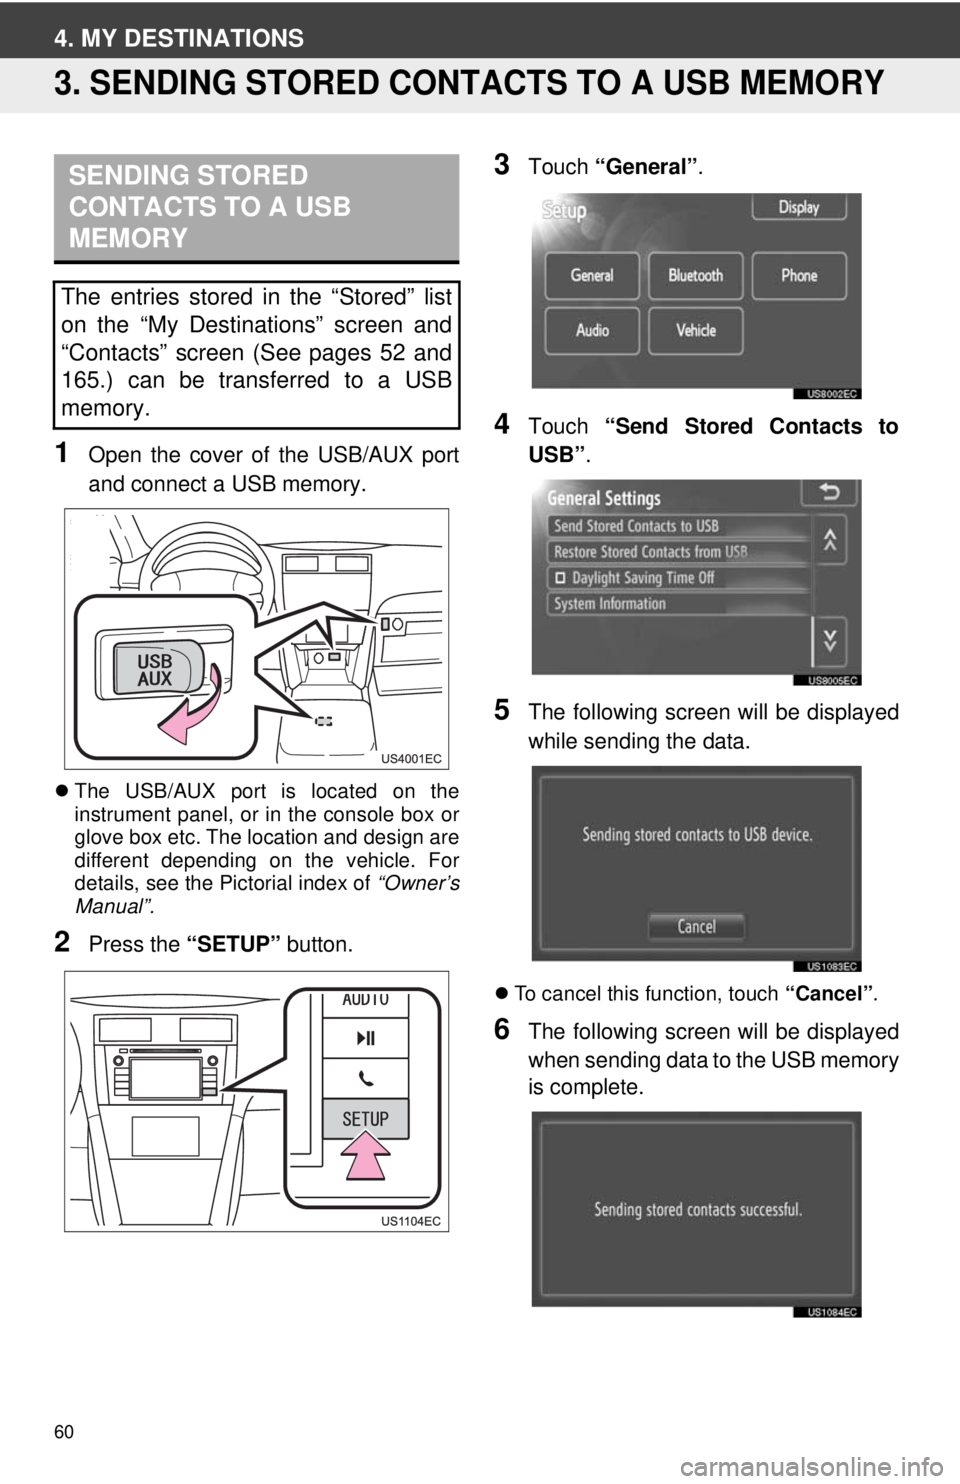
1Open the cover of the USB/AUX port
and connect a USB memory.
The USB/AUX port is located on the
instrument panel, or in the console box or
glove box etc. The location and design are
different depending on the vehicle. For
details, see the Pictorial index of “Owner’s
Manual”.
2Press the “SETUP” button.
3Touch “General” .
4Touch “Send Stored Contacts to
USB” .
5The following screen will be displayed
while sending the data.
To cancel this function, touch “Cancel”.
6The following screen will be displayed
when sending data to the USB memory
is complete.
SENDING STORED
CONTACTS TO A USB
MEMORY
The entries stored in the “Stored” list
on the “My Destinations” screen and
“Contacts” screen (See pages 52 and
165.) can be transferred to a USB
memory.
Page 75 of 228
75
3
APPLICATION-THE OTHERS
1. APPLICATIONS OPERATION
2. PICTURE SLIDESHOW
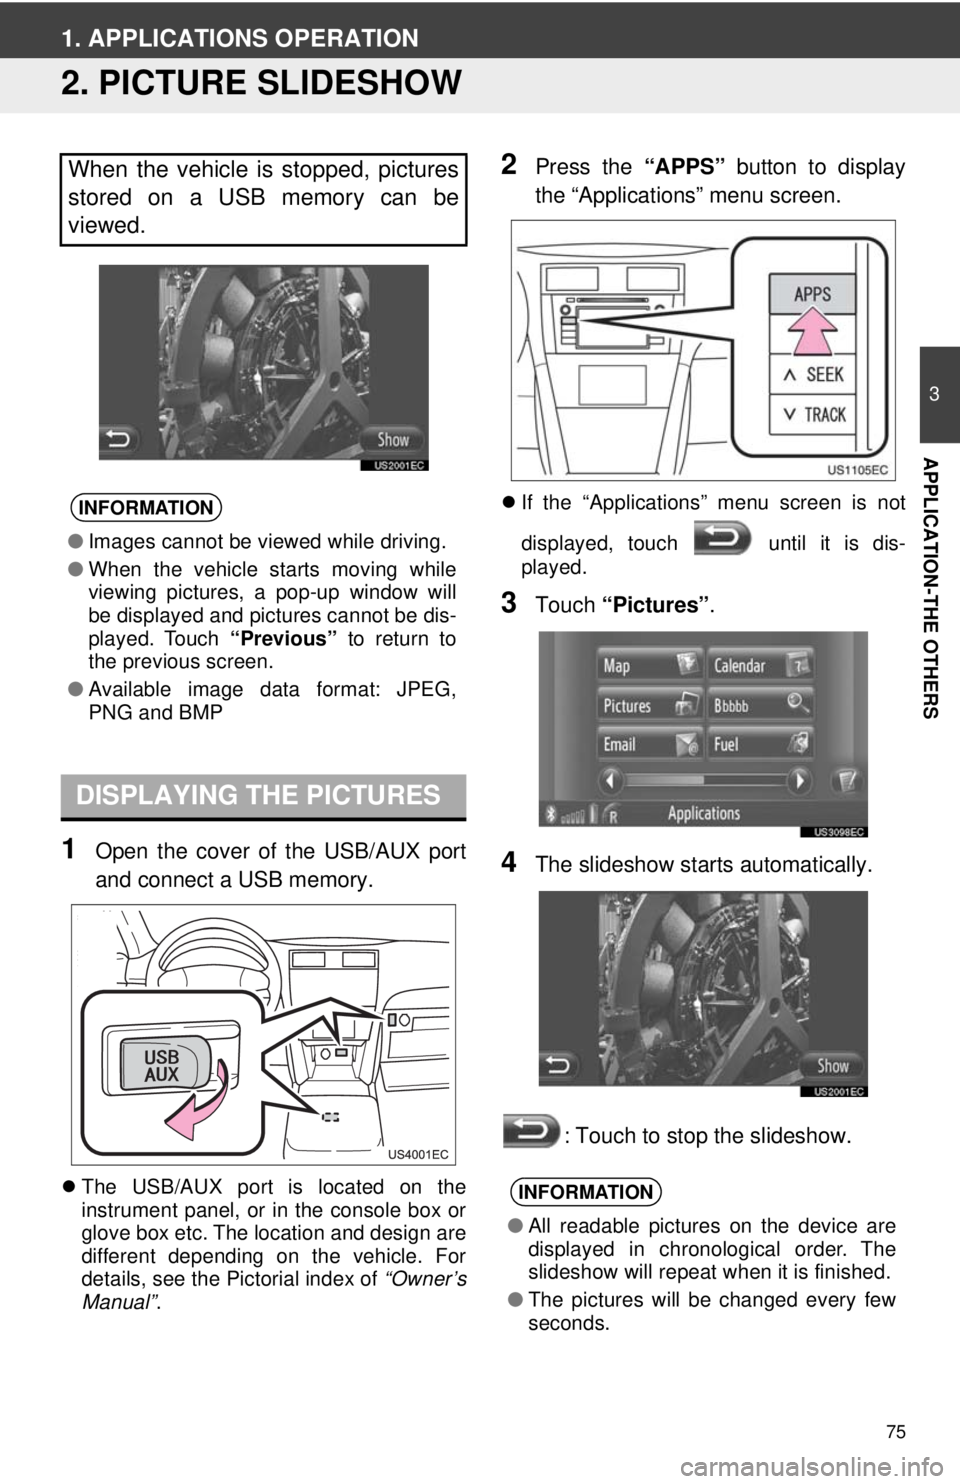
1Open the cover of the USB/AUX port
and connect a USB memory.
The USB/AUX port is located on the
instrument panel, or in the console box or
glove box etc. The location and design are
different depending on the vehicle. For
details, see the Pictorial index of “Owner’s
Manual” .
2Press the “APPS” button to display
the “Applications” menu screen.
If the “Applications” menu screen is not
displayed, touch until it is dis-
played.
3Touch “Pictures” .
4The slideshow starts automatically.
: Touch to stop the slideshow.
When the vehicle is stopped, pictures
stored on a USB memory can be
viewed.
INFORMATION
●Images cannot be viewed while driving.
● When the vehicle starts moving while
viewing pictures, a pop-up window will
be displayed and pictures cannot be dis-
played. Touch “Previous” to return to
the previous screen.
● Available image data format: JPEG,
PNG and BMP
DISPLAYING THE PICTURES
INFORMATION
●All readable pictures on the device are
displayed in chronological order. The
slideshow will repeat when it is finished.
● The pictures will be changed every few
seconds.
Page 110 of 228
110
1. AUDIO SYSTEM OPERATION
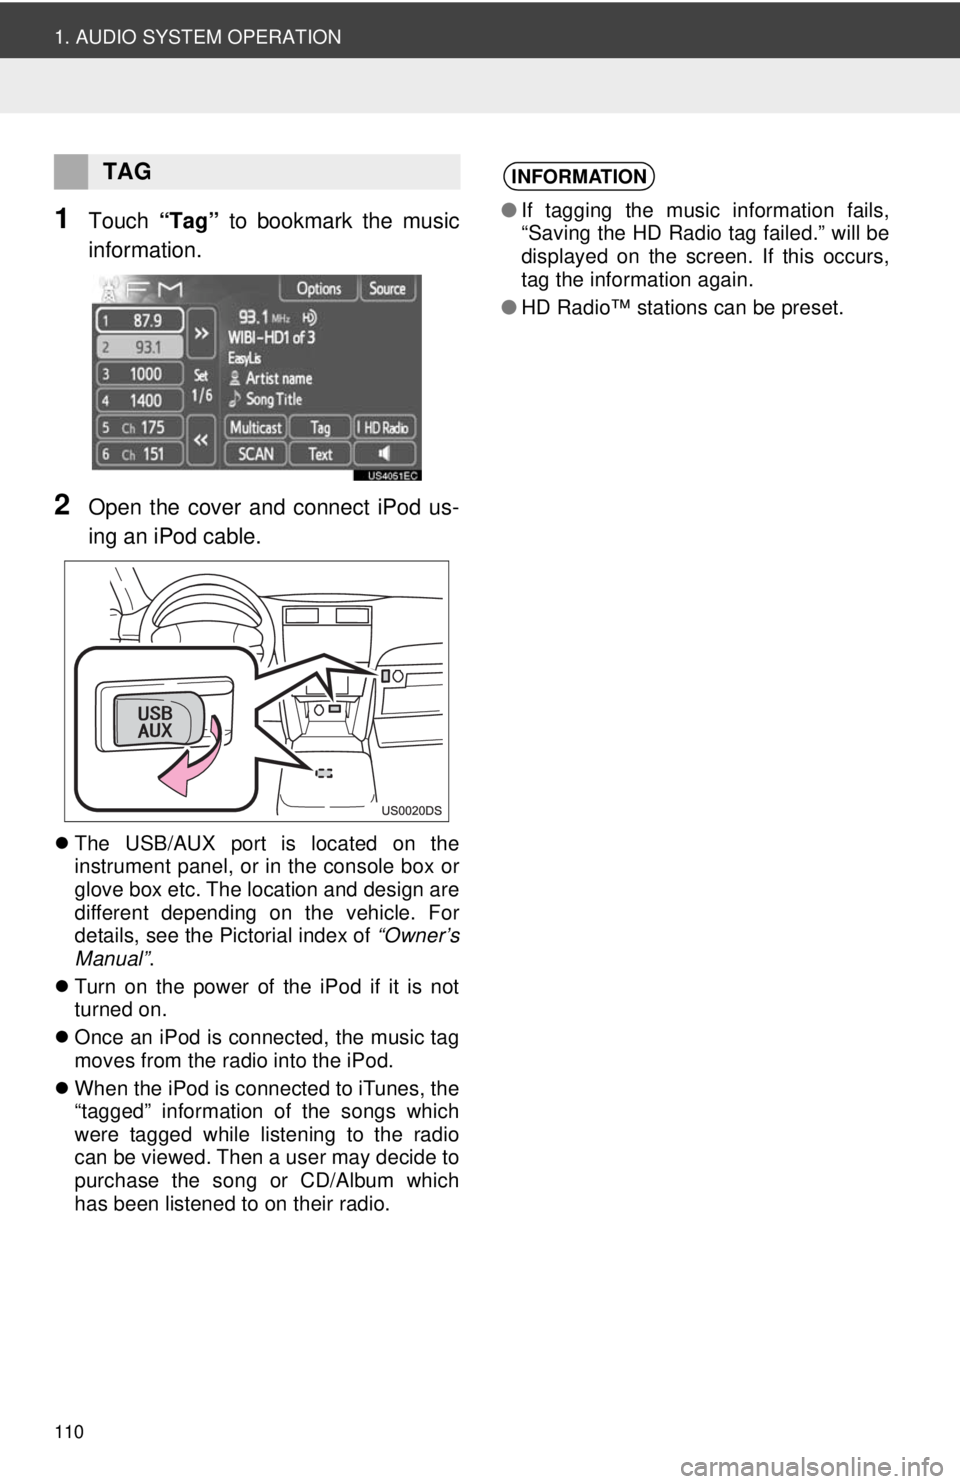
1Touch “Tag” to bookmark the music
information.
2Open the cover and connect iPod us-
ing an iPod cable.
The USB/AUX port is located on the
instrument panel, or in the console box or
glove box etc. The location and design are
different depending on the vehicle. For
details, see the Pictorial index of “Owner’s
Manual” .
Turn on the power of the iPod if it is not
turned on.
Once an iPod is connected, the music tag
moves from the radio into the iPod.
When the iPod is connected to iTunes, the
“tagged” information of the songs which
were tagged while listening to the radio
can be viewed. Then a user may decide to
purchase the song or CD/Album which
has been listened to on their radio.
TAGINFORMATION
●If tagging the music information fails,
“Saving the HD Radio tag failed.” will be
displayed on the screen. If this occurs,
tag the information again.
● HD Radio™ stations can be preset.
Page 123 of 228
123
4
AUDIO SYSTEM
1. AUDIO SYSTEM OPERATION
6. USB MEMORY/iPod OPERATION
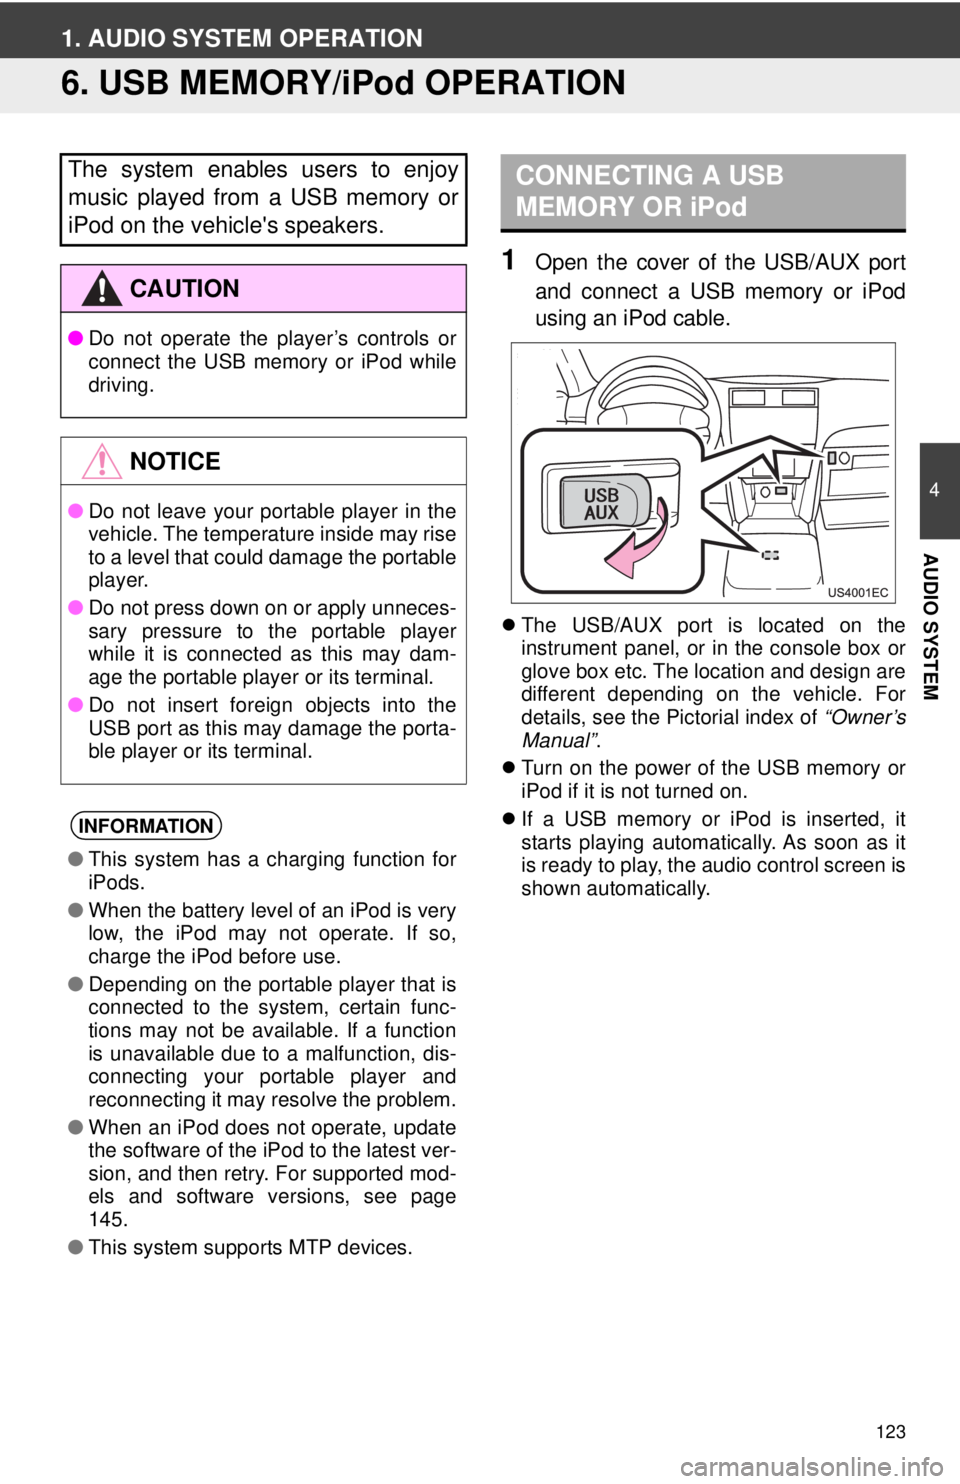
1Open the cover of the USB/AUX port
and connect a USB memory or iPod
using an iPod cable.
The USB/AUX port is located on the
instrument panel, or in the console box or
glove box etc. The location and design are
different depending on the vehicle. For
details, see the Pictorial index of “Owner’s
Manual” .
Turn on the power of the USB memory or
iPod if it is not turned on.
If a USB memory or iPod is inserted, it
starts playing automatically. As soon as it
is ready to play, the audio control screen is
shown automatically.
The system enables users to enjoy
music played from a USB memory or
iPod on the vehicle's speakers.
CAUTION
● Do not operate the player’s controls or
connect the USB memory or iPod while
driving.
NOTICE
●Do not leave your portable player in the
vehicle. The temperature inside may rise
to a level that could damage the portable
player.
● Do not press down on or apply unneces-
sary pressure to the portable player
while it is connected as this may dam-
age the portable player or its terminal.
● Do not insert foreign objects into the
USB port as this may damage the porta-
ble player or its terminal.
INFORMATION
●This system has a charging function for
iPods.
● When the battery level of an iPod is very
low, the iPod may not operate. If so,
charge the iPod before use.
● Depending on the portable player that is
connected to the system, certain func-
tions may not be available. If a function
is unavailable due to a malfunction, dis-
connecting your portable player and
reconnecting it may resolve the problem.
● When an iPod does not operate, update
the software of the iPod to the latest ver-
sion, and then retry. For supported mod-
els and software versions, see page
145.
● This system supports MTP devices.
CONNECTING A USB
MEMORY OR iPod
Page 130 of 228
130
1. AUDIO SYSTEM OPERATION
7. AUX DEVICE OPERATION
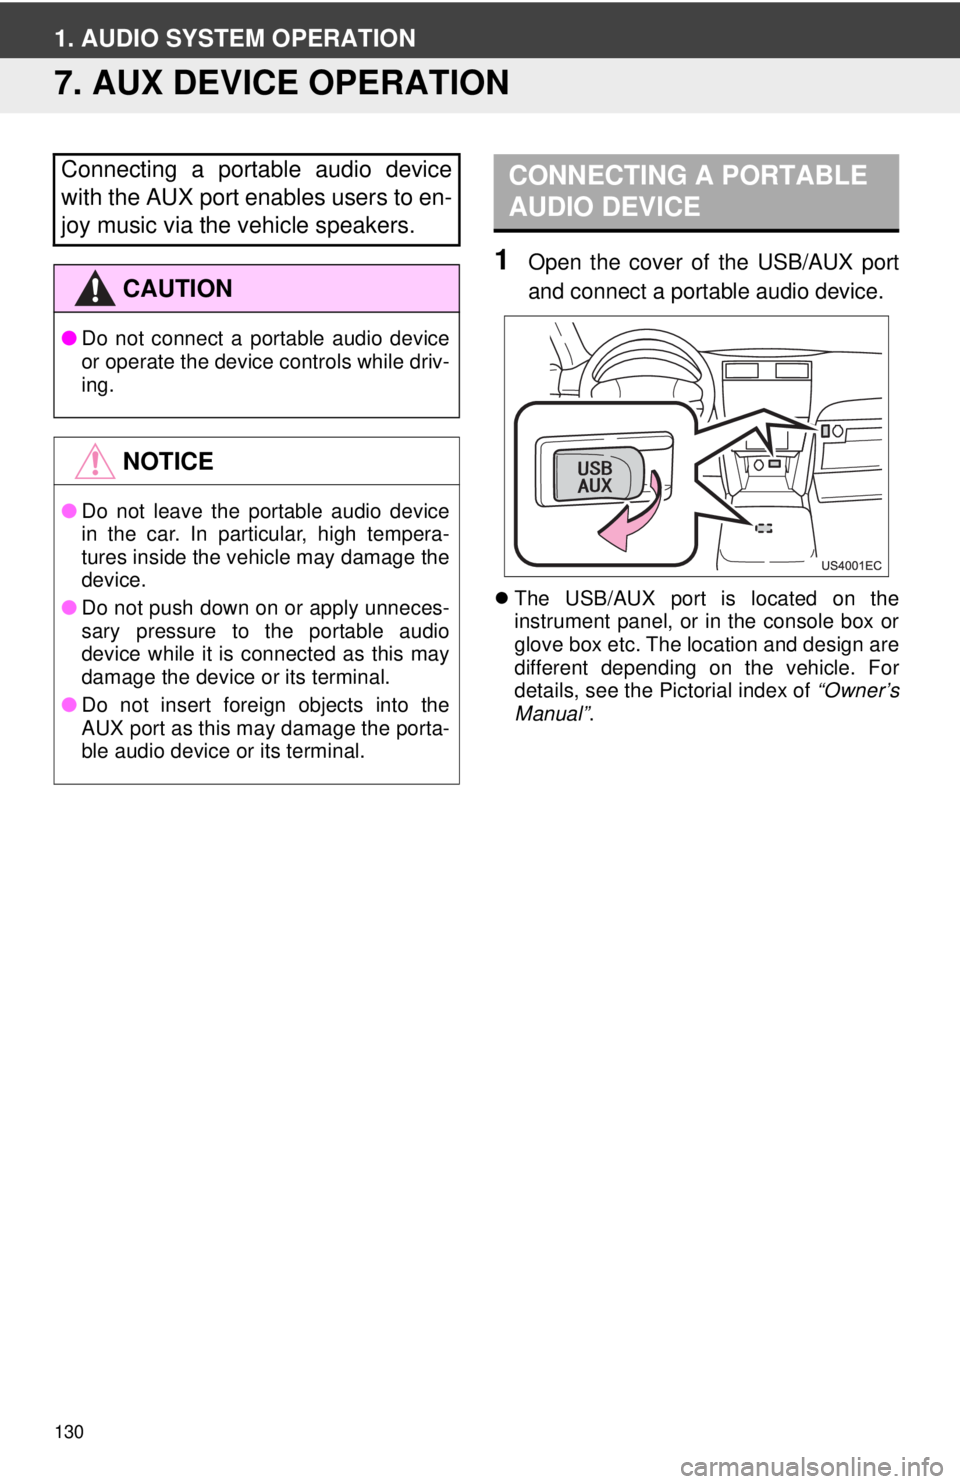
1Open the cover of the USB/AUX port
and connect a portable audio device.
The USB/AUX port is located on the
instrument panel, or in the console box or
glove box etc. The location and design are
different depending on the vehicle. For
details, see the Pictorial index of “Owner’s
Manual” .
Connecting a portable audio device
with the AUX port enables users to en-
joy music via the vehicle speakers.
CAUTION
●Do not connect a portable audio device
or operate the device controls while driv-
ing.
NOTICE
●Do not leave the portable audio device
in the car. In particular, high tempera-
tures inside the vehicle may damage the
device.
● Do not push down on or apply unneces-
sary pressure to the portable audio
device while it is connected as this may
damage the device or its terminal.
● Do not insert foreign objects into the
AUX port as this may damage the porta-
ble audio device or its terminal.
CONNECTING A PORTABLE
AUDIO DEVICE
Page 156 of 228
156
1. BASIC INFORMATION BEFORE OPERATION
The amount of
battery charge
left
The six bars display the charge level of the phone’s battery.
•The amount displayed does not always correspond with the
amount displayed on the cellular phone. The amount of battery
charge left may not be displayed depending on the phone. This
system does not have a charging function.
• If this information is not available from the connected phone, the
icon will be shown with a question mark.
The level of re-
ception
The five bars display the level of reception.
•The level of reception does not always correspond with the level
displayed on the cellular phone.
• The level of reception may not be displayed depending on the
phone.
• If this information is not available from the connected phone, the
icon will be shown with a question mark.
Bluetooth® con-
nectionThe icon indicates an active BT-connection
Short messag-
es informationDisplays short messages information.
Missed calls in-
formationDisplays missed calls information.
INFORMATION
● An antenna for the Bluetooth® connection is built into the instrument panel. The system
may not function when you use the Bluetooth® phone in the following conditions and
places:
• When the cellular phone is obstructed by certain objects (such as when it is behind the seat or in the glove box and console box).
• When the cellular phone touches or is covered with metal materials.
No.NameFunction