radio TOYOTA TACOMA 2013 Accessories, Audio & Navigation (in English)
[x] Cancel search | Manufacturer: TOYOTA, Model Year: 2013, Model line: TACOMA, Model: TOYOTA TACOMA 2013Pages: 228, PDF Size: 3.73 MB
Page 6 of 228

TABLE OF CONTENTS
6
1. CONTROLS AND FEATURES ........ 10
OVERVIEW BUTTONS ......................... 10
SYSTEM FUNCTION INDEX................. 12
TOUCH SCREEN OPERATION ............ 14
1. NAVIGATION OPERATION ............ 20
QUICK REFERENCE ............................ 20
NAVIGATION SYSTEM FUNCTION INDEX .............................. 23
MAP SCREEN OPERATION ................. 25
MAP ICONS ........................................... 29
2. DESTINATION SEARCH ................. 33
DESTINATION SEARCH ....................... 33
3. ROUTE GUIDANCE... ...................... 42
STARTING ROUTE GUIDANCE ........... 42
ROUTE GUIDANCE .............................. 44
SETTING AND DELETING
THE ROUTE........................................ 46
4. MY DESTINATIONS ........................ 52
REGISTERING A ENTRY...................... 52
DISPLAYING AND EDITING THE ENTRY INFORMATION .............. 58
SENDING STORED CONTACTS TO A USB MEMORY .......................... 60
5. NAVIGATION SETTING .................. 61
MAP SETTINGS .................................... 61
ROUTE SETTINGS ............................... 64
6. NAVIGATION SYSTEM INFORMATION .............................. 66
LIMITATIONS OF THE NAVIGATION
SYSTEM.............................................. 66
MAP INFORMATION ............................. 68
1. APPLICATIONS OPERATION........ 74
QUICK REFERENCE ............................. 74
PICTURE SLIDESHOW ......................... 75
EMAIL..................................................... 77
CALENDAR ............................................ 79
2. ENTUNE SERVICE ......................... 80
ENTUNE SERVICE ................................ 80
OPERATING NAVIGATION FUNCTION USING ENTUNE SERVICE ................. 83
OPERATING AN APPLICATION USING ENTUNE SERVICE ................. 93
1. AUDIO SYSTEM OPER ATION ..... 100
QUICK REFERENCE ........................... 100
SOME BASICS..................................... 102
RADIO OPERATION ............................ 106
RADIO OPERATION (XM
® Satellite
Radio BROADCAST) ......................... 112
CD PLAYER OPERATION ................... 117
USB MEMORY/iPod OPERATION ...... 123
AUX DEVICE OPERATION ................. 130
Bluetooth
® AUDIO OPERATION ......... 132
STEERING SWITCHES ....................... 141
AUDIO SYSTEM OPERATING HINTS .......................... 144
1QUICK GUIDE
2APPLICATION-“Map”
3APPLICATION-THE OTHERS
4AUDIO SYSTEM
Page 10 of 228
10
1. CONTROLS AND FEATURES
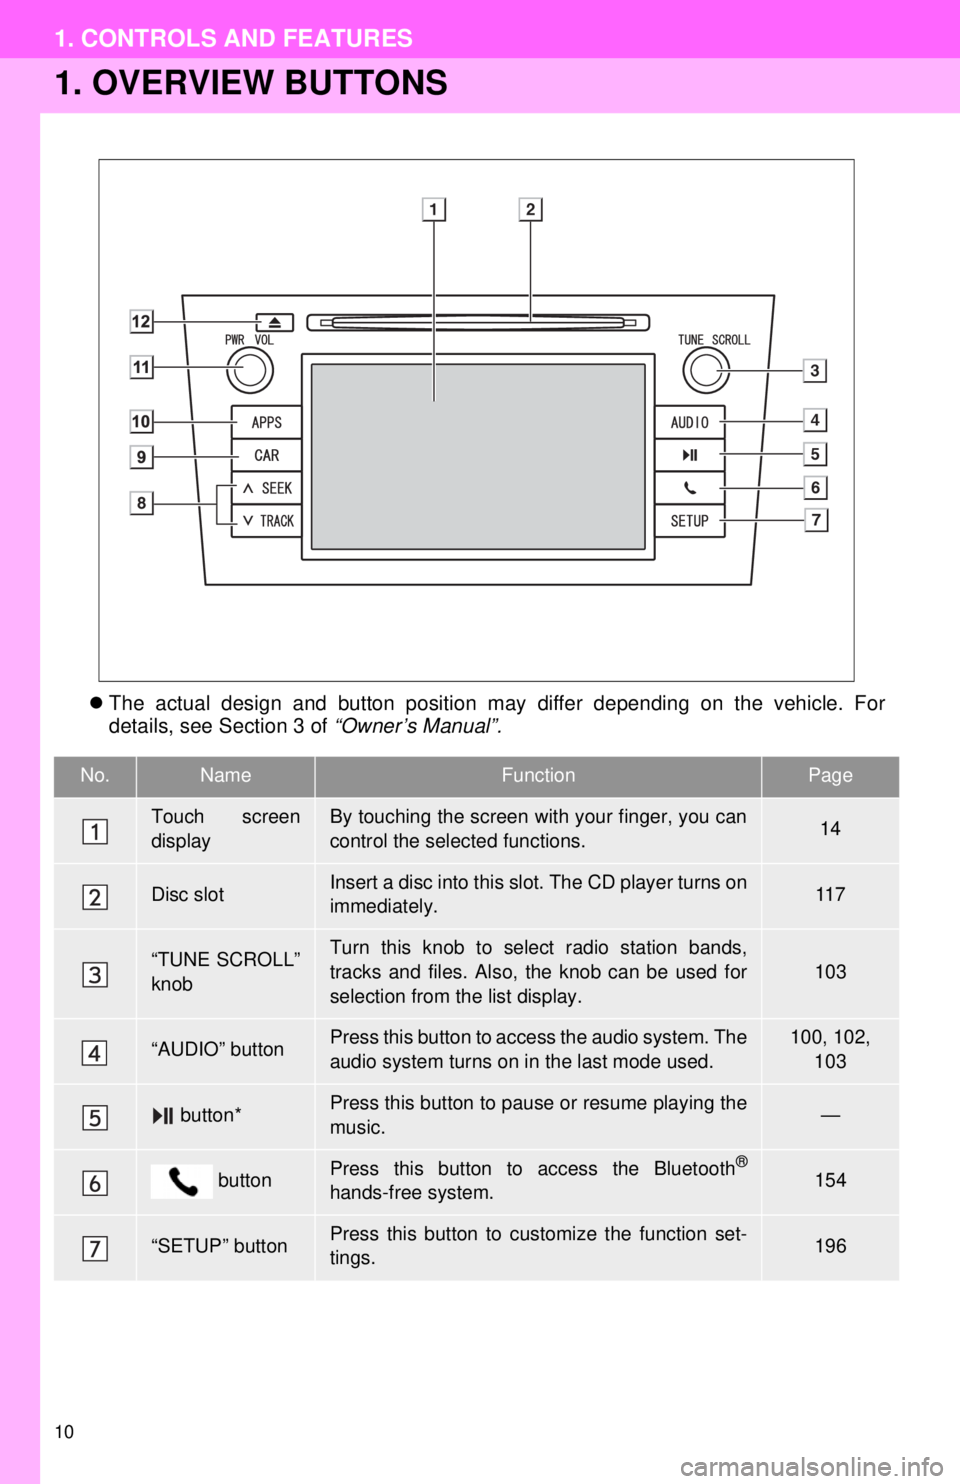
1. OVERVIEW BUTTONS
The actual design and button position may differ depending on the vehicle. For
details, see Section 3 of “Owner’s Manual”.
No.NameFunctionPage
Touch screen
displayBy touching the screen with your finger, you can
control the selected functions.14
Disc slotInsert a disc into this slot. The CD player turns on
immediately.11 7
“TUNE SCROLL”
knobTurn this knob to select radio station bands,
tracks and files. Also, the knob can be used for
selection from the list display.103
“AUDIO” buttonPress this button to access the audio system. The
audio system turns on in the last mode used.100, 102,
103
button*Press this button to pause or resume playing the
music.—
buttonPress this button to access the Bluetooth®
hands-free system.154
“SETUP” buttonPress this button to customize the function set-
tings.196
Page 11 of 228
11
1. CONTROLS AND FEATURES
1
QUICK GUIDE
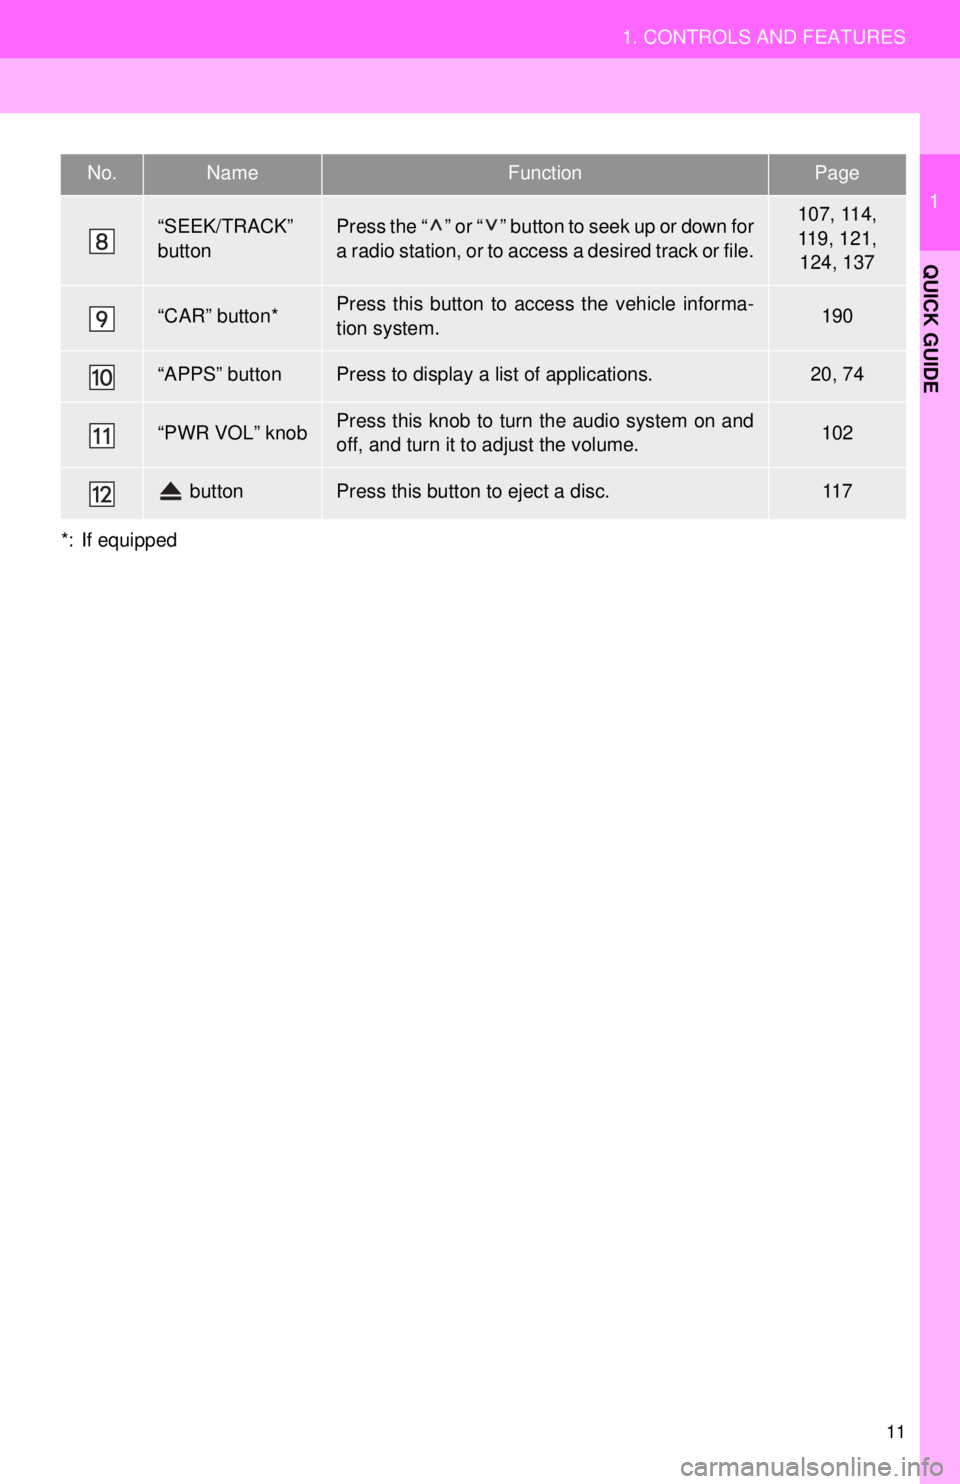
*: If equipped
“SEEK/TRACK”
buttonPress the “ ” or “ ” button to seek up or down for
a radio station, or to access a desired track or file.107, 114,
119, 121,
124, 137
“CAR” button*Press this button to access the vehicle informa-
tion system.190
“APPS” buttonPress to display a list of applications.20, 74
“PWR VOL” knobPress this knob to turn the audio system on and
off, and turn it to adjust the volume.102
buttonPress this button to eject a disc.11 7
No.NameFunctionPage
Page 12 of 228
12
1. CONTROLS AND FEATURES
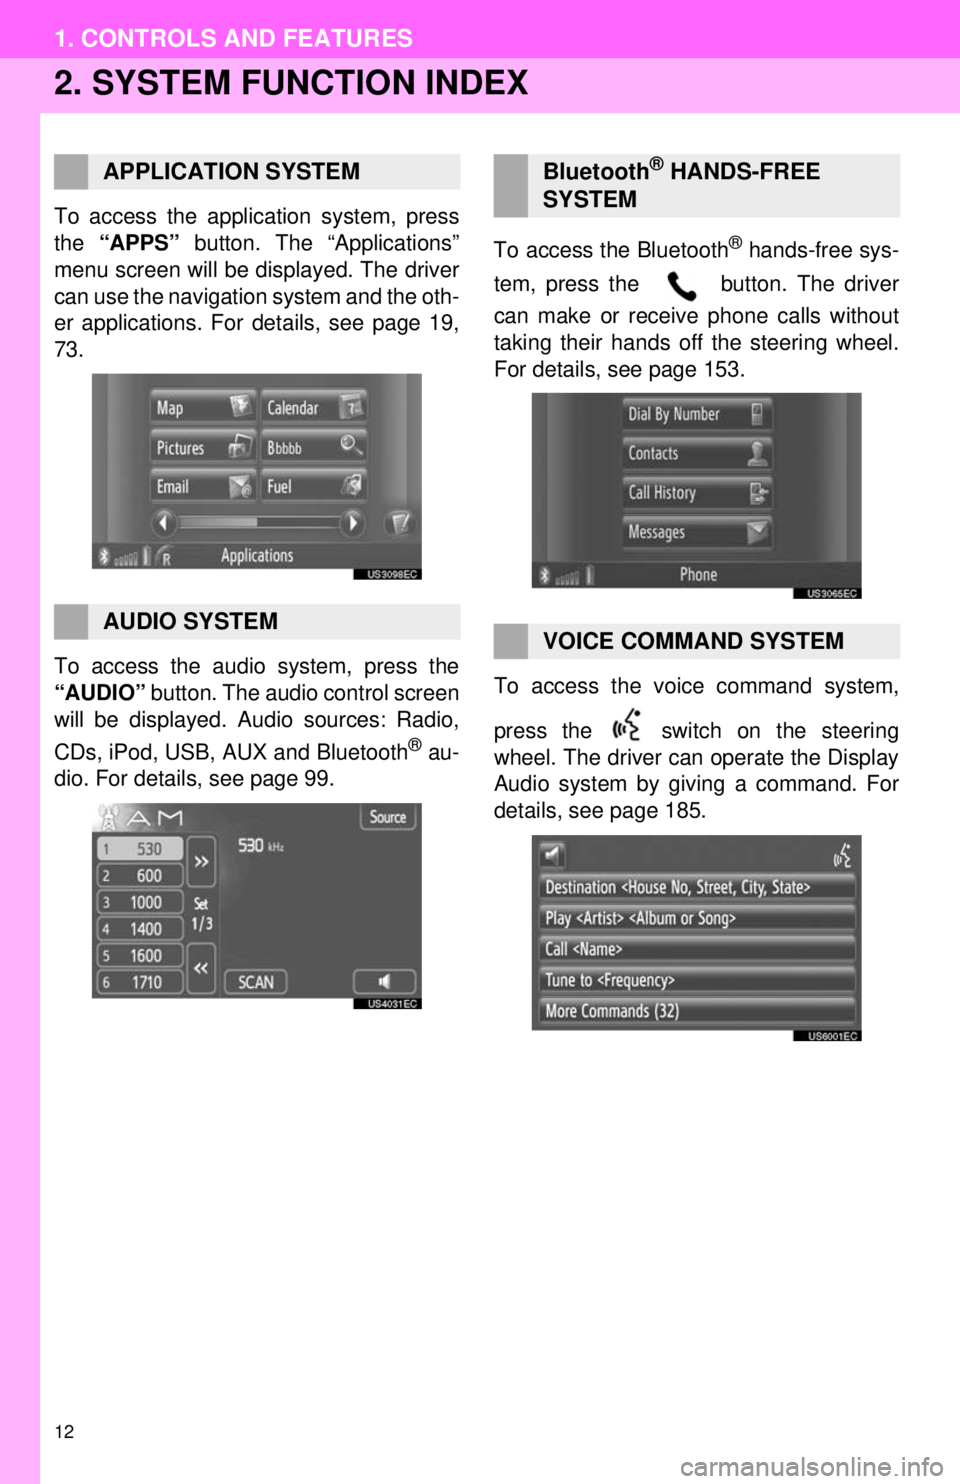
2. SYSTEM FUNCTION INDEX
To access the application system, press
the “APPS” button. The “Applications”
menu screen will be displayed. The driver
can use the navigation system and the oth-
er applications. For details, see page 19,
73.
To access the audio system, press the
“AUDIO” button. The audio control screen
will be displayed. Audio sources: Radio,
CDs, iPod, USB, AUX and Bluetooth
® au-
dio. For details, see page 99. To access the Bluetooth
® hands-free sys-
tem, press the button. The driver
can make or receive phone calls without
taking their hands off the steering wheel.
For details, see page 153.
To access the vo ice command system,
press the switch on the steering
wheel. The driver can operate the Display
Audio system by giving a command. For
details, see page 185.
APPLICATION SYSTEM
AUDIO SYSTEM
Bluetooth® HANDS-FREE
SYSTEM
VOICE COMMAND SYSTEM
Page 82 of 228
82
2. ENTUNE SERVICE
Entune is available in the 48 states,
D.C. and Alaska.
The following personal data can be
deleted and returned to their default set-
tings:
• Downloaded contents
• Radio stations that were listened to
• Input history
AVAILABILITY OF SERVICE
INFORMATION
●When using Entune, depending on the
details of your cellular phone contract,
data usage fees may apply. Confirm
data usage fees before using this ser-
vice.
● In this section, the required operations
to activate application, connect a cellular
phone to the navigation system and reg-
istration steps for Entune are explained.
For details regarding Entune operations
and each of the application, refer to
http://www.toyota.com/entune/
.
INITIALIZING PERSONAL
DATA
The personal data used in application
can be reset. (See “DELETE PER-
SONAL DATA” on page 199.)
INFORMATION
●Once initialized, data will be erased. Pay
close attention when initializing the data.
Page 98 of 228
98
1. QUICK REFERENCE .................. 100
2. SOME BASICS ............................ 102
TURNING THE AUDIO SYSTEM ON OR OFF ....................................... 102
CONTROLS USING THE “TUNE SCROLL” KNOB .................... 103
SWITCHING AUDIO SOURCE ............ 103
DSP CONTROL ................................... 104
TONE AND BALANCE ......................... 105
3. RADIO OPERATION ... ................ 106
SWITCHING TO RADIO MODE........... 106
PRESETTING A STATION .................. 106
SELECTING A STATION ..................... 107
RADIO BROADCAST DATA
SYSTEM ............................................ 107
TRAFFIC ANNOUNCEMENT .............. 108
USING HD Radio™ TECHNOLOGY.... 109
1AUDIO SYSTEM OPERATION
4
AUDIO SYSTEM
Page 99 of 228
4
99
1
2
3
4
5
6
7
8
9
4. RADIO OPERATION(XM® Satellite Radio
BROADCAST) ........... ................ 112
HOW TO SUBSCRIBE TO AN
XM® Satellite Radio .......................... 112
DISPLAYING THE RADIO ID .............. 112
SWITCHING TO SATELLITE RADIO MODE ............................................... 113
CHANNEL CATEGORY ...................... 113
PRESETTING A CHANNEL ................ 113
SELECTING A CHANNEL ................... 114
DISPLAYING THE TITLE AND NAME ....................................... 114
IF THE SATELLITE RADIO TUNER MALFUNCTIONS .............................. 115
5. CD PLAYER OPERATION .......... 117
INSERTING OR EJECTING A DISC ... 117
SWITCHING TO CD MODE ................ 118
PLAYING AN AUDIO CD .................... 118
PLAYING A MP3/WMA DISC .............. 120
6. USB MEMORY/iPod OPERATION .............................. 123
CONNECTING A USB
MEMORY OR iPod ........................... 123
SWITCHING TO USB OR iPod MODE ........................ 124
PLAYING A USB MEMORY OR iPod ........................... 124
7. AUX DEVICE OPERATION......... 130
CONNECTING A PORTABLE AUDIO DEVICE ................................. 130
SWITCHING TO AUX MODE .............. 131
PLAYING A PORTABLE AUDIO DEVICE ................................. 131
8. Bluetooth® AUDIO
OPERATION ............................. 132
SWITCHING TO Bluetooth®
AUDIO MODE ................................... 133
CONNECTING Bluetooth
® AUDIO ...... 134
PLAYING Bluetooth® AUDIO ............... 137
9. STEERING SWITCHES............... 141
STEERING SWITCHES (WITH TWO DIRECTION
STEERING SWITCH) ........................ 141
STEERING SWITCHES (WITH FOUR DIRECTION
STEERING SWITCH) ........................ 142
10. AUDIO SYSTEM OPERATING HINTS.................. 144
RADIO RECEPTION............................ 144
iPod ...................................................... 145
USB MEMORY .................................... 146
CARING FOR YOUR CD PLAYER
AND DISCS ....................................... 146
MP3/WMA FILES ................................. 148
CD-R AND CD-RW DISCS .................. 149
TERMS ................................................ 150
Gracenote
®.......................................... 151
AUDIO SYSTEM
Page 100 of 228
100
1. AUDIO SYSTEM OPERATION
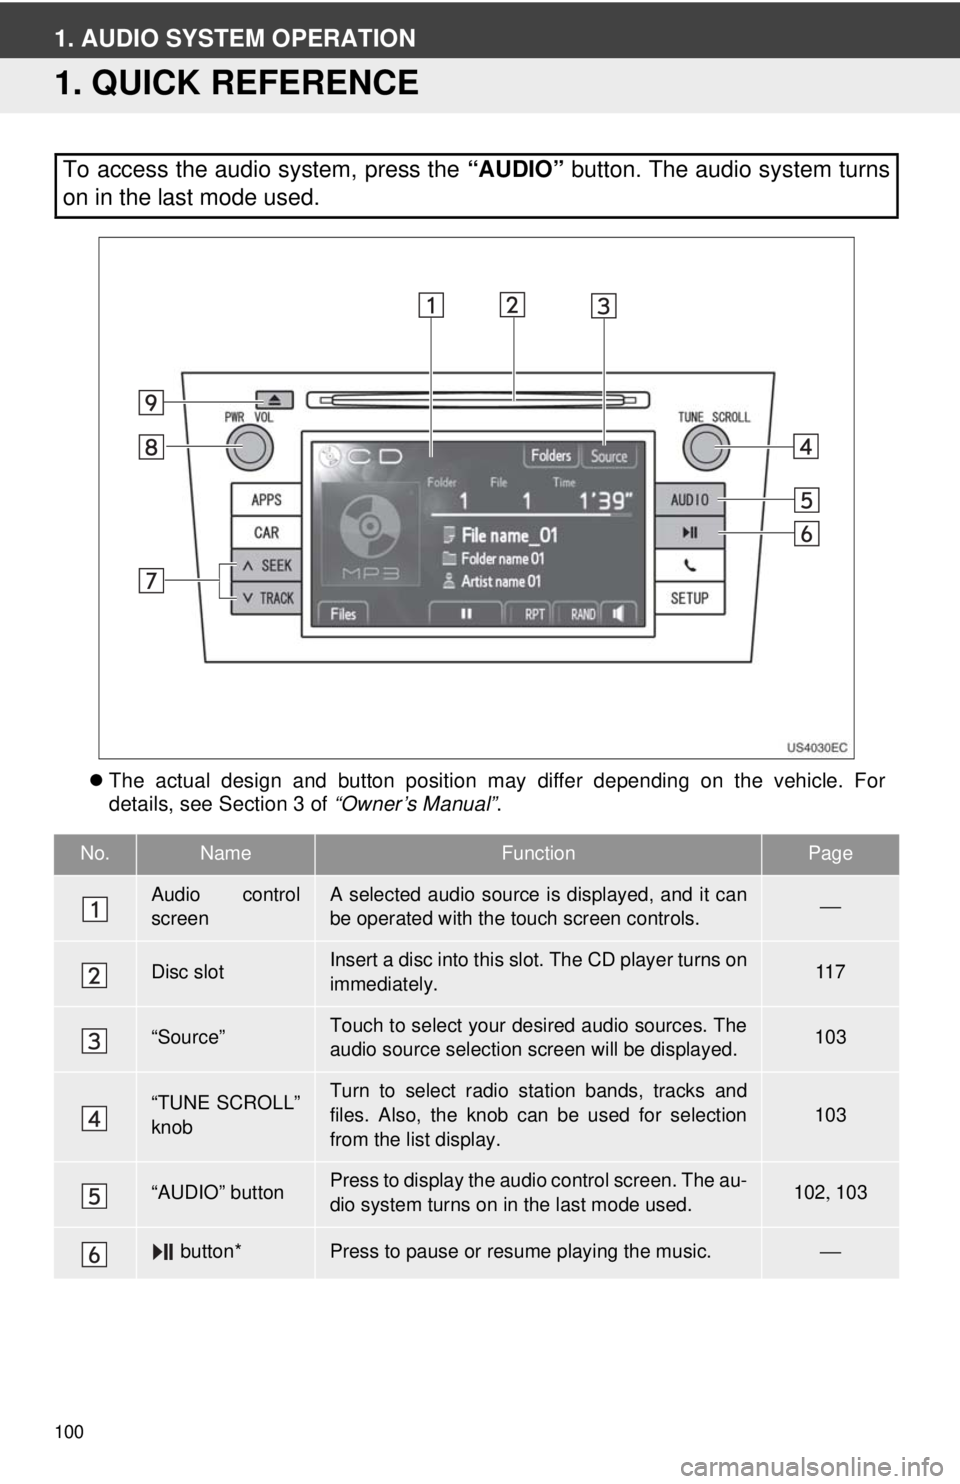
1. QUICK REFERENCE
The actual design and button position may differ depending on the vehicle. For
details, see Section 3 of “Owner’s Manual”.
To access the audio system, press the “AUDIO” button. The audio system turns
on in the last mode used.
No.NameFunctionPage
Audio control
screenA selected audio source is displayed, and it can
be operated with the touch screen controls.⎯
Disc slotInsert a disc into this slot. The CD player turns on
immediately.11 7
“Source”Touch to select your desired audio sources. The
audio source selection screen will be displayed.103
“TUNE SCROLL”
knobTurn to select radio station bands, tracks and
files. Also, the knob can be used for selection
from the list display.
103
“AUDIO” buttonPress to display the audio control screen. The au-
dio system turns on in the last mode used.102 , 103
button*Press to pause or resume playing the music.⎯
Page 102 of 228
102
1. AUDIO SYSTEM OPERATION
2. SOME BASICS
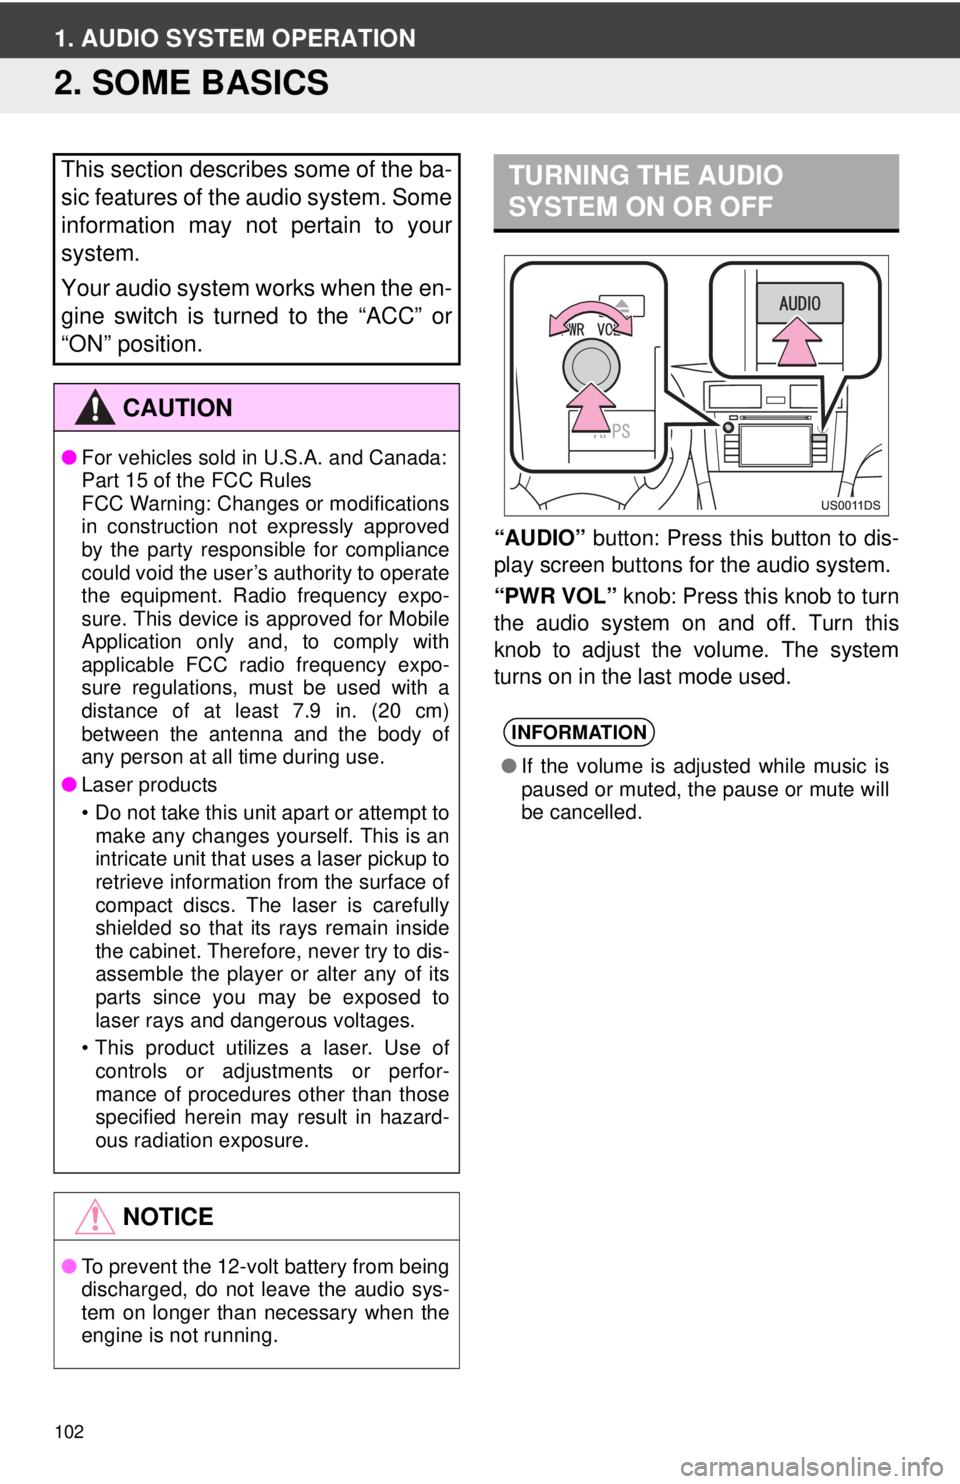
“AUDIO” button: Press this button to dis-
play screen buttons for the audio system.
“PWR VOL” knob: Press this knob to turn
the audio system on and off. Turn this
knob to adjust the volume. The system
turns on in the last mode used.
This section describes some of the ba-
sic features of the audio system. Some
information may not pertain to your
system.
Your audio system works when the en-
gine switch is turned to the “ACC” or
“ON” position.
CAUTION
● For vehicles sold in U.S.A. and Canada:
Part 15 of the FCC Rules
FCC Warning: Changes or modifications
in construction not expressly approved
by the party responsible for compliance
could void the user’s authority to operate
the equipment. Radio frequency expo-
sure. This device is approved for Mobile
Application only and, to comply with
applicable FCC radio frequency expo-
sure regulations, must be used with a
distance of at least 7.9 in. (20 cm)
between the antenna and the body of
any person at all time during use.
● Laser products
• Do not take this unit apart or attempt to
make any changes yourself. This is an
intricate unit that uses a laser pickup to
retrieve information from the surface of
compact discs. The laser is carefully
shielded so that its rays remain inside
the cabinet. Therefore, never try to dis-
assemble the player or alter any of its
parts since you may be exposed to
laser rays and dangerous voltages.
• This product utilizes a laser. Use of controls or adjustments or perfor-
mance of procedures other than those
specified herein may result in hazard-
ous radiation exposure.
NOTICE
● To prevent the 12-volt battery from being
discharged, do not leave the audio sys-
tem on longer than necessary when the
engine is not running.
TURNING THE AUDIO
SYSTEM ON OR OFF
INFORMATION
●If the volume is adjusted while music is
paused or muted, the pause or mute will
be cancelled.
Page 103 of 228
103
1. AUDIO SYSTEM OPERATION
4
AUDIO SYSTEM
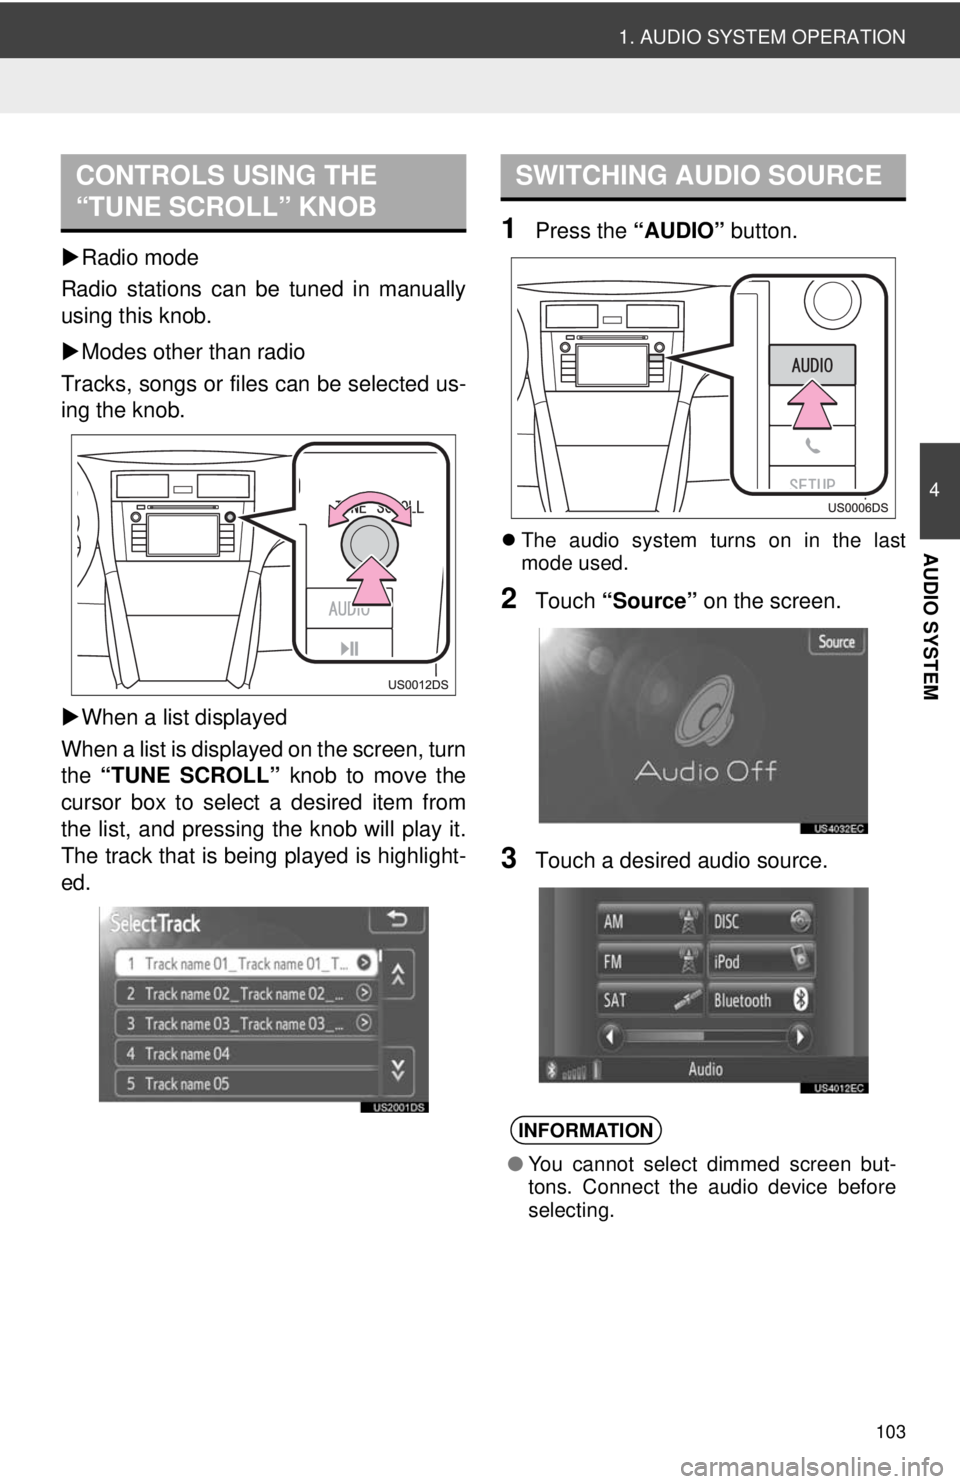
Radio mode
Radio stations can be tuned in manually
using this knob.
Modes other than radio
Tracks, songs or files can be selected us-
ing the knob.
When a list displayed
When a list is displayed on the screen, turn
the “TUNE SCROLL” knob to move the
cursor box to select a desired item from
the list, and pressing the knob will play it.
The track that is being played is highlight-
ed.
1Press the “AUDIO” button.
The audio system turns on in the last
mode used.
2Touch “Source” on the screen.
3Touch a desired audio source.
CONTROLS USING THE
“TUNE SCROLL” KNOBSWITCHING AUDIO SOURCE
INFORMATION
●You cannot select dimmed screen but-
tons. Connect the audio device before
selecting.