display TOYOTA TACOMA 2016 Accessories, Audio & Navigation (in English)
[x] Cancel search | Manufacturer: TOYOTA, Model Year: 2016, Model line: TACOMA, Model: TOYOTA TACOMA 2016Pages: 292, PDF Size: 4.64 MB
Page 107 of 292

107
3. MEDIA OPERATION
AUDIO SYSTEM
3
INFORMATION
●The system can only output the sound while driving.
● When an iPod is connected using a genuine iPod cable, the iPod starts charging its bat-
tery.
● Depending on the iPod and the songs in the iPod, iPod cover art may be displayed. This
function can be changed to on/off. ( P.117) It may take time to display iPod cover art,
and the iPod may not be operated while the cover art display is in process.
● When an iPod is connected and the audio source is changed to iPod mode, the iPod will
resume playing from the same point it was last used.
● Depending on the iPod that is connected to the system, certain functions may not be
available.
● Files/tracks selected by operating a connected iPod may not be recognized or displayed
properly.
● If an iPhone is connected via Bluetooth
® and USB at the same time, system operation
may become unstable.
For known phone compatibility information, refer to http://www.toyota.com/entune/
.
Page 110 of 292
110
3. MEDIA OPERATION
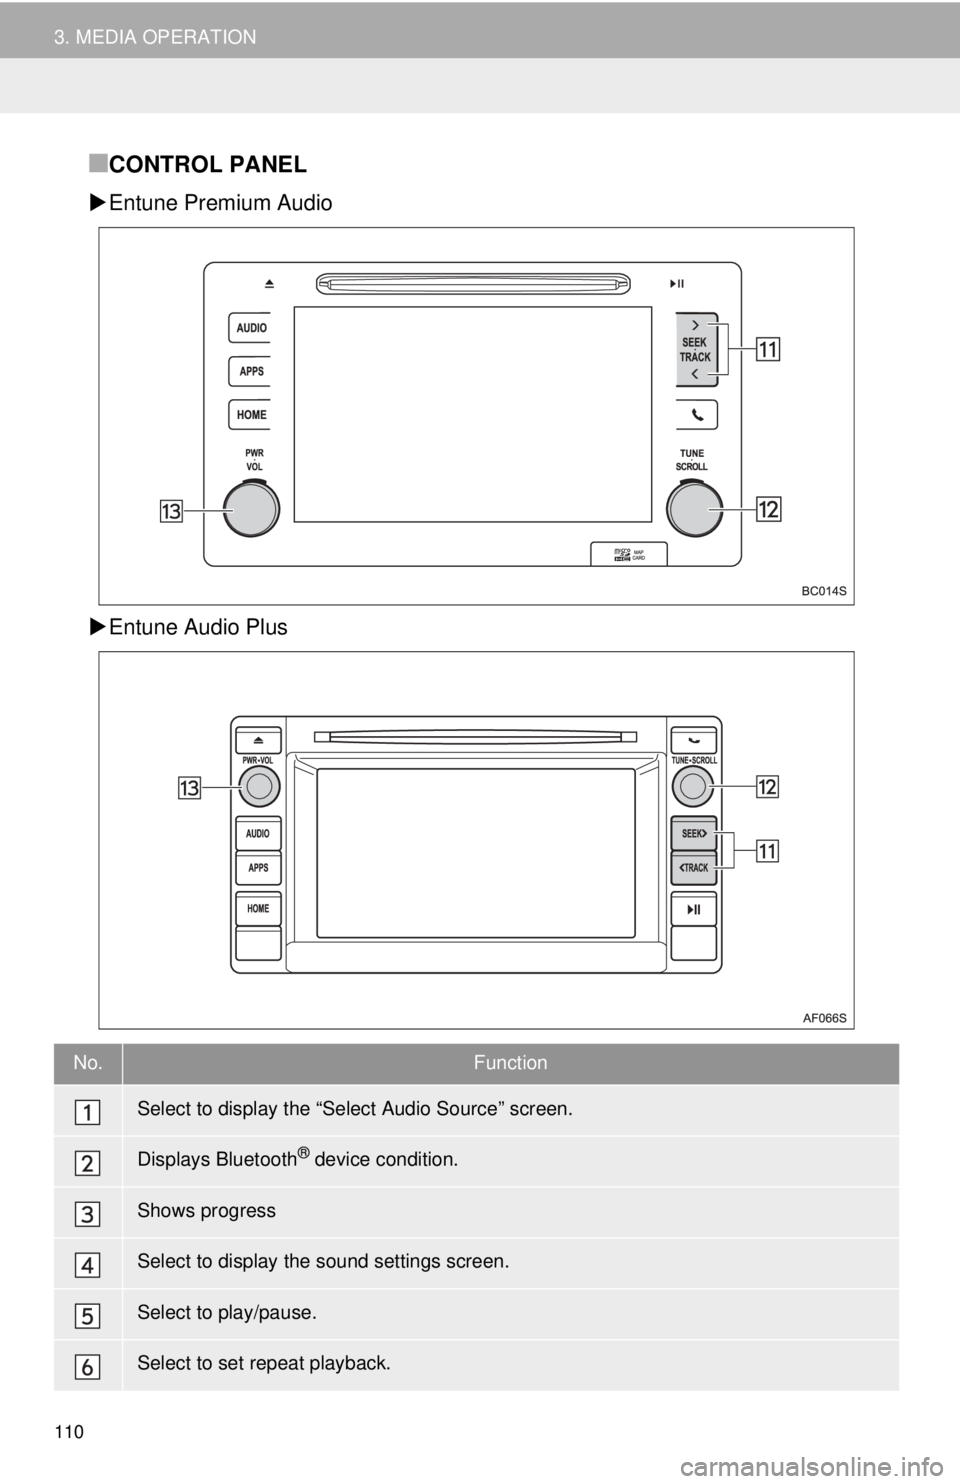
■CONTROL PANEL
Entune Premium Audio
Entune Audio Plus
No.Function
Select to display the “Select Audio Source” screen.
Displays Bluetooth® device condition.
Shows progress
Select to display the sound settings screen.
Select to play/pause.
Select to set repeat playback.
Page 111 of 292
111
3. MEDIA OPERATION
AUDIO SYSTEM
3
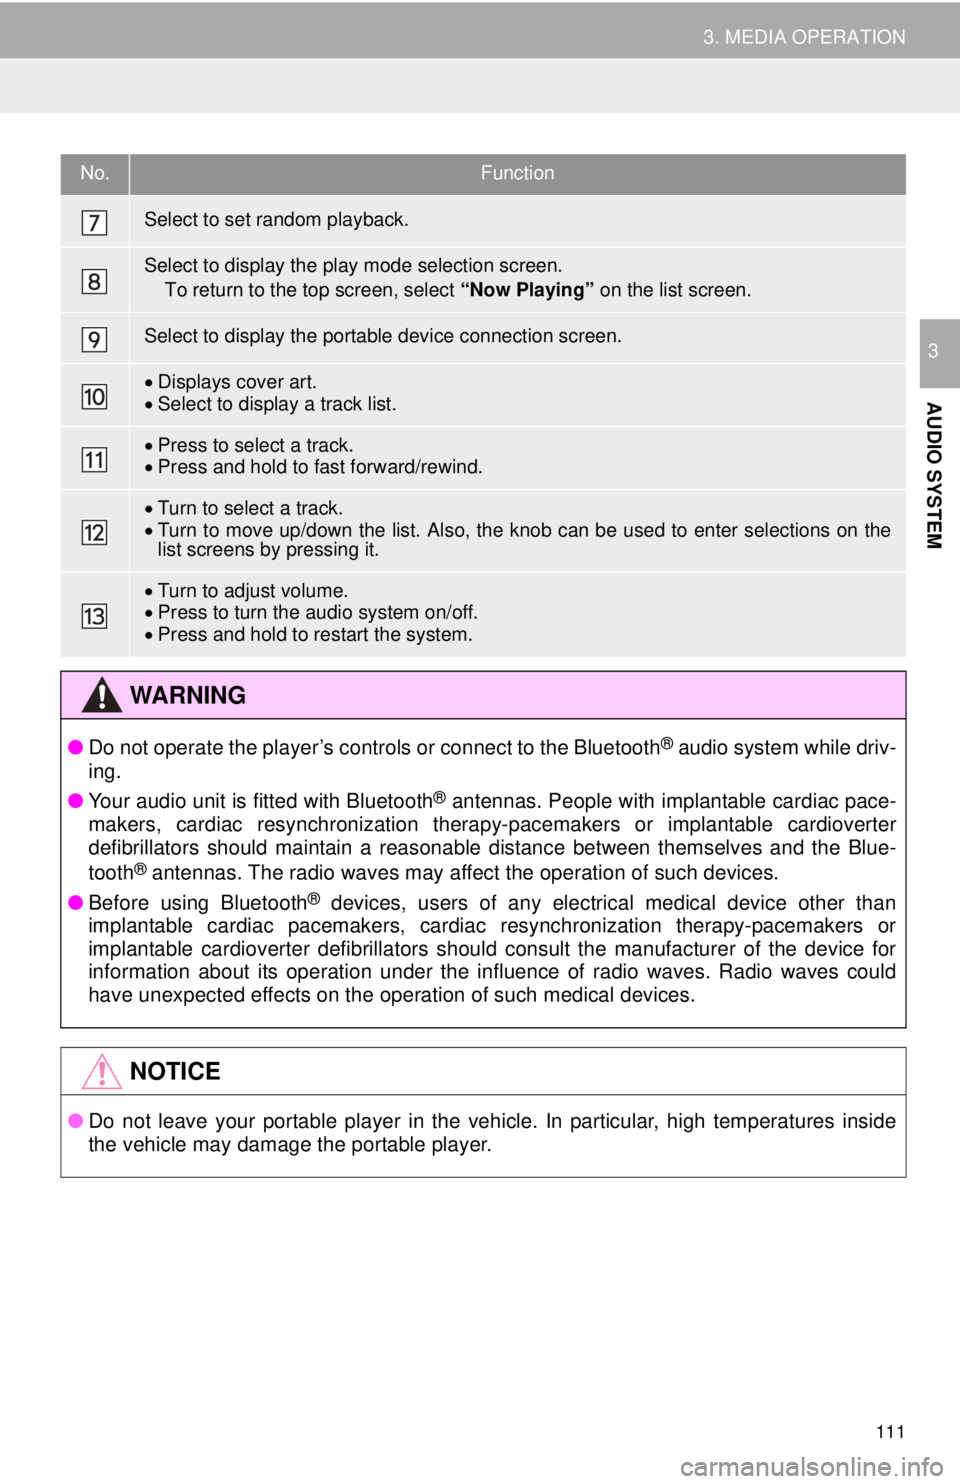
Select to set random playback.
Select to display the play mode selection screen. To return to the top screen, select “Now Playing” on the list screen.
Select to display the portable device connection screen.
Displays cover art.
Select to display a track list.
Press to select a track.
Press and hold to fast forward/rewind.
Turn to select a track.
Turn to move up/down the list. Also, the knob can be used to enter selections on the
list screens by pressing it.
Turn to adjust volume.
Press to turn the audio system on/off.
Press and hold to restart the system.
WA R N I N G
● Do not operate the player’s controls or connect to the Bluetooth® audio system while driv-
ing.
● Your audio unit is fitted with Bluetooth
® antennas. People with implantable cardiac pace-
makers, cardiac resynchronization therapy-pacemakers or implantable cardioverter
defibrillators should maintain a reasonable distance between themselves and the Blue-
tooth
® antennas. The radio waves may affect the operation of such devices.
● Before using Bluetooth
® devices, users of any electrical medical device other than
implantable cardiac pacemakers, cardiac resynchronization therapy-pacemakers or
implantable cardioverter defibrillators should consult the manufacturer of the device for
information about its operation under the influence of radio waves. Radio waves could
have unexpected effects on the operation of such medical devices.
NOTICE
● Do not leave your portable player in the vehicle. In particular, high temperatures inside
the vehicle may damage the portable player.
No.Function
Page 115 of 292
115
3. MEDIA OPERATION
AUDIO SYSTEM
3
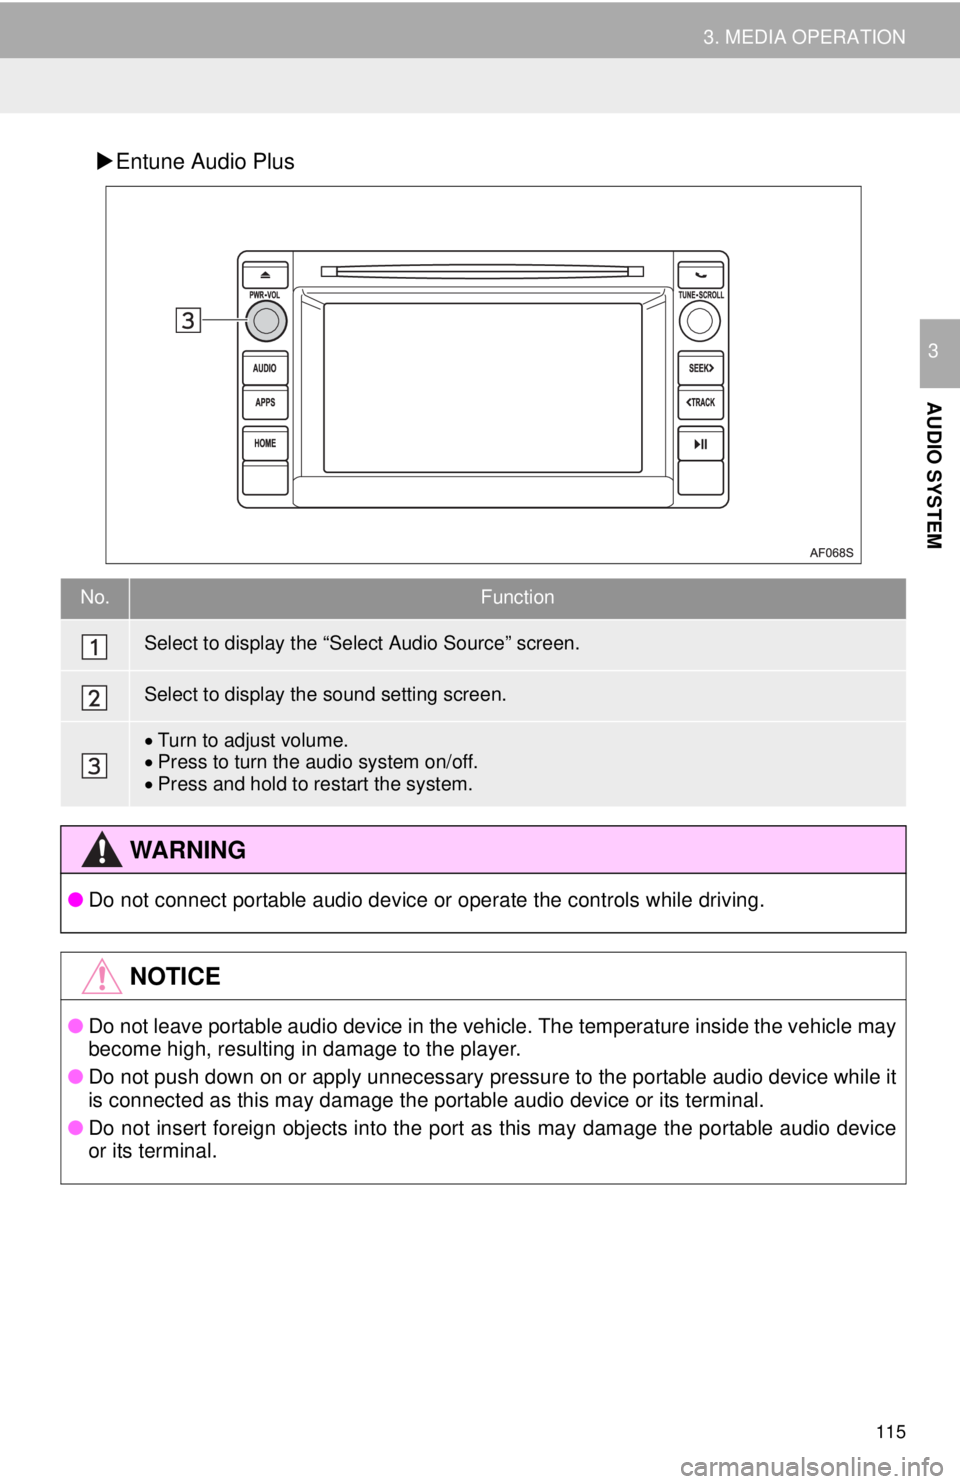
Entune Audio Plus
No.Function
Select to display the “Select Audio Source” screen.
Select to display the sound setting screen.
Turn to adjust volume.
Press to turn the audio system on/off.
Press and hold to restart the system.
WA R N I N G
● Do not connect portable audio device or operate the controls while driving.
NOTICE
●Do not leave portable audio device in the vehicle. The temperature inside the vehicle may
become high, resulting in damage to the player.
● Do not push down on or apply unnecessary pressure to the portable audio device while it
is connected as this may damage the portable audio device or its terminal.
● Do not insert foreign objects into the port as this may damage the portable audio device
or its terminal.
Page 117 of 292
117
AUDIO SYSTEM
3
5. SETUP
1. AUDIO SETTINGS
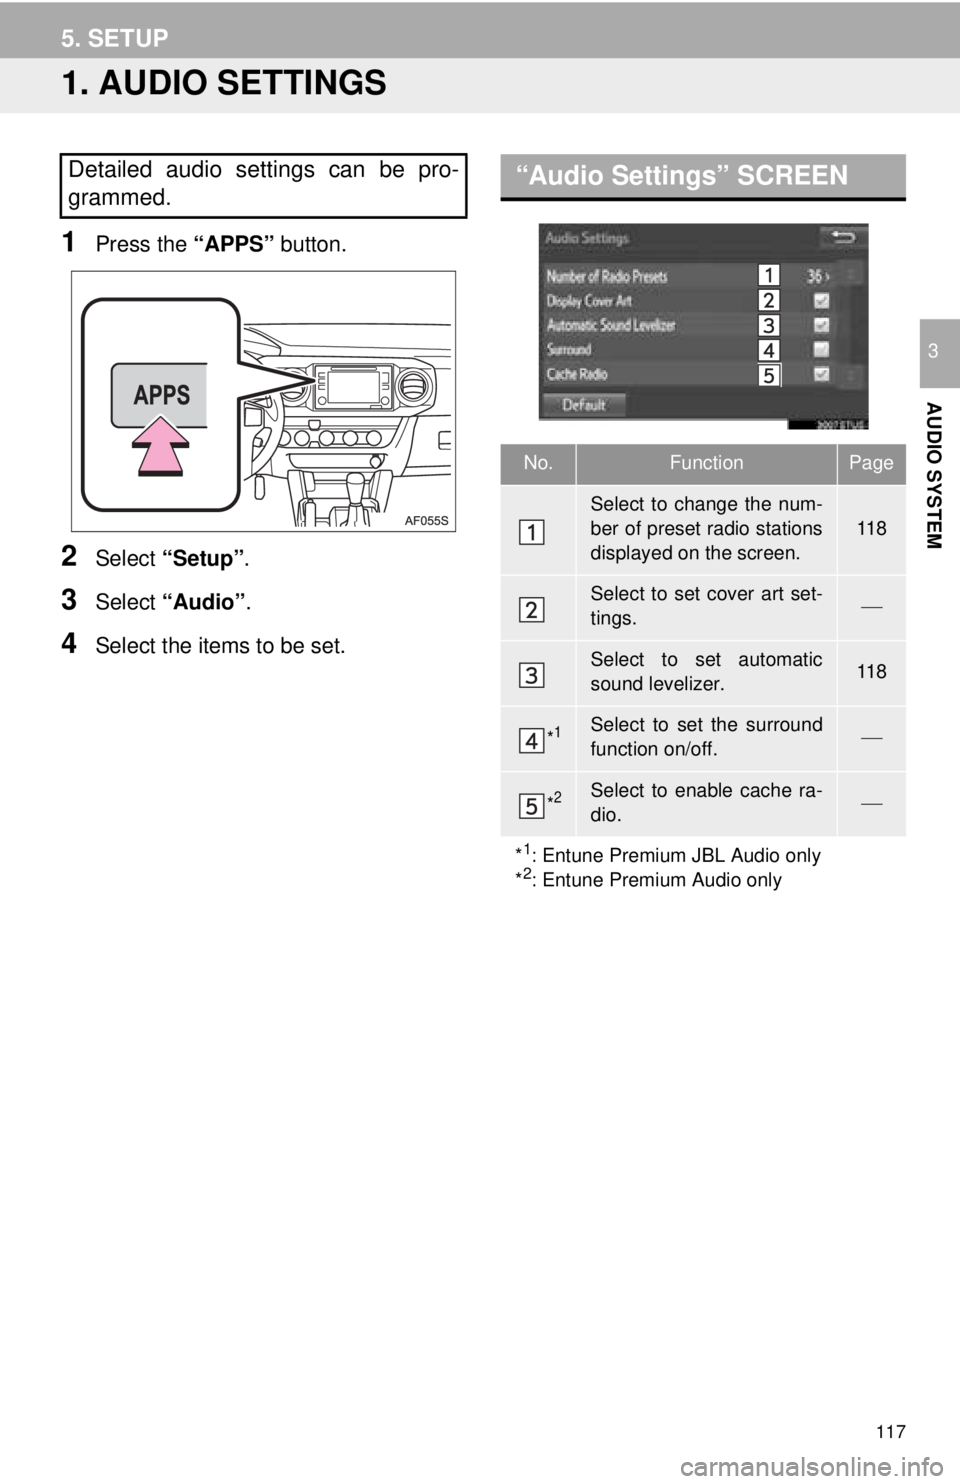
1Press the “APPS” button.
2Select “Setup” .
3Select “Audio” .
4Select the items to be set.
Detailed audio settings can be pro-
grammed.“Audio Settings” SCREEN
No.FunctionPage
Select to change the num-
ber of preset radio stations
displayed on the screen.
11 8
Select to set cover art set-
tings.
Select to set automatic
sound levelizer.11 8
*1Select to set the surround
function on/off.
*2Select to enable cache ra-
dio.
*
1: Entune Premium JBL Audio only
*2: Entune Premium Audio only
Page 118 of 292
118
5. SETUP
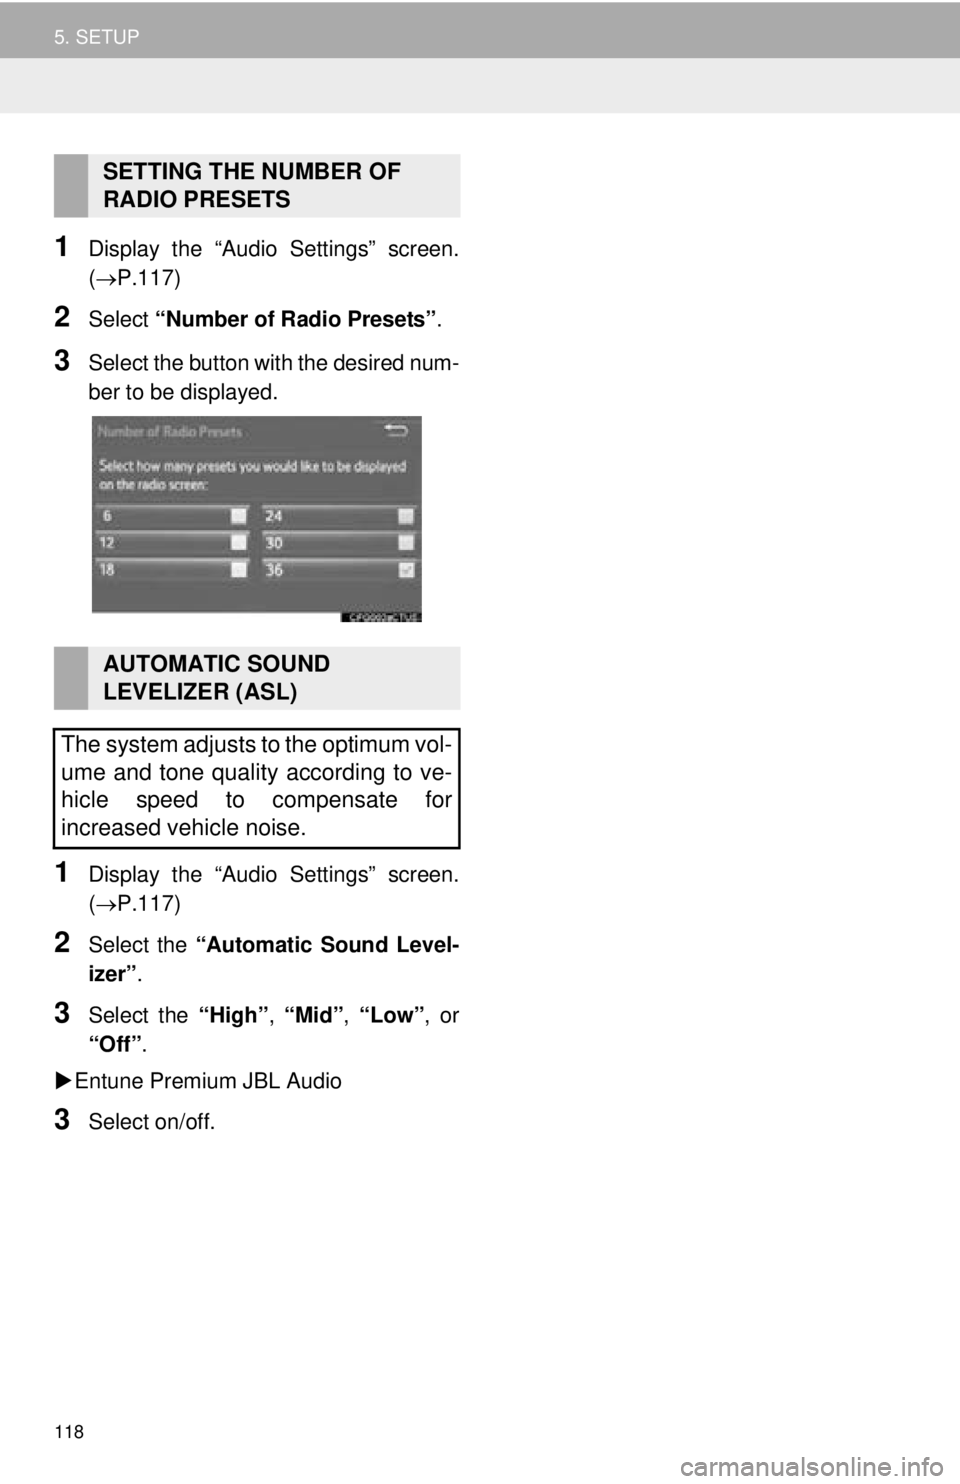
1Display the “Audio Settings” screen.
(P.117)
2Select “Number of Radio Presets” .
3Select the button with the desired num-
ber to be displayed.
1Display the “Audio Settings” screen.
(P.117)
2Select the “Automatic Sound Level-
izer” .
3Select the “High”, “Mid”, “Low”, or
“Off” .
Entune Premium JBL Audio
3Select on/off.
SETTING THE NUMBER OF
RADIO PRESETS
AUTOMATIC SOUND
LEVELIZER (ASL)
The system adjusts to the optimum vol-
ume and tone quality according to ve-
hicle speed to compensate for
increased vehicle noise.
Page 124 of 292
124
6. TIPS FOR OPERATING THE AUDIO SYSTEM
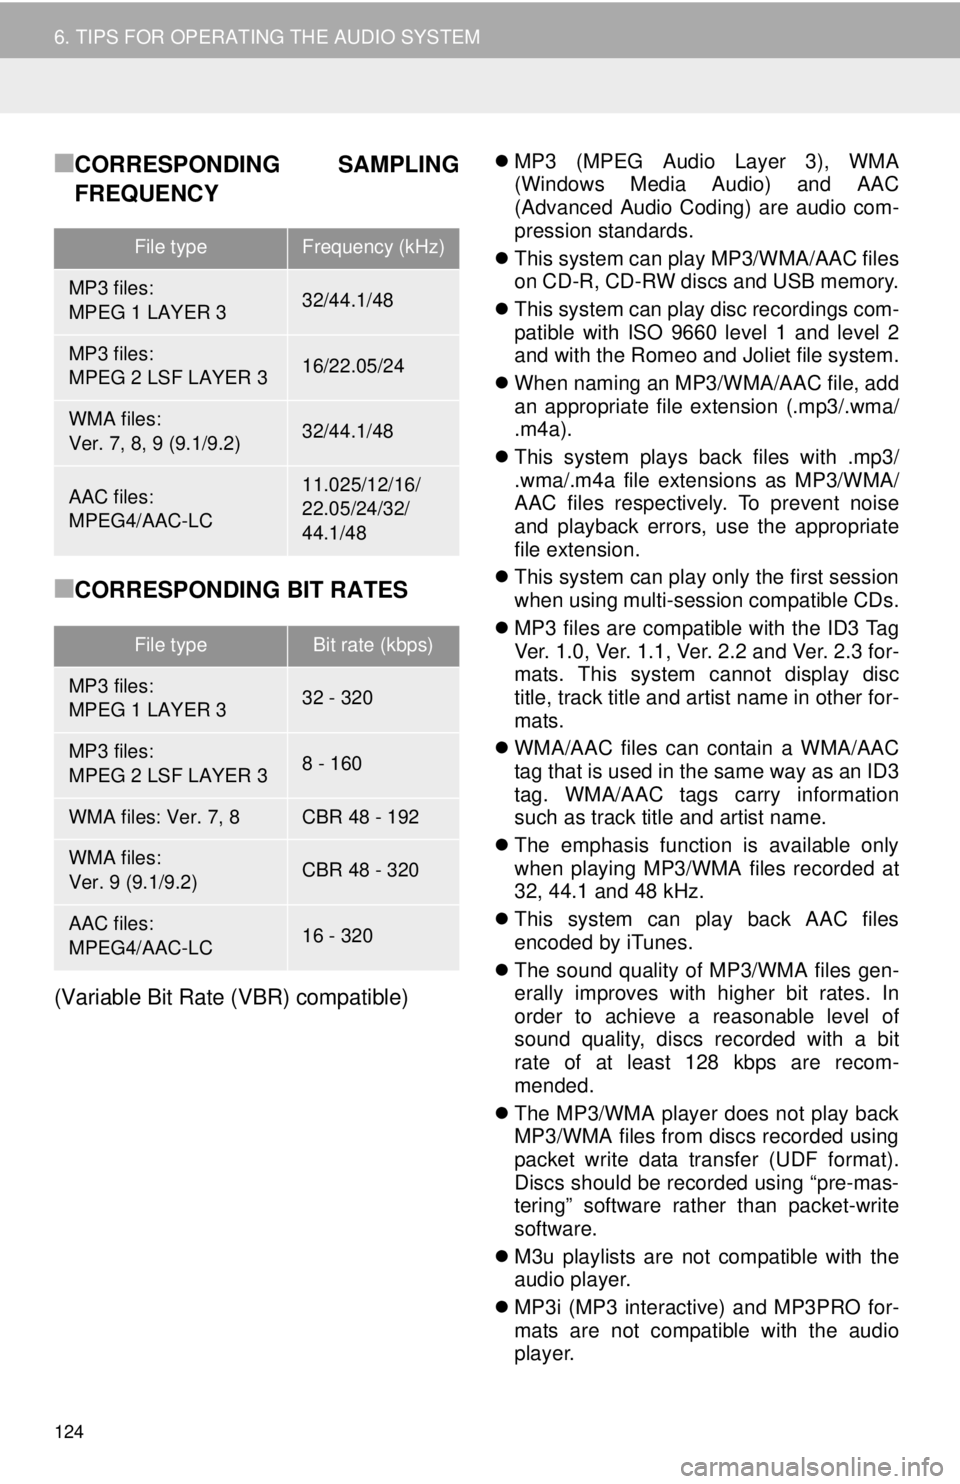
■CORRESPONDING SAMPLING
FREQUENCY
■CORRESPONDING BIT RATES
(Variable Bit Rate (VBR) compatible)
MP3 (MPEG Audio Layer 3), WMA
(Windows Media Audio) and AAC
(Advanced Audio Coding) are audio com-
pression standards.
This system can play MP3/WMA/AAC files
on CD-R, CD-RW discs and USB memory.
This system can play disc recordings com-
patible with ISO 9660 level 1 and level 2
and with the Romeo and Joliet file system.
When naming an MP3/WMA/AAC file, add
an appropriate file extension (.mp3/.wma/
.m4a).
This system plays back files with .mp3/
.wma/.m4a file extensions as MP3/WMA/
AAC files respectively. To prevent noise
and playback errors, use the appropriate
file extension.
This system can play only the first session
when using multi-session compatible CDs.
MP3 files are compatible with the ID3 Tag
Ver. 1.0, Ver. 1.1, Ver. 2.2 and Ver. 2.3 for-
mats. This system cannot display disc
title, track title and artist name in other for-
mats.
WMA/AAC files can contain a WMA/AAC
tag that is used in the same way as an ID3
tag. WMA/AAC tags carry information
such as track title and artist name.
The emphasis function is available only
when playing MP3/WMA files recorded at
32, 44.1 and 48 kHz.
This system can play back AAC files
encoded by iTunes.
The sound quality of MP3/WMA files gen-
erally improves with higher bit rates. In
order to achieve a reasonable level of
sound quality, discs recorded with a bit
rate of at least 128 kbps are recom-
mended.
The MP3/WMA player does not play back
MP3/WMA files from discs recorded using
packet write data transfer (UDF format).
Discs should be record ed using “pre-mas-
tering” software rather than packet-write
software.
M3u playlists are not compatible with the
audio player.
MP3i (MP3 interactive) and MP3PRO for-
mats are not compatible with the audio
player.
File typeFrequency (kHz)
MP3 files:
MPEG 1 LAYER 332/44.1/48
MP3 files:
MPEG 2 LSF LAYER 316/22.05/24
WMA files:
Ver. 7, 8, 9 (9.1/9.2)32/44.1/48
AAC files:
MPEG4/AAC-LC11.025/12/16/
22.05/24/32/
44.1/48
File typeBit rate (kbps)
MP3 files:
MPEG 1 LAYER 332 - 320
MP3 files:
MPEG 2 LSF LAYER 38 - 160
WMA files: Ver. 7, 8CBR 48 - 192
WMA files:
Ver. 9 (9.1/9.2)CBR 48 - 320
AAC files:
MPEG4/AAC-LC16 - 320
Page 125 of 292
125
6. TIPS FOR OPERATING THE AUDIO SYSTEM
AUDIO SYSTEM
3
The player is compatible with VBR (Vari-
able Bit Rate).
When playing back files recorded as VBR
(Variable Bit Rate) files, the play time will
not be correctly displayed if the fast for-
ward or reverse operations are used.
It is not possible to check folders that do
not include MP3/WMA/AAC files.
MP3/WMA/AAC files in folders up to 8 lev-
els deep can be played. However, the
start of playback may be delayed when
using discs containing numerous levels of
folders. For this reason, we recommend
creating discs with no more than 2 levels
of folders.
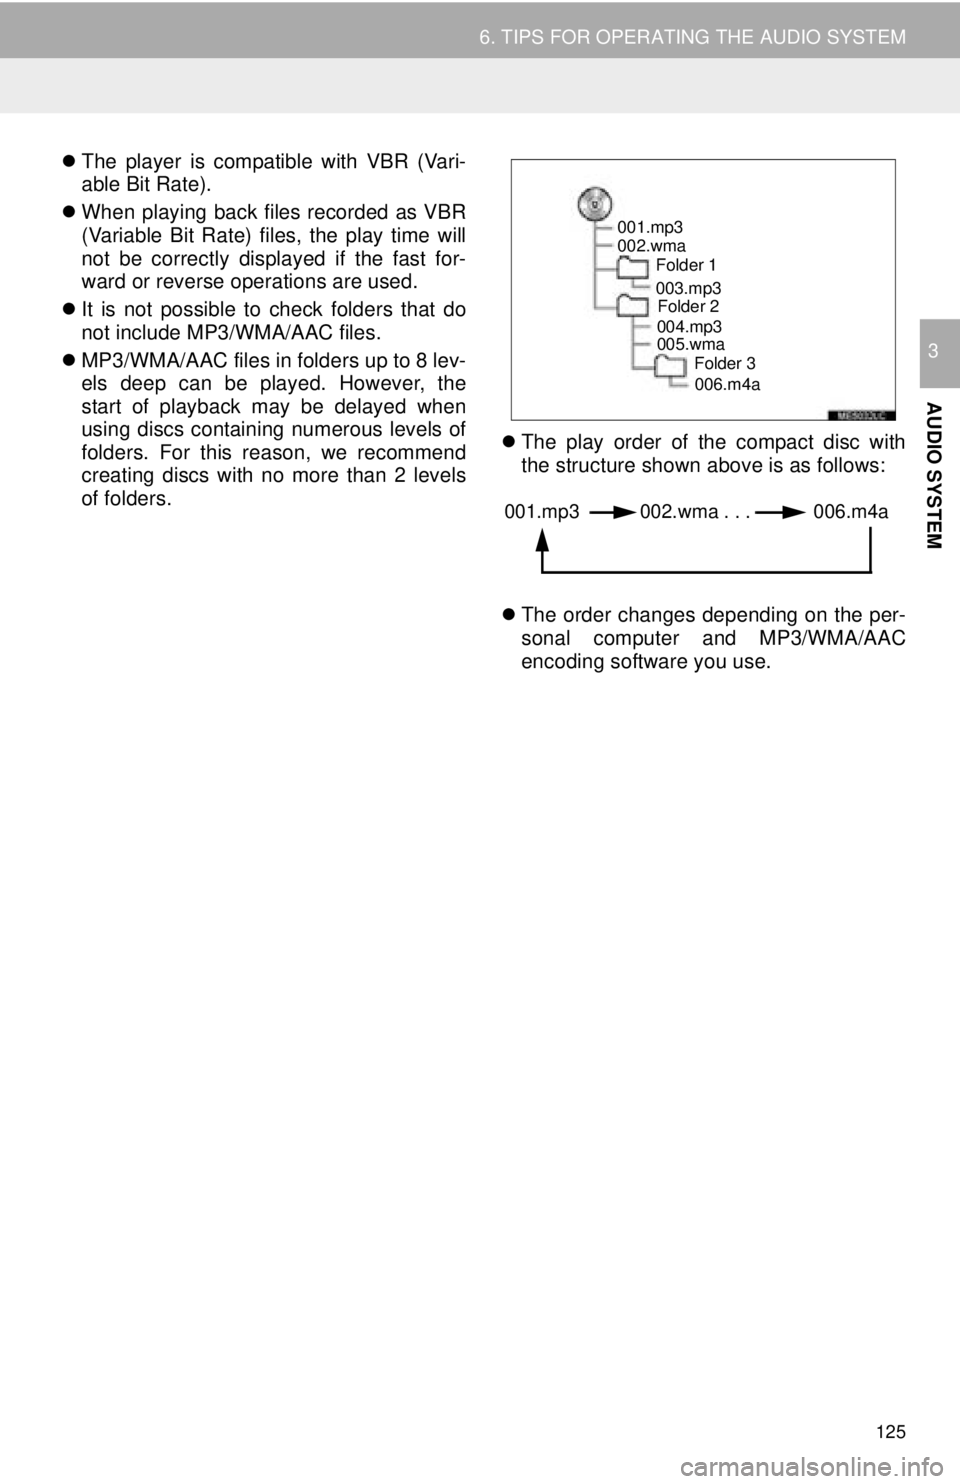
The play order of the compact disc with
the structure shown above is as follows:
The order changes depending on the per-
sonal computer and MP3/WMA/AAC
encoding software you use.
001.mp3
002.wma
Folder 1
003.mp3Folder 2
004.mp3
005.wma Folder 3
006.m4a
001.mp3 002.wma . . . 006.m4a
Page 131 of 292
131
1. VOICE COMMAND SYSTEM OPERATION
VOICE COMMAND SYSTEM
4
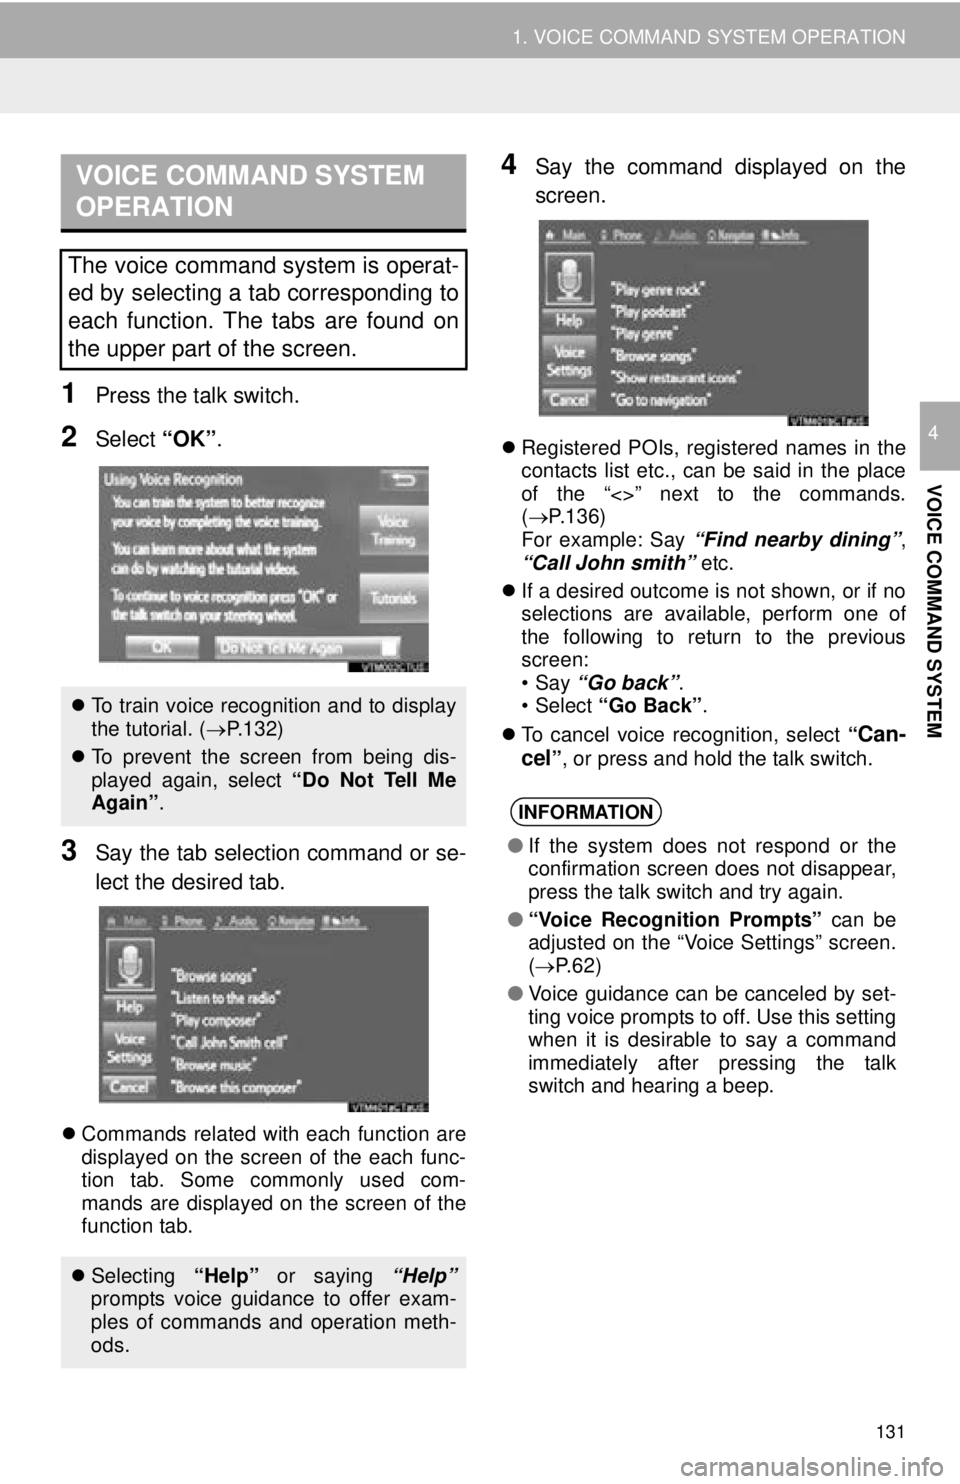
1Press the talk switch.
2Select “OK”.
3Say the tab selection command or se-
lect the desired tab.
Commands related with each function are
displayed on the screen of the each func-
tion tab. Some commonly used com-
mands are displayed on the screen of the
function tab.
4Say the command displayed on the
screen.
Registered POIs, registered names in the
contacts list etc., can be said in the place
of the “<>” next to the commands.
( P.136)
For example: Say “Find nearby dining” ,
“Call John smith” etc.
If a desired outcome is not shown, or if no
selections are available, perform one of
the following to return to the previous
screen:
•Say “Go back” .
•Select “Go Back” .
To cancel voice recognition, select “
Can-
cel” , or press and hold the talk switch.
VOICE COMMAND SYSTEM
OPERATION
The voice command system is operat-
ed by selecting a tab corresponding to
each function. The tabs are found on
the upper part of the screen.
To train voice recognition and to display
the tutorial. ( P.132)
To prevent the screen from being dis-
played again, select “Do Not Tell Me
Again” .
Selecting “Help” or saying “Help”
prompts voice guidance to offer exam-
ples of commands and operation meth-
ods.
INFORMATION
● If the system does not respond or the
confirmation screen does not disappear,
press the talk switch and try again.
● “Voice Recognition Prompts” can be
adjusted on the “Voice Settings” screen.
( P.62)
● Voice guidance can be canceled by set-
ting voice prompts to off. Use this setting
when it is desirable to say a command
immediately after pressing the talk
switch and hearing a beep.
Page 132 of 292
132
1. VOICE COMMAND SYSTEM OPERATION
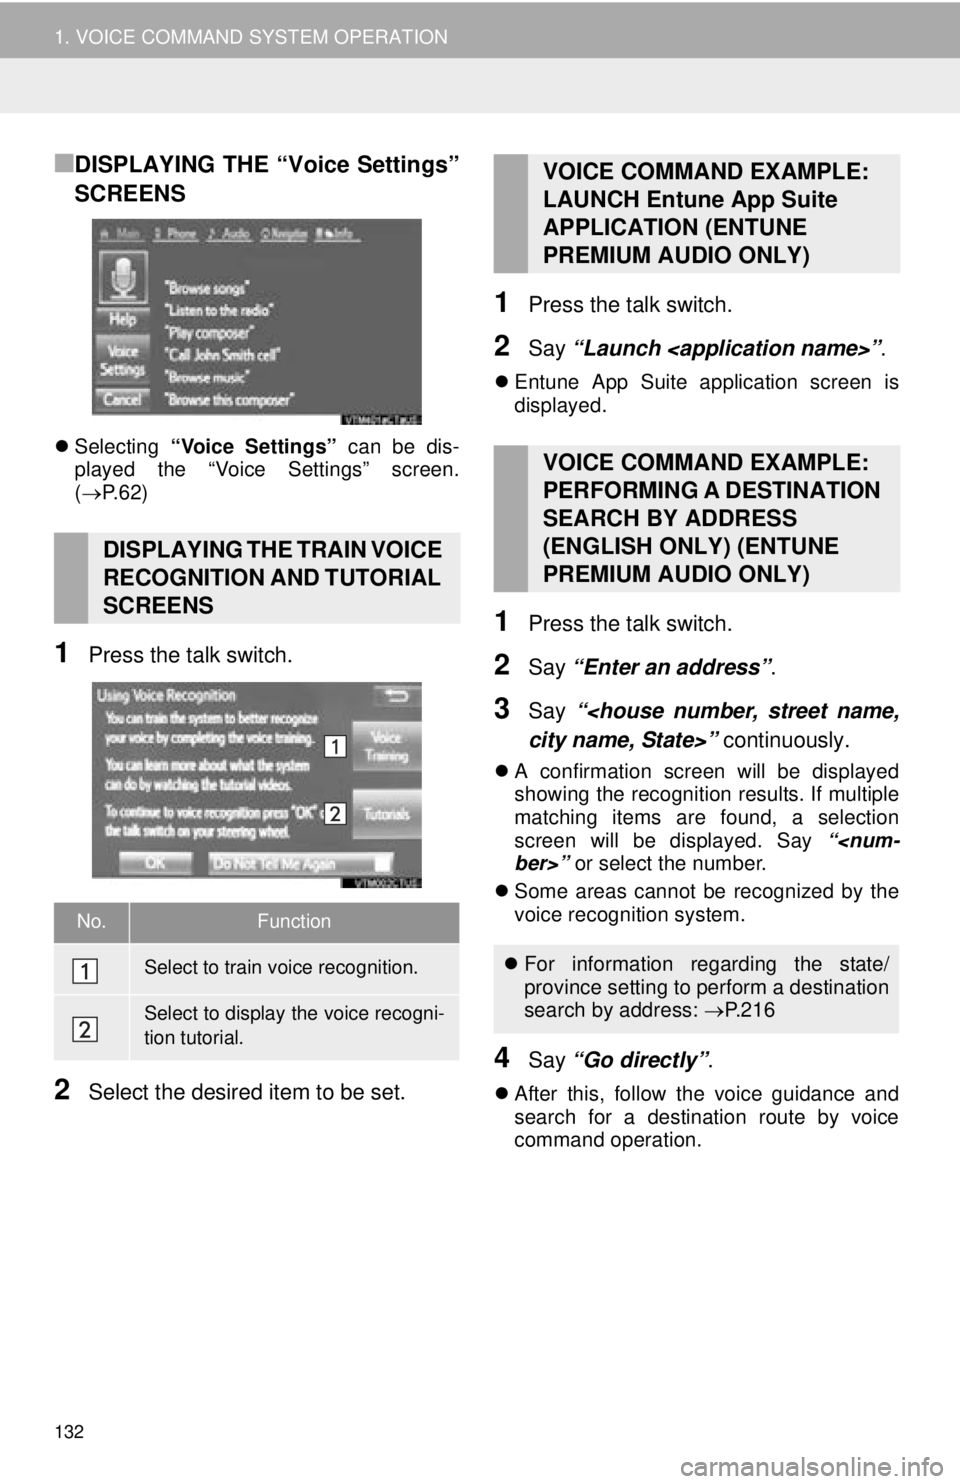
■DISPLAYING THE “Voice Settings”
SCREENS
Selecting “Voice Settings” can be dis-
played the “Voice Settings” screen.
( P.62)
1Press the talk switch.
2Select the desired item to be set.
1Press the talk switch.
2Say “Launch
Entune App Suite application screen is
displayed.
1Press the talk switch.
2Say “Enter an address” .
3Say “
A confirmation screen will be displayed
showing the recognition results. If multiple
matching items are found, a selection
screen will be displayed. Say “
Some areas cannot be recognized by the
voice recognition system.
4Say “Go directly” .
After this, follow the voice guidance and
search for a destination route by voice
command operation.
DISPLAYING THE TRAIN VOICE
RECOGNITION AND TUTORIAL
SCREENS
No.Function
Select to train voice recognition.
Select to display the voice recogni-
tion tutorial.
VOICE COMMAND EXAMPLE:
LAUNCH Entune App Suite
APPLICATION (ENTUNE
PREMIUM AUDIO ONLY)
VOICE COMMAND EXAMPLE:
PERFORMING A DESTINATION
SEARCH BY ADDRESS
(ENGLISH ONLY) (ENTUNE
PREMIUM AUDIO ONLY)
For information regarding the state/
province setting to perform a destination
search by address: P.216