TOYOTA TACOMA 2016 Owners Manual (in English)
TACOMA 2016
TOYOTA
TOYOTA
https://www.carmanualsonline.info/img/14/42993/w960_42993-0.png
TOYOTA TACOMA 2016 Owners Manual (in English)
Trending: buttons, spare wheel, stop start, driver door, fuse, clock reset, checking oil
Page 291 of 640
2915-2. Setup
5
Multimedia
Audio settings
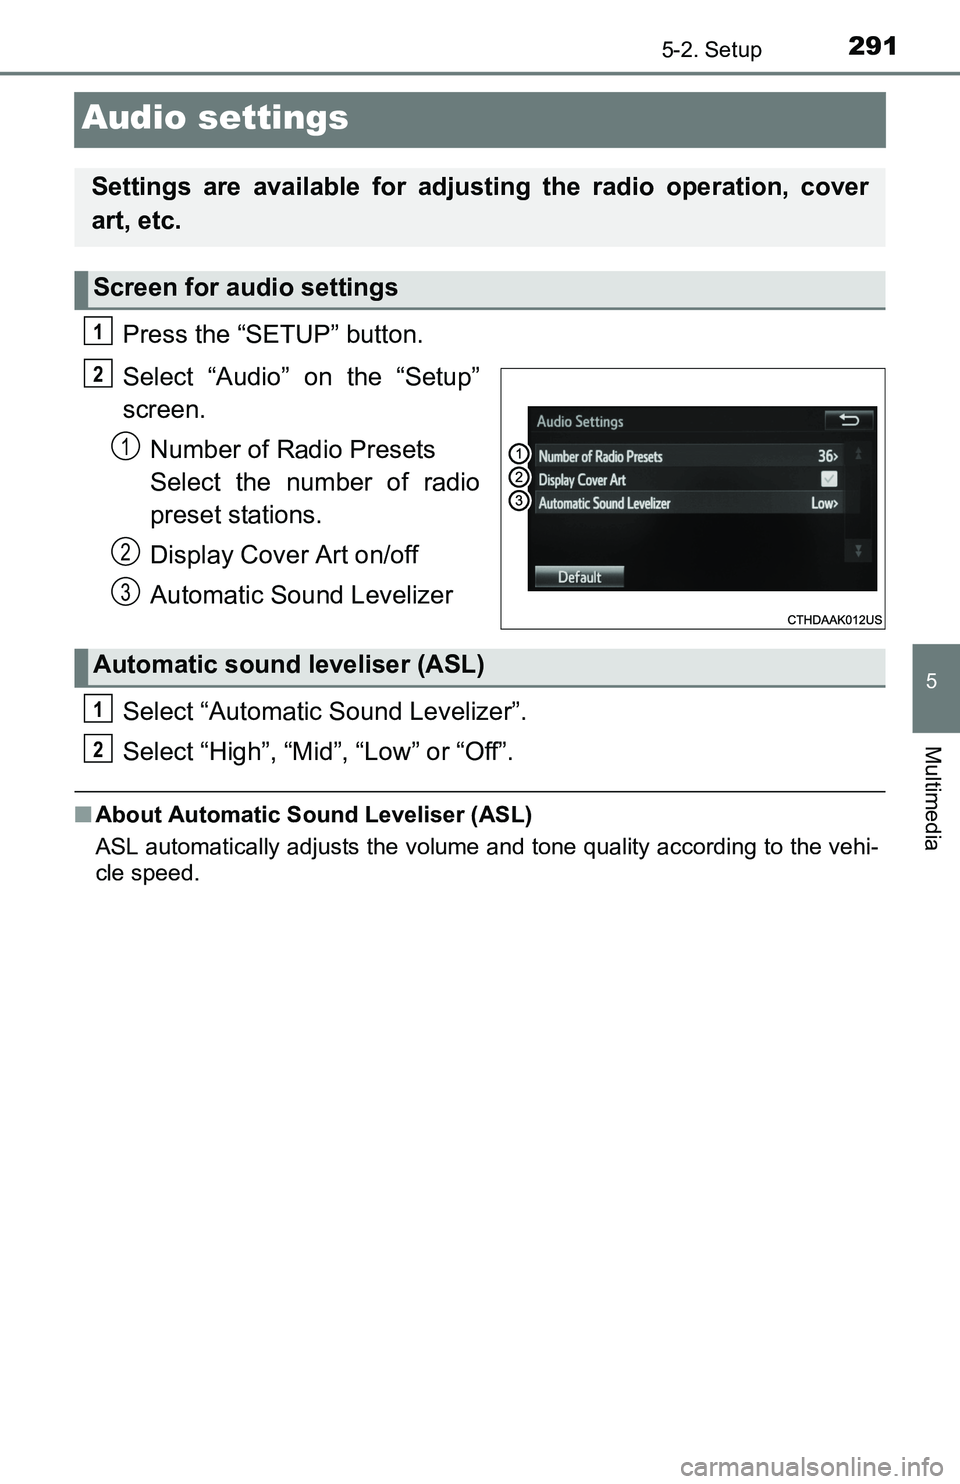
Press the “SETUP” button.
Select “Audio” on the “Setup”
screen.
Number of Radio Presets
Select the number of radio
preset stations.
Display Cover Art on/off
Automatic Sound Levelizer
Select “Automatic Sound Levelizer”.
Select “High”, “Mid”, “Low” or “Off”.
■About Automatic Sound Leveliser (ASL)
ASL automatically adjusts the volume and tone quality according to the vehi-
cle speed.
Settings are available for adjusting the radio operation, cover
art, etc.
Screen for audio settings
1
2
1
2
3
Automatic sound leveliser (ASL)
1
2
Page 292 of 640
2925-2. Setup
Display settings
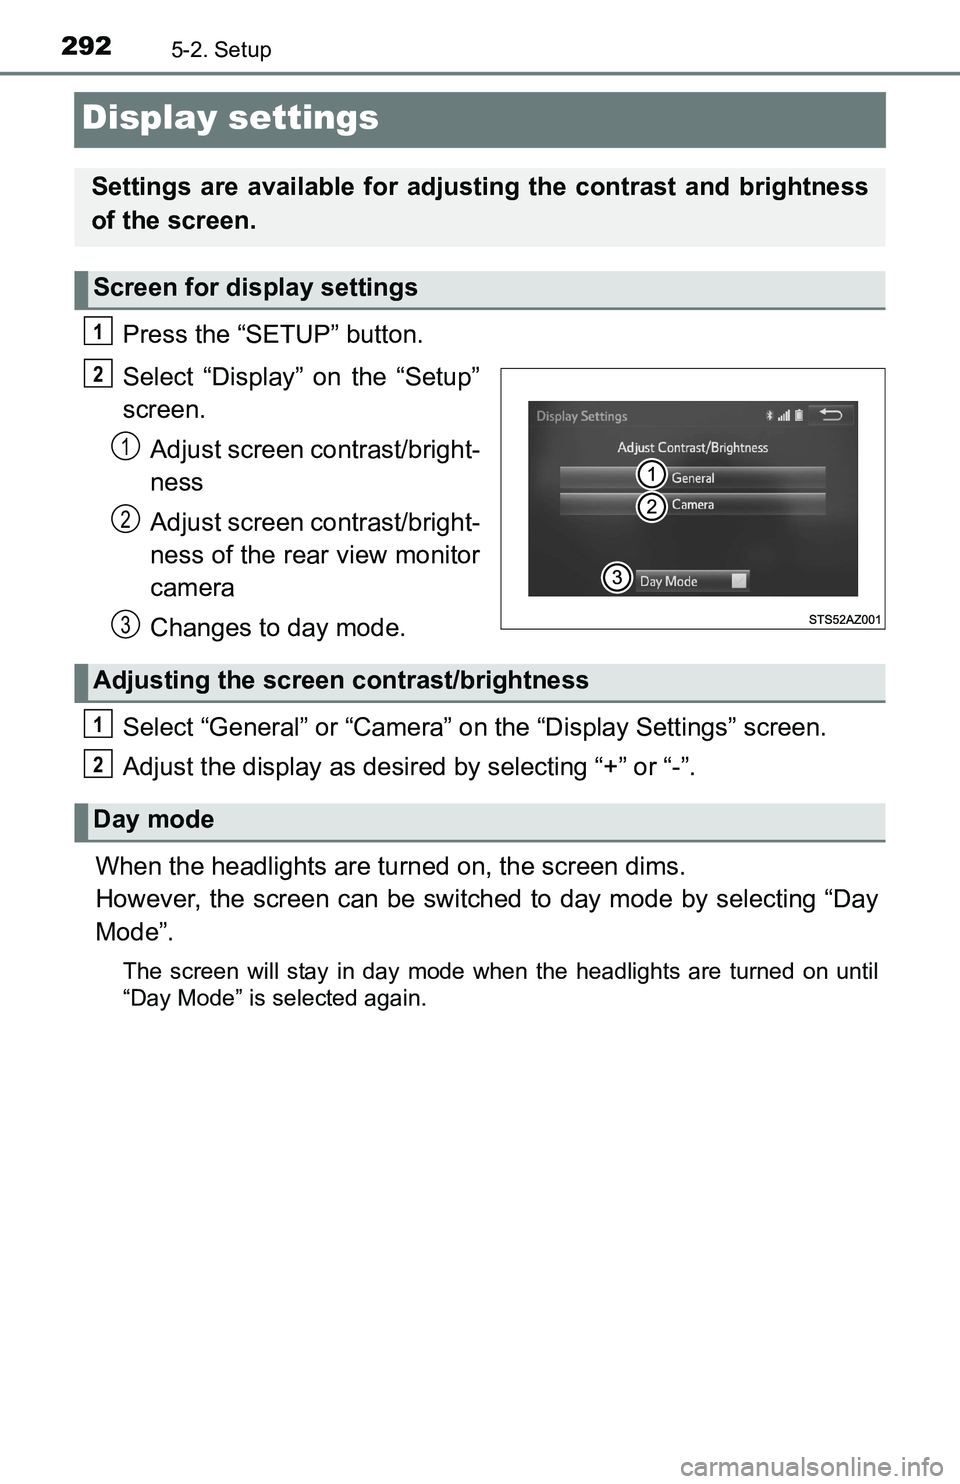
Press the “SETUP” button.
Select “Display” on the “Setup”
screen.
Adjust screen contrast/bright-
ness
Adjust screen contrast/bright-
ness of the rear view monitor
camera
Changes to day mode.
Select “General” or “Camera” on the “Display Settings” screen.
Adjust the display as desired by selecting “+” or “-”.
When the headlights are turned on, the screen dims.
However, the screen can be switched to day mode by selecting “Day
Mode”.
The screen will stay in day mode when the headlights are turned on until
“Day Mode” is selected again.
Settings are available for adjusting the contrast and brightness
of the screen.
Screen for display settings
1
2
1
2
3
Adjusting the screen contrast/brightness
Day mode
1
2
Page 293 of 640
2935-2. Setup
5
Multimedia
Voice settings
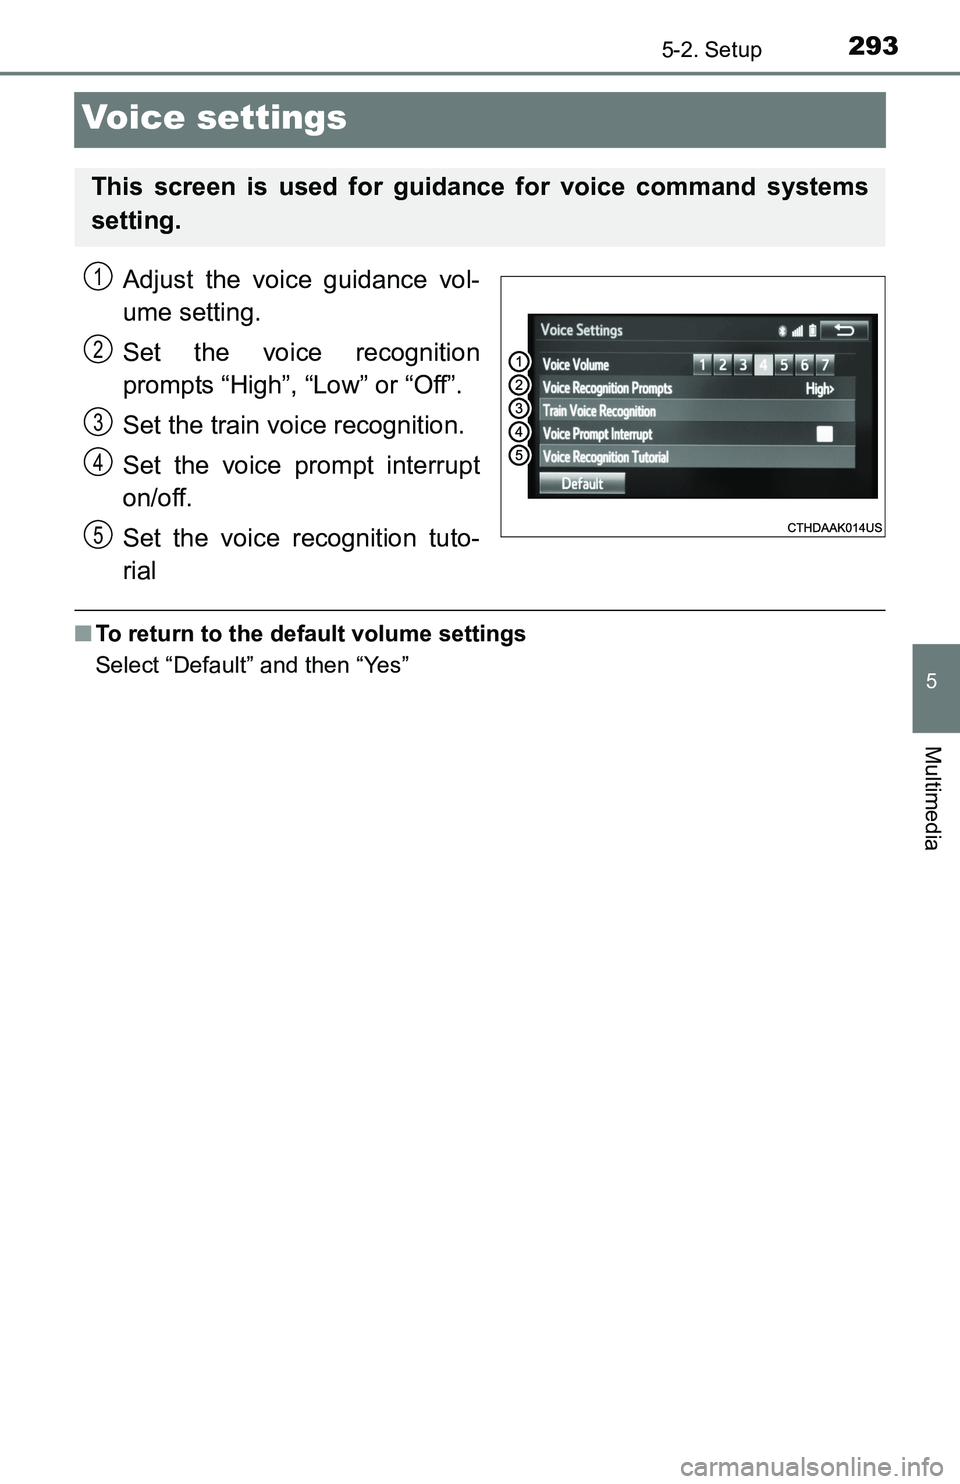
Adjust the voice guidance vol-
ume setting.
Set the voice recognition
prompts “High”, “Low” or “Off”.
Set the train voice recognition.
Set the voice prompt interrupt
on/off.
Set the voice recognition tuto-
rial
■To return to the default volume settings
Select “Default” and then “Yes”
This screen is used for guidance for voice command systems
setting.
1
2
3
4
5
Page 294 of 640
2945-3. Using the multimedia system
Selecting the audio source
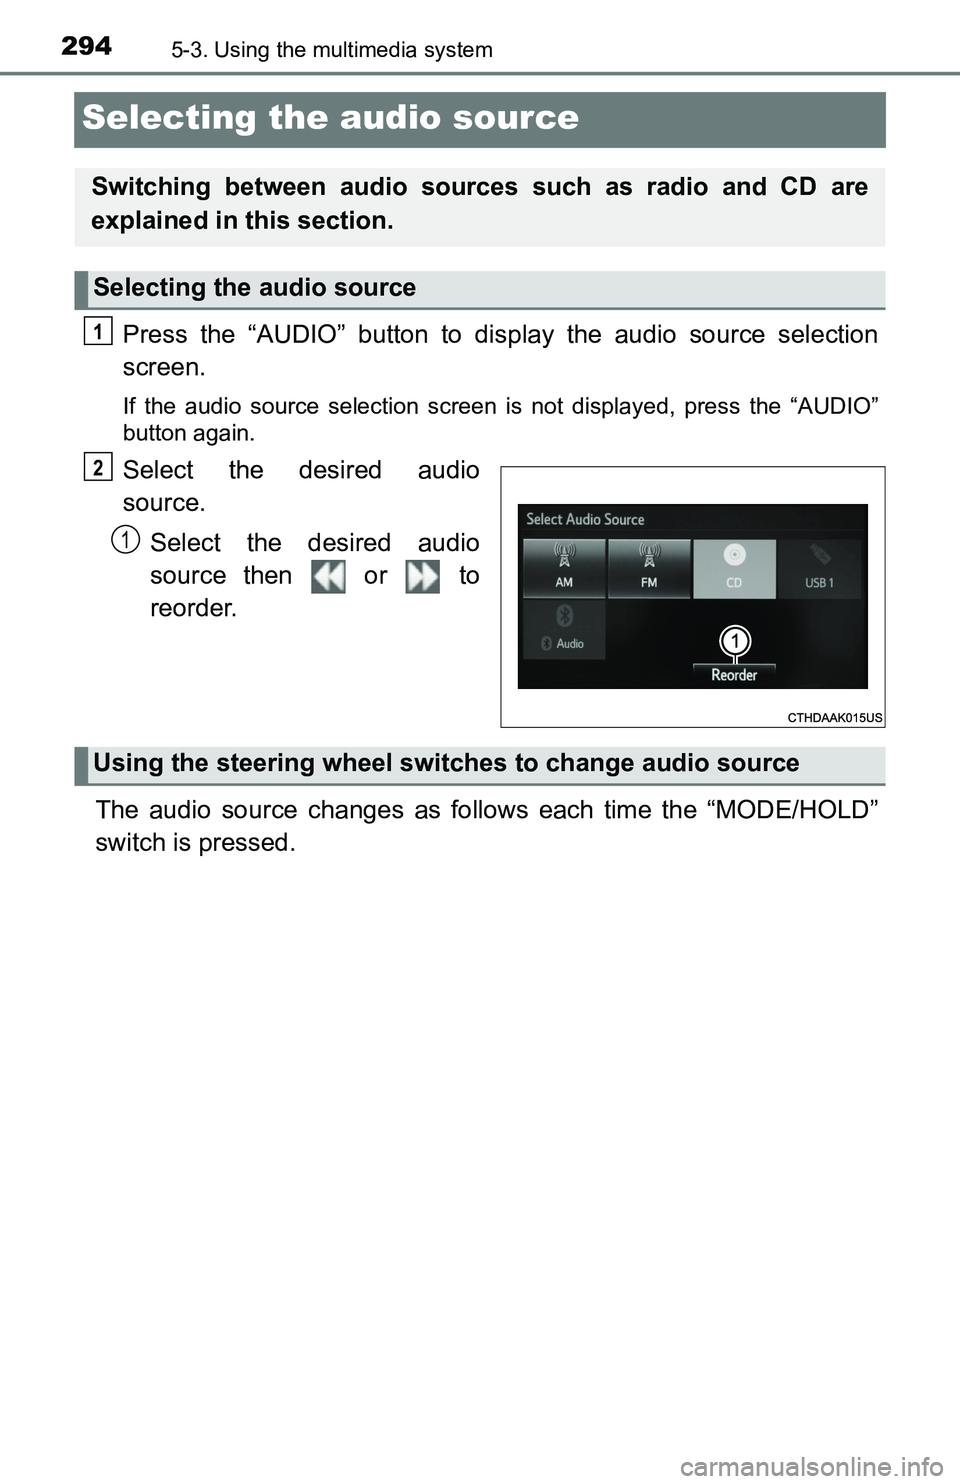
Press the “AUDIO” button to display the audio source selection
screen.
If the audio source selection screen is not displayed, press the “AUDIO”
button again.
Select the desired audio
source.
Select the desired audio
source then or to
reorder.
The audio source changes as follows each time the “MODE/HOLD”
switch is pressed.
Switching between audio sources such as radio and CD are
explained in this section.
Selecting the audio source
1
2
1
Using the steering wheel switches to change audio source
Page 295 of 640
2955-3. Using the multimedia system
5
Multimedia
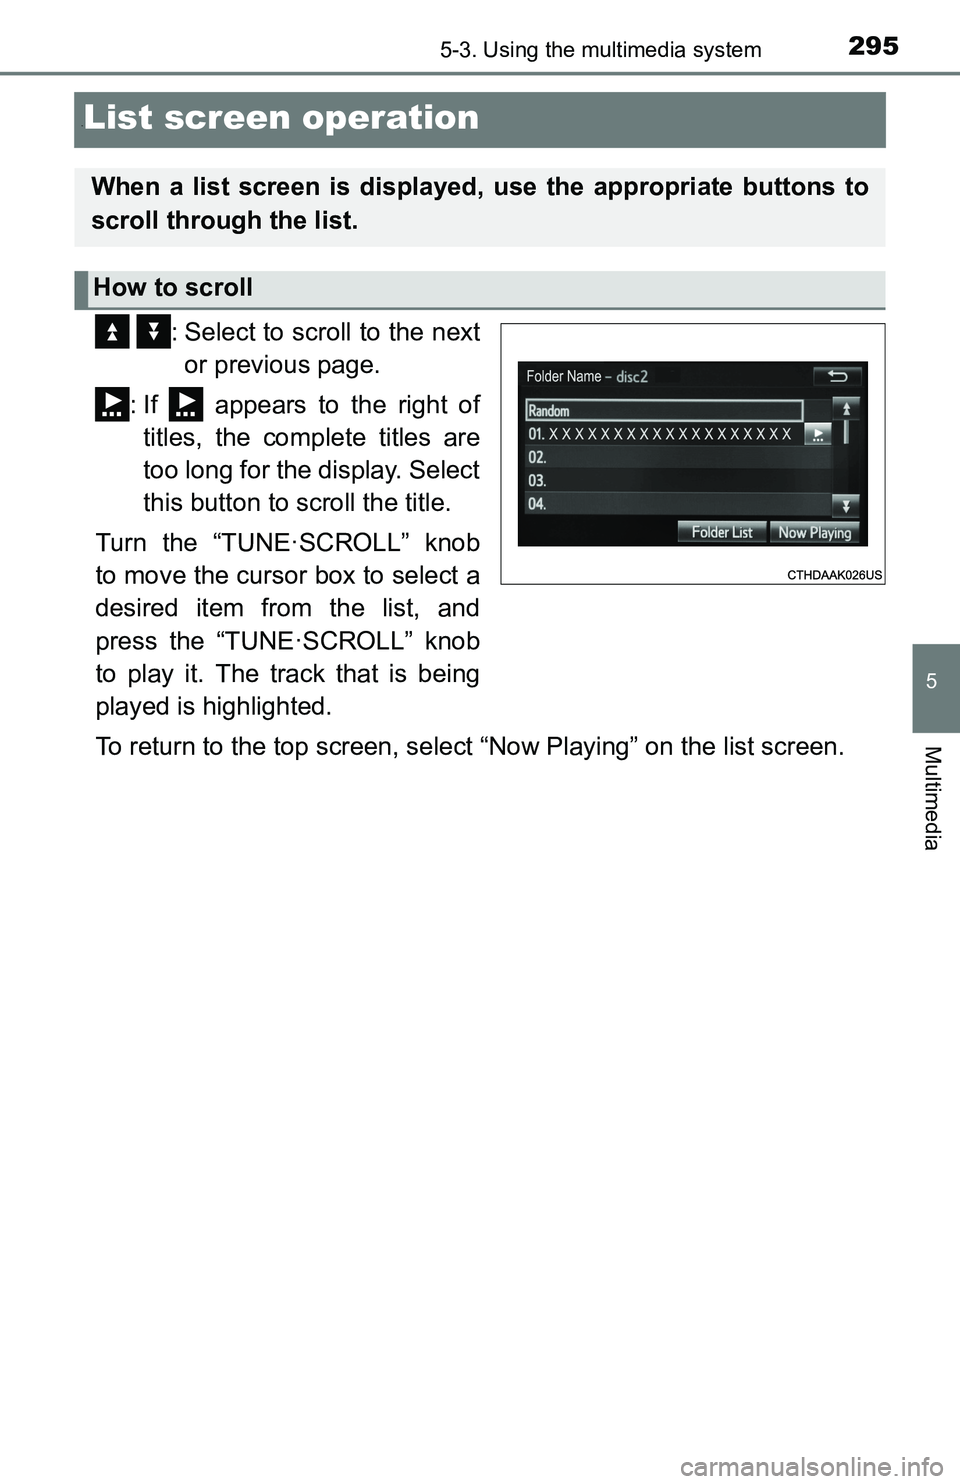
“List screen operation
: Select to scroll to the next
or previous page.
: If appears to the right of
titles, the complete titles are
too long for the display. Select
this button to scroll the title.
Turn the “TUNE·SCROLL” knob
to move the cursor box to select a
desired item from the list, and
press the “TUNE·SCROLL” knob
to play it. The track that is being
played is highlighted.
To return to the top screen, select “Now Playing” on the list screen.
When a list screen is displayed, use the appropriate buttons to
scroll through the list.
How to scroll
Page 296 of 640
2965-3. Using the multimedia system
■Selecting a track/file/song
Press the “SEEK>” or “
“TUNE·SCROLL” knob to select the desired track/file/song number.
To fast-forward or reverse, press and hold the “SEEK>” or
“
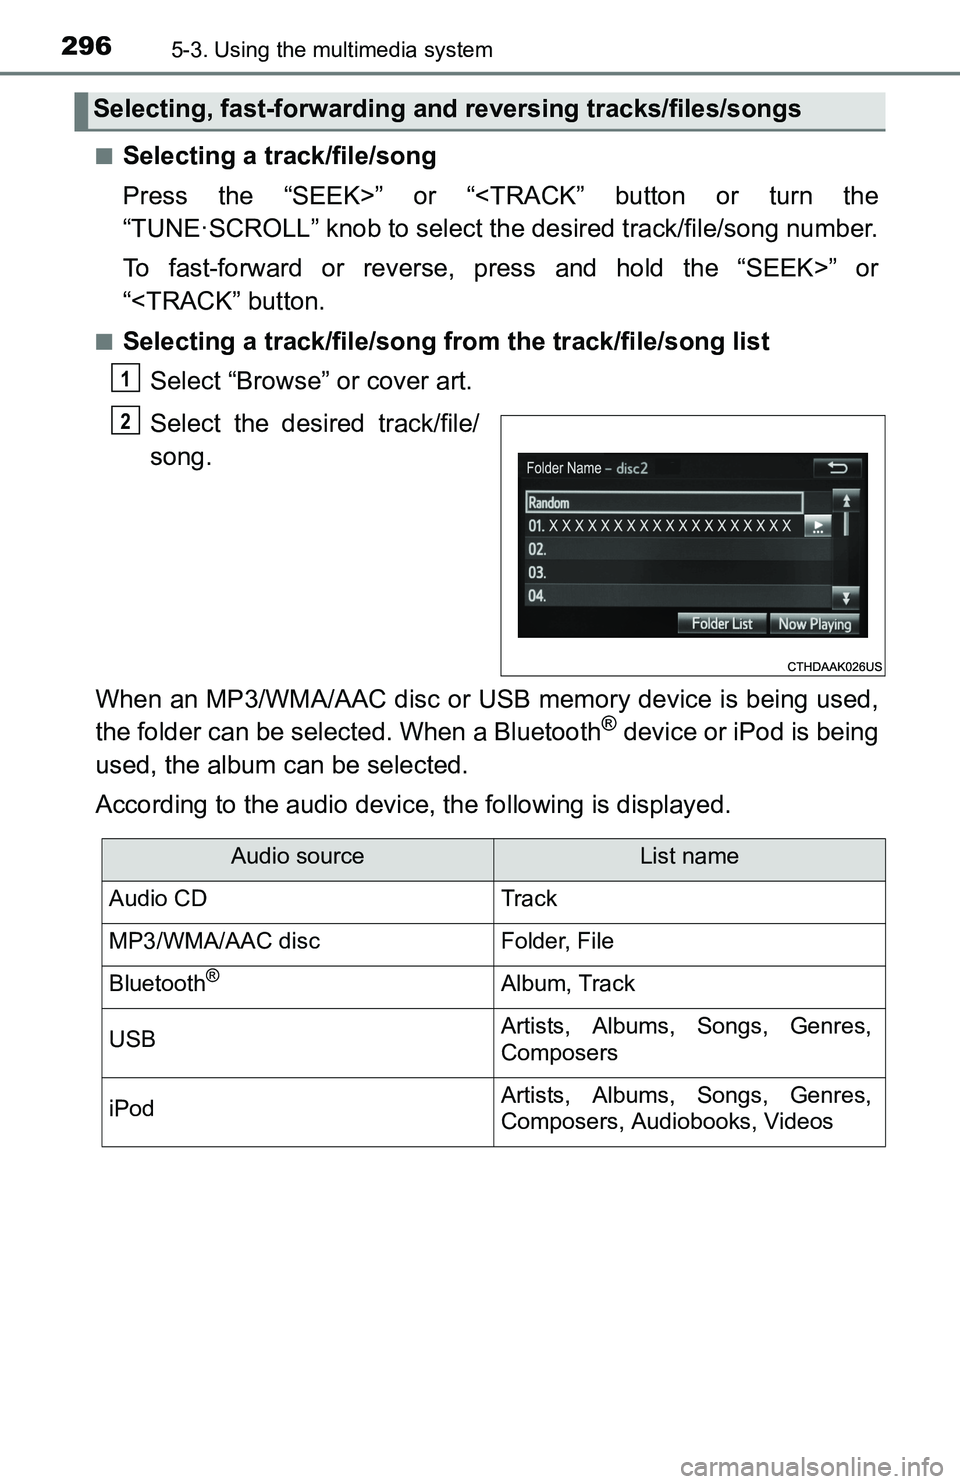
■Selecting a track/file/song from the track/file/song list
Select “Browse” or cover art.
Select the desired track/file/
song.
When an MP3/WMA/AAC disc or USB memory device is being used,
the folder can be selected. When a Bluetooth
® device or iPod is being
used, the album can be selected.
According to the audio device, the following is displayed.
Selecting, fast-forwarding and reversing tracks/files/songs
1
2
Audio sourceList name
Audio CDTrack
MP3/WMA/AAC discFolder, File
Bluetooth®Album, Track
USBArtists, Albums, Songs, Genres,
Composers
iPodArtists, Albums, Songs, Genres,
Composers, Audiobooks, Videos
Page 297 of 640
2975-3. Using the multimedia system
5
Multimedia
Optimal use of the multimedia system
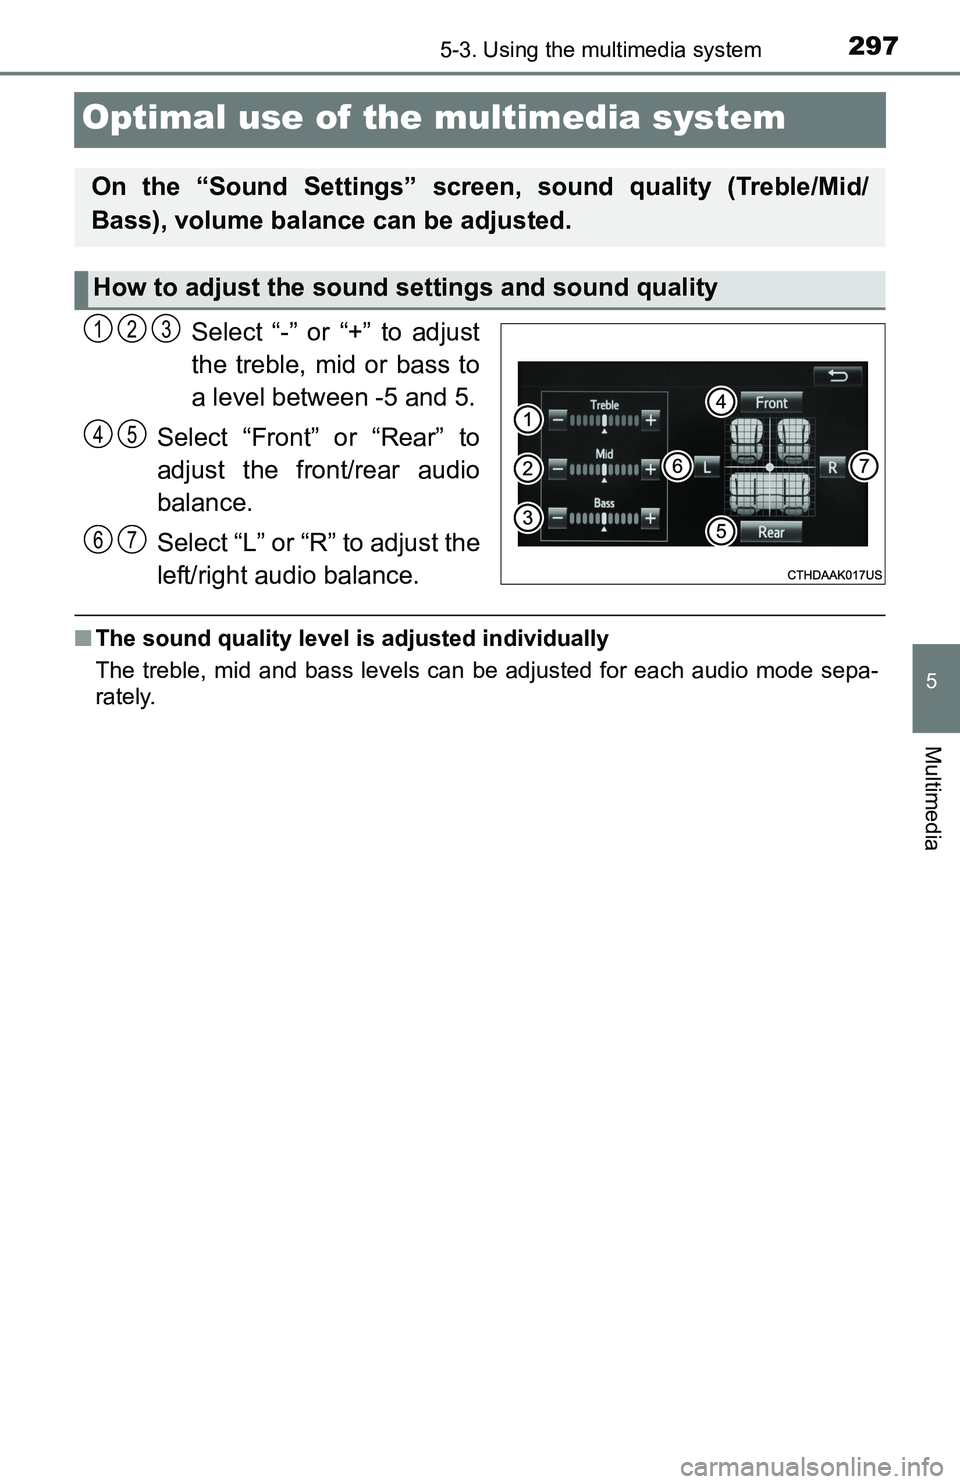
Select “-” or “+” to adjust
the treble, mid or bass to
a level between -5 and 5.
Select “Front” or “Rear” to
adjust the front/rear audio
balance.
Select “L” or “R” to adjust the
left/right audio balance.
■The sound quality level is adjusted individually
The treble, mid and bass levels can be adjusted for each audio mode sepa-
rately.
On the “Sound Settings” screen, sound quality (Treble/Mid/
Bass), volume balance can be adjusted.
How to adjust the sound settings and sound quality
123
45
67
Page 298 of 640
2985-4. Using the radio
Radio operation
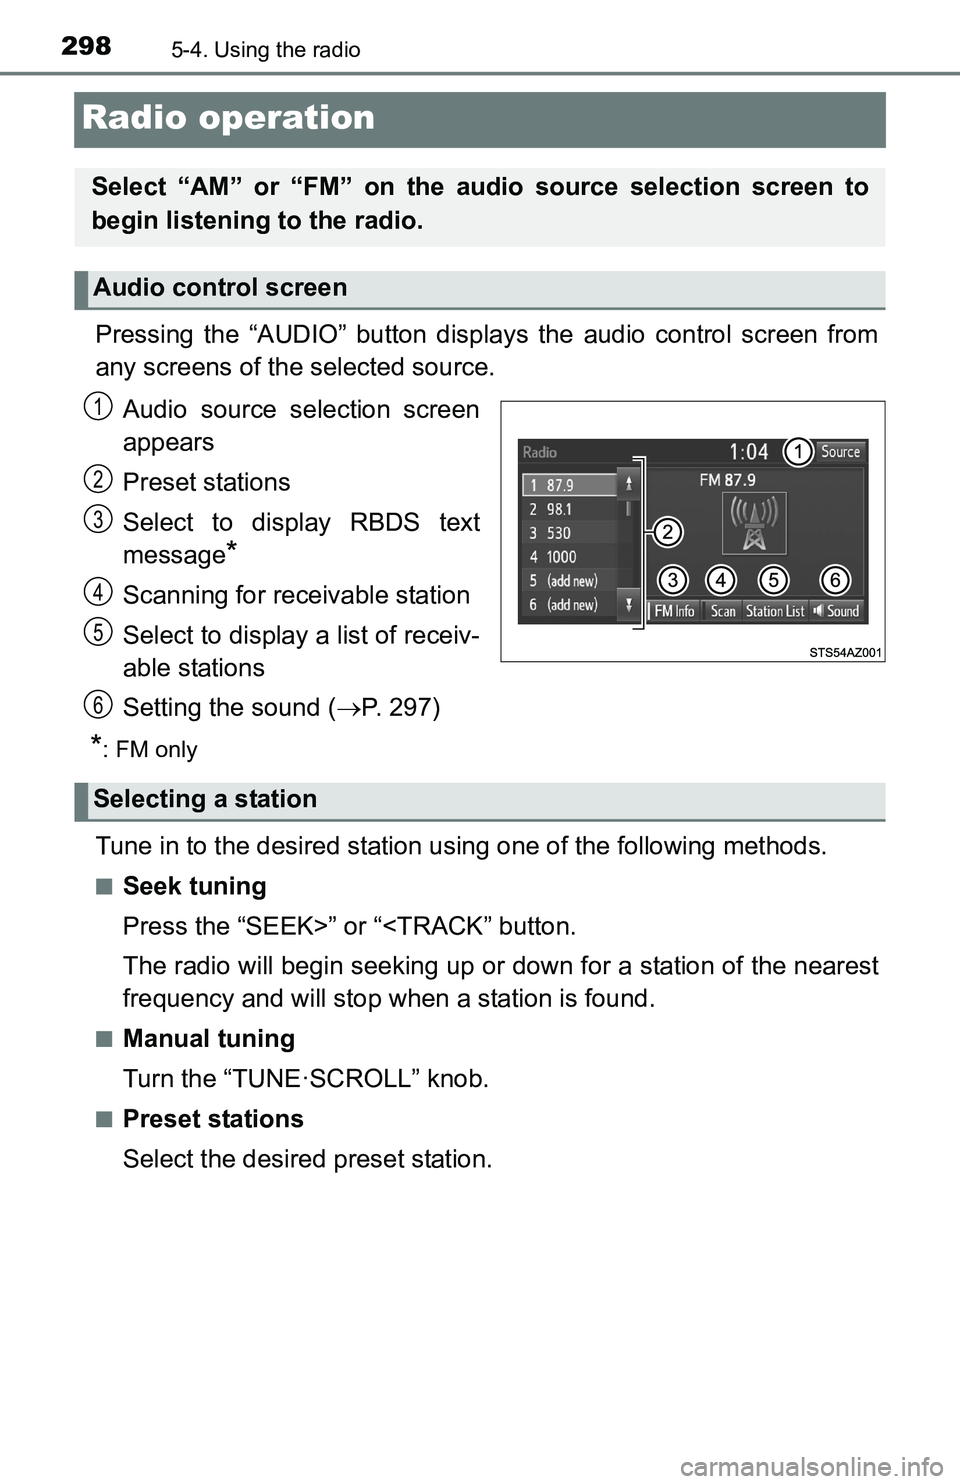
Pressing the “AUDIO” button displays the audio control screen from
any screens of the selected source.
Audio source selection screen
appears
Preset stations
Select to display RBDS text
message
*
Scanning for receivable station
Select to display a list of receiv-
able stations
Setting the sound (P. 297)
*: FM only
Tune in to the desired station using one of the following methods.
■Seek tuning
Press the “SEEK>” or “
The radio will begin seeking up or down for a station of the nearest
frequency and will stop when a station is found.
■Manual tuning
Turn the “TUNE·SCROLL” knob.
■Preset stations
Select the desired preset station.
Select “AM” or “FM” on the audio source selection screen to
begin listening to the radio.
Audio control screen
1
2
3
4
5
Selecting a station
6
Page 299 of 640
2995-4. Using the radio
5
Multimedia
Search for desired stations by turning the “TUNE·SCROLL” knob or
pressing the “SEEK>” or “
Select “(add new)”
To change the preset station to a different one, select and hold the preset
station.
Select “Yes”.
Select “OK” after setting the new preset station.
■Refreshing the station list
Select “Refresh” on the “Station List” screen.
To cancel the refresh, select “Cancel Refresh”.
■Reception sensitivity
●Maintaining perfect radio reception at all times is difficult due to the continu-
ally changing position of the antenna, differences in signal strength and sur-
rounding objects, such as trains, transmitters, etc.
●The radio antenna is mounted on the roof.
Setting station presets
1
2
3
4
Page 300 of 640
3005-5. Playing an audio CD and MP3/WMA/AAC discs
CD player operation
Pressing the “AUDIO” button displays the audio control screen from
any screens of the selected source.
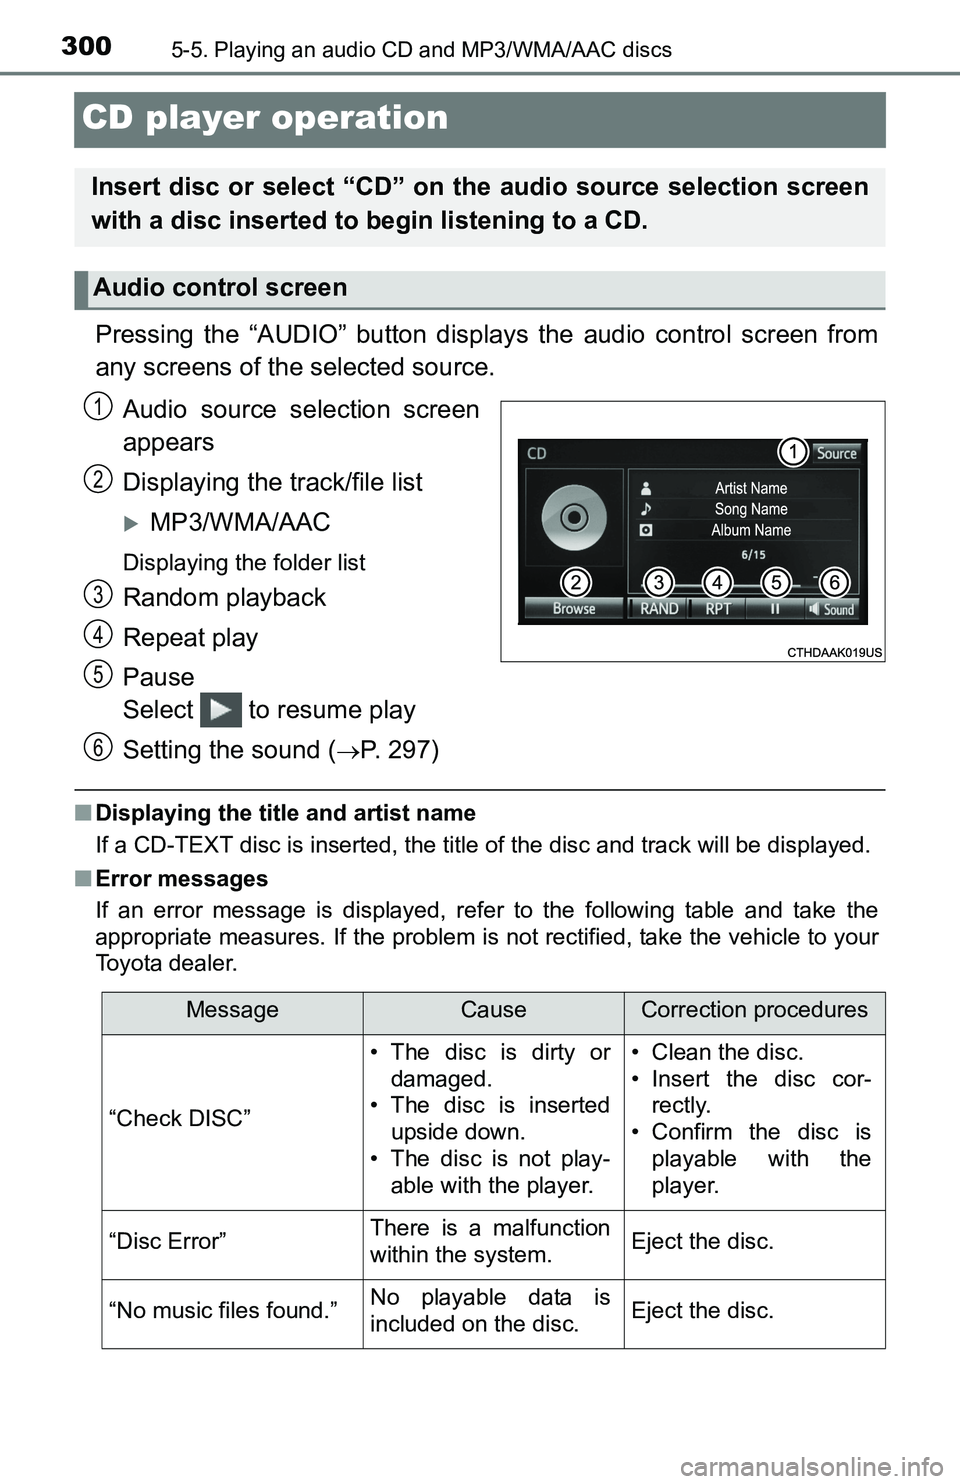
Audio source selection screen
appears
Displaying the track/file list
MP3/WMA/AAC
Displaying the folder list
Random playback
Repeat play
Pause
Select to resume play
Setting the sound (
P. 297)
■Displaying the title and artist name
If a CD-TEXT disc is inserted, the title of the disc and track will be displayed.
■Error messages
If an error message is displayed, refer to the following table and take the
appropriate measures. If the problem is not rectified, take the vehicle to your
Toyota dealer.
Insert disc or select “CD” on the audio source selection screen
with a disc inserted to begin listening to a CD.
Audio control screen
1
2
3
4
5
6
MessageCauseCorrection procedures
“Check DISC”• The disc is dirty or
damaged.
• The disc is inserted
upside down.
• The disc is not play-
able with the player.• Clean the disc.
• Insert the disc cor-
rectly.
• Confirm the disc is
playable with the
player.
“Disc Error”There is a malfunction
within the system.Eject the disc.
“No music files found.”No playable data is
included on the disc.Eject the disc.
Trending: tow, TPMS, interior lights, fuel, USB, lumbar support, fuses
