change time TOYOTA TACOMA 2017 Owners Manual (in English)
[x] Cancel search | Manufacturer: TOYOTA, Model Year: 2017, Model line: TACOMA, Model: TOYOTA TACOMA 2017Pages: 640, PDF Size: 11.07 MB
Page 8 of 640
8
For your information
Please note that this manual applies to all models and all equipment, includ-
ing options. Therefore, you may find some explanations for equipment not
installed on your vehicle.
All specifications provided in this manual are current at the time of printing.
However, because of the Toyota policy of continual product improvement, we
reserve the right to make changes at any time without notice.
Depending on specifications, the vehicle shown in the illustrations may differ
from your vehicle in terms of equipment.
Approximately five hours after the engine is turned off, you may hear sound
coming from under the vehicle for several minutes. This is the sound of a fuel
evaporation leakage check and it does not indicate a malfunction.
A wide variety of non-genuine spare parts and accessories for Toyota vehi-
cles are currently available in the market. You should know that Toyota does
not warrant these products and is not responsible for their performance,
repair, or replacement, or for any damage they may cause to, or adverse
effect they may have on, your Toyota vehicle.
This vehicle should not be modified with non-genuine Toyota products. Modi-
fication with non-genuine Toyota products could affect its performance, safety
or durability, and may even violate governmental regulations. In addition,
damage or performance problems resulting from the modification may not be
covered under warranty.
Main Owner’s Manual
Noise from under vehicle after turning off the engine
Accessories, spare parts and modification of your Toyota
Page 94 of 640
942. Instrument cluster
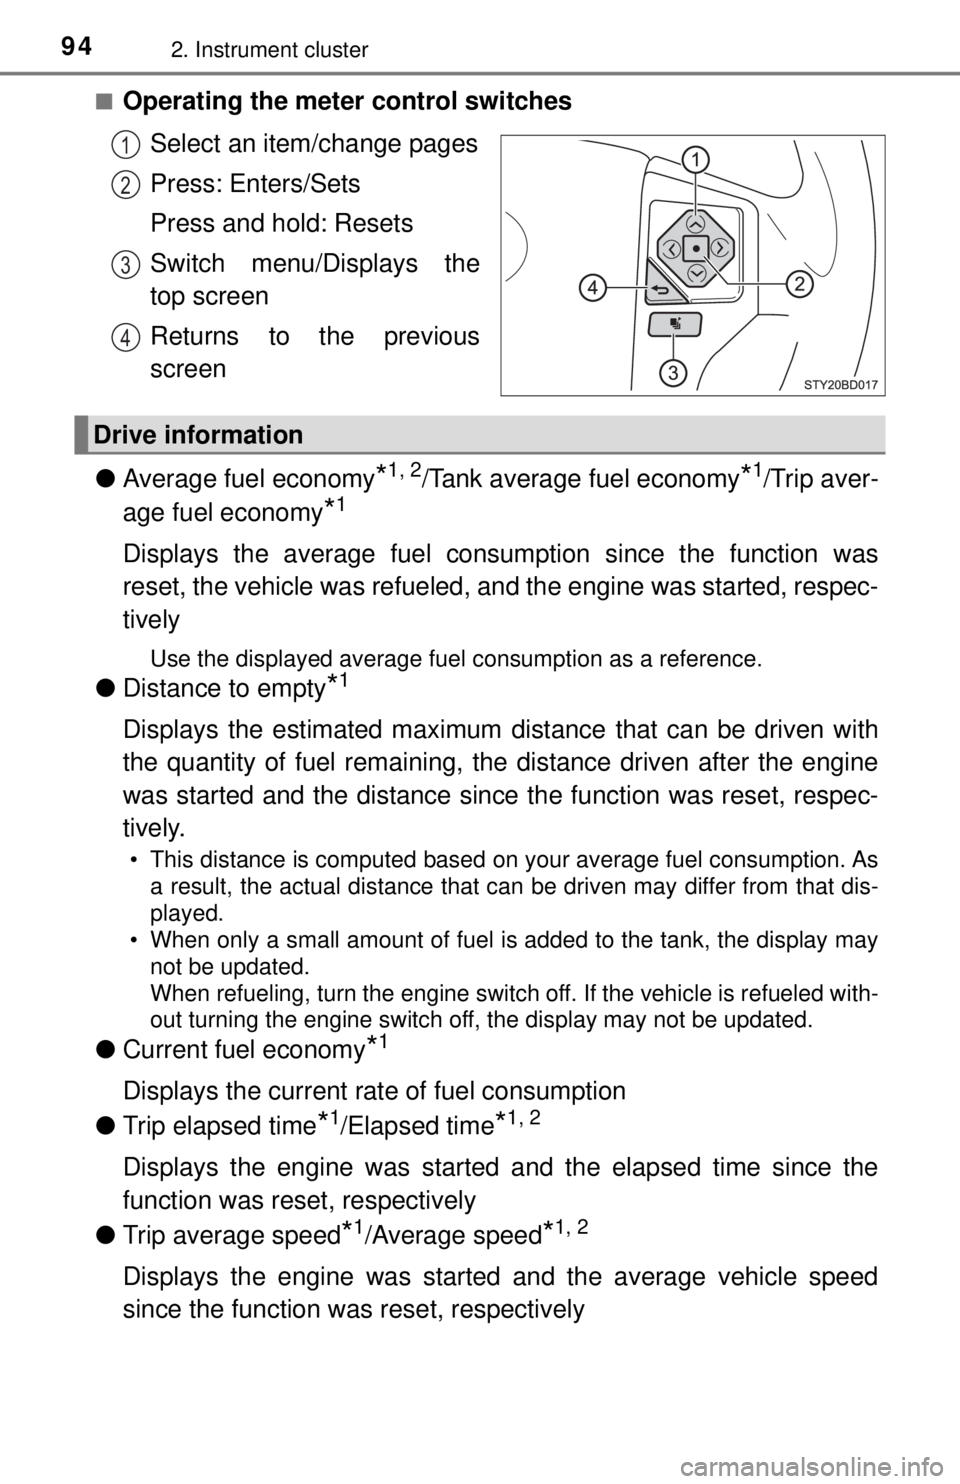
■Operating the meter control switchesSelect an item/change pages
Press: Enters/Sets
Press and hold: Resets
Switch menu/Displays the
top screen
Returns to the previous
screen
● Average fuel economy
*1, 2/Tank average fuel economy*1/Trip aver-
age fuel economy
*1
Displays the average fuel consum ption since the function was
reset, the vehicle was refueled, an d the engine was started, respec-
tively
Use the displayed average fuel consumption as a reference.
● Distance to empty*1
Displays the estimated maximum distance that can be driven with
the quantity of fuel remaining, t he distance driven after the engine
was started and the distance since the function was reset, respec-
tively.
• This distance is computed based on your average fuel consumption. As a result, the actual distance that can be driven may differ from that dis-
played.
• When only a small amount of fuel is added to the tank, the display may
not be updated.
When refueling, turn the engine switch off. If the vehicle is refueled with-
out turning the engine switch off, the display may not be updated.
● Current fuel economy*1
Displays the current rate of fuel consumption
● Trip elapsed time
*1/Elapsed time*1, 2
Displays the engine was started and the elapsed time since the
function was reset, respectively
● Trip average speed
*1/Average speed*1, 2
Displays the engine was started and the average vehicle speed
since the function wa s reset, respectively
1
2
3
4
Drive information
Page 125 of 640

1253-2. Opening, closing and locking the doors
3
Operation of each component
■Note for the entry function
●Even when the electronic key is within the effective range (detection areas),
the system may not operate properly in the following cases:
• The electronic key is too close to the window or outside door handle, near
the ground, or in a high place when the doors are locked or unlocked.
• The electronic key is near the ground or in a high place, or too close to
the rear bumper center when the trunk is opened.
• The electronic key is on the instrument panel or floor, or in the console box or glove box when the engine is started or engine switch modes are
changed.
● Do not leave the electronic key on top of the instrument panel or near t\
he
door pockets when exiting the vehicle. Depending on the radio wave recep-
tion conditions, it may be detected by the antenna outside the cabin and the
door will become lockable from the out side, possibly trapping the electronic
key inside the vehicle.
● As long as the electronic key is within the effective range, the doors may be
locked or unlocked by anyone. However, only the doors detecting the elec-
tronic key can be used to unlock the vehicle.
● Even if the electronic key is not inside the vehicle, it may be possible to start
the engine if the electronic key is near the window.
● The doors may unlock or lock if a large amount of water splashes on the
door handle, such as in the rain or in a car wash, when the electronic key is
within the effective range. (The doors will automatically be locked after
approximately 60 seconds if the doors are not opened and closed.)
● If the wireless remote control is used to lock the doors when the electronic
key is near the vehicle, there is a possibility that the door may not be
unlocked by the entry function. (Use the wireless remote control to unlock
the doors.)
● Touching the door lock or unlock sensor while wearing gloves may prevent
lock or unlock operation. Remove the gloves and touch the lock sensor
again.
● When the lock operation is performed using the lock sensor, recognition sig-
nals will be shown up to two consecutive times. After this, no recognition
signals will be given.
● If the door handle becomes wet while the electronic key is within the effec-
tive range, the door may lock and unlock repeatedly. In this case, follow the
following correction procedures to wash the vehicle:
• Place the electronic key in a location 6 ft. (2 m) or more away from the
vehicle. (Take care to ensure that the key is not stolen.)
• Set the electronic key to battery-saving mode to disable the smart key system. ( →P. 123)
● If the electronic key is inside the vehicle and a door handle becomes wet
during a car wash, a message may be shown on the multi-information dis-
play and a buzzer will sound outside the vehicle. To turn off the alarm, lock
all the doors.
Page 193 of 640
1934-2. Driving procedures
4
Driving
Stop the vehicle.
Set the parking brake (→P. 205), and shift the shift lever to P.
Press the engine switch.
Release the brake pedal and check that the display on the instru-
ment cluster is off.
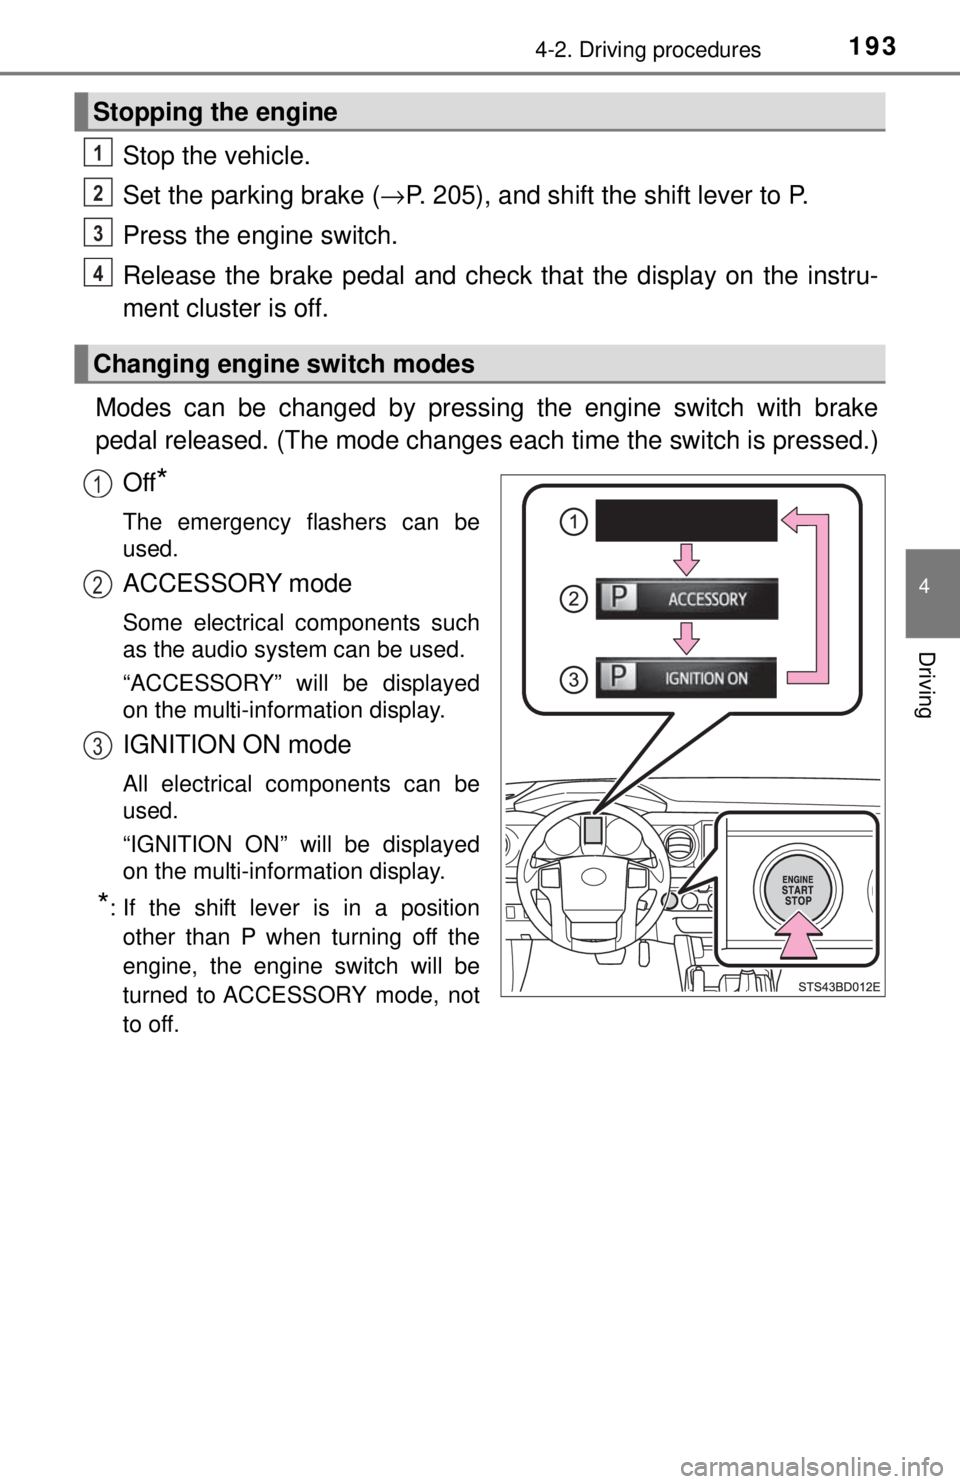
Modes can be changed by pressing the engine switch with brake
pedal released. (The mode changes ea ch time the switch is pressed.)
Off
*
The emergency flashers can be
used.
ACCESSORY mode
Some electrical components such
as the audio system can be used.
“ACCESSORY” will be displayed
on the multi-information display.
IGNITION ON mode
All electrical components can be
used.
“IGNITION ON” will be displayed
on the multi-information display.
*: If the shift lever is in a position other than P when turning off the
engine, the engine switch will be
turned to ACCESSORY mode, not
to off.
Stopping the engine
Changing engine switch modes
1
2
3
4
1
2
3
Page 195 of 640
1954-2. Driving procedures
4
Driving
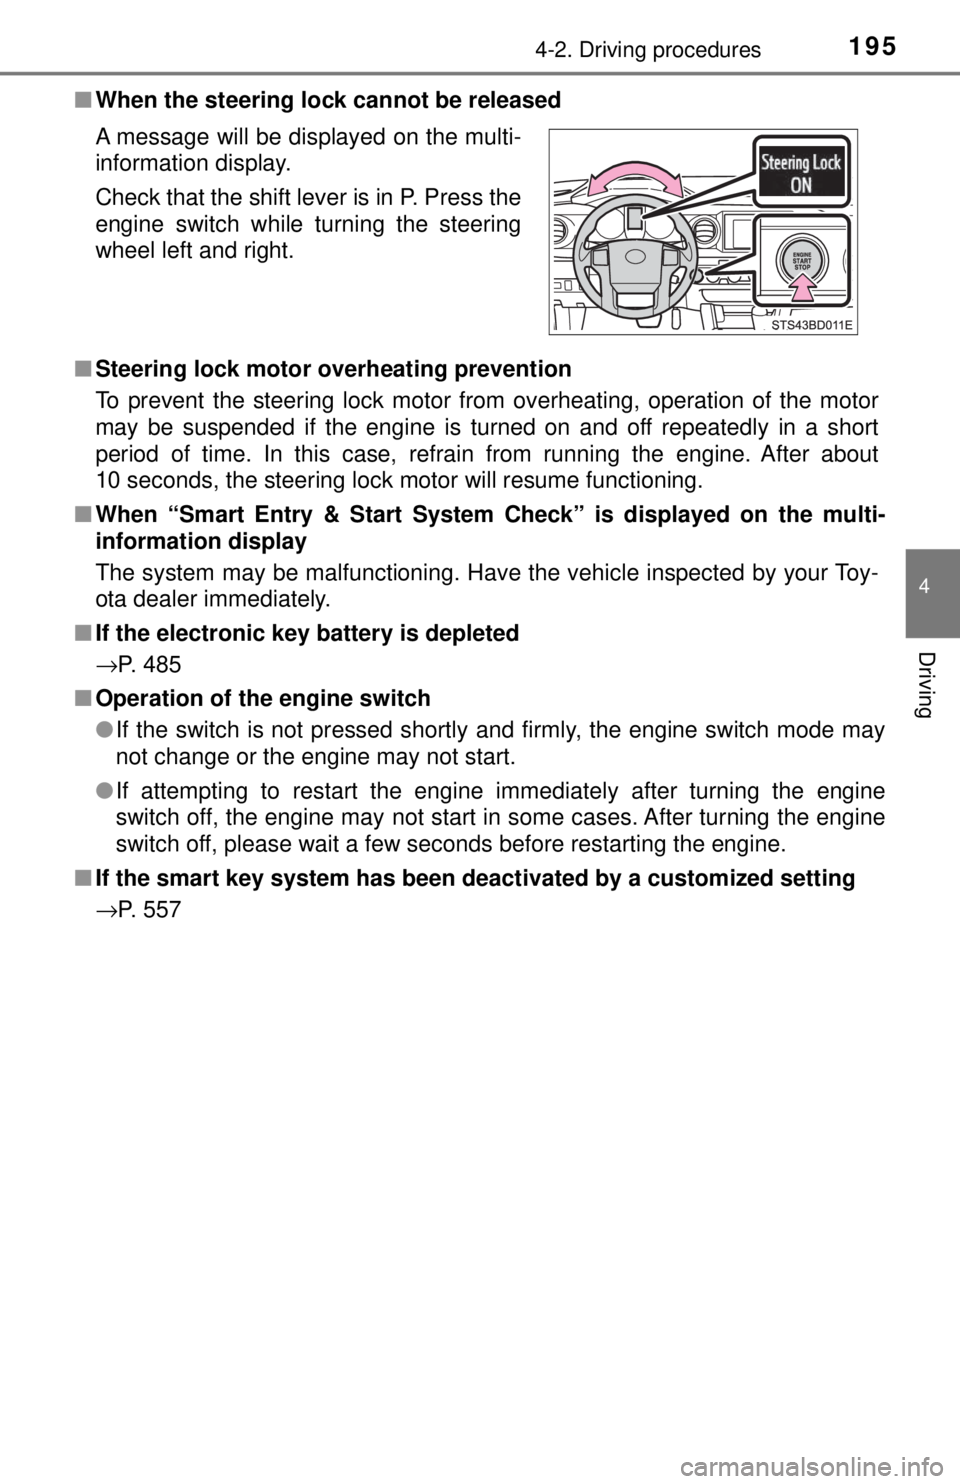
■When the steering lock cannot be released
■ Steering lock motor o verheating prevention
To prevent the steering lock motor from overheating, operation of the motor
may be suspended if the engine is turned on and off repeatedly in a short
period of time. In this case, refrain from running the engine. After about
10 seconds, the steering lock motor will resume functioning.
■ When “Smart Entry & Start System Check” is displayed on the multi-
information display
The system may be malfunctioning. Have the vehicle inspected by your Toy-
ota dealer immediately.
■ If the electronic key battery is depleted
→P. 485
■ Operation of the engine switch
●If the switch is not pressed shortly and firmly, the engine switch mode may
not change or the engine may not start.
● If attempting to restart the engine immediately after turning the engine
switch off, the engine may not start in some cases. After turning the engine
switch off, please wait a few seconds before restarting the engine.
■ If the smart key system has been deactivated by a customized setting
→P. 557 A message will be displayed on the multi-
information display.
Check that the shift lever is in P. Press the
engine switch while turning the steering
wheel left and right.
Page 201 of 640
2014-2. Driving procedures
4
Driving
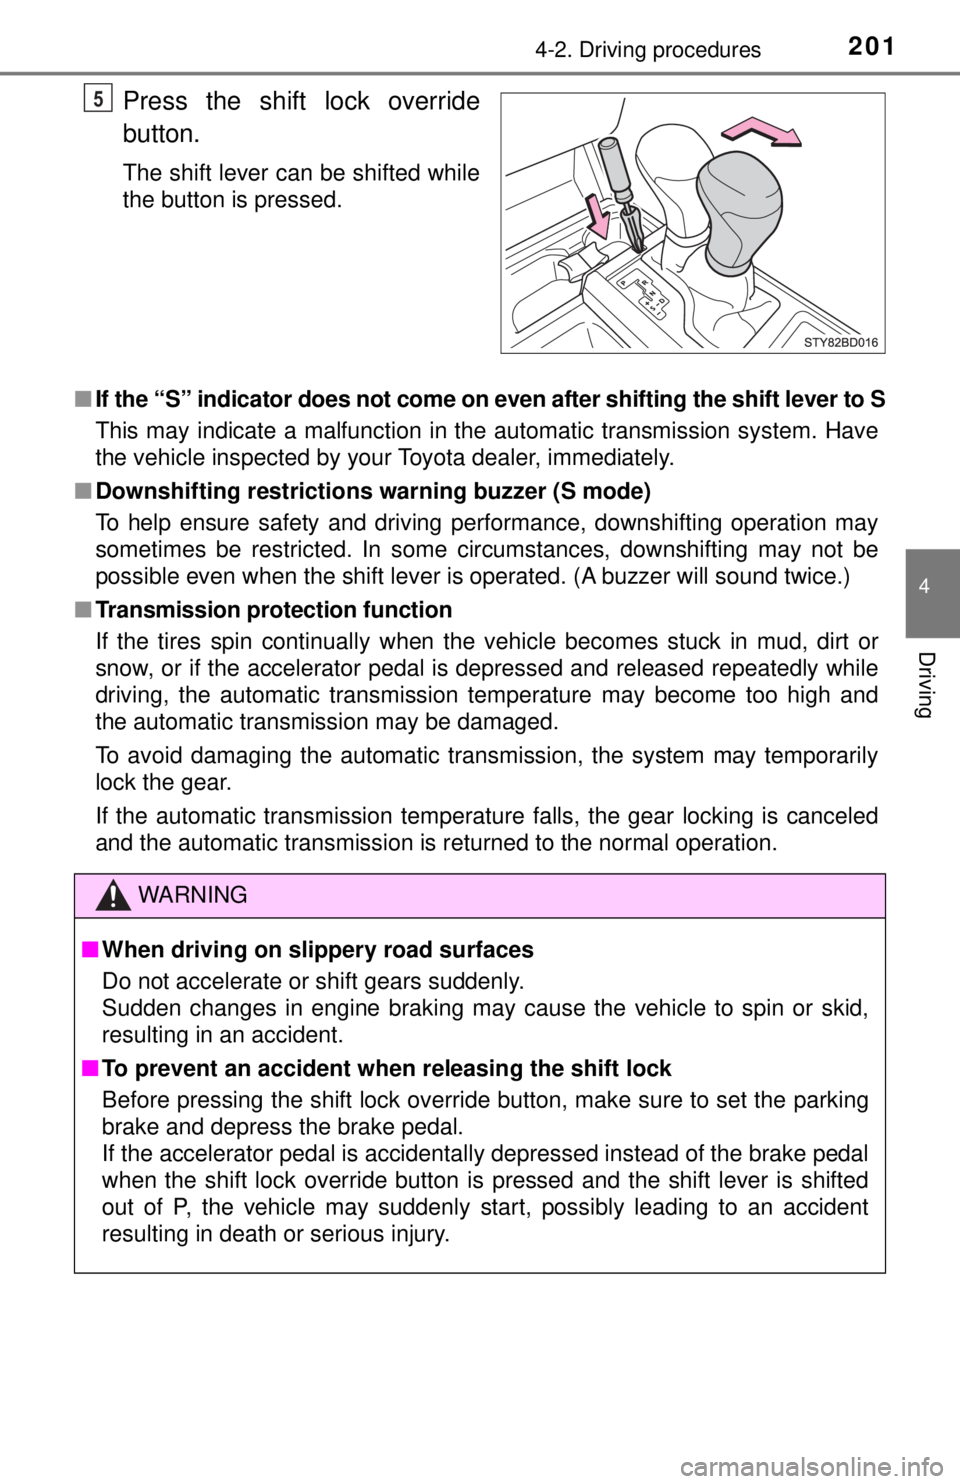
Press the shift lock override
button.
The shift lever can be shifted while
the button is pressed.
■ If the “S” indicator does not come on even after shifting the shift lever to S
This may indicate a malfunction in the automatic transmission system. Have
the vehicle inspected by your Toyota dealer, immediately.
■ Downshifting restrictions warning buzzer (S mode)
To help ensure safety and driving performance, downshifting operation may
sometimes be restricted. In some circumstances, downshifting may not be
possible even when the shift lever is operated. (A buzzer will sound twice.)
■ Transmission protection function
If the tires spin continually when the vehicle becomes stuck in mud, dir\
t or
snow, or if the accelerator pedal is depressed and released repeatedly while
driving, the automatic transmission temperature may become too high and
the automatic transmission may be damaged.
To avoid damaging the automatic transmission, the system may temporarily
lock the gear.
If the automatic transmission temperature falls, the gear locking is canceled
and the automatic transmission is returned to the normal operation.
5
WARNING
■When driving on slippery road surfaces
Do not accelerate or shift gears suddenly.
Sudden changes in engine braking may cause the vehicle to spin or skid,
resulting in an accident.
■ To prevent an accident when releasing the shift lock
Before pressing the shift lock override button, make sure to set the parking
brake and depress the brake pedal.
If the accelerator pedal is accidentally depressed instead of the brake pedal
when the shift lock override button is pressed and the shift lever is shifted
out of P, the vehicle may suddenly start, possibly leading to an accident
resulting in death or serious injury.
Page 204 of 640
2044-2. Driving procedures
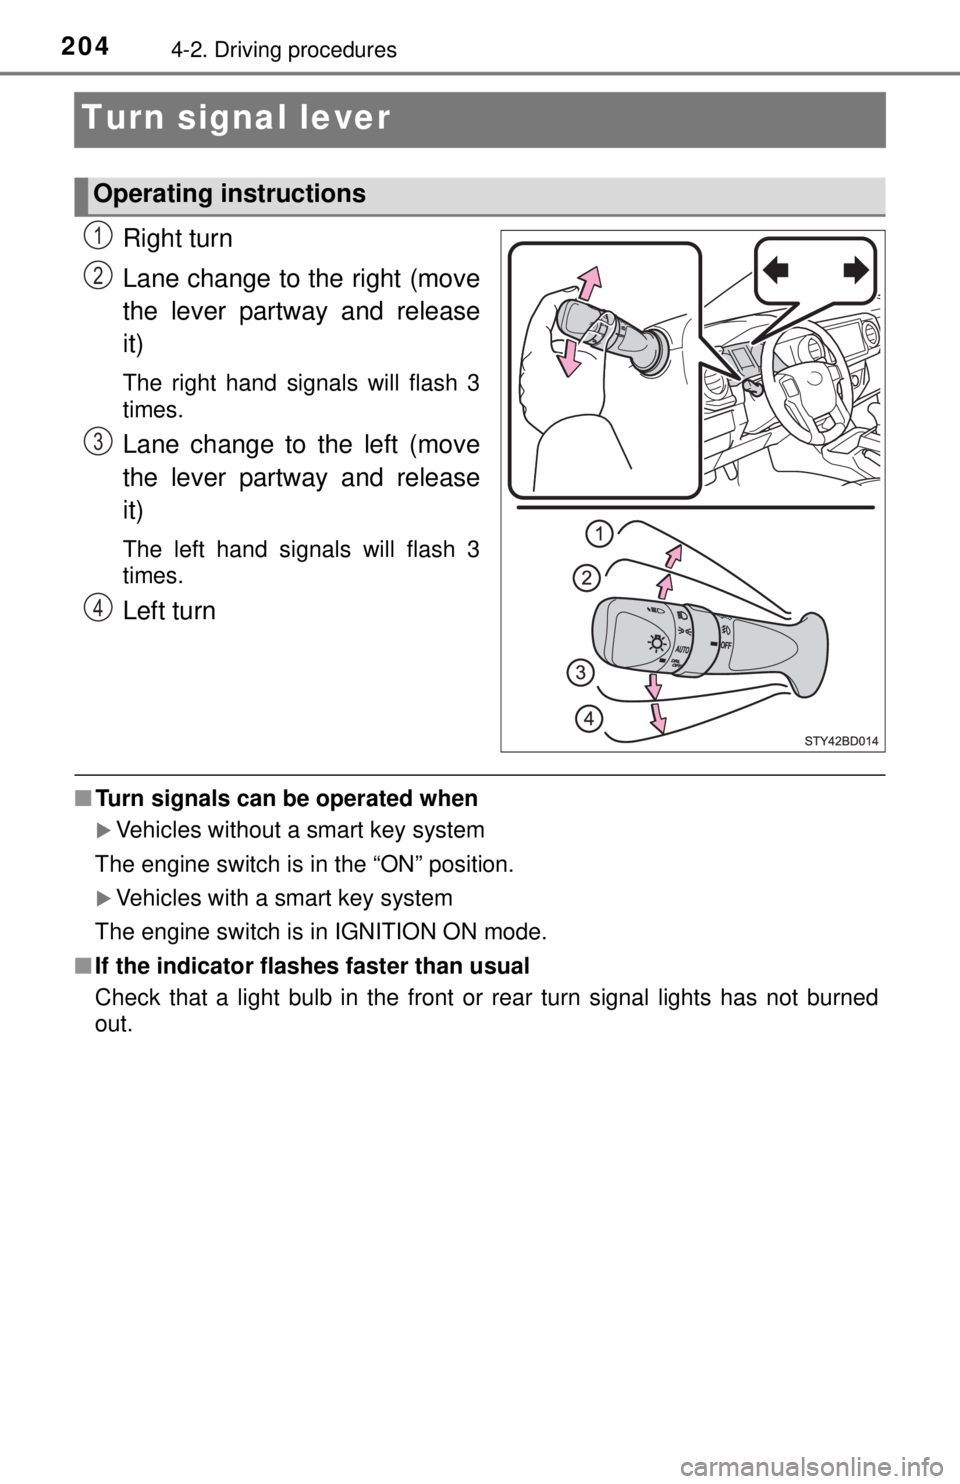
Turn signal lever
Right turn
Lane change to the right (move
the lever partway and release
it)
The right hand signals will flash 3
times.
Lane change to the left (move
the lever partway and release
it)
The left hand signals will flash 3
times.
Left turn
■Turn signals can be operated when
Vehicles without a smart key system
The engine switch is in the “ON” position.
Vehicles with a smart key system
The engine switch is in IGNITION ON mode.
■ If the indicator flashes faster than usual
Check that a light bulb in the front or rear turn signal lights has not burned
out.
Operating instructions
1
2
3
4
Page 220 of 640
2204-5. Using the driving support systems
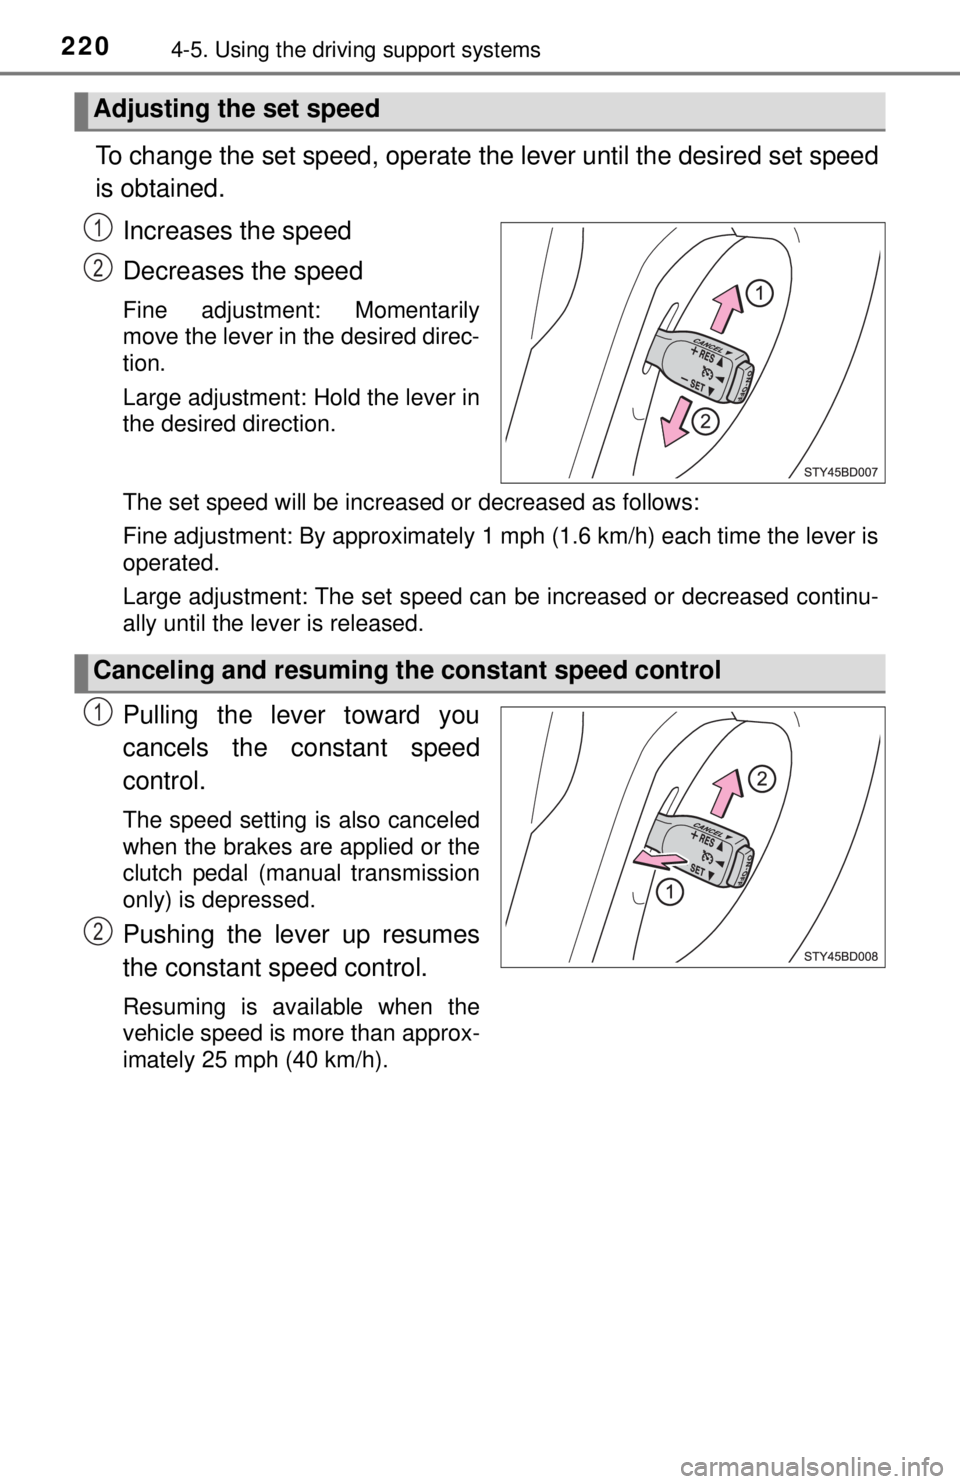
To change the set speed, operate the lever until the desired set speed
is obtained.
Increases the speed
Decreases the speed
Fine adjustment: Momentarily
move the lever in the desired direc-
tion.
Large adjustment: Hold the lever in
the desired direction.
The set speed will be increased or decreased as follows:
Fine adjustment: By approximately 1 mph (1.6 km/h) each time the lever is
operated.
Large adjustment: The set speed can be increased or decreased continu-
ally until the lever is released.
Pulling the lever toward you
cancels the c onstant speed
control.
The speed setting is also canceled
when the brakes are applied or the
clutch pedal (manual transmission
only) is depressed.
Pushing the lever up resumes
the constant speed control.
Resuming is available when the
vehicle speed is more than approx-
imately 25 mph (40 km/h).
Adjusting the set speed
1
2
Canceling and resuming the constant speed control
1
2
Page 225 of 640
2254-5. Using the driving support systems
4
Driving
■When multiple obstacles are detected in front and behind the
vehicle at the same time
The buzzer will change in the following manner.
● If an obstacle has been detected within 1.5 ft. (45 cm) of the front
or 2.8 ft. (85 cm) in rear of t he vehicle (a continuous buzzer is
sounding), and a new obstacle is detected at the other end of the
vehicle, the buzzer will sound 7 times then 1 continuous buzzer.
● If an obstacle has been detected within 1.5 ft. (45 cm) of the front
or 2.8 ft. (85 cm) in rear of t he vehicle (a continuous buzzer is
sounding), and a new obstacle is detected in the same way at the
other end of t he vehicle, the buzzer will sound 3 times then 1
continuous buzzer.
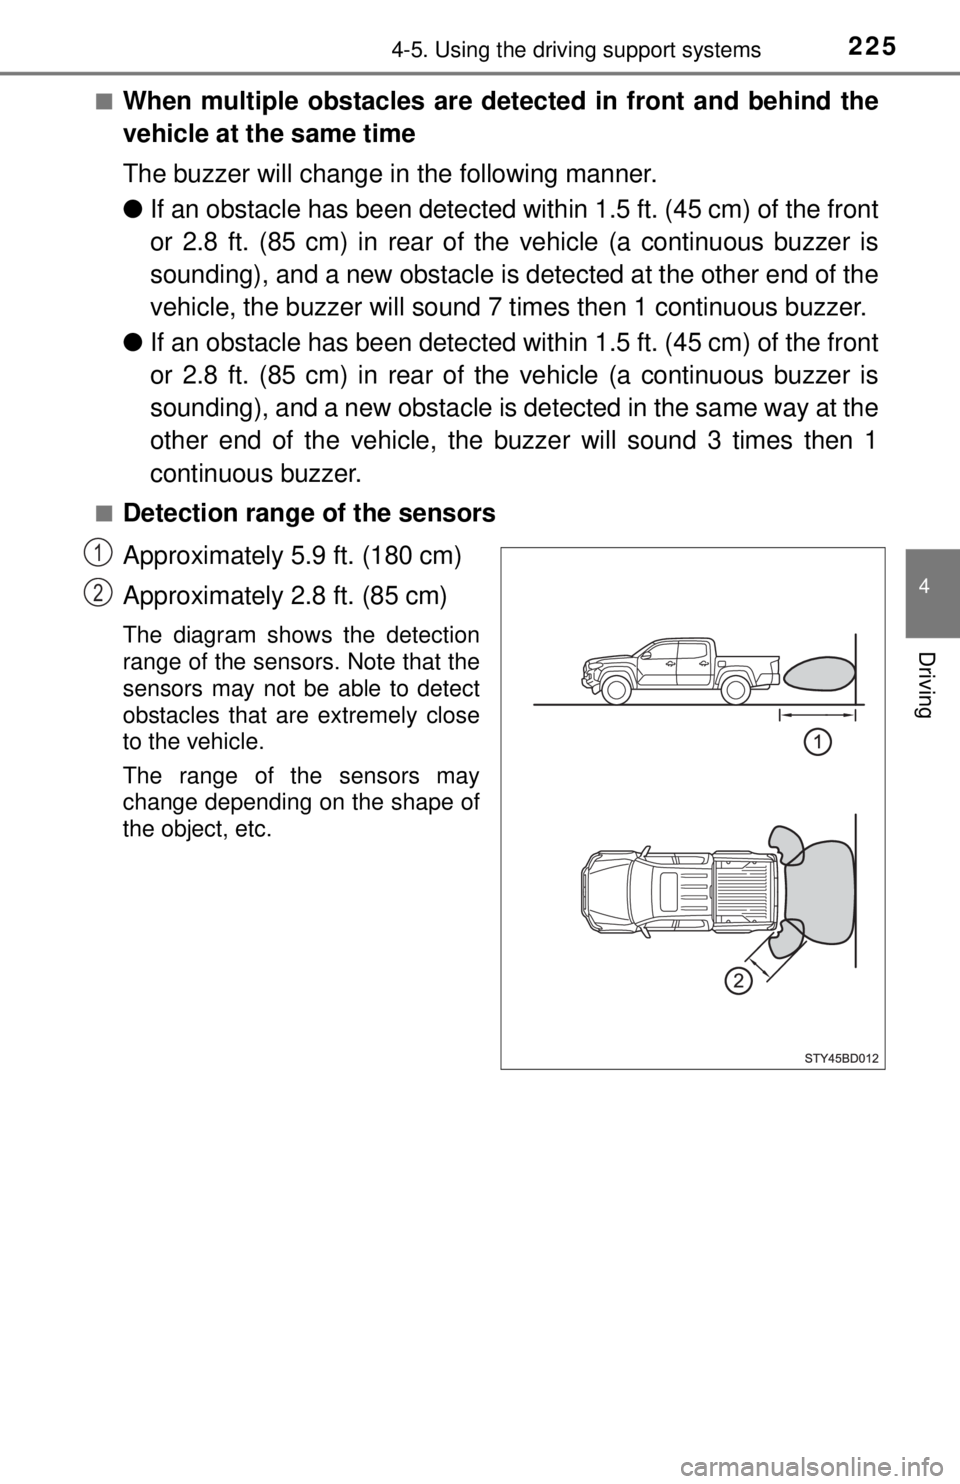
■Detection range of the sensors
Approximately 5.9 ft. (180 cm)
Approximately 2.8 ft. (85 cm)
The diagram shows the detection
range of the sensors. Note that the
sensors may not be able to detect
obstacles that are extremely close
to the vehicle.
The range of the sensors may
change depending on the shape of
the object, etc.
1
2
Page 287 of 640
2875-1. Basic Operations
5
Multimedia
By touching the screen with your finger, you can control the multime-
dia system, etc.
■Drag*
Touch the screen with your finger, and move the screen to the
desired position.
● Scrolling the lists
■Flick*
Touch the screen with your finger and then quickly move the screen
by flicking your finger.
●Scrolling the main screen page
*: The above operations may not be performed on all screens.
■When using the touch screen
●If the screen is cold, the display may be dark, or the system may seem to be
operating slightly slower than normal.
● The screen may seem dark and hard to see when viewed through sun-
glasses. Change your angle of viewing, adjust the display on the “Display
Settings” screen ( →P. 296) or remove your sunglasses.
● Flick operations may not be performed smoothly in high altitudes.
Operating the touch screen
NOTICE
■To avoid damaging the touch screen
● To prevent damaging the screen, lightly touch the screen buttons with your
finger.
● Do not use objects other than your finger to touch the screen.
● Wipe off fingerprints using a glass cleaning cloth. Do not use chemical
cleaners to clean the screen, as they may damage the touch screen.