steering TOYOTA TACOMA 2021 Accessories, Audio & Navigation (in English)
[x] Cancel search | Manufacturer: TOYOTA, Model Year: 2021, Model line: TACOMA, Model: TOYOTA TACOMA 2021Pages: 312, PDF Size: 56.22 MB
Page 227 of 312
2277-3. Multi-terrain Monitor
7
Peripheral monitoring system
Vehicle center line (blue)
The line indicates the estimated vehicle center on the ground.
Rear vehicle width extension guide lines
Displays a guide path when the vehicle is being backed straight up.
Projected reverse course line (yellow)
Shows an estimated course when the steering wheel is turned.
Rear distance guide line
Shows the distance behind the vehicle when the steering wheel is turned.
• The guide lines move in conjunction with the estimated course lines.
• The guide lines display points approximately 1.5 ft. (0.5 m) (red) and
approximately 3 ft. (1 m) (yellow) from the center of the edge of the
bumper.
Rear distance guide line (blue)
Shows the distance behind the vehicle.
• Displays a point approximately 1.5 ft. (0.5 m) (red/blue) from the edge of
the bumper.
Parking assist guide line (blue)
Shows the path of the smallest turn possible behind the vehicle.
When parking in a space which
is in the reverse direction to the
space described in the proce-dure below, the steering direc-
tions will be reversed.
1Shift the shift lever to the “R”
position.
2Turn the steering wheel so
that the estimated course
WA R N I N G
●Depending on the circumstances of the vehicle (number of passengers,
amount of luggage, etc.), the position of the guide lines displayed on the
screen may change. Be sure to check visually around the vehicle before
proceeding.
●If the steering wheel is straight and the vehicle width guide lines and the
estimated course lines are not in alignment, have the vehicle inspected
by your Toyota dealer.
●Do not use the system if the display is incorrect due to an uneven (hilly)
road or a non-straight (curvy) road.
B
C
D
E
F
G
Parking
Using the projected reverse
course line
Page 228 of 312
2287-3. Multi-terrain Monitor
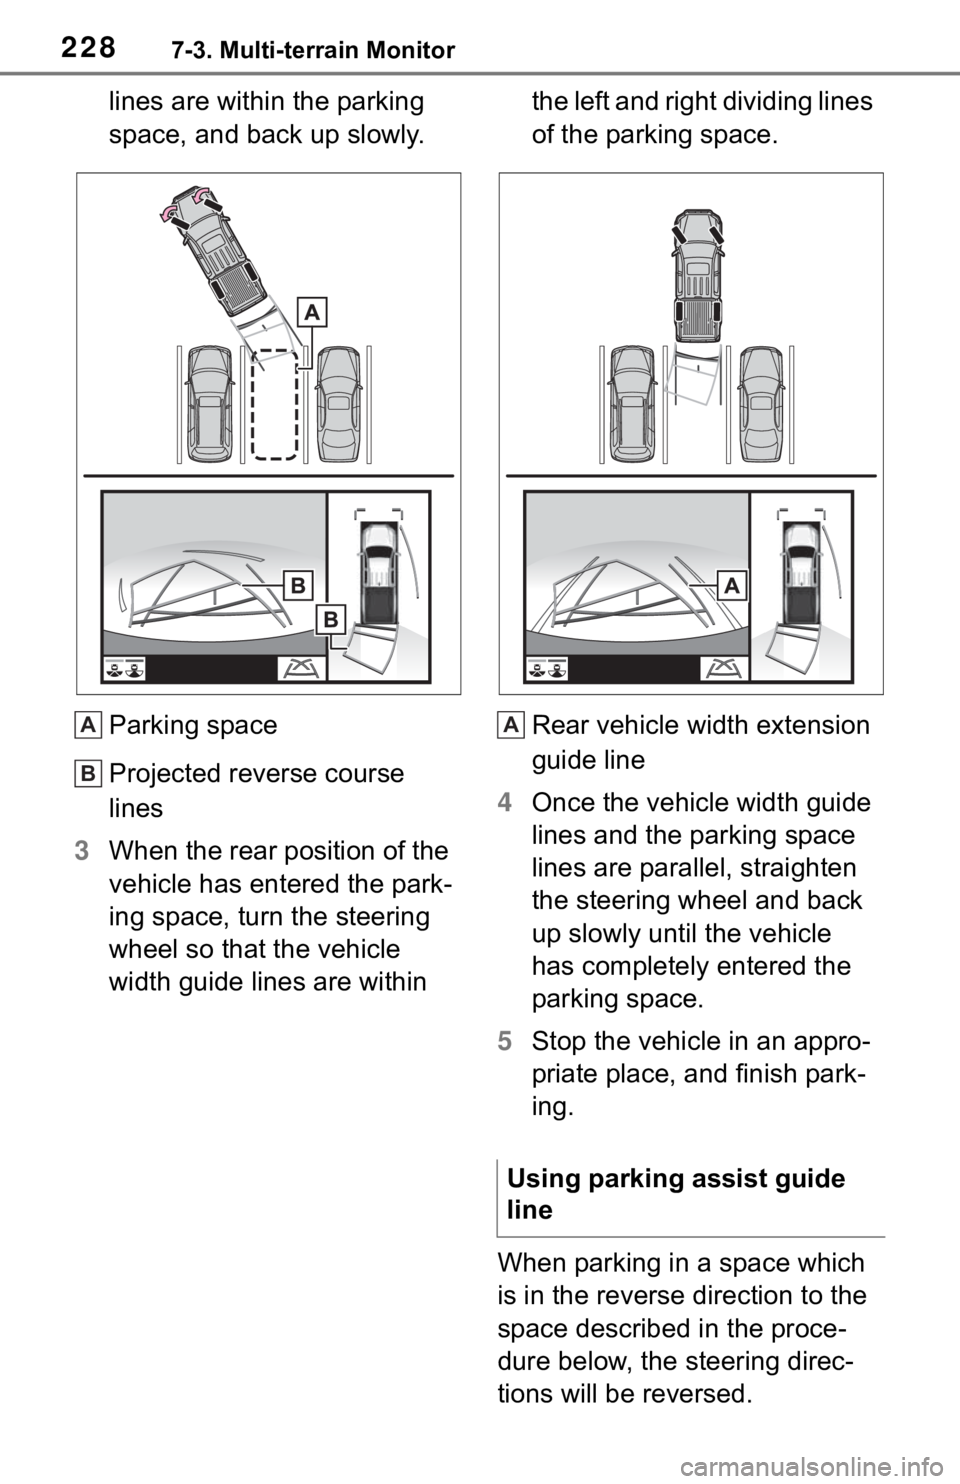
lines are within the parking
space, and back up slowly.
Parking space
Projected reverse course
lines
3When the rear position of the
vehicle has entered the park-
ing space, turn the steering
wheel so that the vehicle
width guide lines are within the left and right dividing lines
of the parking space.
Rear vehicle width extension
guide line
4Once the vehicle width guide
lines and the parking space
lines are parallel, straighten
the steering wheel and back
up slowly until the vehicle
has completely entered the
parking space.
5Stop the vehicle in an appro-
priate place, and finish park-
ing.
When parking in a space which
is in the reverse direction to the
space described in the proce-
dure below, the steering direc-
tions will be reversed.
A
B
Using parking assist guide
line
A
Page 229 of 312
2297-3. Multi-terrain Monitor
7
Peripheral monitoring system
1Shift the shift lever to the “R”
position.
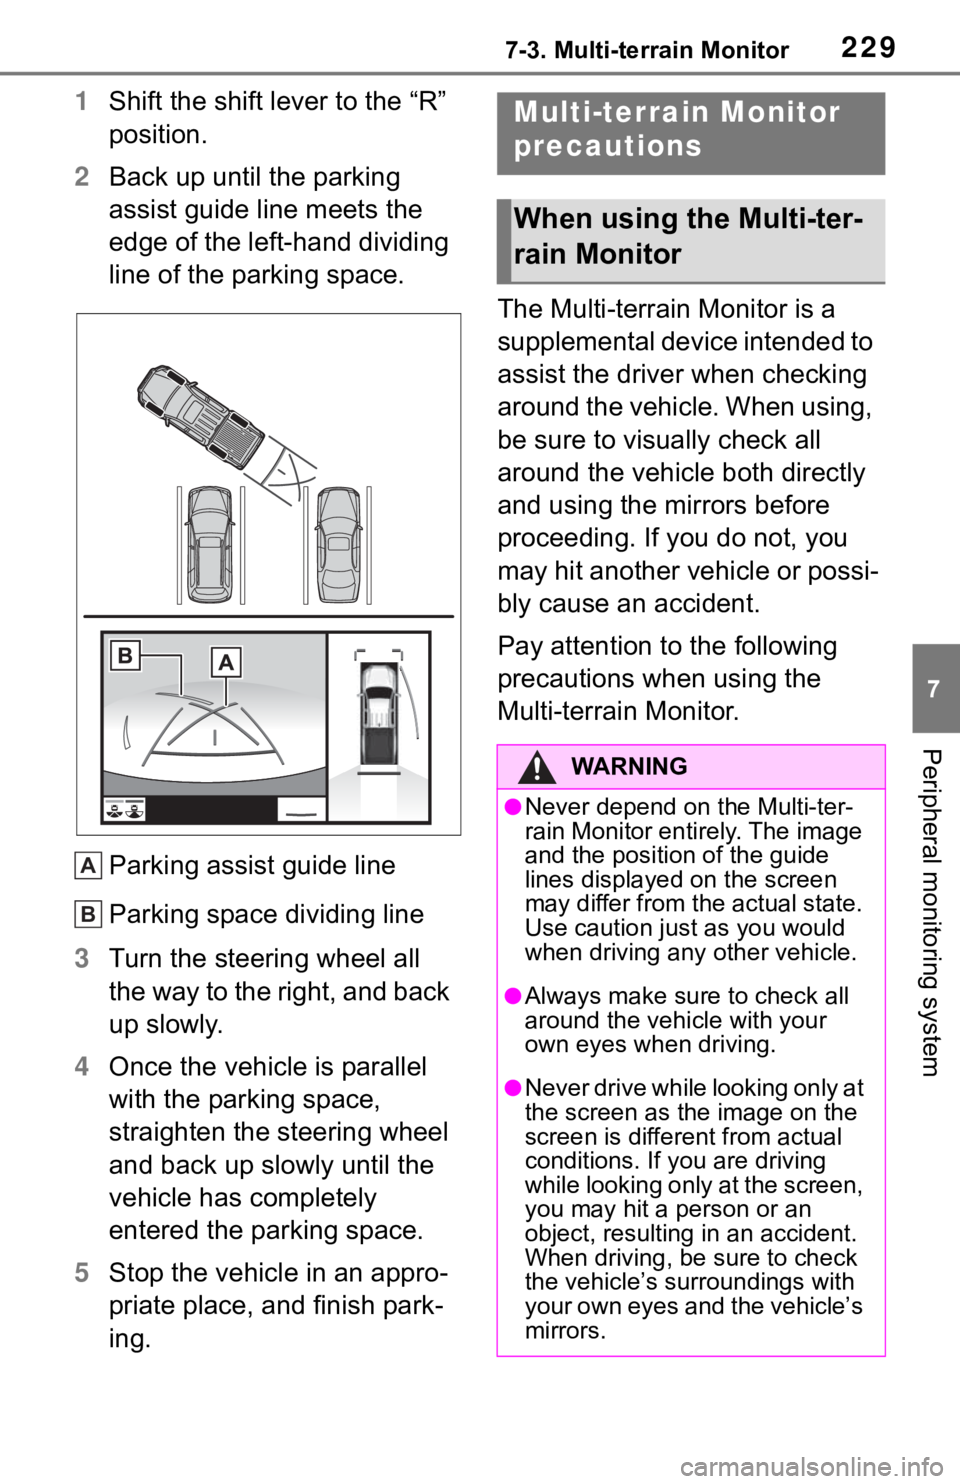
2Back up until the parking
assist guide line meets the
edge of the left-hand dividing
line of the parking space.
Parking assist guide line
Parking space dividing line
3Turn the steering wheel all
the way to the right, and back
up slowly.
4Once the vehicle is parallel
with the parking space,
straighten the steering wheel
and back up slowly until the
vehicle has completely
entered the parking space.
5Stop the vehicle in an appro-
priate place, and finish park-
ing.The Multi-terrain Monitor is a
supplemental device intended to
assist the driver when checking
around the vehicle. When using,
be sure to visually check all
around the vehicle both directly
and using the mirrors before
proceeding. If you do not, you
may hit another vehicle or possi-
bly cause an accident.
Pay attention to the following
precautions when using the
Multi-terrain Monitor.
A
B
Multi-terrain Monitor
precautions
When using the Multi-ter-
rain Monitor
WA R N I N G
●Never depend on the Multi-ter-
rain Monitor entirely. The image
and the position of the guide
lines displayed on the screen
may differ from the actual state.
Use caution just as you would
when driving any other vehicle.
●Always make sure to check all
around the vehicle with your
own eyes when driving.
●Never drive while looking only at
the screen as the image on the
screen is different from actual
conditions. If you are driving
while looking only at the screen,
you may hit a person or an
object, resulting in an accident.
When driving, be sure to check
the vehicle’s surroundings with
your own eyes and the vehicle’s
mirrors.
Page 241 of 312
2417-3. Multi-terrain Monitor
7
Peripheral monitoring system
The guide lines are very
far out of alignment
The camera position is
out of alignment.Have the vehicle
inspected by your Toy-
ota dealer.
The vehicle is tilted.
(There is a heavy load
on the vehicle, tire
pressure is low due to
a tire puncture, etc.)
The vehicle is used on
an incline.If this happens due to
these causes, it does
not indicate a malfunc-
tion.
Back up while visually
checking the vehicle’s
surroundings.
The estimated course
lines move even though
the steering wheel is
straightThere is a malfunction
in the signals being out-
put by the steering sen-
sor.Have the vehicle
inspected by your Toy-
ota dealer.
Guide lines are not dis-
playedThe tailgate is open.
Close the tailgate.
If this does not resolve
the symptom, have the
vehicle inspected by
your Toyota dealer.
is displayed
Battery has been rein-
stalled.
The steering wheel
has been moved while
the battery was being
reinstalled.
Battery power is low.
The steering sensor
has been reinstalled.
There is a malfunction
in the signals being
output by the steering
sensor.
Stop the vehicle, and
turn the steering wheel
as far as it will go to the
left and right.
If this does not resolve
the symptom, have the
vehicle inspected by
your Toyota dealer.
SymptomLikely causeSolution
Page 245 of 312
2458-1. Phone operation (Hands-free system for cellular phones)
8
Phone
●This system is not guaranteed to
operate with all Bluetooth®
devices.
●If your cellular phone does not
support Bluetooth®, this system
cannot function.
●In the following conditions, the
system may not function:
• The cellular phone is turned off.
• The current position is outside the
communication area.
• The cellular phone is not con-
nected.
• The cellular phone has a low bat-
tery.
●Depending on the type of Blue-
tooth® phone, some function is
not available.
●When using the hands-free sys-
tem or Bluetooth® audio and Wi-
Fi® hotspot functions at the same
time, the following problems may
occur:
• The Bluetooth
® connection may
be cut.
• Noise may be heard on the Blue-
tooth
® audio playback.
• A noise may be heard during
phone calls.
●Bluetooth® uses the 2.4 GHz fre-
quency band. If both a Wi-Fi® con-
nection and Bluetooth®
connection are being used simul-
taneously, each connection may
be affected.
●If a Bluetooth® device is attempt-
ing to connect to the vehicle while
another device is connected as a
Bluetooth
® audio device or con-
nected using the hands-free sys-
tem or Wi-Fi
® hotspot function, the
communication speed may
decrease or malfunctions may
occur, such as image distortion or
audio skipping. If a Bluetooth
®
device is connected to the system,
the interference it may cause will
be reduced. When carrying a
device with its Bluetooth
® connec-
tion enabled, make sure to regis-
ter it to the system and connect it
or disable its Bluetooth
® function.
●When a device is connected via
Bluetooth®, the Bluetooth® icon
on the status bar will be displayed
in blue. (P. 1 6 )
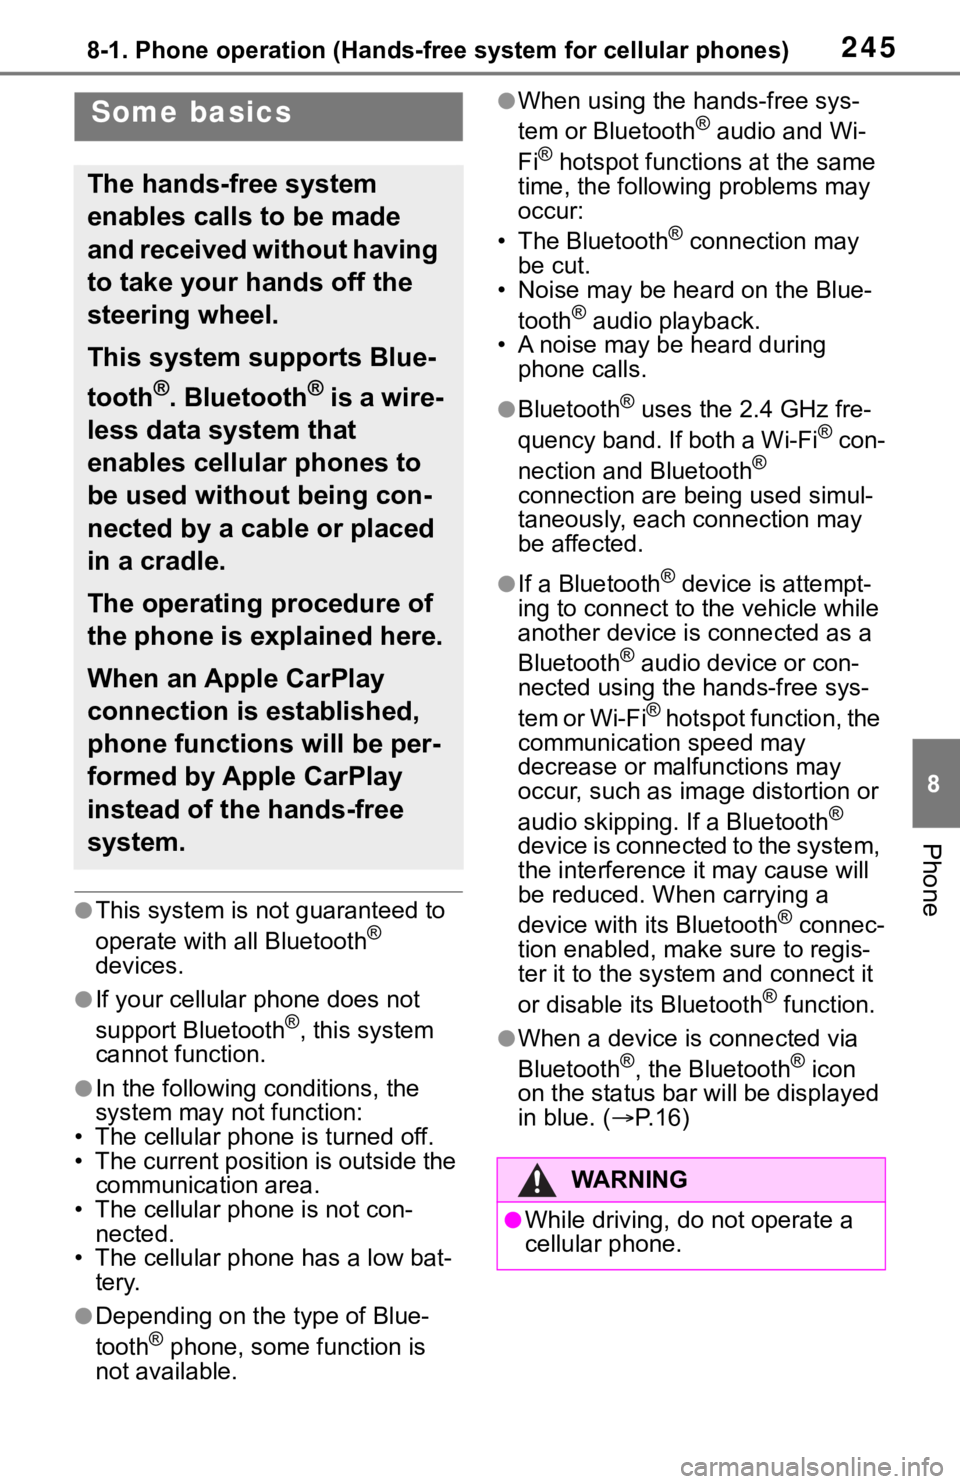
Some basics
The hands-free system
enables calls to be made
and received without having
to take your hands off the
steering wheel.
This system supports Blue-
tooth
®. Bluetooth® is a wire-
less data system that
enables cellular phones to
be used without being con-
nected by a cable or placed
in a cradle.
The operating procedure of
the phone is explained here.
When an Apple CarPlay
connection is established,
phone functions will be per-
formed by Apple CarPlay
instead of the hands-free
system.
WA R N I N G
●While driving, do not operate a
cellular phone.
Page 247 of 312
2478-1. Phone operation (Hands-free system for cellular phones)
8
Phone
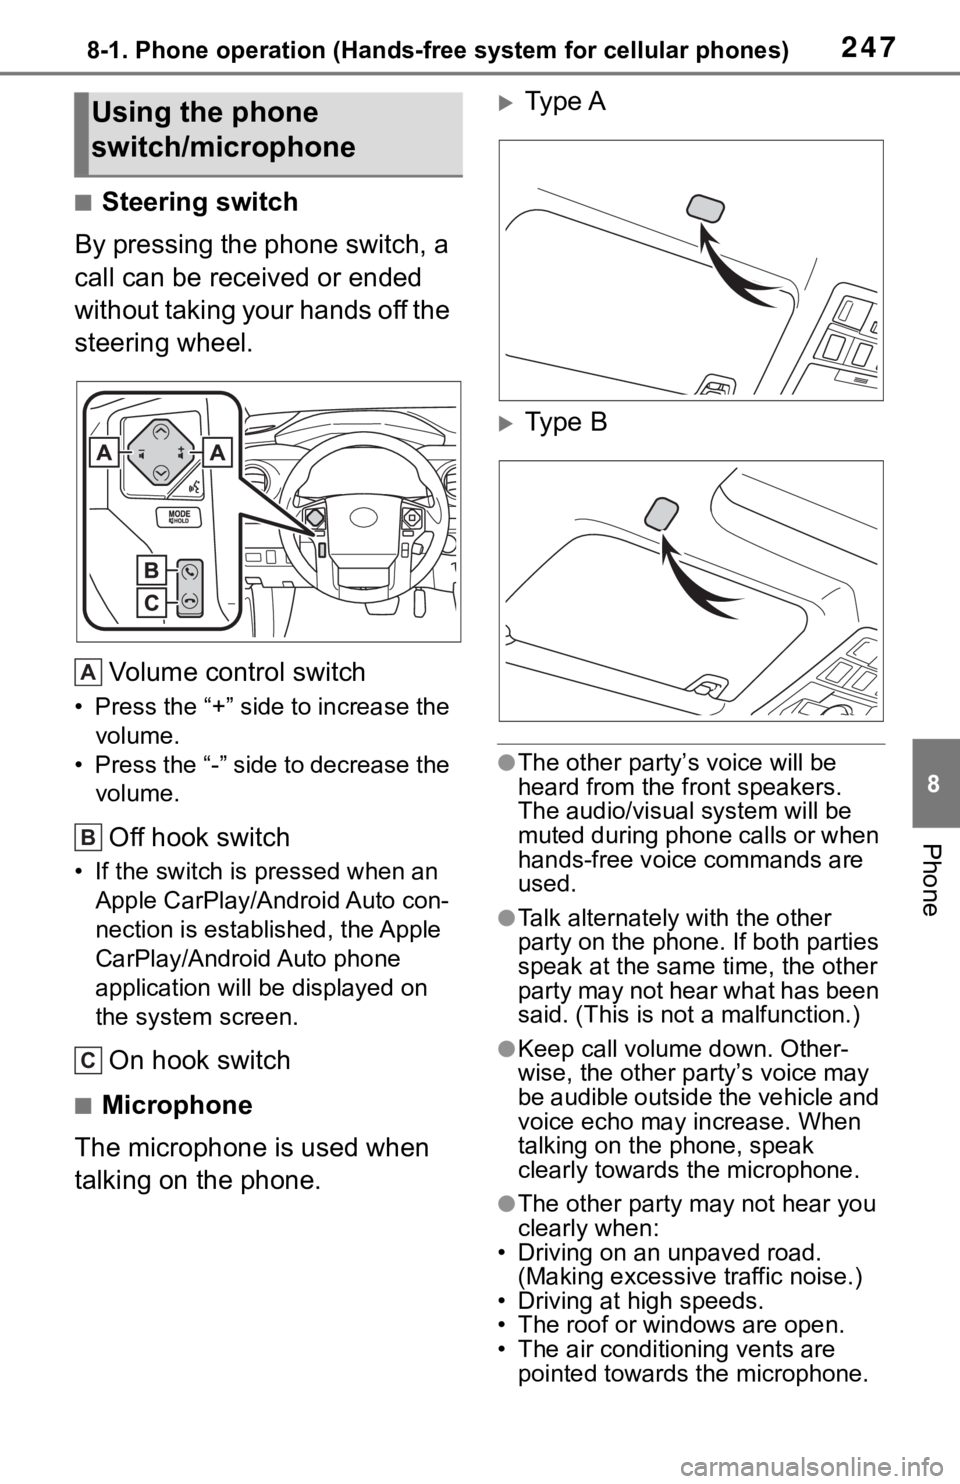
■Steering switch
By pressing the phone switch, a
call can be received or ended
without taking your hands off the
steering wheel.
Volume control switch
• Press the “+” side to increase the
volume.
• Press the “-” side to decrease the
volume.
Off hook switch
• If the switch is pressed when an
Apple CarPlay/Android Auto con-
nection is established, the Apple
CarPlay/Android Auto phone
application will be displayed on
the system screen.
On hook switch
■Microphone
The microphone is used when
talking on the phone.
Type A
Type B
●The other party’s voice will be
heard from the front speakers.
The audio/visual system will be
muted during phone calls or when
hands-free voice commands are
used.
●Talk alternately with the other
party on the phone. If both parties
speak at the same time, the other
party may not hear what has been
said. (This is not a malfunction.)
●Keep call volume down. Other-
wise, the other party’s voice may
be audible outside the vehicle and
voice echo may increase. When
talking on the phone, speak
clearly towards the microphone.
●The other party may not hear you
clearly when:
• Driving on an unpaved road.
(Making excessive traffic noise.)
• Driving at high speeds.
• The roof or windows are open.
• The air conditioning vents are
pointed towards the microphone.
Using the phone
switch/microphone
A
B
C
Page 251 of 312
2518-1. Phone operation (Hands-free system for cellular phones)
8
Phone
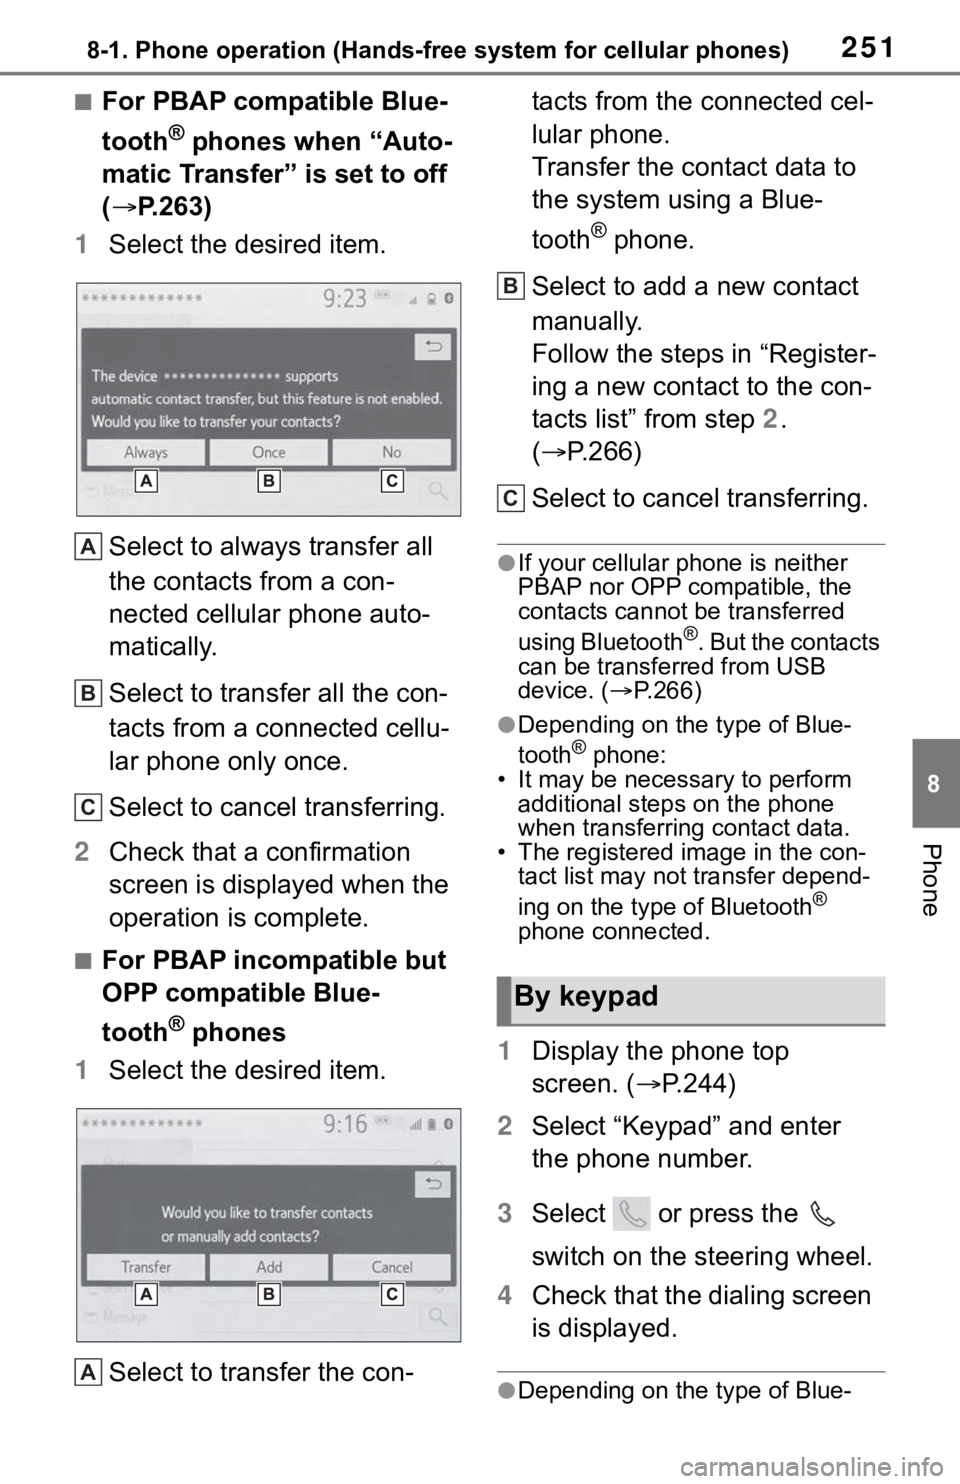
■For PBAP compatible Blue-
tooth
® phones when “Auto-
matic Transfer” is set to off
(P.263)
1Select the desired item.
Select to always transfer all
the contacts from a con-
nected cellular phone auto-
matically.
Select to transfer all the con-
tacts from a connected cellu-
lar phone only once.
Select to cancel transferring.
2Check that a confirmation
screen is displayed when the
operation is complete.
■For PBAP incompatible but
OPP compatible Blue-
tooth
® phones
1Select the desired item.
Select to transfer the con-tacts from the connected cel-
lular phone.
Transfer the contact data to
the system using a Blue-
tooth
® phone.
Select to add a new contact
manually.
Follow the steps in “Register-
ing a new contact to the con-
tacts list” from step 2.
(P.266)
Select to cancel transferring.
●If your cellular phone is neither
PBAP nor OPP compatible, the
contacts cannot be transferred
using Bluetooth
®. But the contacts
can be transferred from USB
device. (P.266)
●Depending on the type of Blue-
tooth® phone:
• It may be necessary to perform
additional steps on the phone
when transferring contact data.
• The registered image in the con-
tact list may not transfer depend-
ing on the type of Bluetooth
®
phone connected.
1Display the phone top
screen. (P.244)
2Select “Keypad” and enter
the phone number.
3Select or press the
switch on the steering wheel.
4Check that the dialing screen
is displayed.
●Depending on the type of Blue-
A
B
C
A
By keypad
B
C
Page 252 of 312
2528-1. Phone operation (Hands-free system for cellular phones)
tooth® phone being connected, it
may be necessary to perform
additional steps on the phone.
1Display the home screen.
(P. 2 9 )
2Select the desired contact.
3Check that the dialing screen
is displayed.
■Registering a new contact
1Select and hold the screen
button to add a contact.
2Select the desired contact.
3Select the desired number.
●If there is no contact in the con-
tacts list, the contacts cannot be
registered at the home screen.
●The contact cannot be registered
at the home screen while driving.
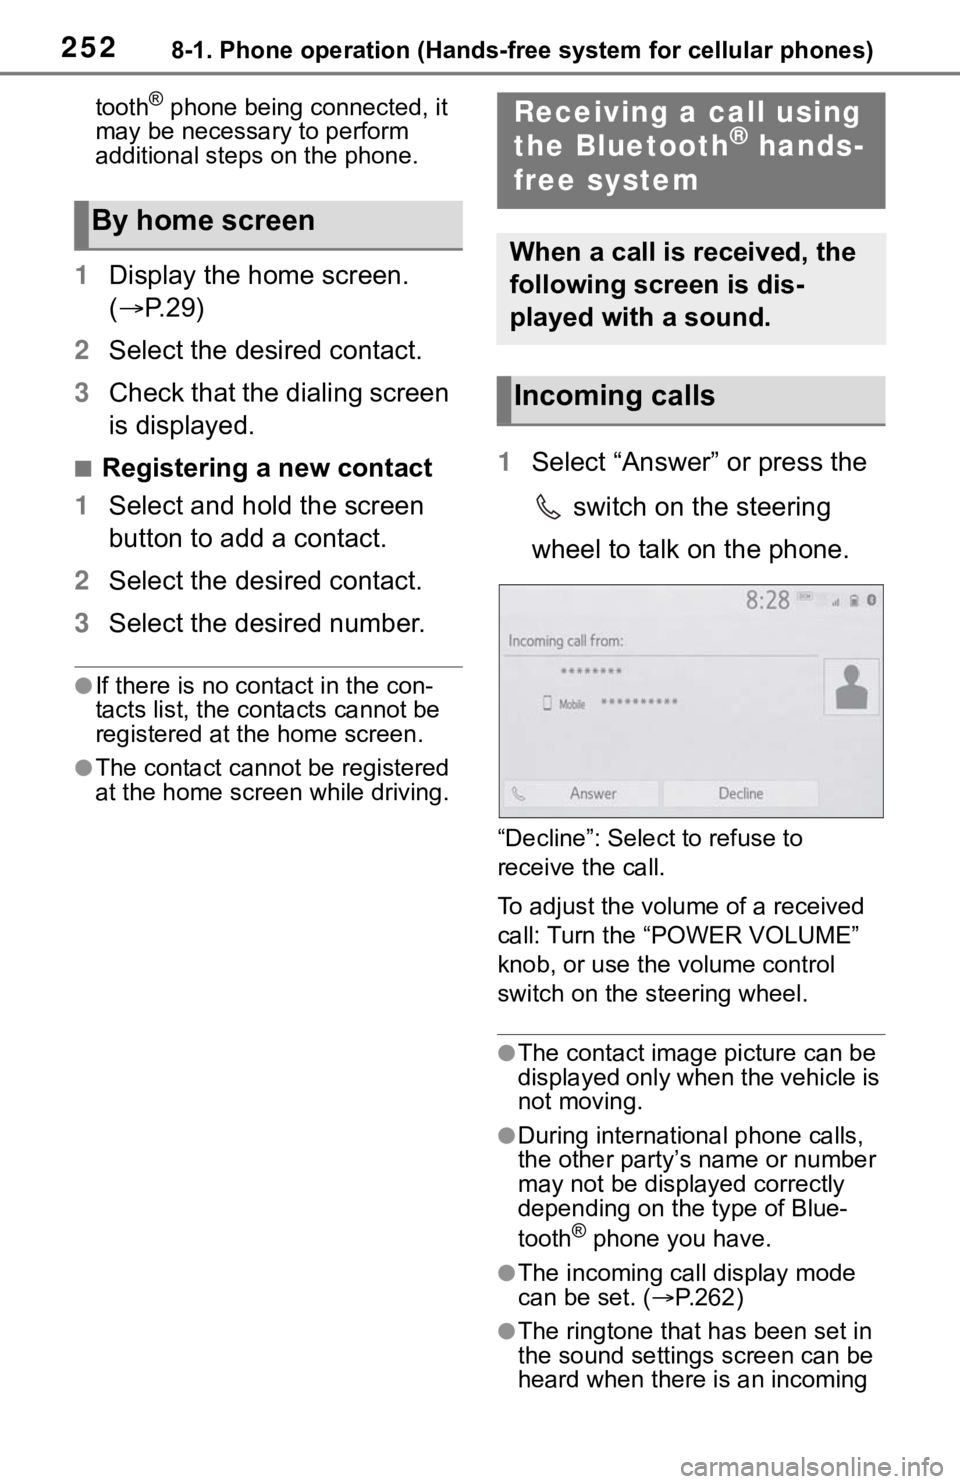
1Select “Answer” or press the
switch on the steering
wheel to talk on the phone.
“Decline”: Select to refuse to
receive the call.
To adjust the volume of a received
call: Turn the “POWER VOLUME”
knob, or use the volume control
switch on the steering wheel.
●The contact image picture can be
displayed only when the vehicle is
not moving.
●During international phone calls,
the other party’s name or number
may not be displayed correctly
depending on the type of Blue-
tooth
® phone you have.
●The incoming call display mode
can be set. (P.262)
●The ringtone that has been set in
the sound settings screen can be
heard when there is an incoming
By home screen
Receiving a call using
the Bluetooth® hands-
free system
When a call is received, the
following screen is dis-
played with a sound.
Incoming calls
Page 255 of 312
2558-1. Phone operation (Hands-free system for cellular phones)
8
Phone
When there are no calls on
hold during a call: “Hold” is
displayed. When selected, the
current call is placed on hold.
When there is no current call,
but there is a call on hold:
“Activate” is displayed. When
selected, the system switches
to the call that was on hold.
When there is another call on
hold during a call: “Swap
Calls” is displayed. When
selected, the current call is
placed on hold, and the sys-
tem switches to the call that
was on hold.
●This function may not be available
depending on the type of cellular
phone.
When a call is interrupted by a
third party while talking, the
incoming screen is displayed.
1Select “Answer” or press the
switch on the steering
wheel to start talking with the
other party.
To refuse to receive the call:
Select “Decline”.
Each time “Swap Calls” is
selected, the party who is on
hold will be switched.
●This function may not be available
depending on the type of Blue-
tooth
® phone.
Switching calls while a
call is in progress
Incoming call waiting
Page 258 of 312
2588-1. Phone operation (Hands-free system for cellular phones)
folder to be displayed.
●Only received messages on the
connected Bluetooth® phone can
be displayed.
●The text of the message is not dis-
played while driving.
●Turn the “POWER VOLUME”
knob, or use the volume control
switch on the steering wheel to
adjust the message read out vol-
ume.
●“Subject:” field is not shown on
SMS case.
●E-mail only: Select “Mark Unread”
or “Mark Read” to mark mail
unread or read on the message
screen.
This function is available when
“Update Message Read Status on
Phone” is set to on. (P.269)
*: If equipped
1Display the message screen.
(P.256)
2Select the desired message
from the list.
3Select “Reply”.
4Select “Dictation”.
5When the “Say Your Mes-
sage” screen is displayed,
speak message that you
want to send.
6Select “Send” to send mes-
sage.
“Cancel”: Select to cancel sending
the message.
“Retry”: Select to retry speaking
message that you want to send.
While the message is being
sent, a sending message
screen is displayed.
7Check that a confirmation
screen is displayed when the
operation is complete.
If an error message is dis-
played, follow the guidance
on the screen to try again.
15 messages have already
been stored.
1Display the message screen.
(P.256)
2Select the desired message
from the list.
3Select “Reply”.
4Select “Quick Message”.
5Select the desired message.
: Select to edit the message.
(P.259)
6Select “Send”.
“Cancel”: Select to cancel sending
the message.
While the message is being
sent, a sending message
screen is displayed.
7Check that a confirmation
screen is displayed when the
operation is complete.
If an error message is dis-
played, follow the guidance
on the screen to try again.
Replying to a message
(dictation reply)*
Replying to a message
(quick reply)