key TOYOTA tC 2013 (in English) Manual PDF
[x] Cancel search | Manufacturer: TOYOTA, Model Year: 2013, Model line: tC, Model: TOYOTA tC 2013Pages: 484, PDF Size: 9.1 MB
Page 307 of 484

307
4-3. Do-it-yourself maintenance
4
Maintenance and care
tC_OM_OM21042U_(U)
■
Before recharging
When recharging, the battery produces hydrogen gas which is flammable
and explosive. Therefore, observe the following before recharging:
● If recharging with the battery installed on the vehicle, be sure to discon-
nect the ground cable.
● Make sure the power switch on the charger is off when connecting and
disconnecting the charger cables to the battery.
■ After recharging/reconnecting the battery (vehicles with a smart key
system)
● Unlocking the doors using the smart key system may not be possible
immediately after reconnecting the battery. If this happens, use the wire-
less remote control or the mechanical key to lock/unlock the doors.
● Start the engine with the “ENGINE START STOP” switch in ACCES-
SORY mode. The engine may not start with the “ENGINE START STOP”
switch turned OFF. However, the engine will operate normally from the
second attempt.
● The “ENGINE START STOP” switch mode is recorded by the vehicle. If
the battery is reconnected, the vehicle will return the “ENGINE START
STOP” switch mode to the status it was in before the battery was discon-
nected. Make sure to turn off the power before disconnecting the battery.
Take extra care when connecting the battery if the “ENGINE START
STOP” switch mode prior to discharge is unknown.
If the system will not start even after multiple attempts, contact your Scion
dealer.
Page 314 of 484

314 4-3. Do-it-yourself maintenance
tC_OM_OM21042U_(U)
Initializing the tire pressure warning system (U.S.A. only)■ The tire pressure warning system must be initialized in the fol-
lowing circumstances:
●When rotating front and rear tires which have different tire infla-
tion pressures
● When changing the tire size
When the tire pressure warning system is initialized, the current
tire inflation pressure is set as the pressure benchmark.
■ How to initialize the tire pressure warning system
Park the vehicle in a safe pl ace and turn the engine switch
(vehicles without a smart key system) or the “ENGINE START
STOP” switch (vehicles with a smart key system) off.
While the vehicle is moving, in itialization is not performed.
Adjust the tire inflation pressure to the specified cold tire infla-
tion pressure level. ( P. 431)
Make sure to adjust the tire pressure to the specified cold tire
inflation pressure level. The ti re pressure warning system will
operate based on this pressure level.
Turn the engine switch to the “O N” position (vehicles without a
smart key system) or the “ENGINE START STOP” switch to
IGNITION ON mode (vehicles with a smart key system).
STEP 1
STEP 2
STEP 3
Page 315 of 484

315
4-3. Do-it-yourself maintenance
4
Maintenance and care
tC_OM_OM21042U_(U)
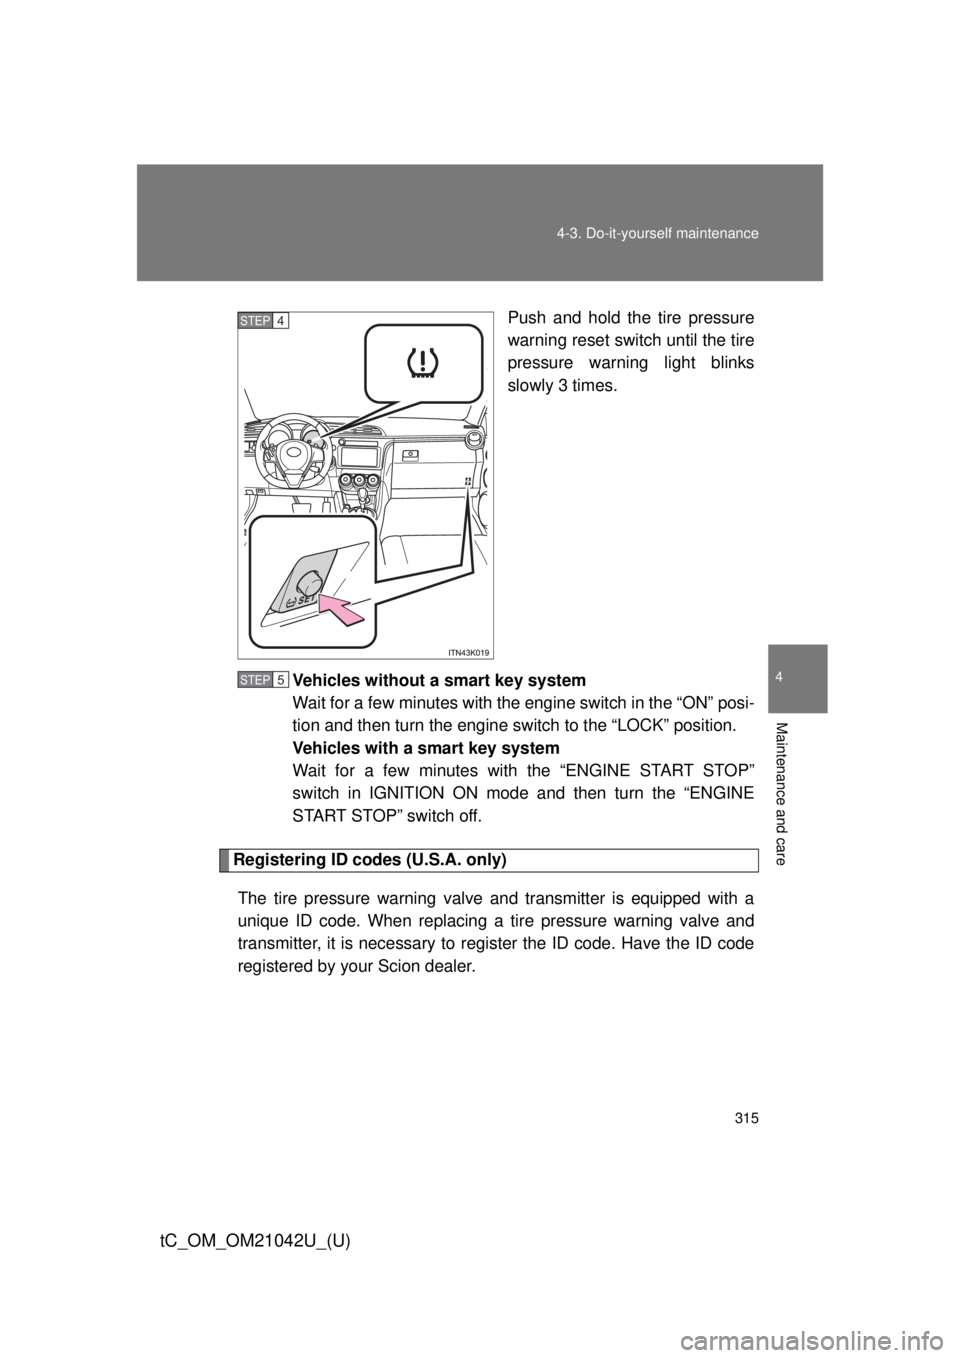
Push and hold the tire pressure
warning reset switch until the tire
pressure warning light blinks
slowly 3 times.
Vehicles without a smart key system
Wait for a few minutes with the engine switch in the “ON” posi-
tion and then turn the engine switch to the “LOCK” position.
Vehicles with a smart key system
Wait for a few minutes with the “ENGINE START STOP”
switch in IGNITION ON mode and then turn the “ENGINE
START STOP” switch off.
Registering ID codes (U.S.A. only)
The tire pressure warning valve and transmitter is equipped with a
unique ID code. When replacing a ti re pressure warning valve and
transmitter, it is necessary to register the ID code. Have the ID code
registered by your Scion dealer.
STEP 4
STEP 5
Page 330 of 484

330
4-3. Do-it-yourself maintenance
tC_OM_OM21042U_(U)
Wireless remote control/electronic key batter y
Replace the battery with a new one if it is depleted.
■You will need the following items:
●Flathead screwdriver
● Lithium battery CR2016 (vehicles without a smart key sys-
tem), or CR1632 (vehicles with a smart key system)
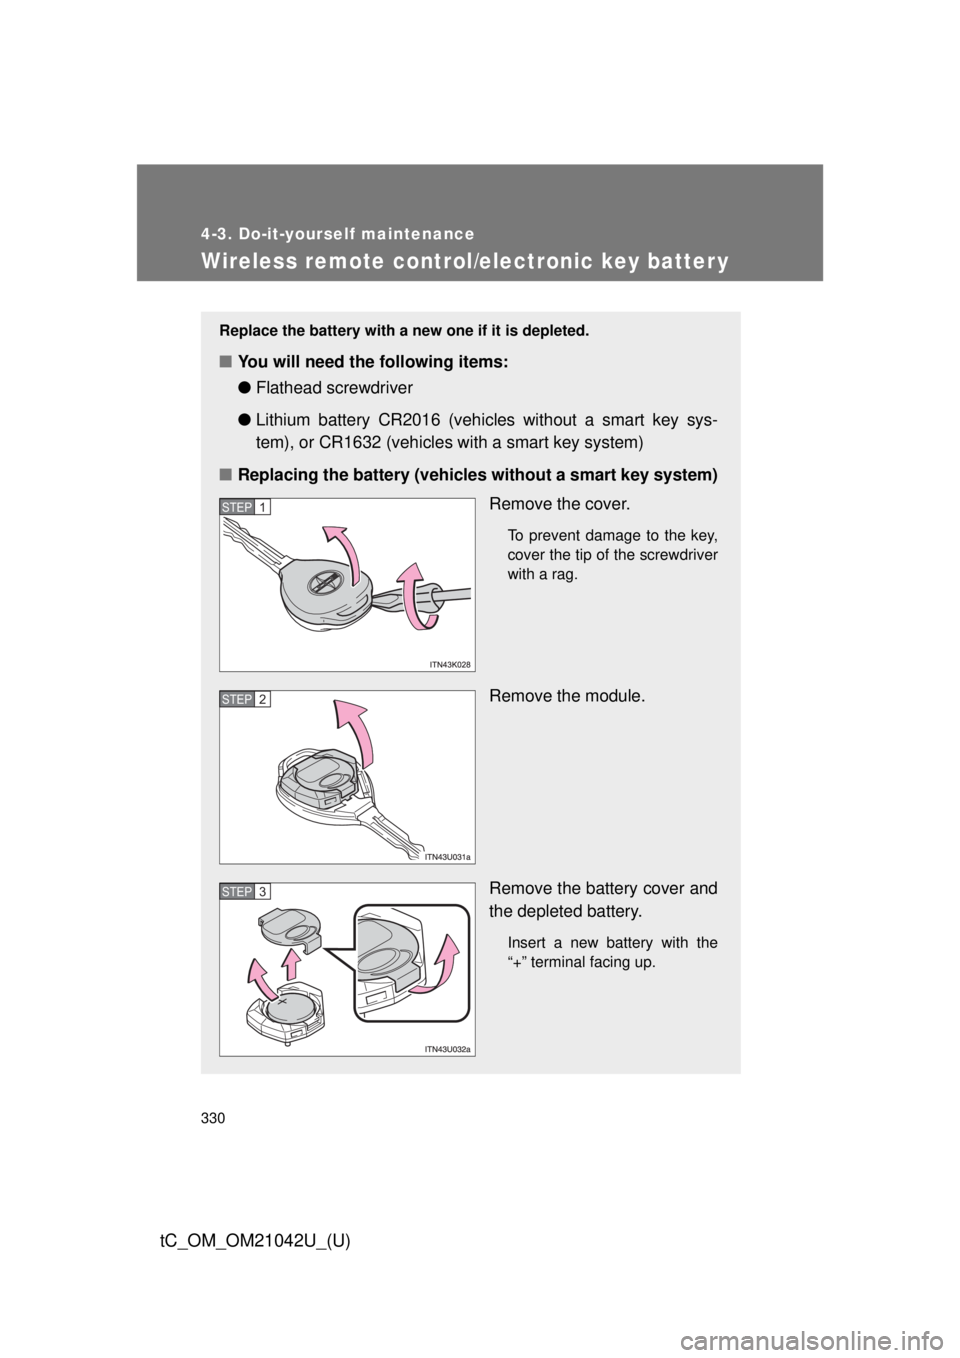
■ Replacing the battery (vehicles without a smart key system)
Remove the cover.
To prevent damage to the key,
cover the tip of the screwdriver
with a rag.
Remove the module.
Remove the battery cover and
the depleted battery.
Insert a new battery with the
“+” terminal facing up.
STEP 1
STEP 2
STEP 3
Page 331 of 484

331
4-3. Do-it-yourself maintenance
4
Maintenance and care
tC_OM_OM21042U_(U)
■
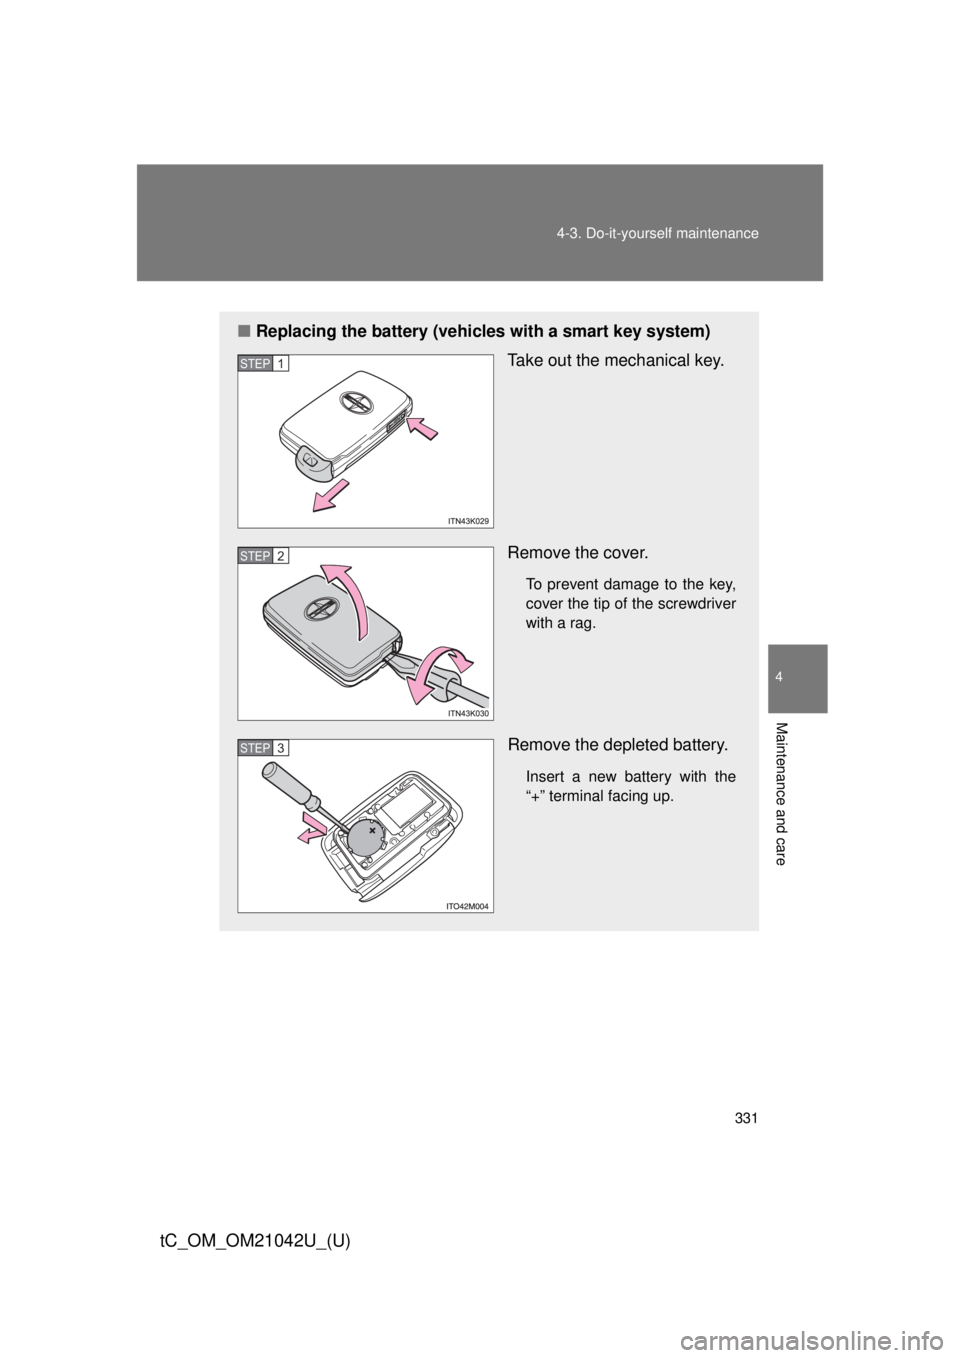
Replacing the battery (vehicles with a smart key system)
Take out the mechanical key.
Remove the cover.
To prevent damage to the key,
cover the tip of the screwdriver
with a rag.
Remove the depleted battery.
Insert a new battery with the
“+” terminal facing up.
STEP 1
STEP 2
STEP 3
Page 332 of 484

332 4-3. Do-it-yourself maintenance
tC_OM_OM21042U_(U)
■Use the following types of lithium battery
Vehicles without a smart key system: CR2016
Vehicles with a smart key system: CR1632
● Batteries can be purchased at your Scion dealer, local electrical appli-
ance shops or camera stores.
● Replace only with the same or equivalent type recommended by the
manufacturer.
● Dispose of used batteries according to local laws.
■ If the key battery is depleted
The following symptoms may occur:
● The smart key system (if equipped) and wireless remote control will not
function properly.
● The operational range will be reduced.
CAUTION
■Removed battery and other parts
Keep away from children. These parts are small and if swallowed by a child,
they can cause choking. Failure to do so could result in death or serious
injury.
Page 334 of 484

334
4-3. Do-it-yourself maintenance
tC_OM_OM21042U_(U)
Checking and replacing fuses
If any of the electrical components do not operate, a fuse may have
blown. If this happens, check and replace the fuses as necessary.
Vehicles without a smart key system
Turn the engine switch off.
Vehicles with a smart key system
Turn the “ENGINE START STOP” switch off.
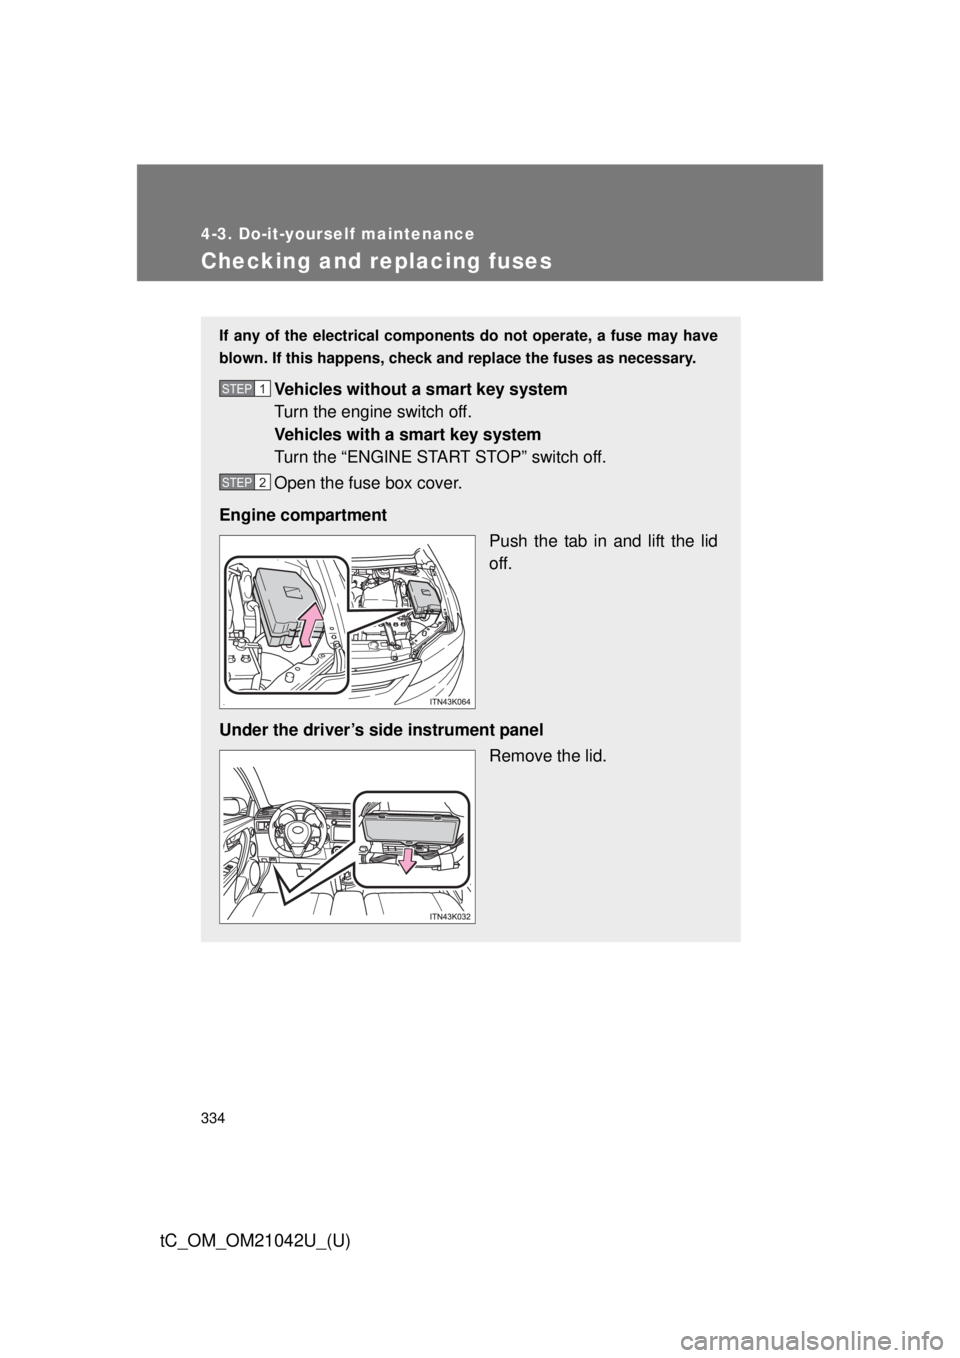
Open the fuse box cover.
Engine compartment Push the tab in and lift the lid
off.
Under the driver’s side instrument panel Remove the lid.STEP 1
STEP 2
Page 339 of 484

339
4-3. Do-it-yourself maintenance
4
Maintenance and care
tC_OM_OM21042U_(U)
25 ECU-B NO.2 10 A
Automatic transmission, power
windows, clock, smart key system,
wireless remote control, front pas-
senger occupant classification sys-
tem
26 ECU-B 10 ABody ECU, gauges and meters,
steering sensor, wireless remote
control, smart key system
27 RAD NO.1 15 A Audio system
28 DOME 10 AInterior light, personal light, lug-
gage compartment light
29 STOP 10 AMultiport fuel injection system/
sequential multiport fuel injection
system, ABS, VSC, automatic
transmission, shift lock system,
stop lights, high mounted stoplight,
power management system
FuseAmpereCircuit
Page 340 of 484

340 4-3. Do-it-yourself maintenance
tC_OM_OM21042U_(U)
*: Vehicles with a smart key system only
30 DEF 40 A MIR HTR, rear window defoggers
31 EFI NO.2 15 A
Multiport fuel injection system/
sequential multiport fuel injection
system, fuel pump
32 EFI NO.1 15 A Multiport fuel injection system/
sequential multiport fuel injection
system, automatic transmission
33 HORN 10 A Horn
34 IG2 15 A MET, IGN, Multiport fuel injection
system/sequential multiport fuel
injection system
FuseAmpereCircuit
Page 342 of 484

342 4-3. Do-it-yourself maintenance
tC_OM_OM21042U_(U)
14 ACC5 ABody ECU, clock, outside rear view
mirror, shift lock system, audio sys-
tem
15 IG 5 ARear window defoggers, electric
cooling fan, multiport fuel injection
system/sequential multiport fuel
injection system
16 TAIL 10 AParking lights, tail lights, side
marker lights, license plate lights,
multiport fuel injection system/
sequential multiport fuel injection
system
17 IGN 7.5 AMultiport fuel injection system/
sequential multiport fuel injection
system, automatic transmission,
clock, smart key system, steering
lock system, SRS airbag system,
fuel pump, front passenger occu-
pant classification system
18 PANEL 5 AGauges and meters, air condition-
ing system, seat heater, VSC OFF
switch, shift lever illumination,
steering switch, clock, audio sys-
tem
19 S/HTR FL 10 A Seat heater (driver’s side)
20 MET 7.5 A Gauges and meters
FuseAmpereCircuit