height TOYOTA TUNDRA 2011 2.G Owners Manual
[x] Cancel search | Manufacturer: TOYOTA, Model Year: 2011, Model line: TUNDRA, Model: TOYOTA TUNDRA 2011 2.GPages: 732, PDF Size: 16.65 MB
Page 58 of 732
58
1-3. Adjustable components (seats, mirrors, steering wheel)
Front seats
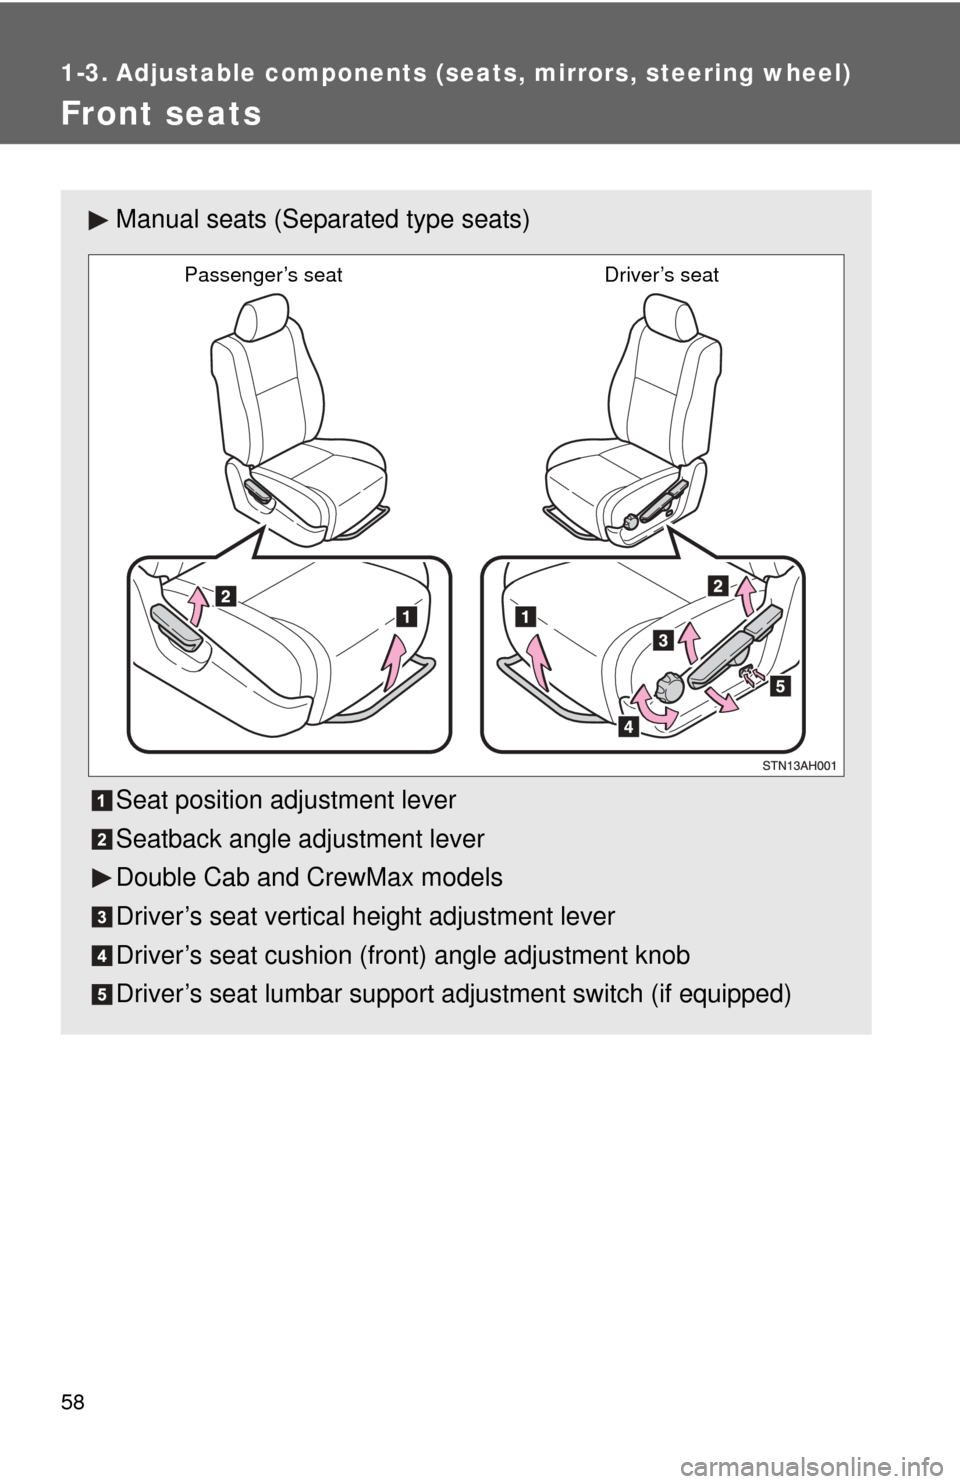
Manual seats (Separated type seats)
Seat position adjustment lever
Seatback angle adjustment lever
Double Cab and CrewMax models
Driver’s seat vertical height adjustment lever
Driver’s seat cushion (front) angle adjustment knob
Driver’s seat lumbar support adjustment switch (if equipped)
Passenger’s seat Driver’s seat
Page 59 of 732
59
1-3. Adjustable components (s
eats, mirrors, steering wheel)
1
Before driving
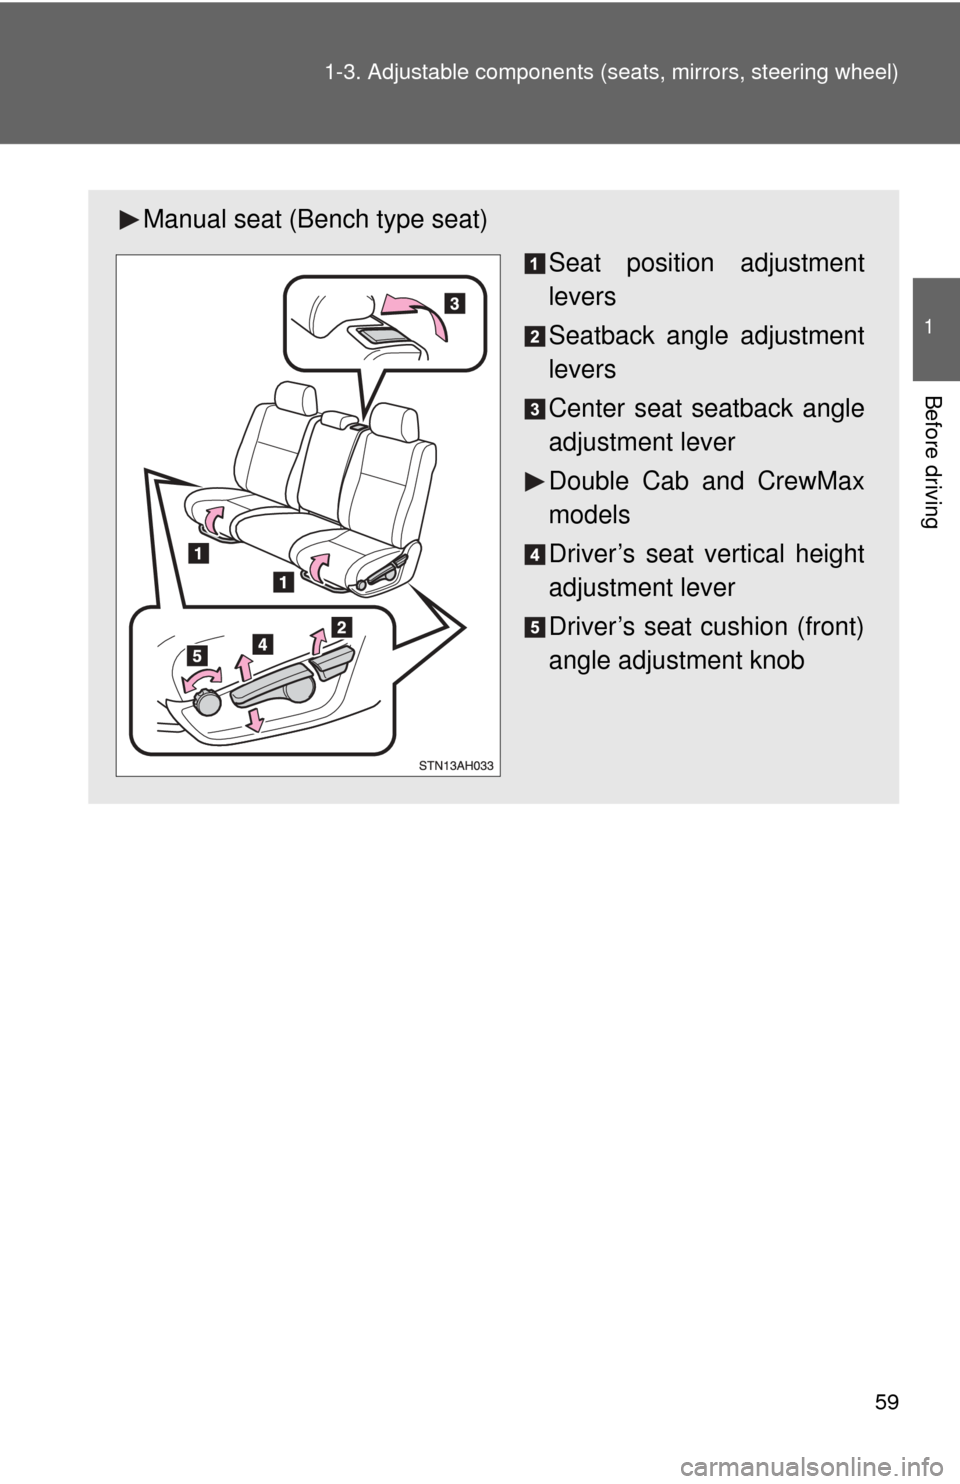
Manual seat (Bench type seat)
Seat position adjustment
levers
Seatback angle adjustment
levers
Center seat seatback angle
adjustment lever
Double Cab and CrewMax
models
Driver’s seat vertical height
adjustment lever
Driver’s seat cushion (front)
angle adjustment knob
Page 60 of 732
60 1-3. Adjustable components (seats, mirrors, steering wheel)
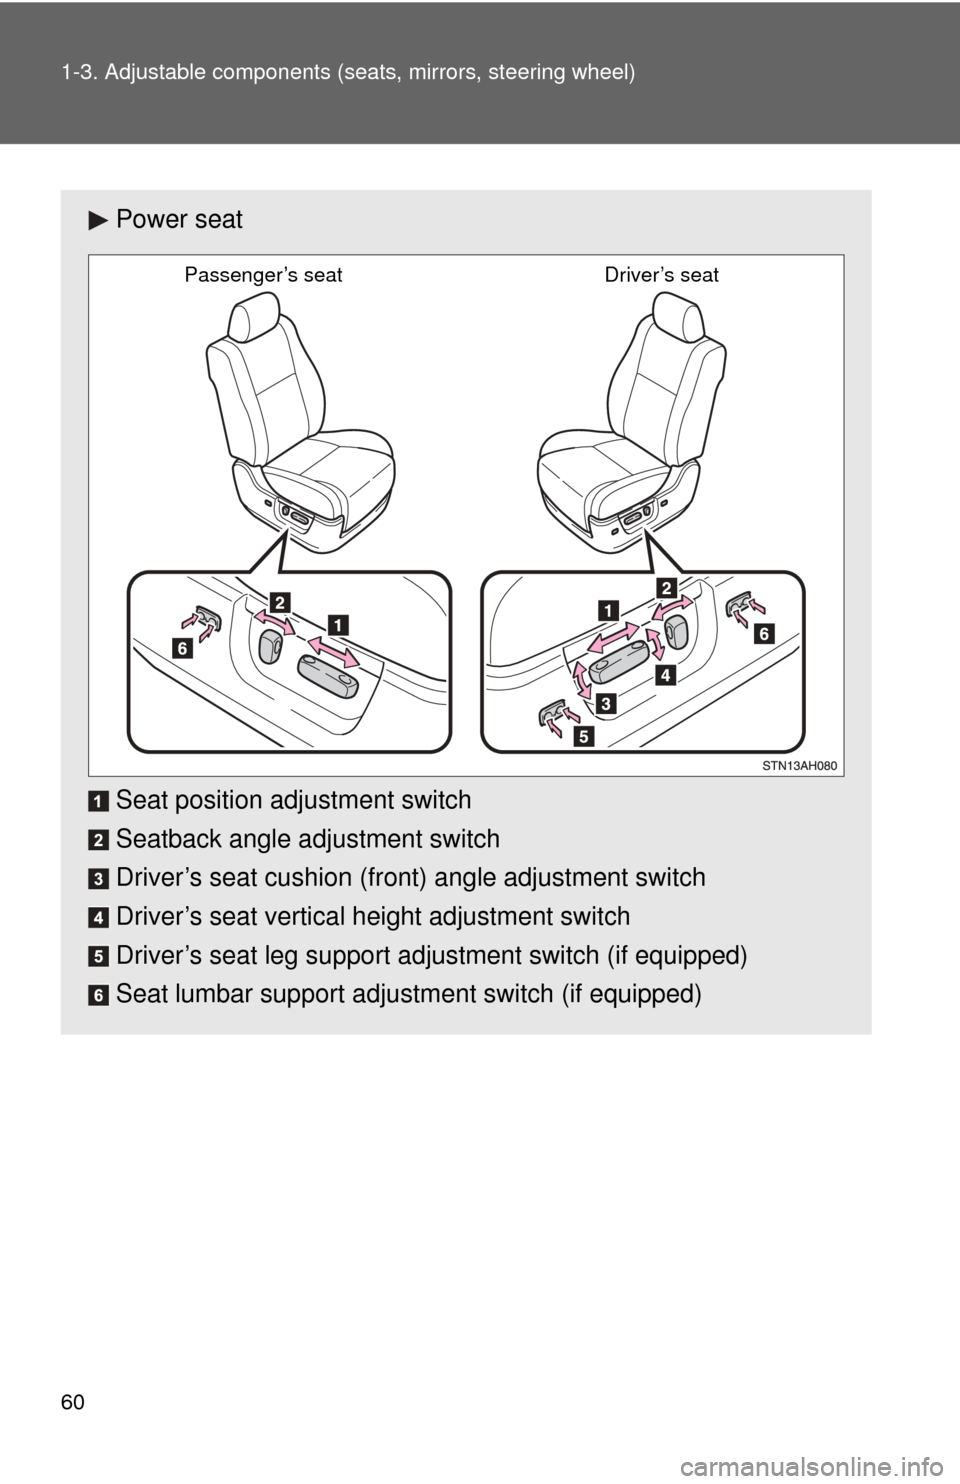
Power seat
Seat position adjustment switch
Seatback angle adjustment switch
Driver’s seat cushion (front) angle adjustment switch
Driver’s seat vertical height adjustment switch
Driver’s seat leg support adjustment switch (if equipped)
Seat lumbar support adjustment switch (if equipped)
Passenger’s seat Driver’s seat
Page 74 of 732
74 1-3. Adjustable components (seats, mirrors, steering wheel)
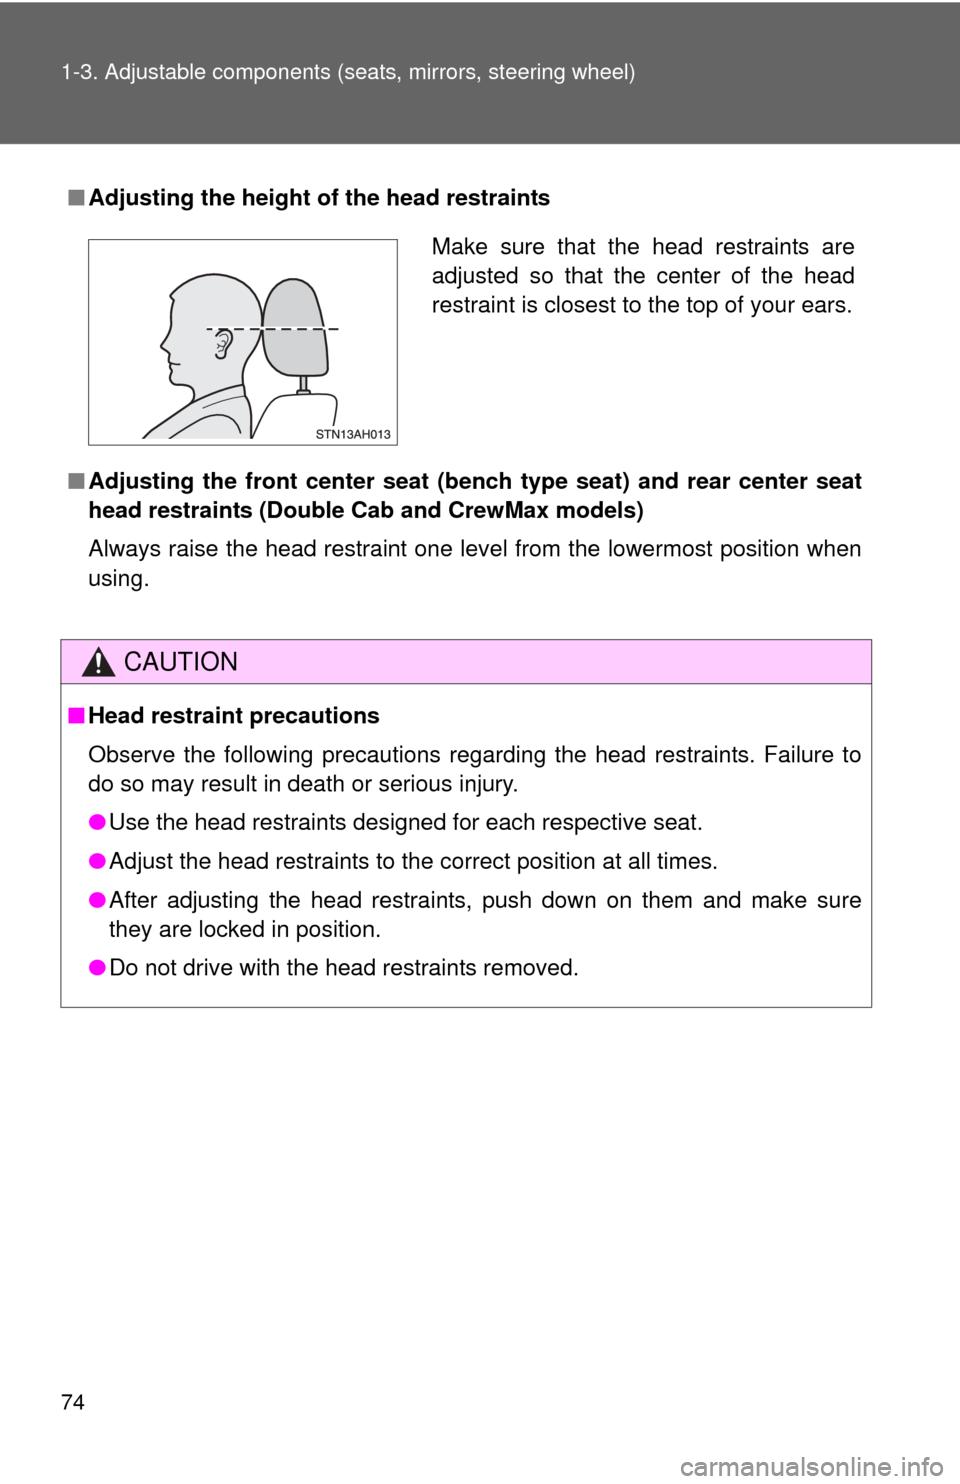
■Adjusting the height of the head restraints
■ Adjusting the front center seat (ben ch type seat) and rear center seat
head restraints (Double Cab and CrewMax models)
Always raise the head restraint one level from the lowermost position wh\
en
using.
CAUTION
■ Head restraint precautions
Observe the following precautions regarding the head restraints. Failure to
do so may result in death or serious injury.
●Use the head restraints designed for each respective seat.
● Adjust the head restraints to the correct position at all times.
● After adjusting the head restraints, push down on them and make sure
they are locked in position.
● Do not drive with the head restraints removed.
Make sure that the head restraints are
adjusted so that the center of the head
restraint is closest to the top of your ears.
Page 77 of 732
77
1-3. Adjustable components (s
eats, mirrors, steering wheel)
1
Before driving
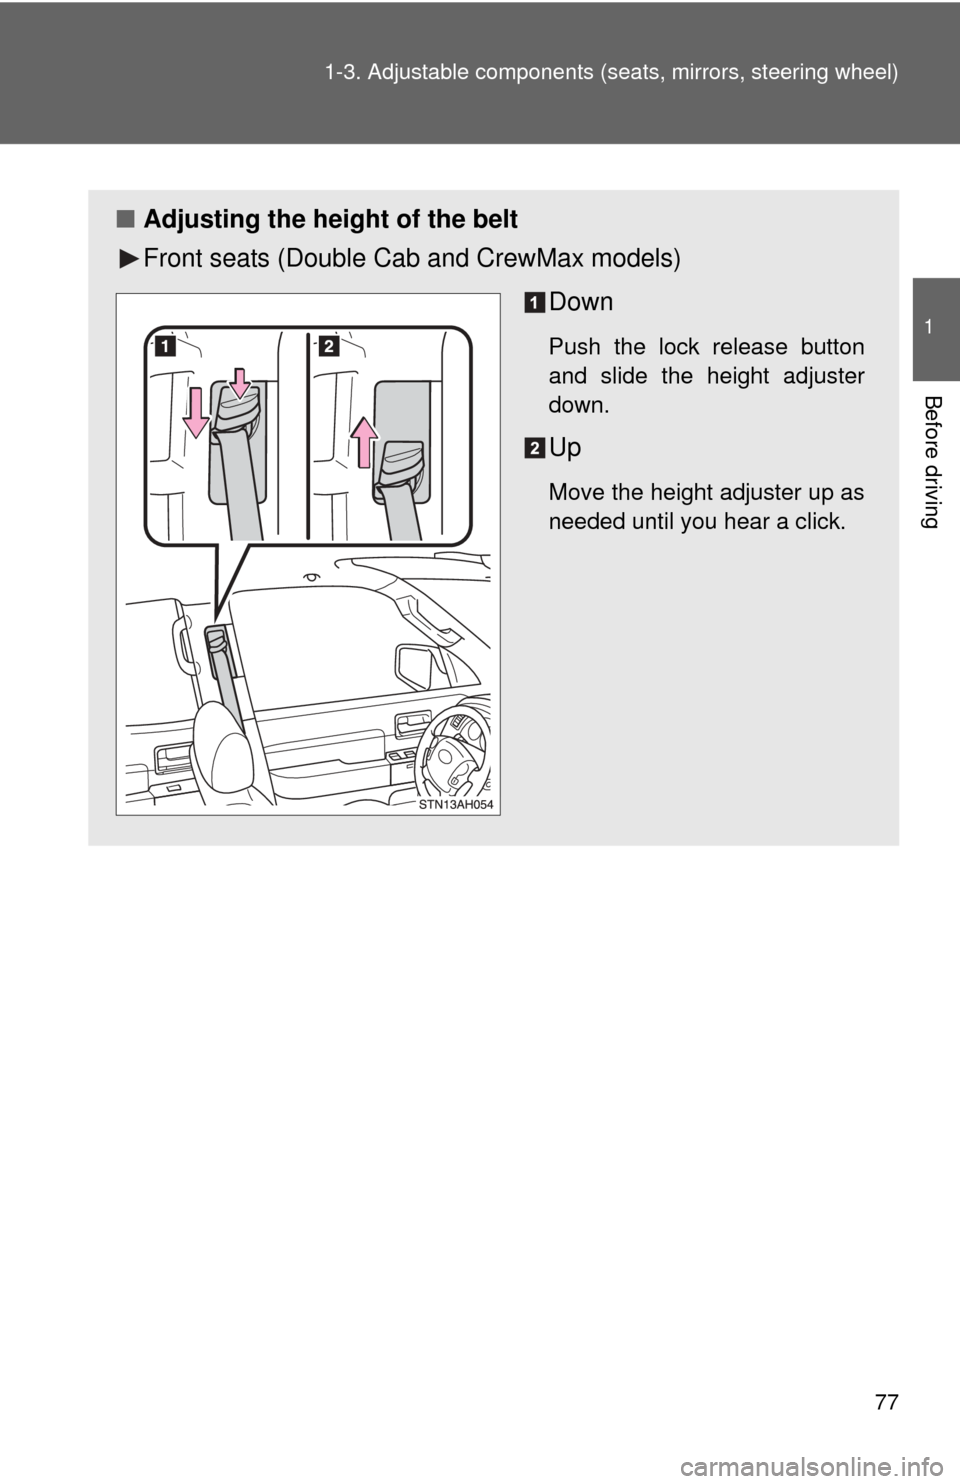
■Adjusting the height of the belt
Front seats (Double Cab and CrewMax models)
Down
Push the lock release button
and slide the height adjuster
down.
Up
Move the height adjuster up as
needed until you hear a click.
Page 78 of 732
78 1-3. Adjustable components (seats, mirrors, steering wheel)
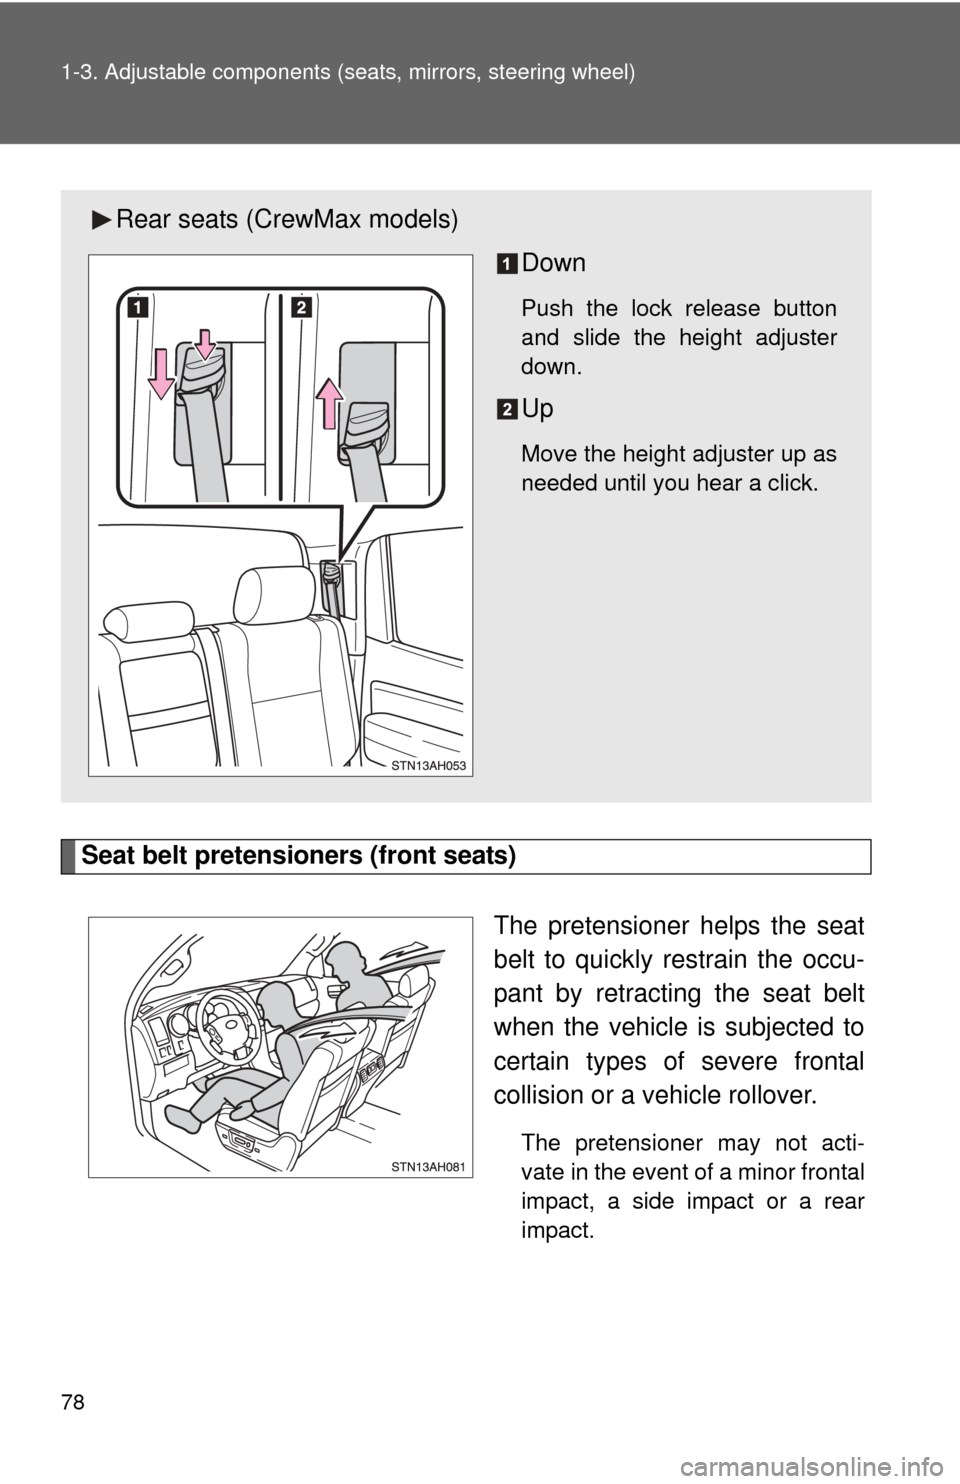
Seat belt pretensioners (front seats)
The pretensioner helps the seat
belt to quickly restrain the occu-
pant by retracting the seat belt
when the vehicle is subjected to
certain types of severe frontal
collision or a vehicle rollover.
The pretensioner may not acti-
vate in the event of a minor frontal
impact, a side impact or a rear
impact.
Rear seats (CrewMax models)Down
Push the lock release button
and slide the height adjuster
down.
Up
Move the height adjuster up as
needed until you hear a click.
Page 87 of 732
87
1-3. Adjustable components (s
eats, mirrors, steering wheel)
1
Before driving
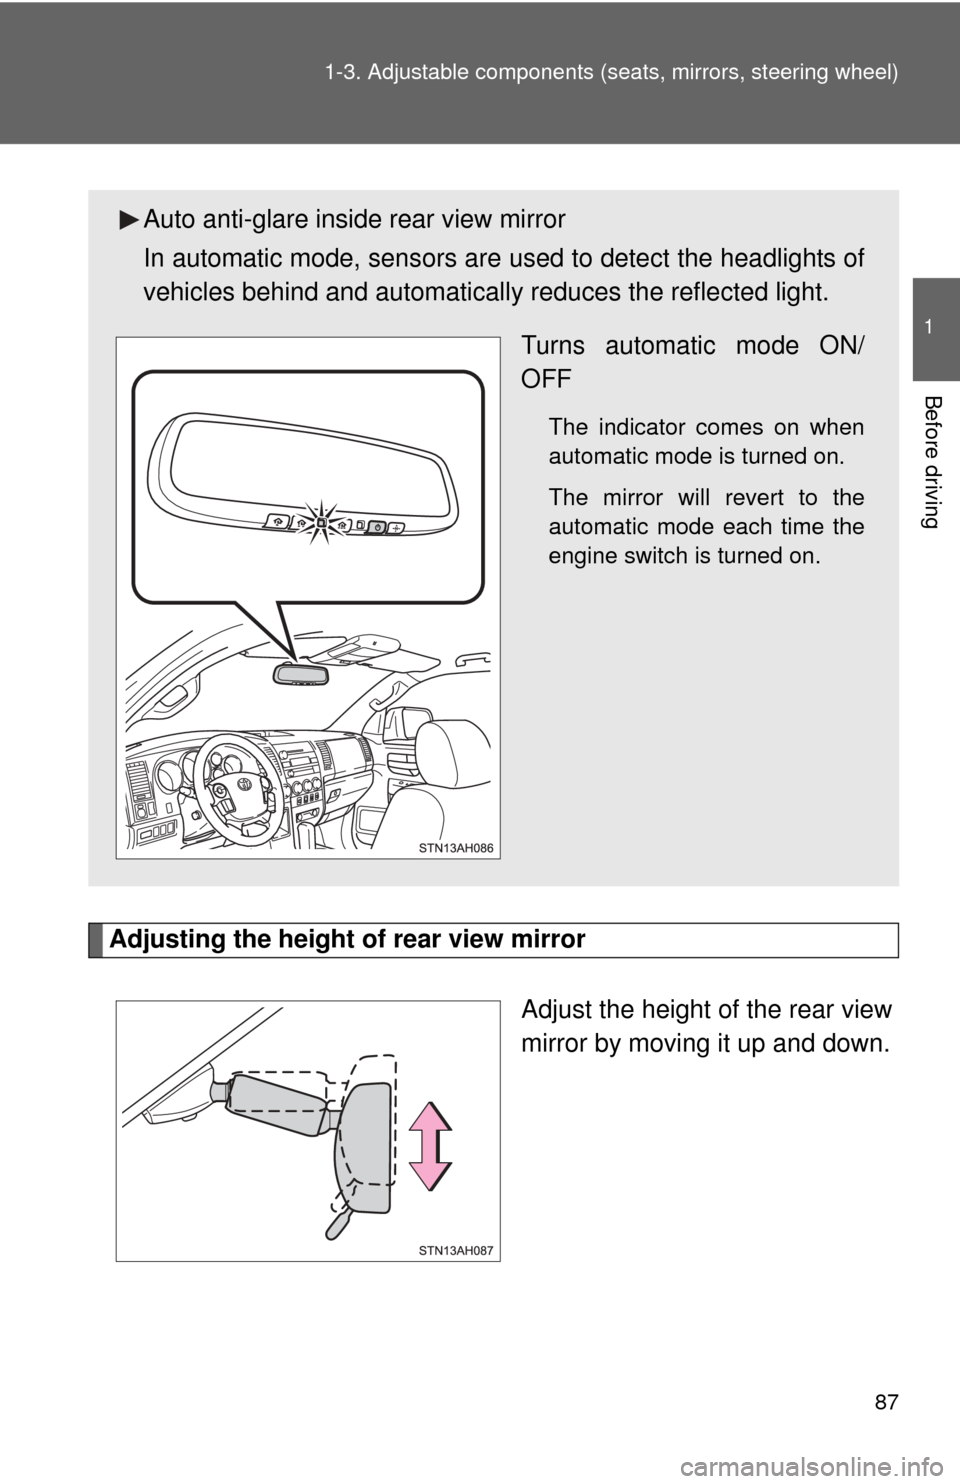
Adjusting the height of rear view mirror
Adjust the height of the rear view
mirror by moving it up and down.
Auto anti-glare inside rear view mirror
In automatic mode, sensors are used to detect the headlights of
vehicles behind and automatical ly reduces the reflected light.
Turns automatic mode ON/
OFF
The indicator comes on when
automatic mode is turned on.
The mirror will revert to the
automatic mode each time the
engine switch is turned on.
Page 251 of 732

251
2
When driving
2-5. Driving information
Off-road precautions
Off-road vehicle feature● Specific design characteristics give it a higher center of gravity
than ordinary passenger cars. This vehicle design feature causes
this type of vehicle to be more likely to rollover. And, it has a signif-
icantly higher rollover rate than other types of vehicles.
● An advantage of the higher ground clearance is a better view of the
road allowing you to anticipate problems.
● It is not designed for cornering at the same speeds as ordinary
passenger cars any more than low-slung sports cars are designed
to perform satisfactorily under of f-road conditions. Therefore, sharp
turns at excessive speeds may cause rollover.
This vehicle has higher ground cl earance and narrower tread in rela-
tion to the height of its center of gravity to make it capable of per-
forming in a wide variety of off-road applications.
Page 275 of 732
275
2-5. Driving information
2
When driving
Trailer Tongue Weight and Trailer Kingpin Weight
● A recommended tongue weight or kingpin weight varies in accor-
dance with the types of trailers or towing as described below.
● To ensure the recommended values shown below, the trailer must
be loaded by referring to the following instructions.
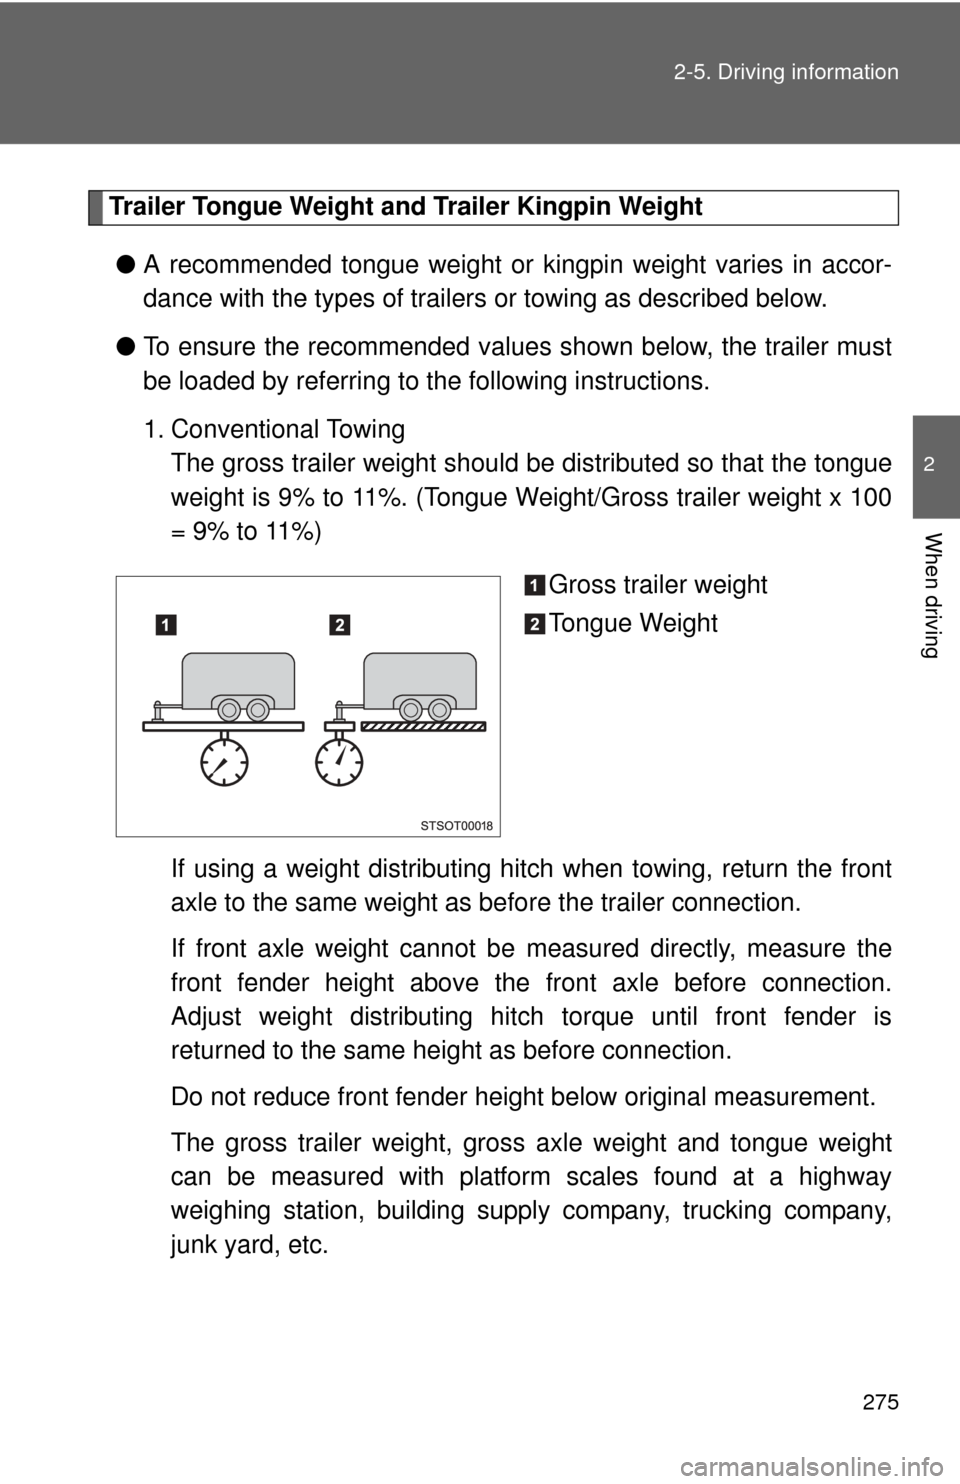
1. Conventional Towing
The gross trailer weight should be distributed so that the tongue
weight is 9% to 11%. (Tongue Weight/Gross trailer weight x 100
= 9% to 11%)
Gross trailer weight
Tongue Weight
If using a weight distributing hitch when towing, return the front
axle to the same weight as before the trailer connection.
If front axle weight cannot be measured directly, measure the
front fender height above th e front axle before connection.
Adjust weight distributing hitch torque until front fender is
returned to the same height as before connection.
Do not reduce front fender height below original measurement.
The gross trailer weight, gross axle weight and tongue weight
can be measured with platform scales found at a highway
weighing station, building supply company, trucking company,
junk yard, etc.
Page 283 of 732
283
2-5. Driving information
2
When driving
●
When restarting after parking on a slope:
With the transmission in P, start the engine. Be sure to keep
the brake pedal pressed.
Shift into D or R (if reversing).
Release the parking brake and brake pedal, and slowly pull or
back away from the wheel blocks. Stop and apply the brakes.
Have someone retrieve the blocks.
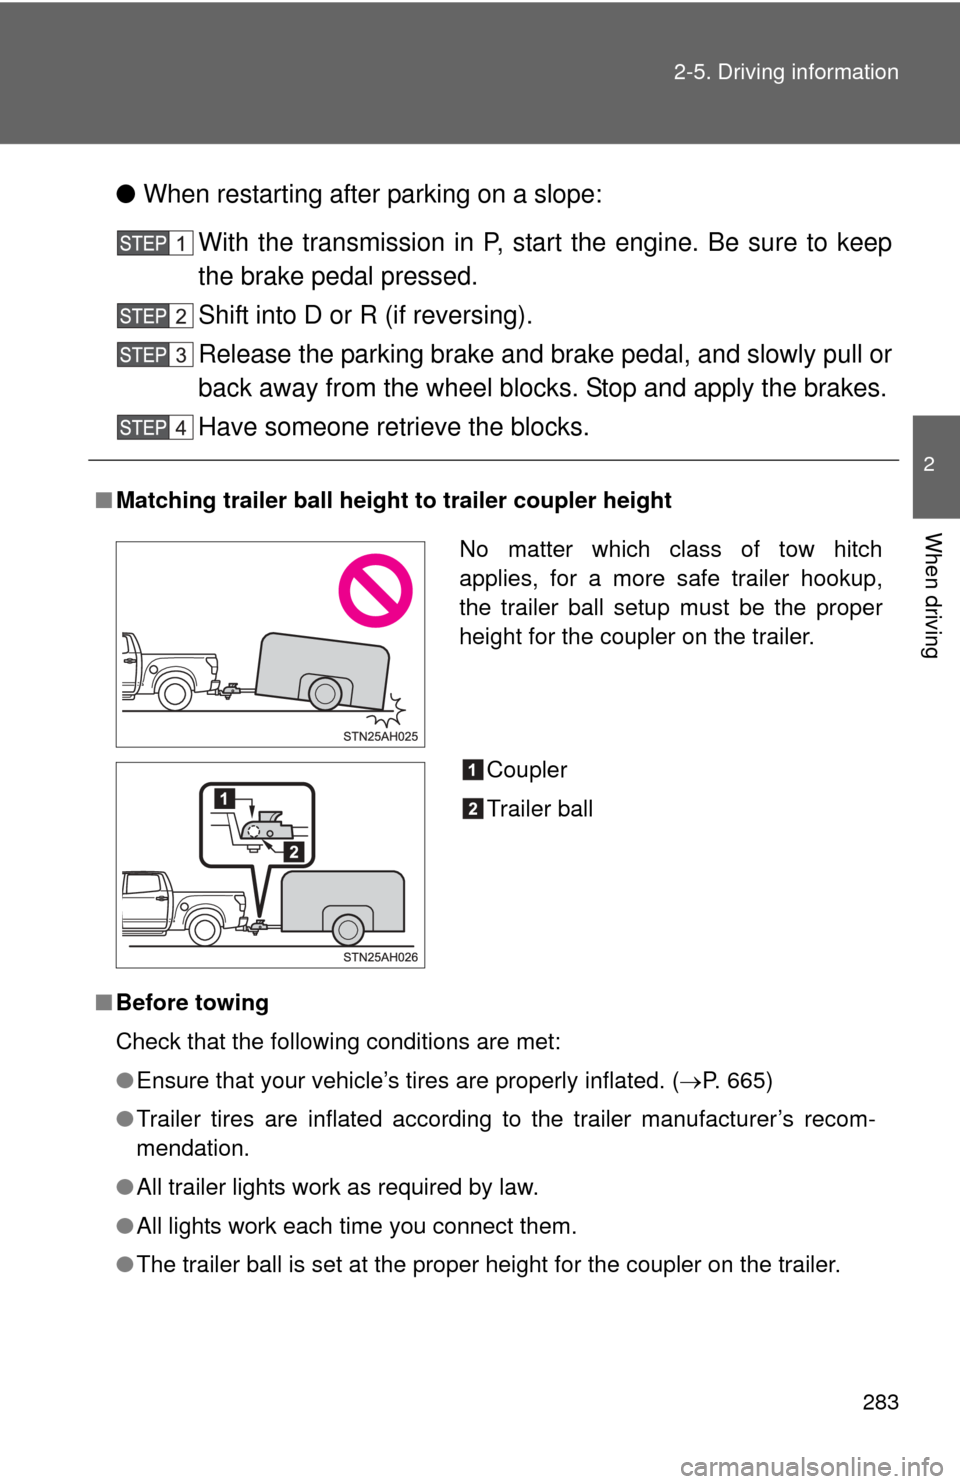
■ Matching trailer ball height to trailer coupler height
■ Before towing
Check that the following conditions are met:
●Ensure that your vehicle’s tires are properly inflated. ( P. 665)
● Trailer tires are inflated according to the trailer manufacturer’s recom-
mendation.
● All trailer lights work as required by law.
● All lights work each time you connect them.
● The trailer ball is set at the proper height for the coupler on the trai\
ler.
No matter which class of tow hitch
applies, for a more safe trailer hookup,
the trailer ball setup must be the proper
height for the coupler on the trailer.
Coupler
Trailer ball