TOYOTA TUNDRA 2014 2.G Owners Manual
Manufacturer: TOYOTA, Model Year: 2014, Model line: TUNDRA, Model: TOYOTA TUNDRA 2014 2.GPages: 576, PDF Size: 10.54 MB
Page 261 of 576
2615-2. Setup
5
Multimedia
Voice settings
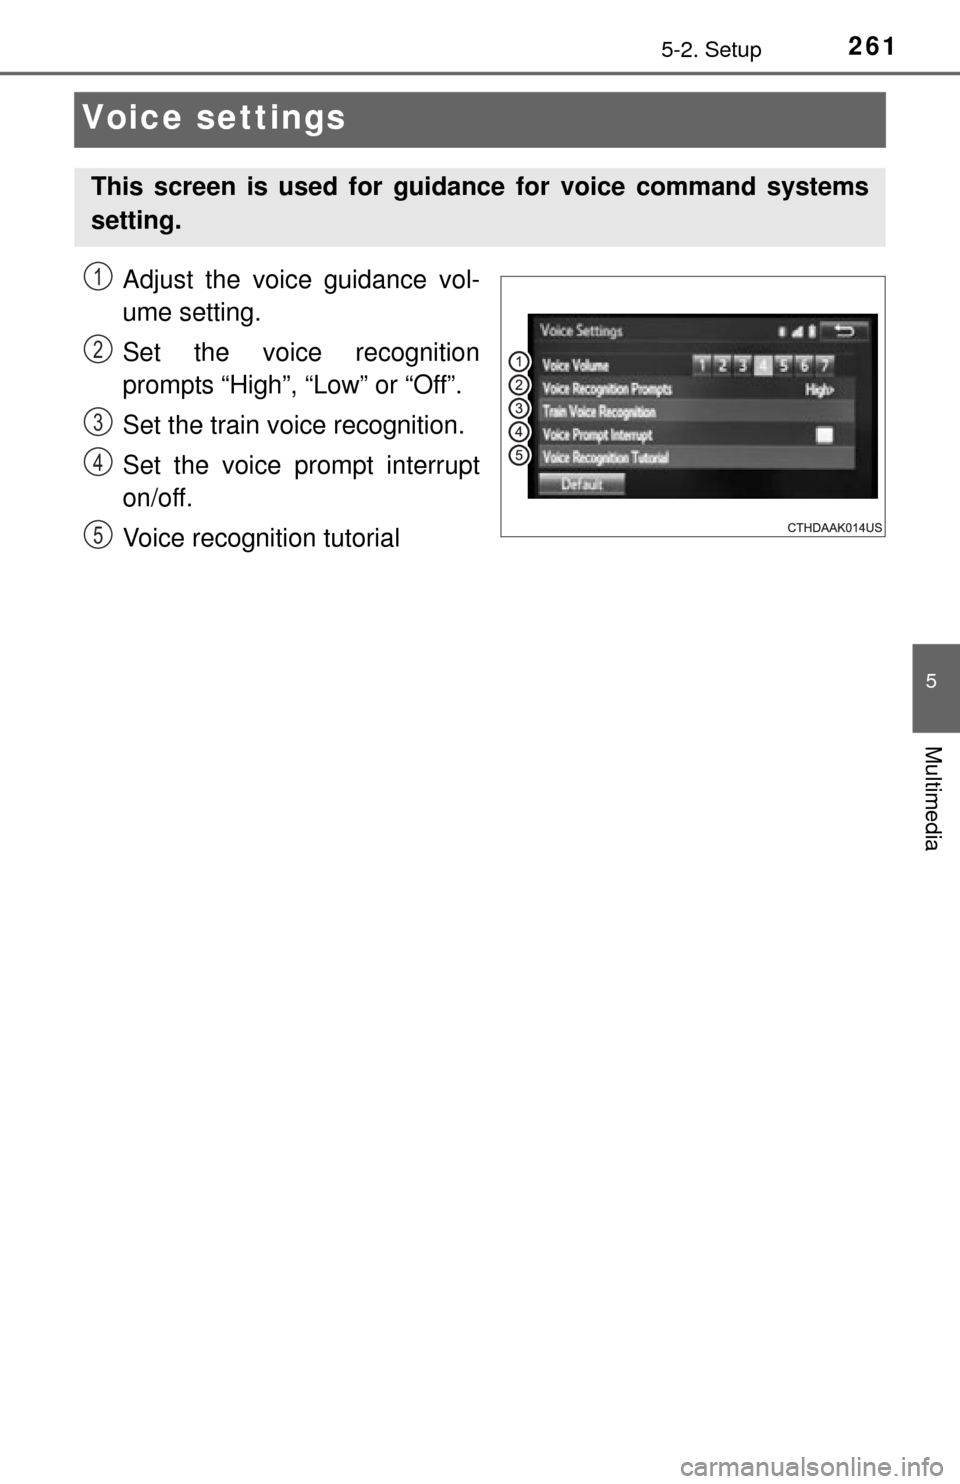
Adjust the voice guidance vol-
ume setting.
Set the voice recognition
prompts “High”, “Low” or “Off”.
Set the train voice recognition.
Set the voice prompt interrupt
on/off.
Voice recognition tutorial
This screen is used for guidance for voice command systems
setting.
1
2
3
4
5
Page 262 of 576
2625-3. Using the audio system
Basic audio operations
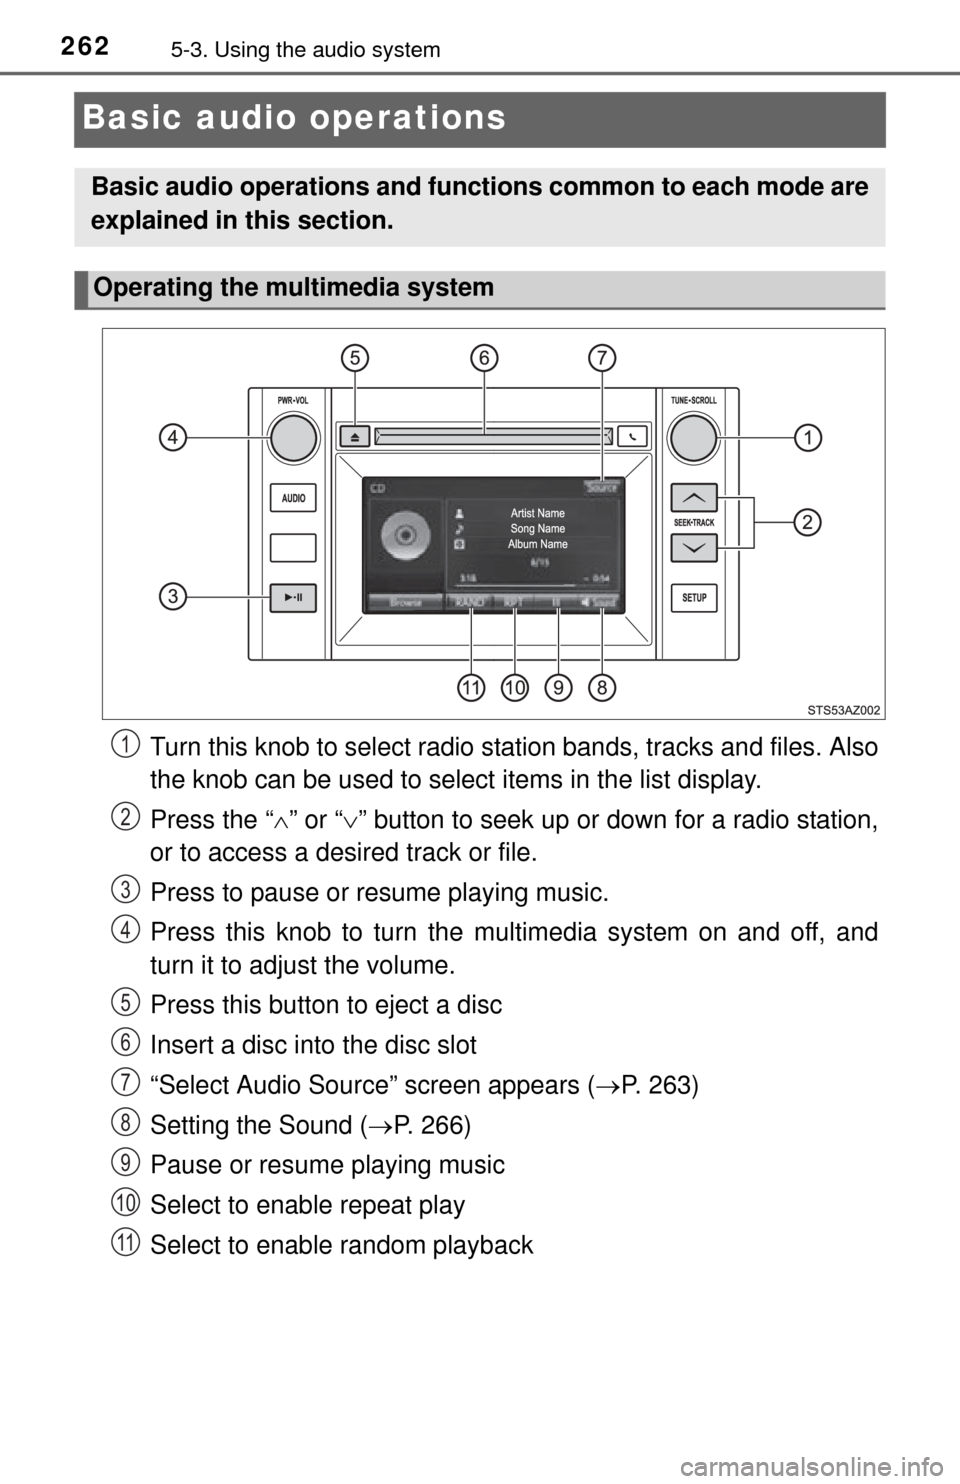
Turn this knob to select radio station bands, tracks and files. Also
the knob can be used to select items in the list display.
Press the “ ” or “ ” button to seek up or down for a radio station,
or to access a desired track or file.
Press to pause or resume playing music.
Press this knob to turn the mu ltimedia system on and off, and
turn it to adjust the volume.
Press this button to eject a disc
Insert a disc into the disc slot
“Select Audio Source” screen appears ( P. 263)
Setting the Sound ( P. 266)
Pause or resume playing music
Select to enable repeat play
Select to enable random playback
Basic audio operations and functi ons common to each mode are
explained in this section.
Operating the multimedia system
1
2
3
4
5
6
7
8
9
10
11
Page 263 of 576
2635-3. Using the audio system
5
Multimedia
Selecting the audio source
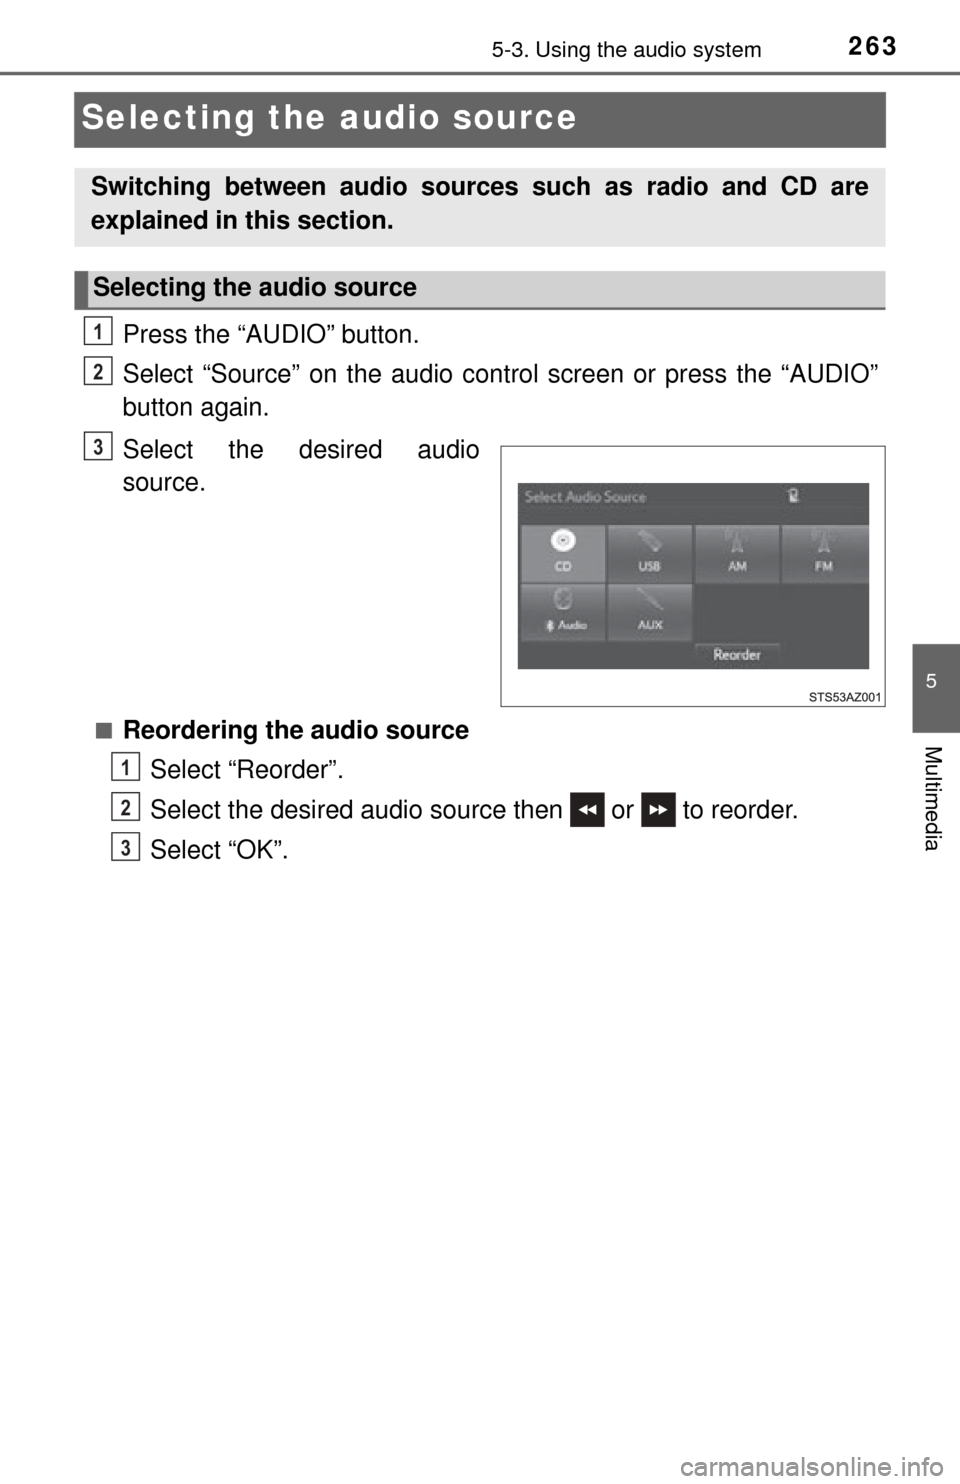
Press the “AUDIO” button.
Select “Source” on the audio control screen or press the “AUDIO”
button again.
Select the desired audio
source.
■Reordering the audio sourceSelect “Reorder”.
Select the desired audio source then or to reorder.
Select “OK”.
Switching between audio sources such as radio and CD are
explained in this section.
Selecting the audio source
1
2
3
1
2
3
Page 264 of 576
2645-3. Using the audio system
“List screen operation
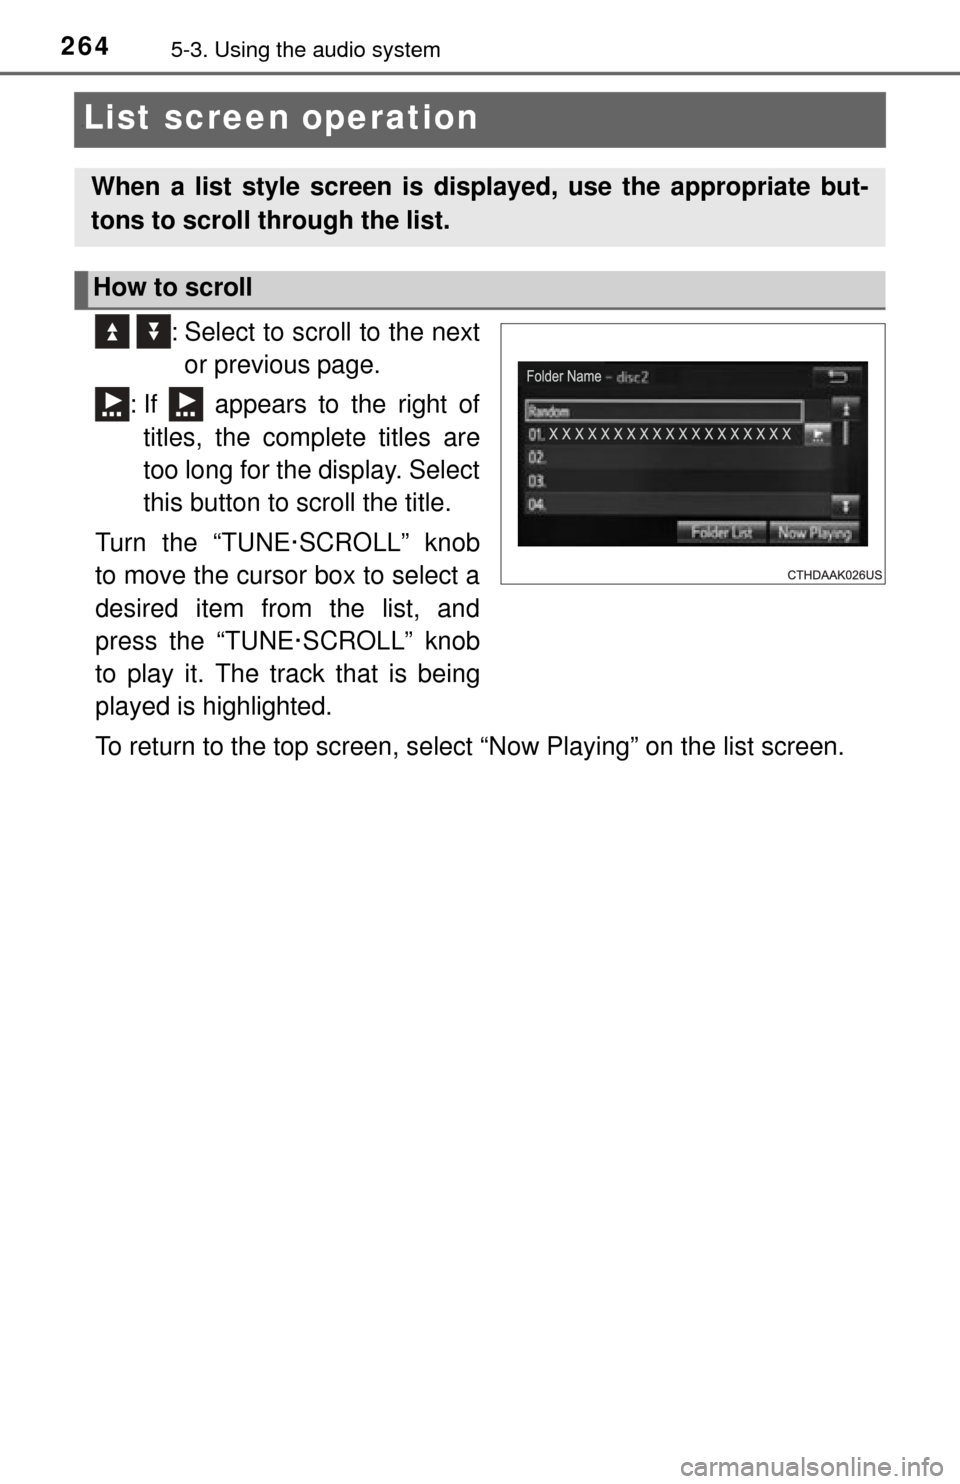
: Select to scroll to the nextor previous page.
: If appears to the right of titles, the complete titles are
too long for the display. Select
this button to scroll the title.
Turn the “TUNE·SCROLL” knob
to move the cursor box to select a
desired item from the list, and
press the “TUNE·SCROLL” knob
to play it. The track that is being
played is highlighted.
To return to the top screen, select “Now Playing” on the list screen.
When a list style screen is displayed, use the appropriate but-
tons to scroll through the list.
How to scroll
Page 265 of 576
2655-3. Using the audio system
5
Multimedia
■Selecting a track/file/song
Press the “” or “ ” button on “SEEK/TRACK” or turn the
“TUNE·SCROLL” knob to select the desired track/file/song number.
To fast-forward or reverse, press and hold the “ ” or “ ” button on
“SEEK/TRACK”.
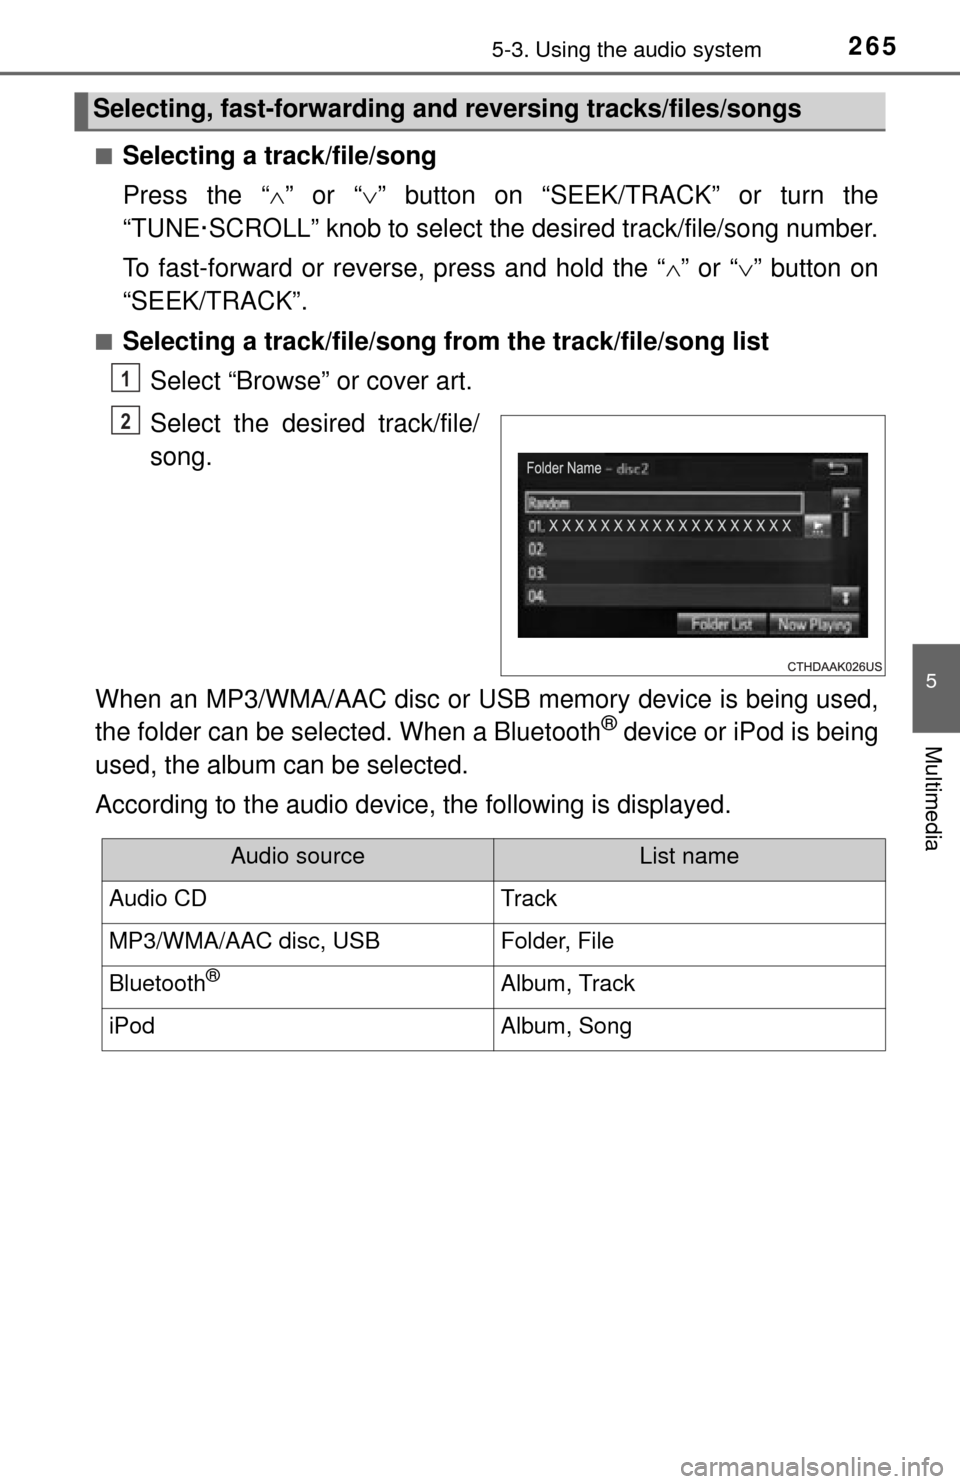
■Selecting a track/file/song from the track/file/song list
Select “Browse” or cover art.
Select the desired track/file/
song.
When an MP3/WMA/AAC disc or USB memory device is being used,
the folder can be selected. When a Bluetooth
® device or iPod is being
used, the album can be selected.
According to the audio device, the following is displayed.
Selecting, fast-forwarding a nd reversing tracks/files/songs
1
2
Audio sourceList name
Audio CDTrack
MP3/WMA/AAC disc, USBFolder, File
Bluetooth®Album, Track
iPodAlbum, Song
Page 266 of 576
2665-3. Using the audio system
Sound settings
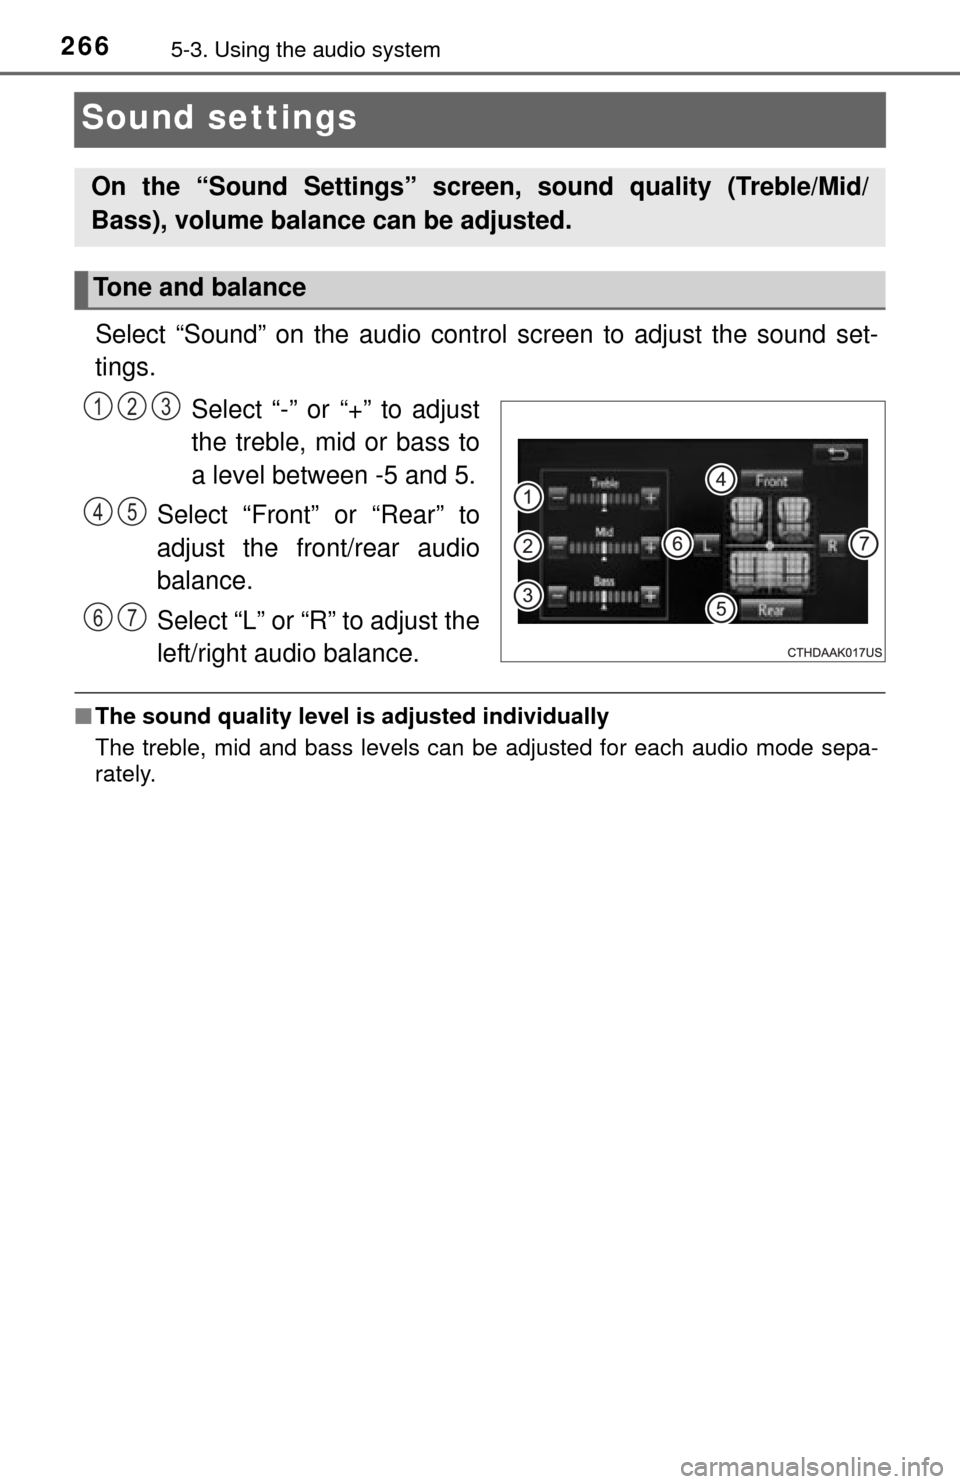
Select “Sound” on the audio control screen to adjust the sound set-
tings.Select “-” or “+” to adjust
the treble, mid or bass to
a level between -5 and 5.
Select “Front” or “Rear” to
adjust the front/rear audio
balance.
Select “L” or “R” to adjust the
left/right audio balance.
■ The sound quality level is adjusted individually
The treble, mid and bass levels can be adjusted for each audio mode sepa-
rately.
On the “Sound Settings” screen, sound quality (Treble/Mid/
Bass), volume balance can be adjusted.
Tone and balance
123
45
67
Page 267 of 576
2675-4. Using the radio
5
Multimedia
Radio operation
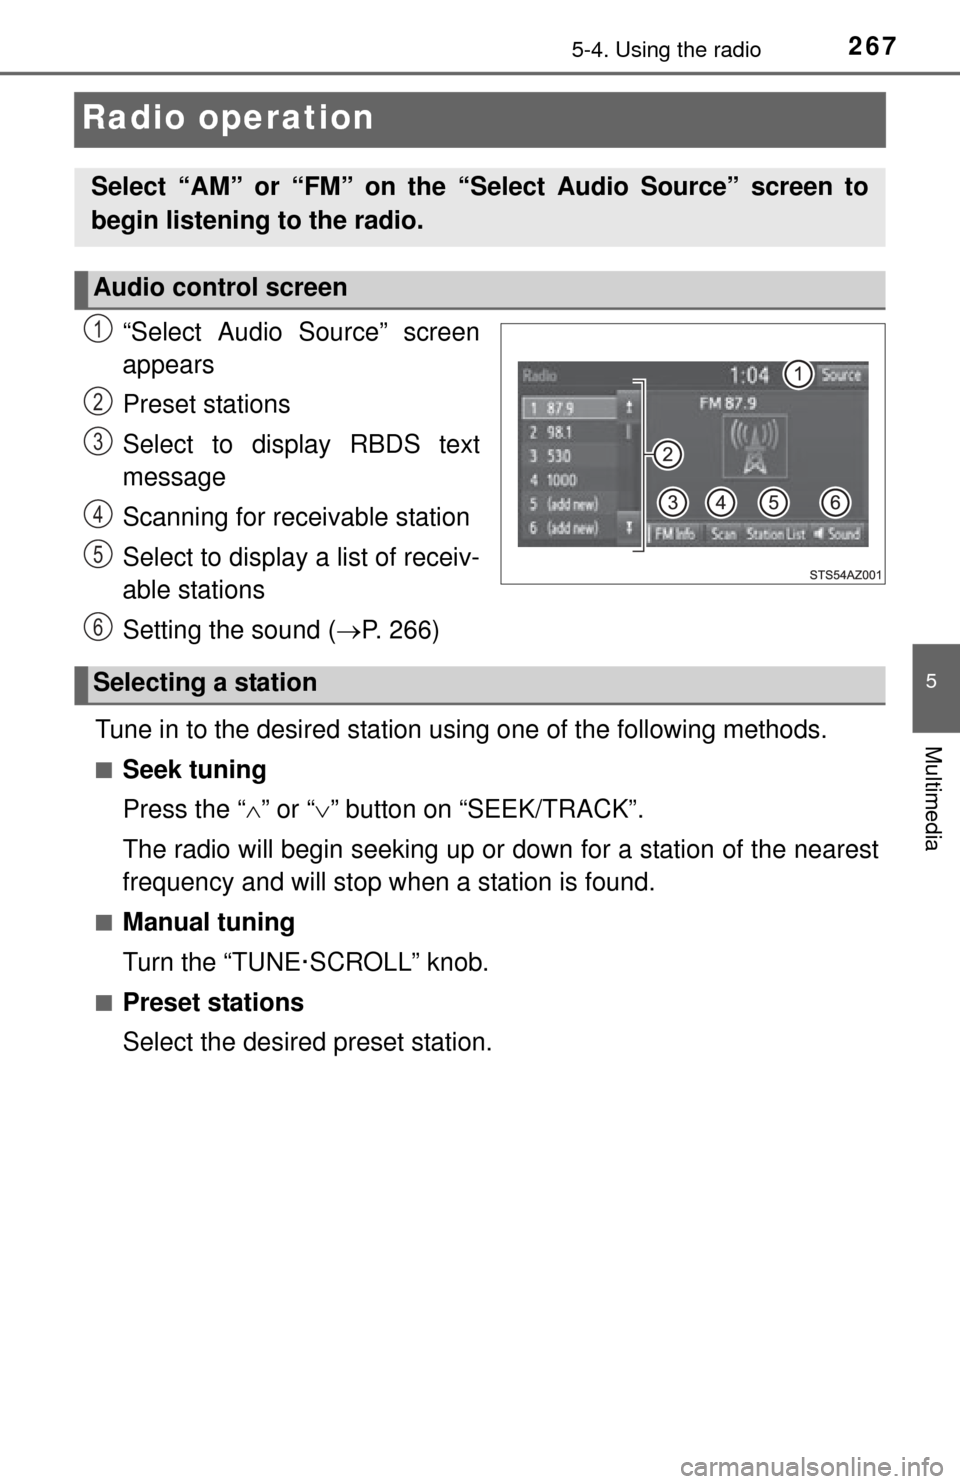
“Select Audio Source” screen
appears
Preset stations
Select to display RBDS text
message
Scanning for receivable station
Select to display a list of receiv-
able stations
Setting the sound (P. 266)
Tune in to the desired station using one of the following methods.
■Seek tuning
Press the “ ” or “ ” button on “SEEK/TRACK”.
The radio will begin seeking up or down for a station of the nearest
frequency and will stop when a station is found.
■Manual tuning
Turn the “TUNE·SCROLL” knob.
■Preset stations
Select the desired preset station.
Select “AM” or “FM” on the “Select Audio Source” screen to
begin listening to the radio.
Audio control screen
1
2
3
4
5
6
Selecting a station
Page 268 of 576
2685-4. Using the radio
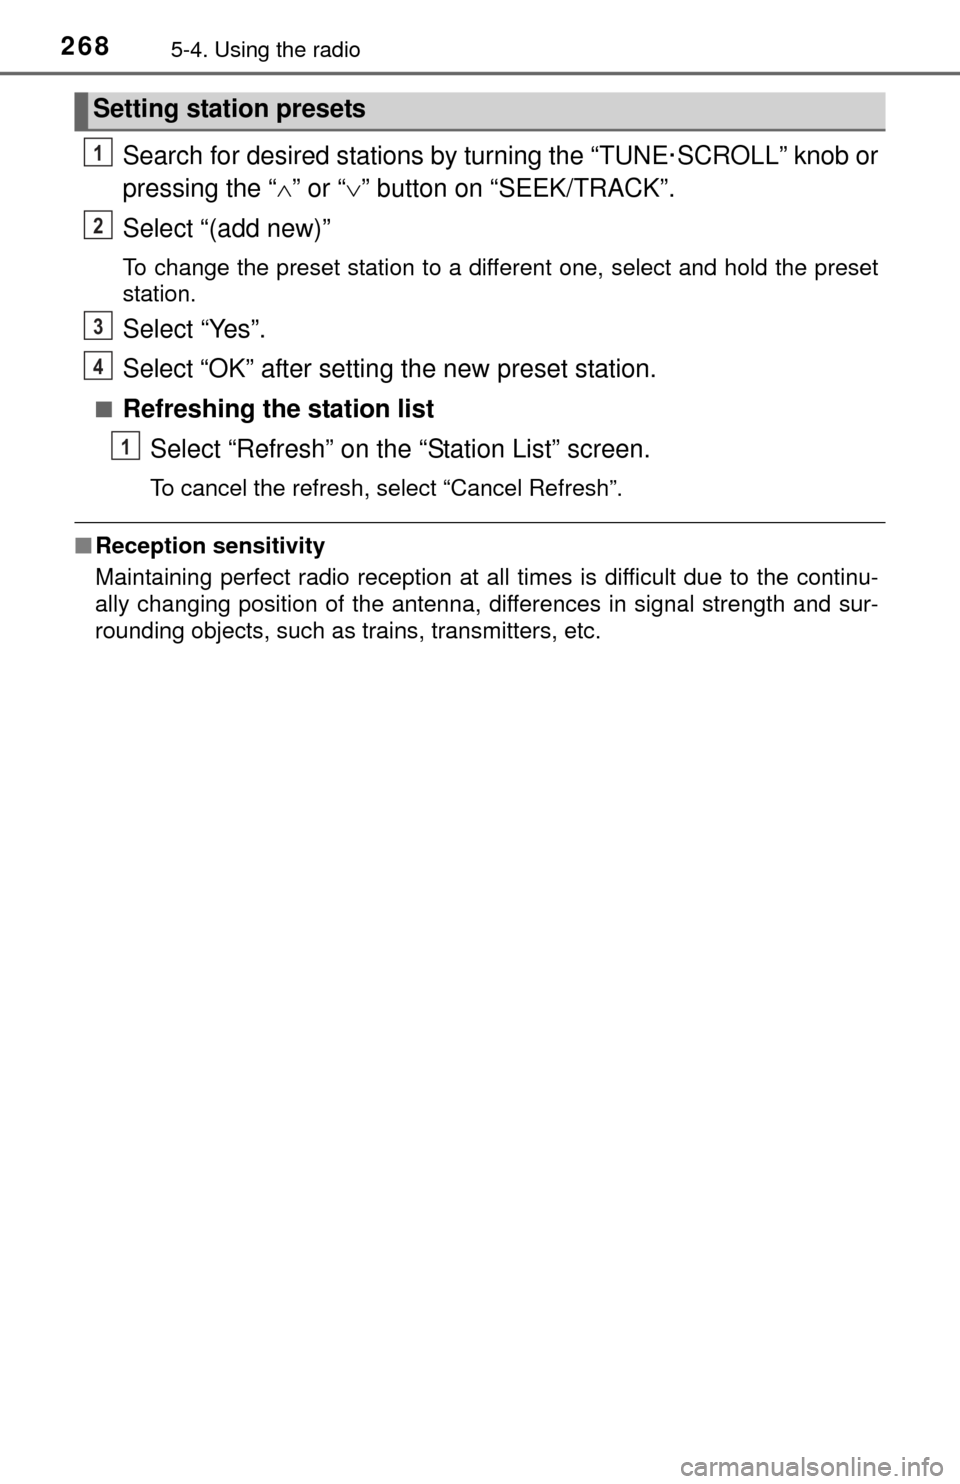
Search for desired stations by turning the “TUNE·SCROLL” knob or
pressing the “” or “ ” button on “SEEK/TRACK”.
Select “(add new)”
To change the preset station to a different one, select and hold the preset
station.
Select “Yes”.
Select “OK” after setting the new preset station.
■Refreshing the station list Select “Refresh” on the “Station List” screen.
To cancel the refresh, select “Cancel Refresh”.
■Reception sensitivity
Maintaining perfect radio reception at all times is difficult due to the continu-
ally changing position of the antenna, differences in signal strength and sur-
rounding objects, such as trains, transmitters, etc.
Setting station presets
1
2
3
4
1
Page 269 of 576
2695-5. Playing an audio CD and MP3/WMA/AAC discs
5
Multimedia
CD player operation
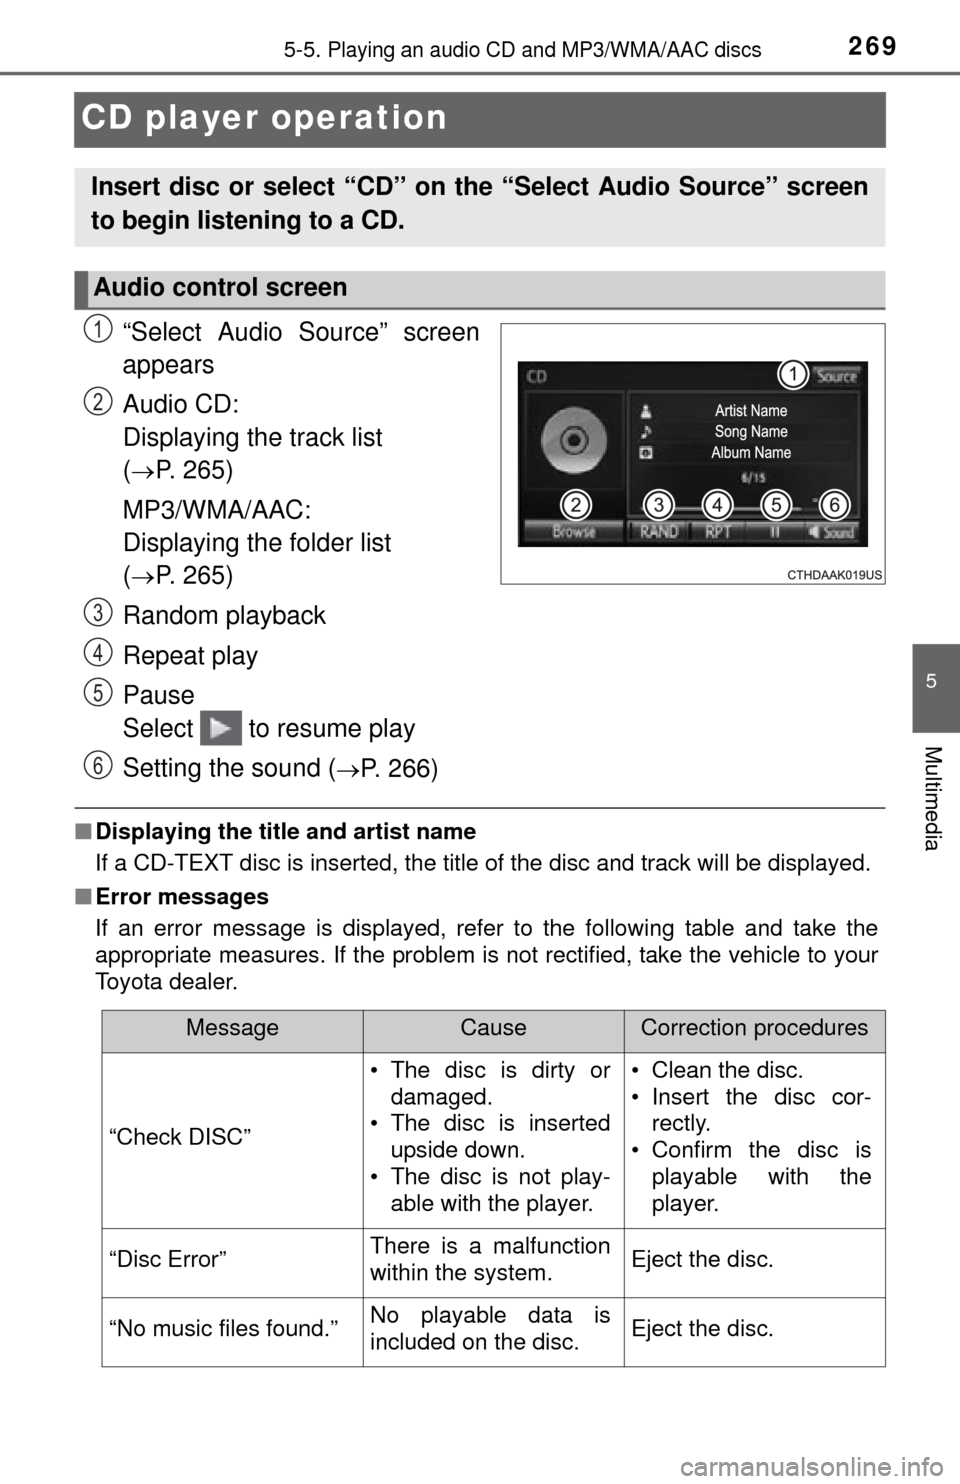
“Select Audio Source” screen
appears
Audio CD:
Displaying the track list
(
P. 265)
MP3/WMA/AAC:
Displaying the folder list
(
P. 265)
Random playback
Repeat play
Pause
Select to resume play
Setting the sound (
P. 266)
■ Displaying the title and artist name
If a CD-TEXT disc is inserted, the title of the disc and track will be displayed.
■ Error messages
If an error message is displayed, refer to the following table and take the
appropriate measures. If the problem is not rectified, take the vehicle to your
Toyota dealer.
Insert disc or select “CD” on the “Select Audio Source” screen
to begin listening to a CD.
Audio control screen
1
2
3
4
5
6
MessageCauseCorrection procedures
“Check DISC” • The disc is dirty or
damaged.
• The disc is inserted
upside down.
• The disc is not play-
able with the player. • Clean the disc.
• Insert the disc cor-
rectly.
• Confirm the disc is playable with the
player.
“Disc Error”There is a malfunction
within the system.Eject the disc.
“No music files found.”No playable data is
included on the disc.Eject the disc.
Page 270 of 576

2705-5. Playing an audio CD and MP3/WMA/AAC discs
■Discs that can be used
Discs with the marks shown below can be used.
Playback may not be possible depending on recording format or disc fea-
tures, or due to scratches, dirt or deterioration.
CDs with copy-protection features may not play correctly.
■ CD player protection feature
To protect the internal components, playback is automatically stopped when a
problem is detected.
■ If a disc is left inside the CD pl ayer or in the ejected position for
extended periods
Disc may be damaged and may not play properly.
■ Lens cleaners
Do not use lens cleaners. Doing so may damage the CD player.
■ MP3, WMA and AAC files
MP3 (MPEG Audio LAYER3) is a standard audio compression format.
Files can be compressed to approximately 1/10 of their original size by using
MP3 compression.
WMA (Windows Media Audio) is a Microsoft audio compression format.
This format compresses audio data to a size smaller than that of the MP3 for-
mat.
AAC is short for Advanced Audio Coding and refers to an audio compression
technology standard used with MPEG2 and MPEG4.
MP3, WMA and AAC file and media/formats compatibility are limited.
● MP3 file compatibility
• Compatible standards
MP3 (MPEG1 LAYER3, MPEG2 LSF LAYER3)
• Compatible sampling frequencies MPEG1 LAYER3: 32, 44.1, 48 (kHz)
MPEG2 LSF LAYER3: 16, 22.05, 24 (kHz)
• Compatible bit rates (compatible with VBR) MPEG1 LAYER3: 32-320 (kbps)
MPEG2 LSF LAYER3: 8-160 (kbps)
• Compatible channel modes: stereo, joint stereo, dual channel and mon- aural