bulb TOYOTA TUNDRA 2014 2.G Owners Manual
[x] Cancel search | Manufacturer: TOYOTA, Model Year: 2014, Model line: TUNDRA, Model: TOYOTA TUNDRA 2014 2.GPages: 576, PDF Size: 10.54 MB
Page 5 of 576
5
1
9 8
7 5 4
3
2
10
6
6-4. Other interior featuresOther interior features ....... 374• Sun visors ..................... 374
• Vanity mirrors................ 374
• Clock ............................. 375
• Outside temperature
display........................... 376
• Power outlets ................ 377
• Armrest ......................... 379
• Assist grips ................... 380
Garage door opener .......... 381
Compass ........................... 387
7-1. Maintenance and care Cleaning and protecting the vehicle exterior .......... 392
Cleaning and protecting the vehicle interior ........... 394
7-2. Maintenance Maintenance requirements ................... 397
General maintenance ........ 399
Emission inspection and maintenance (I/M)
programs ......................... 402
7-3. Do-it-yourself maintenance Do-it-yourself service precautions ..................... 403
Hood.................................. 405
Engine compartment ......... 406
Tires .................................. 417
Tire inflation pressure........ 425
Wheels .............................. 428
Air conditioning filter .......... 431
Wireless remote control battery ............................. 434
Checking and replacing fuses ............................... 436
Light bulbs ......................... 439 8-1. Essential information
Emergency flashers ........... 456
If your vehicle has to be stopped in
an emergency.................. 457
8-2. Steps to take in an emergency
If your vehicle needs to be towed .......................... 458
If you think something is wrong............................... 462
Fuel pump shut off system ............................. 463
If a warning light turns on or a warning buzzer
sounds ............................. 464
If a warning message is displayed (vehicles
with multi-information
display) ............................ 472
If you have a flat tire .......... 475
If the engine will not start ................................. 490
If the shift lever cannot be shifted from P ............. 491
If the vehicle battery is discharged ....................... 493
If your vehicle overheats.... 496
If the vehicle becomes stuck ................................ 498
7Maintenance and care
8When trouble arises
Page 15 of 576
15Pictorial index
Fuel filler door . . . . . . . . . . . . . . . . . . . . . . . . . . . . . . . . . . . . P. 196
Refueling method . . . . . . . . . . . . . . . . . . . . . . . . . . . . . . . . . . . P. 196
Fuel type/fuel tank capacity . . . . . . . . . . . . . . . . . . . . . . . . . . . P. 508
Tires . . . . . . . . . . . . . . . . . . . . . . . . . . . . . . . . . . . . . . . . . . . . P. 417
Tire size/inflation pressure . . . . . . . . . . . . . . . . . . . . . . . . . . . . P. 513
Winter tires/tire chain . . . . . . . . . . . . . . . . . . . . . . . . . . . . . . . . P. 240
Checking/rotation/tire pressure warning system . . . . . . . . . . . P. 417
Coping with flat tires . . . . . . . . . . . . . . . . . . . . . . . . . . . . . . . . P. 475
Hood . . . . . . . . . . . . . . . . . . . . . . . . . . . . . . . . . . . . . . . . . . . . P. 405
Opening . . . . . . . . . . . . . . . . . . . . . . . . . . . . . . . . . . . . . . . . . . P. 405
Engine oil . . . . . . . . . . . . . . . . . . . . . . . . . . . . . . . . . . . . . . . . . P. 508
Coping with overheat . . . . . . . . . . . . . . . . . . . . . . . . . . . . . . . . P. 496
Camera . . . . . . . . . . . . . . . . . . . . . . . . . . . . . . . . . . . . . . . . . . P. 209
Headlights. . . . . . . . . . . . . . . . . . . . . . . . . . . . . . . . . . . . . . . . P. 189
Fog lights
*3 . . . . . . . . . . . . . . . . . . . . . . . . . . . . . . . . . . . . . . P. 192
Front turn signal lights . . . . . . . . . . . . . . . . . . . . . . . . . . . . . P. 186
Parking lights (bulb type)
*3/
daytime running lights (bulb type)
*3. . . . . . . . . . . . . . . . . . P. 189
Parking lights (LED type)
*3/
daytime running lights (LED type)
*3 . . . . . . . . . . . . . . . . . . P. 189
Rear turn signal lights . . . . . . . . . . . . . . . . . . . . . . . . . . . . . . P. 186
Tail lights . . . . . . . . . . . . . . . . . . . . . . . . . . . . . . . . . . . . . . . . P. 189
License plate lights . . . . . . . . . . . . . . . . . . . . . . . . . . . . . . . . P. 189
Back-up lights
Shifting the shift lever to R . . . . . . . . . . . . . . . . . . . . . . . . . . . . P. 181
Side marker lights . . . . . . . . . . . . . . . . . . . . . . . . . . . . . . . . . P. 189
6
7
8
9
Light bulbs of the exterior lights for driving
(Replacing method: P. 439, Watts: P. 515)
*1: Vehicles with multi-information display
*2: If equipped on CrewMax models
*3: If equipped
10
11
12
13
14
15
16
17
18
Page 186 of 576
1864-2. Driving procedures
Turn signal lever
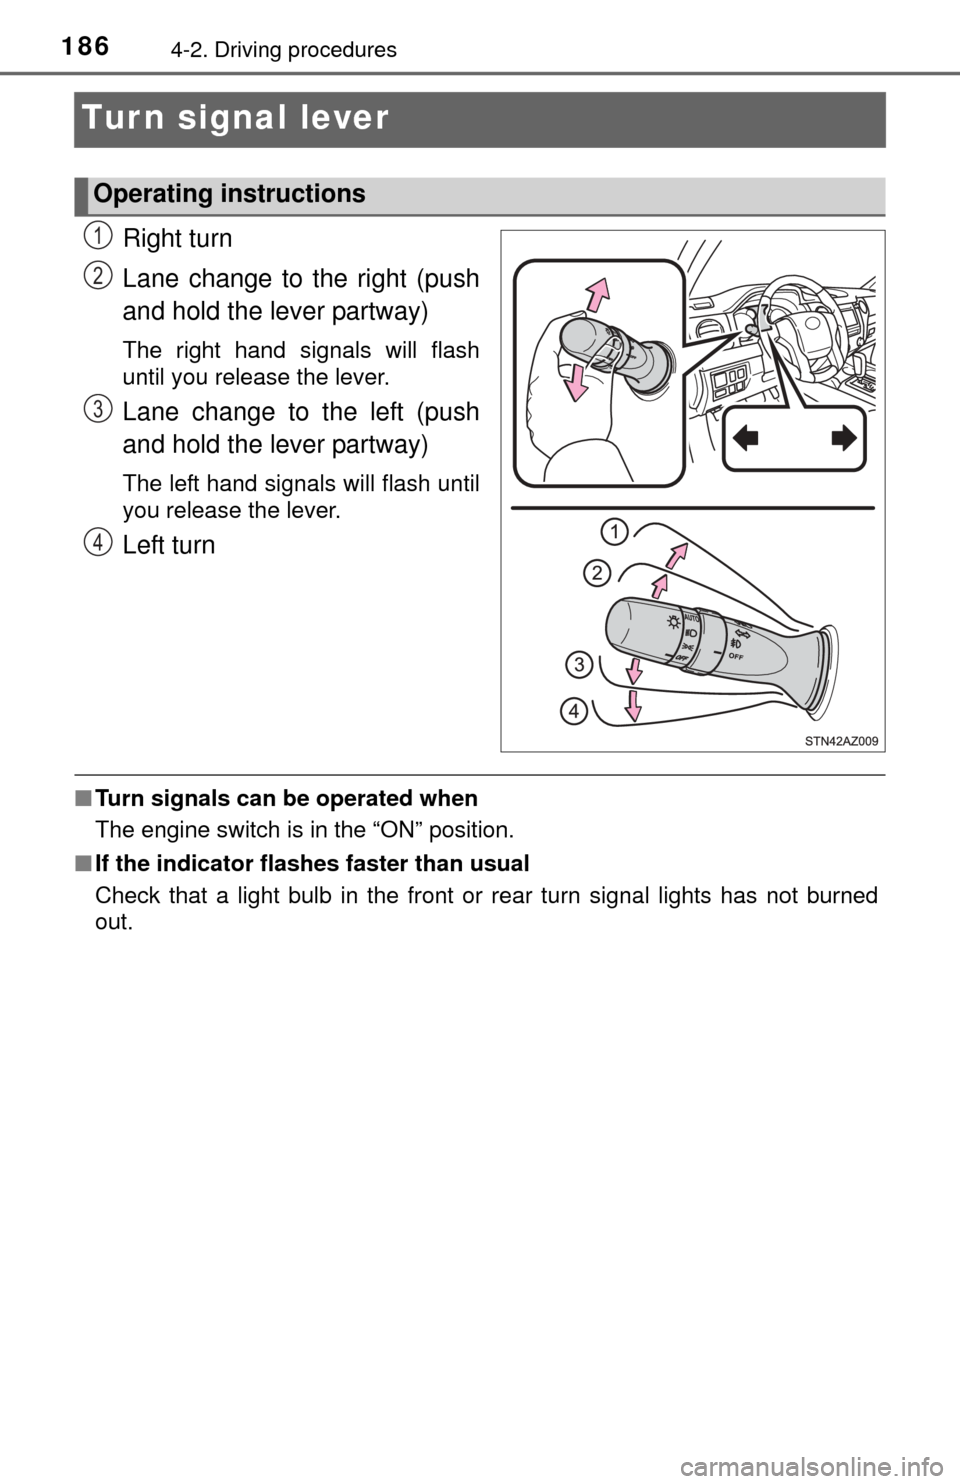
Right turn
Lane change to the right (push
and hold the lever partway)
The right hand signals will flash
until you release the lever.
Lane change to the left (push
and hold the lever partway)
The left hand signals will flash until
you release the lever.
Left turn
■Turn signals can be operated when
The engine switch is in the “ON” position.
■ If the indicator flashes faster than usual
Check that a light bulb in the front or rear turn signal lights has not burned
out.
Operating instructions
1
2
3
4
Page 391 of 576

391
7Maintenance and care
7-1. Maintenance and careCleaning and protecting the vehicle exterior .......... 392
Cleaning and protecting the vehicle interior ........... 394
7-2. Maintenance Maintenance requirements ................... 397
General maintenance ........ 399
Emission inspection and maintenance (I/M)
programs ......................... 402 7-3. Do-it-yourself maintenance
Do-it-yourself service precautions ..................... 403
Hood ................................. 405
Engine compartment ......... 406
Tires .................................. 417
Tire inflation pressure ....... 425
Wheels .............................. 428
Air conditioning filter.......... 431
Wireless remote control battery ............................. 434
Checking and replacing fuses ............................... 436
Light bulbs......................... 439
Page 403 of 576
4037-3. Do-it-yourself maintenance
7
Maintenance and care
Do-it-yourself ser vice precautions
If you perform maintenance by yourself, be sure to follow the
correct procedure as given in these sections.
ItemsParts and tools
Battery condition
( P. 414)• Warm water• Baking soda• Grease
• Conventional wrench (for terminal clamp bolts)
Brake fluid level
( P. 412)• FMVSS No.116 DOT 3 or SAE J1703 brake fluid
• Rag or paper towel
• Funnel (used only for adding brake fluid)
Engine coolant
level ( P. 410)
• “Toyota Super Long Life Coolant” or a similar high
quality ethylene glycol-based non-silicate, non-
amine, non-nitrite and non-borate coolant with long-
life hybrid organic acid technology
For the U.S.A.:
“Toyota Super Long Life Coolant” is pre-mixed with
50% coolant and 50% deionized water.
For Canada:
“Toyota Super Long Life Coolant” is pre-mixed with
55% coolant and 45% deionized water.
• Funnel (used only for adding coolant)
Engine oil level
( P. 408)• “Toyota Genuine Motor Oil” or equivalent
• Rag or paper towel
• Funnel (used only for adding engine oil)
Fuses
( P. 436)• Fuse with same amperage rating as original
Light bulbs
( P. 439)
• Bulb with same number and wattage rating as origi-
nal
• Phillips-head screwdriver
• Flathead screwdriver• Wrench
Power steering
fluid level
(
P. 413)
• Automatic transmission fluid DEXRON® II or III
• Rag or paper towel
• Funnel (used only for adding power steering fluid)
Radiator and
condenser
(
P. 412)
Tire inflation
pressure
( P. 425)• Tire pressure gauge
• Compressed air source
Washer fluid
( P. 416)• Water or washer fluid containing antifreeze (for win-
ter use)
• Funnel (used only for adding water or washer fluid)
Page 437 of 576
4377-3. Do-it-yourself maintenance
7
Maintenance and care
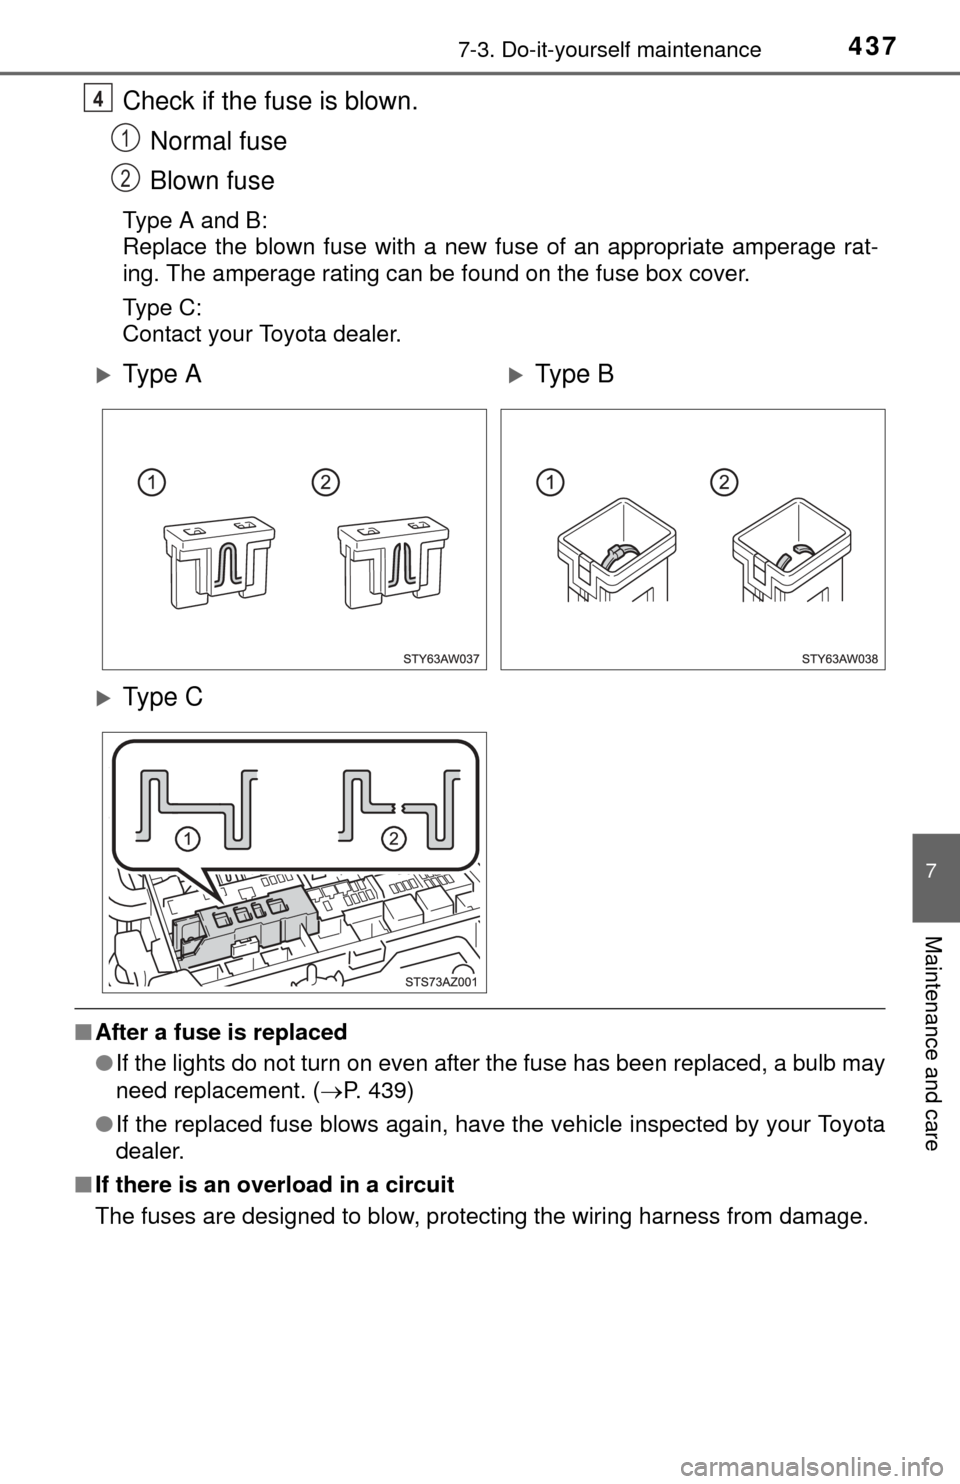
Check if the fuse is blown.Normal fuse
Blown fuse
Type A and B:
Replace the blown fuse with a new fuse of an appropriate amperage rat-
ing. The amperage rating can be found on the fuse box cover.
Type C:
Contact your Toyota dealer.
■After a fuse is replaced
●If the lights do not turn on even after the fuse has been replaced, a bulb may
need replacement. ( P. 439)
● If the replaced fuse blows again, have the vehicle inspected by your Toyota
dealer.
■ If there is an overload in a circuit
The fuses are designed to blow, protecting the wiring harness from damage.
4
1
2
Ty p e AType B
Ty p e C
Page 439 of 576
4397-3. Do-it-yourself maintenance
7
Maintenance and care
Light bulbs
Check the wattage of the light bulb to be replaced. (P. 515)
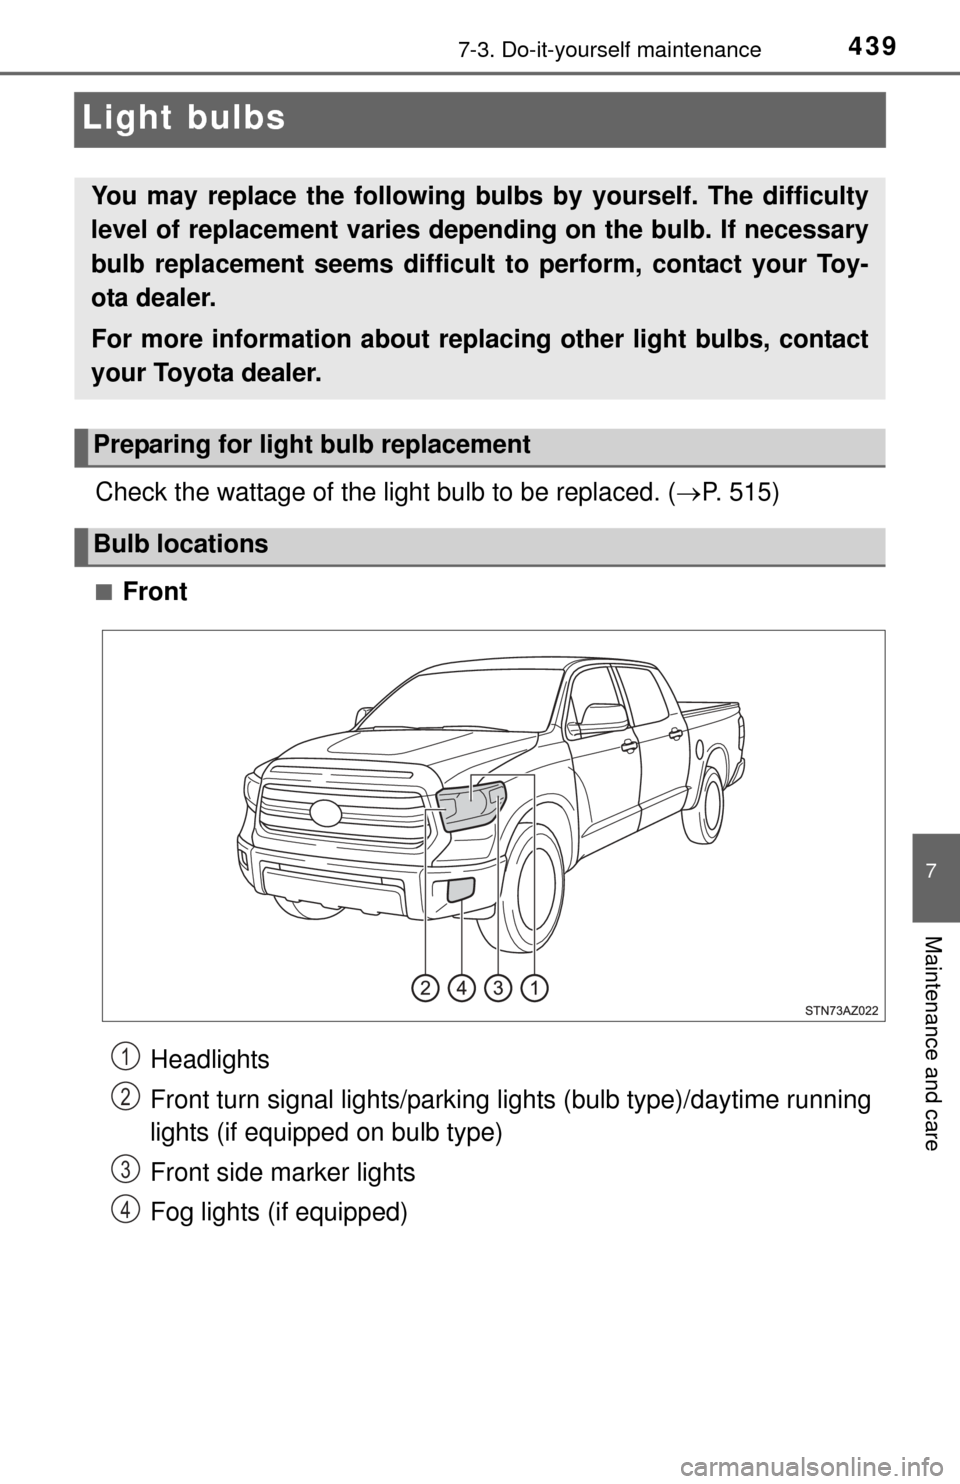
■Front
You may replace the following bulbs by yourself. The difficulty
level of replacement varies de pending on the bulb. If necessary
bulb replacement seems difficult to perform, contact your Toy-
ota dealer.
For more information about repl acing other light bulbs, contact
your Toyota dealer.
Preparing for light bulb replacement
Bulb locations
Headlights
Front turn signal lights/parking lights (bulb type)/daytime running
lights (if equipped on bulb type)
Front side marker lights
Fog lights (if equipped)1
2
3
4
Page 441 of 576
4417-3. Do-it-yourself maintenance
7
Maintenance and care
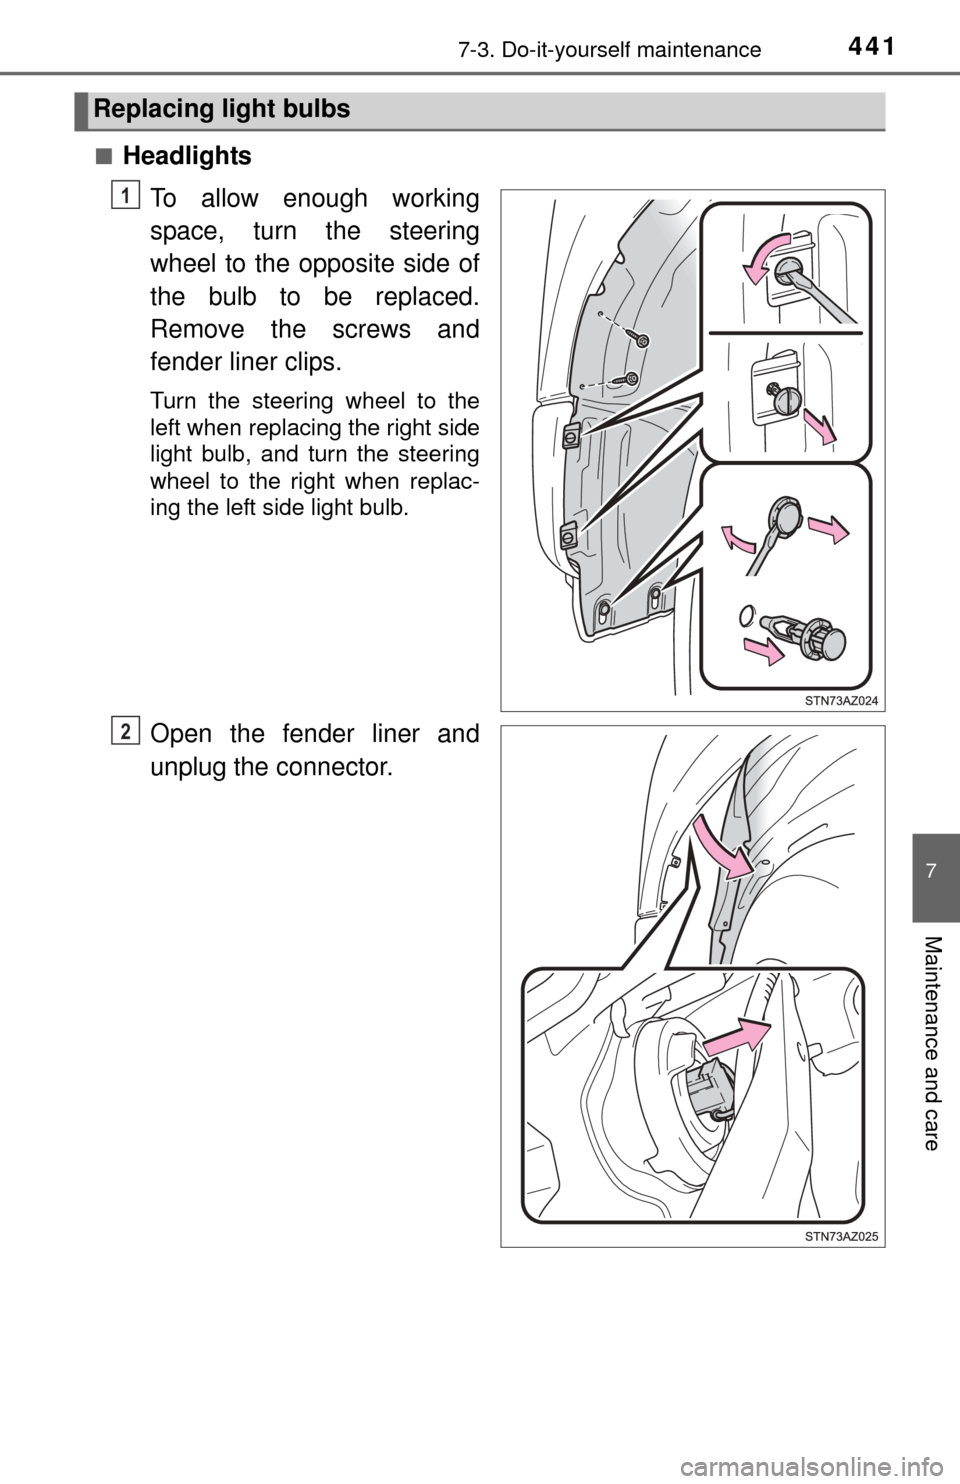
■HeadlightsTo allow enough working
space, turn the steering
wheel to the opposite side of
the bulb to be replaced.
Remove the screws and
fender liner clips.
Turn the steering wheel to the
left when replacing the right side
light bulb, and turn the steering
wheel to the right when replac-
ing the left side light bulb.
Open the fender liner and
unplug the connector.
Replacing light bulbs
1
2
Page 442 of 576
4427-3. Do-it-yourself maintenance
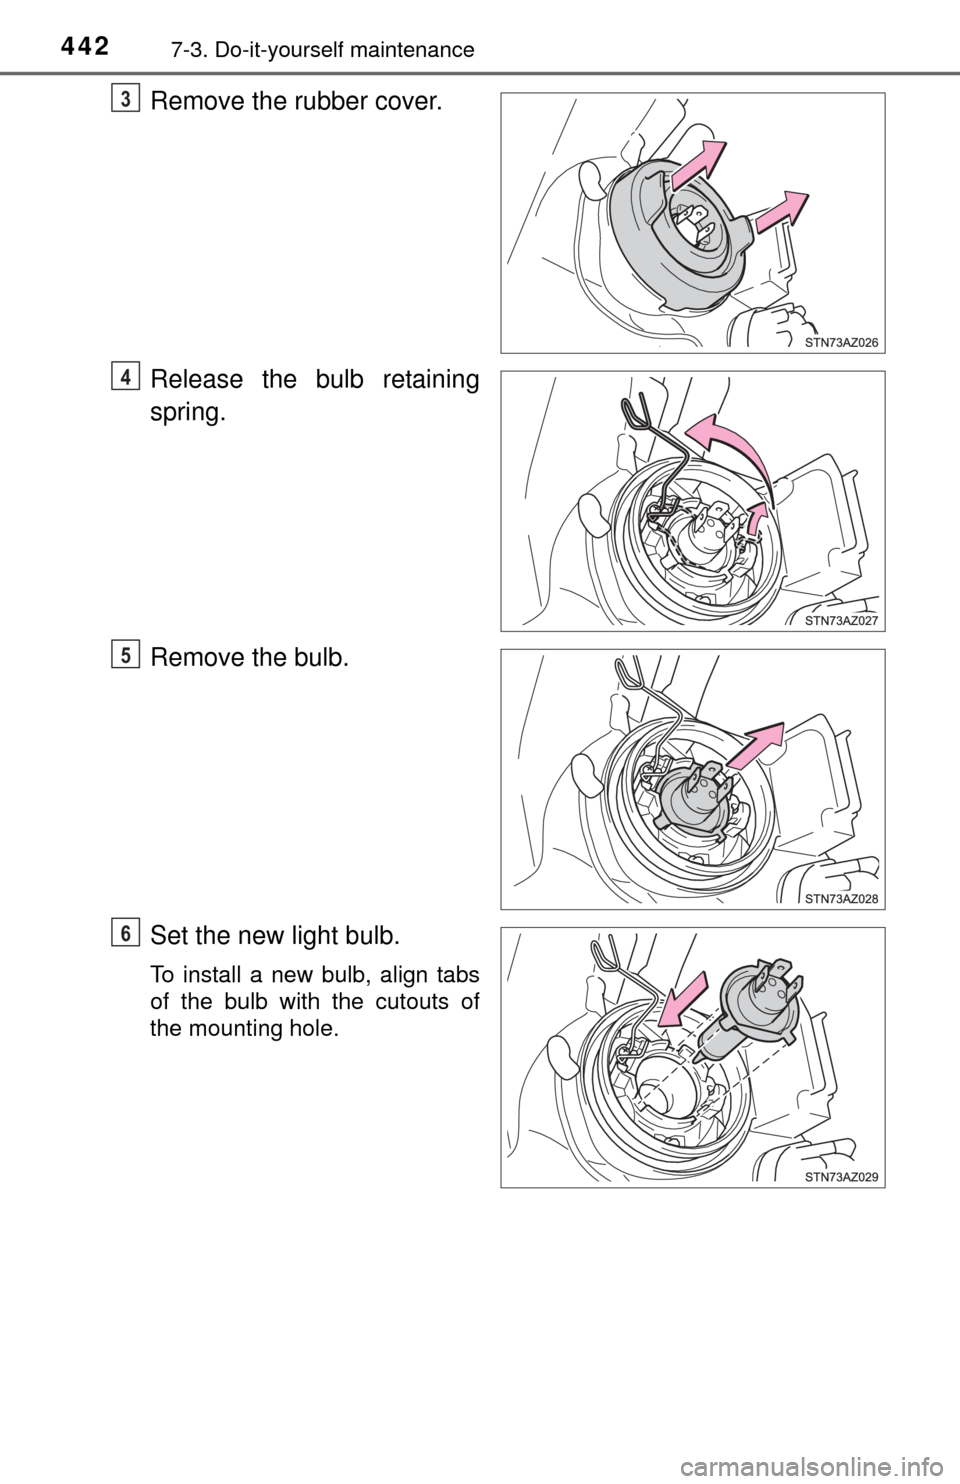
Remove the rubber cover.
Release the bulb retaining
spring.
Remove the bulb.
Set the new light bulb.
To install a new bulb, align tabs
of the bulb with the cutouts of
the mounting hole.
3
4
5
6
Page 443 of 576
4437-3. Do-it-yourself maintenance
7
Maintenance and care
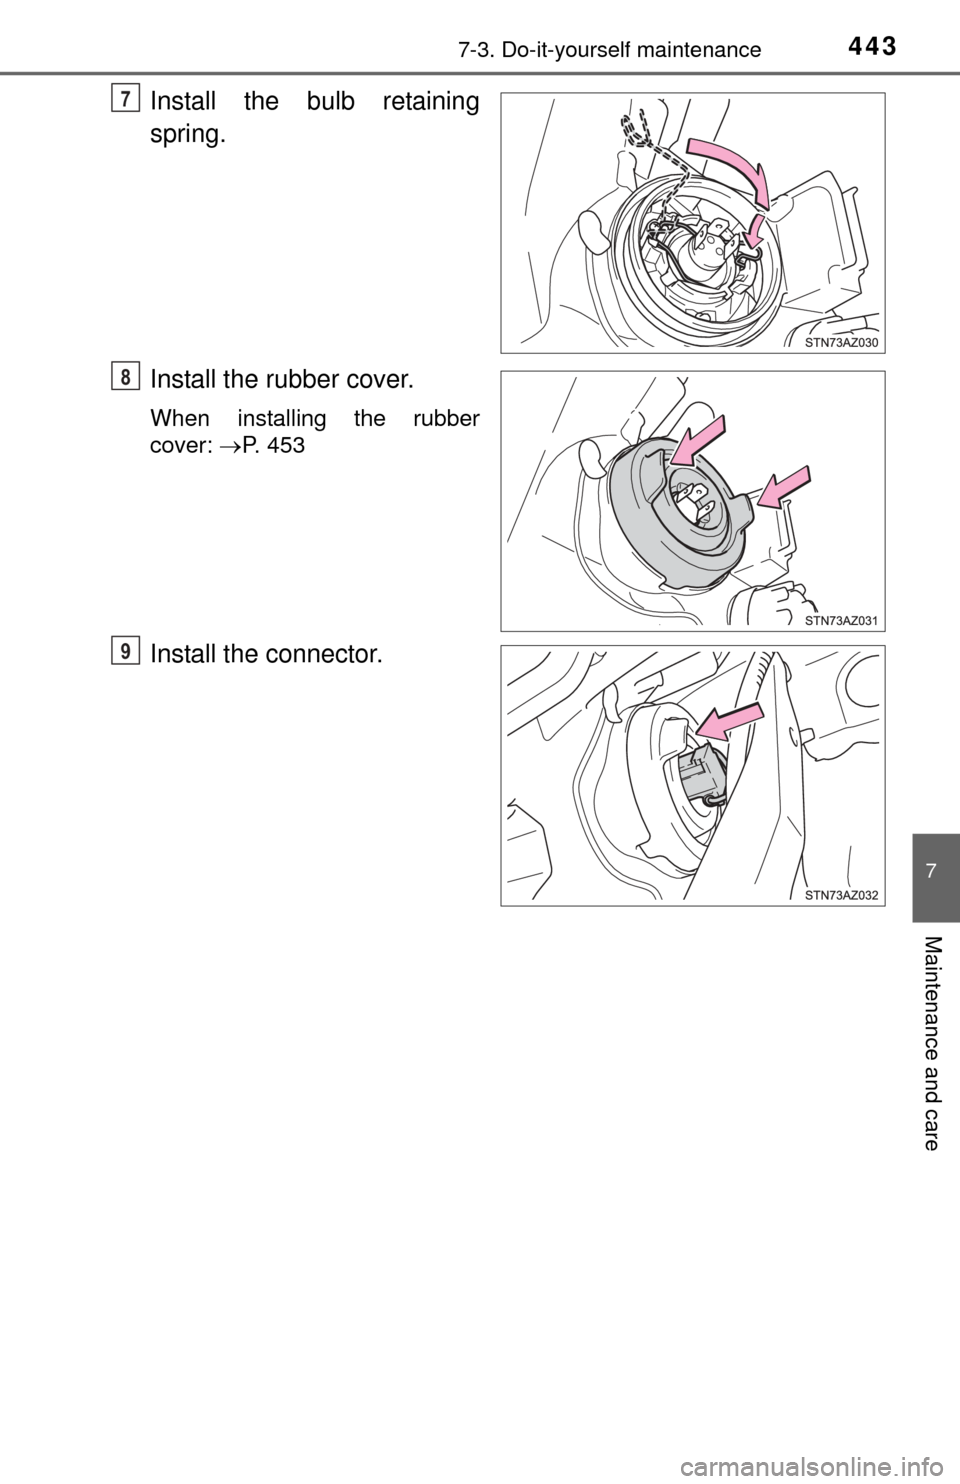
Install the bulb retaining
spring.
Install the rubber cover.
When installing the rubber
cover: P. 453
Install the connector.
7
8
9