tow TOYOTA TUNDRA 2016 2.G User Guide
[x] Cancel search | Manufacturer: TOYOTA, Model Year: 2016, Model line: TUNDRA, Model: TOYOTA TUNDRA 2016 2.GPages: 588, PDF Size: 13.44 MB
Page 110 of 588
1103-2. Opening, closing and locking the doors
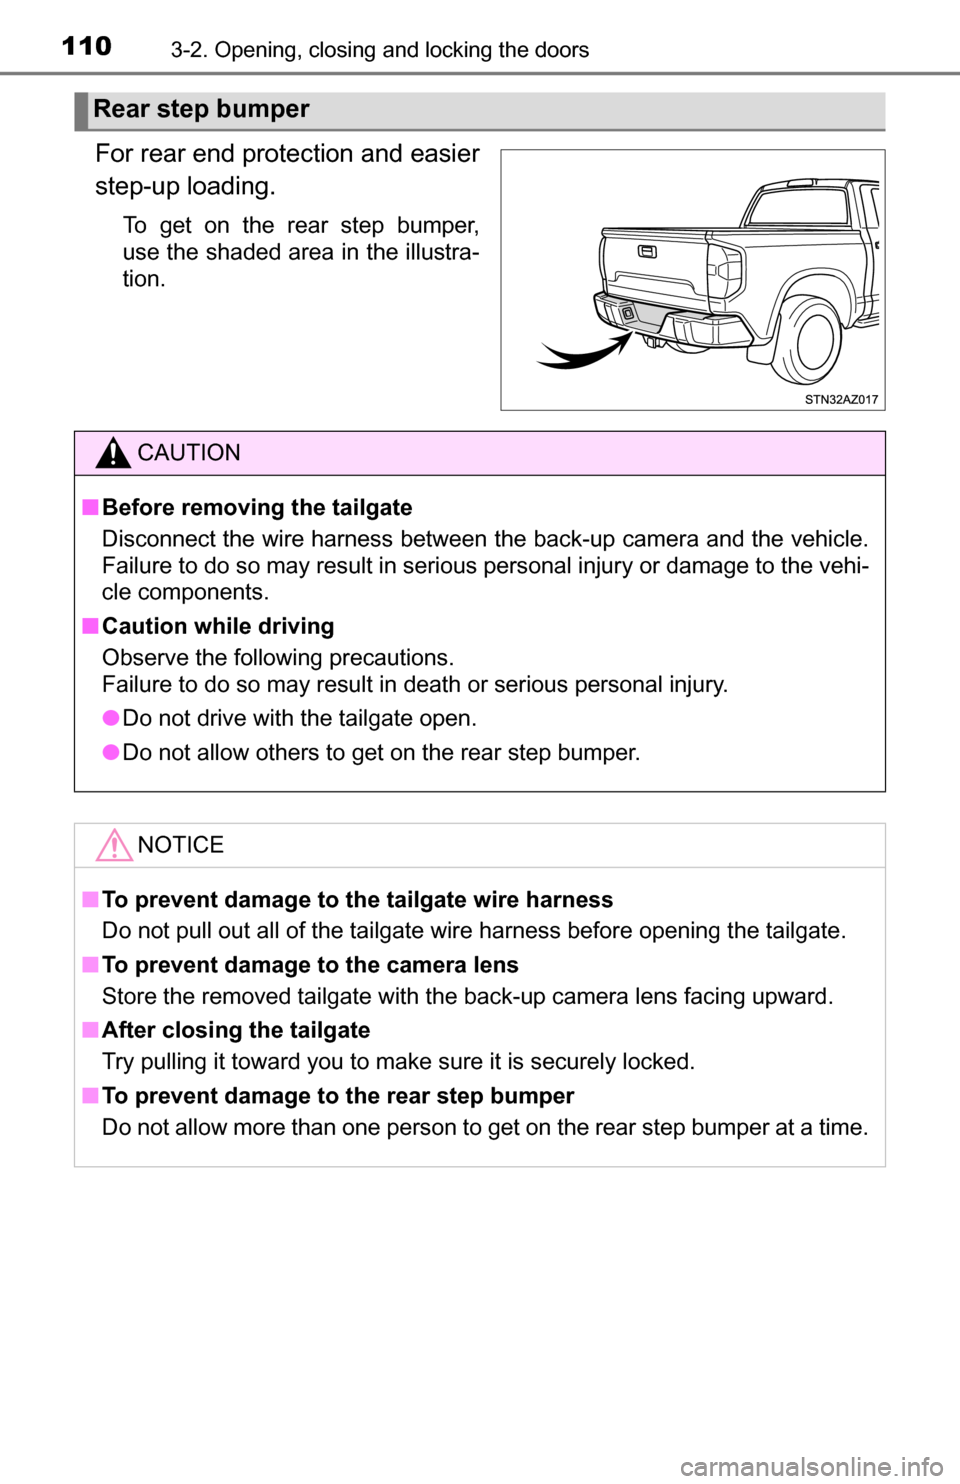
For rear end protection and easier
step-up loading.
To get on the rear step bumper,
use the shaded area in the illustra-
tion.
Rear step bumper
CAUTION
■ Before removing the tailgate
Disconnect the wire harness between the back-up camera and the vehicle.
Failure to do so may result in serious personal injury or damage to the vehi-
cle components.
■ Caution while driving
Observe the following precautions.
Failure to do so may result in death or serious personal injury.
● Do not drive with the tailgate open.
● Do not allow others to get on the rear step bumper.
NOTICE
■To prevent damage to the tailgate wire harness
Do not pull out all of the tailgate wire harness before opening the tailgate.
■ To prevent damage to the camera lens
Store the removed tailgate with the back-up camera lens facing upward.
■ After closing the tailgate
Try pulling it toward you to make sure it is securely locked.
■ To prevent damage to the rear step bumper
Do not allow more than one person to get on the rear step bumper at a time.
Page 115 of 588
1153-3. Adjusting the seats
3
Operation of each component
CAUTION
■When raising the bottom cushion
Observe the following precautions.
Failure to do so may result in death or serious injury.
● Do not raise the bottom cushion while driving.
● Stop the vehicle on level ground, set the parking brake and shift the shift
lever to P.
■ When bottom cushion is raised
Do not allow passengers to sit on raised bottom cushion or place anything
on storage box (Double Cab models) while driving.
■ When returning the seats to their original position
Observe the following precautions.
Failure to do so may result in death or serious injury.
● Be careful not to get your hands or feet pinched in the seat.
● Make sure the bottom cushions are securely locked.
● Check that the seat belts are not twisted or caught in the seat.
● Arrange the seat belts in the proper positions for ready use.
● Make sure that there are no objects under the seat cushion or on the load-
ing floor.
NOTICE
■ Before raising the bottom cushion
● Make sure that there are no objects, such as cushions, on the seat cush-
ion.
● The seat belts must be stowed.
Page 122 of 588
1223-3. Adjusting the seats
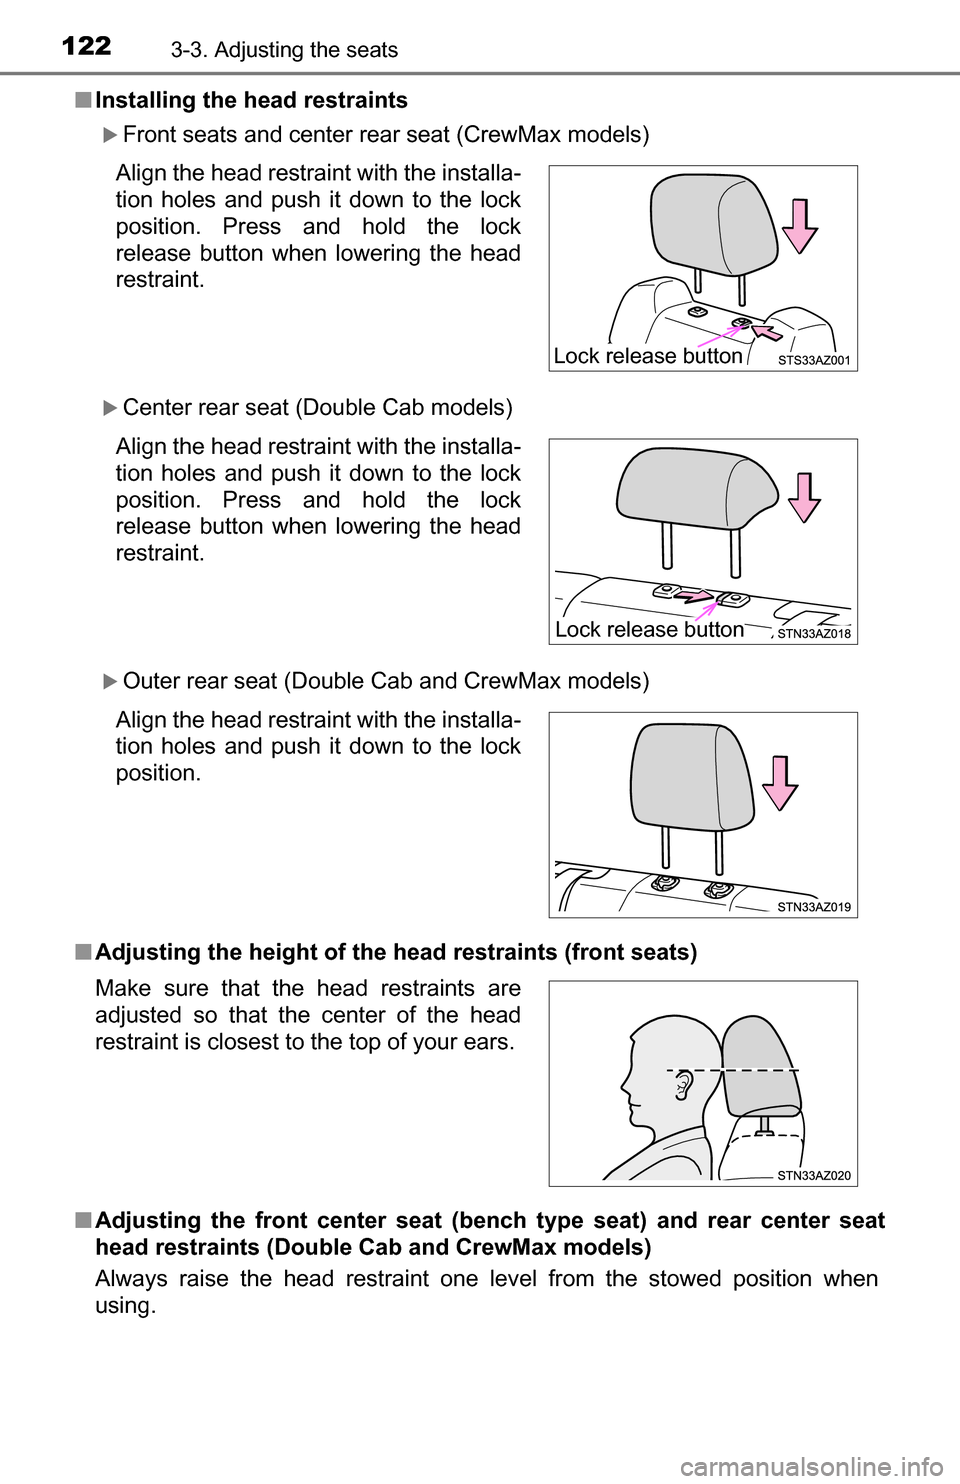
■Installing the head restraints
Front seats and center rear seat (CrewMax models)
Center rear seat (Double Cab models)
Outer rear seat (Double Cab and CrewMax models)
■ Adjusting the height of the head restraints (front seats)
■ Adjusting the front center seat (ben ch type seat) and rear center seat
head restraints (Double Cab and CrewMax models)
Always raise the head restraint one level from the stowed position when
using. Align the head restraint with the installa-
tion holes and push it down to the lock
position. Press and hold the lock
release button when lowering the head
restraint.
Align the head restraint with the installa-
tion holes and push it down to the lock
position. Press and hold the lock
release button when lowering the head
restraint.
Align the head restraint with the installa-
tion holes and push it down to the lock
position.
Make sure that the head restraints are
adjusted so that the center of the head
restraint is closest to the top of your ears.
Lock release button
Lock release button
Page 125 of 588
1253-4. Adjusting the steering wheel and mirrors
3
Operation of each component
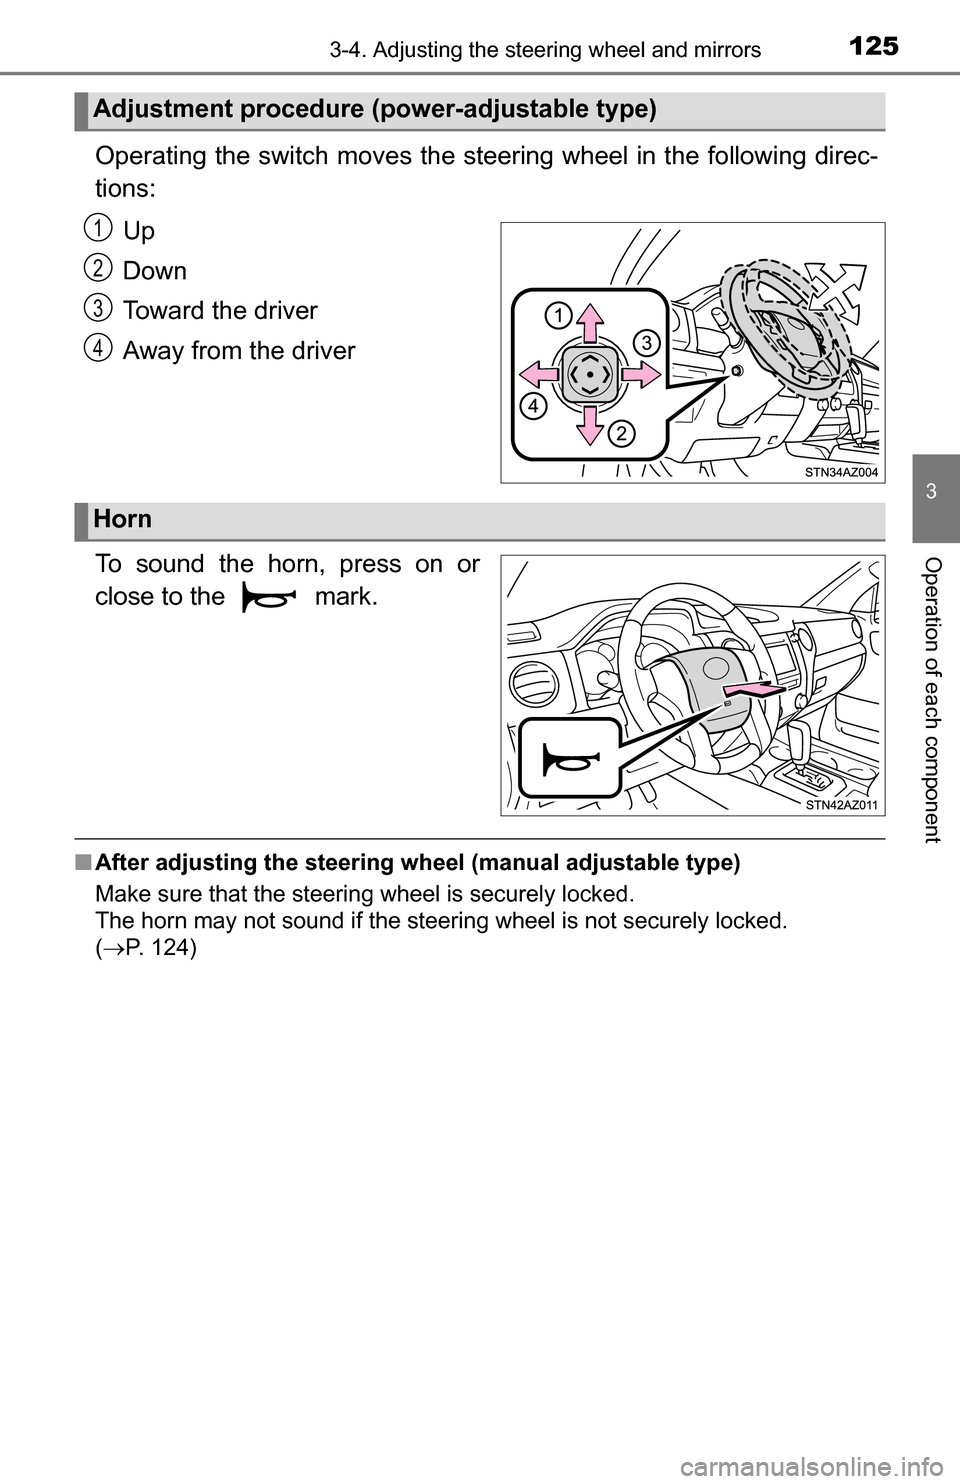
Operating the switch moves the steering wheel in the following direc-
tions:Up
Down
Toward the driver
Away from the driver
To sound the horn, press on or
close to the mark.
■ After adjusting the steering wh eel (manual adjustable type)
Make sure that the steering wheel is securely locked.
The horn may not sound if the steering wheel is not securely locked.
( P. 124)
Adjustment procedure (power-adjustable type)
1
2
3
4
Horn
Page 126 of 588
1263-4. Adjusting the steering wheel and mirrors
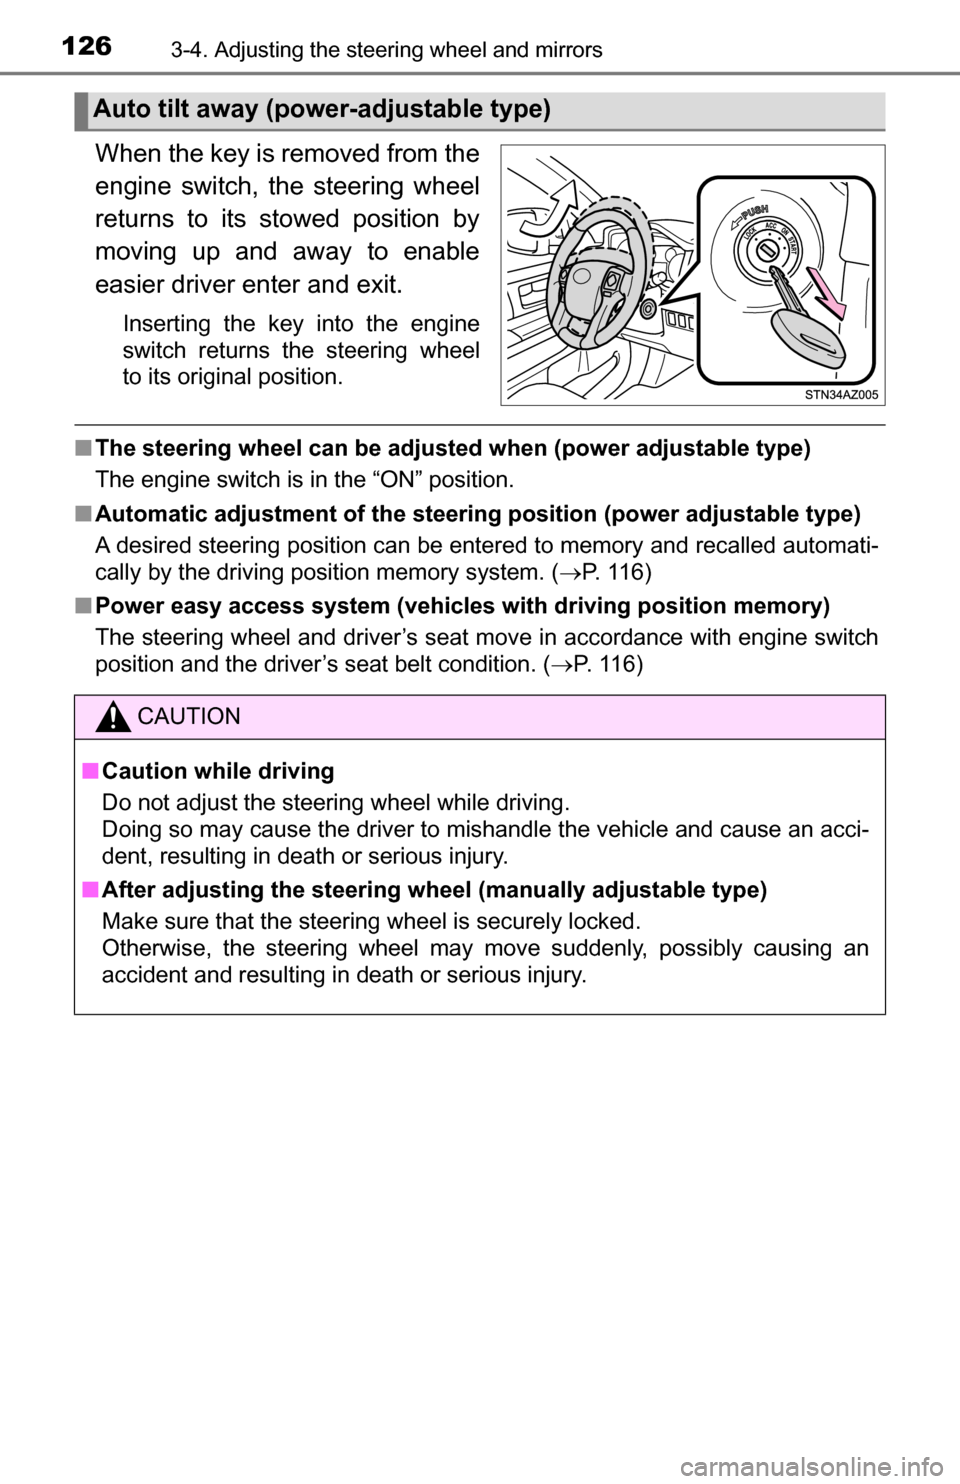
When the key is removed from the
engine switch, the steering wheel
returns to its stowed position by
moving up and away to enable
easier driver enter and exit.
Inserting the key into the engine
switch returns the steering wheel
to its original position.
■The steering wheel can be adjusted when (power adjustable type)
The engine switch is in the “ON” position.
■ Automatic adjustment of the steering position (power adjustable type)
A desired steering position can be entered to memory and recalled automati-
cally by the driving position memory system. ( P. 116)
■ Power easy access system (vehicles with driving position memory)
The steering wheel and driver’s seat move in accordance with engine switch
position and the driver’s seat belt condition. ( P. 116)
Auto tilt away (power-adjustable type)
CAUTION
■ Caution while driving
Do not adjust the steering wheel while driving.
Doing so may cause the driver to mishandle the vehicle and cause an acci-
dent, resulting in death or serious injury.
■ After adjusting the steering wheel (manually adjustable type)
Make sure that the steering wheel is securely locked.
Otherwise, the steering wheel may move suddenly, possibly causing an
accident and resulting in death or serious injury.
Page 132 of 588
1323-4. Adjusting the steering wheel and mirrors
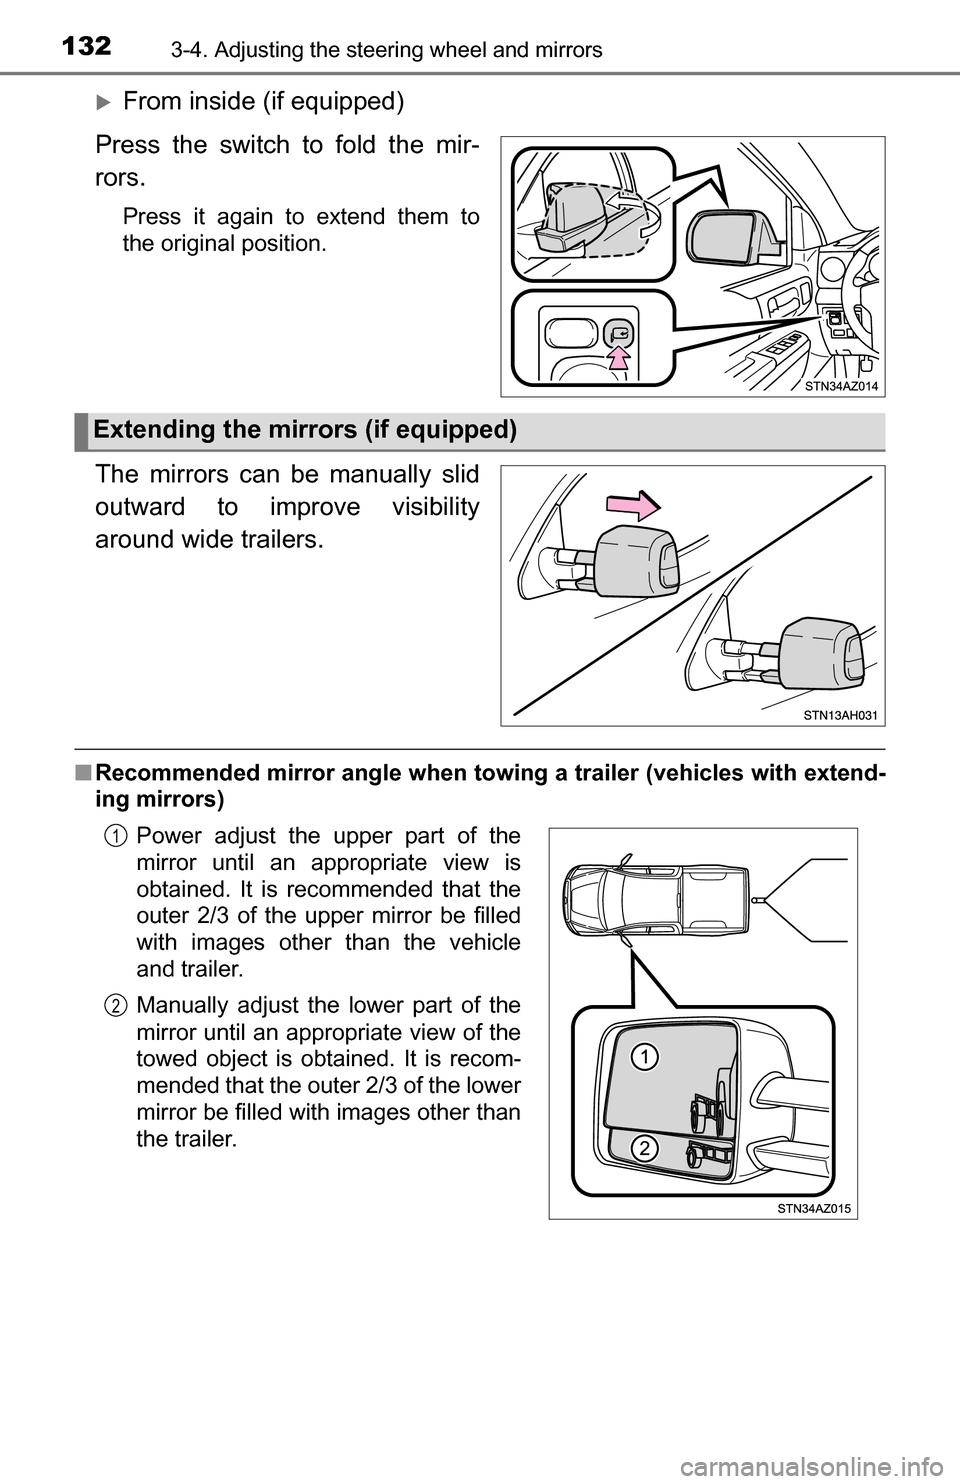
From inside (if equipped)
Press the switch to fold the mir-
rors.
Press it again to extend them to
the original position.
The mirrors can be manually slid
outward to improve visibility
around wide trailers.
■ Recommended mirror angle when to wing a trailer (vehicles with extend-
ing mirrors)
Extending the mirrors (if equipped)
Power adjust the upper part of the
mirror until an appropriate view is
obtained. It is recommended that the
outer 2/3 of the upper mirror be filled
with images other than the vehicle
and trailer.
Manually adjust the lower part of the
mirror until an appropriate view of the
towed object is obtained. It is recom-
mended that the outer 2/3 of the lower
mirror be filled with images other than
the trailer.1
2
Page 143 of 588
1433-5. Opening, closing the windows and moon roof
3
Operation of each component
■Moon roof open reminder function
The buzzer sounds when the engine switch is turned to the “LOCK” position
and the driver’s door is opened with the moon roof open.
■ When the battery is disconnected
The moon roof must be initialized in order to ensure proper operation.
Push and hold the switch toward the “UP” (tilt up) side or “ ▼” (sliding
close) side.
After the moon roof will tilt up and down, release the switch.
To ensure the initialization is complete, make sure automatic opening and
closing functions work properly.
■ Customization that can be configured at Toyota dealer
Settings (e.g. linked door lock operation) can be changed.
(Customizable features: P. 543)
CAUTION
Observe the following precautions.
Failure to do so may cause death or serious injury.
■Opening the moon roof
● Do not allow any passengers to put their hands or heads outside the vehi-
cle while it is moving.
● Do not sit on top of the moon roof.
■ Closing the moon roof
● The driver is responsible for moon roof opening and closing operations. In
order to prevent accidental operation, especially by a child, do not let a
child operate the moon roof. It is possible for children and other passen-
gers to have body parts caught in the moon roof.
● Check to make sure that all passengers do not have any part of their body
in a position where it could be caught when the moon roof is being oper-
ated.
● When using the key and operating the moon roof, operate the moon roof
after checking to make sure that there is no possibility of any passenger
having any of their body parts caught in the moon roof. Also, do not let a
child operate moon roof by the key. It is possible for children and other
passengers to get caught in the moon roof.
● When exiting the vehicle, turn the engine switch off, carry the key and exit
the vehicle along with the child. There may be accidental operation, due to
mischief, etc., that may possibly lead to an accident.
■ Jam protection function
● Never use any part of your body to intentionally activate the jam protection
function.
● The jam protection function may not work if something gets caught just
before the moon roof fully closes.
1
2
3
Page 145 of 588
145
4Driving
4-1. Before drivingDriving the vehicle ............. 146
Cargo and luggage ........... 153
Vehicle load limits ............. 156
Trailer towing..................... 158
Dinghy towing ................... 181
4-2. Driving procedures Engine (ignition) switch ..... 182
Automatic transmission ..... 184
Turn signal lever................ 189
Parking brake .................... 190
4-3. Operating the lights and wipers
Headlight switch ................ 191
Fog light switch ................. 194
Windshield wipers and washer ............................ 195 4-4. Refueling
Opening the fuel tank cap .................................. 198
4-5. Using the driving support systems
Cruise control .................... 202
Intuitive parking assist....... 205
Rear view monitor system ............................ 211
BSM (Blind Spot Monitor) ........ 220
Four-wheel drive system ... 228
AUTO LSD system............ 231
Driving assist systems ...... 233
Trailer brake controller ...... 240
4-6. Driving tips Winter driving tips ............. 243
Off-road precautions ......... 247
Page 147 of 588
1474-1. Before driving
4
Driving
■Driving in the rain
●Drive carefully when it is raining, because visibility will be reduced, the win-
dows may become fogged-up, and the road will be slippery.
● Drive carefully when it starts to rain, because the road surface will be espe-
cially slippery.
● Refrain from high speeds when driving on an expressway in the rain,
because there may be a layer of water between the tires and the road sur-
face, preventing the steering and brakes from operating properly.
■ Engine speed while driving
In the following conditions, the engine speed may become high while driving.
This is due to automatic up-shifting control or down-shifting implementation to
meet driving conditions. It does not indicate sudden acceleration.
●The vehicle is judged to be driving uphill or downhill
● When the accelerator pedal is released
● When the brake pedal is depressed while TOW/HAUL mode is selected (if
equipped)
■ Breaking in your new Toyota
To extend the life of the vehicle, observing the following precautions is recom-
mended:
●For the first 200 miles (300 km):
Avoid sudden stops.
● For the first 500 miles (800 km):
Do not tow a trailer.
● For the first 1000 miles (1600 km):
• Do not drive at extremely high speeds.
• Avoid sudden acceleration.
• Do not drive continuously in low gears.
• Do not drive at a constant speed for extended periods.
■ Drum-in-disc type parking brake system
Your vehicle has a drum-in-disc type par king brake system. This type of brake
system needs bedding-down of the brake shoes periodically or whenever the
parking brake shoes and/or drum are replaced. Have your Toyota dealer per-
form the bedding down operation.
■ Operating your vehicle in a foreign country
Comply with the relevant vehicle registration laws and confirm the availability
of the correct fuel. ( P. 529)
■ When turning off the engine
The emission system operating sounds may continue for a short time after
the engine is turned off. This is not a malfunction, and helps to ensure optimal
performance of the emission system.
Page 153 of 588
1534-1. Before driving
4
Driving
Cargo and luggage
Cargo capacity depends on the total weight of the occupants.
(Cargo capacity) = (Total load capacity) (Total weight of occupants)
Steps for Determining Correct Load Limit —
(1) Locate the statement “The comb ined weight of occupants and
cargo should never exceed XXX kg or XXX lbs.” on your vehicle’s
placard.
(2) Determine the combined weight of the driver and passengers that
will be riding in your vehicle.
(3) Subtract the combined weight of the driver and passengers from
XXX kg or XXX lbs.
(4) The resulting figure equals the available amount of cargo and lug- gage load capacity.
For example, if the “ XXX” amount equals 1400 lbs. and there will be
five 150 lb passengers in your v ehicle, the amount of available
cargo and luggage load capacity is 650 lbs. (1400 750 (5150) =
650 lbs.)
(5) Determine the combined weight of luggage and cargo being loaded on the vehicle. That weight ma y not safely exceed the available
cargo and luggage load capacity calculated in Step 4.
(6) If your vehicle will be towing a tr ailer, load from your trailer will be
transferred to your vehicle. Consult this manual to determine how
this reduces the available cargo and luggage load capacity of your
vehicle. ( P. 156)
Take notice of the following information about storage precau-
tions, cargo capacity and load:
Capacity and distribution