TOYOTA TUNDRA 2018 Owners Manual (in English)
Manufacturer: TOYOTA, Model Year: 2018, Model line: TUNDRA, Model: TOYOTA TUNDRA 2018Pages: 672, PDF Size: 14.09 MB
Page 101 of 672
1012. Instrument cluster
2
Instrument cluster
Warning message display
Select to display warning messages and measures to be taken if a
malfunction is detected. ( P. 555)
Settings display
Select to change the meter display settings. ( P. 102)
*: If equipped
■
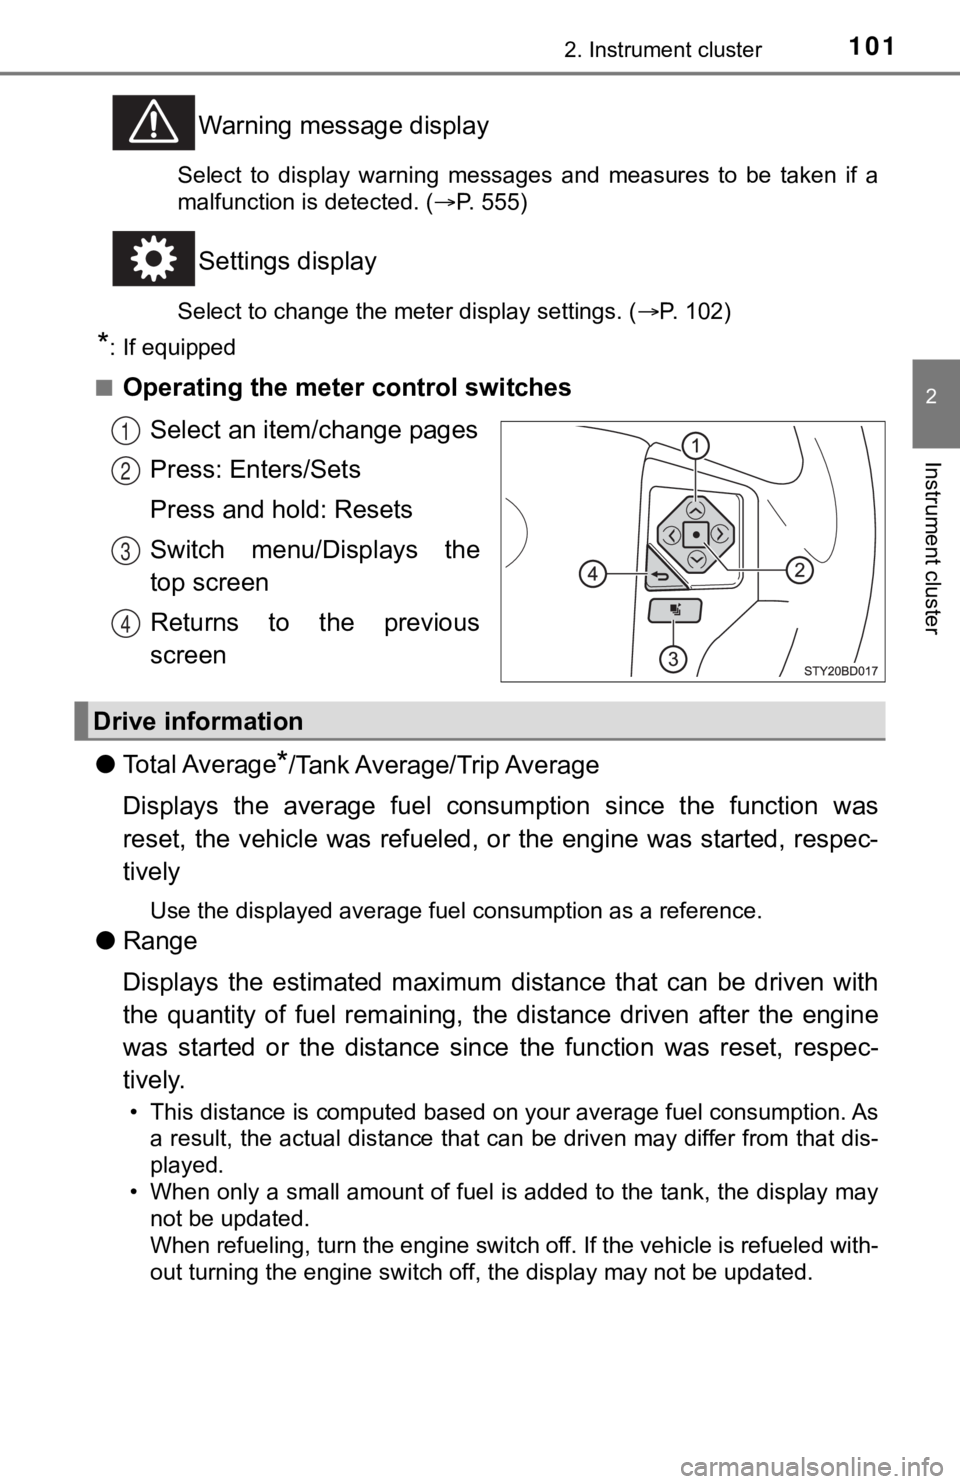
Operating the meter control switches Select an item/change pages
Press: Enters/Sets
Press and hold: Resets
Switch menu/Displays the
top screen
Returns to the previous
screen
● To t a l A v e r a g e
*/Tank Average/Trip Average
Displays the average fuel consum ption since the function was
reset, the vehicle was refueled , or the engine was started, res pec-
tively
Use the displayed average fuel consumption as a reference.
● Range
Displays the estimated maximum distance that can be driven with
the quantity of fuel remaining, t he distance driven after the engine
was started or the distance since the function was reset, respec-
tively.
• This distance is computed based on your average fuel consumpti on. As
a result, the actual distance that can be driven may differ fro m that dis-
played.
• When only a small amount of fuel is added to the tank, the dis play may
not be updated.
When refueling, turn the engine switch off. If the vehicle is r efueled with-
out turning the engine switch off, the display may not be updat ed.
1
2
3
4
Drive information
Page 102 of 672
1022. Instrument cluster
●Current
Displays the current rat e of fuel consumption
● Average Speed
*/Trip Average Speed
Displays the average since engine was started or the average si nce
the function was reset, respectively
● To t a l T i m e
*/Trip Time
Displays the engine was started or the elapsed time since the func-
tion was reset, respectively
● Trip distance
Displays the distance sin ce the engine was started
● Digital speedometer
● Display off
A blank screen is displayed
*: Resetting procedures:
• Select a function to be reset using the meter control switch a nd then
press and hold the center button to reset.
• If there is more than one function that can be reset, check bo xes will be
displayed next to the functions.
The settings of the following items can be changed, refer to P. 624.
For functions that can be enabled or disabled, the function swi tches
between on and off each time is pressed.
● LDA (Lane Departure Alert)*1 (→P. 627)
• LDA Sensitivity
Select to set up the LDA (Lane Departure Alert) sensitivity.
• Sway warning
Select to enable/disable the Sway warning function.
• Sway warning sensitivity
Select to set up the sway warning sensitivity.
● PCS (Pre-Collision System)*1 (→P. 627)
•PCS
Select to enable/disable the PCS (Pre-Collision System) function.
• Sensitivity
Select to set up the PCS (Pre-Collision System) sensitivity.
Settings display
Page 103 of 672

1032. Instrument cluster
2
Instrument cluster
●BSM (Blind Spot Monitor)*1 (→P. 627)
Select to enable/disable the Blind Spot Monitor function.
● RCTA (Rear Cross Traffic Alert)
*1 (→P. 627)
Select to enable/disable the Rear Cross Traffic Alert function.
● Vehicle Settings
• BSM Brightness*1 (P. 627)
Select to set up the BSM (Blind Spot Monitor) outside rear view mirror
indicators brightness.
•RCTA volume
*1 ( P. 627)
Select to set up the RCTA (Rear Cross Traffic Alert) warning buzzer vol-
ume.
• TBC Trailer Type
*1 ( P. 628)
Select to set up the trailer brake type.
• Maintenance reset
*2 ( P. 477)
Select to reset the message after the required maintenance is p er-
formed.
Page 104 of 672

1042. Instrument cluster
●Meter setting
• Language
Select to change the language on the display.
•Units
Select to change the unit of measure for fuel consumption and t empera-
ture.
• Switch settings
You can register 1 screen as the top screen. To register, press and hold
while the desired screen is displayed.
There are also screens that cannot be setup as the Top Screen.
• Drive information 1 and 2
Select to select up to 2 items that will be displayed on a Driv e informa-
tion screen, up to 2 Drive information screens can be set.
• Pop-up display
Select to set the following pop-up displays, which may appear i n some
situations, on/off. • Route guidance display of the navigation system-linked system (if
equipped)
• Incoming call display of the hands-free phone system
• Instrument panel brightness adjustment display
• Accent color
Select to change the accent colors on the screen, such as the m enu
icon color.
• Default settings
Registered or changed meter settings will be deleted or returne d to their
default setting.
*1: If equipped
*2: For vehicles sold in the U.S.A.
Page 105 of 672

1052. Instrument cluster
2
Instrument cluster
■Setting items
●“Vehicle Settings” and “Meter Settings” setting items are not s electable
during driving and cannot be operated.
Also, the settings screen is temporarily canceled in the follow ing situations.
• When a warning message appears.
• When the vehicle begins to move.
● Settings for functions not equipped to the vehicle are not displayed.
● When a function is turned off, the related settings for that fu nction are not
selectable.
■ Pop-up display
In some situations, such as when a switch operation is performe d, a pop-up
display will be temporarily displayed on the multi-information display.
■ When disconnecting and reco nnecting battery terminals
The drive information will be reset.
■ Trip summary display
When the engine switch is turned off, each of the following wil l be displayed
on the multi-information display, and will clear after approximately 30 sec-
onds.
● Distance traveled
● Average fuel consumption
● Driving range
■ Tire inflation pressure
●It may take a few minutes to display the tire inflation pressur e after the
engine switch is turned to the “ON” position. It may also take a few minutes
to display the tire inflation pressure after inflation pressure has been
adjusted.
● “---” may be displayed if the tire position information cannot be determined
due to unfavorable radio wave conditions.
● Tire inflation pressure changes with temperature. The displayed values may
also be different from the values measured using a tire pressur e gauge.
■ Liquid crystal display
Small spots or light spots may appear on the display. This phen omenon is
characteristic of liquid crystal displays, and there is no prob lem continuing to
use the display.
Page 106 of 672
1062. Instrument cluster
WARNING
■Caution for use while driving
● When operating the multi-information display while driving, pay extra
attention to the safety of the area around the vehicle.
● Do not look continuously at the multi-information display while driving as
you may fail to see pedestrians, objects on the road, etc. ahea d of the
vehicle.
■ Cautions during setting up the display
As the engine needs to be running during setting up the display , ensure that
the vehicle is parked in a place with adequate ventilation. In a closed area
such as a garage, exhaust gases including harmful carbon monoxi de (CO)
may collect and enter the vehicle. This may lead to death or a serious
health hazard.
NOTICE
■ During setting up the display
To prevent battery discharge, ensure that the engine is running while setting
up the display features.
Page 107 of 672
1072. Instrument cluster
2
Instrument cluster
Fuel consumption information
Entune Audio
Press the “TRUCK” button.
Entune Premium Audio and Entune Audio Plus
Press the “APPS” button, and t hen select “Eco” on the screen.
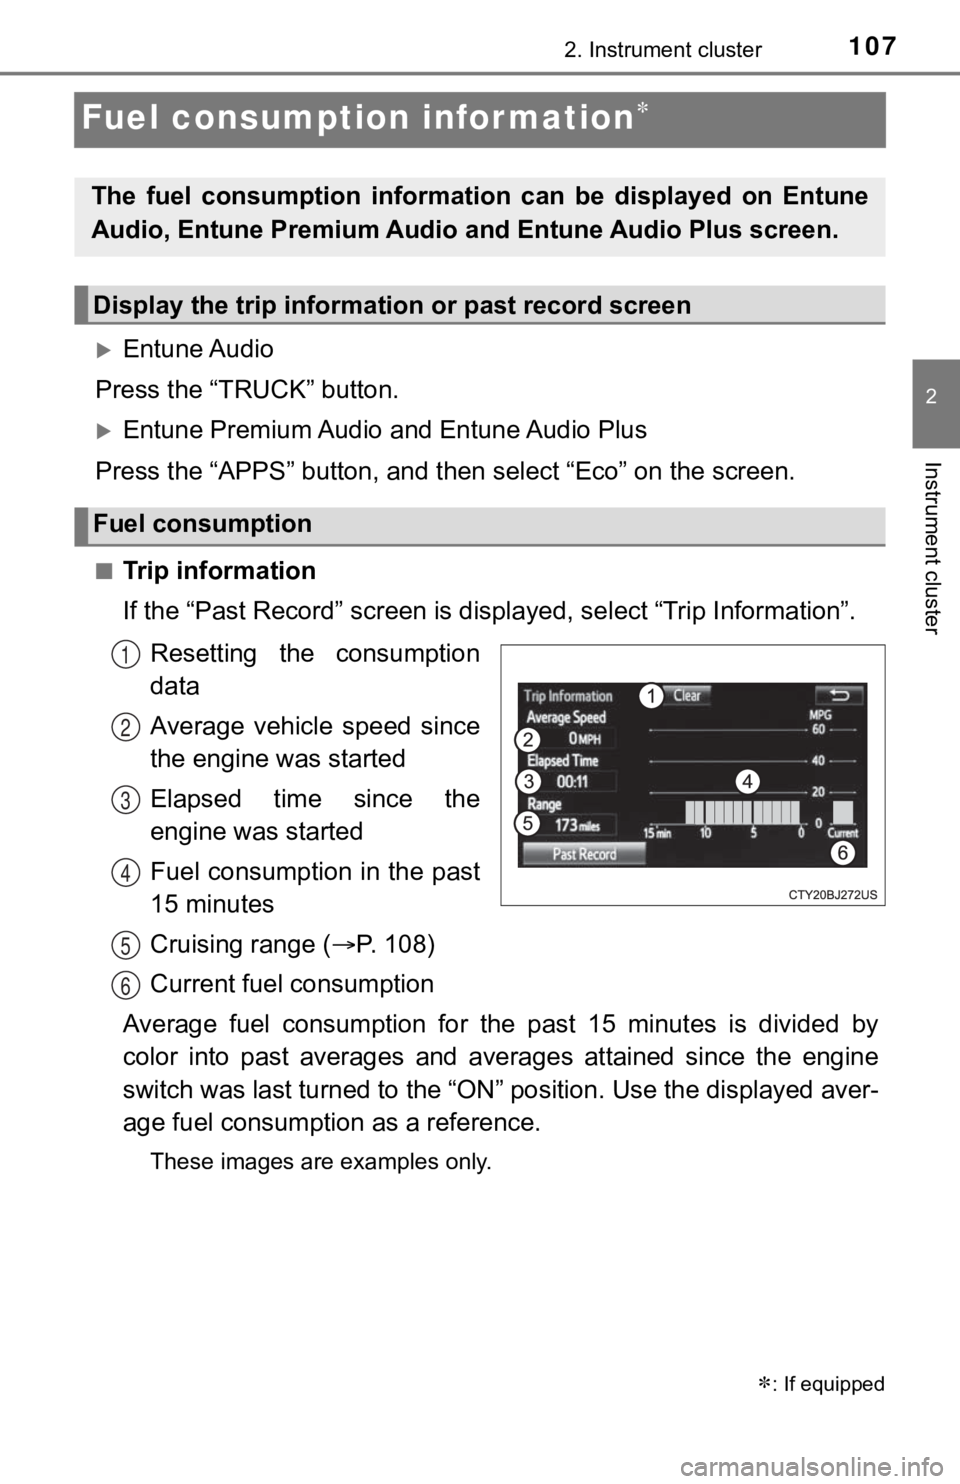
■Trip information
If the “Past Record” screen is displayed, select “Trip Informat ion”.
Resetting the consumption
data
Average vehicle speed since
the engine was started
Elapsed time since the
engine was started
Fuel consumption in the past
15 minutes
Cruising range ( P. 108)
Current fuel consumption
Average fuel consumption for the past 15 minutes is divided by
color into past averages and averages attained since the engine
switch was last turned to the “ON” position. Use the displayed aver-
age fuel consumpti on as a reference.
These images are examples only.
: If equipped
The fuel consumption information can be displayed on Entune
Audio, Entune Premium Audio and Entune Audio Plus screen.
Display the trip information or past record screen
Fuel consumption
1
2
3
4
5
6
Page 108 of 672
1082. Instrument cluster
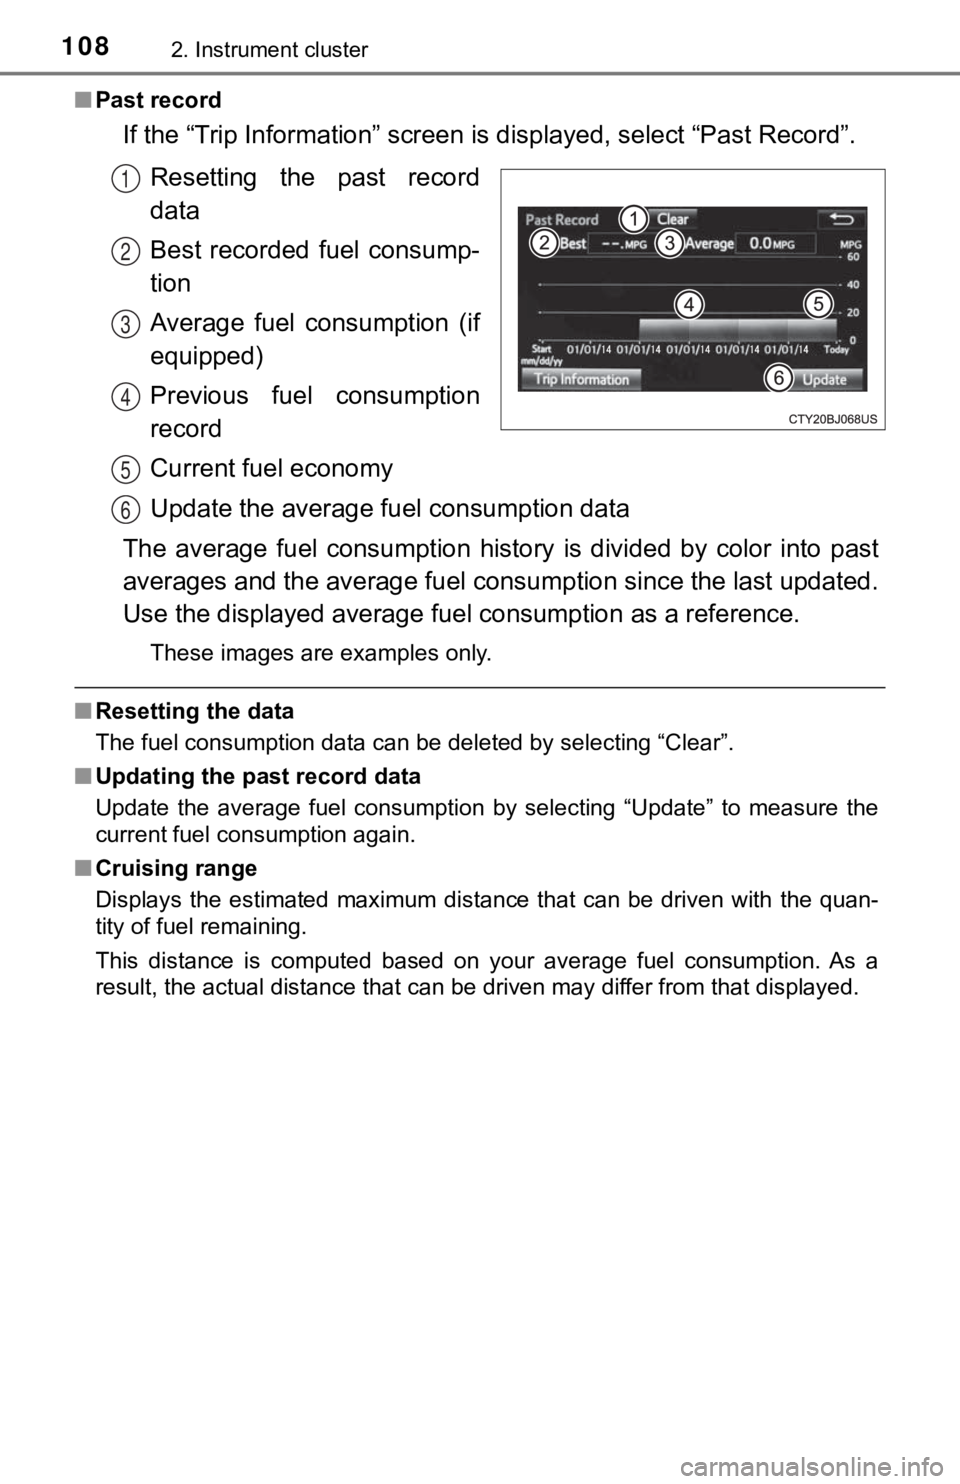
■Past record
If the “Trip Information” screen is displayed, select “Past Record”.
Resetting the past record
data
Best recorded fuel consump-
tion
Average fuel consumption (if
equipped)
Previous fuel consumption
record
Current fuel economy
Update the average fu el consumption data
The average fuel consumption history is divided by color into p ast
averages and the average fuel con sumption since the last updated.
Use the displayed average fuel consumption as a reference.
These images are examples only.
■ Resetting the data
The fuel consumption data can be deleted by selecting “Clear”.
■ Updating the past record data
Update the average fuel consumption by selecting “Update” to me asure the
current fuel consumption again.
■ Cruising range
Displays the estimated maximum distance that can be driven with the quan-
tity of fuel remaining.
This distance is computed based on your average fuel consumptio n. As a
result, the actual distance that can be driven may differ from that displayed.
1
2
3
4
5
6
Page 109 of 672

109
3
Operation of
each component
3-1. Key information
Keys .................................. 110
3-2. Opening, closing and locking the doors
Side doors ......................... 114
Tailgate ............................. 118
3-3. Adjusting the seats Front seats ........................ 123
Rear seats ......................... 126
Driving position memory (driver’s seat) .................. 128
Head restraints .................. 132
3-4. Adjusting the steering wheel and mirrors
Steering wheel .................. 136
Inside rear view mirror....... 139
Outside rear view mirrors ............................. 142 3-5. Opening, closing the
windows and moon roof
Power windows ................. 147
Back window ..................... 150
Power back window .......... 151
Moon roof .......................... 154
Page 110 of 672
1103-1. Key information
Keys
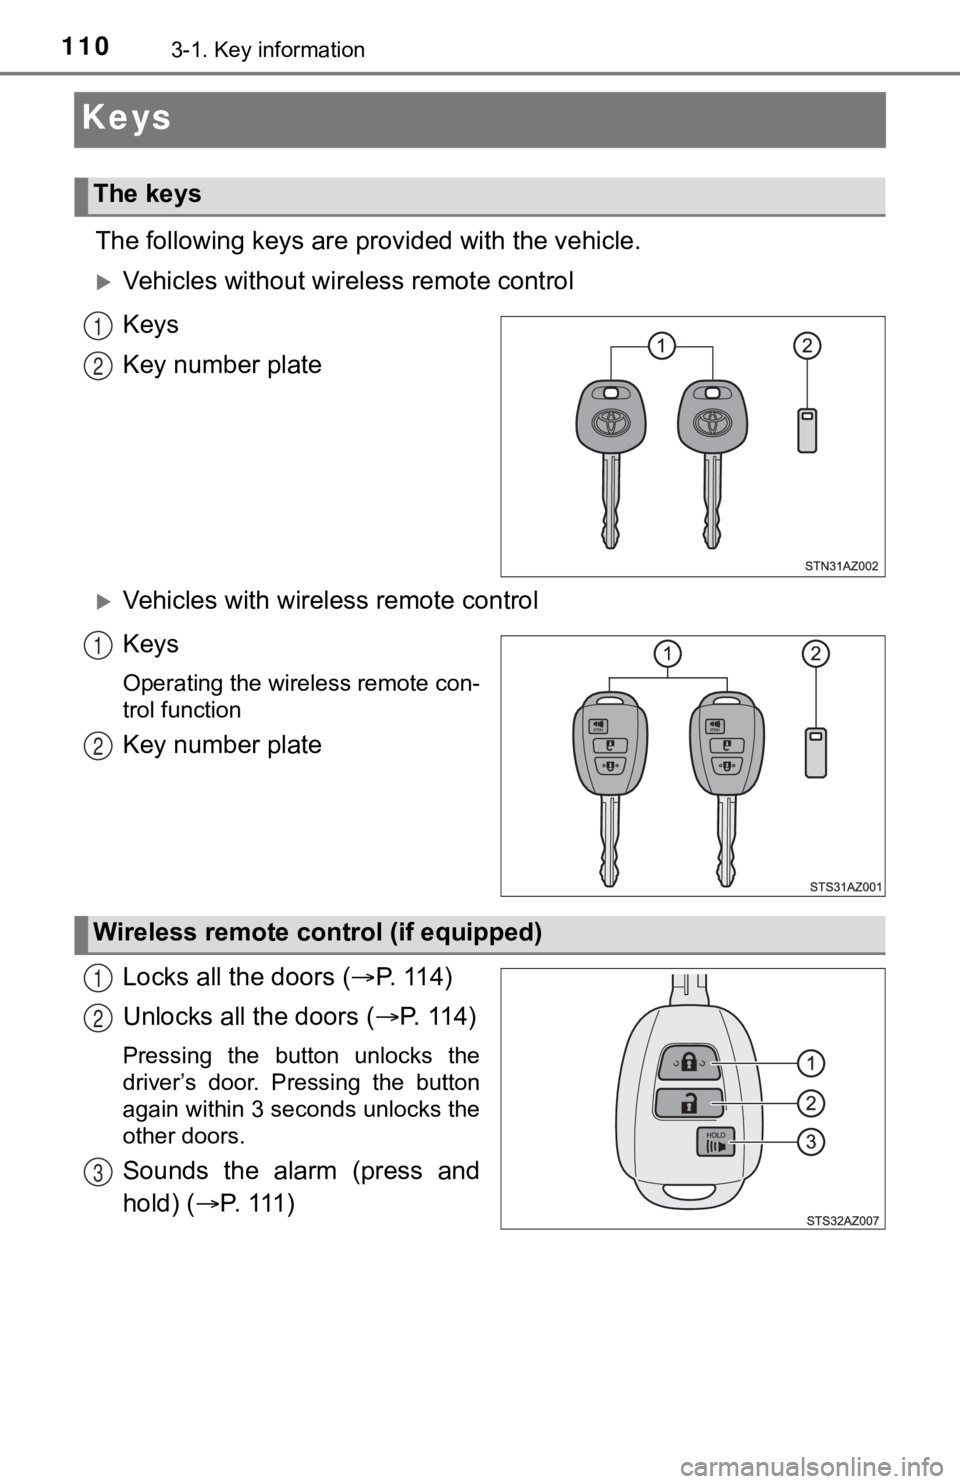
The following keys are provided with the vehicle.
Vehicles without wireless remote control
Keys
Key number plate
Vehicles with wireless remote control
Keys
Operating the wireless remote con-
trol function
Key number plate
Locks all the doors ( P. 1 1 4 )
Unlocks all the doors ( P. 1 1 4 )
Pressing the button unlocks the
driver’s door. Pressing the button
again within 3 seconds unlocks the
other doors.
Sounds the alarm (press and
hold) ( P. 1 1 1 )
The keys
1
2
1
2
Wireless remote control (if equipped)
1
2
3