TOYOTA TUNDRA 2019 Owners Manual (in English)
Manufacturer: TOYOTA, Model Year: 2019, Model line: TUNDRA, Model: TOYOTA TUNDRA 2019Pages: 672, PDF Size: 14.1 MB
Page 451 of 672
4516-4. Using the other interior features
6
Interior features
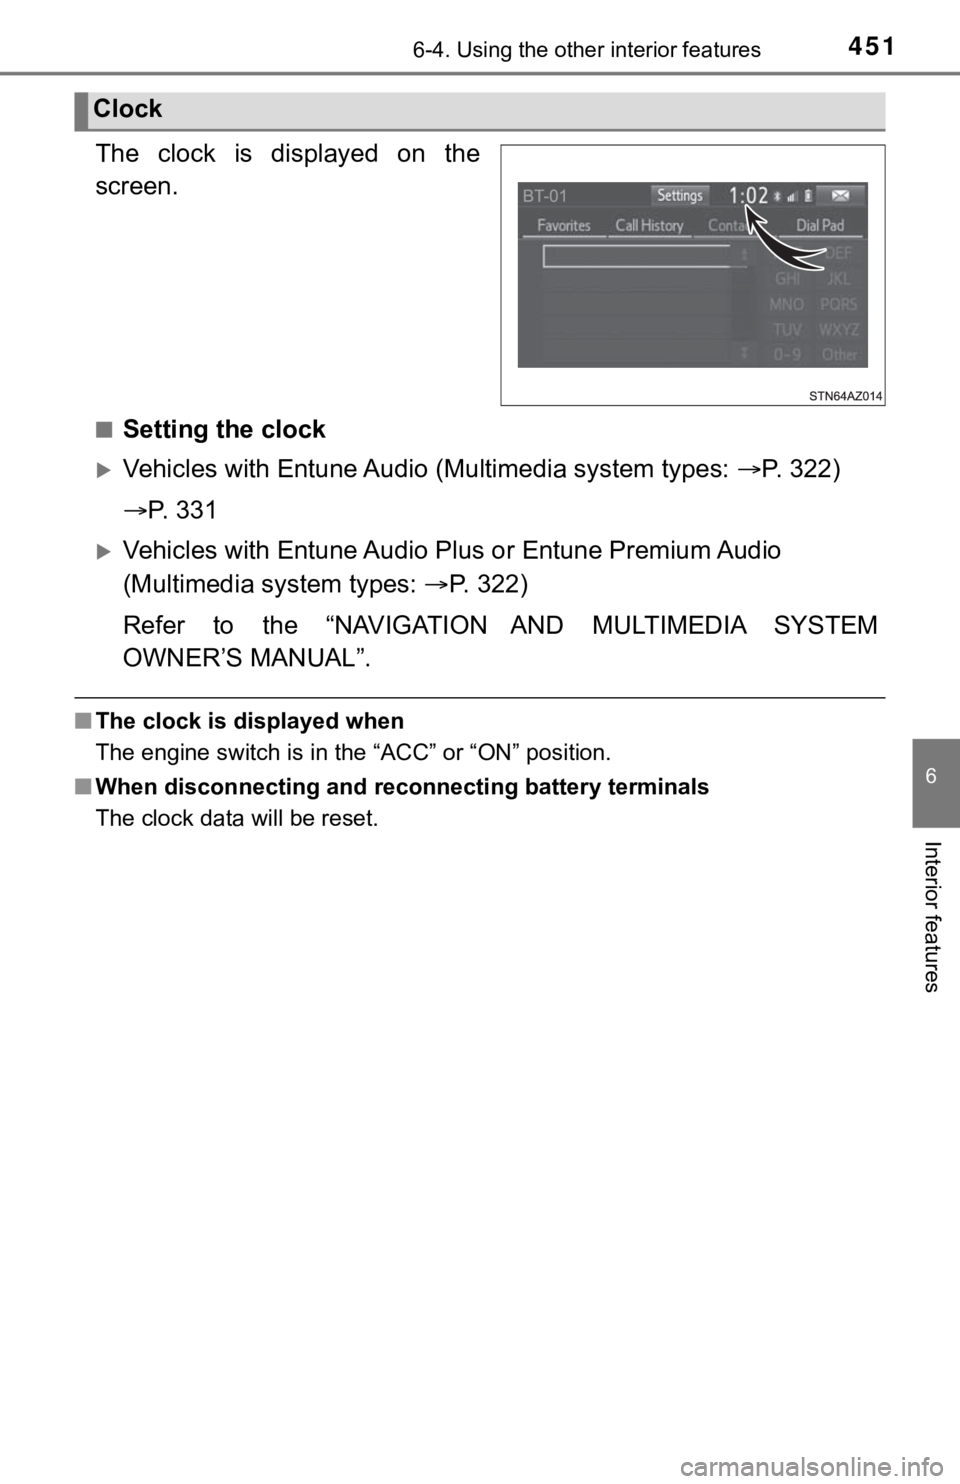
The clock is displayed on the
screen.
■Setting the clock
Vehicles with Entune Audio (Multimedia system types: P. 322)
P. 3 3 1
Vehicles with Entune Audio P lus or Entune Premium Audio
(Multimedia system types: P. 322)
Refer to the “NAVIGATION AND MULTIMEDIA SYSTEM
OWNER’S MANUAL”.
■ The clock is displayed when
The engine switch is in the “ACC” or “ON” position.
■ When disconnecting and reco nnecting battery terminals
The clock data will be reset.
Clock
Page 452 of 672
4526-4. Using the other interior features
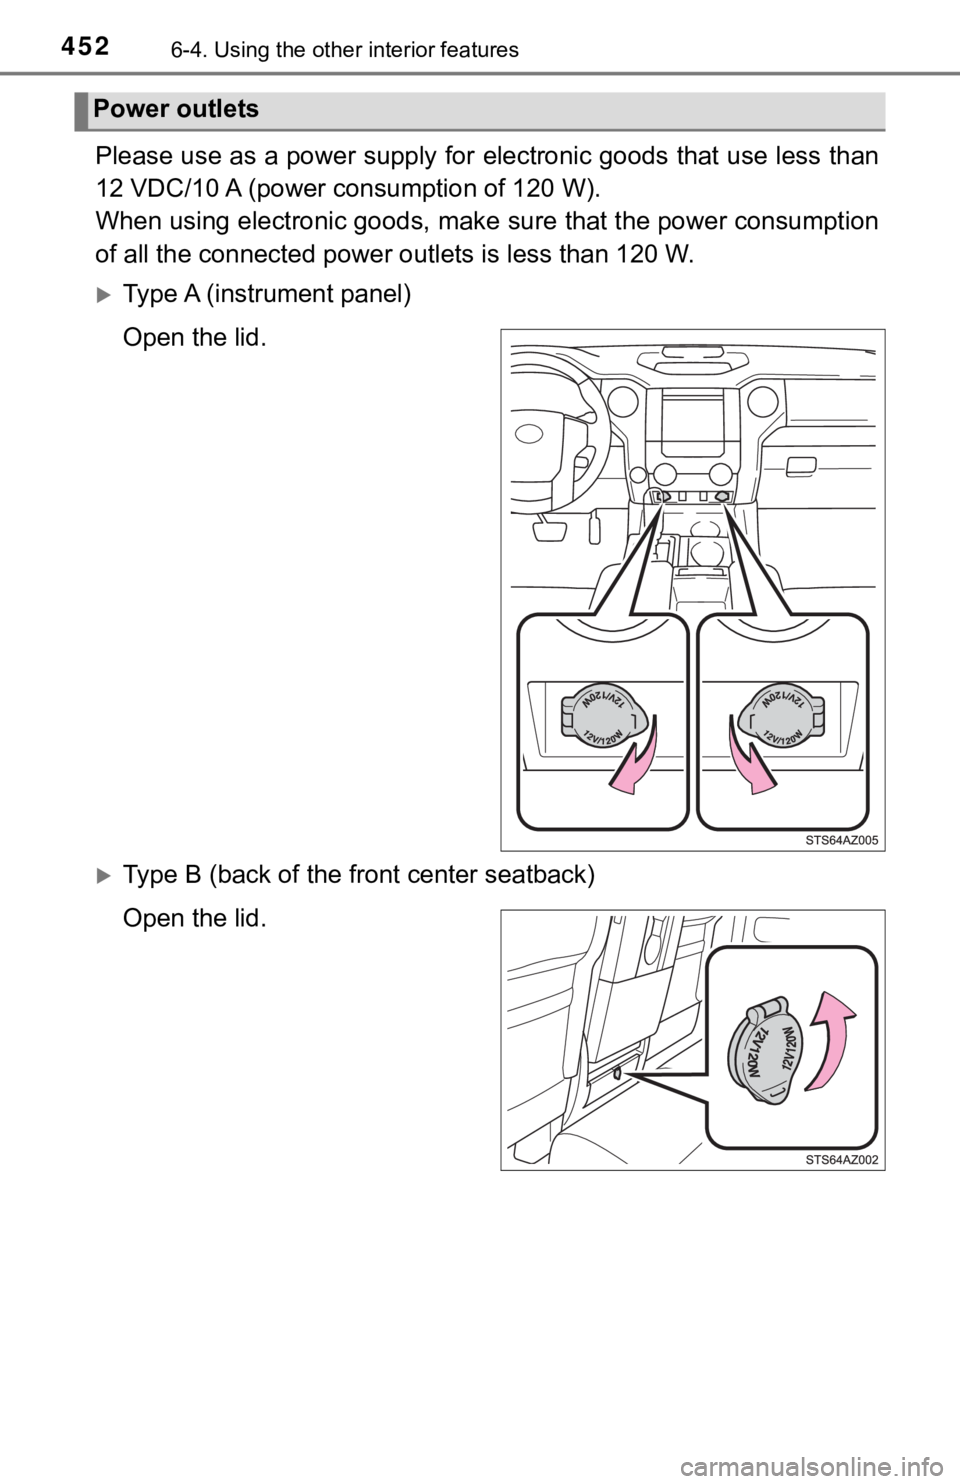
Please use as a power supply for electronic goods that use less than
12 VDC/10 A (power c onsumption of 120 W).
When using electronic goods, make sure that the power consumption
of all the connected power outlets is less than 120 W.
Type A (instrument panel)
Open the lid.
Type B (back of the f ront center seatback)
Open the lid.
Power outlets
Page 453 of 672
4536-4. Using the other interior features
6
Interior features
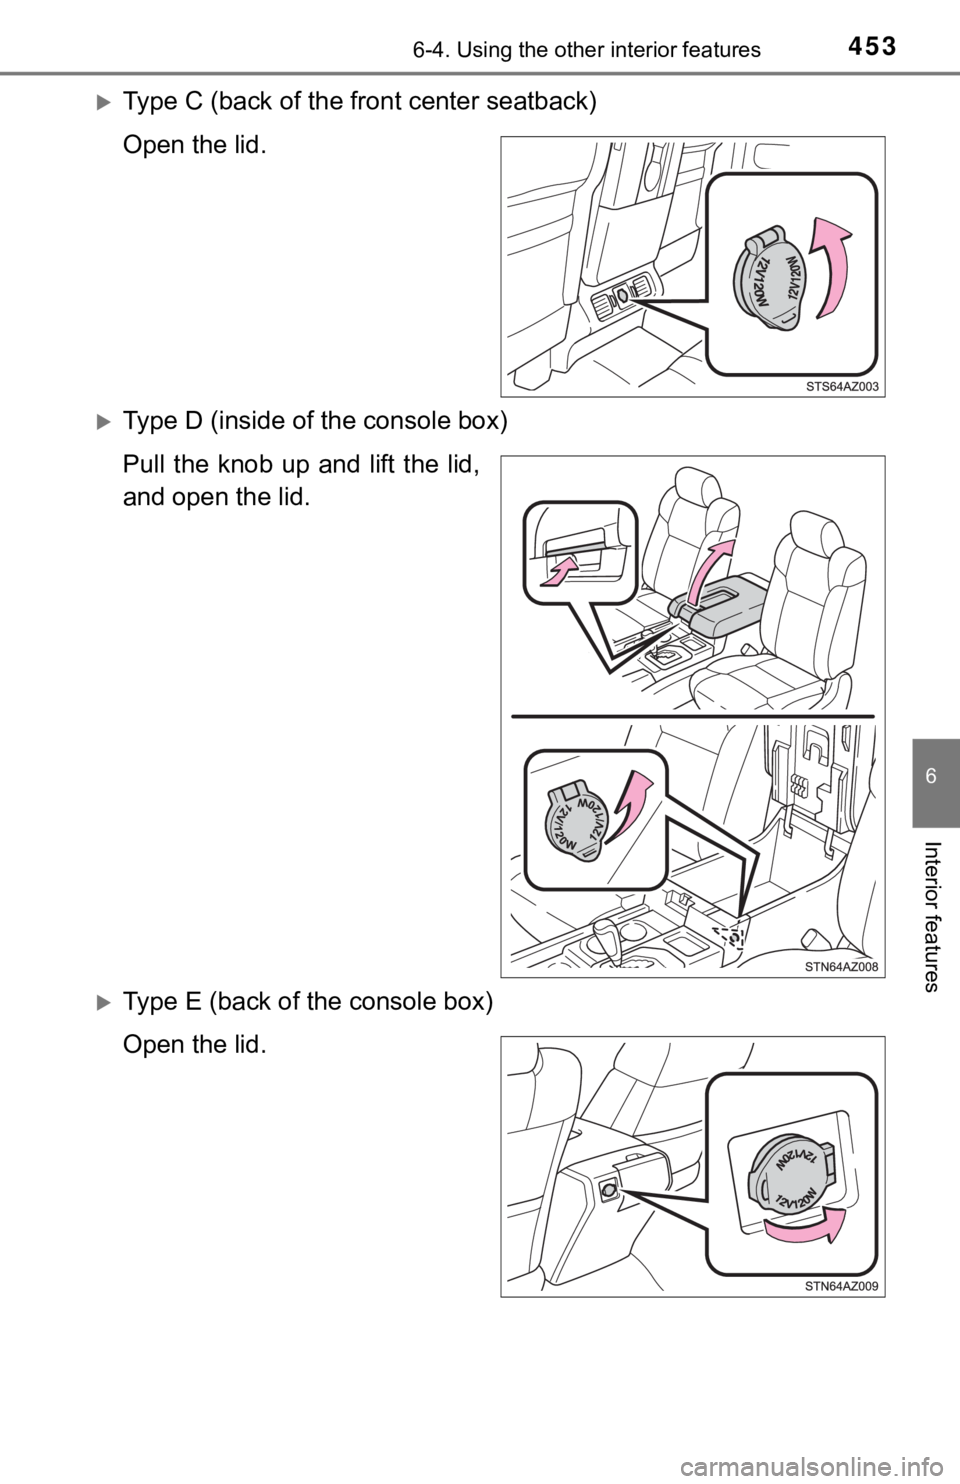
Type C (back of the front center seatback)
Open the lid.
Type D (inside of the console box)
Pull the knob up and lift the lid,
and open the lid.
Type E (back of the console box)
Open the lid.
Page 454 of 672
4546-4. Using the other interior features
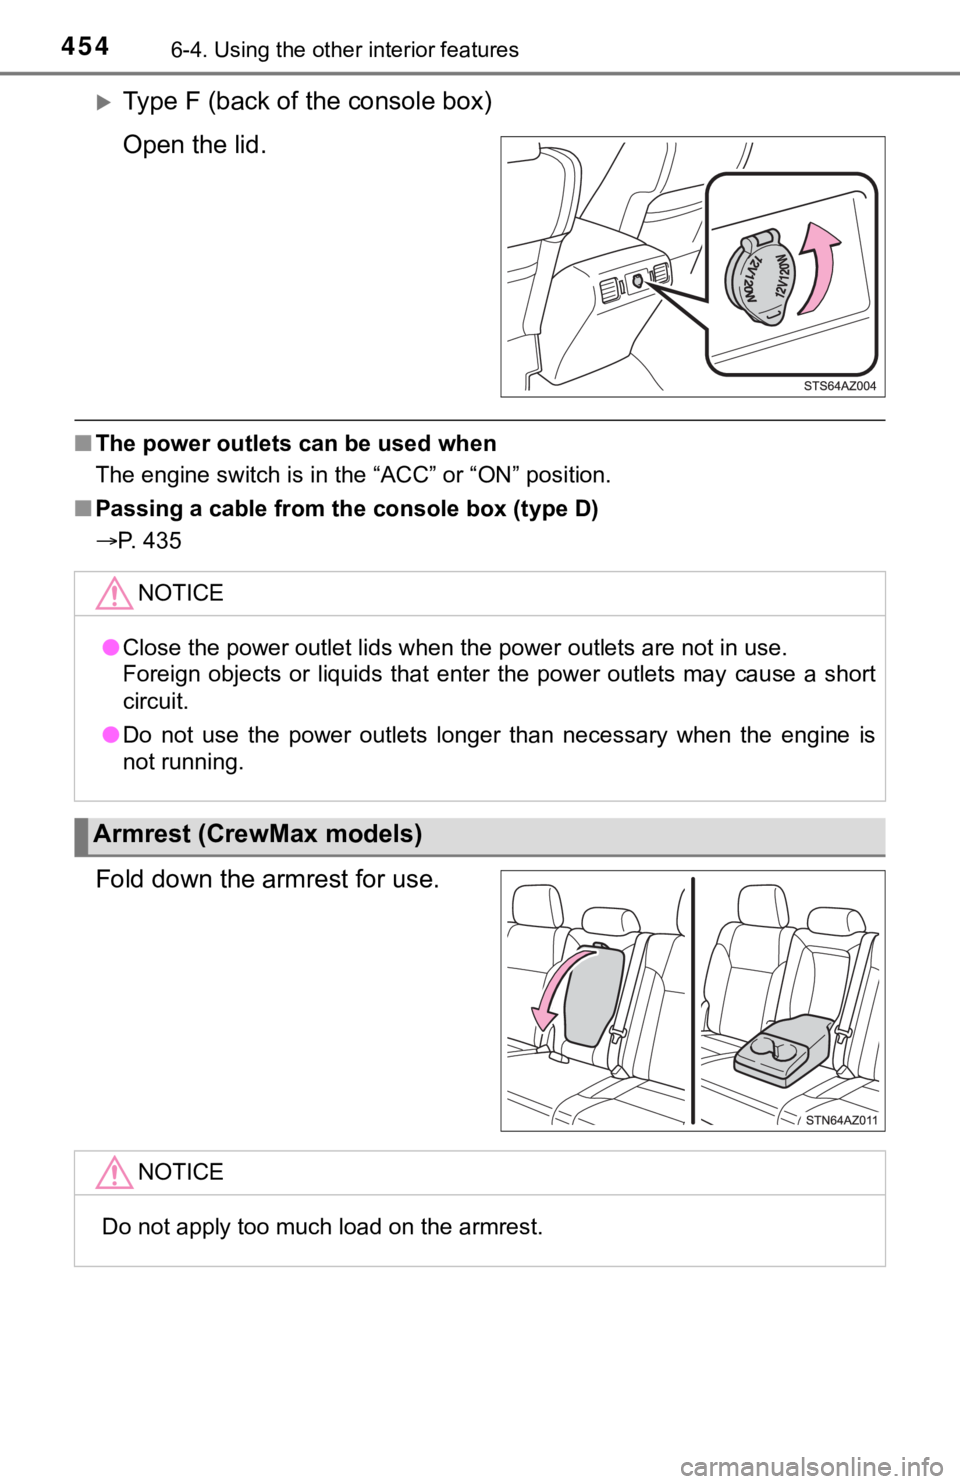
Type F (back of the console box)
Open the lid.
■The power outlets can be used when
The engine switch is in the “ACC” or “ON” position.
■ Passing a cable from th e console box (type D)
P. 435
Fold down the armrest for use.
NOTICE
● Close the power outlet lids when the power outlets are not in use.
Foreign objects or liquids that enter the power outlets may cau se a short
circuit.
● Do not use the power outlets longer than necessary when the eng ine is
not running.
Armrest (CrewMax models)
NOTICE
Do not apply too much load on the armrest.
Page 455 of 672
4556-4. Using the other interior features
6
Interior features
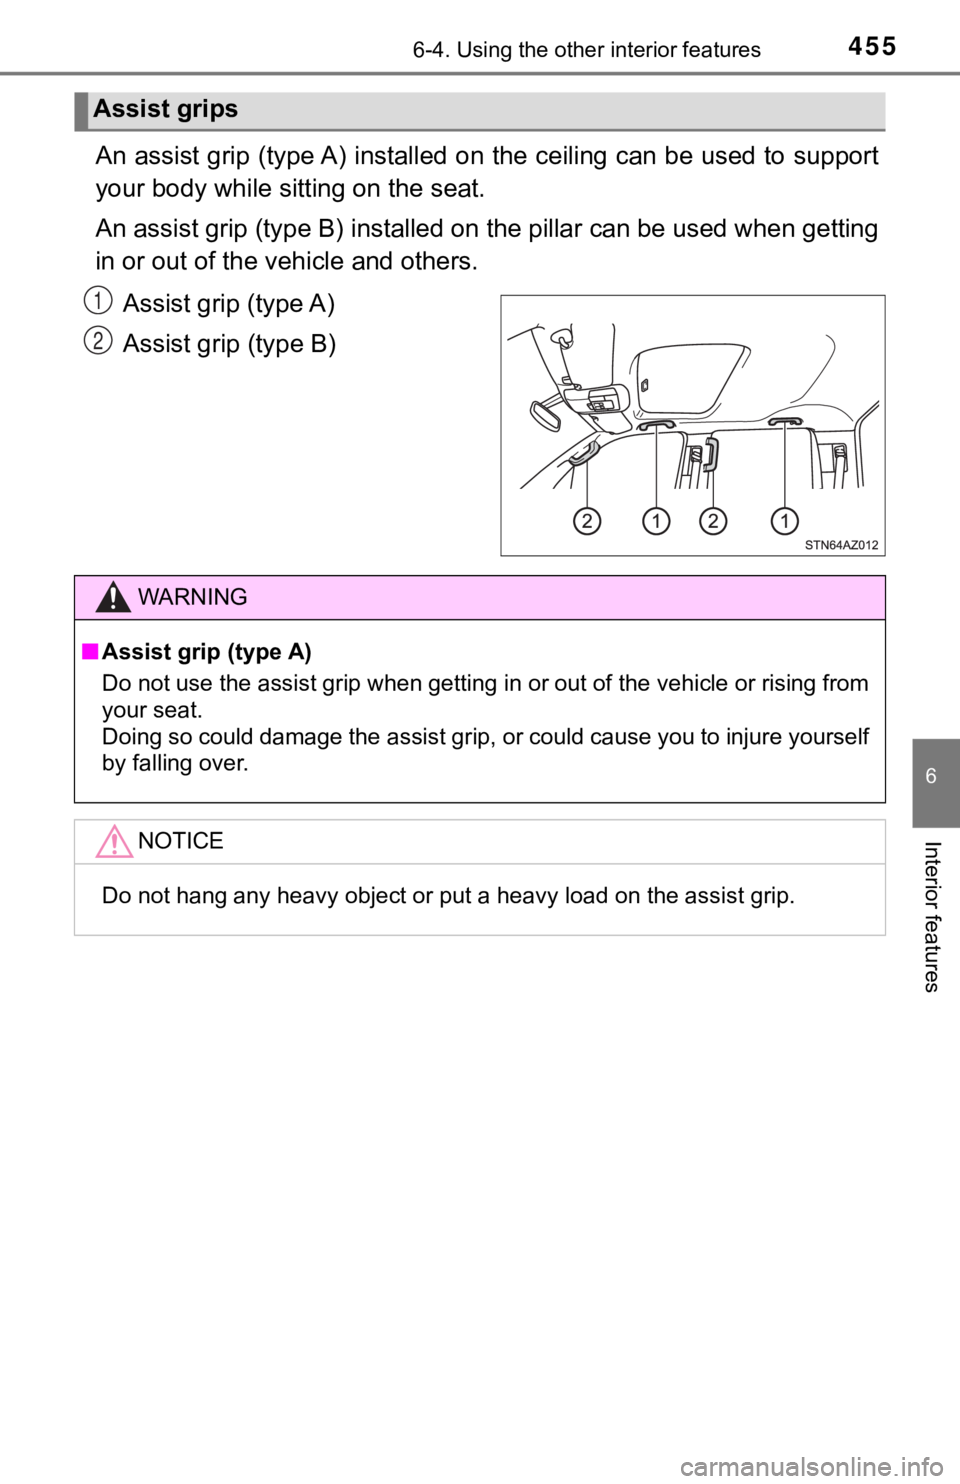
An assist grip (type A) installed on the ceiling can be used to support
your body while si tting on the seat.
An assist grip (type B) installe d on the pillar can be used whe n getting
in or out of the vehicle and others.
Assist grip (type A)
Assist grip (type B)
Assist grips
1
2
WARNING
■Assist grip (type A)
Do not use the assist grip when getting in or out of the vehicle or rising from
your seat.
Doing so could damage the assist grip, or could cause you to in jure yourself
by falling over.
NOTICE
Do not hang any heavy object or put a heavy load on the assist grip.
Page 456 of 672
4566-4. Using the other interior features
Garage door opener
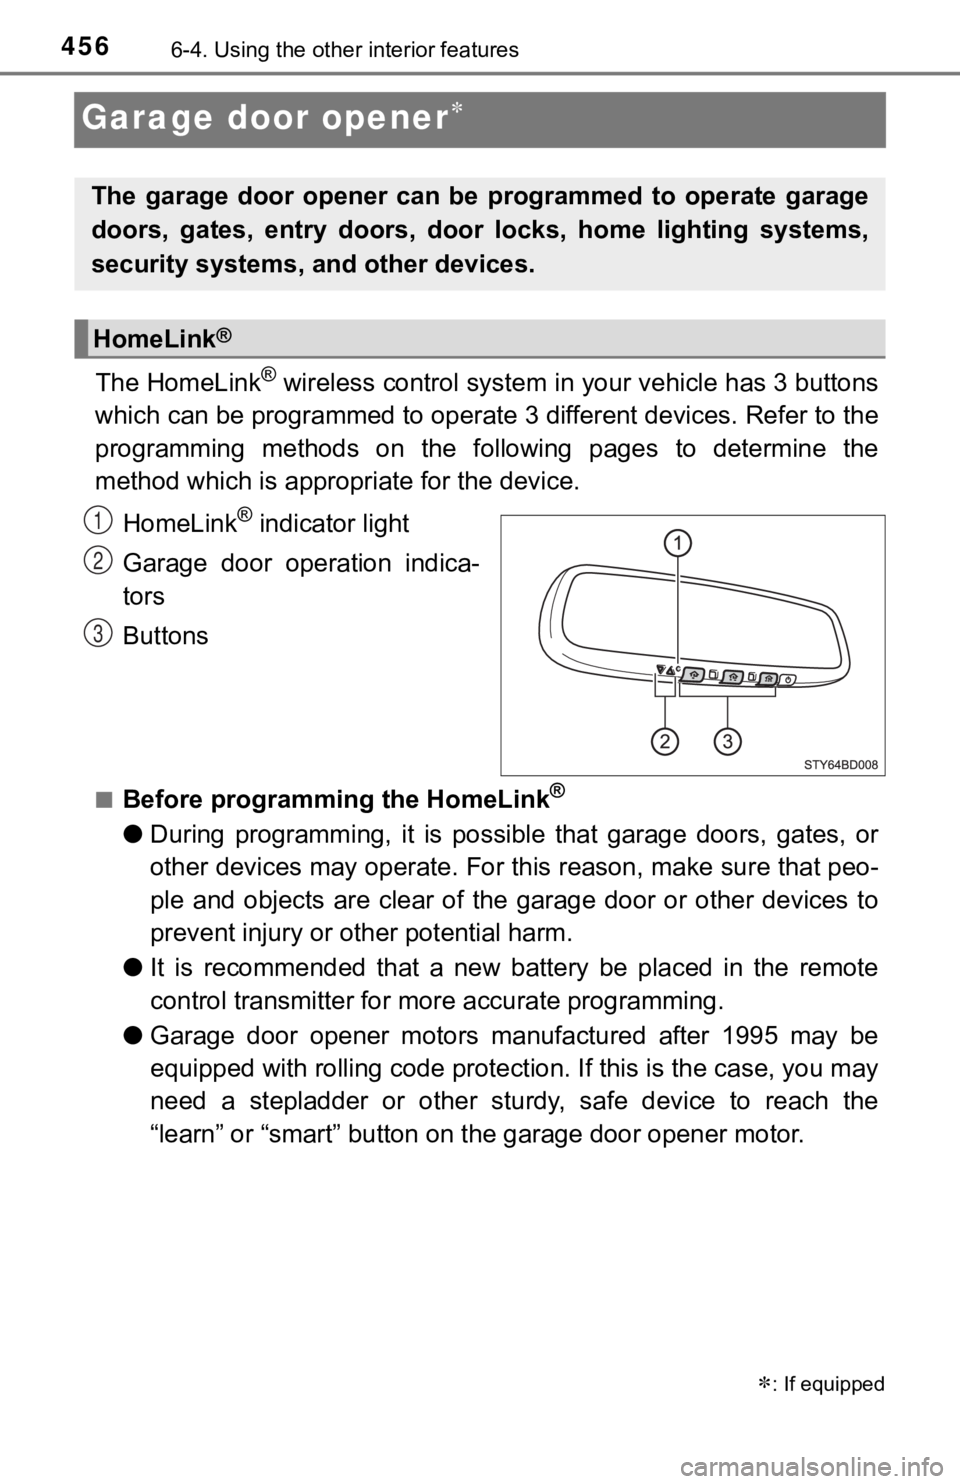
The HomeLink® wireless control system in your vehicle has 3 buttons
which can be programmed to operate 3 different devices. Refer to the
programming methods on the following pages to determine the
method which is approp riate for the device.
HomeLink
® indicator light
Garage door operation indica-
tors
Buttons
■Before programming the HomeLink®
● During programming, it is possible that garage doors, gates, or
other devices may operate. For this reason, make sure that peo-
ple and objects are clear of the garage door or other devices t o
prevent injury or other potential harm.
● It is recommended that a new battery be placed in the remote
control transmitter for mo re accurate programming.
● Garage door opener motors manufactured after 1995 may be
equipped with rolling code pro tection. If this is the case, you may
need a stepladder or other sturdy, safe device to reach the
“learn” or “smart” button on the garage door opener motor.
: If equipped
The garage door opener can be programmed to operate garage
doors, gates, entry doors, door locks, home lighting systems,
security systems, and other devices.
HomeLink®
1
2
3
Page 457 of 672
4576-4. Using the other interior features
6
Interior features
■Programming the HomeLink®
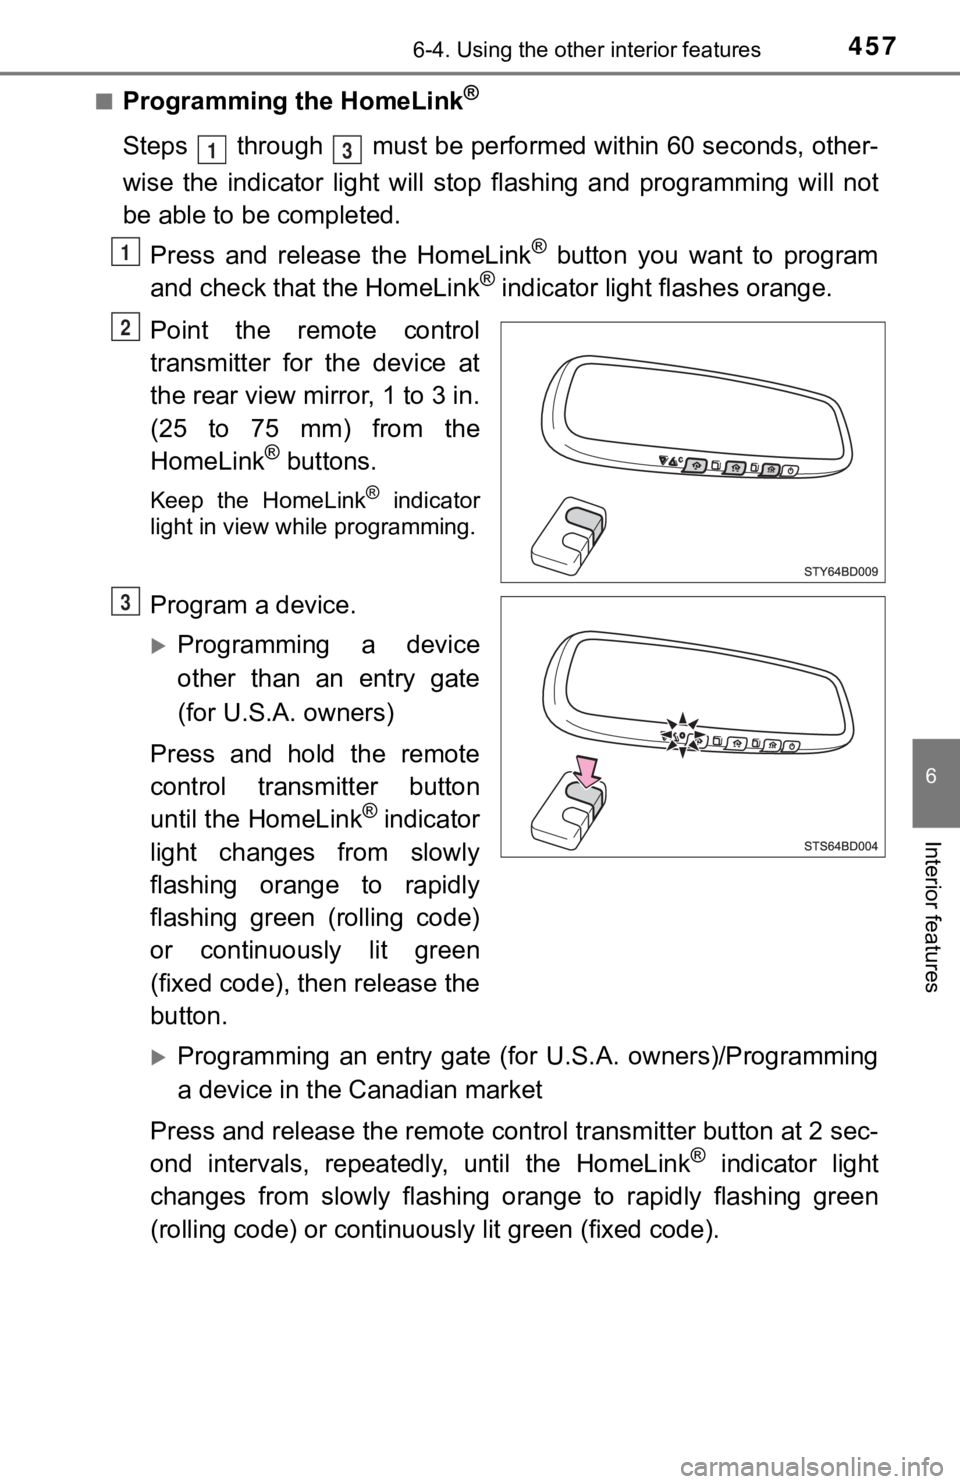
Steps through must be performed within 60 seconds, other-
wise the indicator light will st op flashing and programming wil l not
be able to be completed.
Press and release the HomeLink
® button you want to program
and check that the HomeLink® indicator light flashes orange.
Point the remote control
transmitter for the device at
the rear view mirror, 1 to 3 in.
(25 to 75 mm) from the
HomeLink
® buttons.
Keep the HomeLink® indicator
light in view while programming.
Program a device.
Programming a device
other than an entry gate
(for U.S.A. owners)
Press and hold the remote
control transmitter button
until the HomeLink
® indicator
light changes from slowly
flashing orange to rapidly
flashing green (rolling code)
or continuously lit green
(fixed code), then release the
button.
Programming an entry gate (for U.S.A. owners)/Programming
a device in the Canadian market
Press and release the remote con trol transmitter button at 2 sec-
ond intervals, repeatedly, until the HomeLink
® indicator light
changes from slowly flashing orange to rapidly flashing green
(rolling code) or continuous ly lit green (fixed code).
13
1
2
3
Page 458 of 672
4586-4. Using the other interior features
Test the HomeLink® operation by pressing the newly pro-
grammed button and observi ng the indicator light:
● Indicator light illuminates: Progr amming of a fixed code device
has completed. The garage door or other device should oper-
ate when a HomeLink
® button is pressed and released.
● Indicator light flashes rapidly: The garage door opener motor
or other device is equipped with a rolling code. To complete
programming, firmly press and hold the HomeLink
® button for
2 seconds then release it.
● If the garage door or other device does not operate, proceed
to “Programming a rolling code system”.
Repeat the steps above to program another device for any of the
remaining HomeLink
® buttons.
■Programming a rolling code system
2 or more people may be necessary to complete rolling code pro-
gramming.
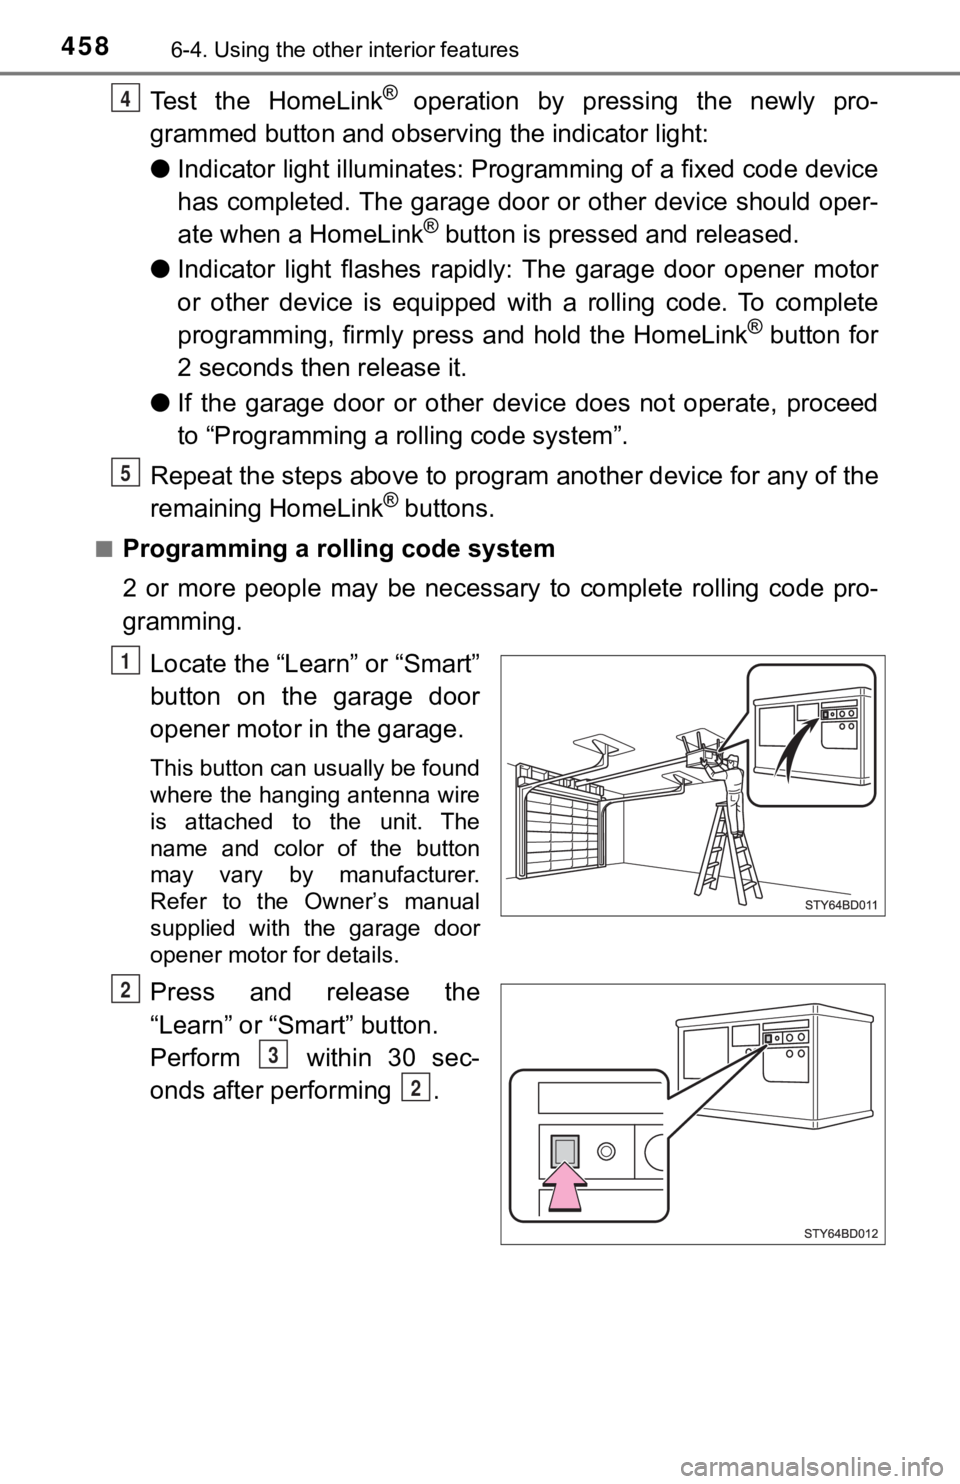
Locate the “Learn” or “Smart”
button on the garage door
opener motor in the garage.
This button can usually be found
where the hanging antenna wire
is attached to the unit. The
name and color of the button
may vary by manufacturer.
Refer to the Owner’s manual
supplied with the garage door
opener motor for details.
Press and release the
“Learn” or “Smart” button.
Perform within 30 sec-
onds after performing .
4
5
1
2
3
2
Page 459 of 672
4596-4. Using the other interior features
6
Interior features
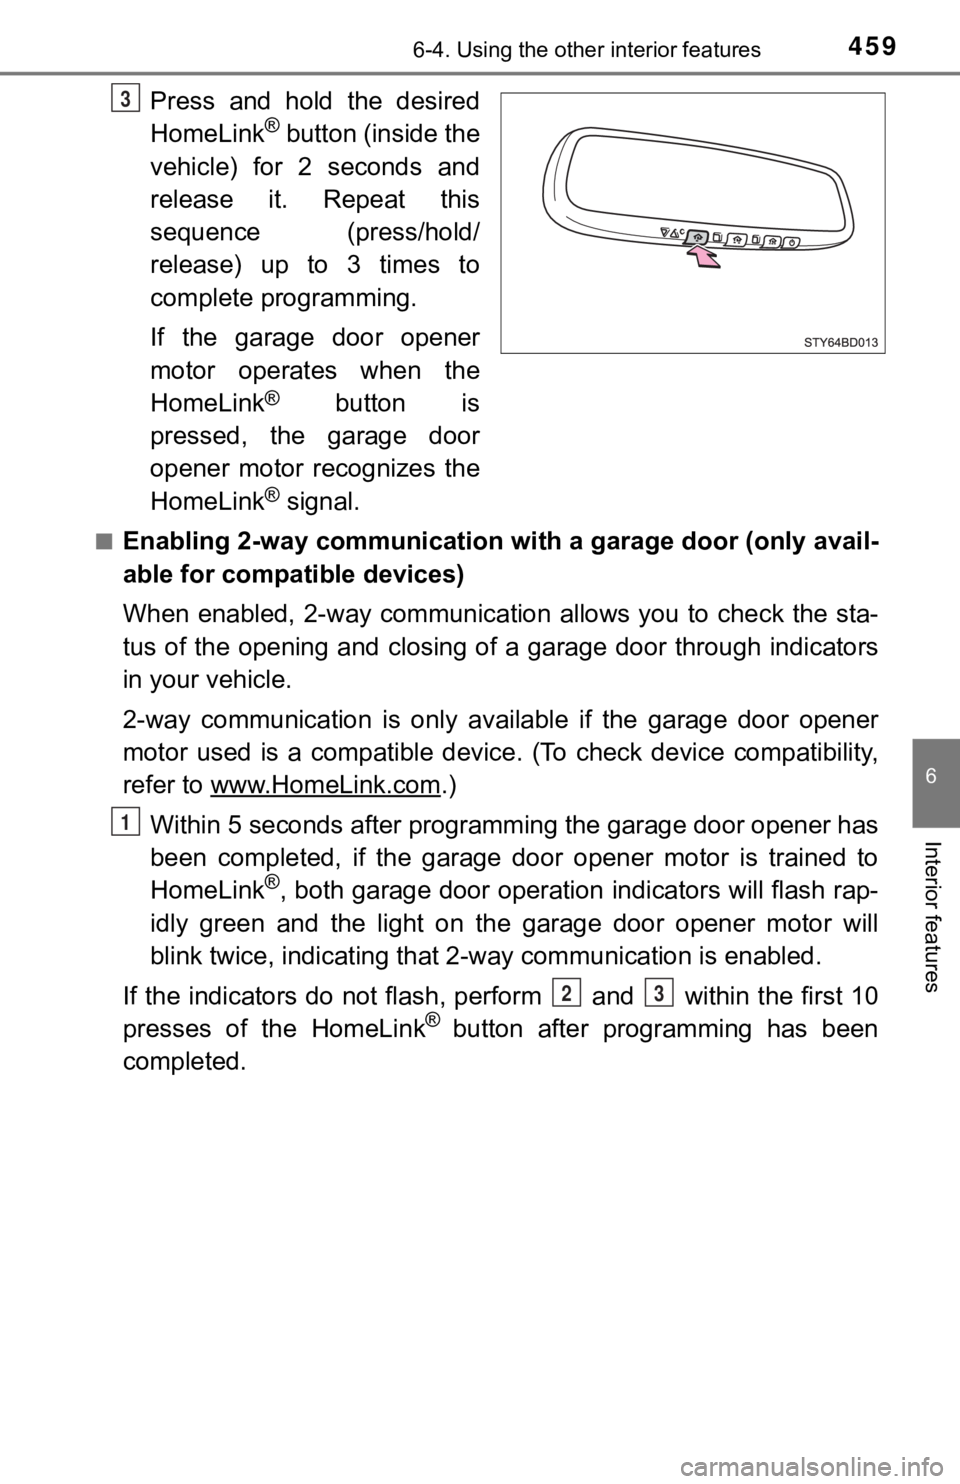
Press and hold the desired
HomeLink® button (inside the
vehicle) for 2 seconds and
release it. Repeat this
sequence (press/hold/
release) up to 3 times to
complete programming.
If the garage door opener
motor operates when the
HomeLink
® button is
pressed, the garage door
opener motor recognizes the
HomeLink
® signal.
■Enabling 2-way communication with a garage door (only avail-
able for compatible devices)
When enabled, 2-way communication allows you to check the sta-
tus of the opening and closing of a garage door through indicat ors
in your vehicle.
2-way communication is only available if the garage door opener
motor used is a compatible device. (To check device compatibility,
refer to www.HomeLink.com
.)
Within 5 seconds after programming the garage door opener has
been completed, if the garage door opener motor is trained to
HomeLink
®, both garage door operation indicators will flash rap-
idly green and the light on the garage door opener motor will
blink twice, indicating that 2 -way communication is enabled.
If the indicators do not flash, perform and within the first 10
presses of the HomeLink
® button after programming has been
completed.
3
1
23
Page 460 of 672
4606-4. Using the other interior features
Press a programmed HomeLink® button to operate a garage
door.
Within 1 minute of pressing the HomeLink
® button, after the
garage door operation has stopped, press the “Learn” or “Smart”
button on the garage door opener motor. Within 5 seconds of the
establishment of 2-way commu nication with the garage door
opener, both garage door operation indicators in the vehicle wi ll
flash rapidly green and the light on the garage door opener mot or
will blink twice, indicating that 2- way communication is enabled.
■Reprogramming a single HomeLink® button
When the following procedure is performed, buttons which alread y
have devices registered to them can be overwritten:
With one hand, press and hold the desired HomeLink
® button.
When the HomeLink
® indicator starts flas hing orange, release
the HomeLink® button and perform “Programming the Home-
Link®” (it takes 20 seconds for the HomeLink® indicator to
start flashing).
Press the appropriate HomeLink
® button. The HomeLink® indicator
light should turn on.
Operating the HomeLink®
2
3
1
2
1