Engine type TOYOTA TUNDRA 2022 User Guide
[x] Cancel search | Manufacturer: TOYOTA, Model Year: 2022, Model line: TUNDRA, Model: TOYOTA TUNDRA 2022Pages: 616, PDF Size: 11.13 MB
Page 330 of 616
3304-6. Driving tips
■Tire chain installation
Observe the following precautions when installing and removing chains:
● Install and remove tire chains in a safe location.
● Install tire chains on the rear tires. Do not install tire chains on the front tires.
● Install tire chains on rear tires as tightly as possible. Retighten chains after
driving 1/4 1/2 mile (0.5 1.0 km).
● Install tire chains following the instructions provided with the tire chains.
WARNING
■ Driving with snow tires
Observe the following precautions to reduce the risk of accidents.
Failure to do so may result in a loss of vehicle control and ca use death or
serious injury.
● Use tires of the specified size.
● Maintain the recommended level of air pressure.
● Do not drive in excess of 75 mph (120 km/h), regardless of the type of
snow tires being used.
● Use snow tires on all, not just some wheels.
● 4WD models: Do not mix tires of different makes, models, tread patterns
or treadwear.
■ Driving with tire chains
Observe the following precautions to reduce the risk of accidents.
Failure to do so may result in the vehicle being unable to be d riven safely,
and may cause death or serious injury.
● Do not drive in excess of the speed limit specified for the tir e chains being
used, or 30 mph (50 km/h), whichever is lower.
● Avoid driving on bumpy road surfaces or over potholes.
● Avoid sudden acceleration, abrupt steering, sudden braking and shifting
operations that cause sudden engine braking.
● Slow down sufficiently before entering a curve to ensure that vehicle con-
trol is maintained.
Page 381 of 616
3815-4. Other interior features
5
Interior features
The USB charging ports are used to supply 2.5 A (Type A) and 3. 0 A
(Type C) of electricity at 5 V t o external devices. The USB cha rging
ports are for charging only. They are not designed for data transfer or
other purposes. Depending on the external device, it may not ch arge
properly. Refer to the manual included with the device before u sing a
USB charging port.
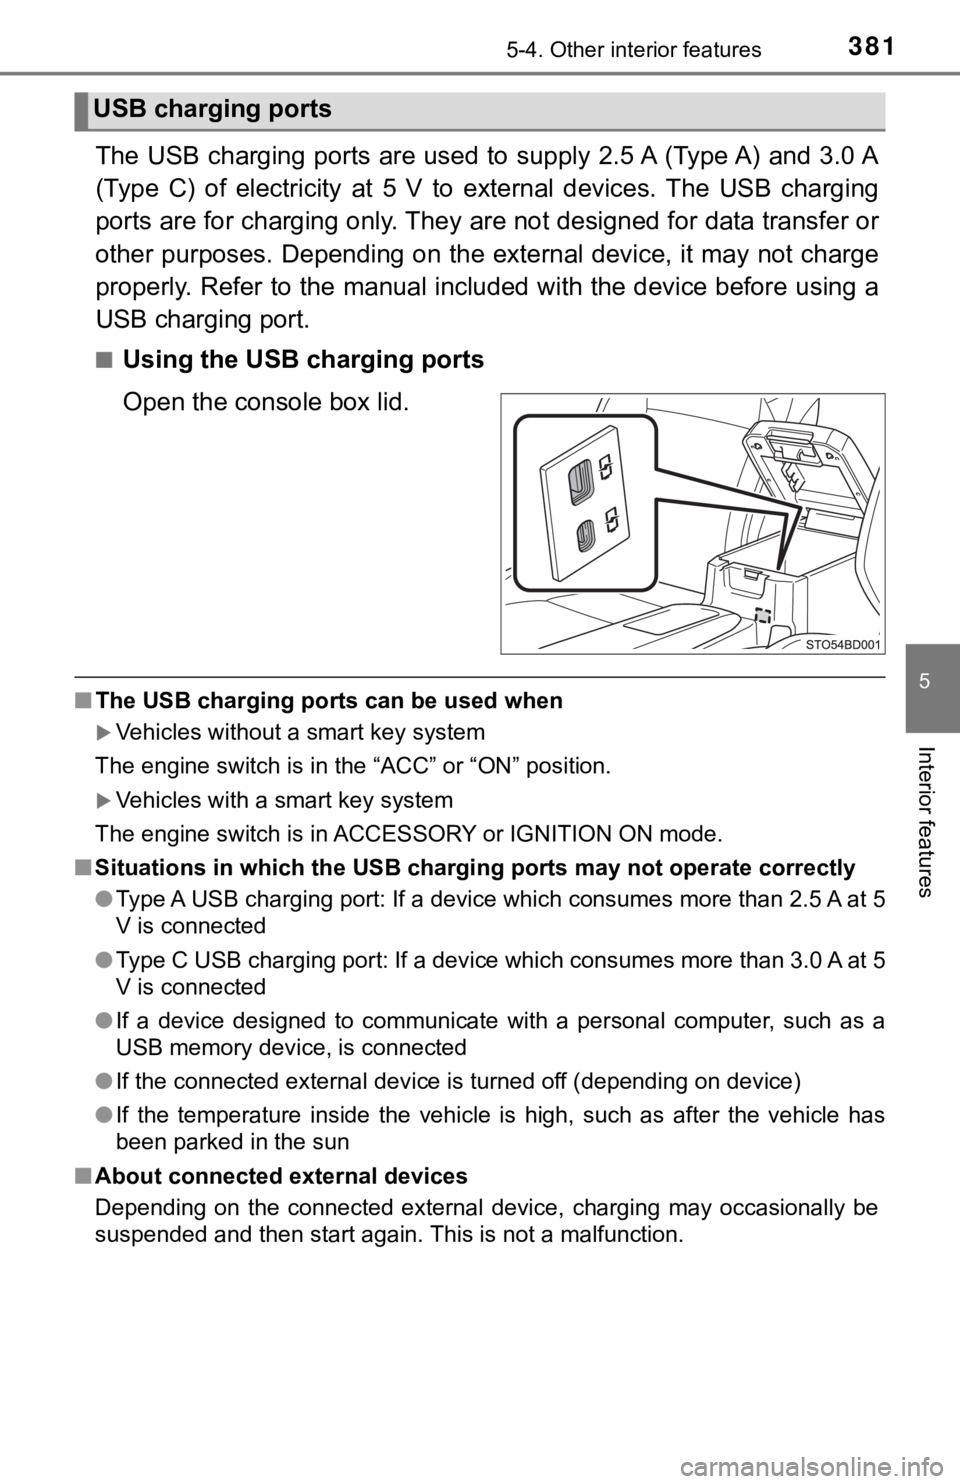
■Using the USB charging ports
Open the console box lid.
■ The USB charging ports can be used when
Vehicles without a smart key system
The engine switch is in the “ACC” or “ON” position.
Vehicles with a smart key system
The engine switch is in ACCESSORY or IGNITION ON mode.
■ Situations in which the USB charg ing ports may not operate correctly
● Type A USB charging port: If a device which consumes more than 2.5 A at 5
V is connected
● Type C USB charging port: If a device which consumes more than 3.0 A at 5
V is connected
● If a device designed to communicate with a personal computer, s uch as a
USB memory device, is connected
● If the connected external device is turned off (depending on de vice)
● If the temperature inside the vehicle is high, such as after the vehicle has
been parked in the sun
■ About connected external devices
Depending on the connected external device, charging may occasi onally be
suspended and then start again. This is not a malfunction.
USB charging ports
Page 383 of 616
3835-4. Other interior features
5
Interior features
A mobile device can be charg ed wirelessly on the tray.
Vehicles without a smart key system
Charging can only be performed with the engine switch in the
“ACC” or “ON” position and only on mobile devices with the “ ”
logo.
Vehicles with a smart key system
Charging can only be performed with the engine switch in ACCES-
SORY or IGNITION ON mode and only on mobile devices with the
“ ” logo.
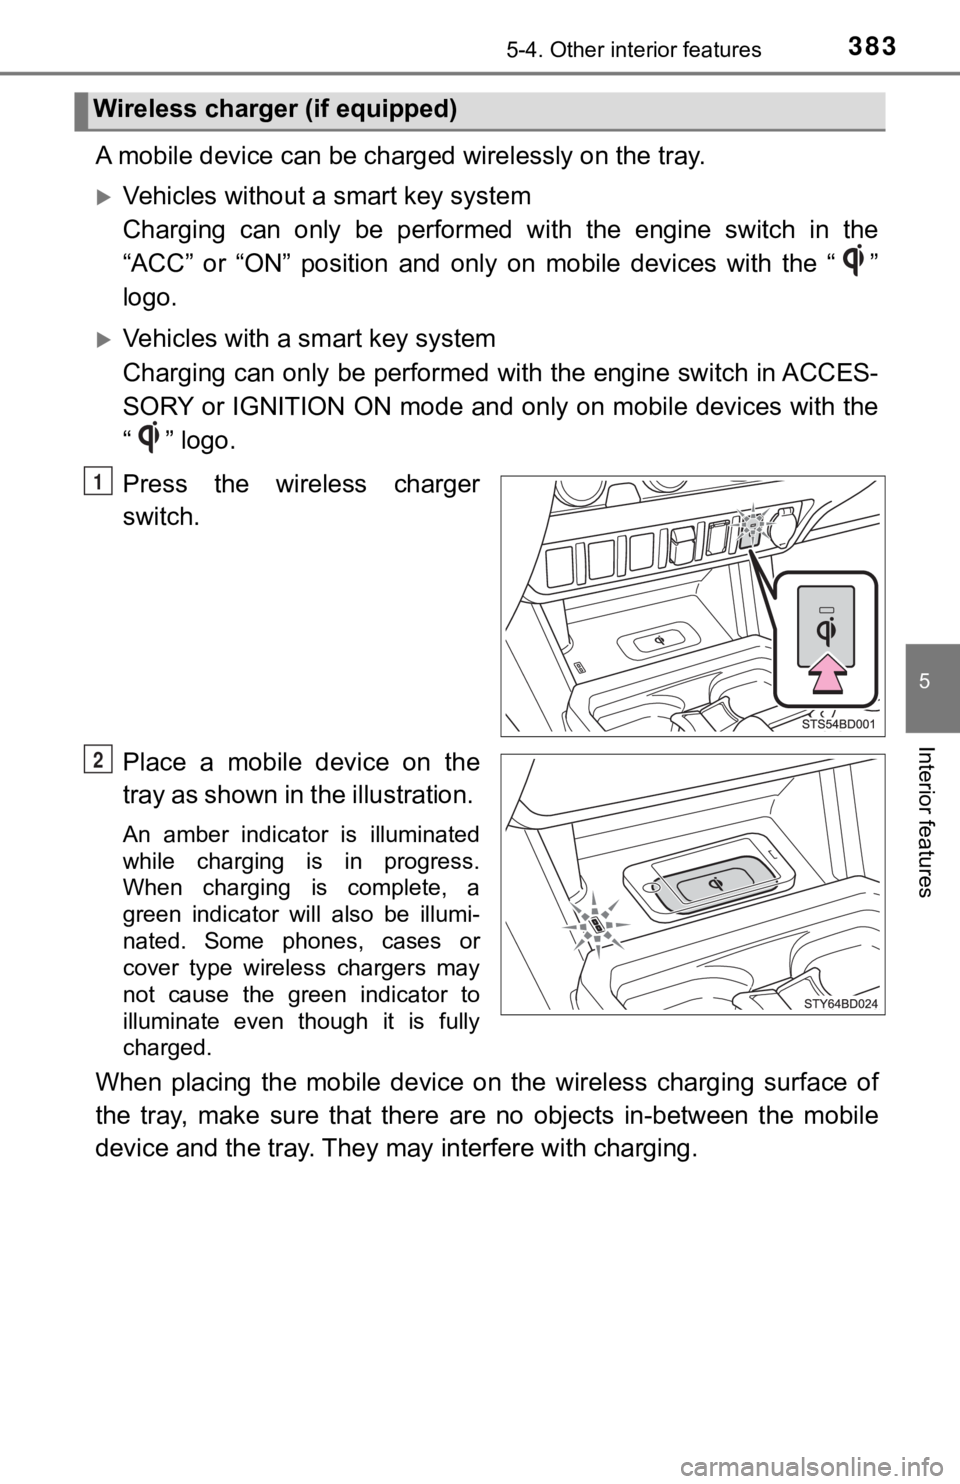
Press the wireless charger
switch.
Place a mobile device on the
tray as shown in the illustration.
An amber indicator is illuminated
while charging is in progress.
When charging is complete, a
green indicator will also be illumi-
nated. Some phones, cases or
cover type wireless chargers may
not cause the green indicator to
illuminate even though it is fully
charged.
When placing the mobile device on the wireless charging surface of
the tray, make sure that there a re no objects in-between the mo bile
device and the tray. They may interfere with charging.
Wireless charger (if equipped)
1
2
Page 421 of 616
4216-3. Do-it-yourself maintenance
6
Maintenance and care
With the engine at operating temperature and turned off, check the oil
level on the dipstick.
■Checking the engine oil
Park the vehicle on level ground. After warming up the engine
and turning it off, wait more than 5 minutes for the oil to dra in
back into the bottom of the engine.
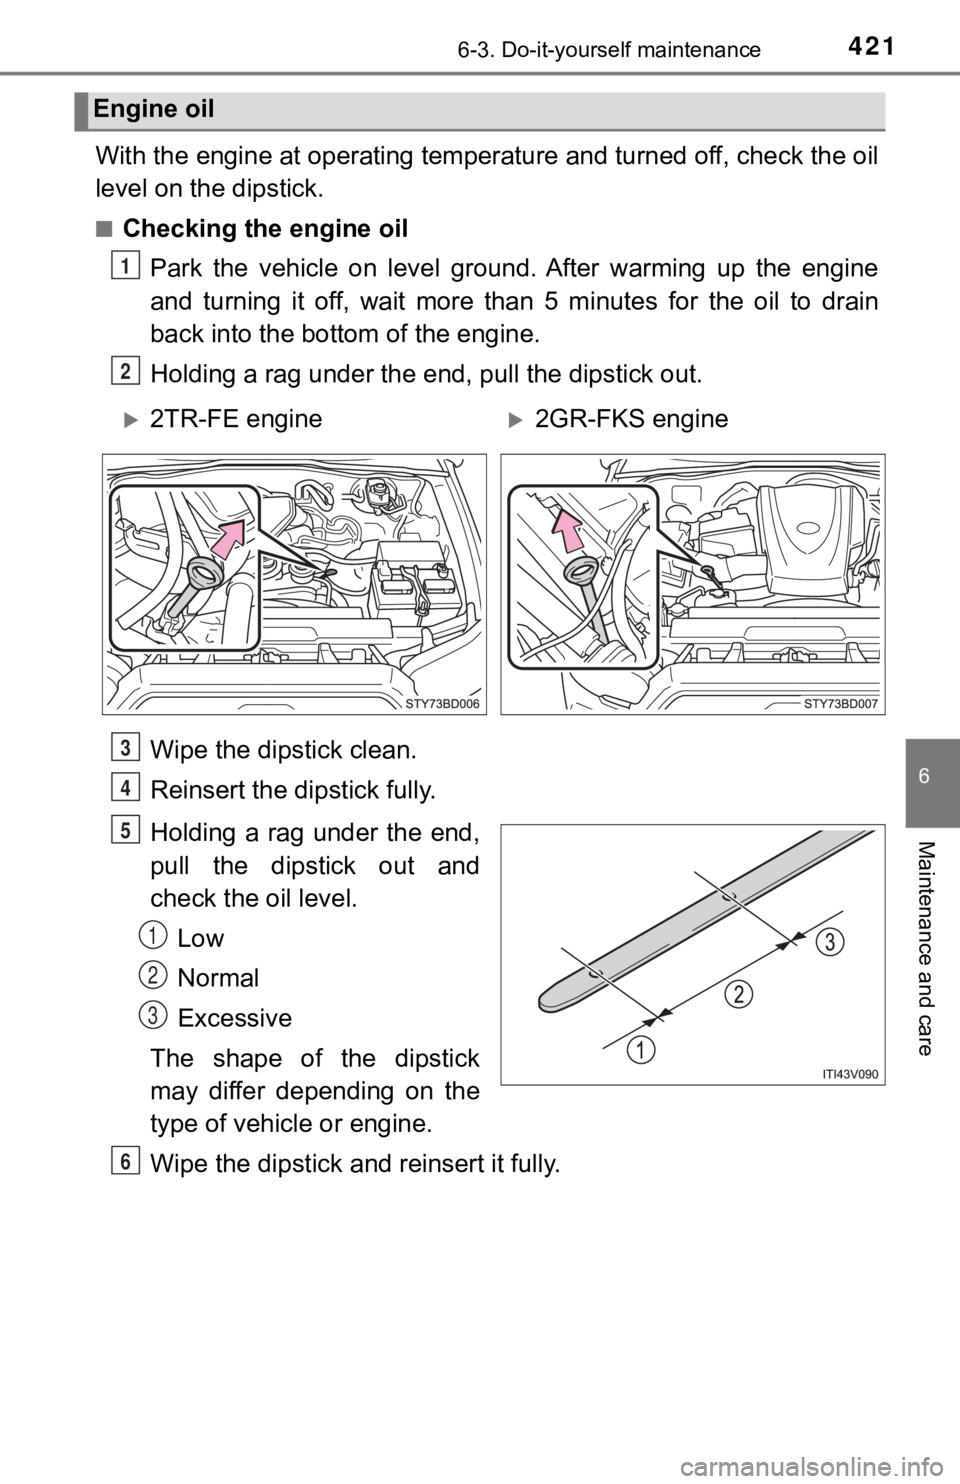
Holding a rag under the end, pull the dipstick out.
Wipe the dipstick clean.
Reinsert the dipstick fully.
Holding a rag under the end,
pull the dipstick out and
check the oil level.
Low
Normal
Excessive
The shape of the dipstick
may differ depending on the
type of vehicle or engine.
Wipe the dipstick and reinsert it fully.
Engine oil
1
2
2TR-FE engine2GR-FKS engine
3
4
5
1
2
3
6
Page 422 of 616
4226-3. Do-it-yourself maintenance
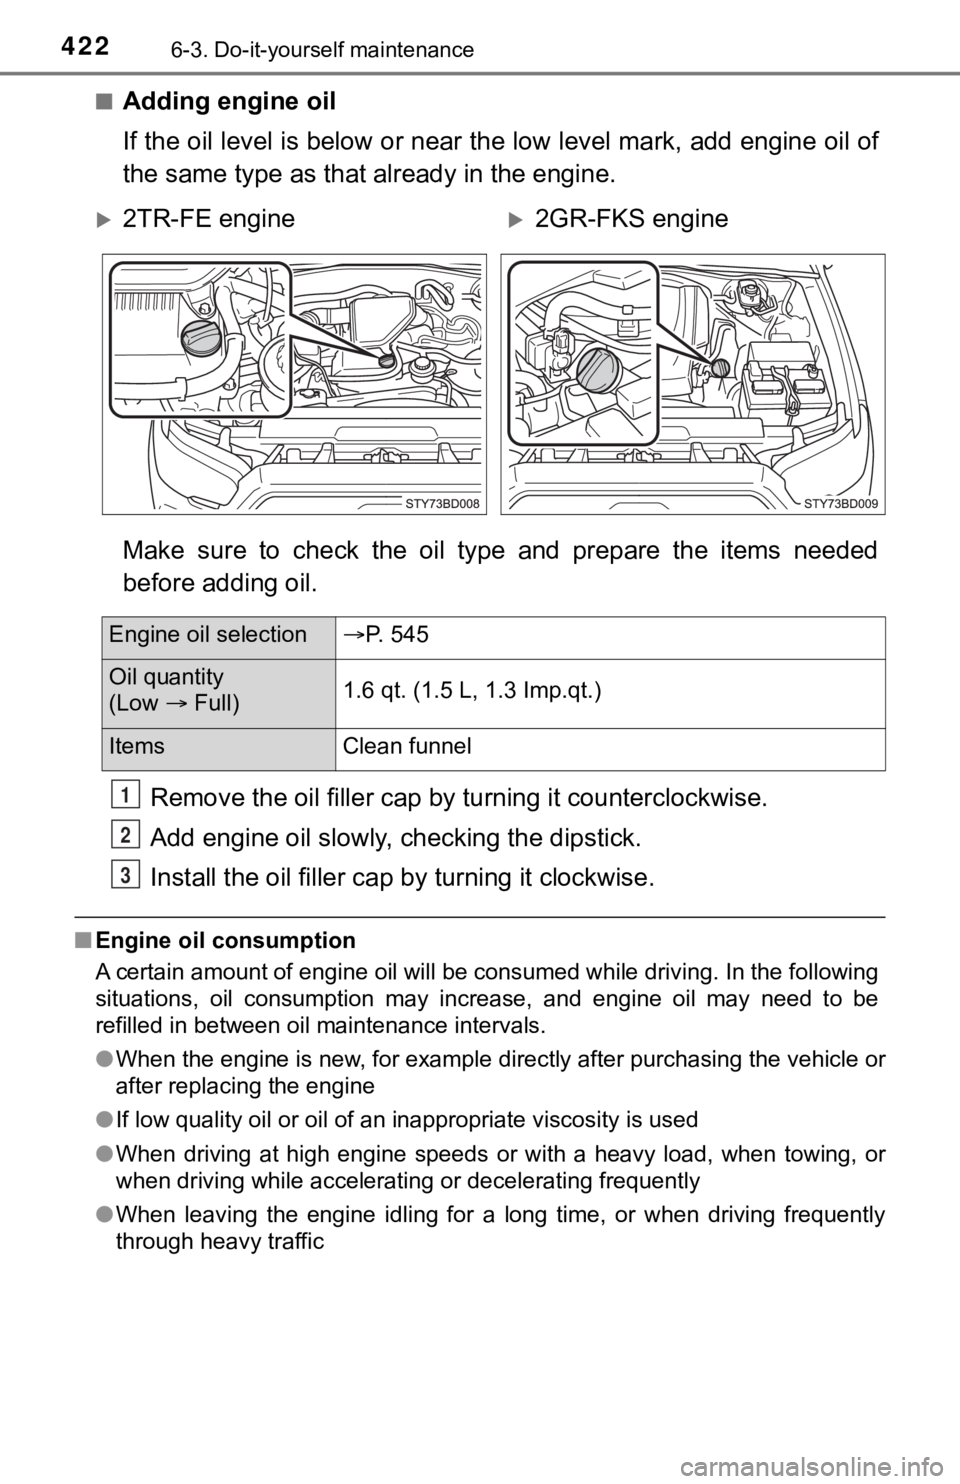
■Adding engine oil
If the oil level is below or near the low level mark, add engine oil of
the same type as that a lready in the engine.
Make sure to check the oil type and prepare the items needed
before adding oil. Remove the oil fille r cap by turning it counterclockwise.
Add engine oil slowly, checking the dipstick.
Install the oil filler cap by turning it clockwise.
■Engine oil consumption
A certain amount of engine oil will be consumed while driving. In the following
situations, oil consumption may increase, and engine oil may ne ed to be
refilled in between oil maintenance intervals.
● When the engine is new, for example directly after purchasing t he vehicle or
after replacing the engine
● If low quality oil or oil of an inappropriate viscosity is used
● When driving at high engine speeds or with a heavy load, when t owing, or
when driving while accelerating or decelerating frequently
● When leaving the engine idling for a long time, or when driving frequently
through heavy traffic
2TR-FE engine2GR-FKS engine
Engine oil selection P. 545
Oil quantity
(Low Full) 1.6 qt. (1.5 L, 1.3 Imp.qt.)
Items
Clean funnel
1
2
3
Page 425 of 616
4256-3. Do-it-yourself maintenance
6
Maintenance and care
Check the radiator and condenser and clear away any foreign objects.
If either of the above parts is extremely dirty or you are not sure of
their condition, have your vehicle inspected by your Toyota dea l e r.
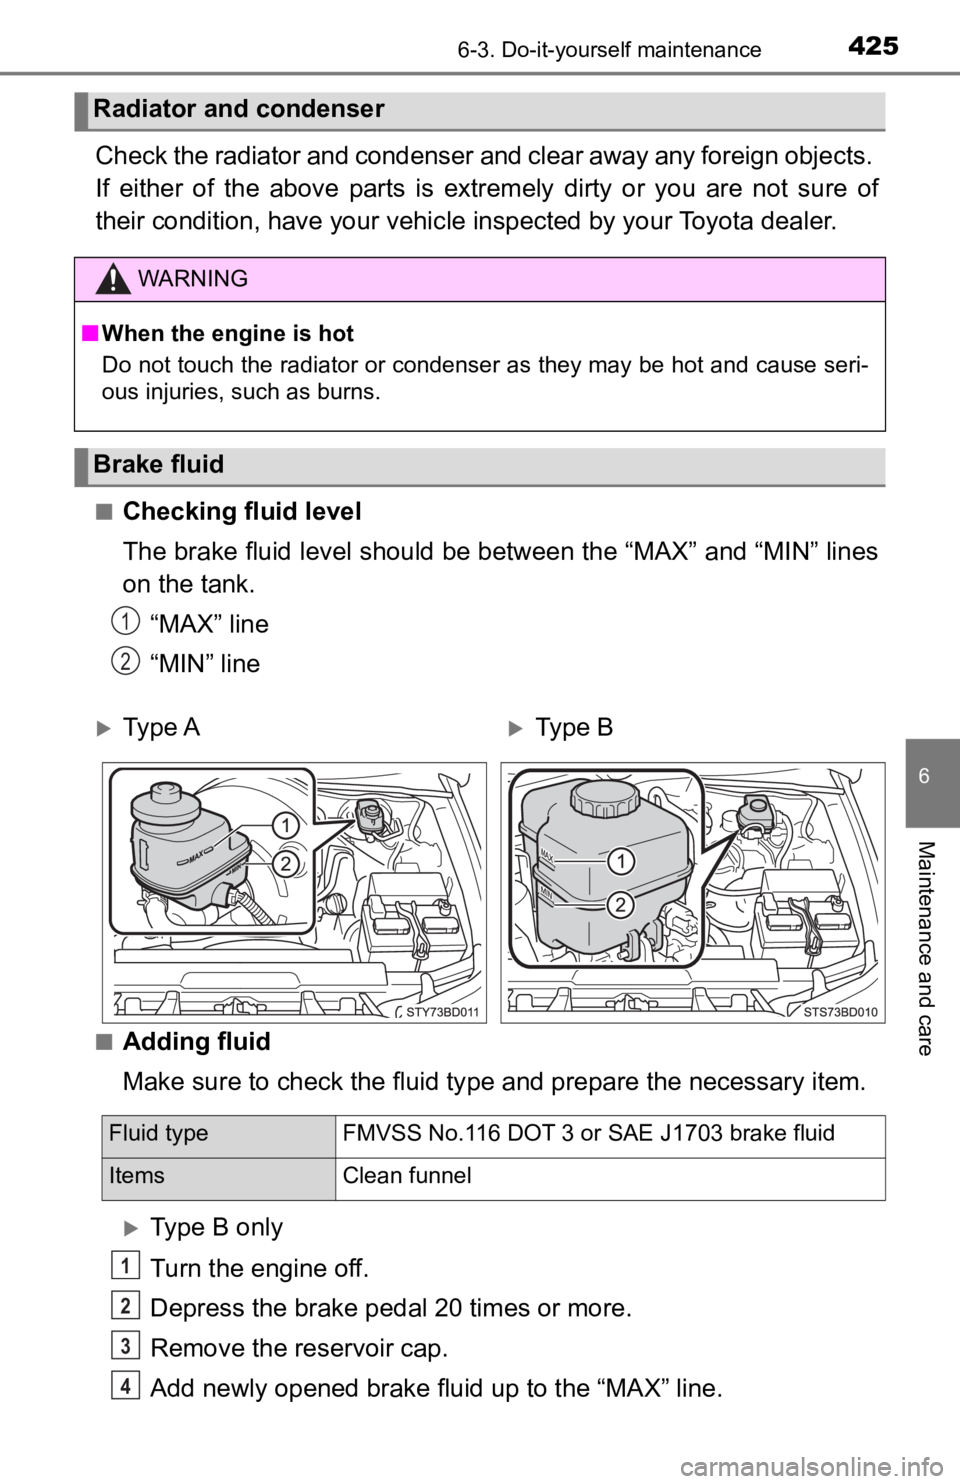
■Checking fluid level
The brake fluid level should be between the “MAX” and “MIN” lin es
on the tank.
“MAX” line
“MIN” line
■Adding fluid
Make sure to check the fluid ty pe and prepare the necessary ite m.
Type B only
Turn the engine off.
Depress the brake pedal 20 times or more.
Remove the reservoir cap.
Add newly opened brake fluid up to the “MAX” line.
Radiator and condenser
WARNING
■When the engine is hot
Do not touch the radiator or condenser as they may be hot and c ause seri-
ous injuries, such as burns.
Brake fluid
Ty p e AType B
1
2
Fluid type FMVSS No.116 DOT 3 or SAE J1703 brake fluid
Items Clean funnel
1
2
3
4
Page 427 of 616
4276-3. Do-it-yourself maintenance
6
Maintenance and care
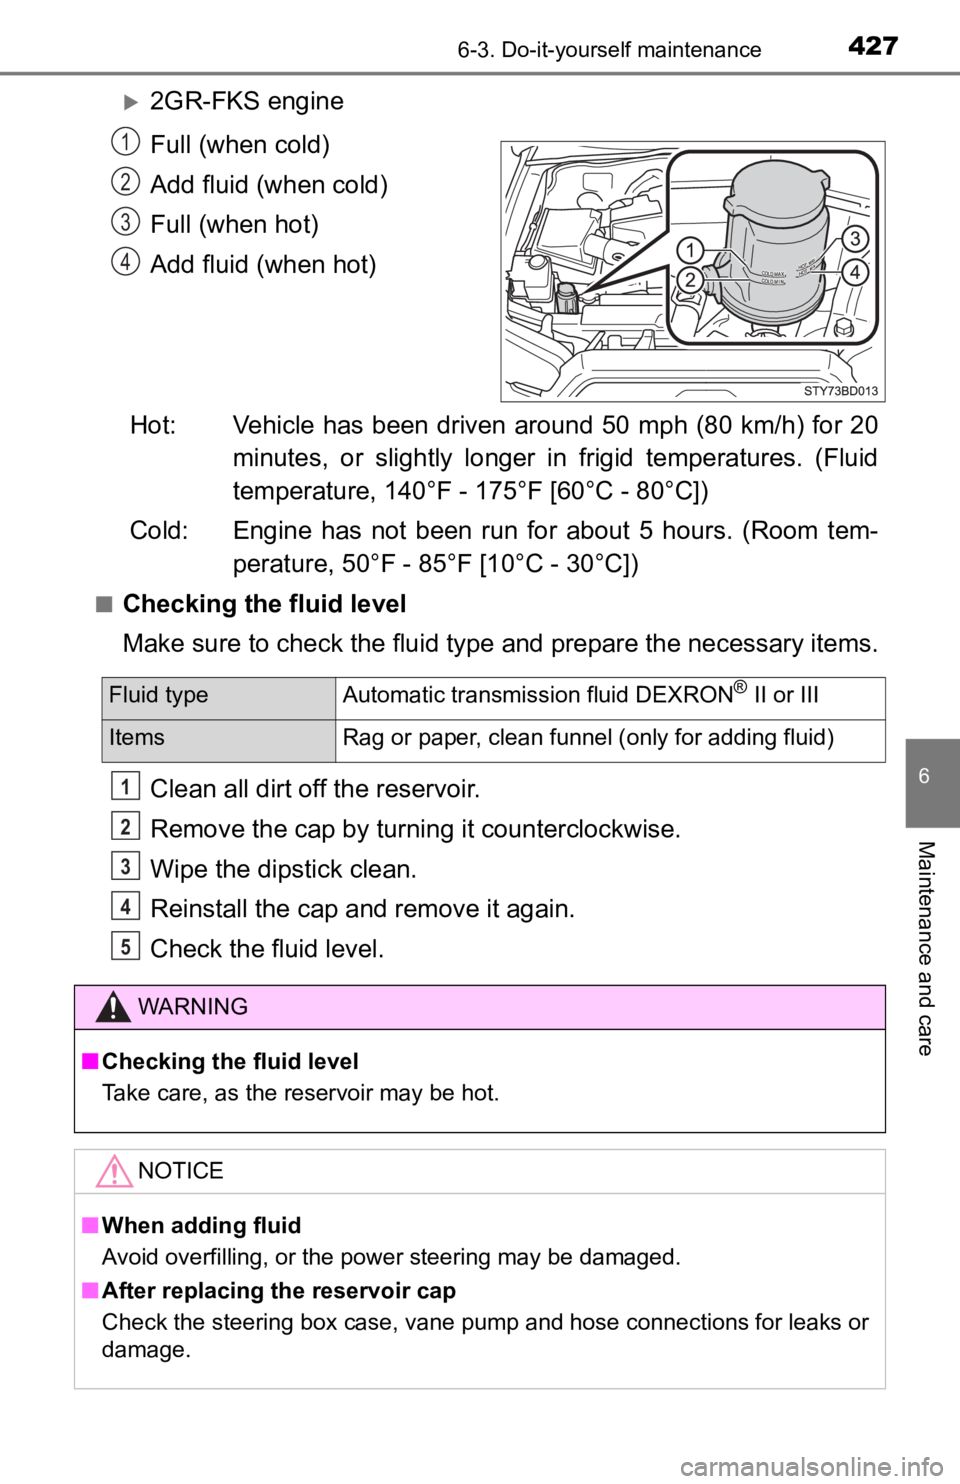
2GR-FKS engine
Full (when cold)
Add fluid (when cold)
Full (when hot)
Add fluid (when hot)
Hot: Vehicle has been driven around 50 mph (80 km/h) for 20 minutes, or slightly longer in frigid temperatures. (Fluid
temperature, 140°F - 175°F [60°C - 80°C])
Cold: Engine has not been run for about 5 hours. (Room tem- perature, 50°F - 85°F [10°C - 30°C])
■Checking the fluid level
Make sure to check the fluid type and prepare the necessary items.
Clean all dirt off the reservoir.
Remove the cap by turning it counterclockwise.
Wipe the dipstick clean.
Reinstall the cap and remove it again.
Check the fluid level.
1
2
3
4
Fluid type Automatic transmission fluid DEXRON® II or III
Items Rag or paper, clean funnel (only for adding fluid)
WARNING
■Checking the fluid level
Take care, as the reservoir may be hot.
NOTICE
■When adding fluid
Avoid overfilling, or the power steering may be damaged.
■ After replacing the reservoir cap
Check the steering box case, vane pump and hose connections for leaks or
damage.
1
2
3
4
5
Page 477 of 616
4777-2. Steps to take in an emergency
7
When trouble arises
The following may indicate a problem with your transmission. Contact
your Toyota dealer or commercial towing service before towing.
● The engine is running but t he vehicle does not move.
● The vehicle makes an abnormal sound.
WARNING
■While towing
● When towing using cables or chains, avoid sudden starts, etc., which
place excessive stress on the towing eyelets, cables or chains. The towing
eyelets, cables or chains may become damaged, broken debris may hit
people, and cause serious damage.
● Do not turn the engine switch to the “LOCK” position (vehicles without a
smart key system) or off (vehicles with a smart key system).
There is a possibility that the steering wheel is locked and ca nnot be oper-
ated.
NOTICE
■ To prevent damage to the vehicle when towing using a wheel-lift type
truck
● Vehicles without a smart key system:
Do not tow the vehicle from the rear when the engine switch is in the
“LOCK” position or the key is removed.
The steering lock mechanism is not strong enough to hold the front wheels
straight.
● Vehicles with a smart key system:
Do not tow the vehicle from the rear when the engine switch is off.
The steering lock mechanism is not strong enough to hold the front wheels
straight.
● When raising the vehicle, ensure adequate ground clearance for towing at
the opposite end of the raised vehicle. Without adequate clearance, the
vehicle could be damaged while being towed.
■ To prevent damage to the vehicle when towing with a sling-type truck
Do not tow with a sling-type truck, either from the front or re a r.
■ To prevent damage to the vehicle during emergency towing
Do not secure cables or chains to the suspension components.
Situations when it is necessary to contact dealers before towing
Page 478 of 616
4787-2. Steps to take in an emergency
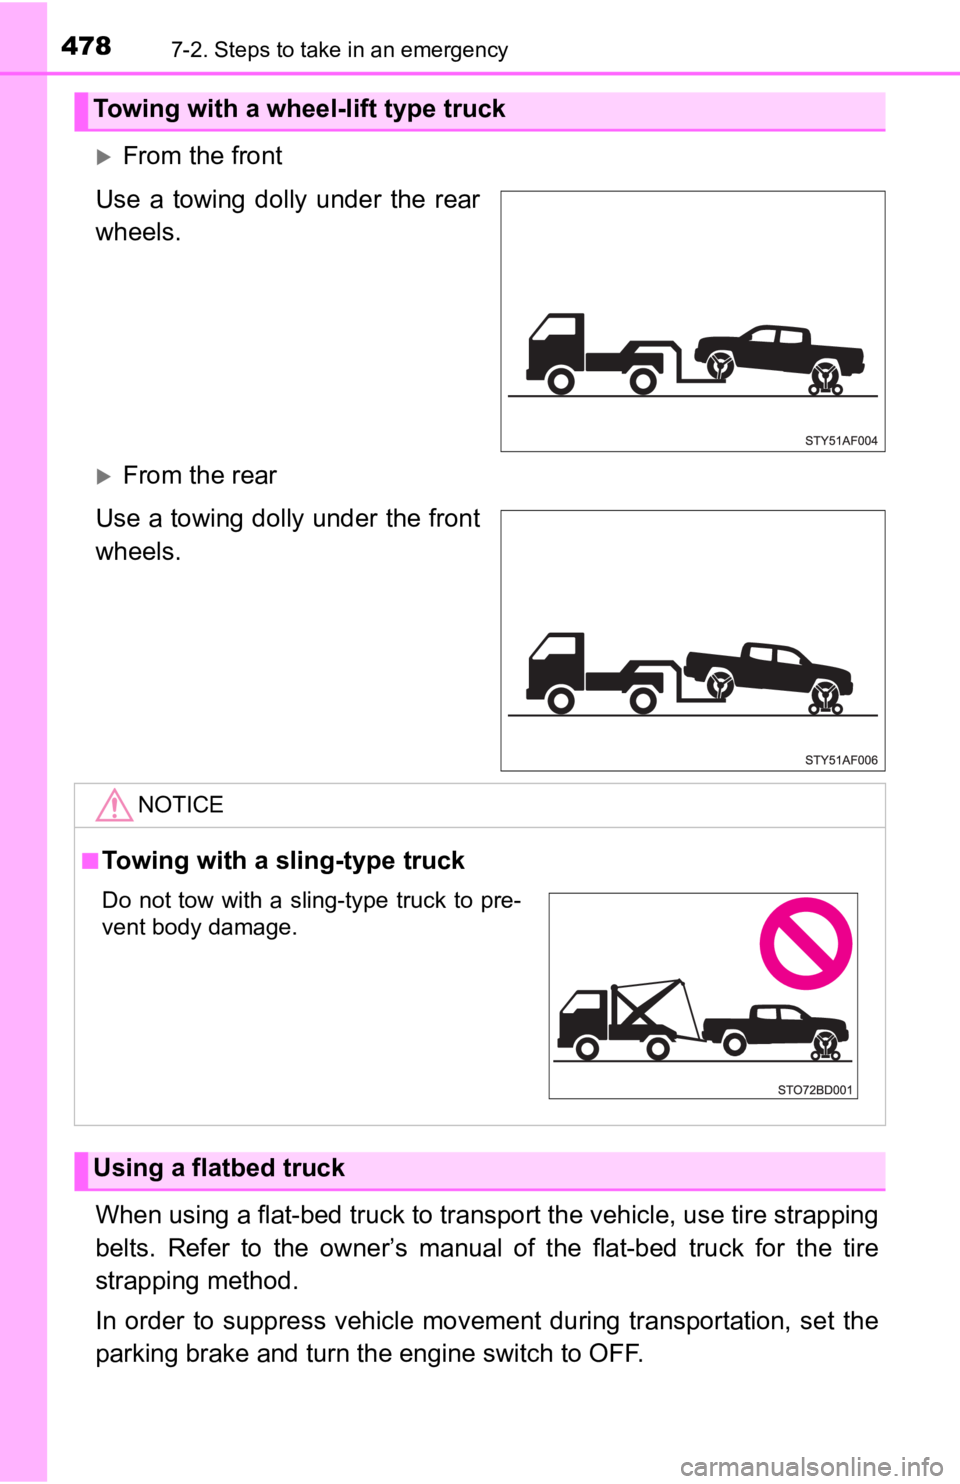
From the front
Use a towing dolly under the rear
wheels.
From the rear
Use a towing dolly under the front
wheels.
When using a flat-bed truck to transport the vehicle, use tire strapping
belts. Refer to the owner’s manual of the flat-bed truck for th e tire
strapping method.
In order to suppress vehicle movement during transportation, se t the
parking brake and turn th e engine switch to OFF.
Towing with a wheel-lift type truck
NOTICE
■Towing with a sling-type truck
Using a flatbed truck
Do not tow with a sling-type truck to pre-
vent body damage.
Page 479 of 616
4797-2. Steps to take in an emergency
7
When trouble arises
If a tow truck is not available in an emergency, your vehicle may be
temporarily towed using cables or chains secured to the emergen cy
towing hook(s). This should only be attempted on hard surfaced roads
for at most 50 miles (80 km) at under 18 mph (30 km/h).
A driver must be in the vehicle to steer and operate the brakes . The
vehicle’s wheels, drivetrain, axles, steering and brakes must b e in
good condition.
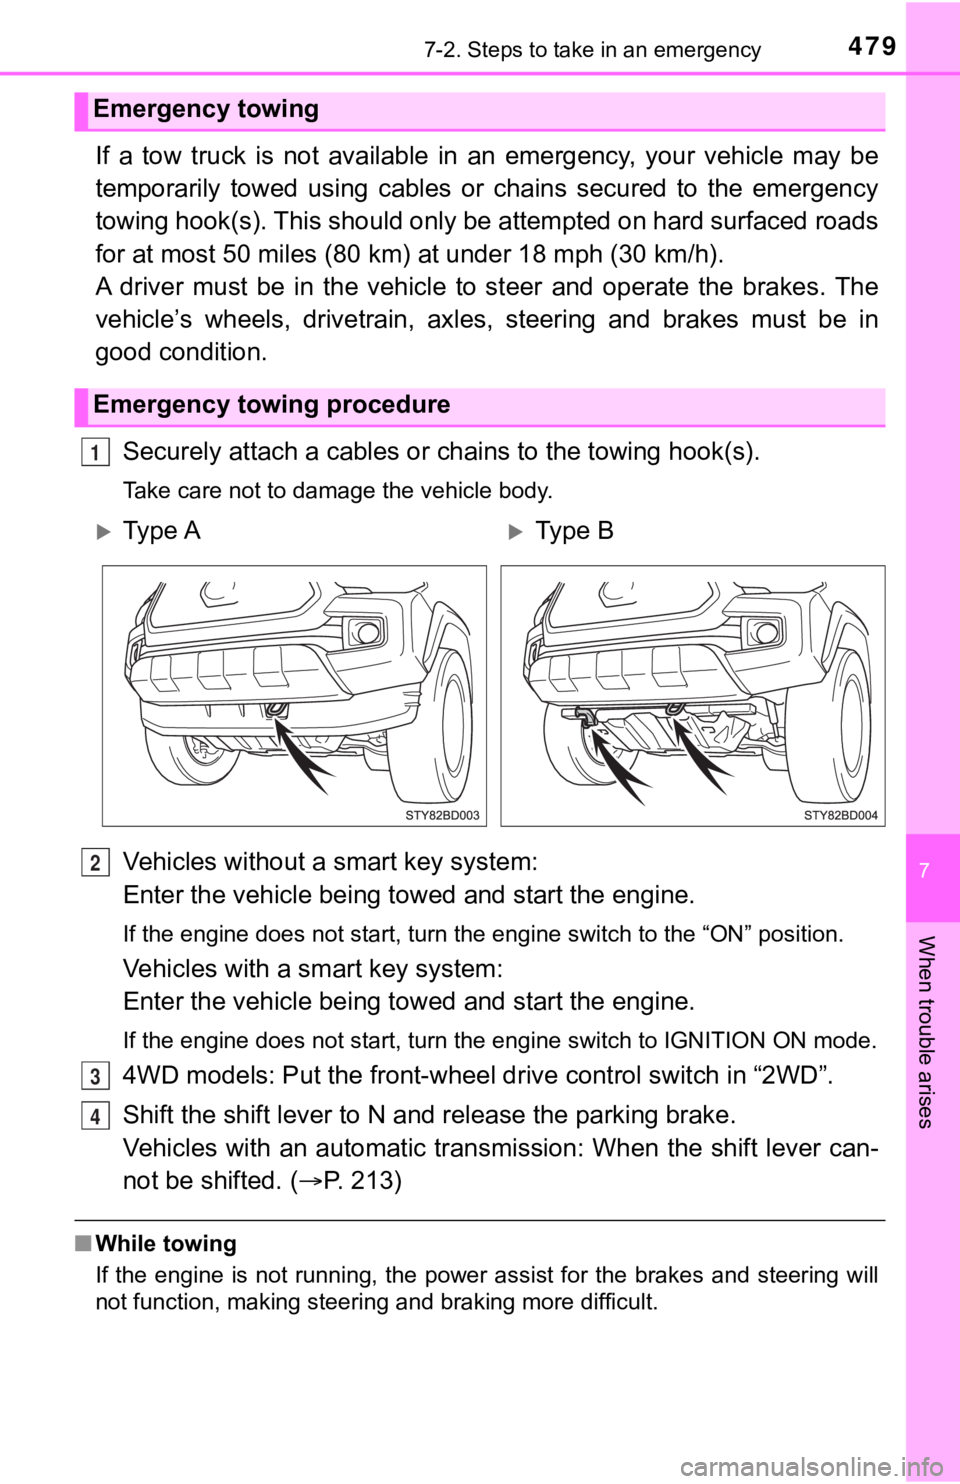
Securely attach a cables or chains to the towing hook(s).
Take care not to damage the vehicle body.
Vehicles without a smart key system:
Enter the vehicle being towed and start the engine.
If the engine does not start, turn the engine switch to the “ON ” position.
Vehicles with a smart key system:
Enter the vehicle being towed and start the engine.
If the engine does not start, turn the engine switch to IGNITIO N ON mode.
4WD models: Put the front-wheel drive control switch in “2WD”.
Shift the shift lever to N and release the parking brake.
Vehicles with an automatic trans mission: When the shift lever can-
not be shifted. ( P. 213)
■While towing
If the engine is not running, the power assist for the brakes a nd steering will
not function, making steering and braking more difficult.
Emergency towing
Emergency towing procedure
1
Ty p e AType B
2
3
4