tow TOYOTA TUNDRA HYBRID 2023 Owner's Manual
[x] Cancel search | Manufacturer: TOYOTA, Model Year: 2023, Model line: TUNDRA HYBRID, Model: TOYOTA TUNDRA HYBRID 2023Pages: 618, PDF Size: 13.67 MB
Page 126 of 618
1263-2. Opening, closing and locking the doors and tailgate
Owners Manual_USA_M0C052_en
*: If equipped
■Automatic stowing function
The step will be automatically
retracted, for safety, under the fol-
lowing condition:
●Vehicle speed is approximately 3
mph (5 km/h) or higher
■If “Power Steps Unable to
Retract” is displayed on the
multi-Information display
The step may not be completely
stowed.
Check that nothing is caught
between the step and the vehicle.
■If “Power Steps System Mal-
function See Owner’s Manual”
is displayed on the multi-infor-
mation display
The system may be malfunctioning.
Have the vehicle inspected by Toy-
ota dealer.
Power bed step*
The power bed step deploys
when opening the tailgate,
operating the wireless
remote control, or by using
the switch inside the vehi-
cle.
The power bed step stows
by closing the tailgate, oper-
ating the switch inside the
vehicle, or by driving above
3 mph (5 km/h).
WARNING
■Cautions regarding the power
bed step
Observe the following precau-
tions. Failure to do so may cause
serious injury.
●Check to make sure that all pas-
sengers and people in the vehi-
cle’s surrounding area do not
have a hand on the step or any
part of their body in a position
where it could be caught
between the step and the vehi-
cle when the pow er bed step is
being operated.
●Confirm that the step has com-
pletely deployed or stowed
before getting in or out of the
vehicle. If someone gets in or
out of the vehicle during power
bed step operation, the step
may stop deploying or stowing.
●Take care when pressing the
power steps switch. The step
will deploy or stow and may hit
other people or objects.
●Always check that the power
steps switch is turned off when
cleaning the step, before jack-
ing up or placing any object
under the vehicle, or if the step
is not operating correctly.
●Do not allow children to operate
the power bed step. Operating
power bed step so that a step
contacts someone can cause
serious injury, and in some
instances, even death.
■Jam protection function
Observe the following precau-
tions. Failure to do so may cause
serious injury.
Do not place any body part
between the power bed step and
vehicle. The jam protection func-
tion may not work depending on
the shape of the object that is
caught.
Page 127 of 618
1273-2. Opening, closing and locking the doors and tailgate
Owners Manual_USA_M0C052_en
3
Before driving
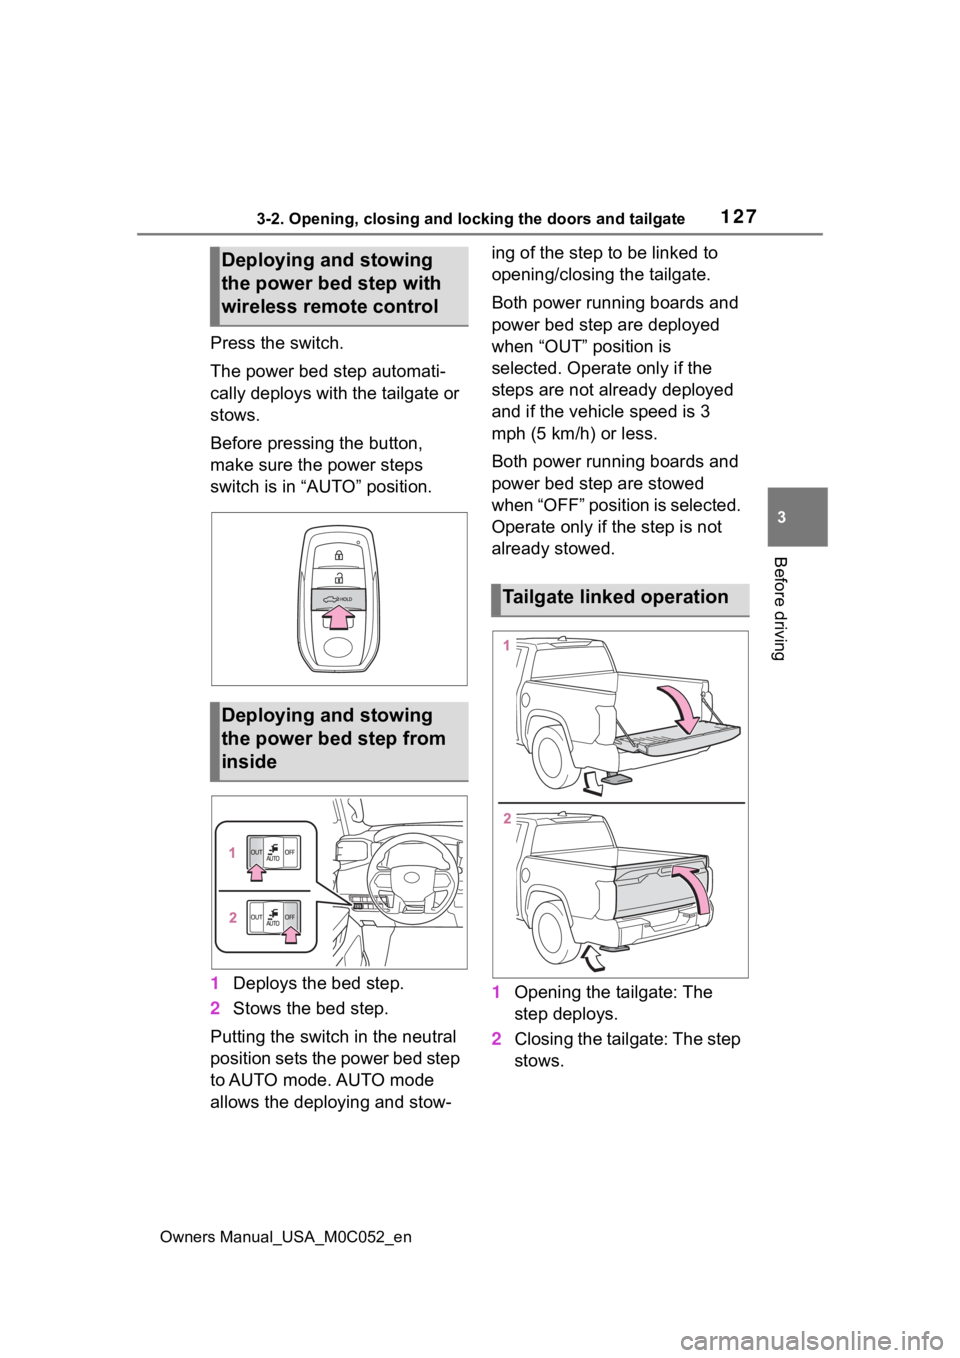
Press the switch.
The power bed step automati-
cally deploys with the tailgate or
stows.
Before pressing the button,
make sure the power steps
switch is in “AUTO” position.
1 Deploys the bed step.
2 Stows the bed step.
Putting the switch in the neutral
position sets the power bed step
to AUTO mode. AUTO mode
allows the deploying and stow- ing of the step to be linked to
opening/closing the tailgate.
Both power running boards and
power bed step are deployed
when “OUT” position is
selected. Operate only if the
steps are not already deployed
and if the vehicle speed is 3
mph (5 km/h) or less.
Both power running boards and
power bed step are stowed
when “OFF” position is selected.
Operate only if the step is not
already stowed.
1
Opening the tailgate: The
step deploys.
2 Closing the tailgate: The step
stows.
Deploying and stowing
the power bed step with
wireless remote control
Deploying and stowing
the power bed step from
inside
Tailgate linked operation
Page 130 of 618

1303-2. Opening, closing and locking the doors and tailgate
Owners Manual_USA_M0C052_en
■Conditions affecting operation
The smart key system uses weak
radio waves. In the following situa-
tions, the communication between
the electronic key and the vehicle
may be affected, preventing the
smart key system, wireless remote
control and immobilizer system from
operating properly. (Ways of coping:
P.527)
●When the electronic key battery is
depleted
●Near a TV tower, electric power
plant, gas station , radio station,
large display, airpo rt or other facil-
ity that generates strong radio
waves or electrical noise
●When carrying a portable radio,
cellular phone, cordless phone or
other wireless communication
device
●When the electronic key is in con-
tact with, or is covered by the fol-
lowing metallic objects
• Cards to which al uminum foil is
attached
• Cigarette boxes that have alumi- num foil inside
• Metallic wallets or bags
• Coins
• Hand warmers made of metal
• Media such as CDs and DVDs
●When other wireless keys (that
emit radio waves) are being used
nearby
●When carrying the electronic key
together with the following devices
that emit radio waves
• Another electronic key or a wire- less key that emits radio waves
• Personal computers or personal
digital assistants (PDAs)
• Digital audio players
• Portable game systems
●If window tint with a metallic con-
tent or metallic objects are
attached to the rear window
●When the electronic key is placed
near a battery charger or elec-
tronic devices
●When the vehicle is parked in a
pay parking spot where radio
waves are emitted.
■Note for the entry function
●Even when the electronic key is
within the effective range (detec-
tion areas), the system may not
operate properly in the following
cases:
• The electronic key is too close to the window or outside door han-
dle, near the ground, or in a high
place when the doors are locked
or unlocked.
• The electronic key is near the
ground or in a high place, or too
close to the center of the rear
bumper.
• The electronic key is on the instru- ment panel, or floor, or in the door
pockets or glove box when the
hybrid system is started or power
switch modes are changed.
●Do not leave the electronic key on
top of the instrument panel or near
the door pockets when exiting the
vehicle. Depending on the radio
wave reception conditions, it may
be detected by the antenna out-
side the cabin and the doors will
become lockable from the outside,
possibly trapping the electronic
key inside the vehicle.
●As long as the electronic key is
within the effective range, the
doors may be locked or unlocked
by anyone. However, only the
doors detecting the electronic key
can be used to unlock the vehicle.
●Even if the electro nic key is not
inside the vehicle, it may be possi-
ble to start the hybrid system if the
electronic key is near the window.
●The doors may unlock or lock if a
large amount of water splashes on
the door handle, such as in the
rain or in a car wash, when the
electronic key is within the effec-
tive range. (The doors will auto-
matically be locked after
approximately 60 seconds if the
Page 134 of 618
1343-3. Adjusting the seats
Owners Manual_USA_M0C052_en
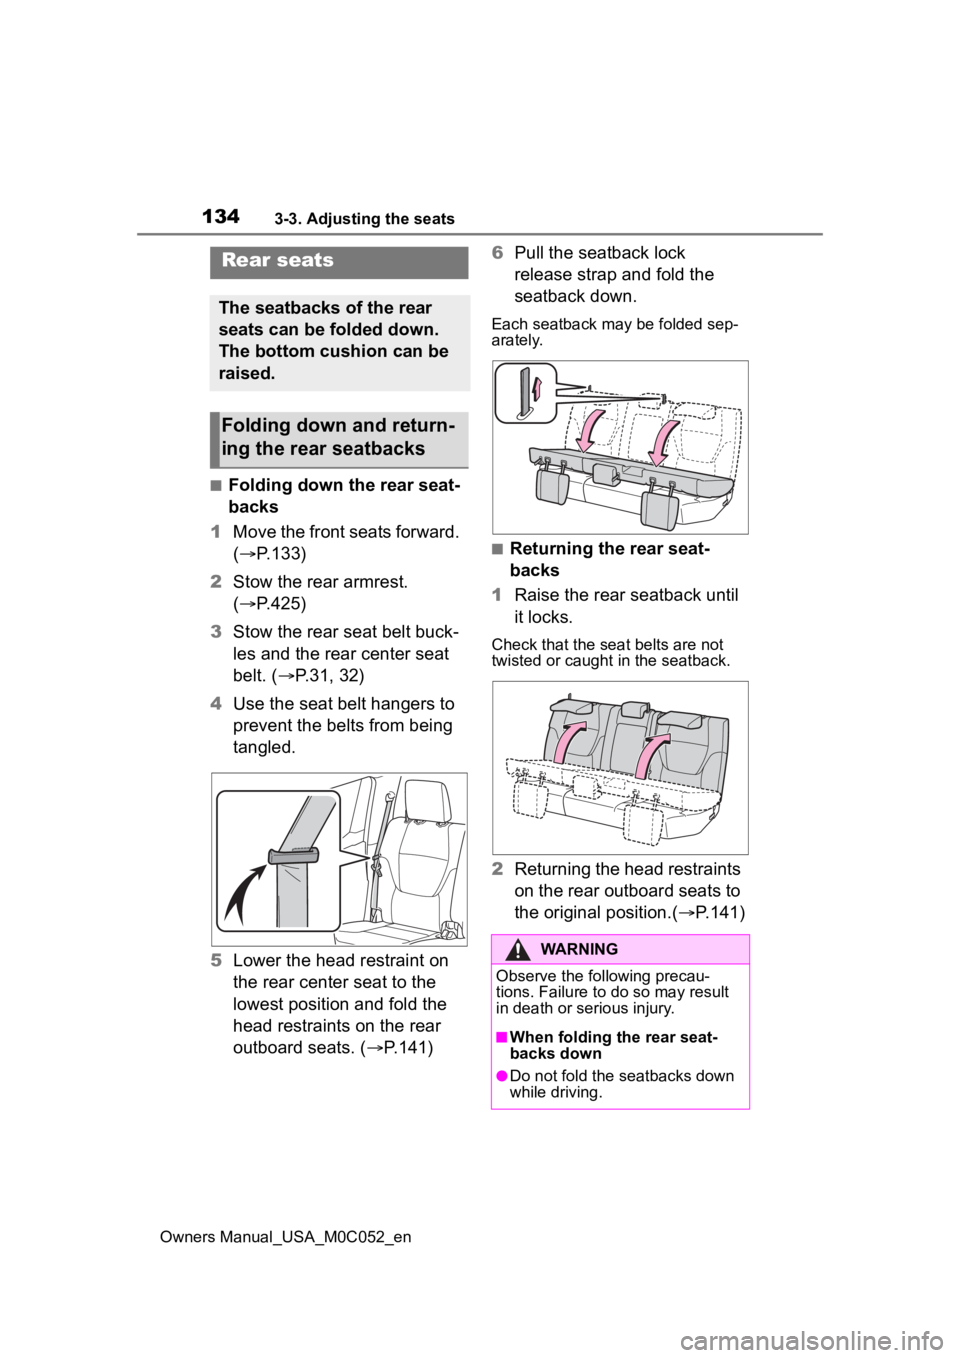
■Folding down the rear seat-
backs
1 Move the front seats forward.
( P.133)
2 Stow the rear armrest.
( P.425)
3 Stow the rear seat belt buck-
les and the rear center seat
belt. ( P.31, 32)
4 Use the seat belt hangers to
prevent the belts from being
tangled.
5 Lower the head restraint on
the rear center seat to the
lowest position and fold the
head restraints on the rear
outboard seats. ( P.141)6
Pull the seatback lock
release strap and fold the
seatback down.
Each seatback may be folded sep-
arately.
■Returning the rear seat-
backs
1 Raise the rear seatback until
it locks.
Check that the seat belts are not
twisted or caught i n the seatback.
2Returning the head restraints
on the rear outboard seats to
the original position.( P.141)
Rear seats
The seatbacks of the rear
seats can be folded down.
The bottom cushion can be
raised.
Folding down and return-
ing the rear seatbacks
WARNING
Observe the following precau-
tions. Failure to do so may result
in death or serious injury.
■When folding the rear seat-
backs down
●Do not fold the seatbacks down
while driving.
Page 135 of 618
1353-3. Adjusting the seats
Owners Manual_USA_M0C052_en
3
Before driving
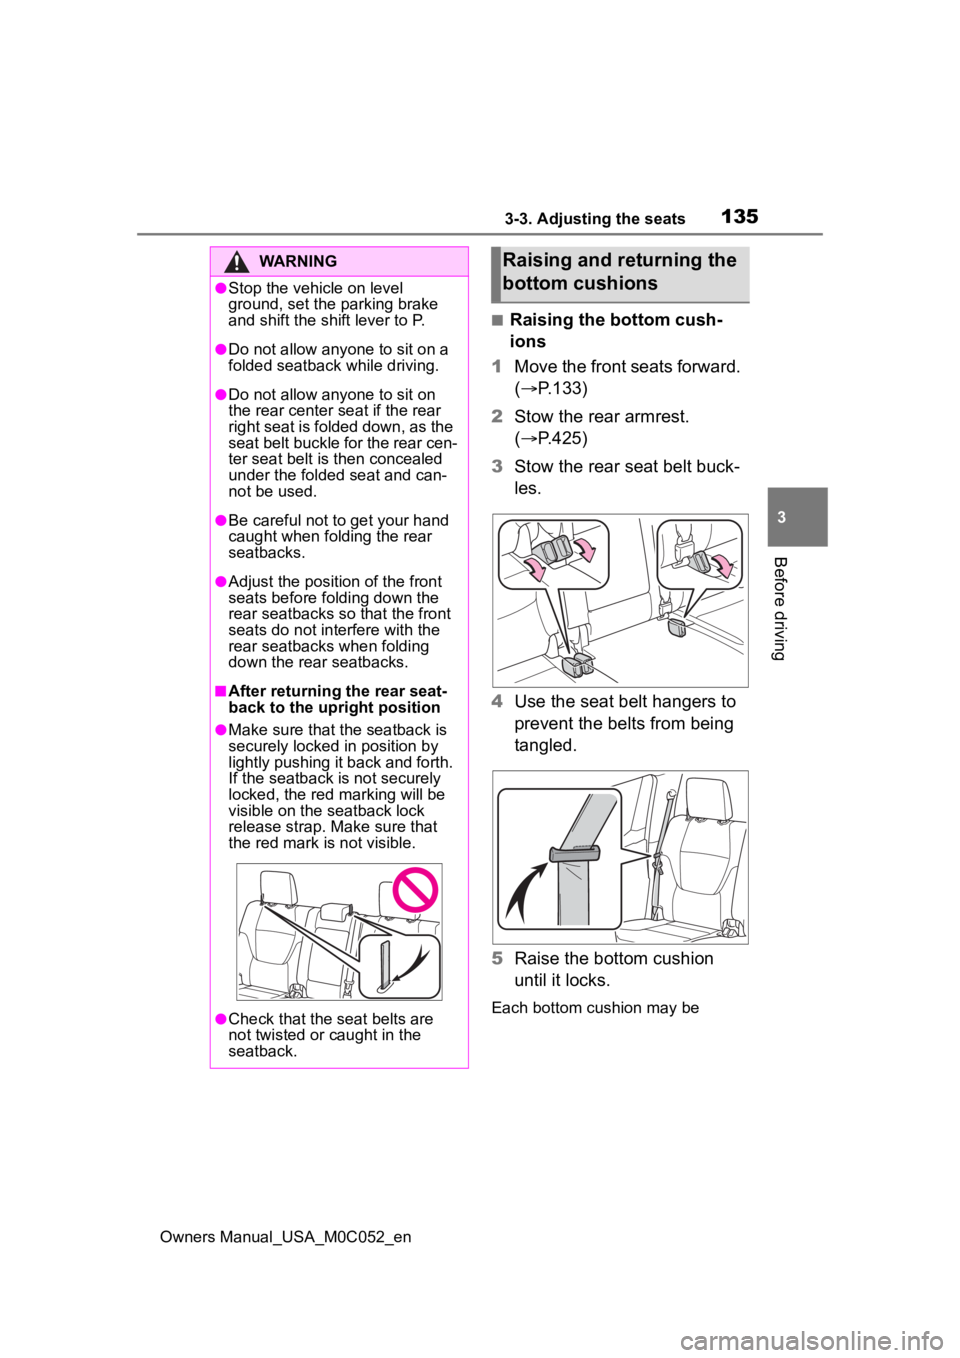
■Raising the bottom cush-
ions
1 Move the front seats forward.
( P.133)
2 Stow the rear armrest.
( P.425)
3 Stow the rear seat belt buck-
les.
4 Use the seat belt hangers to
prevent the belts from being
tangled.
5 Raise the bottom cushion
until it locks.
Each bottom cushion may be
WARNING
●Stop the vehicle on level
ground, set the parking brake
and shift the shift lever to P.
●Do not allow anyo ne to sit on a
folded seatback while driving.
●Do not allow any one to sit on
the rear center seat if the rear
right seat is folded down, as the
seat belt buckle for the rear cen-
ter seat belt is then concealed
under the folded seat and can-
not be used.
●Be careful not to get your hand
caught when folding the rear
seatbacks.
●Adjust the position of the front
seats before folding down the
rear seatbacks so that the front
seats do not interfere with the
rear seatbacks when folding
down the rear seatbacks.
■After returning the rear seat-
back to the upright position
●Make sure that the seatback is
securely locked in position by
lightly pushing it back and forth.
If the seatback is not securely
locked, the red marking will be
visible on the seatback lock
release strap. Make sure that
the red mark is not visible.
●Check that the seat belts are
not twisted or caught in the
seatback.
Raising and returning the
bottom cushions
Page 141 of 618
1413-3. Adjusting the seats
Owners Manual_USA_M0C052_en
3
Before driving
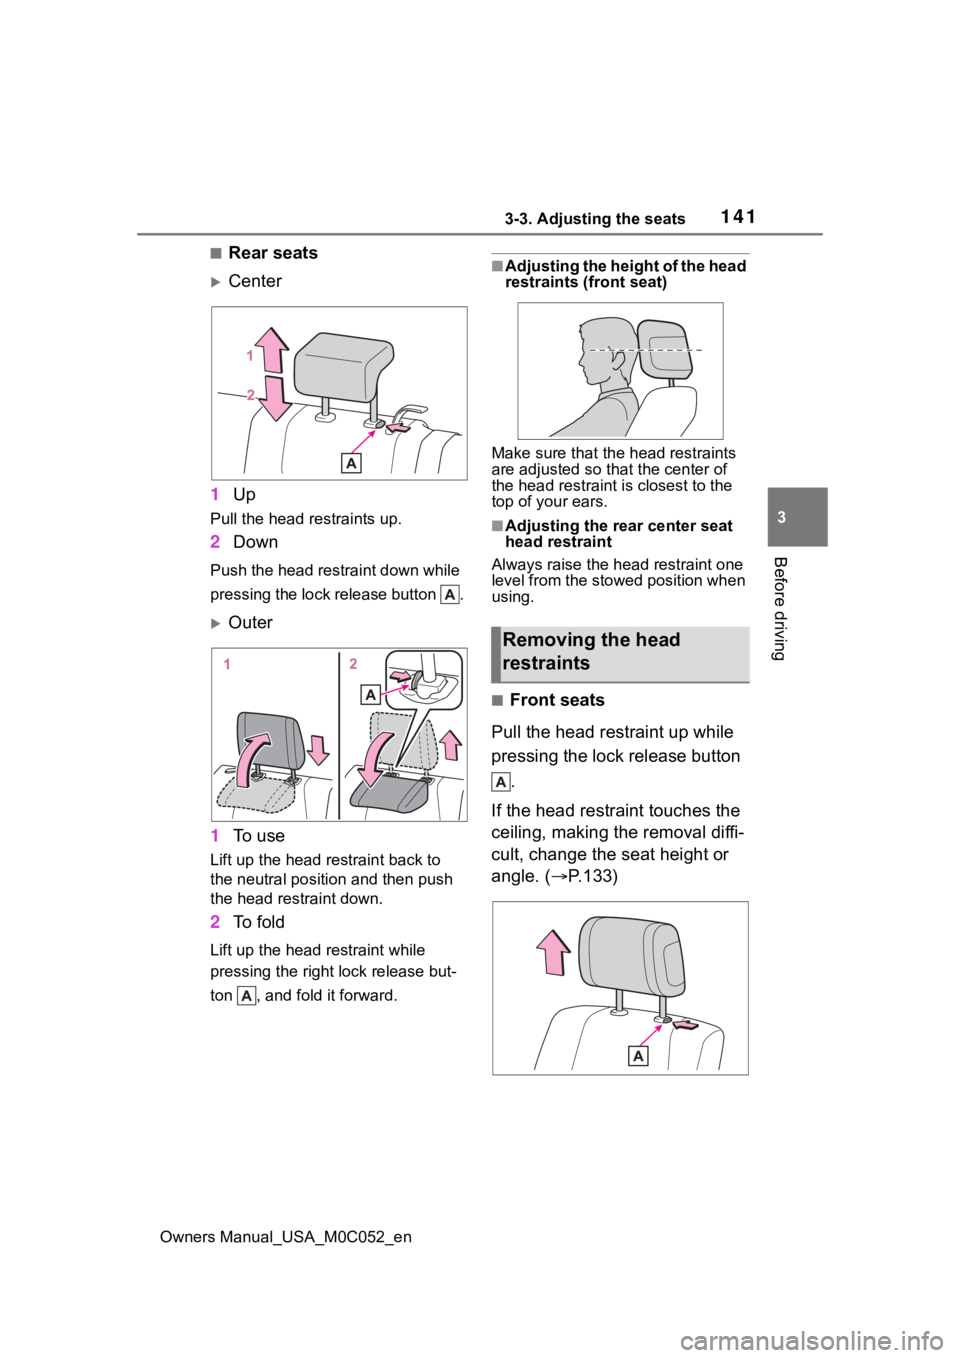
■Rear seats
Center
1 Up
Pull the head restraints up.
2Down
Push the head restraint down while
pressing the lock release button .
Outer
1 To u s e
Lift up the head restraint back to
the neutral position and then push
the head restraint down.
2To fold
Lift up the head restraint while
pressing the right lock release but-
ton , and fold it forward.
■Adjusting the height of the head
restraints (front seat)
Make sure that the head restraints
are adjusted so that the center of
the head restraint i s closest to the
top of your ears.
■Adjusting the rear center seat
head restraint
Always raise the head restraint one
level from the stowed position when
using.
■Front seats
Pull the head restraint up while
pressing the lock release button .
If the head restraint touches the
ceiling, making the removal diffi-
cult, change the seat height or
angle. ( P.133)
Removing the head
restraints
Page 143 of 618
1433-4. Adjusting the steering wheel and mirrors
Owners Manual_USA_M0C052_en
3
Before driving
3-4.Adjusting the steering wheel and mirrors
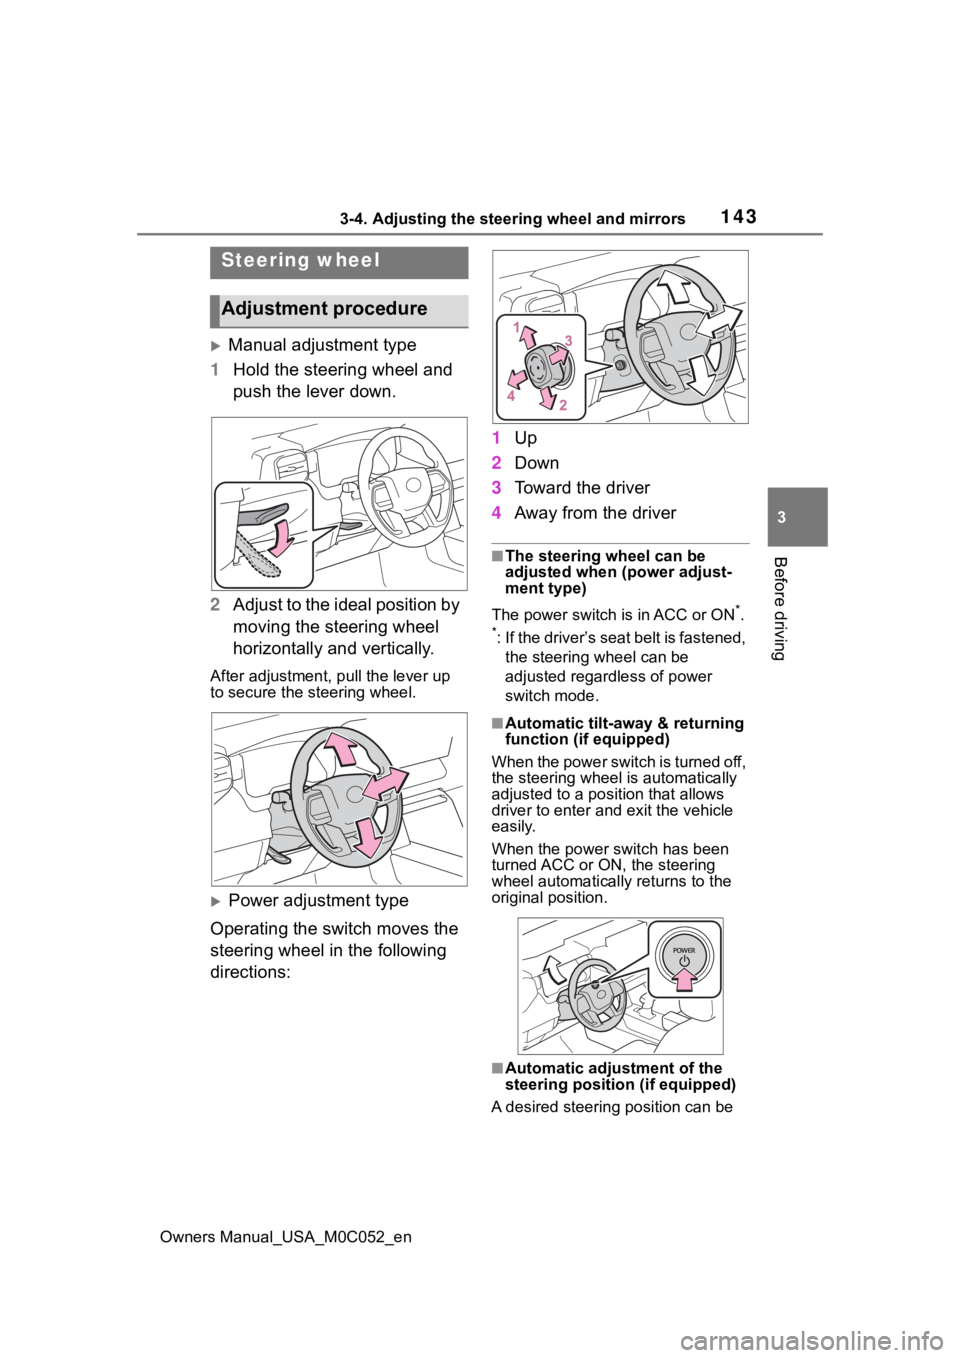
Manual adjustment type
1 Hold the steering wheel and
push the lever down.
2 Adjust to the ideal position by
moving the steering wheel
horizontally and vertically.
After adjustment, pull the lever up
to secure the steering wheel.
Power adjustment type
Operating the switch moves the
steering wheel in the following
directions: 1
Up
2 Down
3 Toward the driver
4 Away from the driver
■The steering wheel can be
adjusted when (power adjust-
ment type)
The power switch is in ACC or ON
*.
*: If the driver’s seat belt is fastened, the steering wheel can be
adjusted regardless of power
switch mode.
■Automatic tilt-away & returning
function (if equipped)
When the power switch is turned off,
the steering wheel is automatically
adjusted to a posit ion that allows
driver to enter and exit the vehicle
easily.
When the power switch has been
turned ACC or ON, the steering
wheel automatically returns to the
original position.
■Automatic adjustment of the
steering positi on (if equipped)
A desired steering position can be
Steering wheel
Adjustment procedure
Page 153 of 618
1533-4. Adjusting the steering wheel and mirrors
Owners Manual_USA_M0C052_en
3
Before driving
The image is diffi-
cult to see.
The vehicle is in a dark
area.
The vehicle is near a TV
tower, broadcasting sta-
tion, electric power plant,
or other location where
strong radio waves or
electrical noise may be
present.
The temperature around
the camera is extremely
high/low.
The ambient temperature
is extremely low.
It is raining or humid.
Sunlight or headlights are
shining directly into the
camera lens.
The vehicle is under fluo-
rescent lights, sodium
lights, mercury lights, etc.
Water vapor from the tail-
pipe is obstructing the
camera.
Change to optical mirror
mode.
(Change back to digital
mirror mode when the
conditions have
improved.)
The image is diffi-
cult to see.Foreign matters (such as
water droplets, snow, mud,
etc.) is on the camera lens.
Change to optical mir-
ror mode.
Rinse the camera
with a large quantity
of water, wipe it clean
with a soft cloth
dampened with water,
and then change back
to digital mirror mode.
The image is out of
alignment.The camera or its surround-
ing area has received a
strong impact.Change to optical mirror
mode and have the
vehicle inspected by
your Toyota dealer.
SymptomLikely causeSolution
Page 157 of 618
1573-4. Adjusting the steering wheel and mirrors
Owners Manual_USA_M0C052_en
3
Before driving
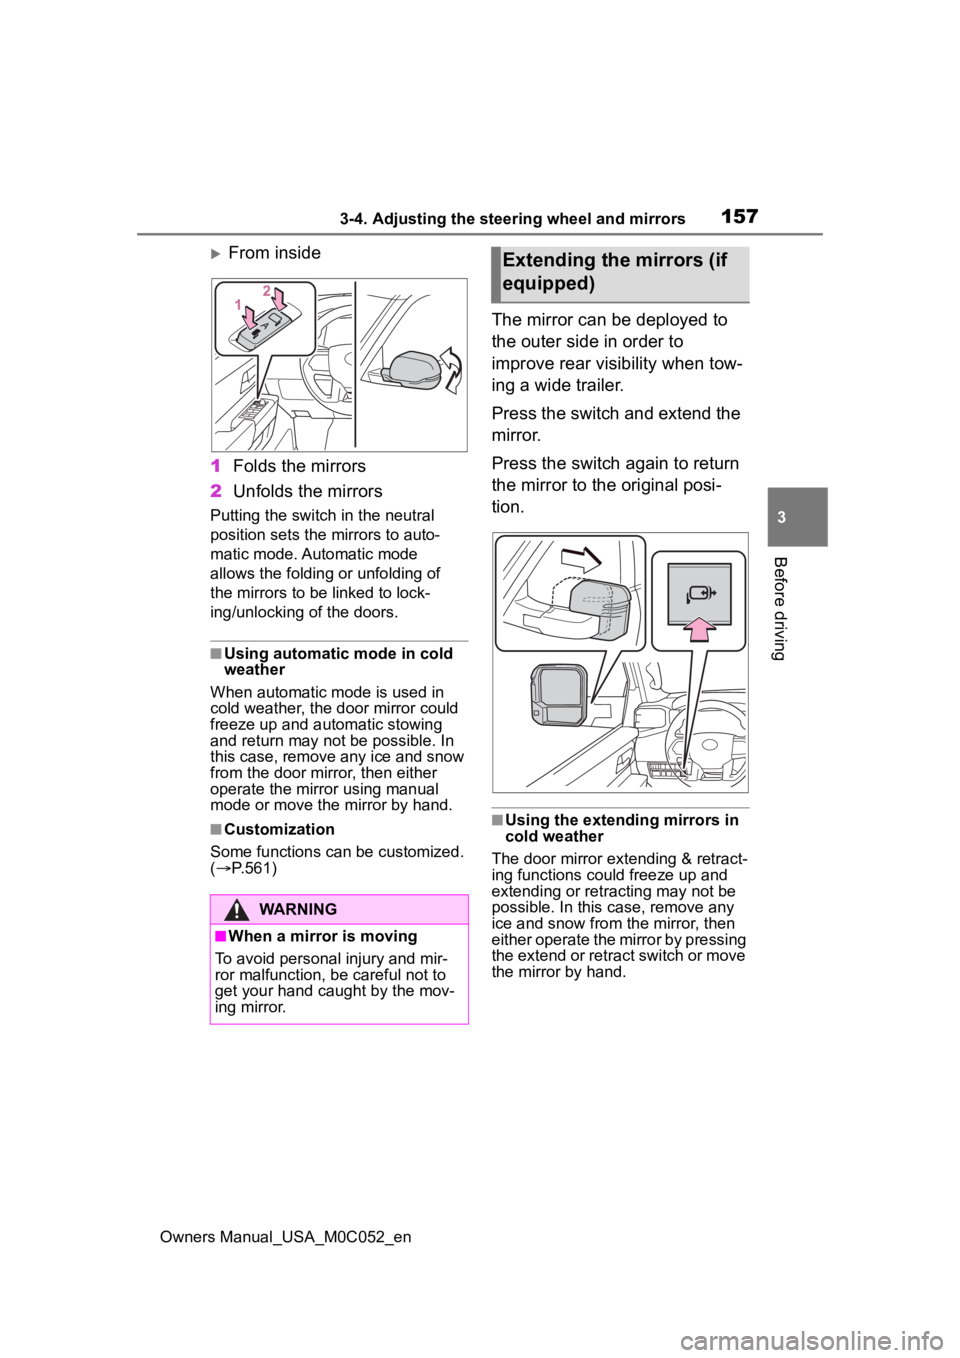
From inside
1 Folds the mirrors
2 Unfolds the mirrors
Putting the switch in the neutral
position sets the mirrors to auto-
matic mode. Automatic mode
allows the folding or unfolding of
the mirrors to be linked to lock-
ing/unlocking of the doors.
■Using automatic mode in cold
weather
When automatic mode is used in
cold weather, the door mirror could
freeze up and aut omatic stowing
and return may not be possible. In
this case, remove any ice and snow
from the door mirror, then either
operate the mirror using manual
mode or move the mirror by hand.
■Customization
Some functions can be customized.
( P.561)
The mirror can be deployed to
the outer side in order to
improve rear visibility when tow-
ing a wide trailer.
Press the switch and extend the
mirror.
Press the switch again to return
the mirror to the original posi-
tion.
■Using the extending mirrors in
cold weather
The door mirror extending & retract-
ing functions could freeze up and
extending or retracting may not be
possible. In this c ase, remove any
ice and snow from the mirror, then
either operate the mirror by pressing
the extend or retract switch or move
the mirror by hand.
WARNING
■When a mirror is moving
To avoid personal injury and mir-
ror malfunction, be careful not to
get your hand caught by the mov-
ing mirror.
Extending the mirrors (if
equipped)
Page 158 of 618
1583-4. Adjusting the steering wheel and mirrors
Owners Manual_USA_M0C052_en
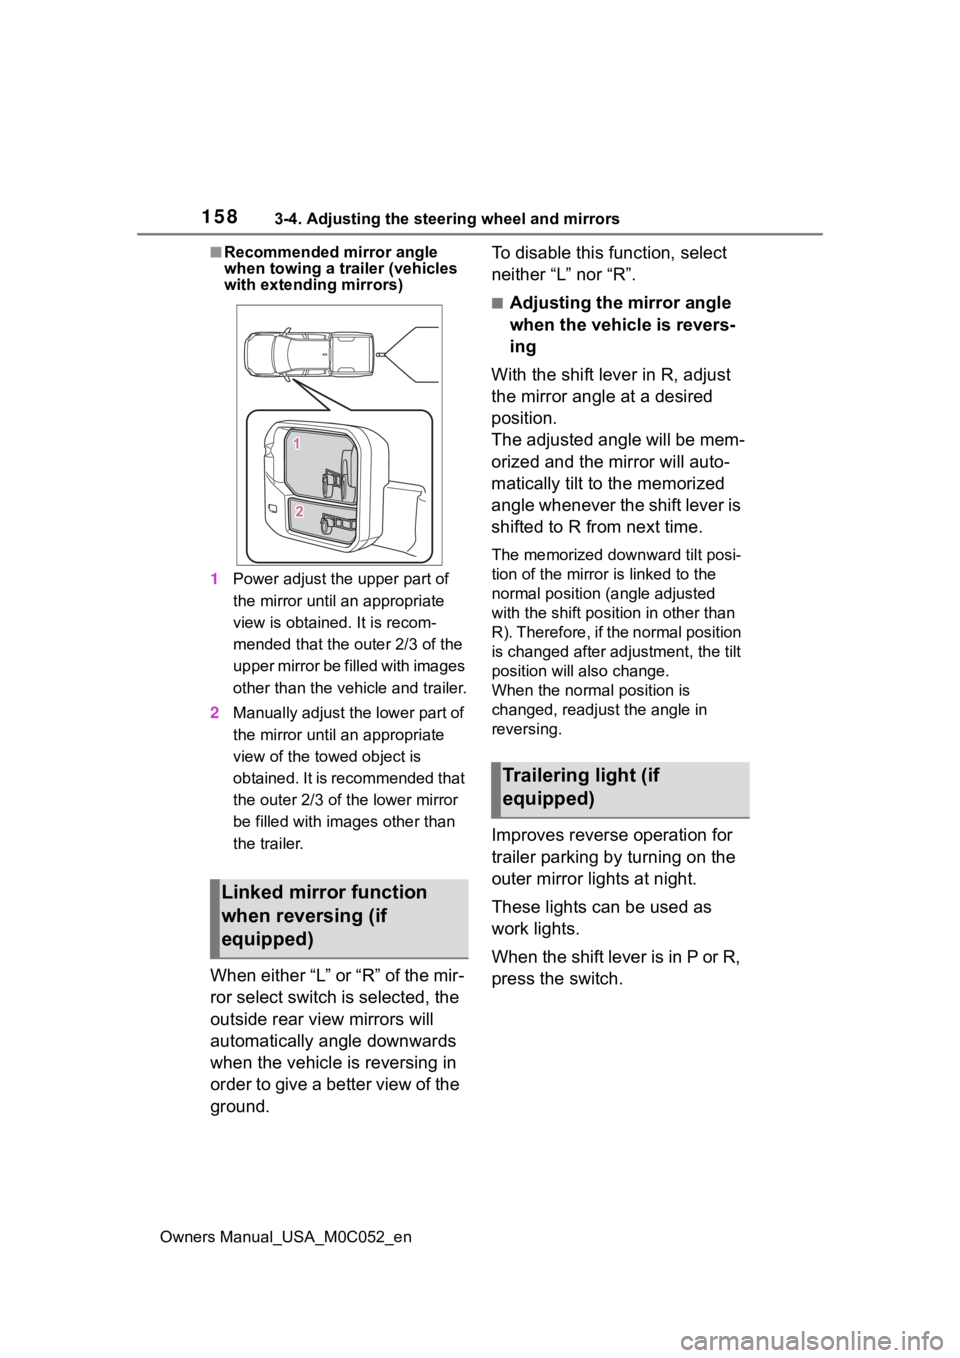
■Recommended mirror angle
when towing a trailer (vehicles
with extending mirrors)
1 Power adjust the upper part of
the mirror until an appropriate
view is obtained. It is recom-
mended that the outer 2/3 of the
upper mirror be f illed with images
other than the vehicle and trailer.
2 Manually adjust the lower part of
the mirror until an appropriate
view of the towed object is
obtained. It is recommended that
the outer 2/3 of the lower mirror
be filled with images other than
the trailer.
When either “L” or “R” of the mir-
ror select switch is selected, the
outside rear view mirrors will
automatically angle downwards
when the vehicle is reversing in
order to give a better view of the
ground. To disable this function, select
neither “L” nor “R”.
■Adjusting the mirror angle
when the vehicle is revers-
ing
With the shift lever in R, adjust
the mirror angle at a desired
position.
The adjusted angle will be mem-
orized and the mirror will auto-
matically tilt to the memorized
angle whenever the shift lever is
shifted to R from next time.
The memorized downward tilt posi-
tion of the mirror is linked to the
normal position (angle adjusted
with the shift posit ion in other than
R). Therefore, if the normal position
is changed after adjustment, the tilt
position will also change.
When the normal position is
changed, readjust the angle in
reversing.
Improves reverse operation for
trailer parking by turning on the
outer mirror lights at night.
These lights can be used as
work lights.
When the shift lever is in P or R,
press the switch.
Linked mirror function
when reversing (if
equipped)
Trailering light (if
equipped)