phone TOYOTA VENZA 2012 Accessories, Audio & Navigation (in English)
[x] Cancel search | Manufacturer: TOYOTA, Model Year: 2012, Model line: VENZA, Model: TOYOTA VENZA 2012Pages: 228, PDF Size: 3.73 MB
Page 7 of 228
7
1
2
3
4
5
6
7
8
9
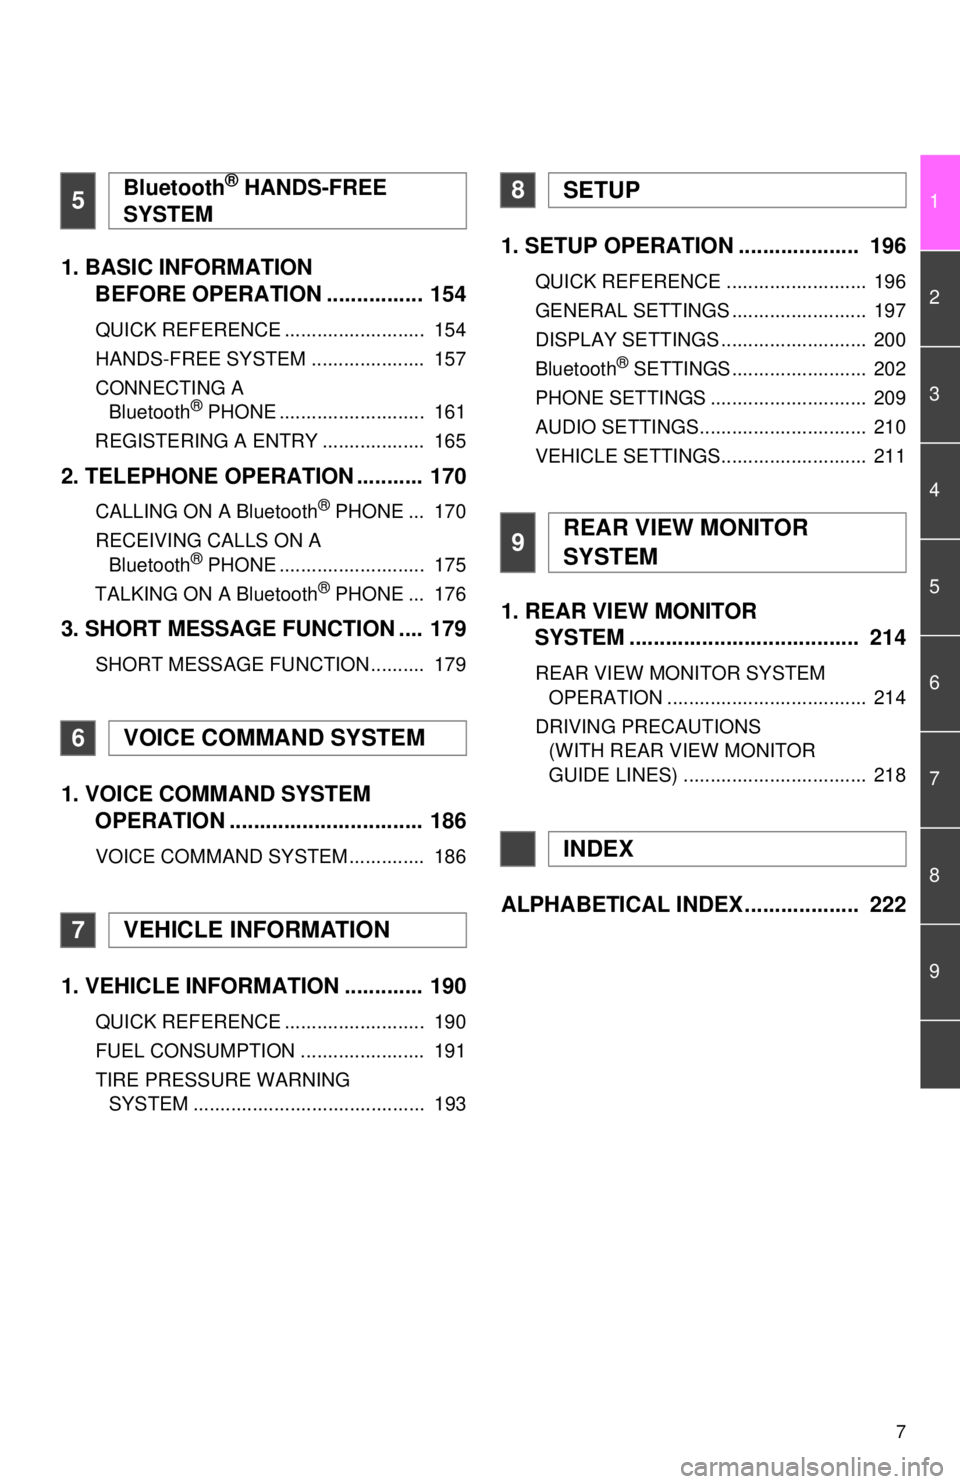
1. BASIC INFORMATION BEFORE OPERATION ................ 154
QUICK REFERENCE .......................... 154
HANDS-FREE SYSTEM ..................... 157
CONNECTING A
Bluetooth
® PHONE ........................... 161
REGISTERING A ENTRY ................... 165
2. TELEPHONE OPERATION ........... 170
CALLING ON A Bluetooth® PHONE ... 170
RECEIVING CALLS ON A Bluetooth
® PHONE ........................... 175
TALKING ON A Bluetooth® PHONE ... 176
3. SHORT MESSAGE FUNCTION .... 179
SHORT MESSAGE FUNCTION .......... 179
1. VOICE COMMAND SYSTEM OPERATION ................................ 186
VOICE COMMAND SYSTEM .............. 186
1. VEHICLE INFORMATION ............. 190
QUICK REFERENCE .......................... 190
FUEL CONSUMPTION ....................... 191
TIRE PRESSURE WARNING
SYSTEM ........................................... 193
1. SETUP OPERATION .................... 196
QUICK REFERENCE .......................... 196
GENERAL SETTINGS ......................... 197
DISPLAY SETTINGS ........................... 200
Bluetooth
® SETTINGS ......................... 202
PHONE SETTINGS ............................. 209
AUDIO SETTINGS............................... 210
VEHICLE SETTINGS........................... 211
1. REAR VIEW MONITOR SYSTEM ....... ............................ ... 214
REAR VIEW MONITOR SYSTEM
OPERATION ..................................... 214
DRIVING PRECAUTIONS (WITH REAR VIEW MONITOR
GUIDE LINES) .................................. 218
ALPHABETICAL INDEX ................... 222
5Bluetooth® HANDS-FREE
SYSTEM
6VOICE COMMAND SYSTEM
7VEHICLE INFORMATION
8SETUP
9REAR VIEW MONITOR
SYSTEM
INDEX
Page 12 of 228
12
1. CONTROLS AND FEATURES
2. SYSTEM FUNCTION INDEX
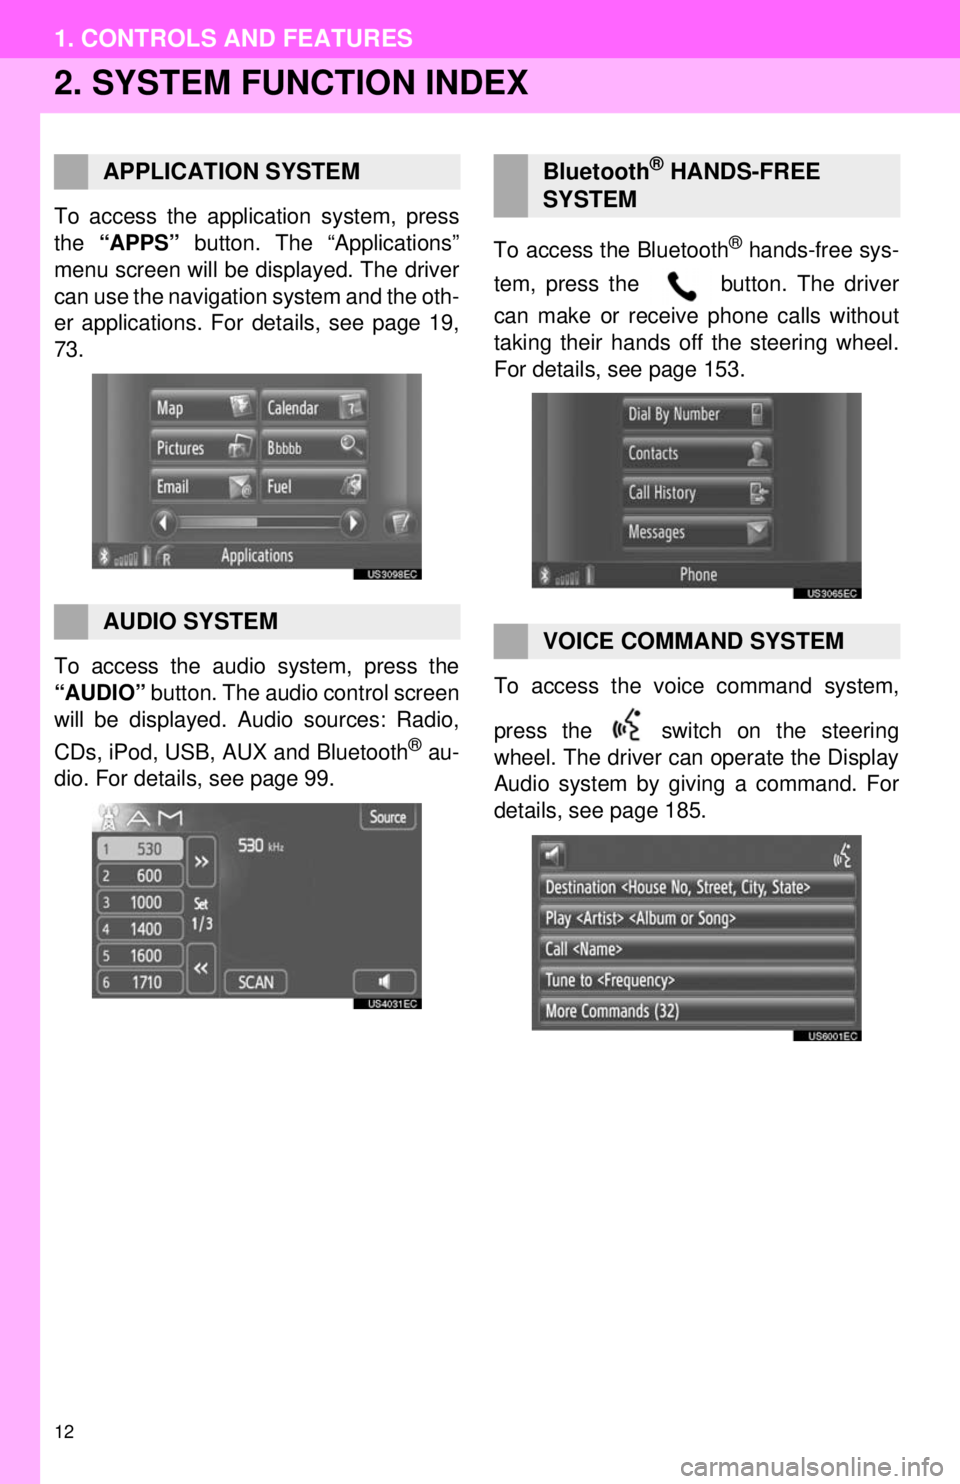
To access the application system, press
the “APPS” button. The “Applications”
menu screen will be displayed. The driver
can use the navigation system and the oth-
er applications. For details, see page 19,
73.
To access the audio system, press the
“AUDIO” button. The audio control screen
will be displayed. Audio sources: Radio,
CDs, iPod, USB, AUX and Bluetooth
® au-
dio. For details, see page 99. To access the Bluetooth
® hands-free sys-
tem, press the button. The driver
can make or receive phone calls without
taking their hands off the steering wheel.
For details, see page 153.
To access the vo ice command system,
press the switch on the steering
wheel. The driver can operate the Display
Audio system by giving a command. For
details, see page 185.
APPLICATION SYSTEM
AUDIO SYSTEM
Bluetooth® HANDS-FREE
SYSTEM
VOICE COMMAND SYSTEM
Page 21 of 228
21
1. NAVIGATION OPERATION
2
APPLICATION-“Map”
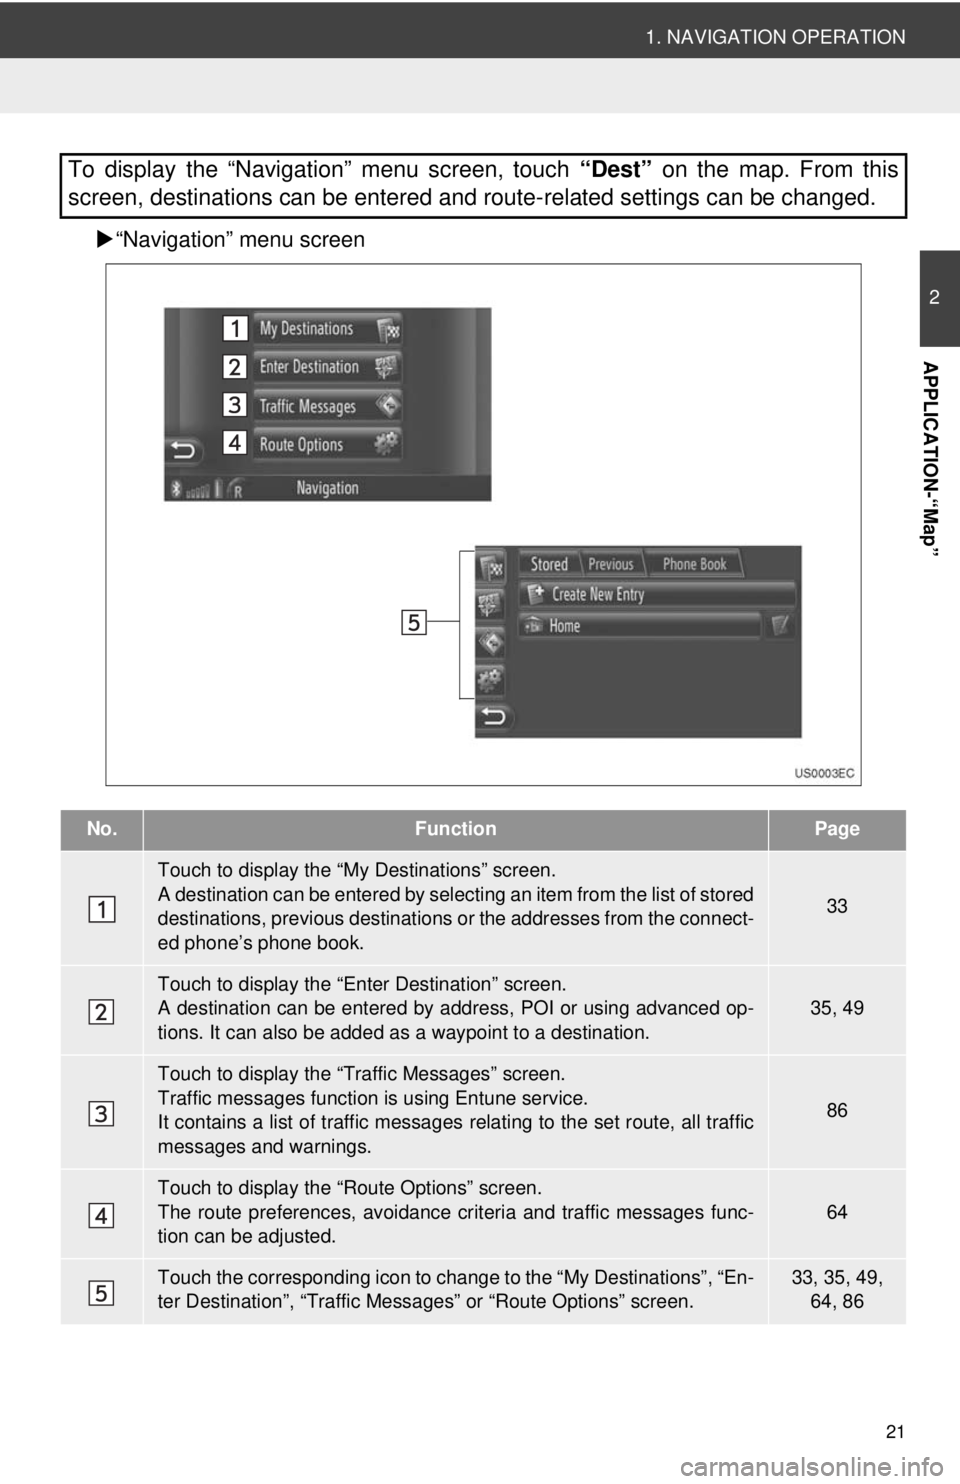
“Navigation” menu screen
To display the “Navigation” menu screen, touch “Dest” on the map. From this
screen, destinations can be entered and route-related settings can be changed.
No.FunctionPage
Touch to display the “My Destinations” screen.
A destination can be entered by selecting an item from the list of stored
destinations, previous destinations or the addresses from the connect-
ed phone’s phone book.
33
Touch to display the “Enter Destination” screen.
A destination can be entered by addr ess, POI or using advanced op-
tions. It can also be added as a waypoint to a destination.35, 49
Touch to display the “Traffic Messages” screen.
Traffic messages function is using Entune service.
It contains a list of traffic messages relating to the set route, all traffic
messages and warnings.
86
Touch to display the “Route Options” screen.
The route preferences, avoidance crit eria and traffic messages func-
tion can be adjusted.
64
Touch the corresponding icon to change to the “My Destinations”, “En-
ter Destination”, “Traffic Mess ages” or “Route Options” screen.33, 35, 49,
64, 86
Page 29 of 228
29
2
APPLICATION-“Map”
1. NAVIGATION OPERATION
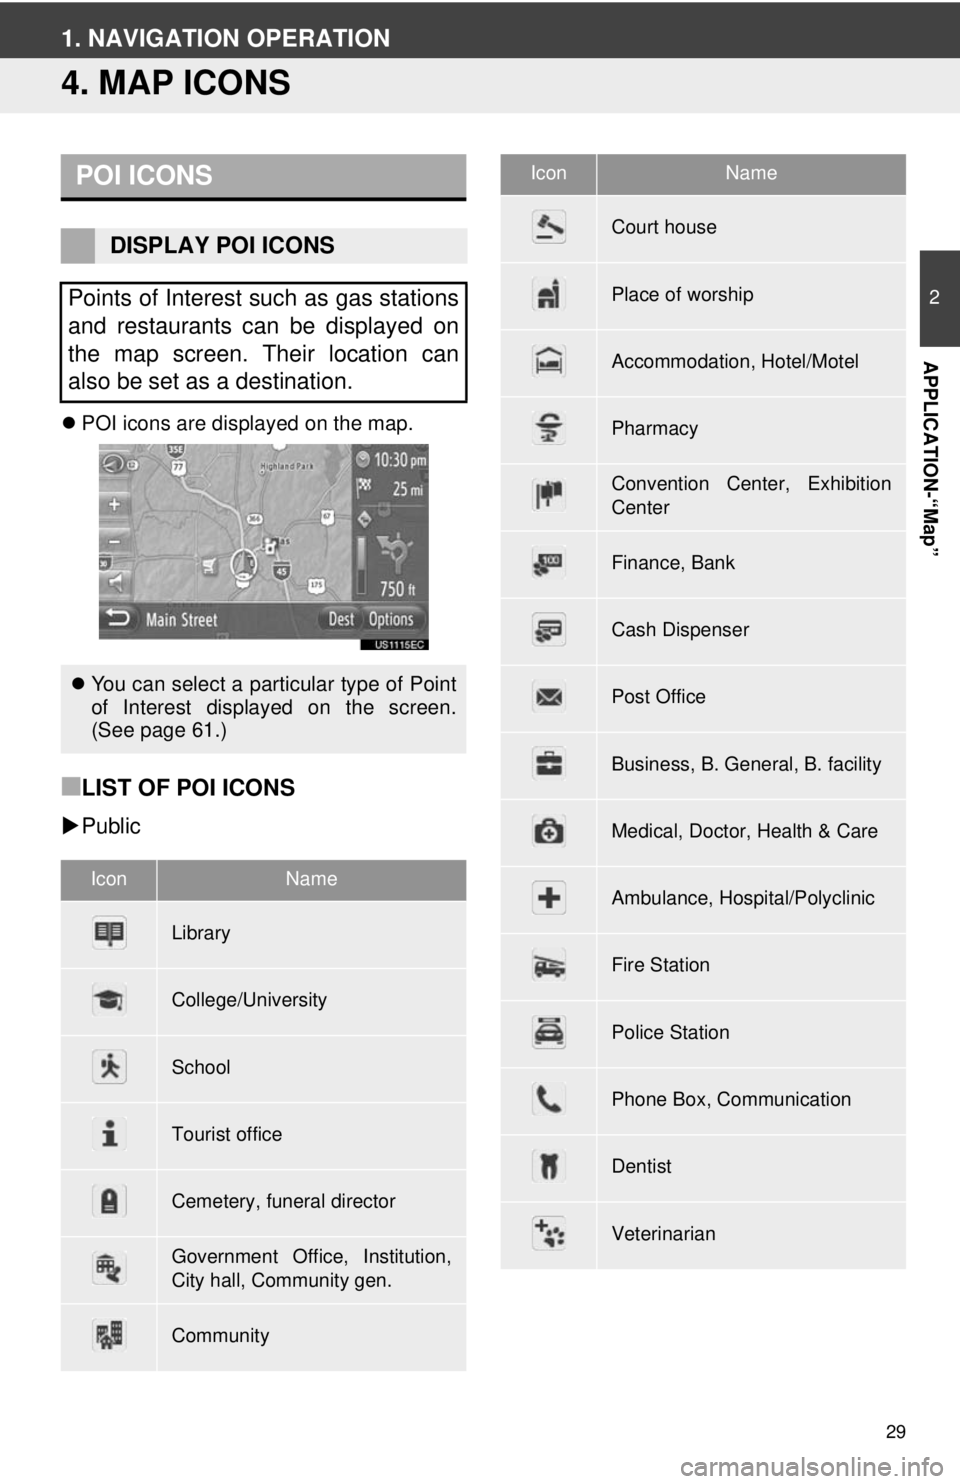
4. MAP ICONS
POI icons are displayed on the map.
■LIST OF POI ICONS
Public
POI ICONS
DISPLAY POI ICONS
Points of Interest such as gas stations
and restaurants can be displayed on
the map screen. Their location can
also be set as a destination.
You can select a particular type of Point
of Interest displayed on the screen.
(See page 61.)
IconName
Library
College/University
School
Tourist office
Cemetery, funeral director
Government Office, Institution,
City hall, Community gen.
Community
Court house
Place of worship
Accommodation, Hotel/Motel
Pharmacy
Convention Center, Exhibition
Center
Finance, Bank
Cash Dispenser
Post Office
Business, B. General, B. facility
Medical, Doctor, Health & Care
Ambulance, Hospital/Polyclinic
Fire Station
Police Station
Phone Box, Communication
Dentist
Veterinarian
IconName
Page 32 of 228
32
1. NAVIGATION OPERATION
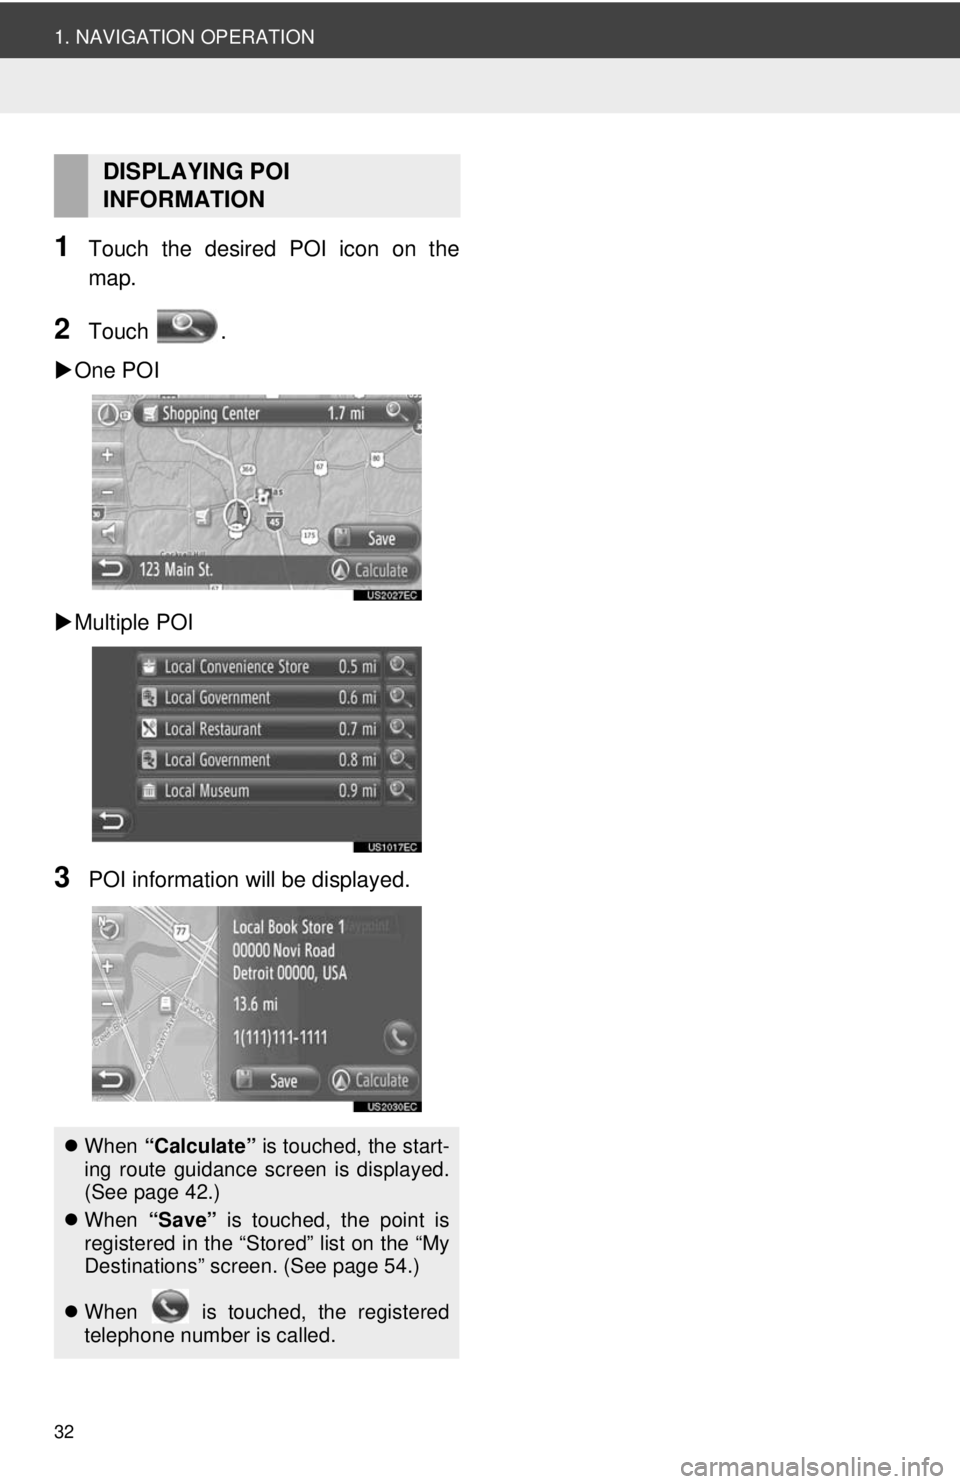
1Touch the desired POI icon on the
map.
2Touch .
One POI
Multiple POI
3POI information will be displayed.
DISPLAYING POI
INFORMATION
When “Calculate” is touched, the start-
ing route guidance screen is displayed.
(See page 42.)
When “Save” is touched, the point is
registered in the “Stored” list on the “My
Destinations” screen. (See page 54.)
When is touched, the registered
telephone number is called.
Page 33 of 228
33
2
APPLICATION-“Map”
2. DESTINATION SEARCH
1. DESTINATION SEARCH
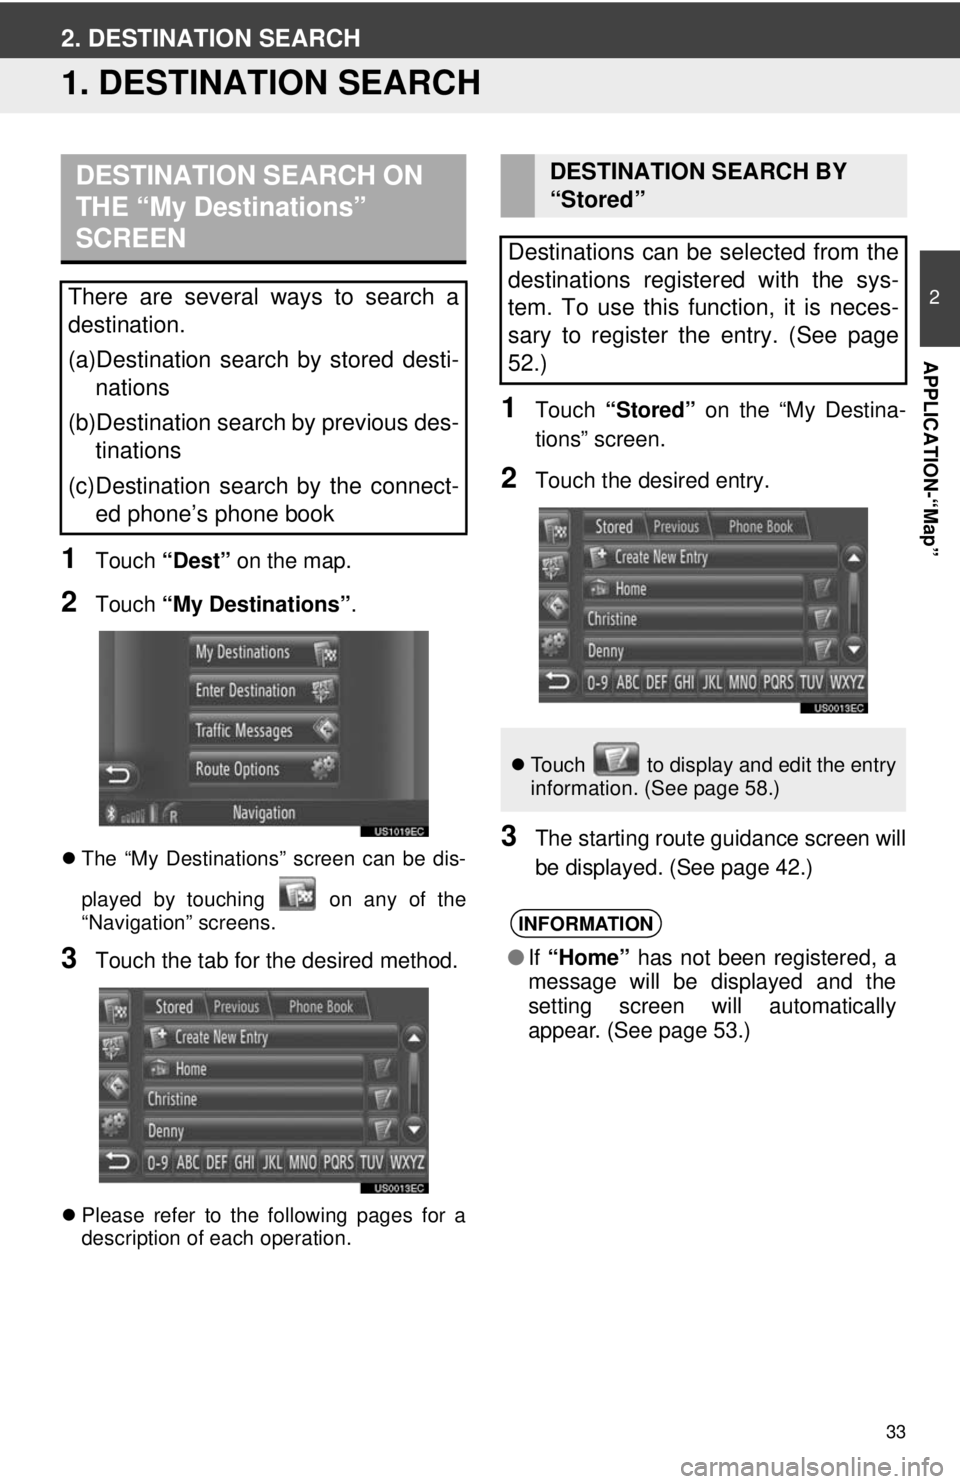
1Touch “Dest” on the map.
2Touch “My Destinations” .
The “My Destinations” screen can be dis-
played by touching on any of the
“Navigation” screens.
3Touch the tab for the desired method.
Please refer to the following pages for a
description of each operation.
1Touch “Stored” on the “My Destina-
tions” screen.
2Touch the desired entry.
3The starting route guidance screen will
be displayed. (See page 42.)
DESTINATION SEARCH ON
THE “My Destinations”
SCREEN
There are several ways to search a
destination.
(a)Destination search by stored desti- nations
(b)Destination search by previous des- tinations
(c)Destination search by the connect- ed phone’s phone book
DESTINATION SEARCH BY
“Stored”
Destinations can be selected from the
destinations registered with the sys-
tem. To use this function, it is neces-
sary to register the entry. (See page
52.)
Touch to display and edit the entry
information. (See page 58.)
INFORMATION
●If “Home” has not been registered, a
message will be displayed and the
setting screen will automatically
appear. (See page 53.)
Page 34 of 228
34
2. DESTINATION SEARCH
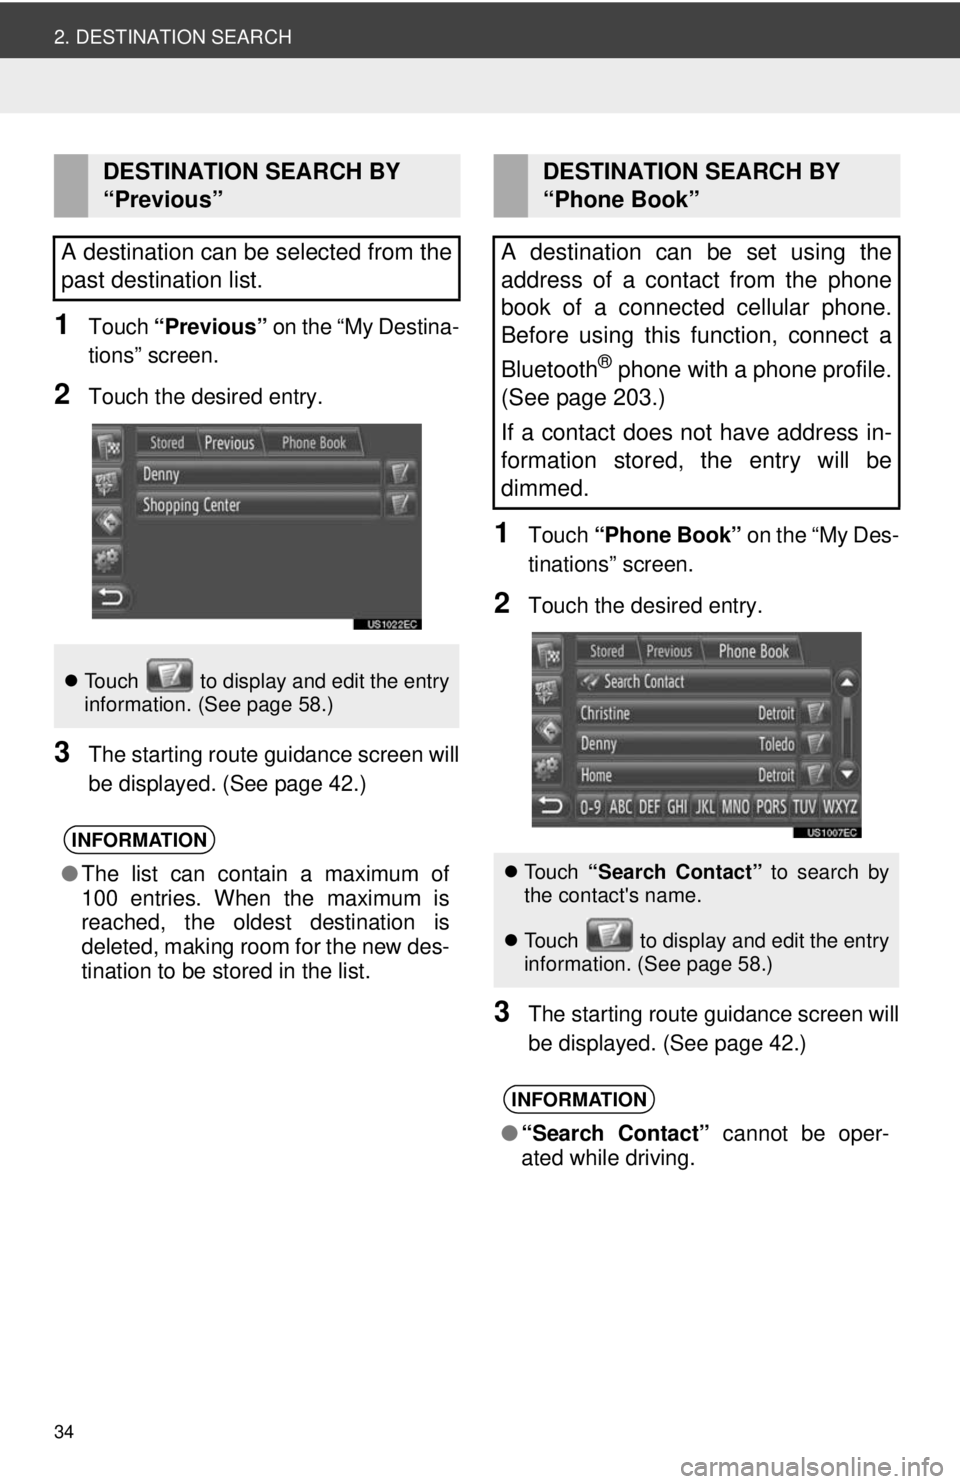
1Touch “Previous” on the “My Destina-
tions” screen.
2Touch the desired entry.
3The starting route guidance screen will
be displayed. (See page 42.)
1Touch “Phone Book” on the “My Des-
tinations” screen.
2Touch the desired entry.
3The starting route guidance screen will
be displayed. (See page 42.)
DESTINATION SEARCH BY
“Previous”
A destination can be selected from the
past destination list.
Touch to display and edit the entry
information. (See page 58.)
INFORMATION
●The list can contain a maximum of
100 entries. When the maximum is
reached, the oldest destination is
deleted, making room for the new des-
tination to be stored in the list.
DESTINATION SEARCH BY
“Phone Book”
A destination can be set using the
address of a contact from the phone
book of a connected cellular phone.
Before using this function, connect a
Bluetooth
® phone with a phone profile.
(See page 203.)
If a contact does not have address in-
formation stored, the entry will be
dimmed.
Touch “Search Contact” to search by
the contact's name.
Touch to display and edit the entry
i
nformation. (See page 58.)
INFORMATION
● “Search Contact” cannot be oper-
ated while driving.
Page 37 of 228
37
2. DESTINATION SEARCH
2
APPLICATION-“Map”
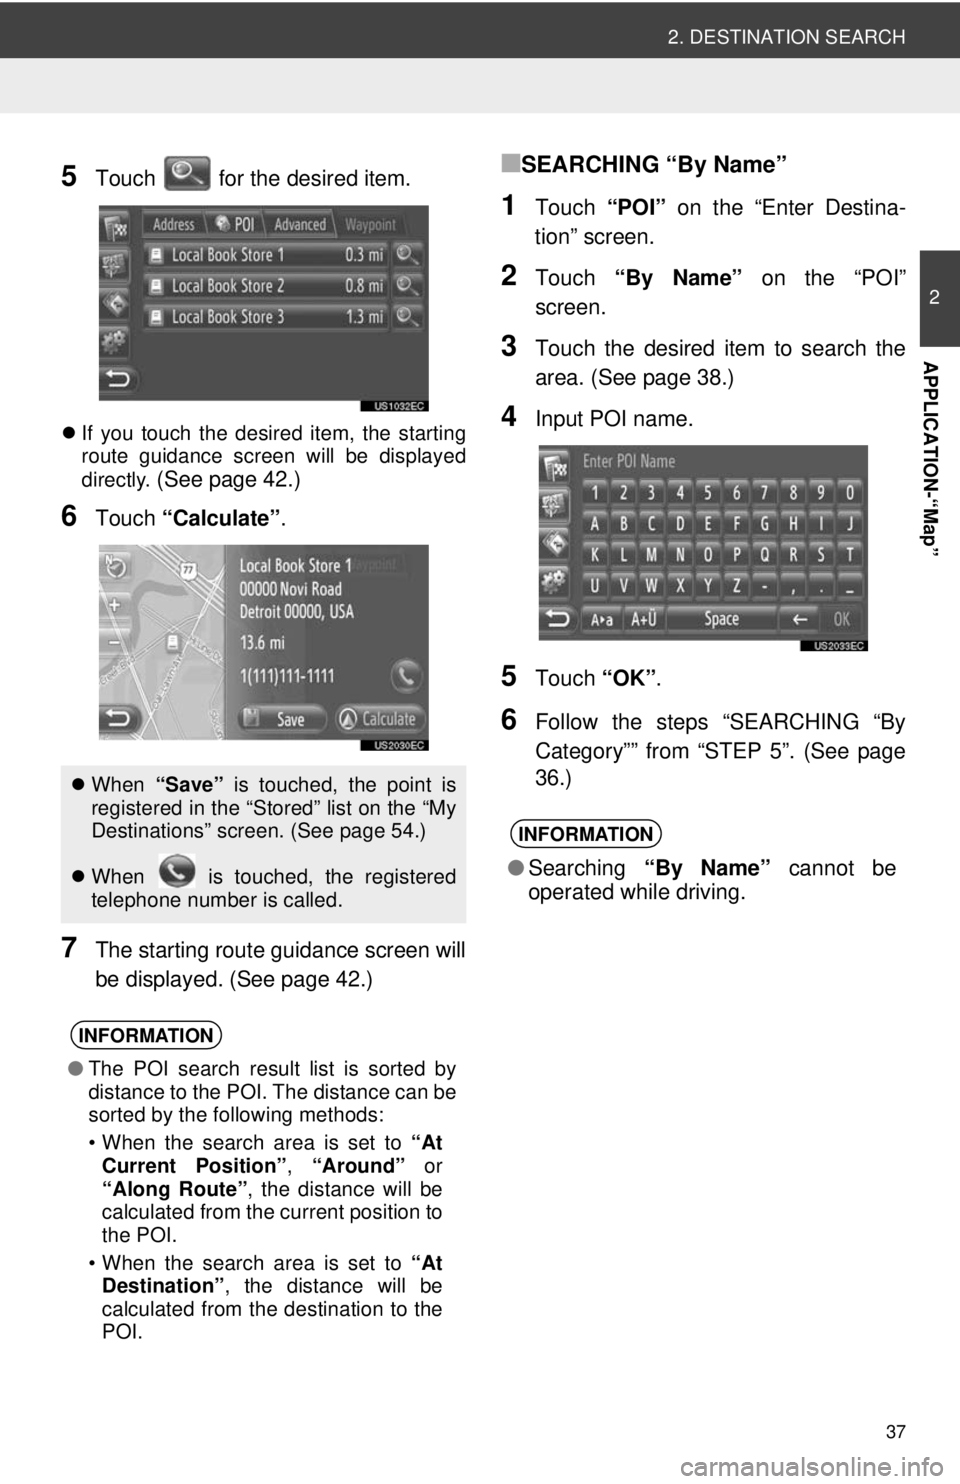
5Touch for the desired item.
If you touch the desired item, the starting
route guidance screen will be displayed
directly.
(See page 42.)
6Touch “Calculate” .
7The starting route guidance screen will
be displayed. (See page 42.)
■SEARCHING “By Name”
1Touch “POI” on the “Enter Destina-
tion” screen.
2Touch “By Name” on the “POI”
screen.
3Touch the desired item to search the
area. (See page 38.)
4Input POI name.
5Touch “OK”.
6Follow the steps “SEARCHING “By
Category”” from “STEP 5”. (See page
36.)
When “Save” is touched, the point is
registered in the “Stored” list on the “My
Destinations” screen. (See page 54.)
When is touched, the registered
telephone number is called.
INFORMATION
● The POI search result list is sorted by
distance to the POI. The distance can be
sorted by the following methods:
• When the search area is set to “At
Current Position” , “Around” or
“Along Route” , the distance will be
calculated from the current position to
the POI.
• When the search area is set to “At
Destination” , the distance will be
calculated from the destination to the
POI.
INFORMATION
● Searching “By Name” cannot be
operated while driving.
Page 54 of 228
54
4. MY DESTINATIONS
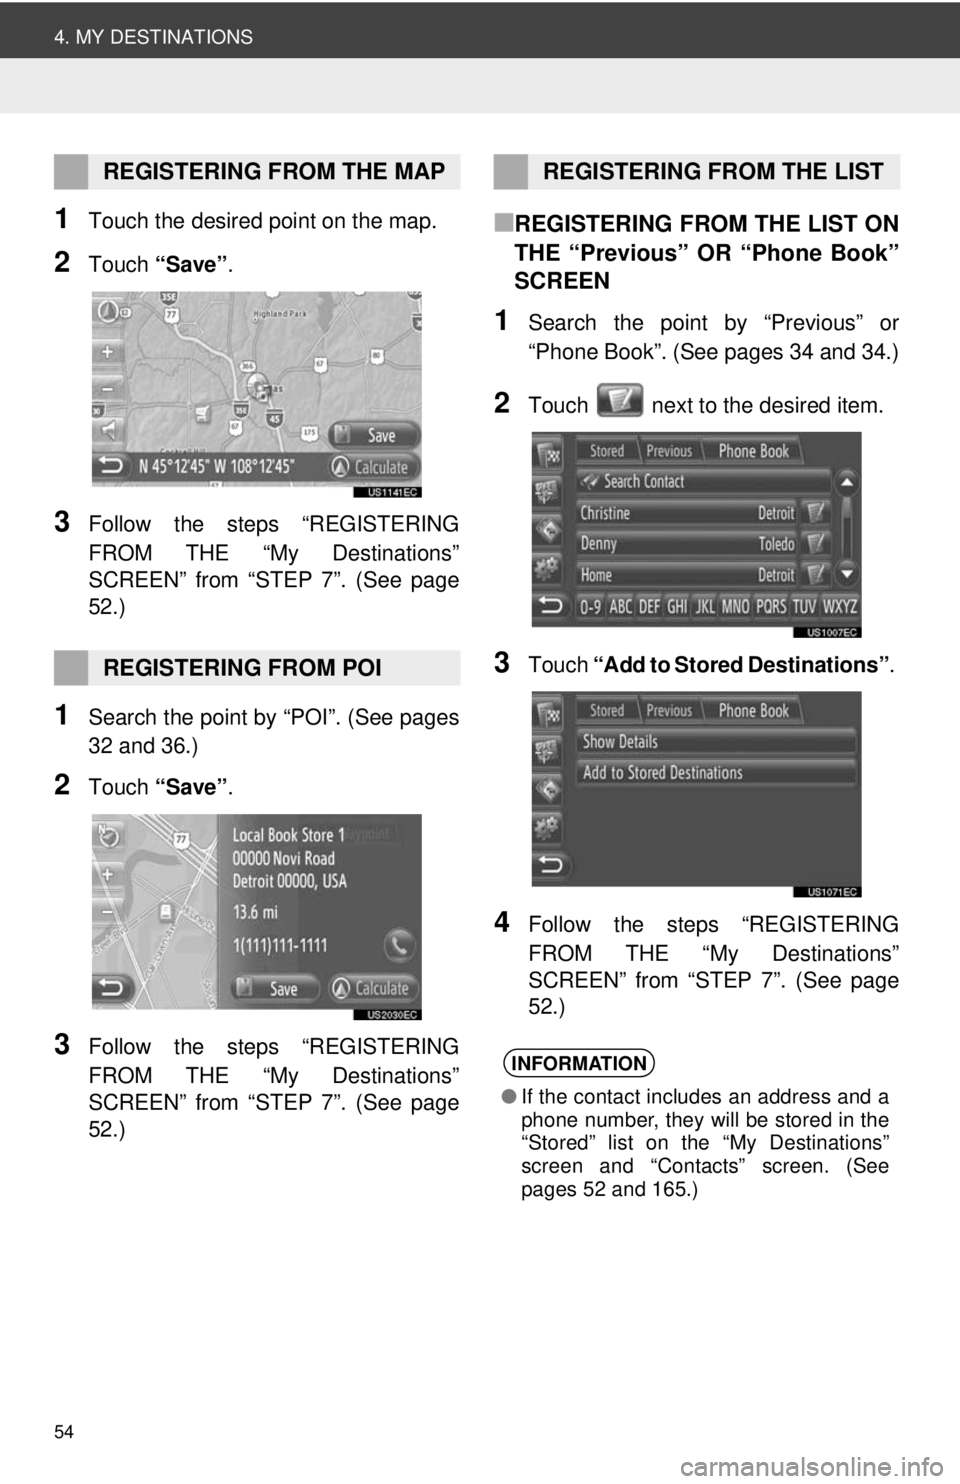
1Touch the desired point on the map.
2Touch “Save” .
3Follow the steps “REGISTERING
FROM THE “My Destinations”
SCREEN” from “STEP 7”. (See page
52.)
1Search the point by “POI”. (See pages
32 and 36.)
2Touch “Save” .
3Follow the steps “REGISTERING
FROM THE “My Destinations”
SCREEN” from “STEP 7”. (See page
52.)
■REGISTERING FROM THE LIST ON
THE “Previous” OR “Phone Book”
SCREEN
1Search the point by “Previous” or
“Phone Book”. (See pages 34 and 34.)
2Touch next to the desired item.
3Touch “Add to Stored Destinations” .
4Follow the steps “REGISTERING
FROM THE “My Destinations”
SCREEN” from “STEP 7”. (See page
52.)
REGISTERING FROM THE MAP
REGISTERING FROM POI
REGISTERING FROM THE LIST
INFORMATION
●If the contact includes an address and a
phone number, they will be stored in the
“Stored” list on the “My Destinations”
screen and “Contacts” screen. (See
pages 52 and 165.)
Page 57 of 228
57
4. MY DESTINATIONS
2
APPLICATION-“Map”
■LOADING ADDRESSES FROM A
PHONE
INFORMATION
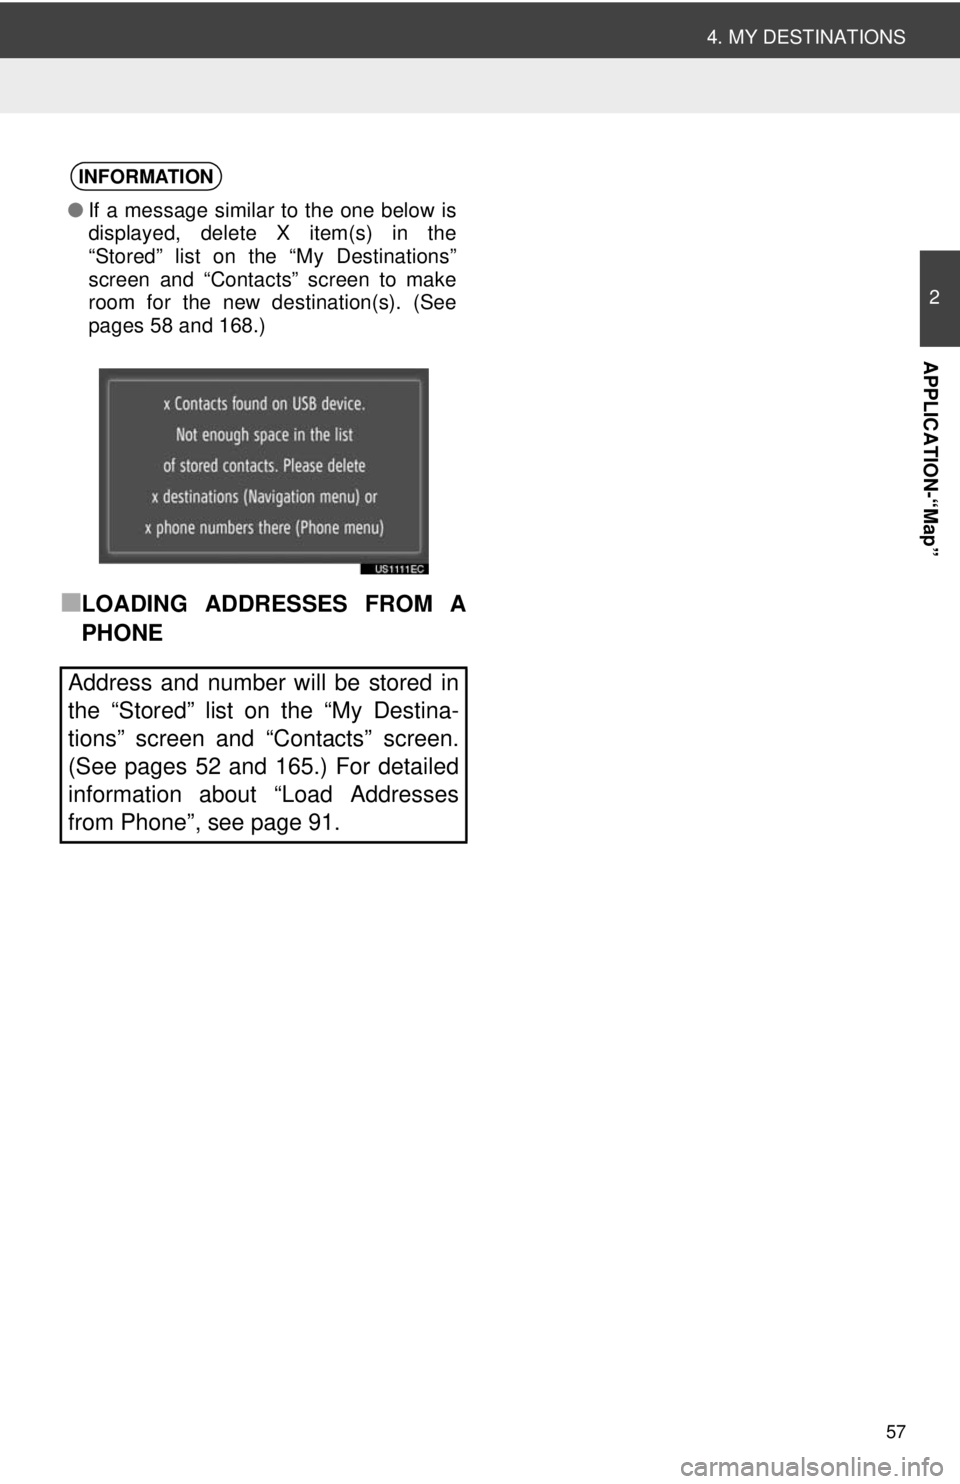
●If a message similar to the one below is
displayed, delete X item(s) in the
“Stored” list on the “My Destinations”
screen and “Contacts” screen to make
room for the new destination(s). (See
pages 58 and 168.)
Address and number will be stored in
the “Stored” list on the “My Destina-
tions” screen and “Contacts” screen.
(See pages 52 and 165.) For detailed
information about “Load Addresses
from Phone”, see page 91.