ECU TOYOTA VENZA 2012 Accessories, Audio & Navigation (in English)
[x] Cancel search | Manufacturer: TOYOTA, Model Year: 2012, Model line: VENZA, Model: TOYOTA VENZA 2012Pages: 131, PDF Size: 5.2 MB
Page 32 of 131
32
1. AUDIO SYSTEM OPERATION
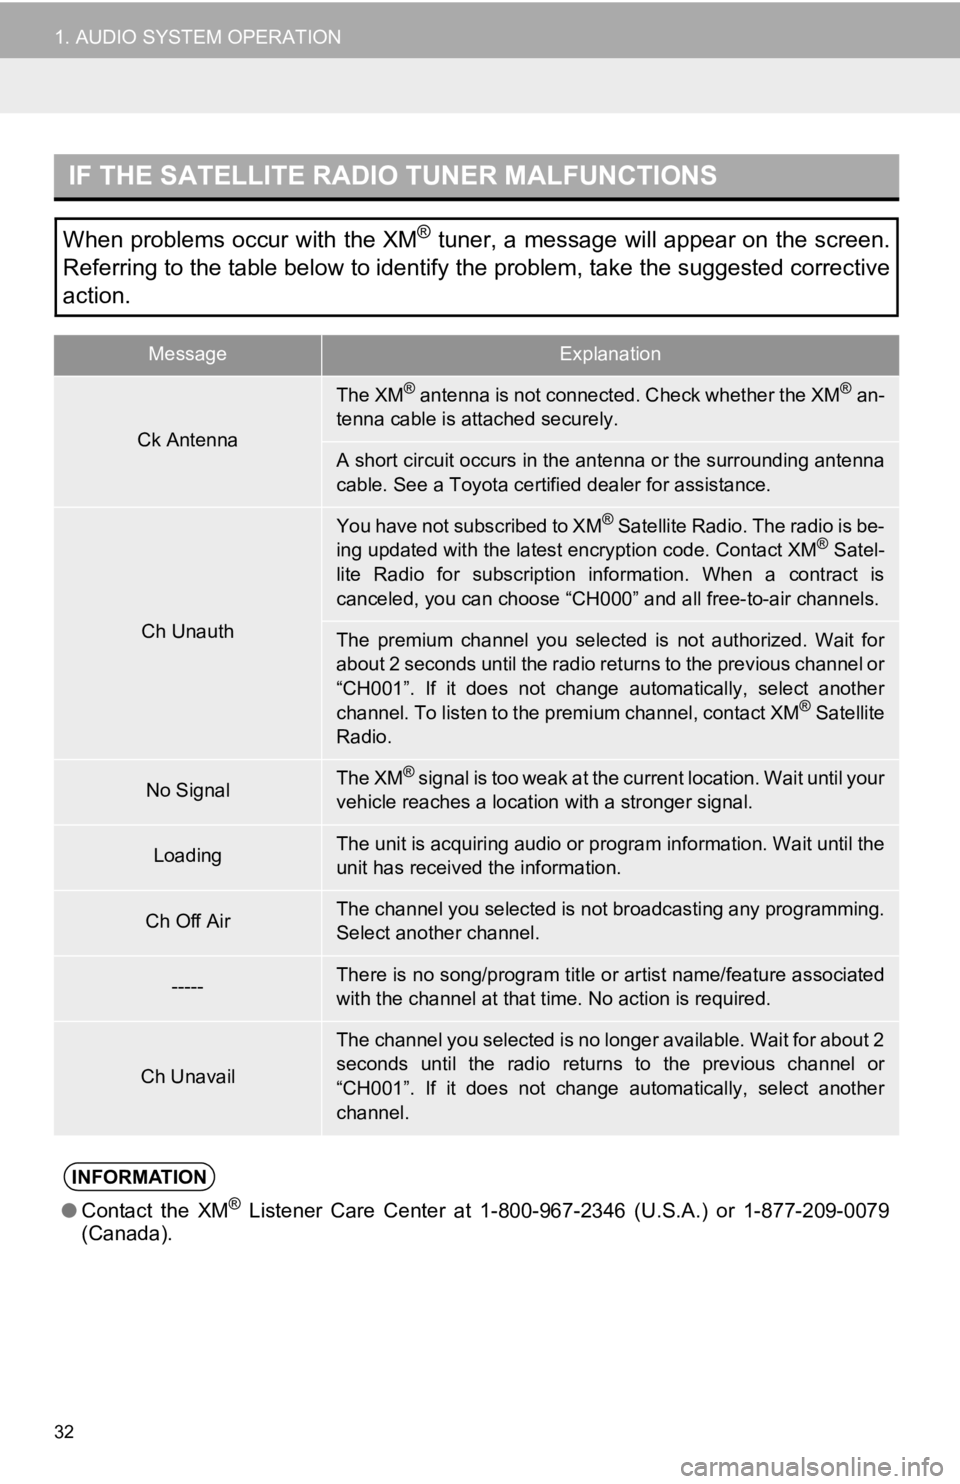
IF THE SATELLITE RADIO TUNER MALFUNCTIONS
When problems occur with the XM® tuner, a message will appear on the screen.
Referring to the table below to identify the problem, take the suggested corrective
action.
MessageExplanation
Ck Antenna
The XM® antenna is not connected. Check whether the XM® an-
tenna cable is attached securely.
A short circuit occurs in the antenna or the surrounding antenna
cable. See a Toyota certified dealer for assistance.
Ch Unauth
You have not subscribed to XM® Satellite Radio. The radio is be-
ing updated with the latest encryption code. Contact XM® Satel-
lite Radio for subscription information. When a contract is
canceled, you can choose “CH000” and all free-to-air channels.
The premium channel you selected is not authorized. Wait for
about 2 seconds until the radio returns to the previous channel or
“CH001”. If it does not change automatically, select another
channel. To listen to the premium channel, contact XM
® Satellite
Radio.
No SignalThe XM® signal is too weak at the current location. Wait until your
vehicle reaches a location with a stronger signal.
LoadingThe unit is acquiring audio or program information. Wait until the
unit has received the information.
Ch Off AirThe channel you selected is no t broadcasting any programming.
Select another channel.
-----There is no song/program title or artist name/feature associated
with the channel at that time. No action is required.
Ch Unavail
The channel you selected is no longer available. Wait for about 2
seconds until the radio returns to the previous channel or
“CH001”. If it does not change automatically, select another
channel.
INFORMATION
● Contact the XM® Listener Care Center at 1-8 00-967-2346 (U.S.A.) or 1-877-209-0079
(Canada).
Page 51 of 131
51
1. AUDIO SYSTEM OPERATION
2
AUDIO SYSTEM
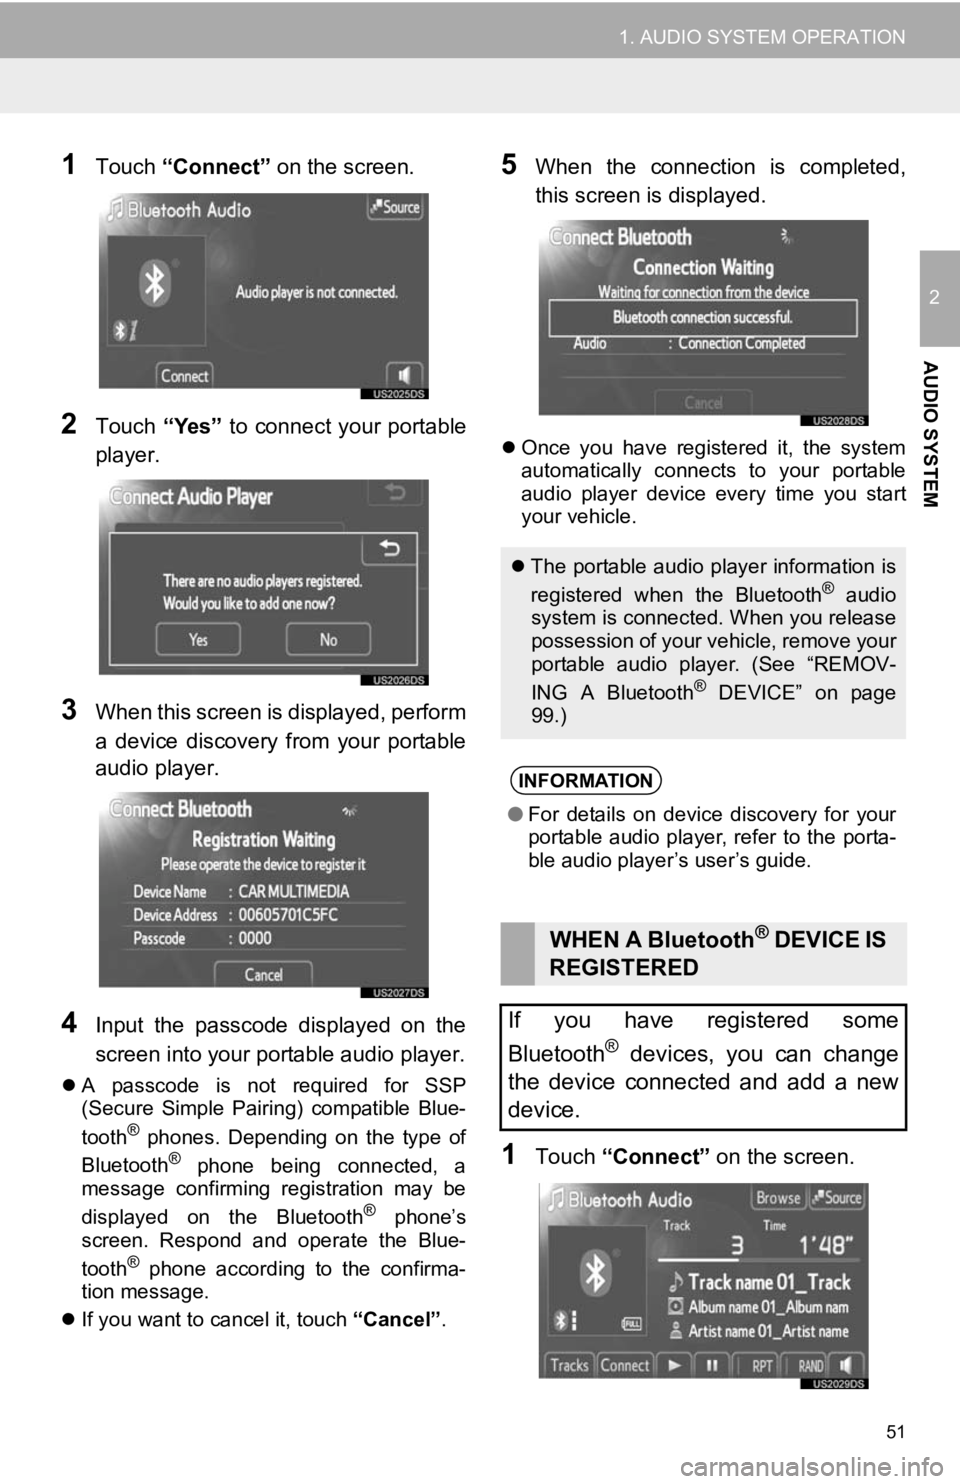
1Touch “Connect” on the screen.
2Touch “Yes” to connect your portable
player.
3When this screen is displayed, perform
a device discovery from your portable
audio player.
4Input the passcode displayed on the
screen into your portable audio player.
A passcode is not required for SSP
(Secure Simple Pairing) compatible Blue-
tooth
® phones. Depending on the type of
Bluetooth® phone being connected, a
message confirming registration may be
displayed on the Bluetooth
® phone’s
screen. Respond and operate the Blue-
tooth
® phone according to the confirma-
tion message.
If you want to cancel it, touch “Cancel”.
5When the connection is completed,
this screen is displayed.
Once you have registered it, the system
automatically connects to your portable
audio player device every time you start
your vehicle.
1Touch “Connect” on the screen.
The portable audio player information is
registered when the Bluetooth® audio
system is connected. When you release
possession of your vehicle, remove your
portable audio player. (See “REMOV-
ING A Bluetooth
® DEVICE” on page
99.)
INFORMATION
● For details on device discovery for your
portable audio player, refer to the porta-
ble audio player’s user’s guide.
WHEN A Bluetooth® DEVICE IS
REGISTERED
If you have registered some
Bluetooth
® devices, you can change
the device connected and add a new
device.
Page 74 of 131
74
1. Bluetooth® HANDS-FREE SYSTEM OPERATION
3. REGISTER A Bluetooth® PHONE
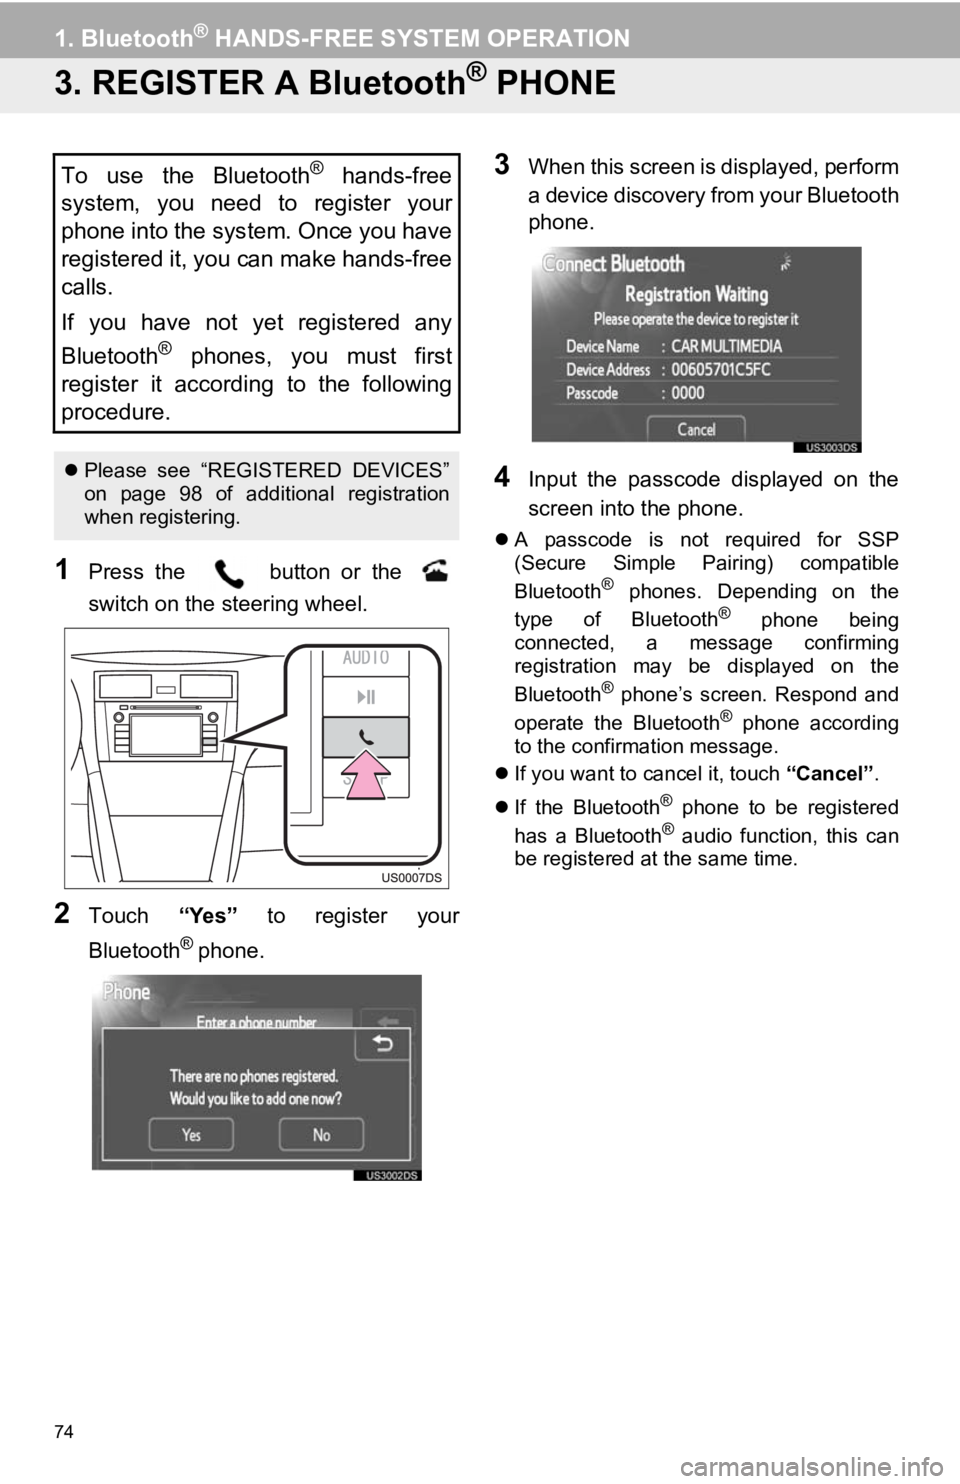
1Press the button or the
switch on the steering wheel.
2Touch “Yes” to register your
Bluetooth
® phone.
3When this screen is displayed, perform
a device discovery from your Bluetooth
phone.
4Input the passcode displayed on the
screen into the phone.
A passcode is not required for SSP
(Secure Simple Pairing) compatible
Bluetooth
® phones. Depending on the
type of Bluetooth® phone being
connected, a message confirming
registration may be displayed on the
Bluetooth
® phone’s screen. Respond and
operate the Bluetooth® phone according
to the confirmation message.
If you want to cancel it, touch “Cancel”.
If the Bluetooth
® phone to be registered
has a Bluetooth® audio function, this can
be registered at the same time.
To use the Bluetooth® hands-free
system, you need to register your
phone into the system. Once you have
registered it, you can make hands-free
calls.
If you have not yet registered any
Bluetooth
® phones, you must first
register it according to the following
procedure.
Please see “REGISTERED DEVICES”
on page 98 of additional registration
when registering.
Page 99 of 131
99
1. SETUP OPERATION
5
SETUP
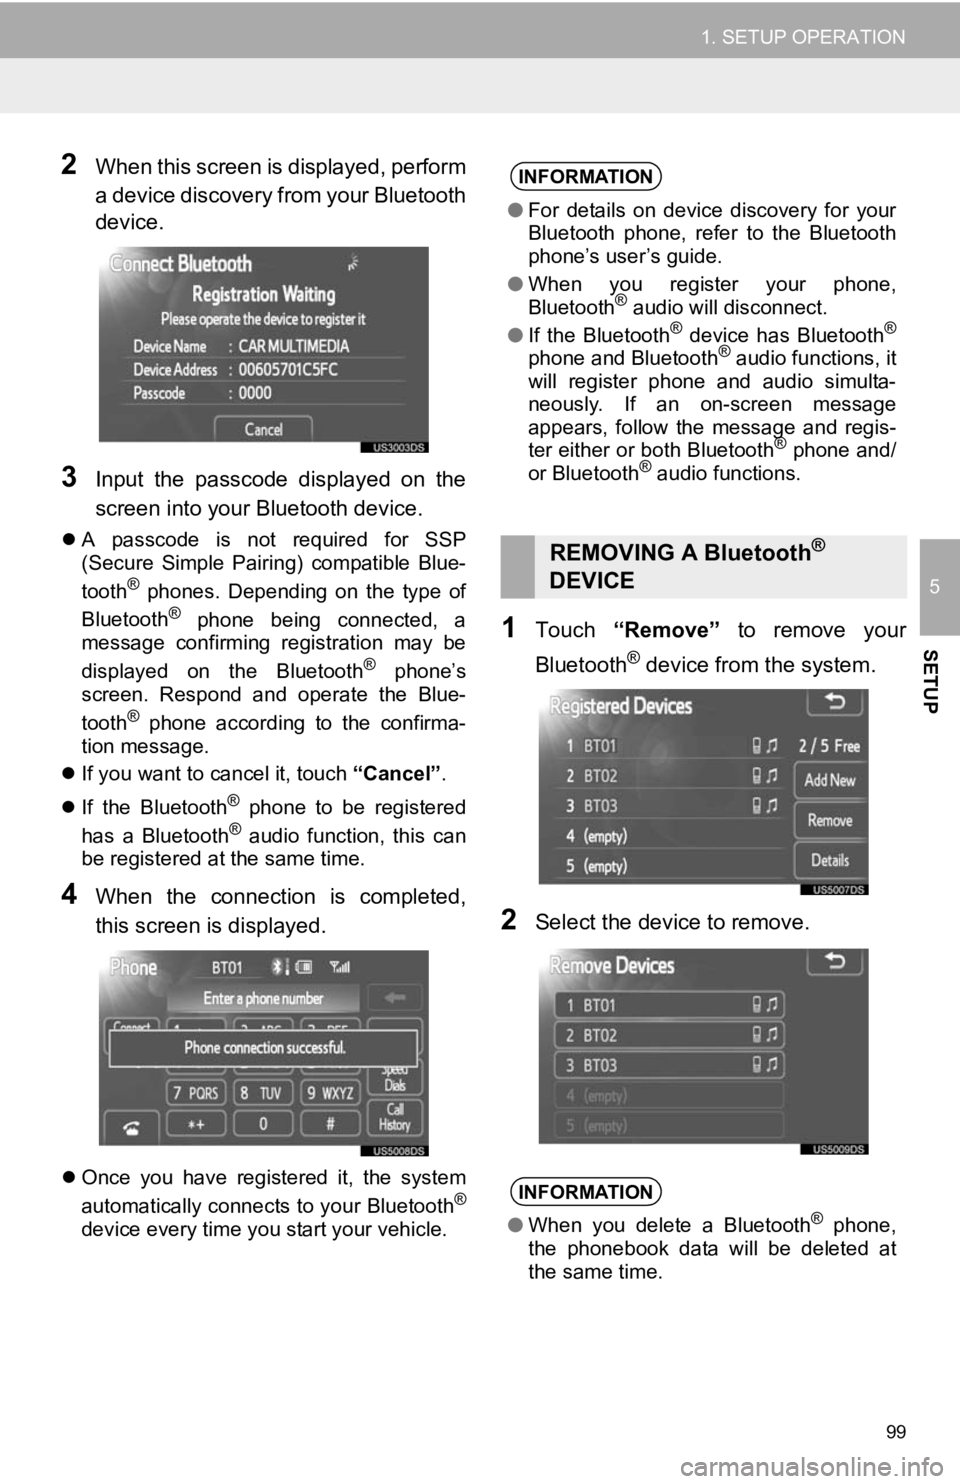
2When this screen is displayed, perform
a device discovery from your Bluetooth
device.
3Input the passcode displayed on the
screen into your Bluetooth device.
A passcode is not required for SSP
(Secure Simple Pairing) compatible Blue-
tooth
® phones. Depending on the type of
Bluetooth® phone being connected, a
message confirming registration may be
displayed on the Bluetooth
® phone’s
screen. Respond and operate the Blue-
tooth
® phone according to the confirma-
tion message.
If you want to cancel it, touch “Cancel”.
If the Bluetooth
® phone to be registered
has a Bluetooth® audio function, this can
be registered at the same time.
4When the connection is completed,
this screen is displayed.
Once you have registered it, the system
automatically connects to your Bluetooth®
device every time you start your vehicle.
1Touch “Remove” to remove your
Bluetooth
® device from the system.
2Select the device to remove.
INFORMATION
● For details on device discovery for your
Bluetooth phone, refer to the Bluetooth
phone’s user’s guide.
● When you register your phone,
Bluetooth
® audio will disconnect.
● If the Bluetooth® device has Bluetooth®
phone and Bluetooth® audio functions, it
will register phone and audio simulta-
neously. If an on-screen message
appears, follow the message and regis-
ter either or both Bluetooth
® phone and/
or Bluetooth® audio functions.
REMOVING A Bluetooth®
DEVICE
INFORMATION
● When you delete a Bluetooth® phone,
the phonebook data will be deleted at
the same time.
Page 100 of 131
100
1. SETUP OPERATION
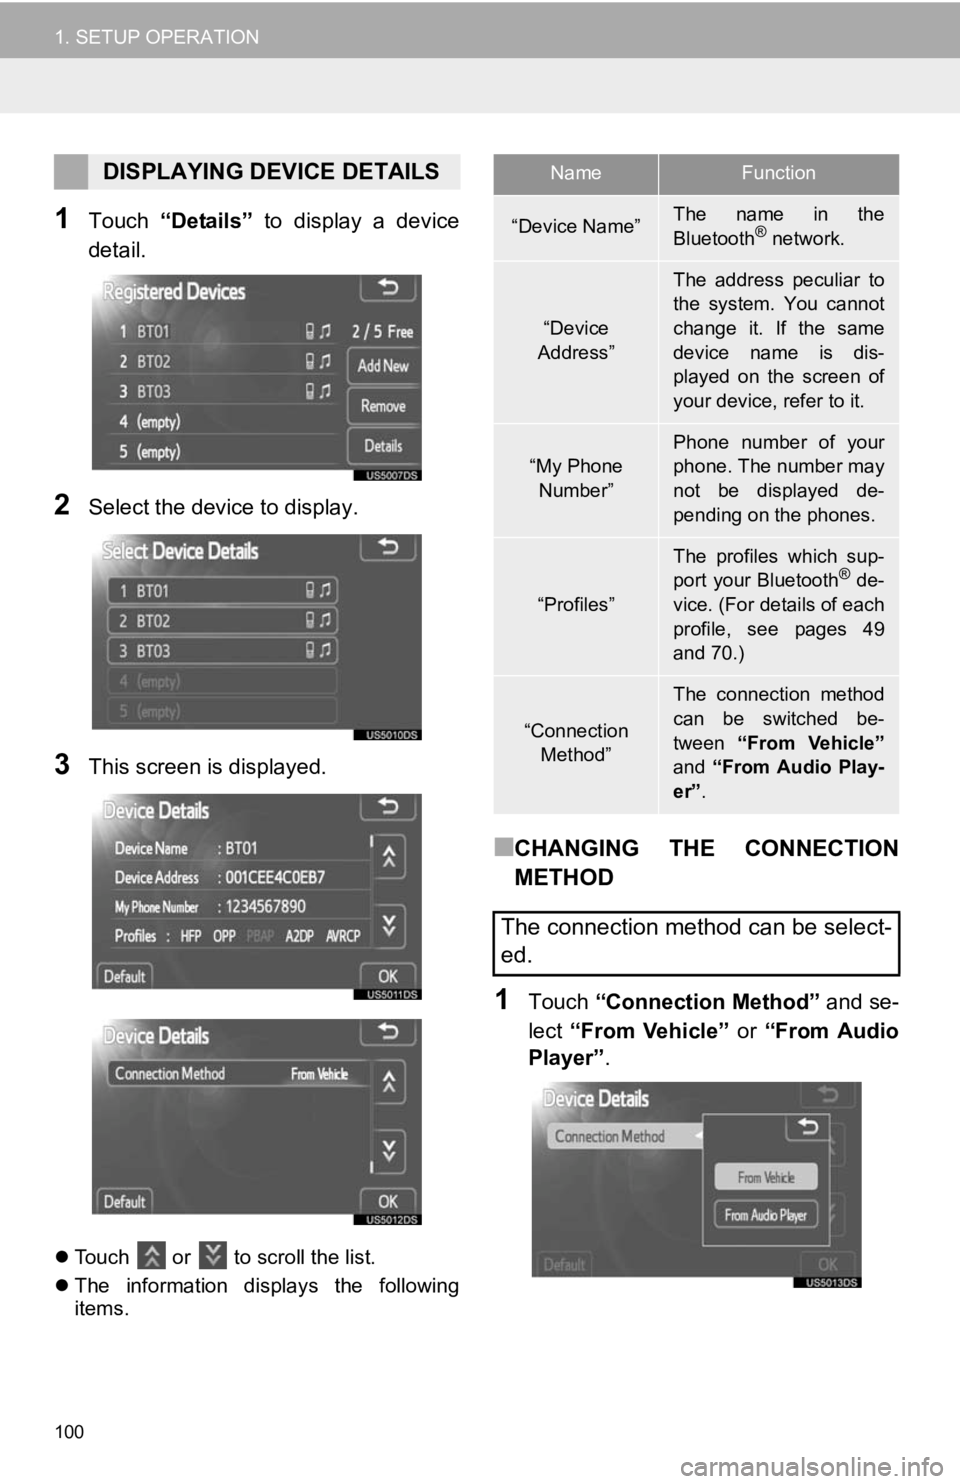
1Touch “Details” to display a device
detail.
2Select the device to display.
3This screen is displayed.
Touch or to scroll the list.
The information displays the following
items.
■CHANGING THE CONNECTION
METHOD
1Touch “Connection Method” and se-
lect “From Vehicle” or “From Audio
Player” .
DISPLAYING DEVICE DETAILSNameFunction
“Device Name”The name in the
Bluetooth® network.
“Device
Address”
The address peculiar to
the system. You cannot
change it. If the same
device name is dis-
played on the screen of
your device, refer to it.
“My Phone Number”Phone number of your
phone. The number may
not be displayed de-
pending on the phones.
“Profiles”
The profiles which sup-
port your Bluetooth® de-
vice. (For details of each
profile, see pages 49
and 70.)
“Connection
Method”
The connection method
can be switched be-
tween “From Vehicle”
and “From Audio Play-
er” .
The connection method can be select-
ed.
Page 103 of 131
103
1. SETUP OPERATION
5
SETUP
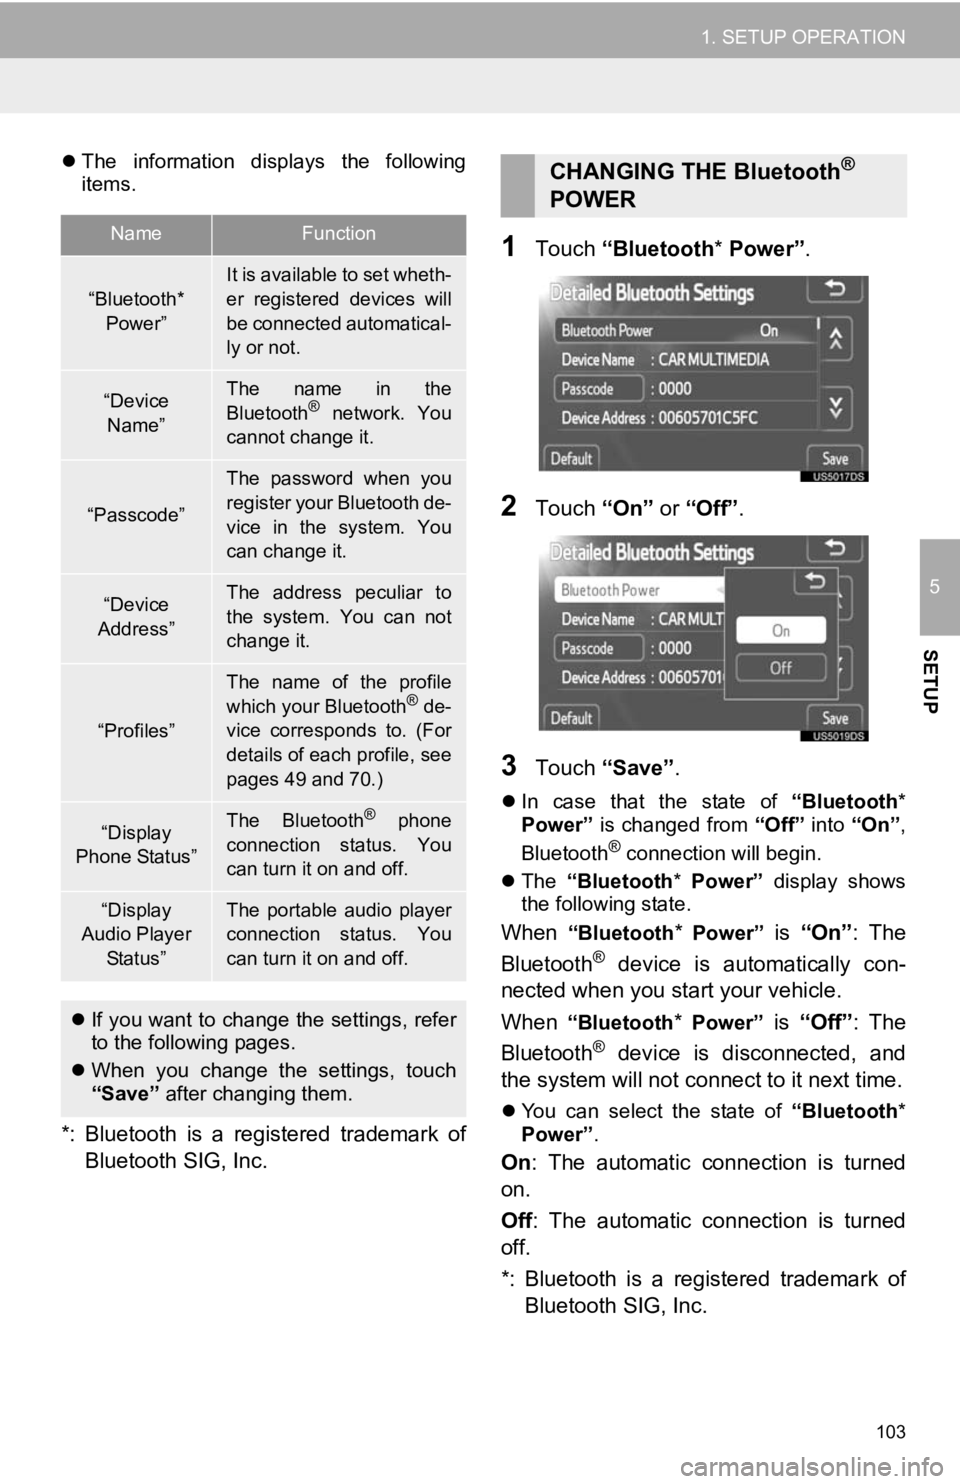
The information displays the following
items.
*: Bluetooth is a registered trademark of
Bluetooth SIG, Inc.
1Touch “Bluetooth * Power” .
2Touch “On” or “Off” .
3Touch “Save” .
In case that the state of “Bluetooth*
Power” is changed from “Off” into “On”,
Bluetooth
® connection will begin.
The “Bluetooth* Power” display shows
the following state.
When “Bluetooth* Power” is “On” : The
Bluetooth® device is automatically con-
nected when you start your vehicle.
When
“Bluetooth* Power” is “Off”: The
Bluetooth® device is disconnected, and
the system will not connect to it next time.
You can select the state of “Bluetooth*
Power” .
On: The automatic connection is turned
on.
Off : The automatic connection is turned
off.
*: Bluetooth is a registered trademark of Bluetooth SIG, Inc.
NameFunction
“Bluetooth*
Power”It is available to set wheth-
er registered devices will
be connected automatical-
ly or not.
“Device Name”The name in the
Bluetooth® network. You
cannot change it.
“Passcode”
The password when you
register your Bluetooth de-
vice in the system. You
can change it.
“Device
Address”The address peculiar to
the system. You can not
change it.
“Profiles”
The name of the profile
which your Bluetooth® de-
vice corresponds to. (For
details of each profile, see
pages 49 and 70.)
“Display
Phone Status”The Bluetooth® phone
connection status. You
can turn it on and off.
“Display
Audio Player
Status”The portable audio player
connection status. You
can turn it on and off.
If you want to change the settings, refer
to the following pages.
When you change the settings, touch
“Save” after changing them.
CHANGING THE Bluetooth®
POWER
Page 123 of 131
123
1. REAR VIEW MONITOR SYSTEM
6
REAR VIEW MONITOR SYSTEM
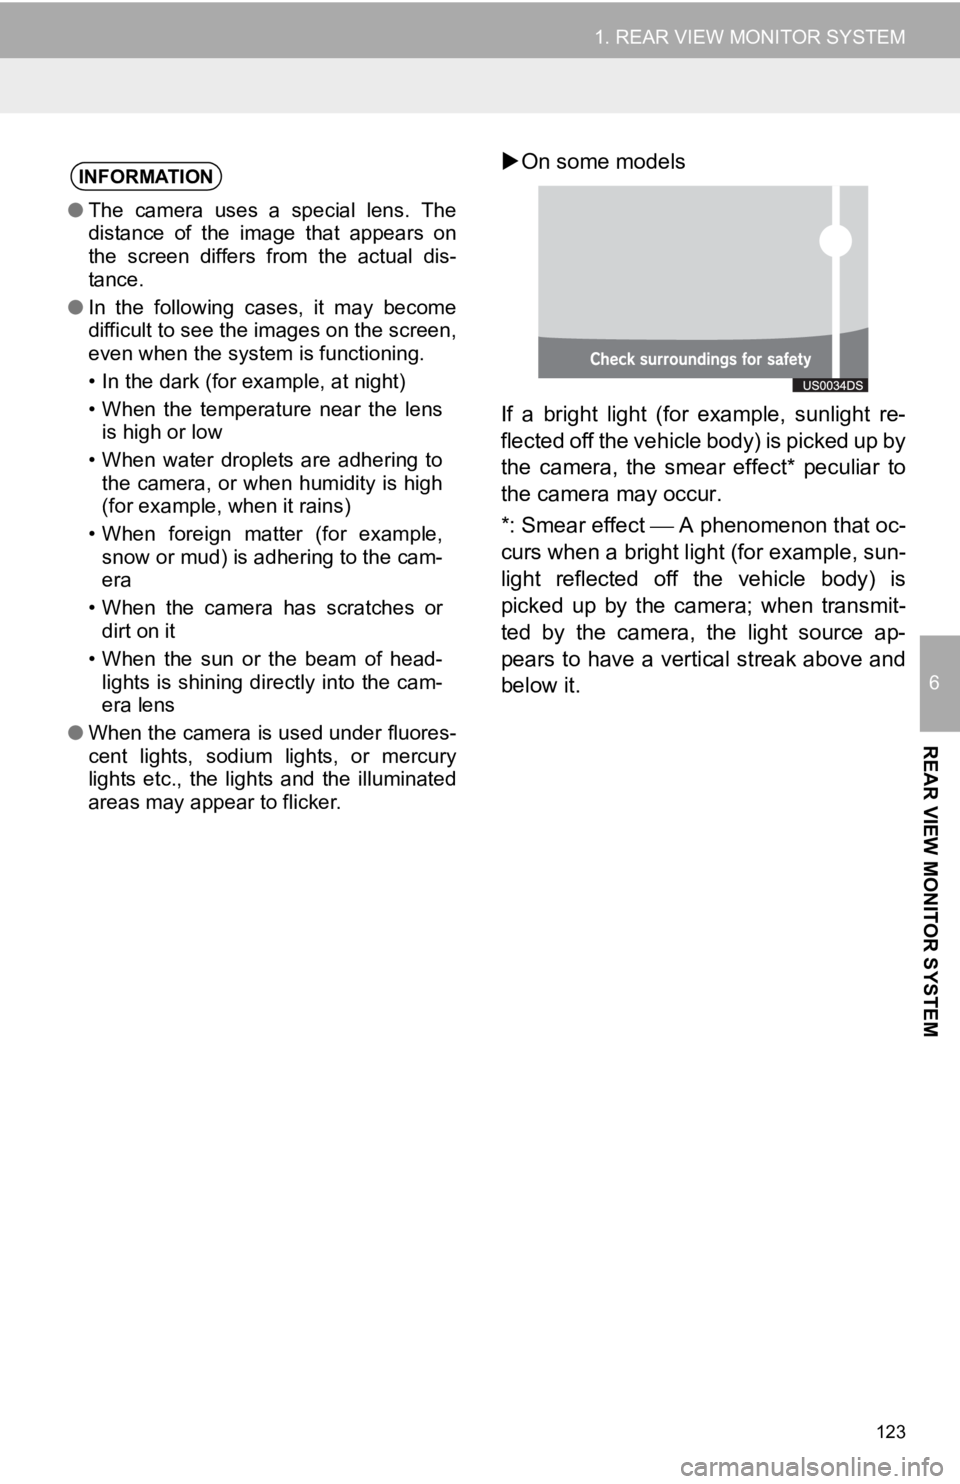
On some models
If a bright light (for example, sunlight re-
flected off the vehicle body) is picked up by
the camera, the smear effect* peculiar to
the camera may occur.
*: Smear effect A phenomenon that oc-
curs when a bright light (for example, sun-
light reflected off the vehicle body) is
picked up by the camera; when transmit-
ted by the camera, the light source ap-
pears to have a vertical streak above and
below it.INFORMATION
● The camera uses a special lens. The
distance of the image that appears on
the screen differs from the actual dis-
tance.
● In the following cases, it may become
difficult to see the images on the screen,
even when the system is functioning.
• In the dark (for example, at night)
• When the temperature near the lens
is high or low
• When water droplets are adhering to the camera, or when humidity is high
(for example, when it rains)
• When foreign matter (for example, snow or mud) is adhering to the cam-
era
• When the camera has scratches or dirt on it
• When the sun or the beam of head- lights is shining directly into the cam-
era lens
● When the camera is used under fluores-
cent lights, sodium lights, or mercury
lights etc., the lights and the illuminated
areas may appear to flicker.