radio TOYOTA VENZA 2012 Accessories, Audio & Navigation (in English)
[x] Cancel search | Manufacturer: TOYOTA, Model Year: 2012, Model line: VENZA, Model: TOYOTA VENZA 2012Pages: 131, PDF Size: 5.2 MB
Page 5 of 131
5
1
2
3
4
5
6
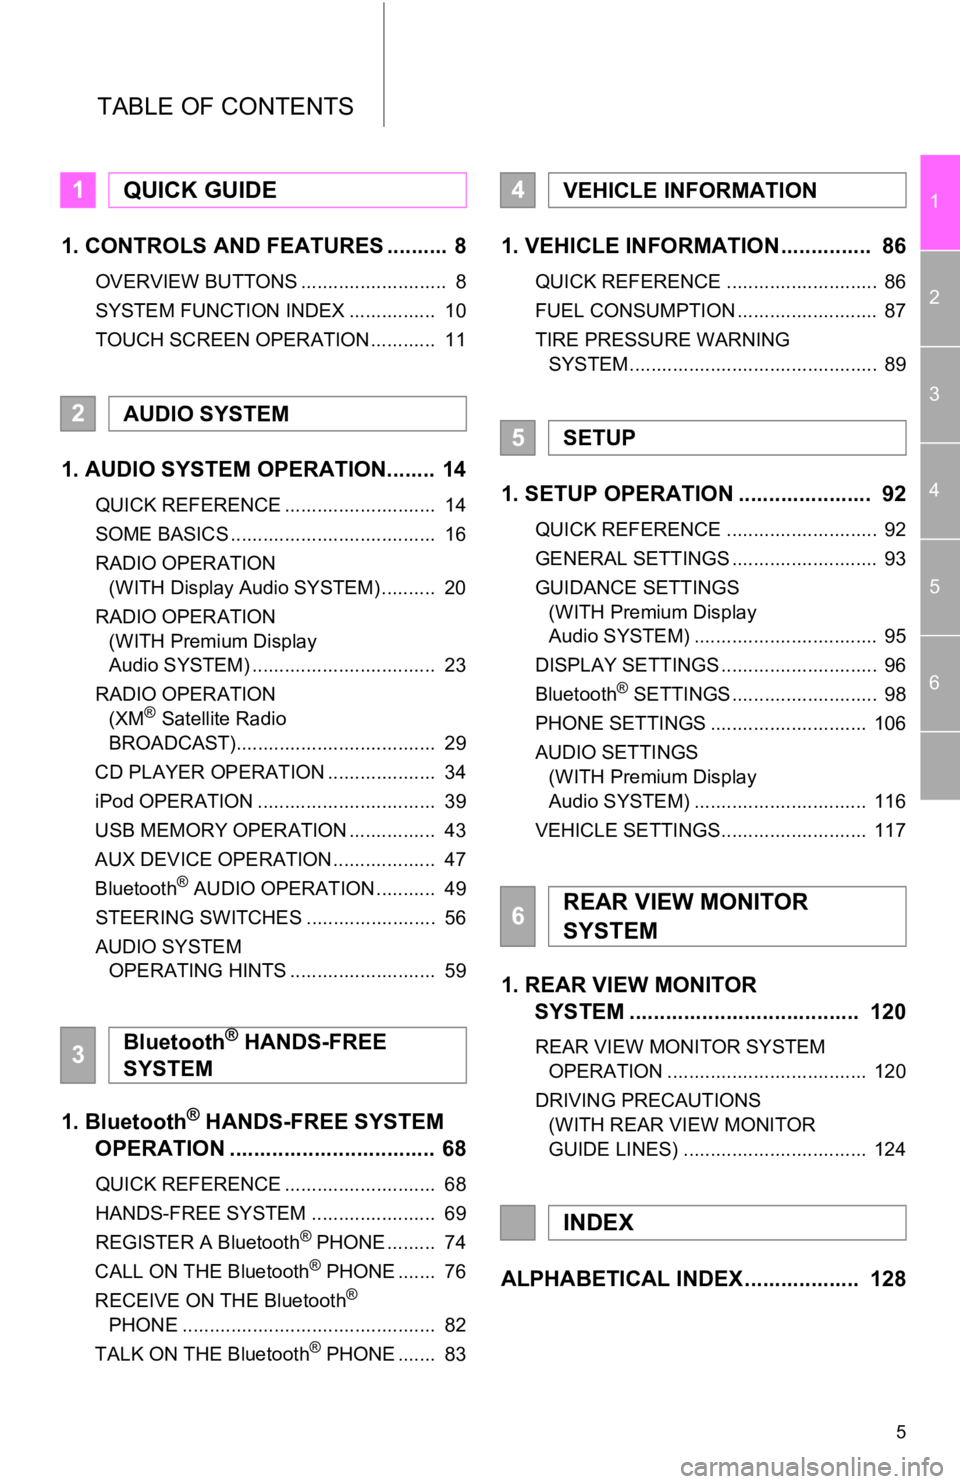
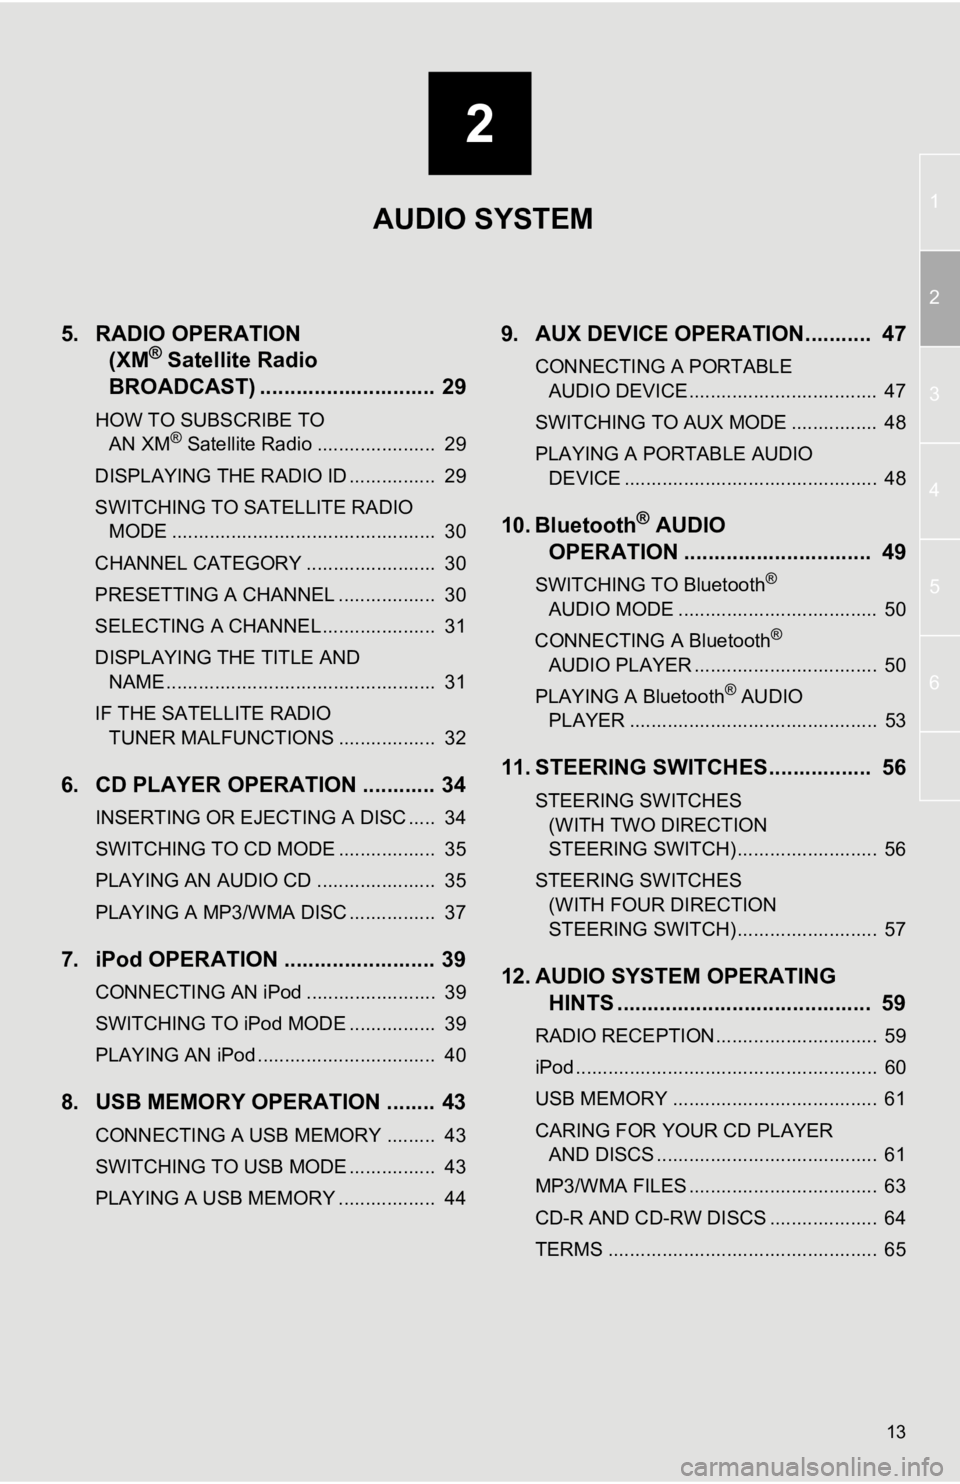
TABLE OF CONTENTS
1. CONTROLS AND FEATURES .......... 8
OVERVIEW BUTTONS ........................... 8
SYSTEM FUNCTION INDEX ................ 10
TOUCH SCREEN OPERATION ............ 11
1. AUDIO SYSTEM OPERATION........ 14
QUICK REFERENCE ............................ 14
SOME BASICS ...................................... 16
RADIO OPERATION (WITH Display Audio SYSTEM) .......... 20
RADIO OPERATION (WITH Premium Display
Audio SYSTEM) .................................. 23
RADIO OPERATION (XM
® Satellite Radio
BROADCAST)..................................... 29
CD PLAYER OPERATION .................... 34
iPod OPERATION ................................. 39
USB MEMORY OPERATION ................ 43
AUX DEVICE OPERATION ................... 47
Bluetooth
® AUDIO OPERATION ........... 49
STEERING SWITCHES ........................ 56
AUDIO SYSTEM OPERATING HINTS ........................... 59
1. Bluetooth® HANDS-FREE SYSTEM
OPERATION .................................. 68
QUICK REFERENCE ............................ 68
HANDS-FREE SYSTEM ....................... 69
REGISTER A Bluetooth
® PHONE ......... 74
CALL ON THE Bluetooth® PHONE ....... 76
RECEIVE ON THE Bluetooth®
PHONE ............................................... 82
TALK ON THE Bluetooth
® PHONE ....... 83
1. VEHICLE INFORMATION ............... 86
QUICK REFERENCE ............................ 86
FUEL CONSUMPTION .......................... 87
TIRE PRESSURE WARNING SYSTEM .............................................. 89
1. SETUP OPERATION ...................... 92
QUICK REFERENCE ............................ 92
GENERAL SETTINGS ........................... 93
GUIDANCE SETTINGS (WITH Premium Display
Audio SYSTEM) .................................. 95
DISPLAY SETTINGS ............................. 96
Bluetooth
® SETTINGS ........................... 98
PHONE SETTINGS ............................. 106
AUDIO SETTINGS (WITH Premium Display
Audio SYSTEM) ................................ 116
VEHICLE SETTINGS........................... 117
1. REAR VIEW MONITOR SYSTEM ................................... ... 120
REAR VIEW MONITOR SYSTEM
OPERATION ..................................... 120
DRIVING PRECAUTIONS (WITH REAR VIEW MONITOR
GUIDE LINES) .................................. 124
ALPHABETICAL INDEX ................... 128
1QUICK GUIDE
2AUDIO SYSTEM
3Bluetooth® HANDS-FREE
SYSTEM
4VEHICLE INFORMATION
5SETUP
6REAR VIEW MONITOR
SYSTEM
INDEX
Page 8 of 131
8
1. CONTROLS AND FEATURES
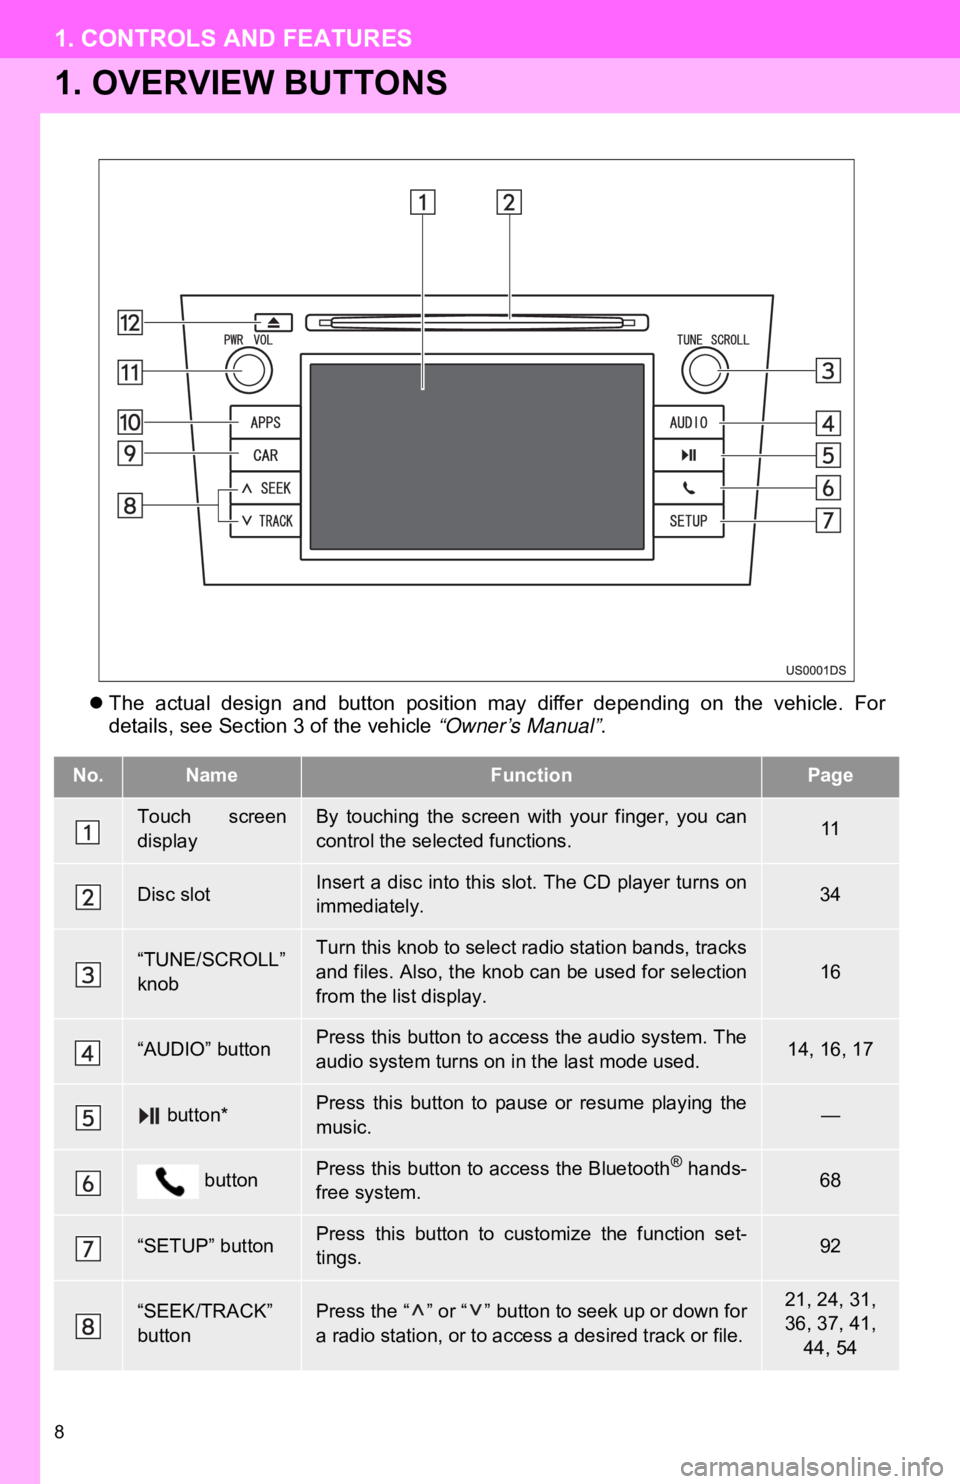
1. OVERVIEW BUTTONS
The actual design and button position may differ depending on the vehicle. For
details, see Section 3 of the vehicle “Owner’s Manual” .
No.NameFunctionPage
Touch screen
displayBy touching the screen with your finger, you can
control the selected functions.11
Disc slotInsert a disc into this slot. The CD player turns on
immediately.34
“TUNE/SCROLL”
knobTurn this knob to select radio station bands, tracks
and files. Also, the knob can be used for selection
from the list display.16
“AUDIO” buttonPress this button to access the audio system. The
audio system turns on in the last mode used.14, 16, 17
button*Press this button to pause or resume playing the
music.—
buttonPress this button to access the Bluetooth® hands-
free system.68
“SETUP” buttonPress this button to customize the function set-
tings.92
“SEEK/TRACK”
buttonPress the “ ” or “ ” button to seek up or down for
a radio station, or to access a desired track or file.21, 24, 31,
36, 37, 41,
44, 54
Page 10 of 131
10
1. CONTROLS AND FEATURES
2. SYSTEM FUNCTION INDEX
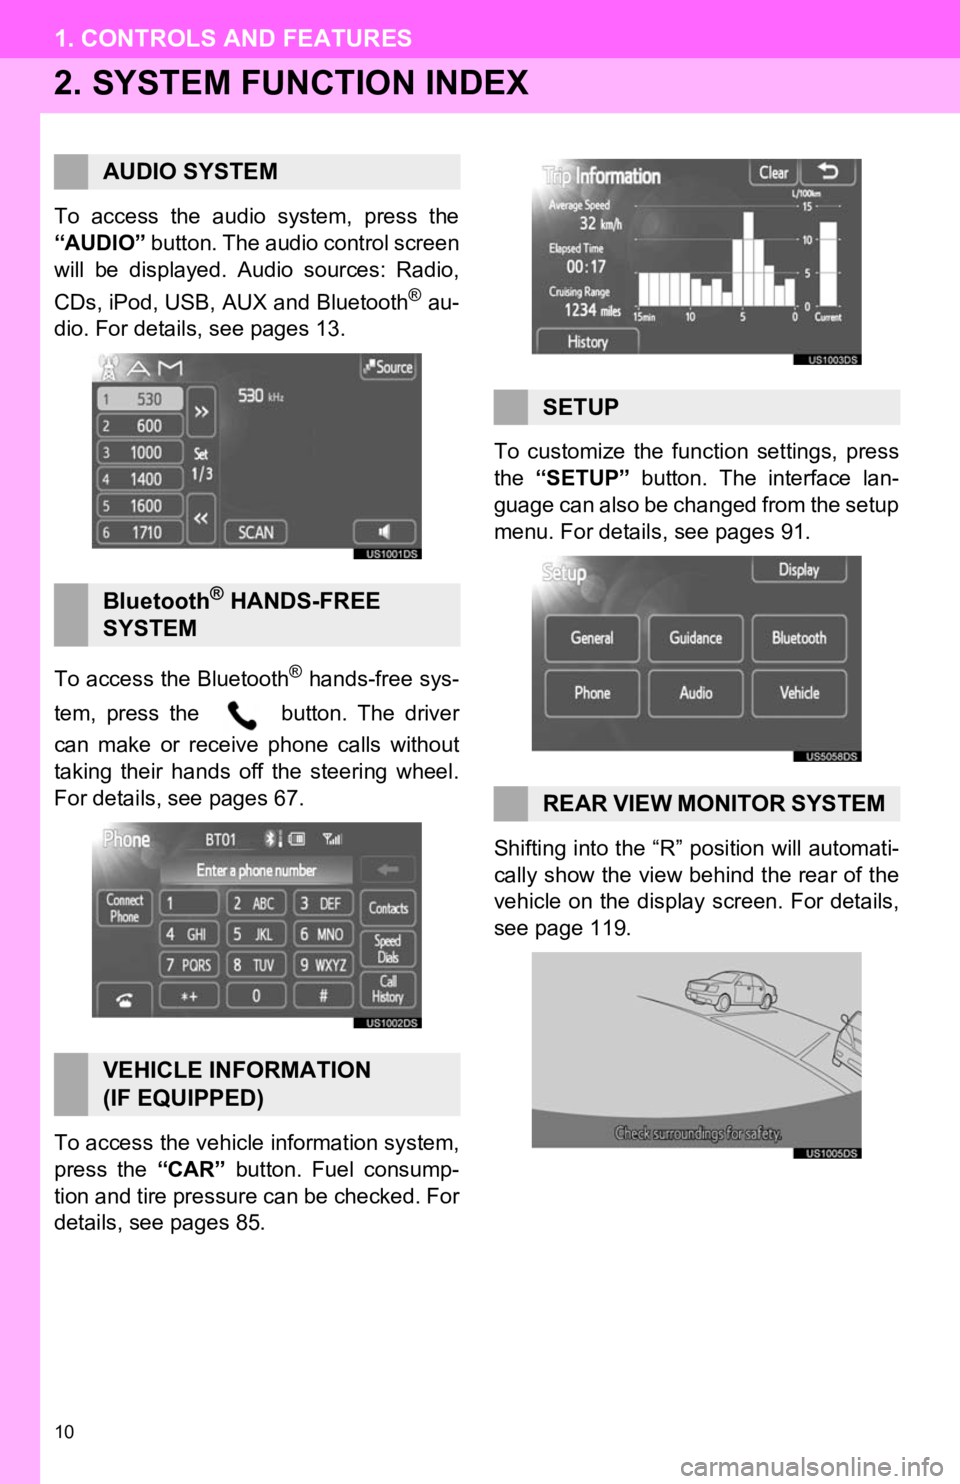
To access the audio system, press the
“AUDIO” button. The audio control screen
will be displayed. Audio sources: Radio,
CDs, iPod, USB, AUX and Bluetooth
® au-
dio. For details, see pages 13.
To access the Bluetooth
® hands-free sys-
tem, press the button. The driver
can make or receive phone calls without
taking their hands off the steering wheel.
For details, see pages 67.
To access the vehicle information system,
press the “CAR” button. Fuel consump-
tion and tire pressure can be checked. For
details, see pages 85. To customize the func
tion settings, press
the “SETUP” button. The interface lan-
guage can also be changed from the setup
menu. For details, see pages 91.
Shifting into the “R” position will automati-
cally show the view behind the rear of the
vehicle on the display screen. For details,
see page 119.
AUDIO SYSTEM
Bluetooth® HANDS-FREE
SYSTEM
VEHICLE INFORMATION
(IF EQUIPPED)
SETUP
REAR VIEW MONITOR SYSTEM
Page 12 of 131
12
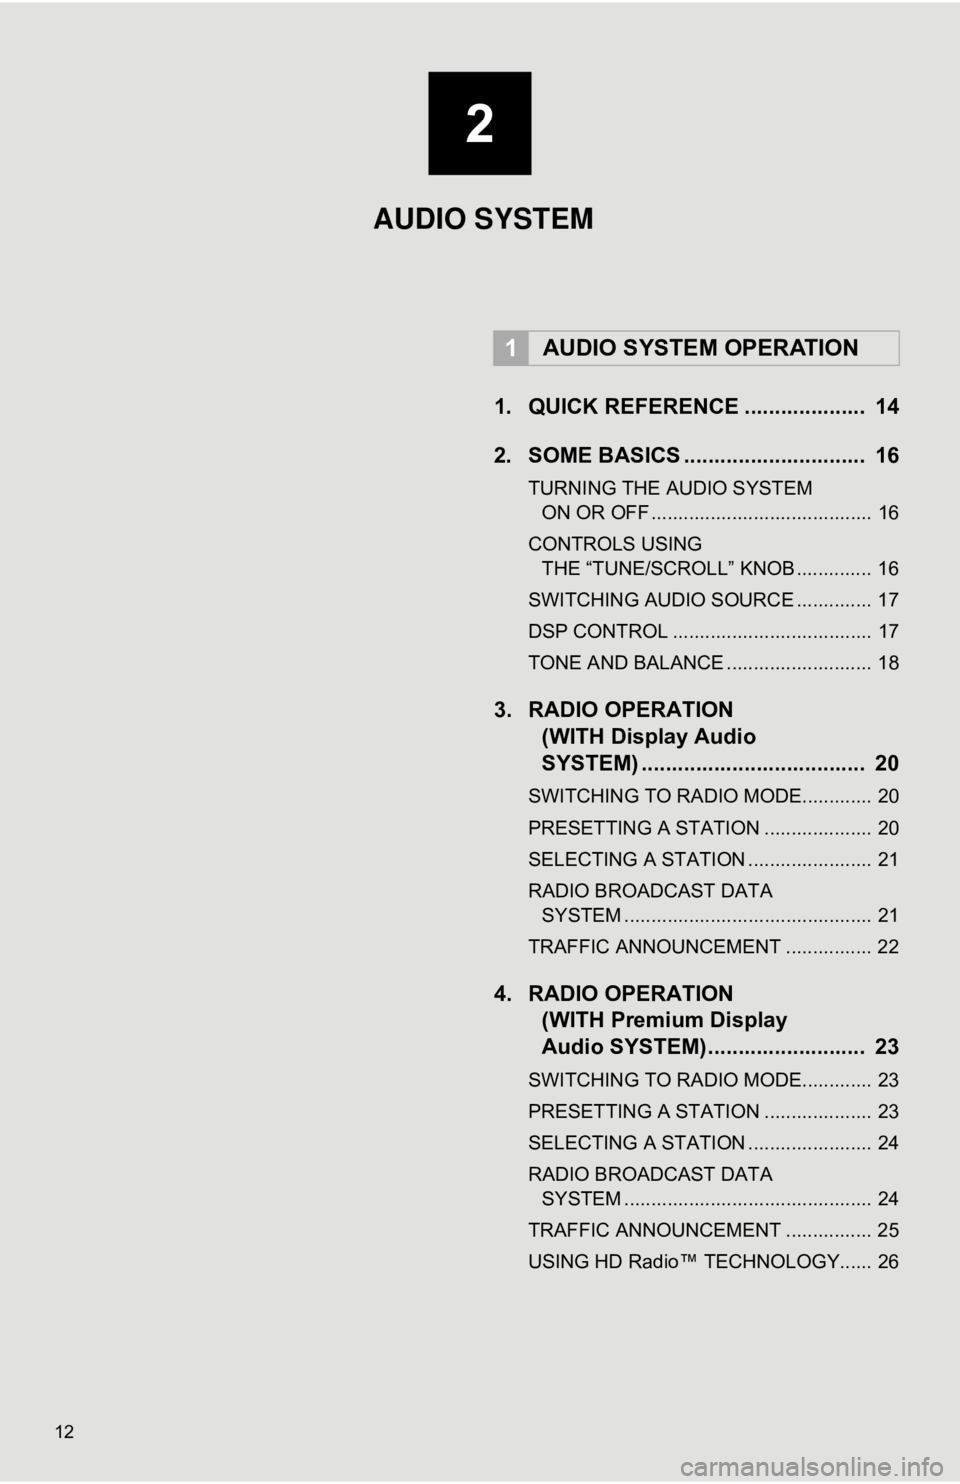
1. QUICK REFERENCE .................... 14
2. SOME BASICS .............................. 16
TURNING THE AUDIO SYSTEM ON OR OFF ......................................... 16
CONTROLS USING THE “TUNE/SCROLL” KNOB .............. 16
SWITCHING AUDIO SOURCE .............. 17
DSP CONTROL ..................................... 17
TONE AND BALANCE ........................... 18
3. RADIO OPERATION (WITH Display Audio
SYSTEM) .......... ....................... .... 20
SWITCHING TO RADIO MODE............. 20
PRESETTING A STATION .................... 20
SELECTING A STATION ....................... 21
RADIO BROADCAST DATA
SYSTEM .............................................. 21
TRAFFIC ANNOUNCEMENT ................ 22
4. RADIO OPERATION (WITH Premium Display
Audio SYSTEM) ........ .................. 23
SWITCHING TO RADIO MODE............. 23
PRESETTING A STATION .................... 23
SELECTING A STATION ....................... 24
RADIO BROADCAST DATA
SYSTEM .............................................. 24
TRAFFIC ANNOUNCEMENT ................ 25
USING HD Radio™ TECHNOLOGY...... 26
1AUDIO SYSTEM OPERATION
2
AUDIO SYSTEM
Page 13 of 131
2
13
1
2
3
4
5
6
5. RADIO OPERATION (XM® Satellite Radio
BROADCAST) .............. ............... 29
HOW TO SUBSCRIBE TO
AN XM® Satellite Radio ...................... 29
DISPLAYING THE RADIO ID ................ 29
SWITCHING TO SATELLITE RADIO MODE ................................................. 30
CHANNEL CATEGORY ........................ 30
PRESETTING A CHANNEL .................. 30
SELECTING A CHANNEL ..................... 31
DISPLAYING THE TITLE AND NAME .................................................. 31
IF THE SATELLITE RADIO TUNER MALFUNCTIONS .................. 32
6. CD PLAYER OPERATION ............ 34
INSERTING OR EJECTING A DISC ..... 34
SWITCHING TO CD MODE .................. 35
PLAYING AN AUDIO CD ...................... 35
PLAYING A MP3/WMA DISC ................ 37
7. iPod OPERATION ......................... 39
CONNECTING AN iPod ........................ 39
SWITCHING TO iPod MODE ................ 39
PLAYING AN iPod ................................. 40
8. USB MEMORY OPERATION ........ 43
CONNECTING A USB MEMORY ......... 43
SWITCHING TO USB MODE ................ 43
PLAYING A USB MEMORY .................. 44
9. AUX DEVICE OPERATION........... 47
CONNECTING A PORTABLE AUDIO DEVICE ................................... 47
SWITCHING TO AUX MODE ................ 48
PLAYING A PORTABLE AUDIO DEVICE ............................................... 48
10. Bluetooth® AUDIO
OPERATION ............................... 49
SWITCHING TO Bluetooth®
AUDIO MODE ..................................... 50
CONNECTING A Bluetooth
®
AUDIO PLAYER .................................. 50
PLAYING A Bluetooth
® AUDIO
PLAYER .............................................. 53
11. STEERING SWITCHES................. 56
STEERING SWITCHES
(WITH TWO DIRECTION
STEERING SWITCH) .......................... 56
STEERING SWITCHES (WITH FOUR DIRECTION
STEERING SWITCH) .......................... 57
12. AUDIO SYSTEM OPERATING HINTS .......................................... 59
RADIO RECEPTION.............................. 59
iPod ........................................................ 60
USB MEMORY ...................................... 61
CARING FOR YOUR CD PLAYER
AND DISCS ......................................... 61
MP3/WMA FILES ................................... 63
CD-R AND CD-RW DISCS .................... 64
TERMS .................................................. 65
AUDIO SYSTEM
Page 14 of 131
14
1. AUDIO SYSTEM OPERATION
1. QUICK REFERENCE
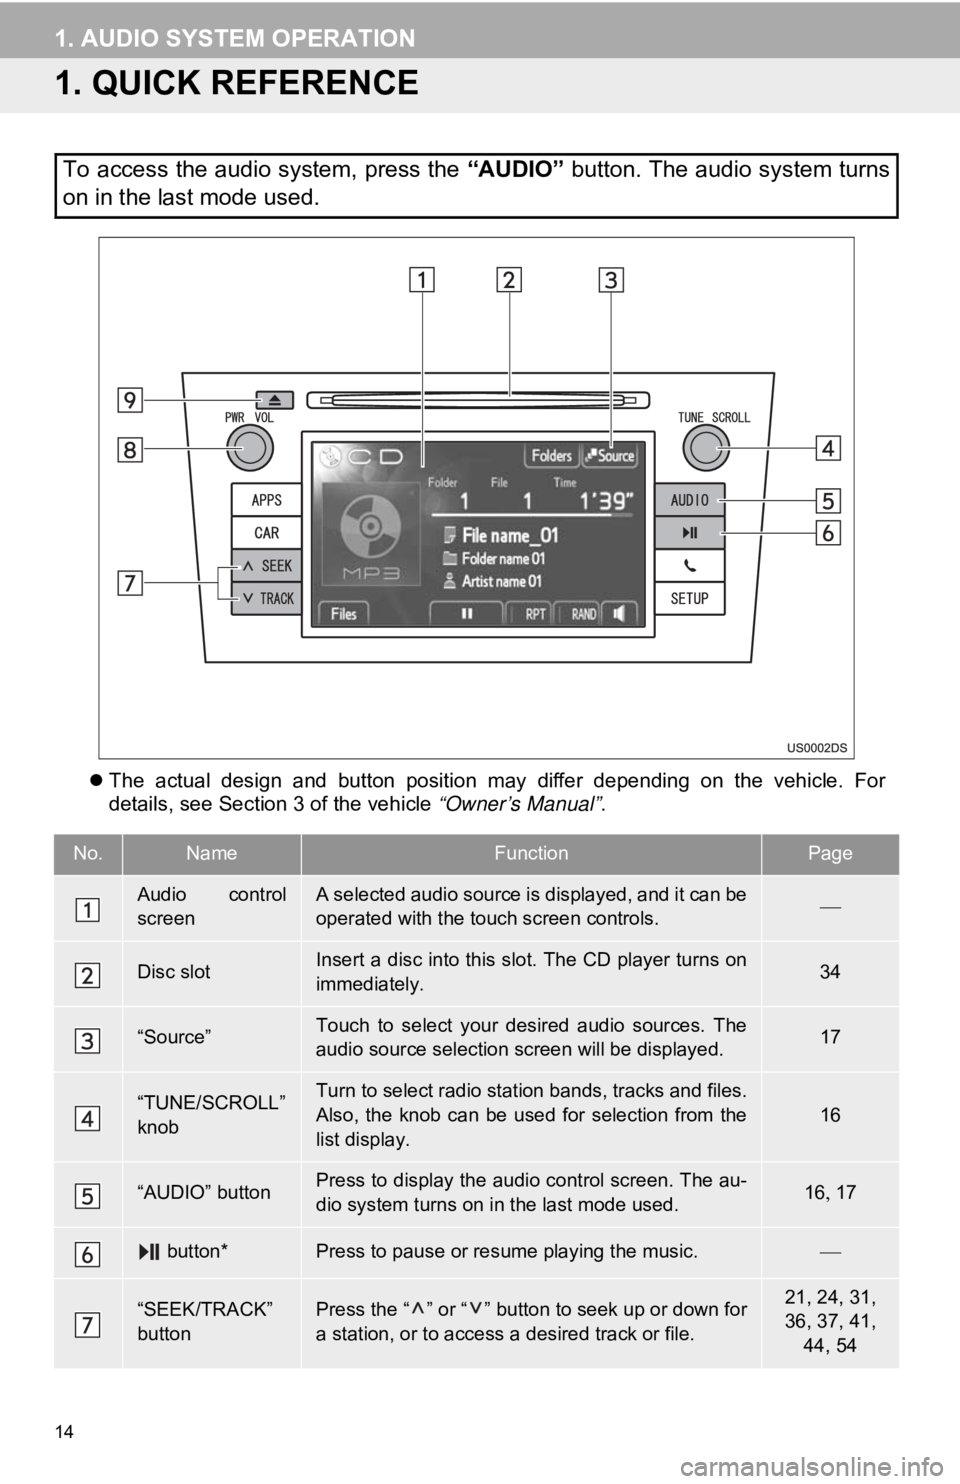
The actual design and button position may differ depending on the vehicle. For
details, see Section 3 of the vehicle “Owner’s Manual” .
To access the audio system, press the “AUDIO” button. The audio system turns
on in the last mode used.
No.NameFunctionPage
Audio control
screenA selected audio source is displayed, and it can be
operated with the touch screen controls.
Disc slotInsert a disc into this slot. The CD player turns on
immediately.34
“Source”Touch to select your desired audio sources. The
audio source selection screen will be displayed.17
“TUNE/SCROLL”
knobTurn to select radio station bands, tracks and files.
Also, the knob can be used for selection from the
list display.
16
“AUDIO” buttonPress to display the audio control screen. The au-
dio system turns on in the last mode used.16 17
button*Press to pause or resume playing the music.
“SEEK/TRACK”
buttonPress the “ ” or “ ” button to seek up or down for
a station, or to access a desired track or file.21, 24, 31,
36, 37, 41,
44, 54
Page 16 of 131
16
1. AUDIO SYSTEM OPERATION
2. SOME BASICS
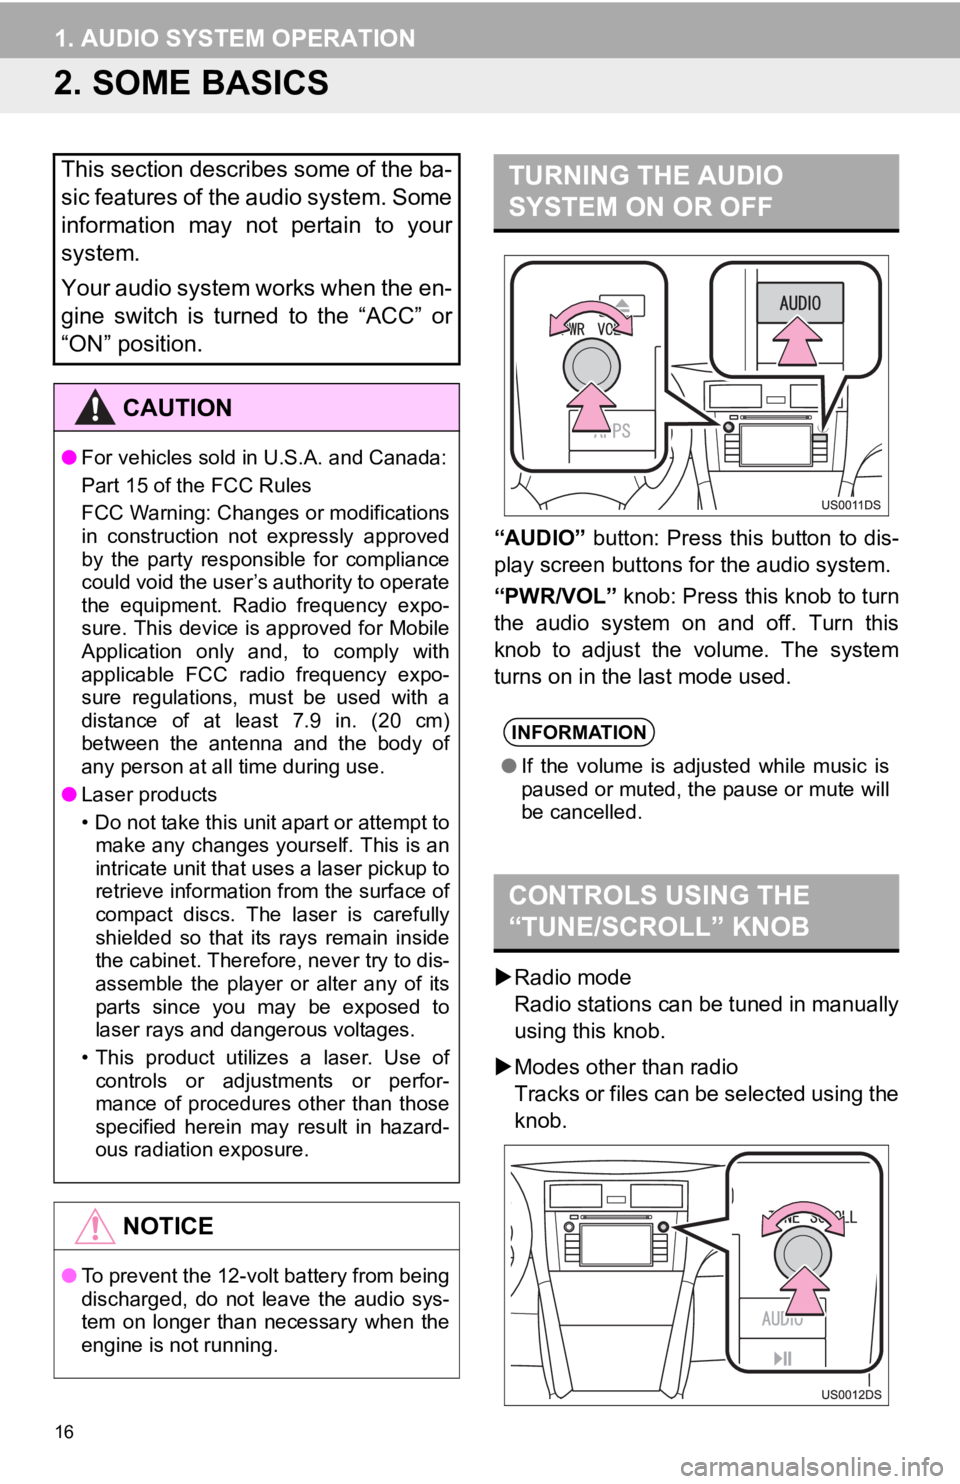
“AUDIO” button: Press this button to dis-
play screen buttons for the audio system.
“PWR/VOL” knob: Press this knob to turn
the audio system on and off. Turn this
knob to adjust the volume. The system
turns on in the last mode used.
Radio mode
Radio stations can be tuned in manually
using this knob.
Modes other than radio
Tracks or files can be selected using the
knob.
This section describes some of the ba-
sic features of the audio system. Some
information may not pertain to your
system.
Your audio system works when the en-
gine switch is turned to the “ACC” or
“ON” position.
CAUTION
● For vehicles sold in U.S.A. and Canada:
Part 15 of the FCC Rules
FCC Warning: Changes or modifications
in construction not expressly approved
by the party responsible for compliance
could void the user’s authority to operate
the equipment. Radio frequency expo-
sure. This device is approved for Mobile
Application only and, to comply with
applicable FCC radio frequency expo-
sure regulations, must be used with a
distance of at least 7.9 in. (20 cm)
between the antenna and the body of
any person at all time during use.
● Laser products
• Do not take this unit apart or attempt to
make any changes yourself. This is an
intricate unit that uses a laser pickup to
retrieve information from the surface of
compact discs. The laser is carefully
shielded so that its rays remain inside
the cabinet. Therefore, never try to dis-
assemble the player or alter any of its
parts since you may be exposed to
laser rays and dangerous voltages.
• This product utilizes a laser. Use of controls or adjustments or perfor-
mance of procedures other than those
specified herein may result in hazard-
ous radiation exposure.
NOTICE
● To prevent the 12-volt battery from being
discharged, do not leave the audio sys-
tem on longer than necessary when the
engine is not running.
TURNING THE AUDIO
SYSTEM ON OR OFF
INFORMATION
●If the volume is adjusted while music is
paused or muted, the pause or mute will
be cancelled.
CONTROLS USING THE
“TUNE/SCROLL” KNOB
Page 20 of 131
20
1. AUDIO SYSTEM OPERATION
3. RADIO OPERATION (WITH Display Audio SYSTEM)
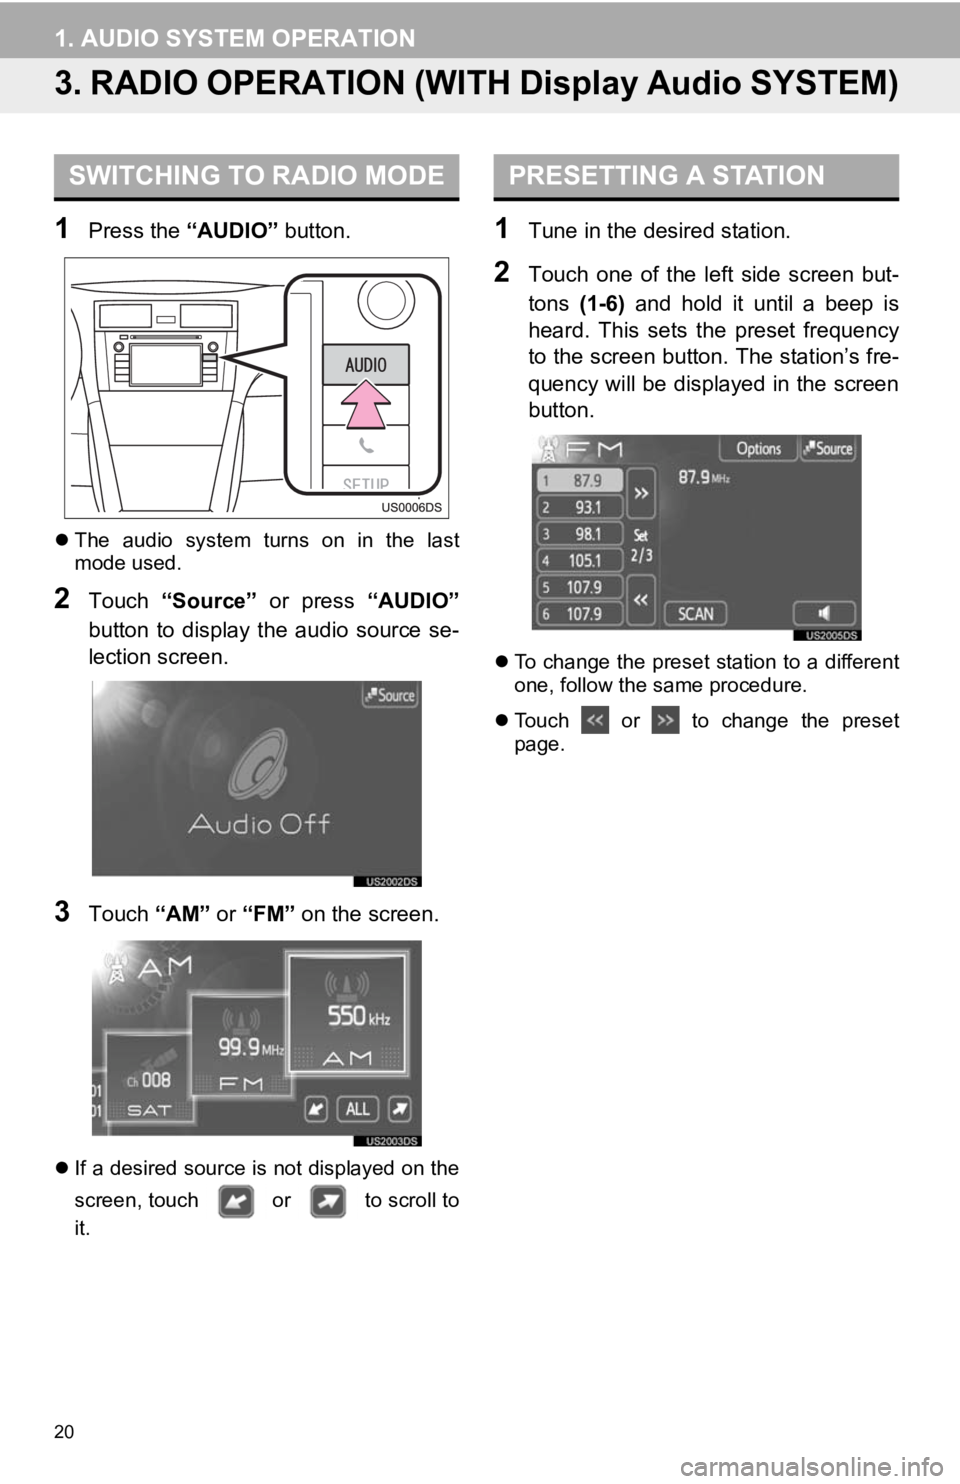
1Press the “AUDIO” button.
The audio system turns on in the last
mode used.
2Touch “Source” or press “AUDIO”
button to display the audio source se-
lection screen.
3Touch “AM” or “FM” on the screen.
If a desired source is not displayed on the
screen, touch or to scroll to
it.
1Tune in the desired station.
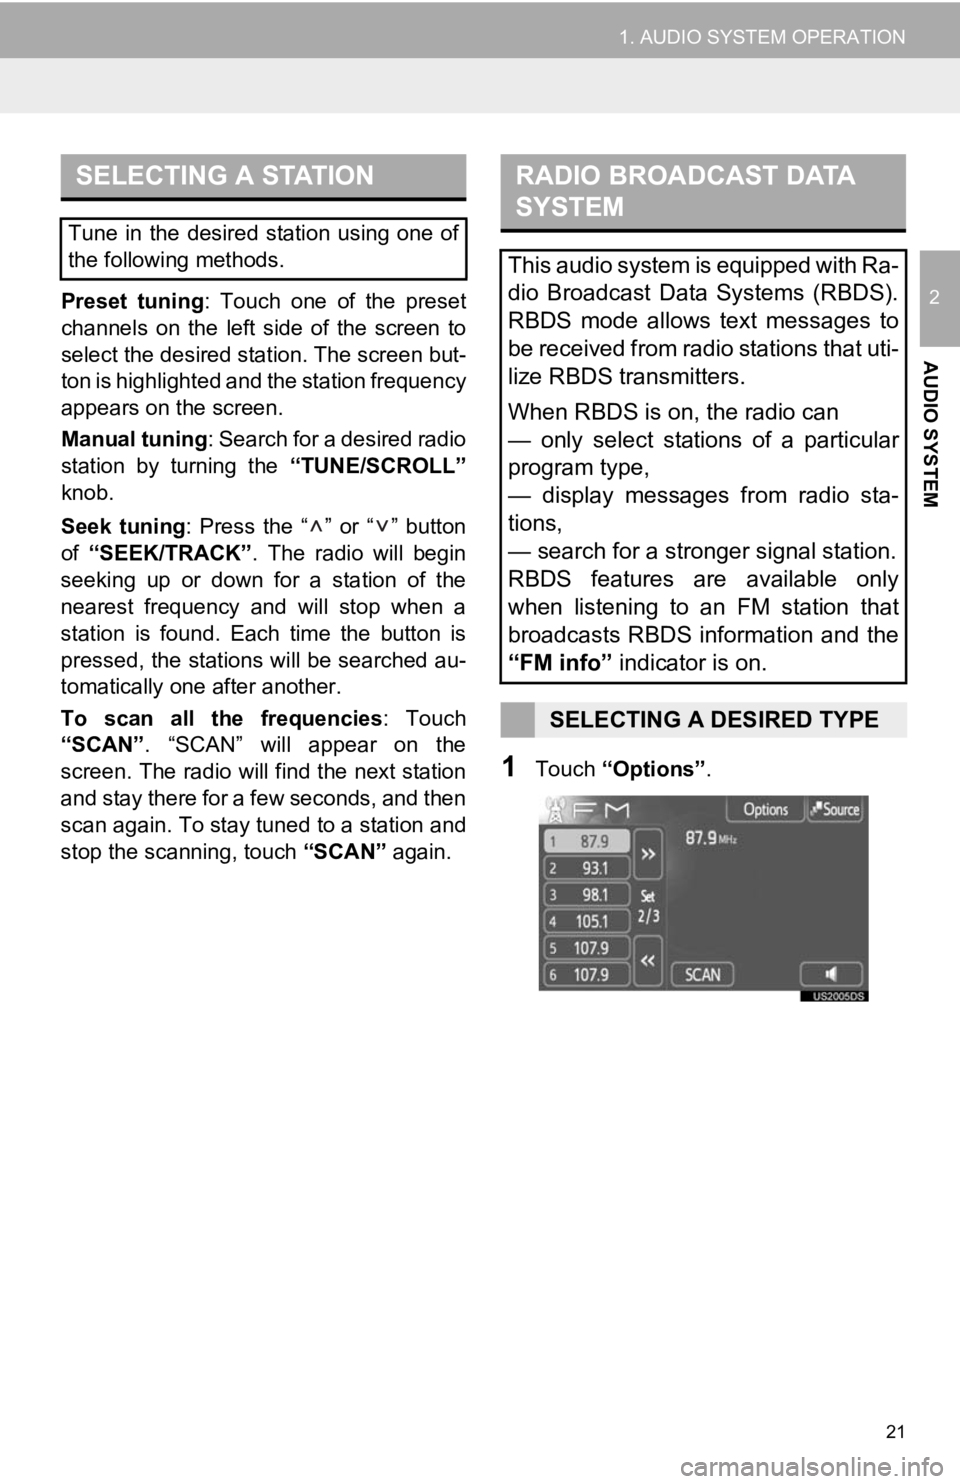
2Touch one of the left side screen but-
tons (1-6) and hold it until a beep is
heard. This sets t he preset frequency
to the screen button. The station’s fre-
quency will be displayed in the screen
button.
To change the preset station to a different
one, follow the same procedure.
Touch or to change the preset
page.
SWITCHING TO RADIO MODEPRESETTING A STATION
Page 21 of 131
21
1. AUDIO SYSTEM OPERATION
2
AUDIO SYSTEM
Preset tuning: Touch one of the preset
channels on the left side of the screen to
select the desired station. The screen but-
ton is highlighted and the station frequency
appears on the screen.
Manual tuning: Search for a desired radio
station by turning the “TUNE/SCROLL”
knob.
Seek tuning: Press the “ ” or “ ” button
of “SEEK/TRACK” . The radio will begin
seeking up or down for a station of the
nearest frequency and will stop when a
station is found. Ea ch time the button is
pressed, the stations will be searched au-
tomatically one after another.
To scan all the frequencies : Touch
“SCAN” . “SCAN” will appear on the
screen. The radio will find the next station
and stay there for a few seconds, and then
scan again. To stay tuned to a station and
stop the scanning, touch “SCAN” again.
1Touch “Options”.
SELECTING A STATION
Tune in the desired station using one of
the following methods.
RADIO BROADCAST DATA
SYSTEM
This audio system is equipped with Ra-
dio Broadcast Data Systems (RBDS).
RBDS mode allows text messages to
be received from radio stations that uti-
lize RBDS transmitters.
When RBDS is on, the radio can
— only select stations of a particular
program type,
— display messages from radio sta-
tions,
— search for a stronger signal station.
RBDS features are available only
when listening to an FM station that
broadcasts RBDS information and the
“FM info” indicator is on.
SELECTING A DESIRED TYPE
Page 23 of 131
23
1. AUDIO SYSTEM OPERATION
2
AUDIO SYSTEM
4. RADIO OPERATION (WITH Premium Display Audio SYSTEM)
1Press the “AUDIO” button.
The audio system turns on in the last
mode used.
2Touch “Source” or press “AUDIO”
button to display the audio source se-
lection screen.
3Touch “AM” or “FM” on the screen.
If a desired source is not displayed on the
screen, touch or to scroll to
it.
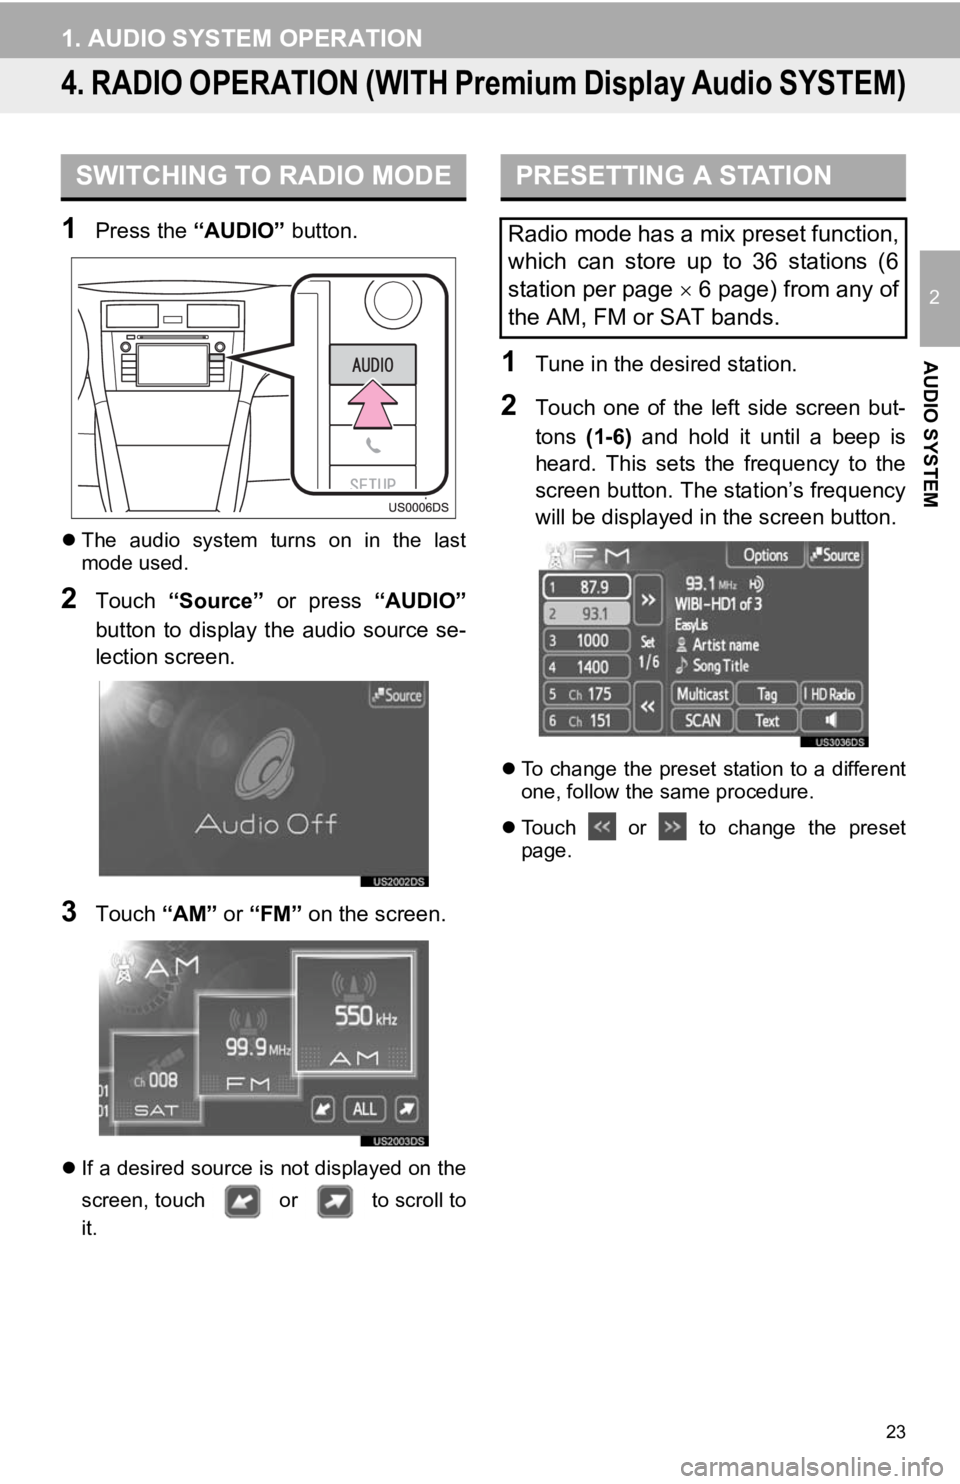
1Tune in the desired station.
2Touch one of the left side screen but-
tons (1-6) and hold it until a beep is
heard. This sets the frequency to the
screen button. The station’s frequency
will be displayed in the screen button.
To change the preset station to a different
one, follow the same procedure.
Touch or to change the preset
page.
SWITCHING TO RADIO MODEPRESETTING A STATION
Radio mode has a mix preset function,
which can store up to 36 stations (6
station per page 6 page) from any of
the AM, FM or SAT bands.