change wheel TOYOTA VENZA 2014 Accessories, Audio & Navigation (in English)
[x] Cancel search | Manufacturer: TOYOTA, Model Year: 2014, Model line: VENZA, Model: TOYOTA VENZA 2014Pages: 228, PDF Size: 3.73 MB
Page 141 of 228

141
4
AUDIO SYSTEM
1. AUDIO SYSTEM OPERATION
9. STEERING SWITCHES
The design and switch position may differ
depending on the vehicle. For details, see
the Pictorial index of “Owner’s Manual”.
Details of the specific switches, controls,
and features are described below.
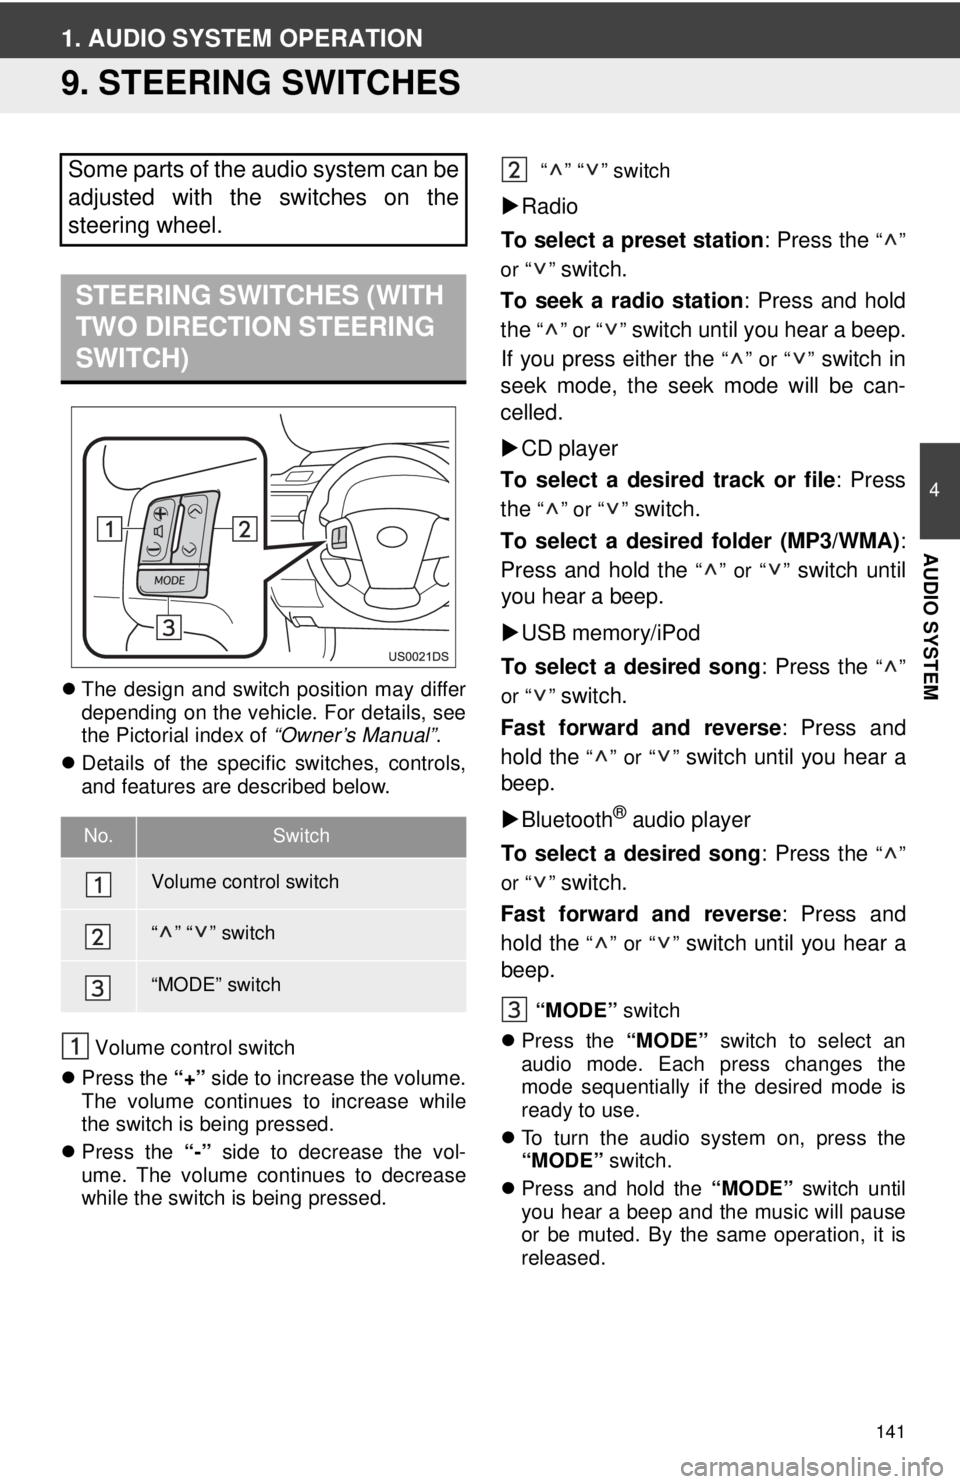
Volume control switch
Press the “+” side to increase the volume.
The volume continues to increase while
the switch is being pressed.
Press the “-” side to decrease the vol-
ume. The volume continues to decrease
while the switch is being pressed. “” “” switch
Radio
To select a preset station : Press the
“”
or “ ”
switch.
To seek a radio station : Press and hold
the
“” or “” switch until you hear a beep.
If you press either the
“” or “” switch in
seek mode, the seek mode will be can-
celled.
CD player
To select a desired track or file : Press
the
“” or “” switch.
To select a desired folder (MP3/WMA) :
Press and hold the
“” or “” switch until
you hear a beep.
USB memory/iPod
To select a desired song : Press the
“”
or “ ”
switch.
Fast forward and reverse : Press and
hold the
“” or “” switch until you hear a
beep.
Bluetooth
® audio player
To select a desired song : Press the
“”
or “ ”
switch.
Fast forward and reverse : Press and
hold the
“” or “” switch until you hear a
beep.
“MODE” switch
Press the “MODE” switch to select an
audio mode. Each press changes the
mode sequentially if the desired mode is
ready to use.
To turn the audio system on, press the
“MODE” switch.
Press and hold the “MODE” switch until
you hear a beep and the music will pause
or be muted. By the same operation, it is
released.
Some parts of the audio system can be
adjusted with the switches on the
steering wheel.
STEERING SWITCHES (WITH
TWO DIRECTION STEERING
SWITCH)
No.Switch
Volume control switch
“” “” switch
“MODE” switch
Page 155 of 228

155
1. BASIC INFORMATION BEFORE OPERATION
5
Bluetooth
® HANDS-FREE SYSTEM
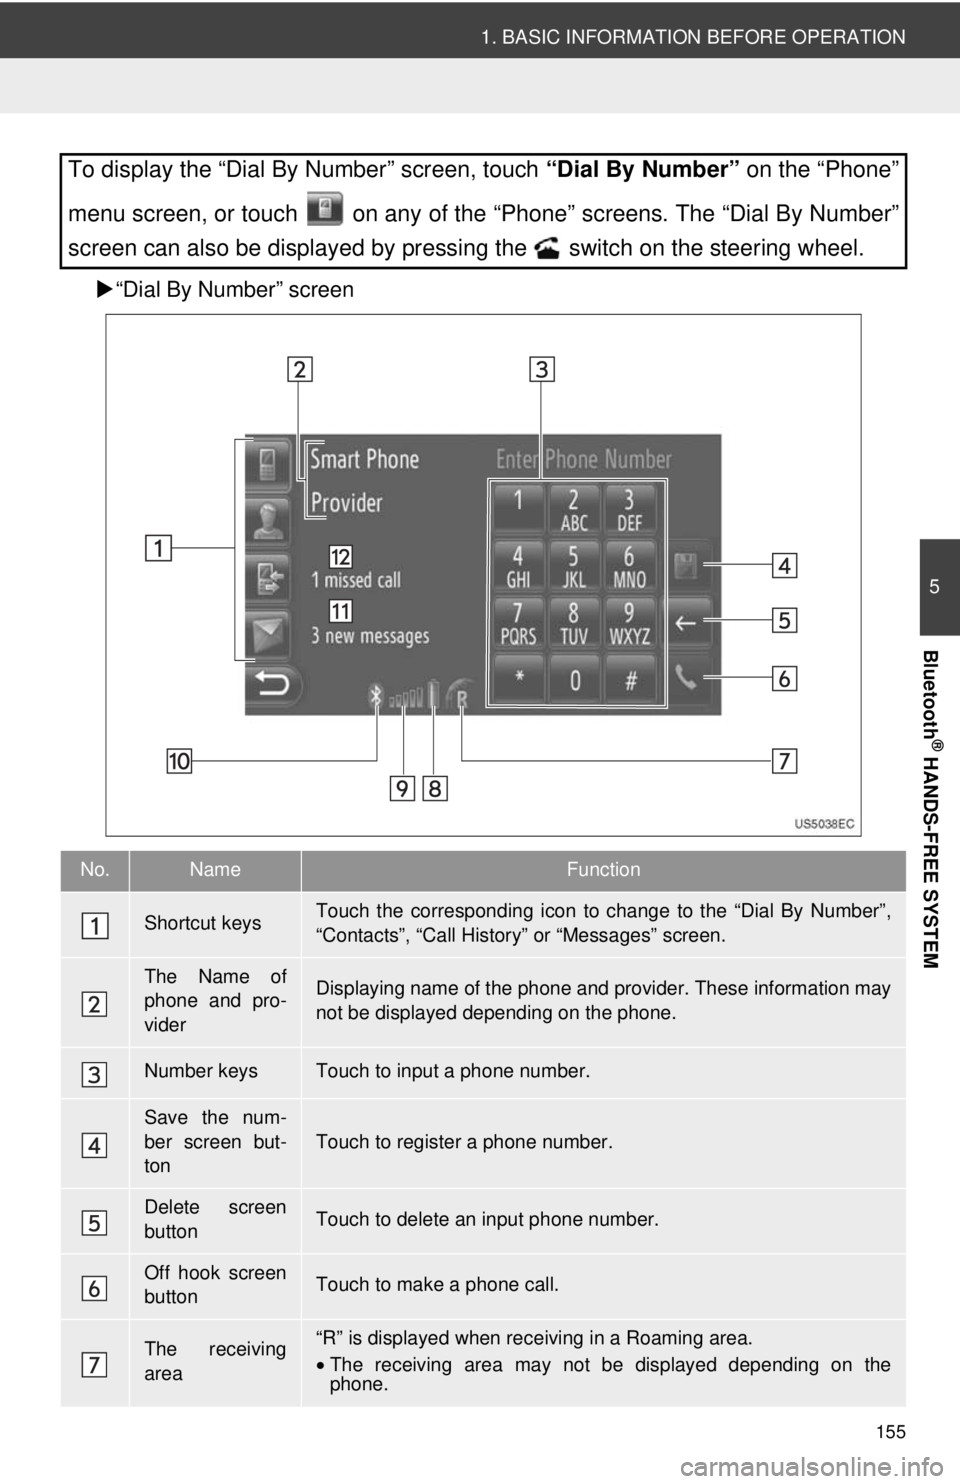
“Dial By Number” screen
To display the “Dial By Number” screen, touch “Dial By Number” on the “Phone”
menu screen, or touch on any of the “Phone” screens. The “Dial By Number”
screen can also be displayed by pressing the switch on the steering wheel.
No.NameFunction
Shortcut keysTouch the corresponding icon to change to the “Dial By Number”,
“Contacts”, “Call Histor y” or “Messages” screen.
The Name of
phone and pro-
viderDisplaying name of the phone and provider. These information may
not be displayed depending on the phone.
Number keysTouch to input a phone number.
Save the num-
ber screen but-
ton
Touch to register a phone number.
Delete screen
buttonTouch to delete an input phone number.
Off hook screen
buttonTouch to make a phone call.
The receiving
area“R” is displayed when rece iving in a Roaming area.
• The receiving area may not be displayed depending on the
phone.
Page 176 of 228

176
2. TELEPHONE OPERATION
3. TALKING ON A Bluetooth® PHONE
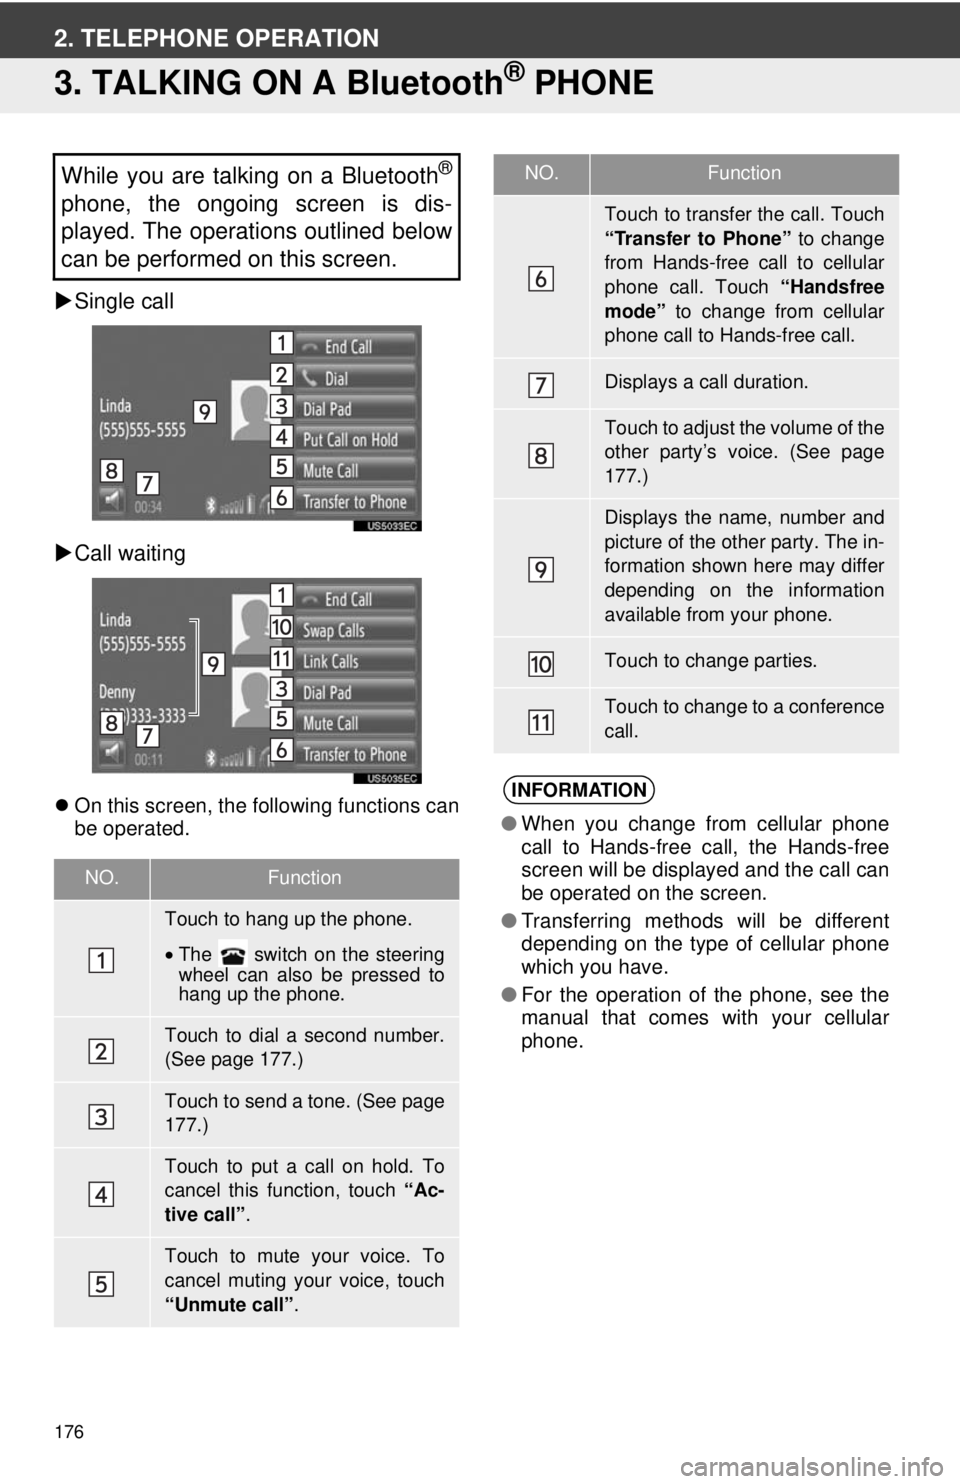
Single call
Call waiting
On this screen, the following functions can
be operated.
While you are talking on a Bluetooth®
phone, the ongoing screen is dis-
played. The operations outlined below
can be performed on this screen.
NO.Function
Touch to hang up the phone.
•The switch on the steering
wheel can also be pressed to
hang up the phone.
Touch to dial a second number.
(See page 177.)
Touch to send a tone. (See page
177.)
Touch to put a call on hold. To
cancel this function, touch “Ac-
tive call” .
Touch to mute your voice. To
cancel muting your voice, touch
“Unmute call” .
Touch to transfer the call. Touch
“Transfer to Phone” to change
from Hands-free call to cellular
phone call. Touch “Handsfree
mode” to change from cellular
phone call to Hands-free call.
Displays a call duration.
Touch to adjust the volume of the
other party’s voice. (See page
177.)
Displays the name, number and
picture of the other party. The in-
formation shown here may differ
depending on the information
available from your phone.
Touch to change parties.
Touch to change to a conference
call.
INFORMATION
● When you change from cellular phone
call to Hands-free call, the Hands-free
screen will be displayed and the call can
be operated on the screen.
● Transferring methods will be different
depending on the type of cellular phone
which you have.
● For the operation of the phone, see the
manual that comes with your cellular
phone.
NO.Function
Page 214 of 228

214
1. REAR VIEW MONITOR SYSTEM
1. REAR VIEW MONITOR SYSTEM OPERATION
1To display the rear view image on the
screen, the shift lever is in the “R” posi-
tion when the engine switch is in the
“ON” position.
If you move the shift lever out of the “R”
position, the screen returns to the previ-
ous screen.
The rear view monitor system assists
the driver by displaying an image of the
view behind the vehicle while backing
up.
The image is displayed in reverse on
the screen. This allows the image to
appear in the same manner as that of
the rear view mirror.CAUTION
●Never depend on the rear view monitor
system entirely when backing up.
Always make sure your intended path is
clear.
Use caution, just as you would when
backing up any vehicle.
● Never back up while looking only at the
screen. The image on the screen is dif-
ferent from actual conditions. Depicted
distances between objects and flat sur-
faces will differ from the actual dis-
tances. If you back up while looking only
at the screen, you may hit a vehicle, a
person or an object. When backing up,
be sure to check behind and all around
the vehicle visually and with mirrors
before proceeding.
● Do not use the system when the back
door, trunk or tailgate is not completely
closed.
● Use your own eyes to confirm the vehi-
cle’s surroundings, as the displayed
image may become faint or dark, and
moving images will be distorted, or not
entirely visible when the outside tem-
perature is low. When backing up, be
sure to check behind and all around the
vehicle visually and with mirror before
proceeding.
● Do not use the system in the following
cases:
• On icy or slick road surfaces, or in
snow.
• When using tire chains or emergency tires.
• On an uneven road, such as a slope.
With rear view monitor guide lines (If
equipped)
● Always check the vehicle surrounding
area, because the guide lines are ancil-
lary lines.
● The guide lines are ancillary lines and
do not change even if the steering wheel
is turned.