tires TOYOTA VENZA HYBRID 2021 Accessories, Audio & Navigation (in English)
[x] Cancel search | Manufacturer: TOYOTA, Model Year: 2021, Model line: VENZA HYBRID, Model: TOYOTA VENZA HYBRID 2021Pages: 308, PDF Size: 11.53 MB
Page 114 of 308

1143-4. Setup
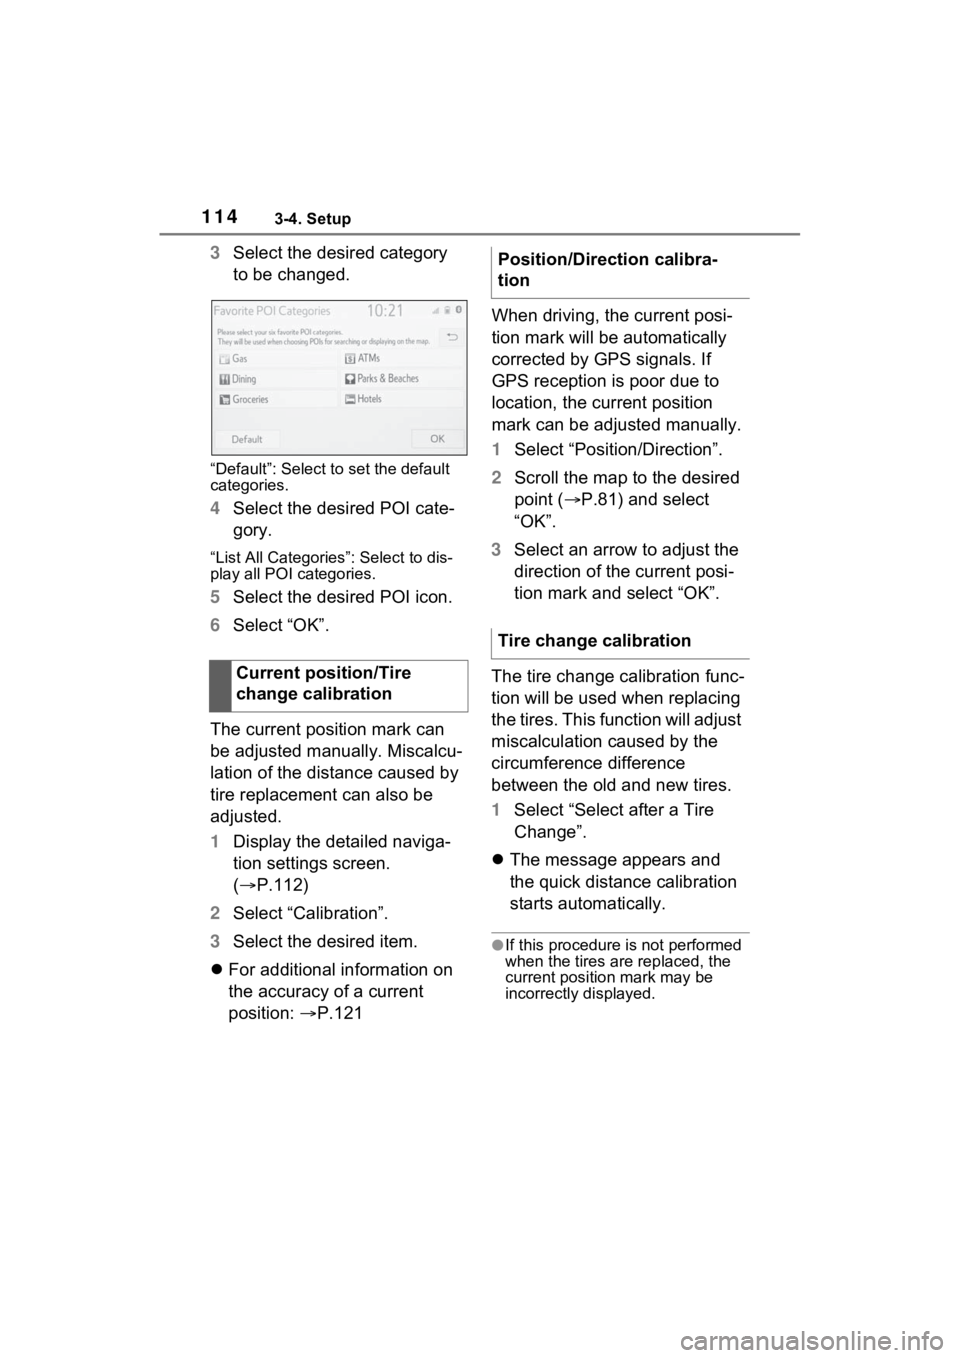
3Select the desired category
to be changed.
“Default”: Select to set the default
categories.
4Select the desired POI cate-
gory.
“List All Categories”: Select to dis-
play all POI categories.
5Select the desired POI icon.
6 Select “OK”.
The current position mark can
be adjusted manually. Miscalcu-
lation of the distance caused by
tire replacement can also be
adjusted.
1 Display the detailed naviga-
tion settings screen.
( P.112)
2 Select “Calibration”.
3 Select the desired item.
For additional information on
the accuracy of a current
position: P.121 When driving, the current posi-
tion mark will be automatically
corrected by GPS signals. If
GPS reception is poor due to
location, the current position
mark can be adjusted manually.
1
Select “Position/Direction”.
2 Scroll the map to the desired
point ( P.81) and select
“OK”.
3 Select an arrow to adjust the
direction of the current posi-
tion mark and select “OK”.
The tire change calibration func-
tion will be used when replacing
the tires. This function will adjust
miscalculation caused by the
circumference difference
between the old and new tires.
1 Select “Select after a Tire
Change”.
The message appears and
the quick distance calibration
starts automatically.
●If this procedure is not performed
when the tires are replaced, the
current position mark may be
incorrectly displayed.
Current position/Tire
change calibration
Position/Direction calibra-
tion
Tire change calibration
Page 122 of 308

1223-5. Tips for the navigation system
• When driving on a long straight road.
• When freeway and surface streets run in parallel.
• After moving by ferry or vehicle carrier.
• When a long route is searched during high speed driving.
• When driving without setting the current position calibration cor-
rectly.
• After repeating a change of direc- tion by going forward and back-
ward, or turning on a turntable in
a parking lot.
• When leaving a covered parking lot or parking garage.
• When a roof carrier is installed.
• When driving with tire chains installed.
• When the tires are worn.
• After replacing a tire or tires.
• When using tires that are smaller or larger than the factory specifi-
cations.
• When the tire pressure in any of the 4 tires is not correct.
If the vehicle cannot receive
GPS signals, the current posi-
tion can be adjusted manu-
ally. For information on setting
the current position calibra-
tion: P.114
Inappropriate route guidance
may occur in the following
cases:
• When turning at an intersection
off the designated route guid-
ance. • If you set more than 1 destination
but skip any of them, auto reroute
will display a rout e returning to
the destination on the previous
route.
• When turning at an intersection for which there is no route guid-
ance.
• When passing through an inter- section for which there is no route
guidance.
• During auto rer oute, the route
guidance may not be available for
the next turn to t he right or left.
• During high speed driving, it may take a long time fo r auto reroute
to operate. In auto reroute, a
detour route may be shown.
• After auto reroute, the route may not be changed.
• If an unnecessary U-turn is shown or announced.
• If a location has multiple names
and the system announces 1 or
more of them.
• When a route cannot be searched.
• If the route to your destination includes gravel, unpaved roads
or alleys, the route guidance may
not be shown.
• Your destination point might be shown on the opposite side of the
street.
• When a portion of the route has regulations prohibiting the entry
of the vehicle that vary by time,
season or other reasons.
• The road and map data stored in the navigation system may not be
complete or may not be the latest
Page 123 of 308

1233-5. Tips for the navigation system
3
Navigation system
version.
After replacing a tire: P.114
●This navigation system uses tire
turning data and is designed to
work with factory- specified tires
for the vehicle. Ins talling tires that
are larger or smaller than the orig-
inally equipped diameter may
cause inaccurate display of the
current position. The tire pressure
also affects the diameter of the
tires, so make sure that the tire
pressure of all 4 tires is correct.
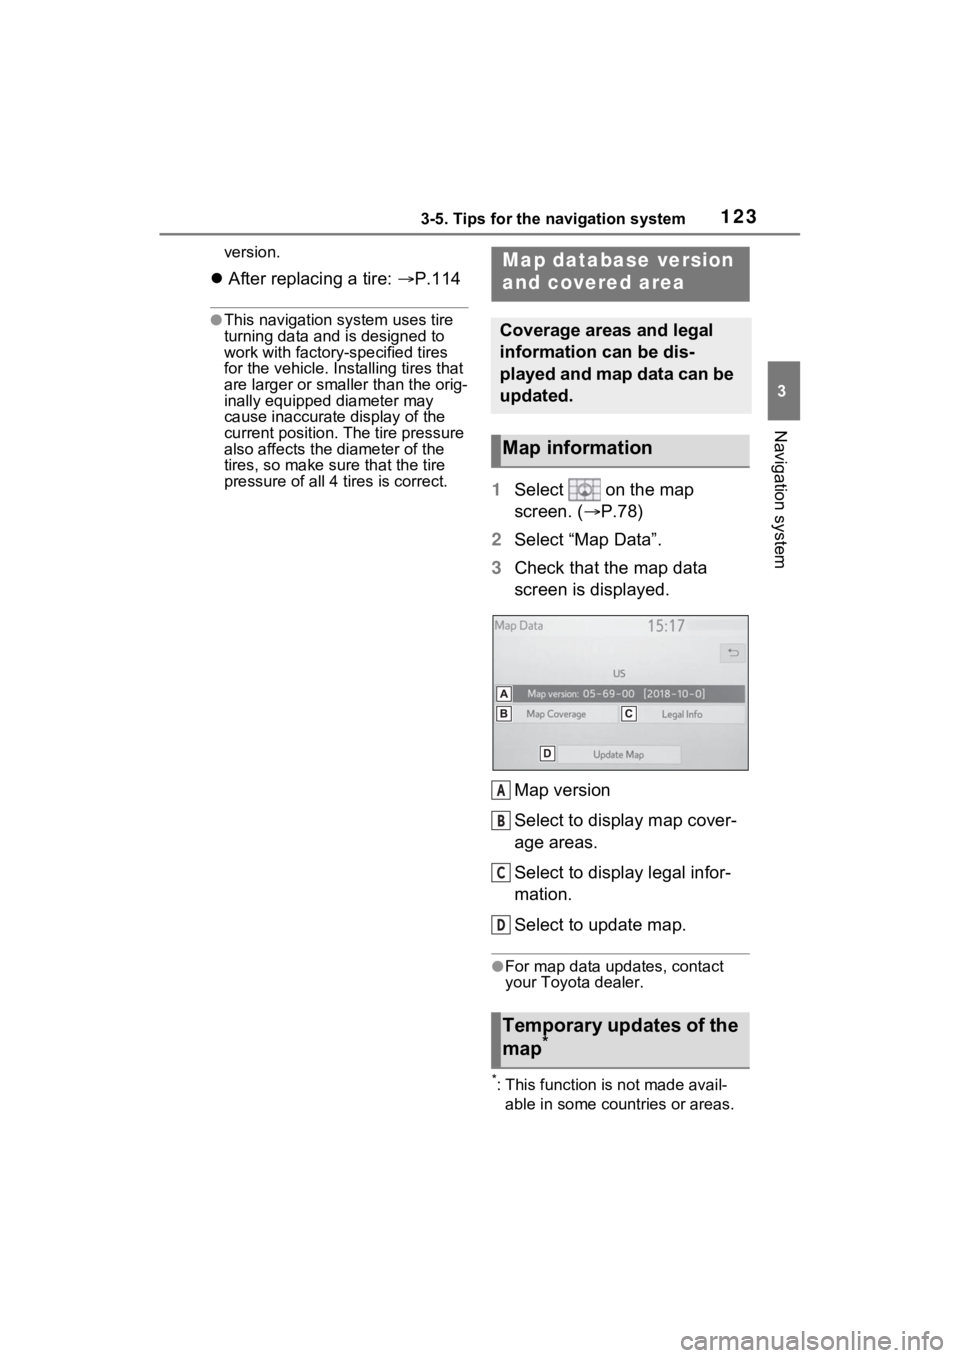
1 Select on the map
screen. ( P.78)
2 Select “Map Data”.
3 Check that the map data
screen is displayed.
Map version
Select to display map cover-
age areas.
Select to display legal infor-
mation.
Select to update map.
●For map data updates, contact
your Toyota dealer.
*: This function is not made avail-
able in some countries or areas.
Map database version
and covered area
Coverage areas and legal
information can be dis-
played and map data can be
updated.
Map information
Temporary updates of the
map*
A
B
C
D
Page 186 of 308

1867-1. Toyota parking assist monitor
7-1.Toyota parking assist monitor
*: If equipped
●The screen illustrations used in
this text are intended as exam-
ples, and may differ from the
image that is actually displayed on
the screen.
The parking assist monitor is a
supplemental device intended to
assist the driver when backing
up. When backing up, be sure to
visually check all around the
vehicle both directly and using
the mirrors before proceeding. If
you do not, you may hit another
vehicle, and could possibly
cause an accident.
Pay attention to the following
precautions when using the
parking assist monitor.
Toyota parking assist
monitor
*
The parking assist monitor
assists the driver by dis-
playing an image of the view
behind the vehicle while
backing up, for example
while parking.
When the display is
changed to the wide rear
view mode, a wider lateral
view behind the vehicle will
be displayed.
Driving precautions
WARNING
●Never depend on the parking
assist monitor entirely when
backing up. The image and the
position of the guide lines dis-
played on the screen may differ
from the actual state.
Use caution, just as you would
when backing up any vehicle.
●Be sure to back up slowly,
depressing the brake pedal to
control vehicle speed.
●If you seem likely to hit nearby
vehicles, obstacles, people or
mount the shoulder, depress
the brake pedal to stop the vehi-
cle.
●The instructions given are only
guidelines. When and how
much to turn the steering wheel
will vary according to traffic con-
ditions, road surface condi-
tions, vehicle condition, etc.
when parking. It is necessary to
be fully aware o f this before
using the parking assist system.
●When parking, be sure to check
that the parking space will
accommodate your vehicle
before maneuvering into it.
●Do not use the parking assist
monitor in the f ollowing cases:
• On icy or slick road surfaces, or in snow
• When using tire chains or emer- gency tires
• When the back door is not closed completely
• On roads that are not flat or straight, such as curves or
slopes
• If the suspension has been modified or tires of a size other
than specified are installed
Page 201 of 308

2017-2. Panoramic view monitor
7
Peripheral monitoring system
WARNING
●Do not use the panoramic view
monitor system in the following
cases:
• On icy or slick road surfaces, or in snow
• When using tire chains or emer- gency tires
• When the front door or the back door is not clo sed completely
• On roads that are not flat or straight, such as curves or
slopes
• If the suspension has been modified or tires of a size other
than specified are installed
●In low temperatures, the screen
may darken or the image may
become faint. The image could
distort when the vehicle is mov-
ing, or you may become unable
to see the image on the screen.
Be sure to visually check all
around the vehicle both directly
and using the mirrors before
proceeding.
●If the tire sizes are changed, the
position of the guide lines dis-
played on the screen may
change.
●The camera uses a special lens.
The distances between objects
and pedestrians that appear in
the image displayed on the
screen will differ from the actual
distances. ( P.229)
NOTICE
●In panoramic view/moving
view/see-through view/Side
Clearance View/Cornering
View, the system combines
images taken from the front,
back, left and right side cam-
eras into a single image. There
are limits to the range and con-
tent that can be displayed.
Familiarize yourself with the
characteristics of the pan-
oramic view monitor system
before using it.
●Image clarity may decline at the
four corners of t he panoramic
view/moving view/see-through
view/Side Clearance View/Cor-
nering View. However, this is
not a malfuncti on, as these are
the regions alon g the border of
each camera image where the
images are combined.
●Depending on lighting condi-
tions near each of the cameras,
bright and dark patches may
appear on the panoramic
view/moving view/see-through
view/Side Clearance View/Cor-
nering View.
●The panoramic view/moving
view/see-through view/Side
Clearance View/Cornering View
display does not extend higher
than the installation position and
image capture range of each
camera.
●There are blind spots around
the vehicle. Accordingly, there
are regions not displayed in
panoramic view/moving
view/see-through view/Side
Clearance View/Cornering
View.